Doodlebugs – Beach Vibes

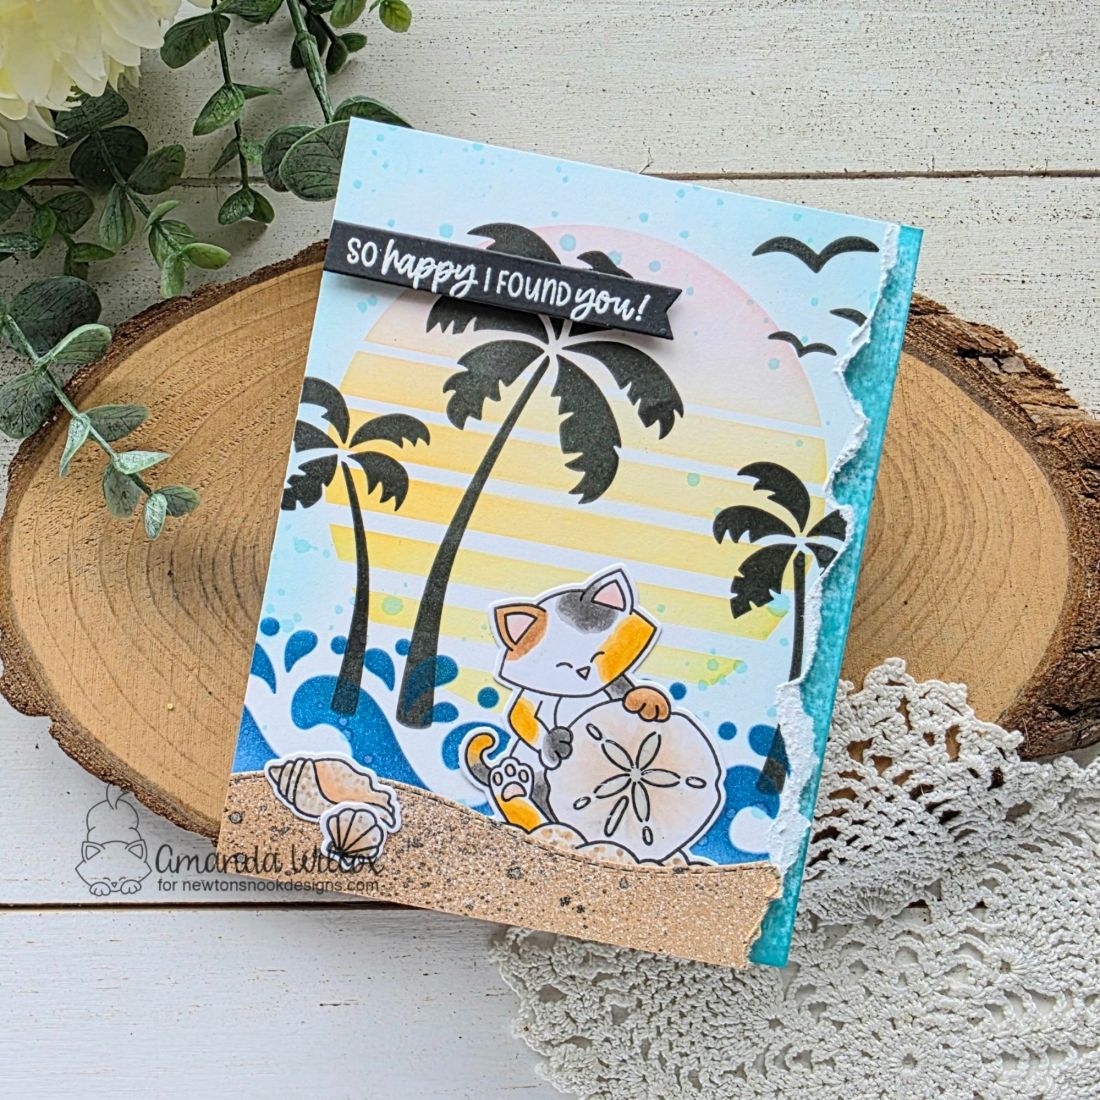
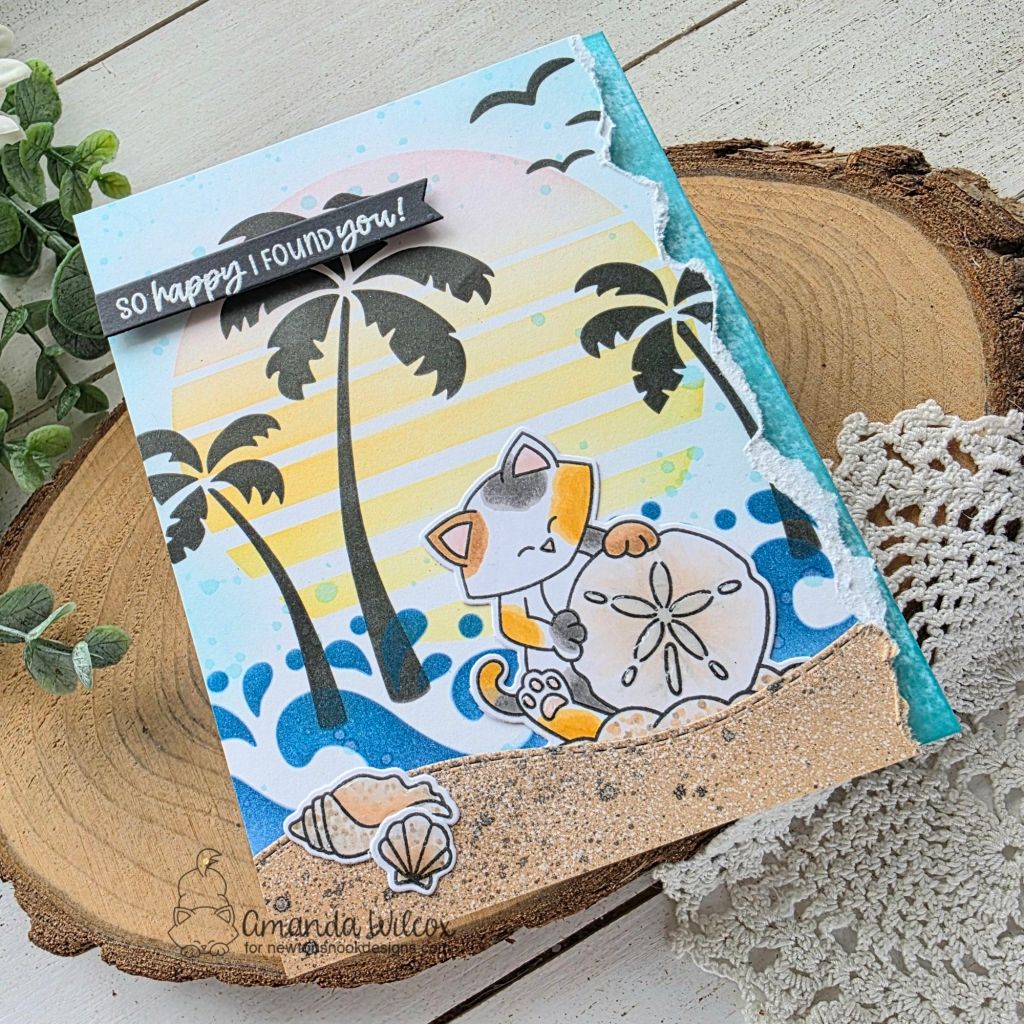
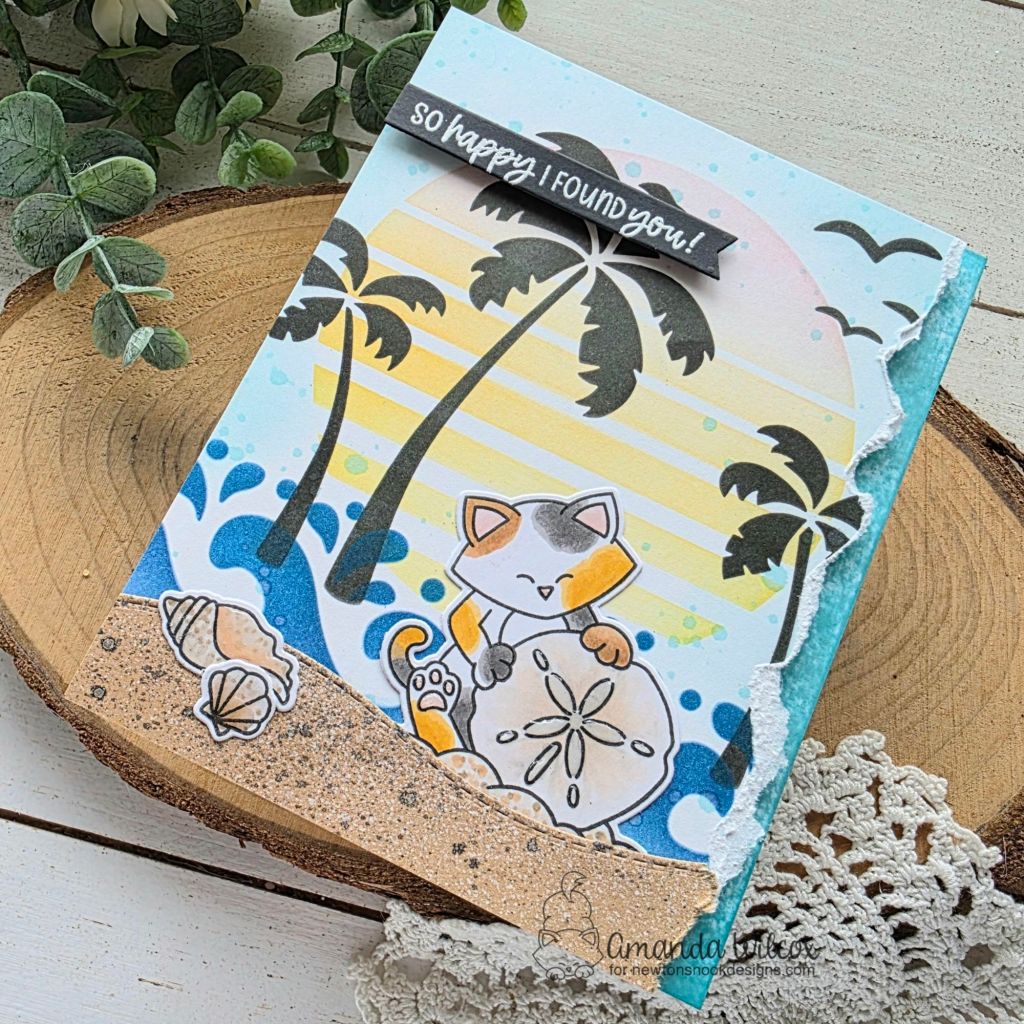
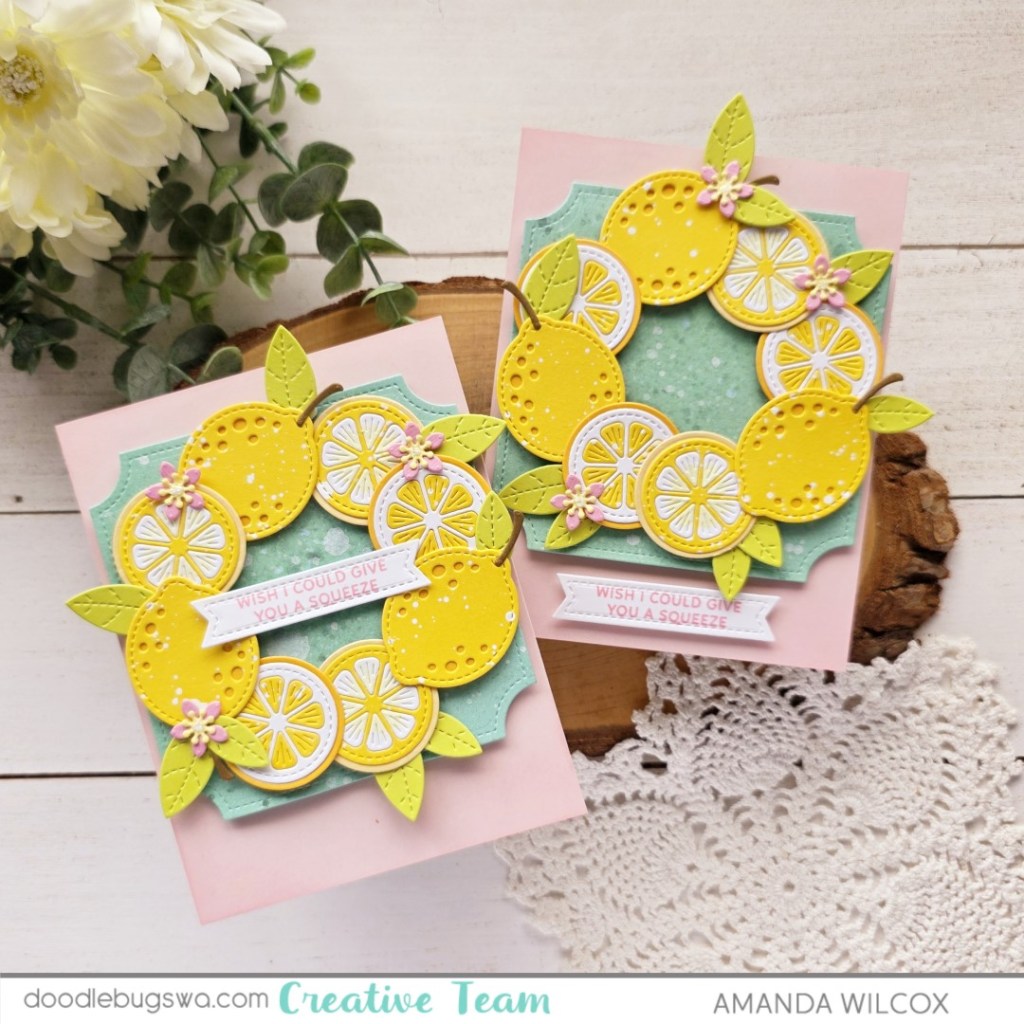
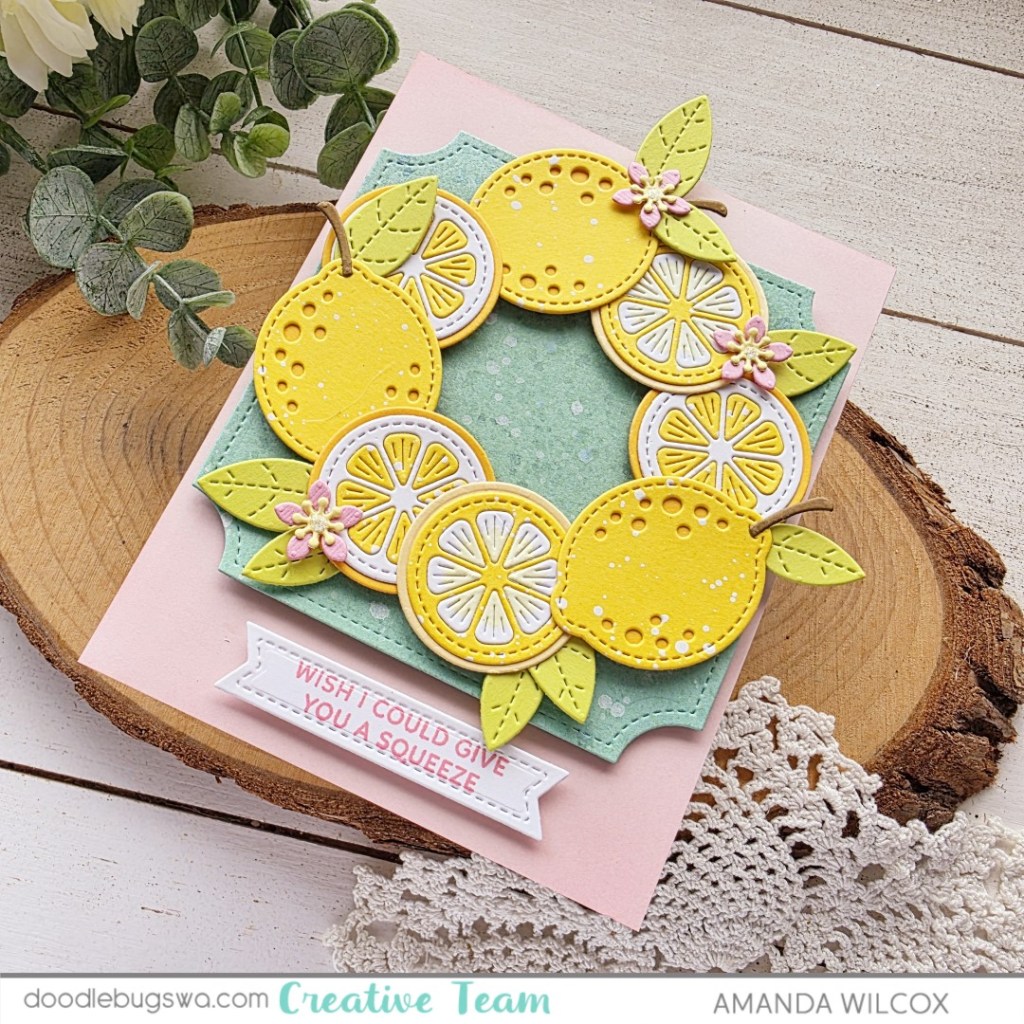
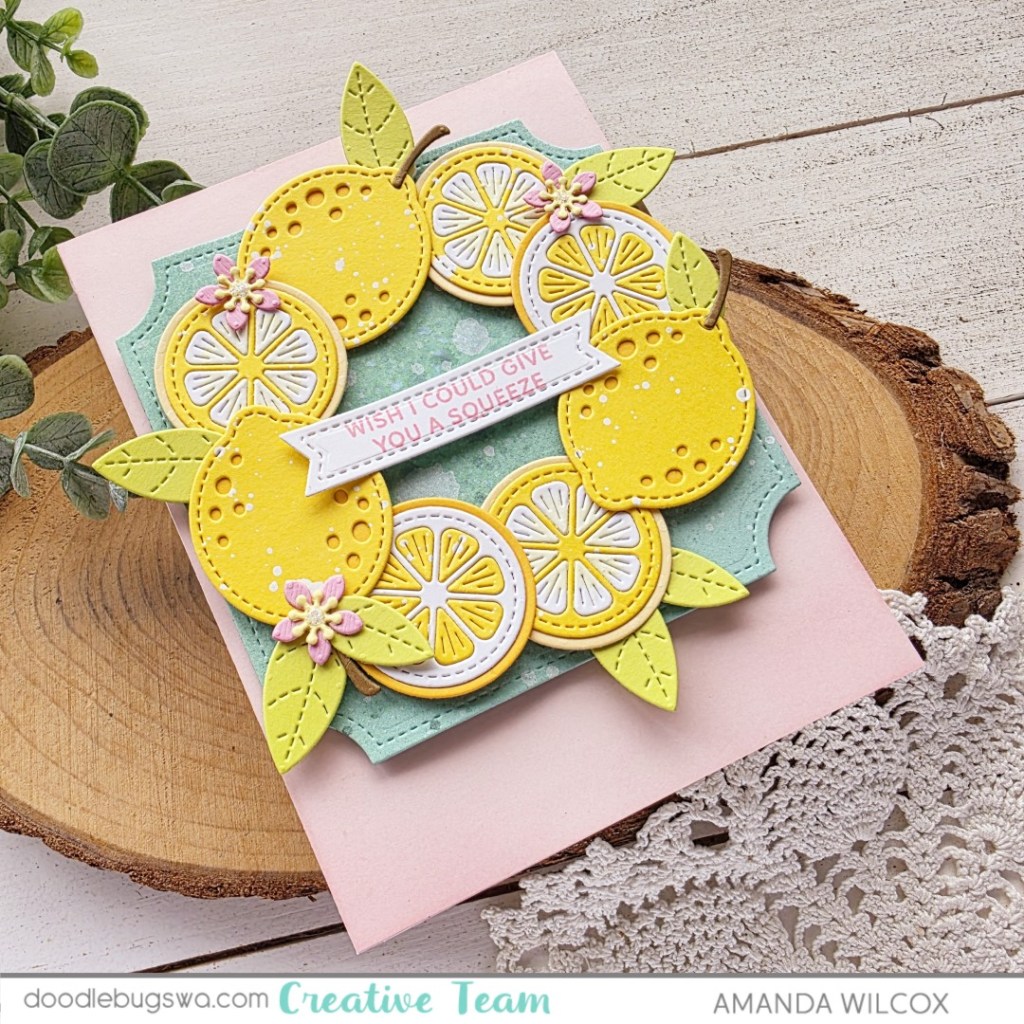
Hey friends! I’m in full beach mode these days, loving all the new beach themed goodies coming out and having fun pairing them with some favorites I didn’t get enough of from previous years!

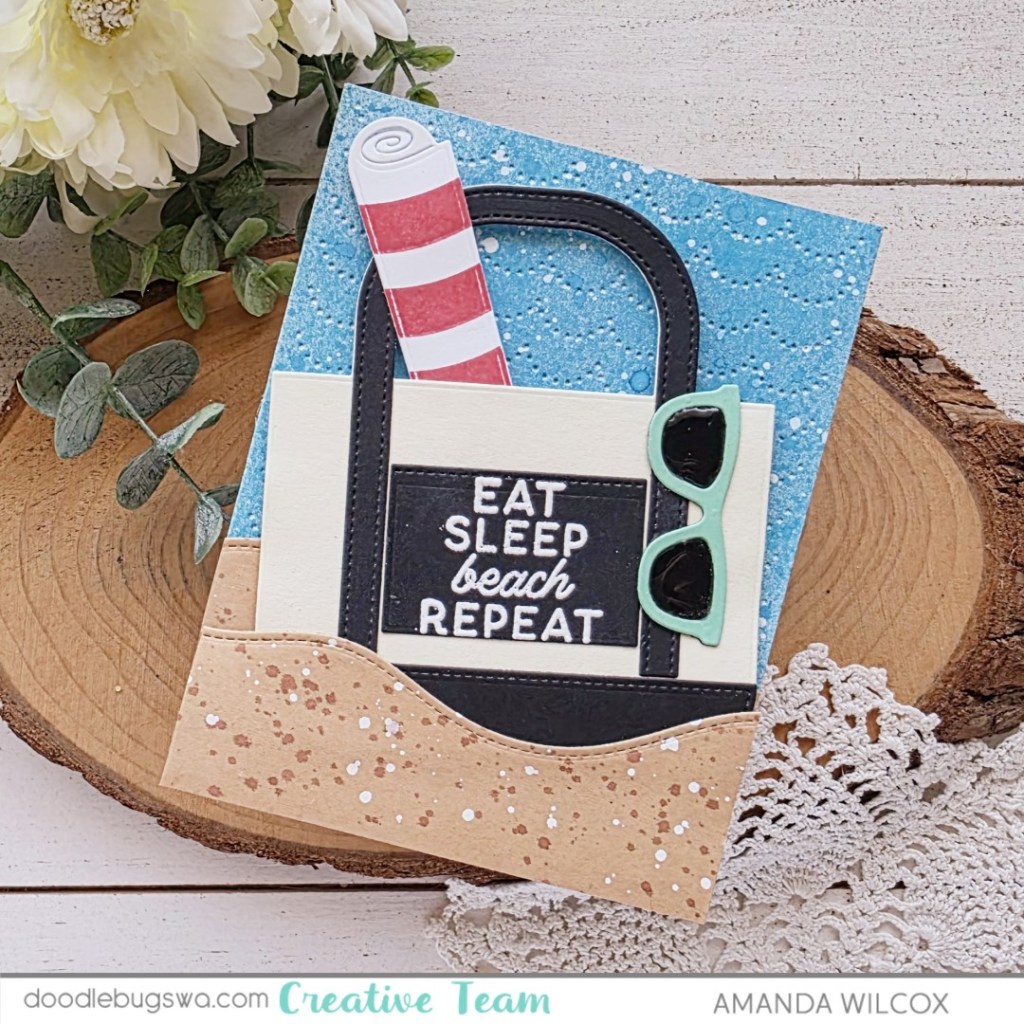
For today’s card, I got inky and splattery and loved every moment of it! I started by playing around with the Waffle Flower Beach Tote. I cut all the pieces, stamped my towel stripes and heat embossed my sentiment. Then I used liquid glue to adhere it all together.

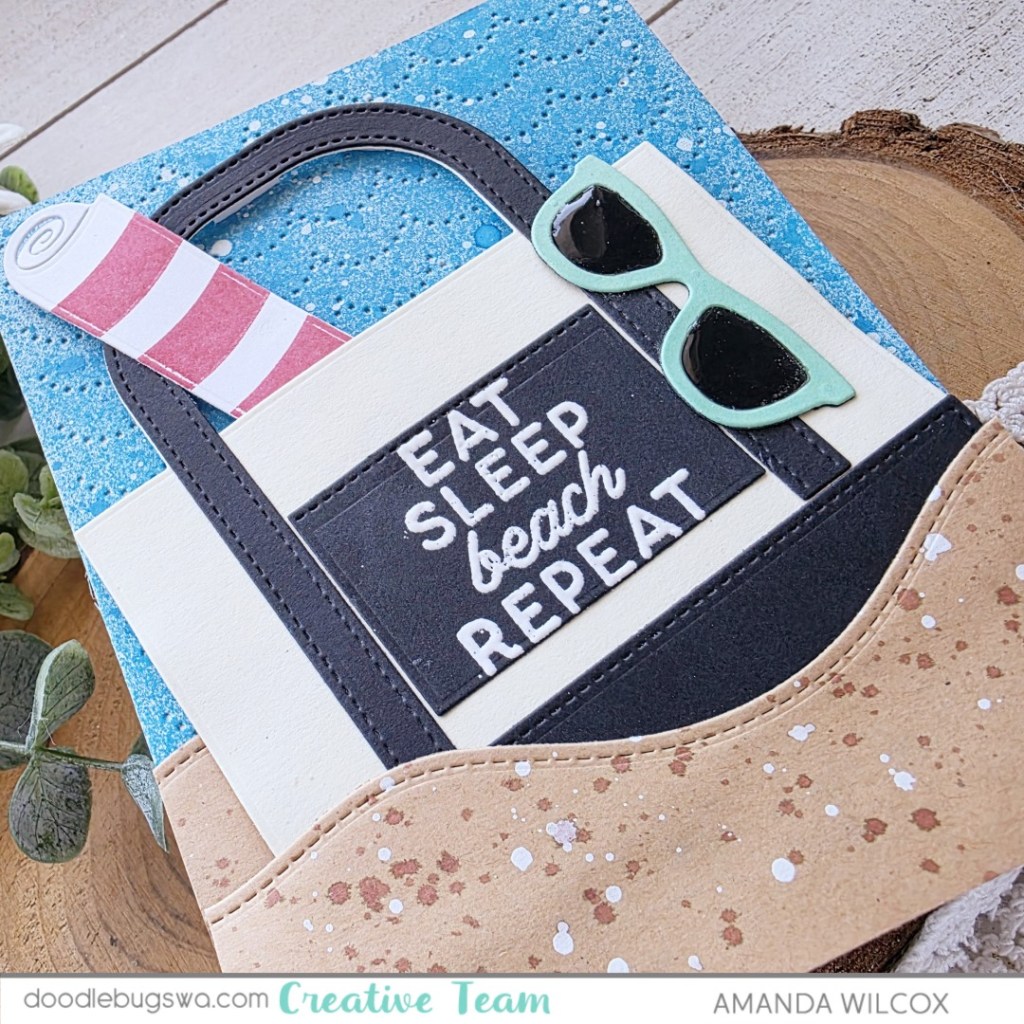
To create my beach scene, I cut a couple pieces of kraft cardstock using the Lawn Fawn hillside borders and splattered them with brown ink and white paint for that sandy look. Then I cut a piece of cardstock with the Pretty Pink Posh Pierced Scallops cover die and splattered it with distress oxide spray and white paint.

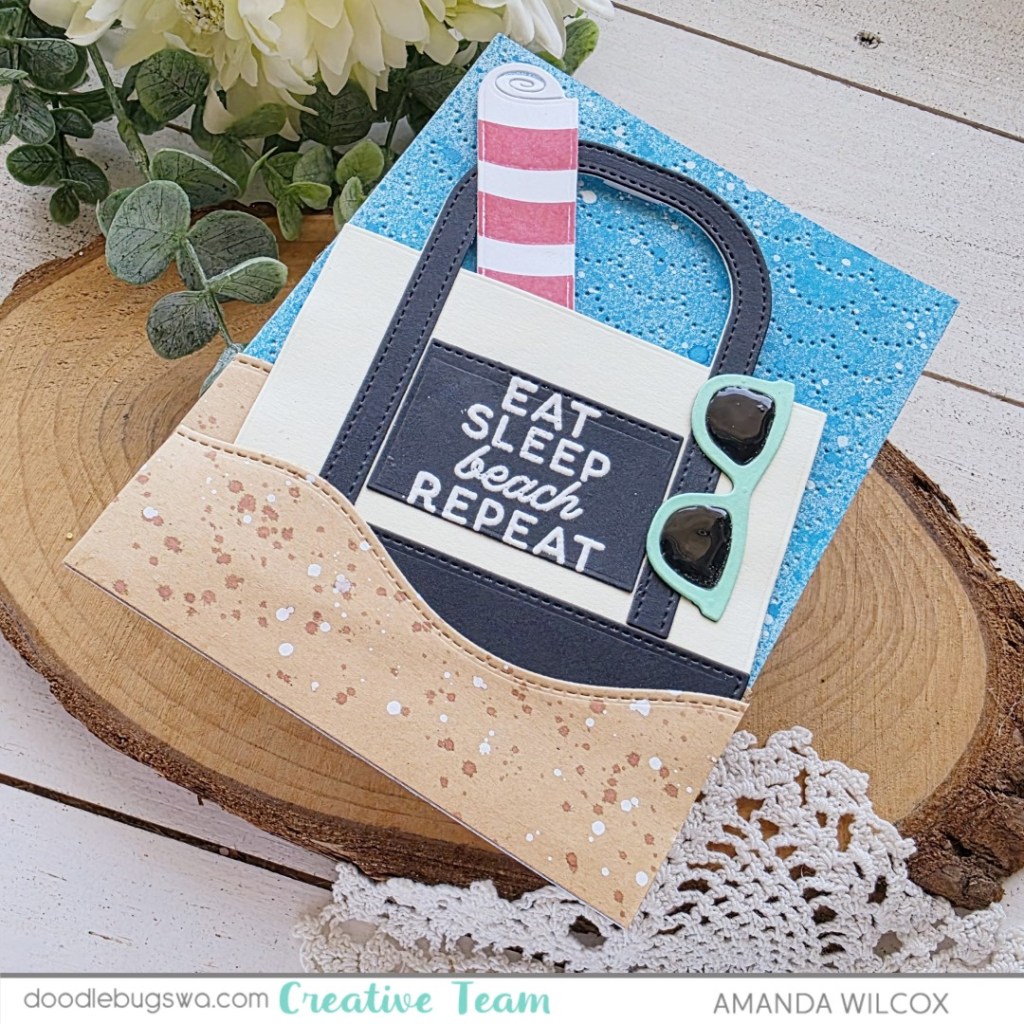
When everything was dry, I glued the back layer of sand to the sky panel and then popped the beach tote up with foam tape. Next, I added the front layer of sand with a combo of liquid glue and foam squares.

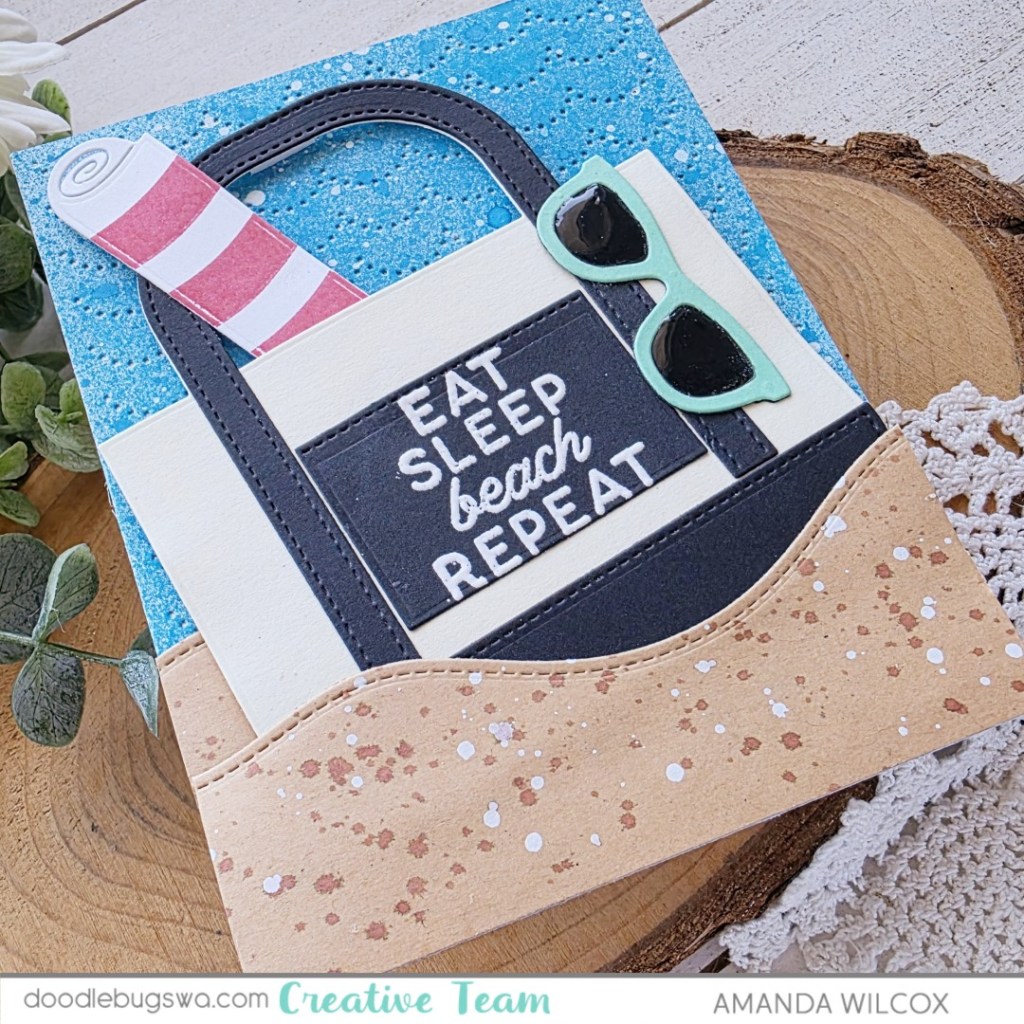
Finally, I glued the whole thing to a card base and finished the design off with glossy accents on the sunglass lenses.

Now, who’s ready for a trip to the beach? ME!!!

Products used:
Waffle Flower Beach Tote Combo
Pretty Pink Posh Pierced Scallop cover die
Lawn Fawn Hillside Border dies
Foam tape and squares
Liquid glue
Glossy accents
Lawn Fawn walnut ink
White paint
Distress Oxide Spray – mermaid lagoon

I appreciate you sharing your time with me. Have a fabulous day!

Miss Ink Stamps – Boho Thanks

Hi friends! It’s time for some Miss Ink Stamps inspiration again. Following suite with my stencil theme these days I pulled out an old favorite to play with and added a custom simple sentiment – all in a fabulous boho theme.

The stencils used for the background is the Artsy Abstracts stencil set. It has 4 stencils in the set to mix and match however you like. I used all dye inks and blending brushes on a piece of cream cardstock. Then I splattered a little water on the panel and blotted it dry.

Next I used double-sided adhesive sheets to adhere brown cardstock to craft foam and die cut that with the Modern Typeset dies to create a thanks sentiment. I used a ruler to keep my letters straight.

And last, I popped the panel up with foam tape on a white card base and glued a small scattering of matte gold sequin discs on the design.

I love that these stencils are so fun to play with in any color combo you’re vibing for the day and there is no wrong way to combine them!

Products used:
Artsy Abstracts stencils
Woodgrain Frame dies

Blending brushes
Lawn Fawn dye inks
Matte gold sequins
Foam tape
Adhesive sheets
Liquid glue

I appreciate you sharing your time with me. Have a fabulous day!

Doodlebugs – Citrus Stenciling All the Ways

Hey friends! It’s Mix it up Monday on the Doodlebugs blog today! I’m sharing some really fun stenciling in a bunch of color combos because who doesn’t love a good citrus!

I was really in the mood to play with stencils a little bit ago so I went digging through all my layering stencils, finally landing on this fun Pretty Pink Posh Citrus stencil set. I inked it up with the orange combo because it seemed immediately logical but right after that I thought, I want to make lemons and limes and, what about grapefruit too!?! So I did.

The final layer is the juice splatter so I spread glossy gel through it and sprinkled those with super fine glitter for sparkle. While those were drying I cut some Lawn Fawn scripty sentiments from white cardstock – 3 layers for each card – and glued them together with liquid glue. But I didn’t like the white sentiment so I cut another layer for each card and inked it with the same inks I used on the stenciling.

Once the panels were dry, I trimmed the edge off and lined the back with foam tape. Then I inked the edge of my card base to match each panel and adhered them together. Last, I glued my sentiments in the center and suddenly have an adorable set of 4 cards done!

Products used:
Pretty Pink Posh Citrus
Lawn Fawn Scripty Congrats die
Lawn Fawn Scripty Hello die
Lawn Fawn inks – celery stick, jalapeno, lemonade, sunflower, carrot, peach fuzz, bubblegum
Liquid glue
Foam tape

I appreciate you sharing your time with me. Have a fabulous day!

Newton’s Nook – June Release Day Instagram Hop

Welcome back everyone! Super excited to share my card for the Newton’s Nook June Release Day Instagram Hop on here, but remember to head to IG to comment and hop along for chances to win!

I’m still feeling my stencil era so I pulled out a few oldies but goodies to pair with Newton’s Sand Dollar on today’s card. I used the Retro Sun & Palms, paired with the Waves & Splashes stencils to create my background. Then I cut a curvy sand bank using the Land Borders dies, splattering the kraft cardstock with brown and white paint for the sandy look.

I stamped and colored all of the images from Newton’s Sand Dollar and used the coordinating dies to cut them all out. With all the pieces ready, I used liquid glue to adhere them all together. Then I tore the right side of my panel for some awesome texture and added foam tape to the back of the panel.

Before popping it up on my card base, I drug my teal ink pad across the edge for texture and color at the same time.

Then I added my scene panel and popped it up a heat embossed sentiment banner using one of the banners in the A7 Frames die set. I finished things off with glossy accents on all of the images.

Click HERE to head to Instagram and hop along, commenting for a chance to win.

I appreciate you sharing your time with me. Have a fabulous day!

Newton’s Nook – June Release Reveals

Hey friends! Welcome to release reveals for the Newton’s Nook June Mini Seaside Release! I’m smitten with the new stamp set and in love with the color palette of the new paper pad! I want to use it everywhere! Let’s take a look!

Seaside Paper Pad and Newton’s Sand Dollar stamps and dies

I have 2 cards to share with you today using both of these new products. Then I’ll be back tomorrow with another card and a link to the Instagram hop celebrating release day!

I used a few pieces of the new paper pad with the A2 Card Layout die. I cut 2 white frames first and then cut the patterned paper, keeping the inserts to paper piece. One fun thing about these is that I cut the center from the same piece of paper, just used one side on each card.

For this first card, I stamped and colored Newton’s Sand Dollar and used the coordinating die to cut him out. Then I grabbed a circle from the Circle Frames dies for my sentiment. On the card front, I went direct-to-paper with my light brown ink pad for color and texture with no bulk.

With all of that done, I just grabbed my glue and foam squares and started assembling it all together. I finished things off with a clay heart on the sentiment and some glossy accents and stardust stickles on the image.

For this card, I repeated the process, using light teal ink on the card front because the browns didn’t quite match enough for my liking. Then I went and grabbed the Hello die in the Filigree Oval Frame dies for my sentiment and just adorned it with a seashell from the stamp set.

It’s simple but so pretty and perfect for any beach lover! Goodness knows I have enough of those in my life. Then for finishing touches I just added a little stardust stickles on the seashell for sparkle.

Enter to Win a $25 Prize!

One lucky winner will receive a $25 store credit to spend at Newton’s Nook Designs online shop! The winner will be chosen at random from the collective blog posts featuring our new products today. For a chance to win, leave comments on the Design Team Member Blog Posts today (June 12th). You will not know which blog has been chosen so the more you comment on the better your chances are of winning! You have until Sunday, June 15th at 9 pm ET to comment.  Winners will be announced on the NND blog on Monday, June 16th.

Check out all the awesome Design Team Blogs below to enter:

Newton’s Nook Designs
Larissa Heskett
Samantha Mann
Diane Morales
Farhana Sarker
Amanda Wilcox
Zsofia Molnar

Doodlebugs – Postage Collage Happy Mail

Hello friends! Today for Mix it up Monday, I’m playing with some more of the Waffle Flower Postage Collage series. I love all of these and that you can mix and match bunches of them together if you want. It adds life to the product and makes it more fun today play with. Today I had a hard time breaking up my rainbow of envelope stamps though.

After die cutting the postage collage base, I cut that with the postage collage envelope base. Then I stuck it to my grip mat and used the postage collage envelope stencil to ink them up in a rainbow of colors.

I used my scissors to trim them apart and arranged them on an A2 scrap of cardstock before using liquid glue to adhere them all together. While those were drying, I cut a piece of dark blue cardstock with the Pretty Pink Posh Pierced Scallops cover plate and splattered that with white paint.

Once all of that was dry, I glued the blue panel to a white card base and popped the envelopes up on that with foam squares. After trimming off the excess I stamped and heat embossed my sentiment from the Waffle Flower Birthday Wishes set. This set has coordinating dies so I also cut it out before popping it up with foam squares to match the level of the envelopes.

For finishing touches here I added a little sparkle to the envelope hearts with stardust Stickles.

Products used:
Waffle Flower Postage Collage dies
Waffle Flower Postage Collage Envelope die
Waffle Flower Postage Collage Envelope stencil
Waffle Flower Birthday Wishes stamps and dies
Pretty Pink Posh Pierced Scallop cover plate
Blending brushes
Lawn Fawn inks – guava, juice box, mermaid, cilantro, sunflower, carrot
Anti-static pouch
Embossing & Watermark ink
Embossing powder – white
Foam squares
Liquid glue
Stardust Stickles

I appreciate you sharing your time with me. Have a fabulous day!

Miss Ink Stamps – Stencil Layering with Punny Farm Pigs

Hello everyone! I’m here with a little dose of Miss Ink Stamps inspiration today. I’m in my stencil everything era so that’s what we’re focusing on today. It’s really fun and gives a great impact on any card design. There are so many options and ways to use them, plus they are a lower price point crafty supply which is nice when that budget isn’t what we wish it was.

For today’s card, I chose 3 stencils to create my background. First I layered the Diagonals Masking stencil over a piece of white cardstock. I inked it up with a light yellow ink, then I added the first layer of the Flower Shower stencil set on that and inked up my flowers with guava ink. I removed the flowers and added the leaf layer, inking those with jalapeno ink.

Now, I removed the masking stencil, flipped it around and positioned it to ink up the in between stripes. When the masking stencil was in place, I added the Enchanted stencil over that, inking it with mermaid ink. After removing that stencil I didn’t like the white so I went over the whole area with more mermaid ink which darkens the first layer and gives a light layer to what was white.

I trimmed that panel to 4×5.25 inches and splattered it with pearl watercolor paint. While that was drying, I stamped and colored images from Punny Farm Pigs and used the coordinating dies to cut them out. I also stamped and heat embossed a sentiment on a banner from the same stamp set.

When the watercolor was dry, I popped the panel up with foam tape on a white card base. Then I added the images and sentiment strip with a combo of liquid glue and foam squares, finishing things off with a little glossy accents on the piggy, duck and flower centers.

Have you tried masking stencils or using a shape as a mask to stencil only a certain area? It’s almost magical and also a really fun way to think outside the box of supplies you already have.

Products used today:
Punny Farm Pigs stamp and dies
Diagonal Lines masking stencil
Flower Power layering stencils
Enchanted stencil

Banner die
Blending brushes
Lawn Fawn inks – guava, jalapeno, butter, mermaid
Pearl watercolor
Foam squares and tape
Liquid glue
Glossy accents

I appreciate you sharing your time with me. Have a fabulous day!

Pretty Pink Posh – Using Shaped Dies for Tags

Hello everyone! So, I needed a set of gift tags and thought mixing and matching dies to create them would be fun and different. Traditional tag shapes are cute and all but how fun is it to get a butterfly shaped tag attached to your package!?!

I even coordinated the colors of the butterflies with the gifts inside the bags since they are clear cellophane bags. It’s going to be adorable! To start these off I cut two different butterflies from the Pretty Pink Posh Stitched Butterflies die set. Then chose a mid-sized body to go with them. I placed the butterflies in my splatter box and sprayed them with distress spritz spray and solar spray for fun shimmer and sparkle in the light. Once they were dry I used liquid glue and reverse tweezers to adhere the layers together.

Next, I cut the smallest die in the Mama Elephant B2B Arches die set from teal cardstock. Then I stamped a sentiment from the Mama Elephant Essential Tag Sayings stamp set. It seemed boring so I pulled the sketch heart from Mama Elephant’s Write with Me set and stamped in with Lawn Fawn mermaid ink above the sentiment.

Last, I punched holes in the butterfly wings and threaded them together with the sentiment tag using pink jute twine. I think they’re super cute and can’t wait to hand these gifts out.

Products used:
Pretty Pink Posh Stitched Butterflies dies
Mama Elephant B2B Arches dies
Mama Elephant Essential Tag Sayings stamps
Mama Elephant Write with Me stamps

Lawn Fawn mermaid ink
Solar Spray – royal flush
Distress Spritz – tattered rose
Liquid glue
Reverse tweezers

I appreciate you sharing your time with me. Have a fabulous day!

Doodlebugs – When Life Gives you Lemons…

Hi friends! It’s getting juicy around here! There are lemons for days and I’m here for it. The original idea was for one card but I ended up with so many lemons and lemon slices that I just couldn’t let them spoil, so we’ve got two cards today!

They are the same design but I put the sentiment in different places so you could see the options; maybe you like one place better than the other. Personally, I couldn’t choose.

To get these started I took yellow cardstock and splattered it with white paint. Then I took watercolor paper and did some ink smooshing with different yellow inks. When the papers were dry, I cut bunches of lemons and lemon slices using the Lawn Fawn Zesty Lemon dies.

Next, I cut the center piece from white cardstock. This is the clincher right here. This step ended up giving me twice as many slices as planned because I loved the combo both ways so I made them all!

I cut two notched squares using the new Pretty Pink Posh dies from teal cardstock and used them as a guide for the size of my lemon wreaths. I used liquid glue to adhere the lemons together and an acrylic block to hold them in place while they dried.

While those were drying I got messy with distress oxide spray and spritz on my teal squares. I also added some watered down white paint to these for more texture.

While all that was drying, I cut pink panels for my card fronts and glued them to bases. I inked the edges a little with a blending brush and ballet slippers ink but I think the colors were too close because it didn’t show up a lot. Next, I cut Pretty Pink Posh sentiment strips and stamped my sentiments on them. This one came from the Pretty Pink Posh Citrus stamp set.

Then everything was assembled with foam tape and squares so there is a bundle of dimension and visual interest on both cards. For finishing touches I added stardust Stickles to the centers of the flowers on both cards.

Products used:
Lawn Fawn Zesty Lemon dies
Pretty Pink Posh Citrus stamps
Pretty Pink Posh Notched Squares dies
Distress Oxide Spray and Spritz – salvaged patina and cracked pistachio
Liquid glue
Foam tape and squares
White paint
Blending brush
Lawn Fawn ink – bubblegum, ballet slippers, sunflower, carrot
Stardust Stickles

I appreciate you sharing your time with me. Have a fabulous day!