Pawsome Stamps – Hauntingly Sweet Halloween

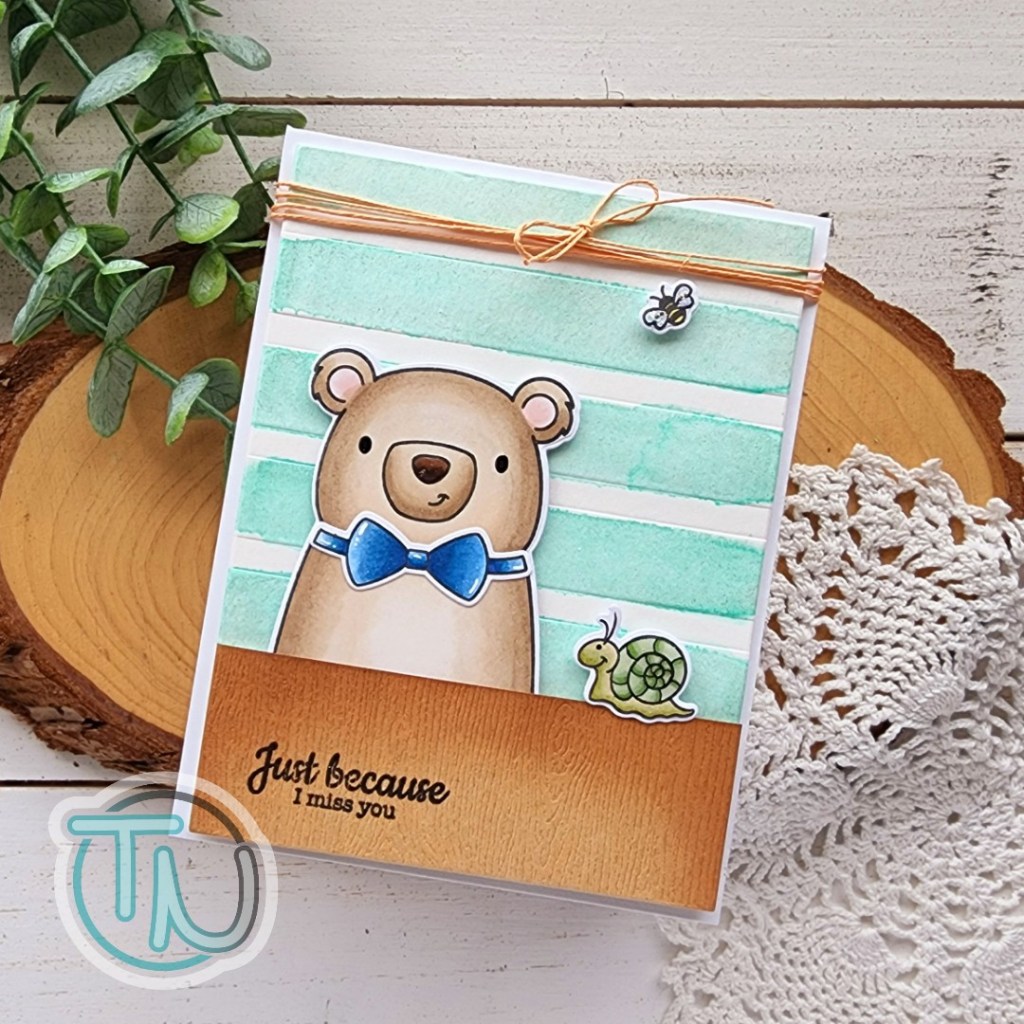
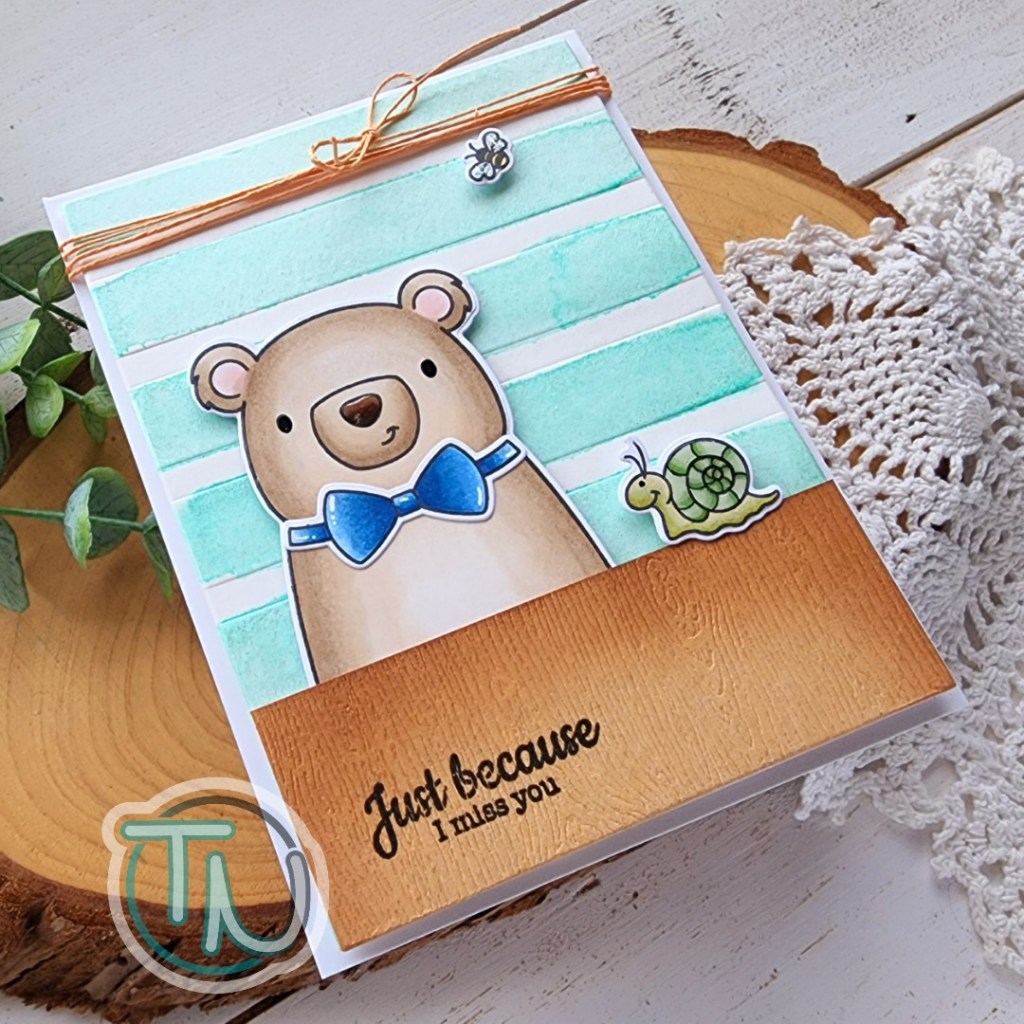
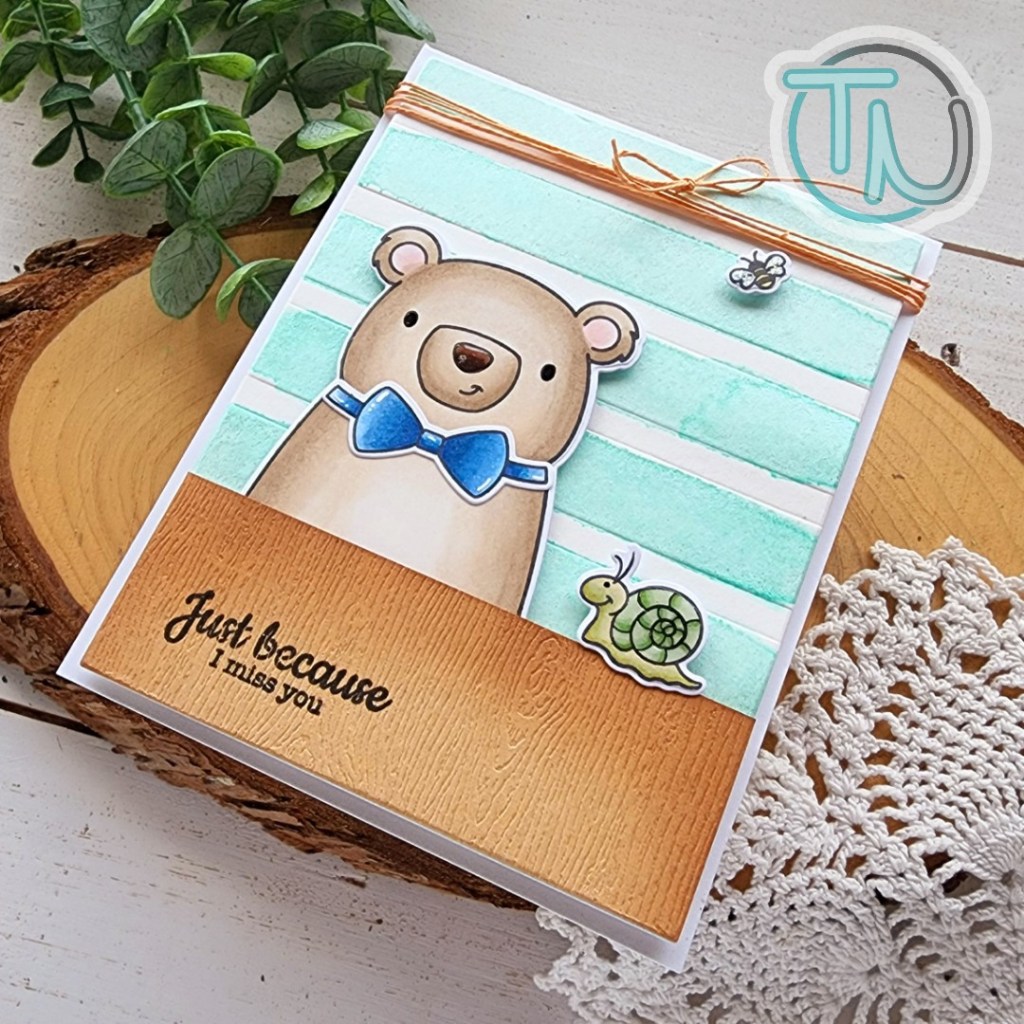
Hi there everyone! My blog is packed full for the next little bit because I’ve been creating a bunch of extra projects and want to share things with you in time to make holiday related creations yourself! So I’m back today with a card featuring a couple of stamp sets from Pawsome Stamps. I love her art and have quite a few of her sets but rarely carve out time to create with them. Shame on me!

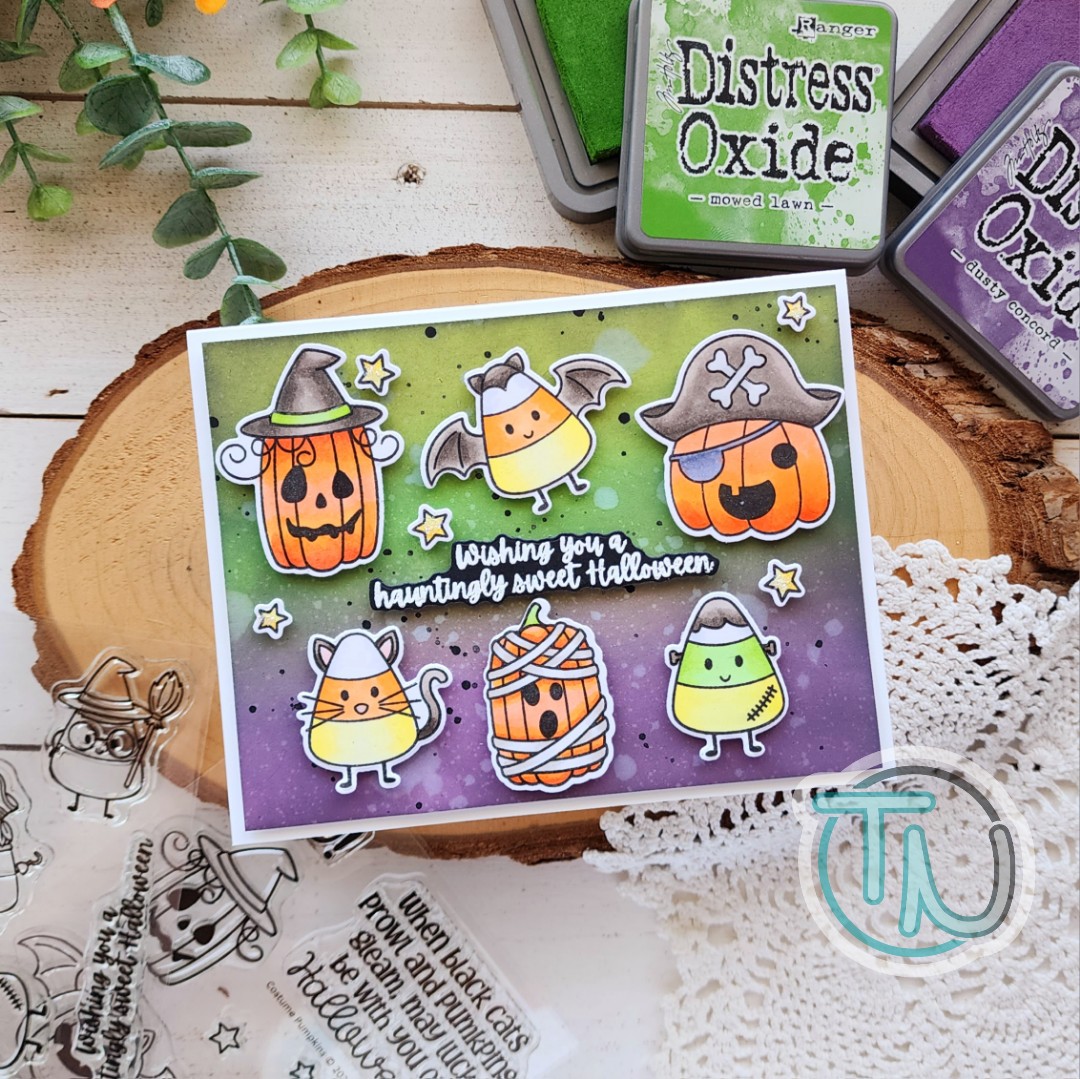
My card today combines a new set and a set released last year combined together. Aren’t these images so spooky fun!?! I love them! The pumpkins are new from Costume Pumpkins and the candy corn cuties are from last year called Hauntingly Sweet.

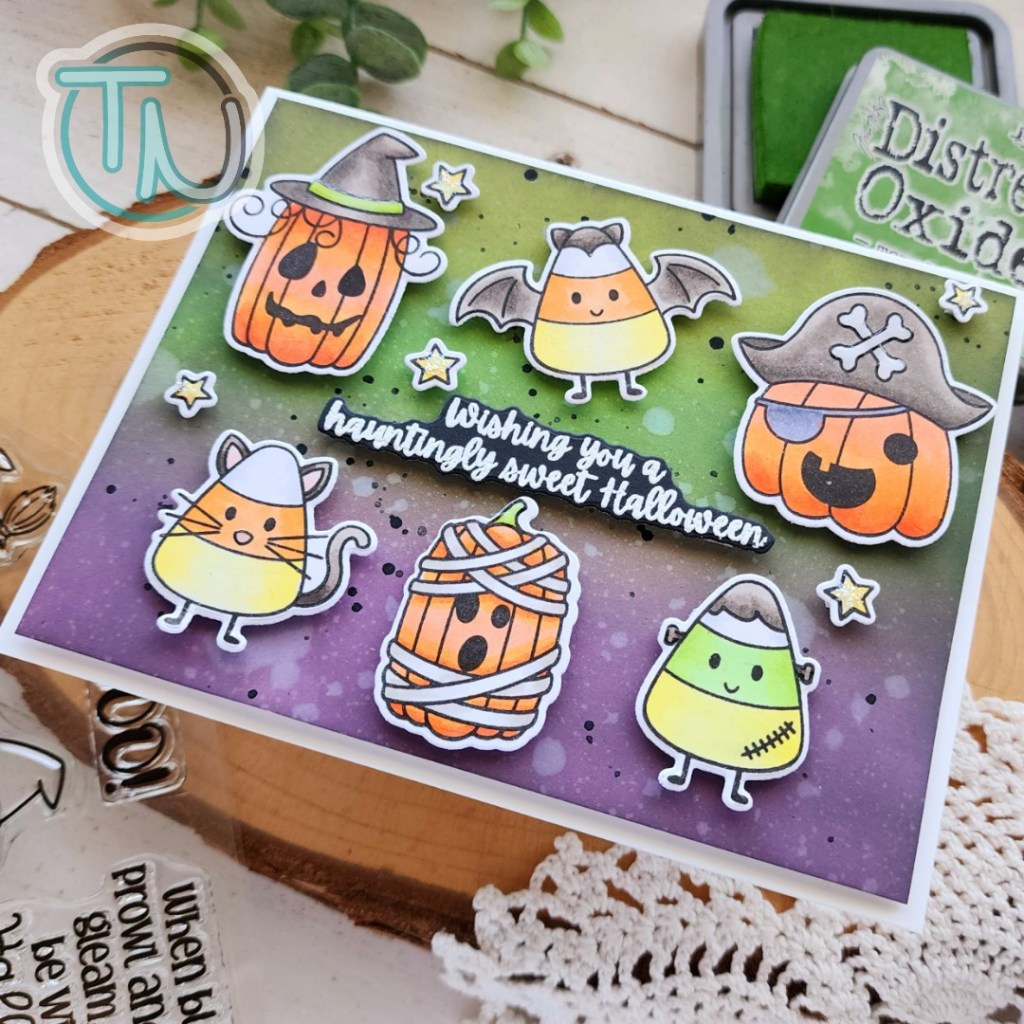
After coloring and die cutting the images, I pulled out a piece of white cardstock for my background. I trimmed that down to 4×5.25 inches before inking it up with distress oxide inks. I wanted spooky feeling colors but still color, not black, so I chose twisted citron, mowed lawn, dusty concord. Once that was blended, I lightly went over the edges with the ink that was left on my black soot distress oxide foam pad. I didn’t add anything to it so it stayed light but just gave some depth. Then I splattered the panel with water, blotted that dry and flicked black paint on it.

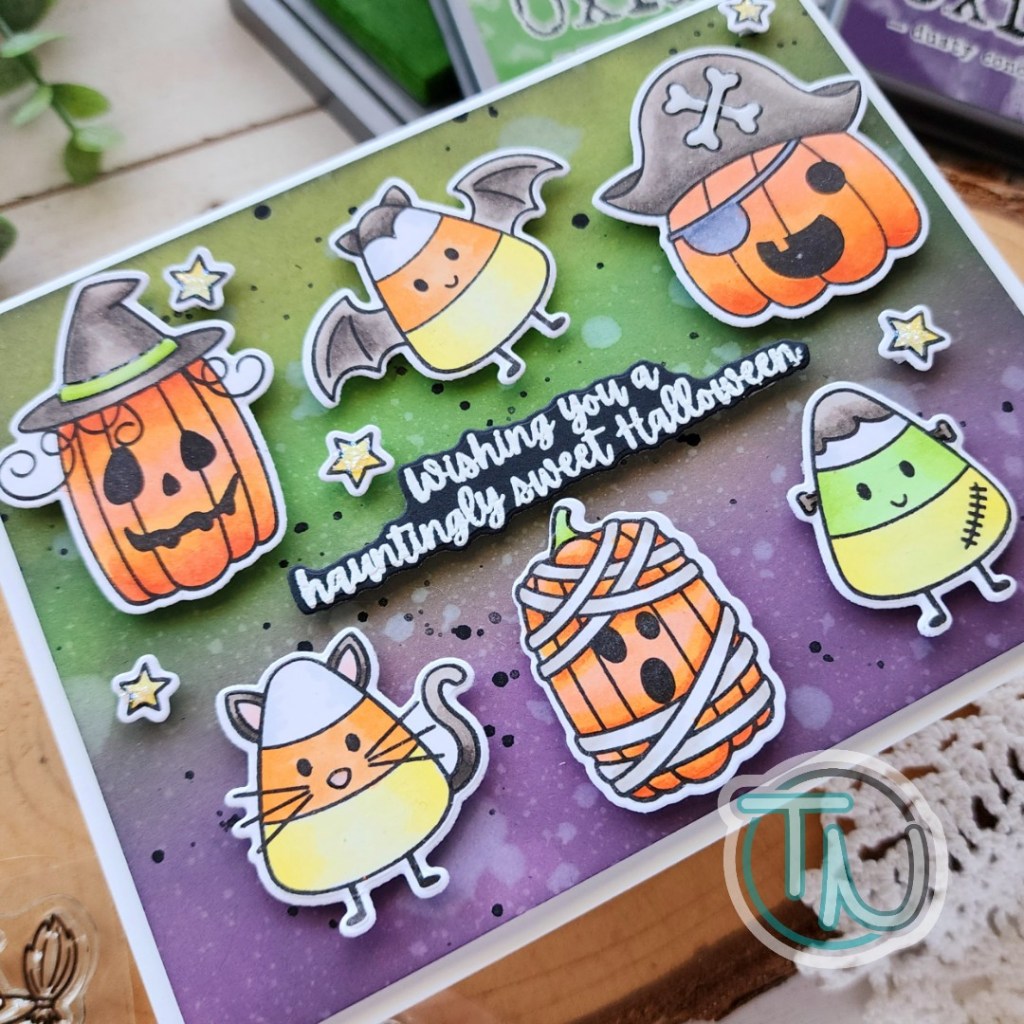
When the paint was dry, I popped it up on a white card base with foam tape and added my images and sentiment with foam squares and strips.

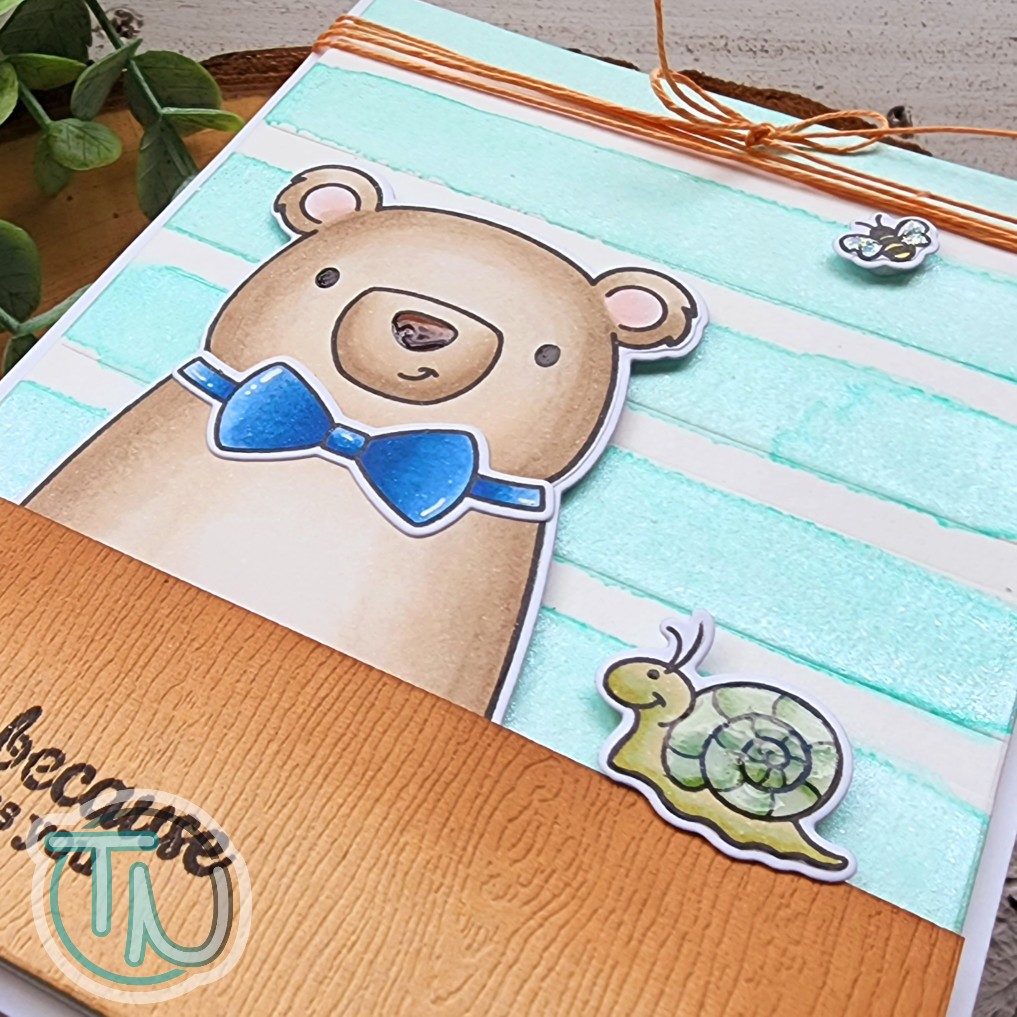
For finishing touches I added bits of Touch of Gloss to most of the images and stardust Stickles to the stars. I could have gone HAM with the glossy and sparkly but I held back so there are just bits here and there. You choose…measure that stuff with your heart! If you love it, keep going, if you’re more reserved, so be it!

Products used:
Hauntingly Sweet stamps and dies
Costume Pumpkins stamps and dies
Distress Oxide Ink – twisted citron, mowed lawn, dusty concord, black soot
Magic Anti-static Brush
Embossing Ink and Powder
Foam tape and squares
Touch of gloss
Stickles – stardust

I appreciate you sharing your time with me. Have a fabulous day!

Pawsome Stamps – Just Because I Miss You

Hello everyone! Today I have a sweet little card showing how to pull your stamps from one theme and stretch them into anything you’d like. I’m using a couple of adorable stamp sets from Pawsome Stamps and new watercolors from LH Colors for my background!

I recently received this adorable bear set called Hoppy Easter from my crafty friend Katie. I just adore this bear and love all of the cute accessories in the set. However, it’s very Easter and I didn’t have a chance to use it in time but I hate to leave it sit a whole year. So I didn’t! I stamped that cute bear and his bowtie and colored them with my copic markers. Then, I used the coordinating dies to cut them out. I used liquid glue to adhere the bowtie in place and went searching for what I wanted to use as a grounding platform for my bear.

I landed on this awesome woodgrain textured cardstock from Birch Press Design that I cut into a strip that ended up being 4×1.5 inches. I inked the edges with a blending brush and some brown dye ink for added interest. Then for the background, I cut a piece of watercolor paper, spritzed it with water and embossed it with the Pink & Main Wide Stripes embossing folder. Using these stripes as a guide I watercolored the Mint Chip color from LH Colors on each strip and set it aside to dry.

I went looking in other Pawsome stamp sets to see what sentiments I had available that were not holiday and thought this miss you one was sweet from the Cup of Tea set. So, I stamped it on the woodgrain panel and also stamped the snail and bumblebee to fill in my design a little.

For assembly on my card today, I adhere the bear to the back of the woodgrain and added foam tape to that whole thing before adhering it to the watercolor panel. Then I added foam squares to the snail and bee and popped them in place. Finally I popped the whole panel up with foam tape on a white card base.

For finishing touches I wrapped twine around the top of the card and tied it in a bow. Then I added black glaze pen to the bear and snail eyes and glossy accents to the nose and shell. Last, but not least, I came in with a little unicorn Stickles on the bee wings and white gel pen highlights on the bear’s bowtie.

Remember to look at your stamps and see if they might be flexible in their use. This time I didn’t change anything with the images, just chose specific details like the bowtie, omitted any bunny ears and picked a new sentiment. Super simple but sometimes we forget and overlook something because it was originally intended for a specific theme or holiday.

Products used today:
Pawsome Stamps Hoppy Easter stamps and dies
Pawsome Stamps Cup of Tea stamps and dies
Pink & Main Wide Stripes embossing folder
Birch Press Design – woodgrain cardstock
LH Colors watercolor – mint chip
Thermoweb 3D foam tape and squares
Glossy accents
Stickles – unicorn

I appreciate you sharing your time with me. Have a fabulous day!

Coffee Loving Cardmakers – Double Pocket Card

Hey everyone! Today is Tuesday Tea over on the Coffee Loving Cardmakers. Today I’m bringing back an oldie but goodie folding technique called a double pocket card. I have made these in the past and filled the pockets with a variety of items – from double notes to the recipient to flower seed packets, Starbucks Via packets, gift cards, cash – lots of options! If you have other ideas, I would absolutely love for you to leave them in the comments below. Giving little gifts like this is a favorite of mine and I’m always looking to add things to the list.

To create my card base, I followed this tutorial from Splitcoast Stampers through step 7. Instead of folding the second layer over on the bottom pocket, I folded it back and actually created a regular card to go with my pockets.

Here’s a look at the inside. I used a 12×12 rainbow plaid paper from Lawn Fawn for a fun and bright card base and my Newton’s Nook Frames & Flags dies for the stitched rounded rectangles for my inserts. The front inserts have ribbon stapled to the top which adds a little whimsy and makes them easy to pull out. This is where I will add either gift cards or probably Starbucks Via packets taped with cute washi tape.

To decorate the front of my card, I used images from Pawsome Stamps Coffee Besties and Playful Pandas. They are colored with copic markers and cut out using the coordinating dies. My thought bubble is from Newton’s Nook and the sentiment today is a mini set from Impress Crafts. The scalloped edging on the pockets is a border die from Newton’s Nook too.

With all the folds and layers this card is a little thick on it’s own so my images are all adhered with liquid glue directly to the card front. Shocker, I know. I am quite addicted to my foam squares, we all know.

For finishing touches I added black glaze pen to the panda’s eyes and white gel pen highlights to all of the images. Then I glued a couple of clay hearts from Twiddler’s Nook Sweethearts embellishment mix and my card is all finished and ready for treats!

Products used today:
Pawsome Stamps Coffee Besties stamps and dies
Pawsome Stamps Playful Pandas stamps and dies
Newton’s Nook Speech Bubbles dies
Newton’s Nook Frames & Flags dies
Newton’s Nook Sky Borders dies
Twiddler’s Nook Sweethearts embellishments

I appreciate you sharing your time with me. Have a fabulous day!