Miss Ink Stamps – Let the Heads Roll

Happy Friday everyone! I’m so excited to have finally made it a priority to play with my Mother’s Day present…the Alice in Wonderland release from Miss Ink Stamps. It was so much fun to sort through it all and decide what to create. My first card kind of shows my mood…a little snarky and a lot funny.

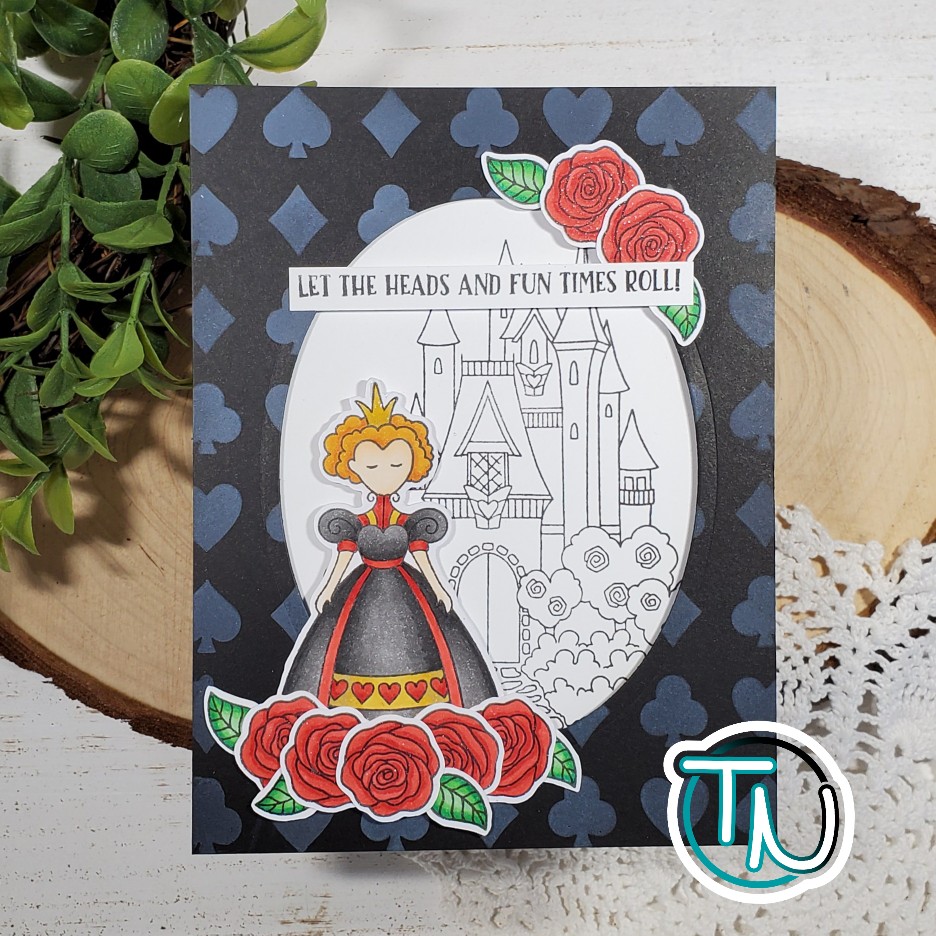
I started this card by stamping my images from Queen of Hearts and colored them with my copics. Then I used my scan-n-cut to cut them out and set them aside to work on my background. I took a 4.25×5.5 black cardstock panel and used white pigment ink with the Pick a Card stencil. Then I die cut an oval from the center. Using this panel and a white card base, I decided on the placement of the Queen’s Castle image and used my MISTI to stamp it.

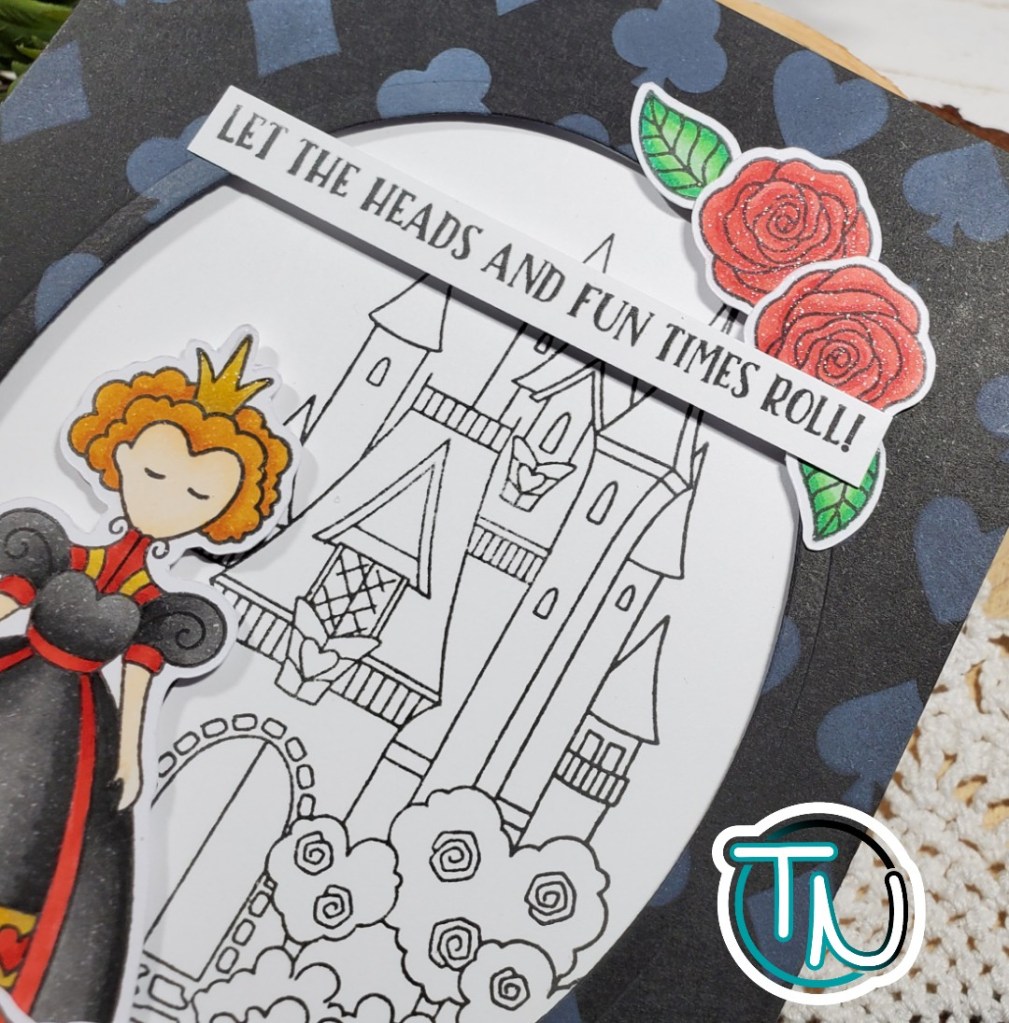
Then I moved on to assembly. I laid out my images and slowly glued them in place, layer by layer to the black panel. Then I flipped the panel over and covered it with foam tape and adhered it to the card front. I stamped my sentiment and cut it into a strip and glued it in place as well. The center is supported with a thin foam strip.

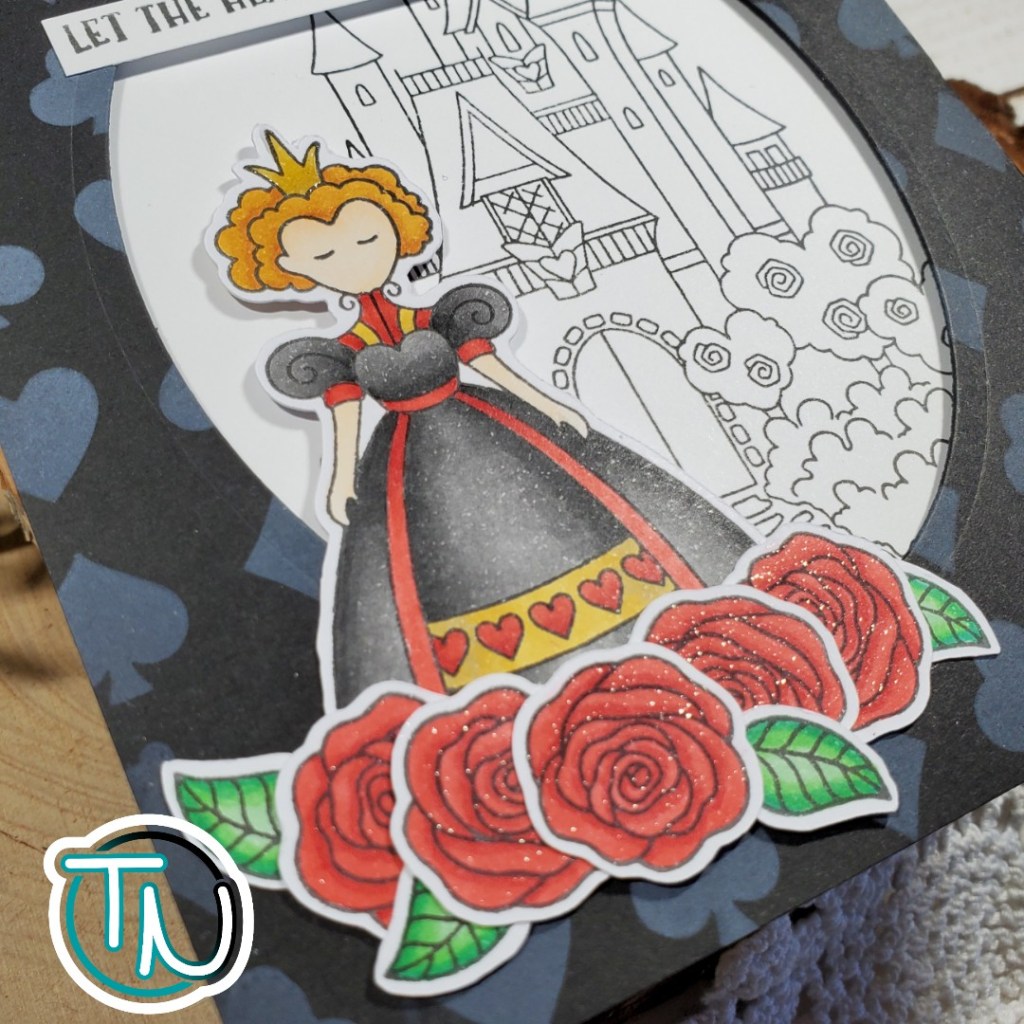
I kept the finishing touches on this card fairly simple – glossy accents on the queen’s crown and Wink of Stella glitter brush pen to all the roses.

I already have my next card planned out and the images all stamped, ready to go. This series of products is just amazing, the possibilities are endless! I can’t wait to share more with you!

I appreciate you sharing your time with me. Have a fabulous day!

Elf Popcorn

Welcome back and happy Friday everyone! Today I wanted to share a project I designed about 5 years ago and have made them every year since.

It’s essentially a wrapper for a package of microwave popcorn. The front looks like elf clothes and then I add a little piece of cardstock to the back so you can write a message.

To make these I cut 8.5×5.5 green cardstock. Then I cut a red patterned paper (pants) to 8.5×2.5 and a black strip (belt) 8.5x.75. I designed a belt buckle on my Cricut and cut those from gold cardstock and threaded the belt through.

Next I glue the belt and pants to the green panel and score that whole piece 2 1/8 from each side. To make the collar I use a 2″ circle scallop punch, cut it in half and glue the two pieces to the top. Finally I add scor-tape to the back, wrap it around the popcorn and seal it shut.

I have this adorable pair of stamps from Stampendous that I like to put on the back. This white panel is 3×4 inches and I just use tape runner to adhere it. I’ll write a quick note and it’s ready to give. I make these in mass, 44 to be exact, because that’s how many packs come in a Costco box of popcorn. Lol!

These make great teacher and classroom gifts, or put one on all your coworker’s desks like I’m doing today!

I appreciate you sharing your time with me. Have a fabulous day!

12 Days of Christmas Tags – Day 6

Thank you so much for stopping by today. We’re half way done with our 12 Days of Christmas Tags series already. I can’t believe it. Today I have an all die cut treat holder tag to share with you.

The tags are cut from an oldie but goodie die from Stampin’ Up called Two Tags. I can’t count how many times I’ve reached for this one over the years. It’s so versatile for so many things.

Today I die cut one of the tags from dark blue cardstock and inked the edges with faded jeans distress ink. Then I splattered it with gold watercolor. Next, I die cut the two smallest snowflakes from the November Spellbinders Small Die of the Month in gold and white cardstock and adhered them to the front. I looped some ribbon through the hole in the top and voila!

I have a hard time with decisions on projects like these so whenever possible I just make half one way and half the other. Above you can see that I did some with white ribbon and others with gold. Then I also flip flopped with snowflakes were white or gold. I love them both and just couldn’t pick a winner.

When you open the flap there is an Andes mint glued inside with removable adhesive that rubs away really easily. That still leaves one whole side for you to write a message on if you’d like.

Treat or no treat, these are beautiful and I’m ecstatic with how they turned out. I’m telling you, gold is my holiday color this year.

Don’t forget there are prizes to be won. Comment each day on here, on my Instagram post for the day and then head to Caffeinated Craftiness and do the same for her. Four comments per day gives you a shot at any one of four prizes!

I appreciate you sharing your time with me. Have a fabulous day!

13 Days of Tricks and Treats – Day 12

Thanks for stopping by. We’re keeping the kids on their toes and dishing another trick their way today. Jumping spiders! Okay, they won’t really jump out of the boxes but they are toy spiders that leap up when the suction cup gives way. Silly and fun.

The die set I used for these is Stampin’ Up’s Curvy Treat Box. I cut them out of a polka dot embossed cardstock and sponged the edges with spiced marmalade distress ink. Then cut the tags from bright green (My daughter’s request, she really loves those eye-popping colors. I think she was meant to be raised in the 80s.) but I inked the edges of them with mowed lawn distress ink. We assembled the boxes, inserting the spiders and then tied the tags on with green ribbon from my stash.

The sentiment we chose was from Stampin’ Up’s Seasonal Chums stamp set which she thought was hilarious given what’s inside of the boxes.

I appreciate you sharing your time with me. Have a fabulous day!

13 Days of Tricks and Treats – Day 11

We’re closing in on the end of our tricking and treating adventures. Just a few days left. I hope you’ll continue to join me for these last few.

I’m absolutely in love with how today’s project turned out. In all actuality, there are about 7 shown here but I’ll be making close to 50 of them to hand out to various people in our lives. They are so fun and were really quick to come together.

Spooky right?!? Ha! Well, here’s how I made them…

Starting with reaching WAAAAAAAAAAAAAAAYYYYYYYYY back into my stash. The ghosts are a die from the original Sizzix series that showed up in craft stores almost 20 years ago. Yes, I still have them. No I will probably never let them go because I love them. 🙂 Also used, from pretty deep into my stash, was the scalloped tag topper punch from Stampin’ Up.

The general idea was to stamp the Lawn Fawn gingham backdrop stamp on 2×3 inch tagboard (quite literally the cardboard backing from your notepads; I keep them), punch with the tag topper and corner rounder. Die cut 1″ circles from gold cardstock and glue them down. Then adhere the ghosts and add some fun spiderweb washi tape to the bottom. I threaded some orange grosgrain ribbon from my stash and then tied it with black and white baker’s twine. Last, I added washi tape to one side of a clothespin and used it to clip the tag to a mini bag of candy corn.

Here’s a less cluttered look at just one of these fun treat tags! Isn’t it so fun??? There are always so many ideas that lead to other ideas and these have my mind swirling.

I think it would be great to write a message on the back of the tag, use a simple to and from stamp or just leave it blank. In the past I have glued strong magnets to the back of clothespins like these too. That would make for an extra gift with your gift!

I hope you’re enjoying the fun treat giving ideas and will join me for the last few. Be sure to subscribe so you don’t miss any.

I appreciate you sharing your time with me. Have a fabulous day!

13 Days of Tricks and Treats – Day 10

Welcome back everyone! Today I’m sharing a trick, of sorts. I’m using the Stampin’ Up Mini Treat Bag die set to create thin pocket-type bags. Over the years I have filled these with everything from gift cards to instant soup packets and hot cocoa. Today these kiddos are getting really corny Halloween jokes taped to apple cider packets for a trick to go with their treat.

The die set gives you everything you need to make super fun, complete bags. I almost always use double-sided cardstock so the inside part that shows up top is just as pretty as the rest. For these I used three pieces of double-sided cardstock in various ways to mix and match the patterns.

The dies I used in the set were the star, star border, bow and washi tape along with the actual treat bag. They are all just layered together with liquid glue and then I placed acrylic blocks on them while I cooked dinner to make sure they dried really well.

I love the added bling of the gold cardstock for the bows. Just a little shine among all of the drab is super fun.

Also, the washi tape pieces were die cut from regular cardstock and ink blended with black soot distress ink because they were just a little too bright for the rest of the design. The “trick or treat” sentiment is from Stampin’ Up Seasonal Chums.

I hope you enjoyed today’s trick. Come back tomorrow for more fun Halloween ideas!

I appreciate you sharing your time with me. Have a fabulous day!

13 Days of Tricks and Treats – Day 8

Welcome back! Today we’ve got a super cute mini milk carton treat holder to share. To make these cuties I used an older die from Stampin’ Up but many other companies have milk carton style dies available.

To whip these up I just die cut the carton, stamped the starry night background stamp from Lawn Fawn and then assembled the boxes with scrappy tape. Next I stamped, colored and die cut my Happy Howloween pups and accessories and glued them directly to the milk carton. You can glue the carton tops shut but I found over the years that the mini clothespin is super cute and it allows you to open the whole top to get treats in and out so the boxes don’t get destroyed in the process.

Here’s another look with the cartons open. You can see that the clothespin is offset just a bit so it stays on when you open and close the carton. I put some chocolate balls inside that are wrapped in foil to look like eyeballs. It made me laugh to look inside and have something looking out at me.

I hope you’re enjoying all of these treat ideas and find some inspiration in at least one of them.

Thank you for sharing your time with me. I appreciate it. Have a fabulous day!

13 Days of Tricks and Treats – Day 1

Welcome to 13 Days of Tricks and Treats at the Twiddler’s Nook! I’m super excited to be sharing a Halloween themed project each day for the next 13 days. Some will be tricks and some will be treats.

We’re going deep into my stash of old and new dies and stamps to inspire you to dig through the dust and cobwebs and bring back things you’ve forgotten you even had.

I’ve also decided that I didn’t need all of these laying around so each day my daughter will be taking them to school and sharing them with friends and teachers. It’s going to be a fabooooolous time!

On with the show and today’s TREAT holders! These are made with an oldie but goodie die from Stampin’ Up called Two Tags. The die does just what it implies, cuts two different shaped tags at the same time. We’re only using one today though.

Aren’t they just so fun! I kept them simple but you could totally jazz them up depending how many you’re making and who they are for.

I just cut a thin strip of patterned paper, punched a scalloped circle in contrasting colors, stamped and punched my images and glued them all together. I used some fun black, orange and white twine from Doodlebug to the top. The images I chose for these are another oldie from Stampin’ Up called Batty for you.

For these tags I usually put an Andes mint inside because they are slim and it still closes easily but the grocery store had the cutest mini Hershey’s candy bars with Addams Family characters so I decided to give them a try and they fit great too!

Don’t forget to come back tomorrow to see what’s brewing next!

I appreciate you sharing your time with me. Have a faboolous day!