Pink & Main – Just Buzzin’ By!

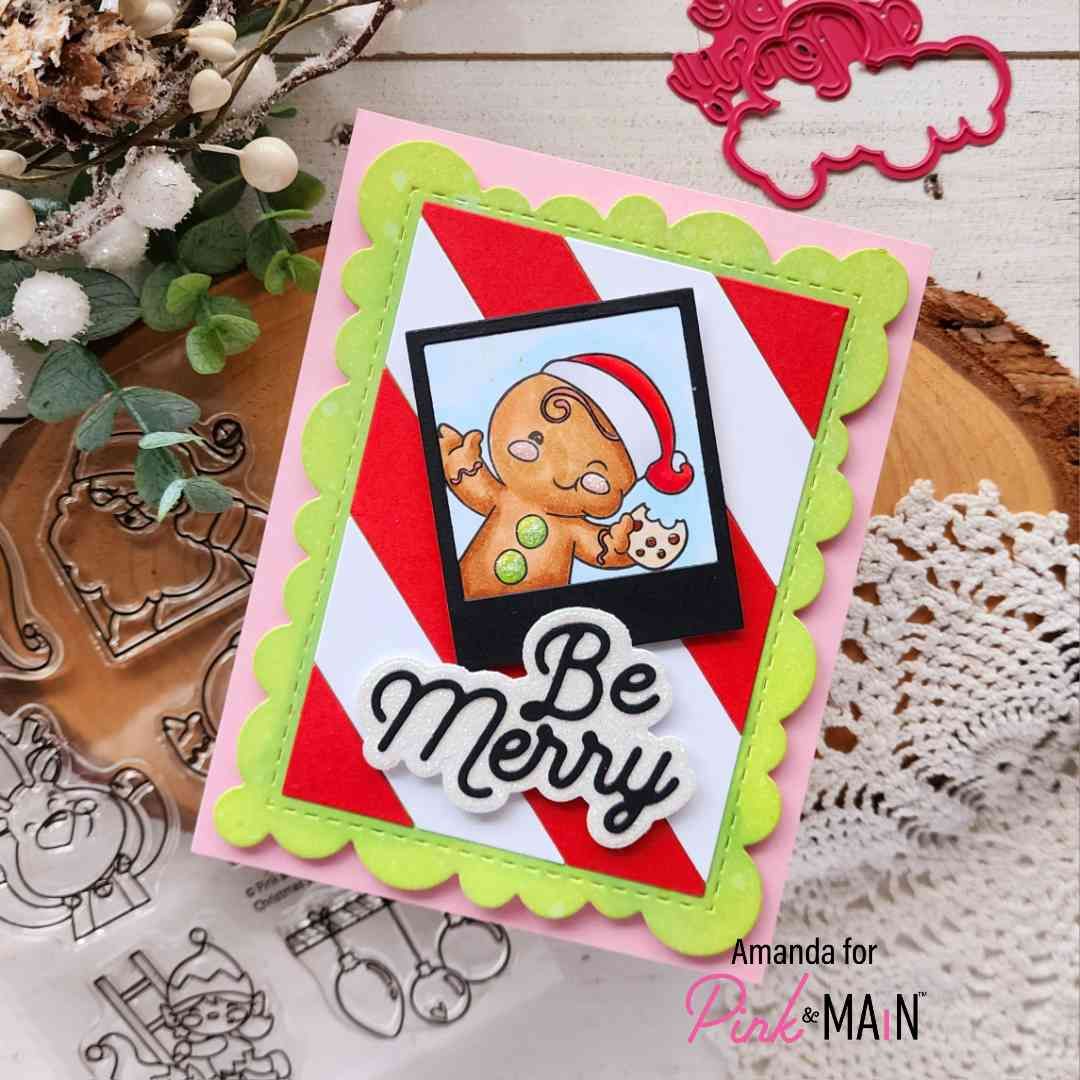
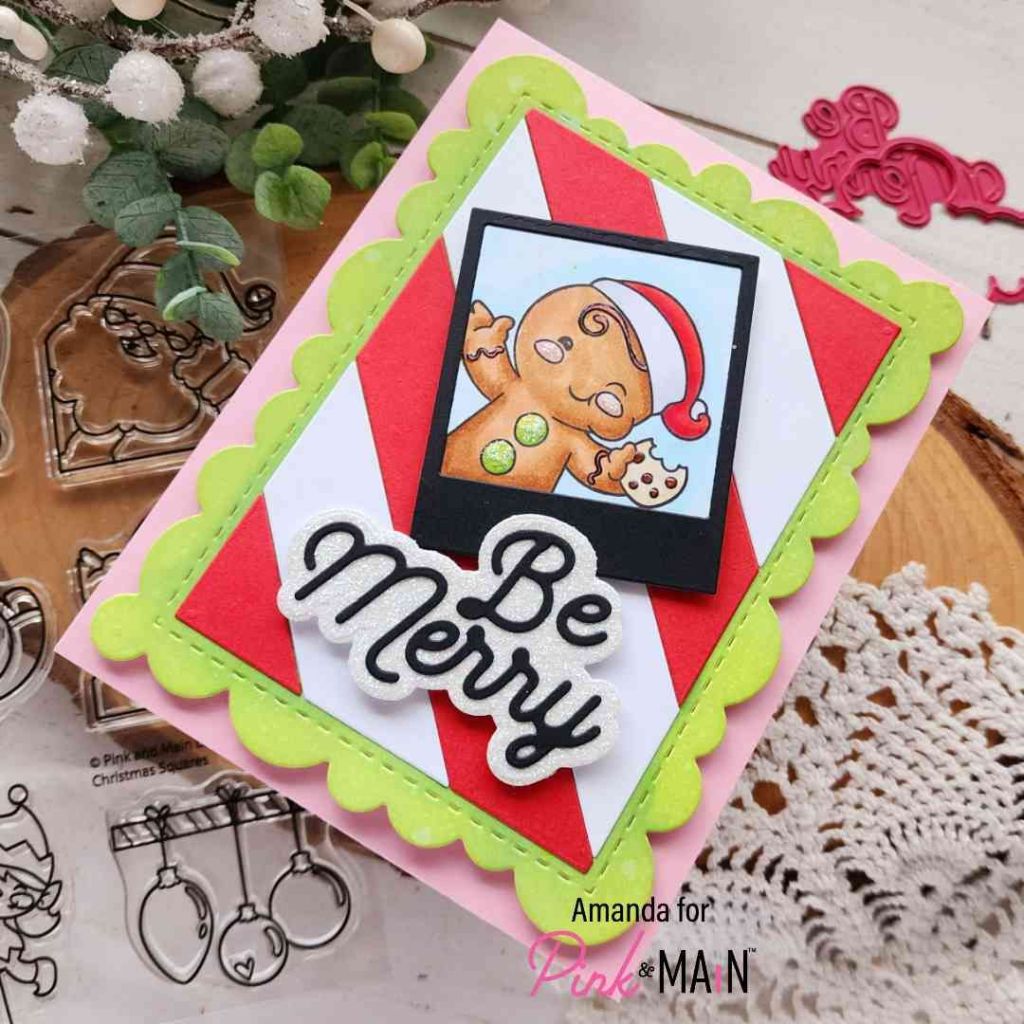
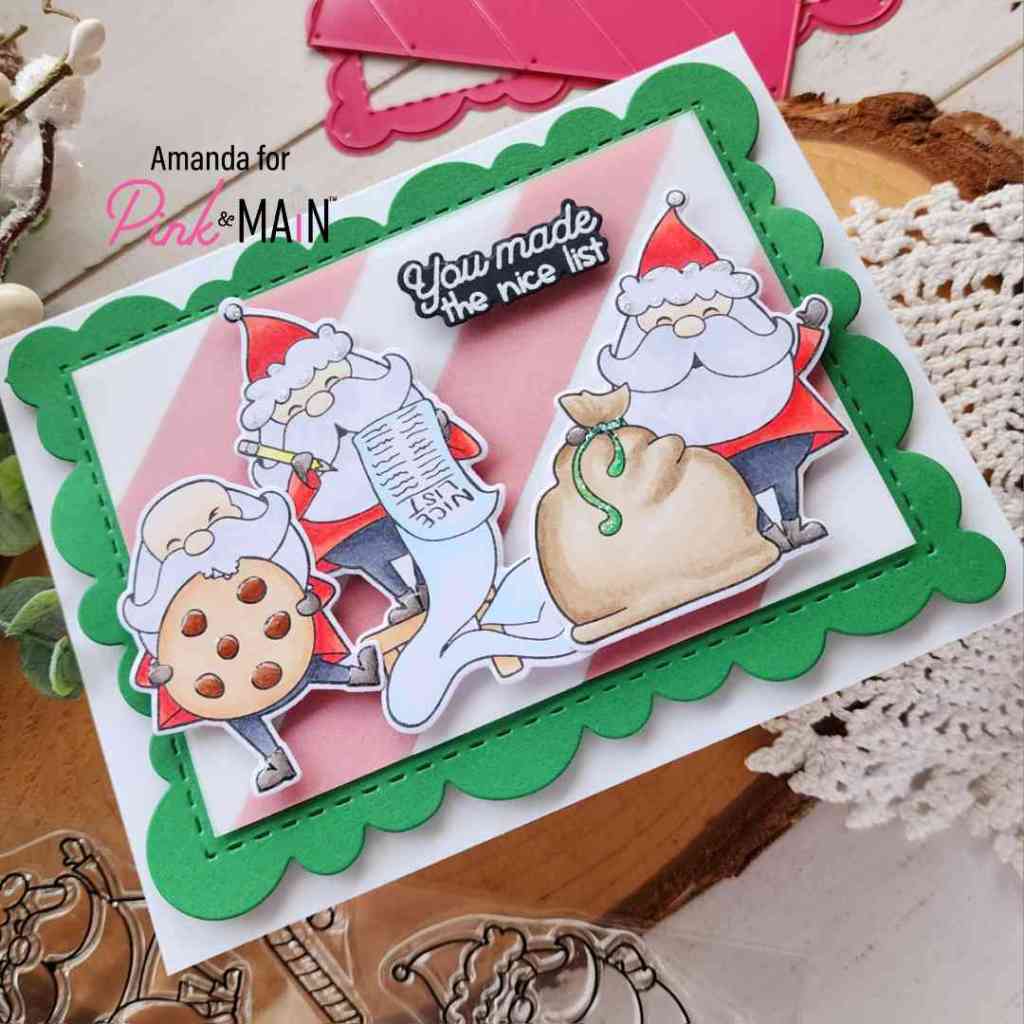
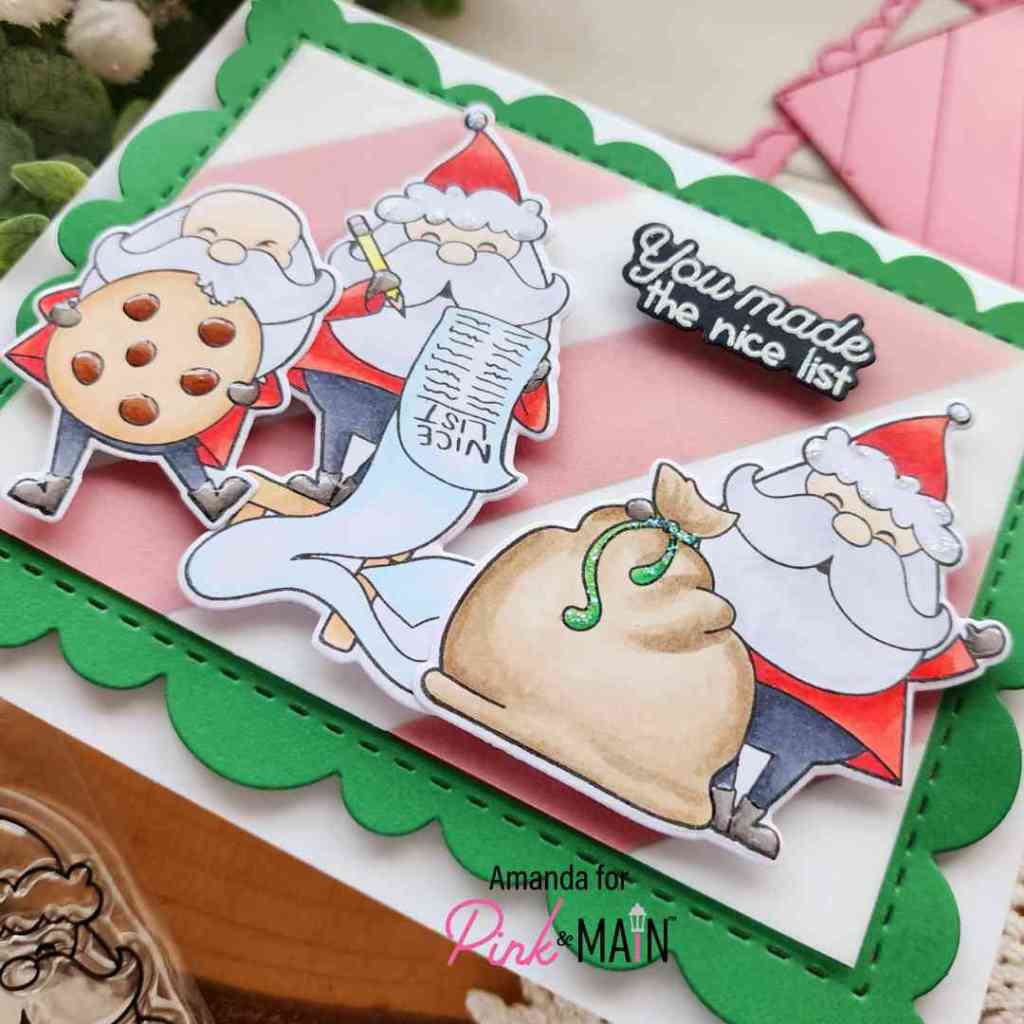
Hello everyone! I took some time to do journaling this weekend and while I had stamps out for that I was immediately inspired to make a card with one of the sets I was using for that too! The journals I use are Little Bits Box by Mommy Lhey Designs, who also designs stamps for Pink & Main. Thus the seamless transition to today’s card.

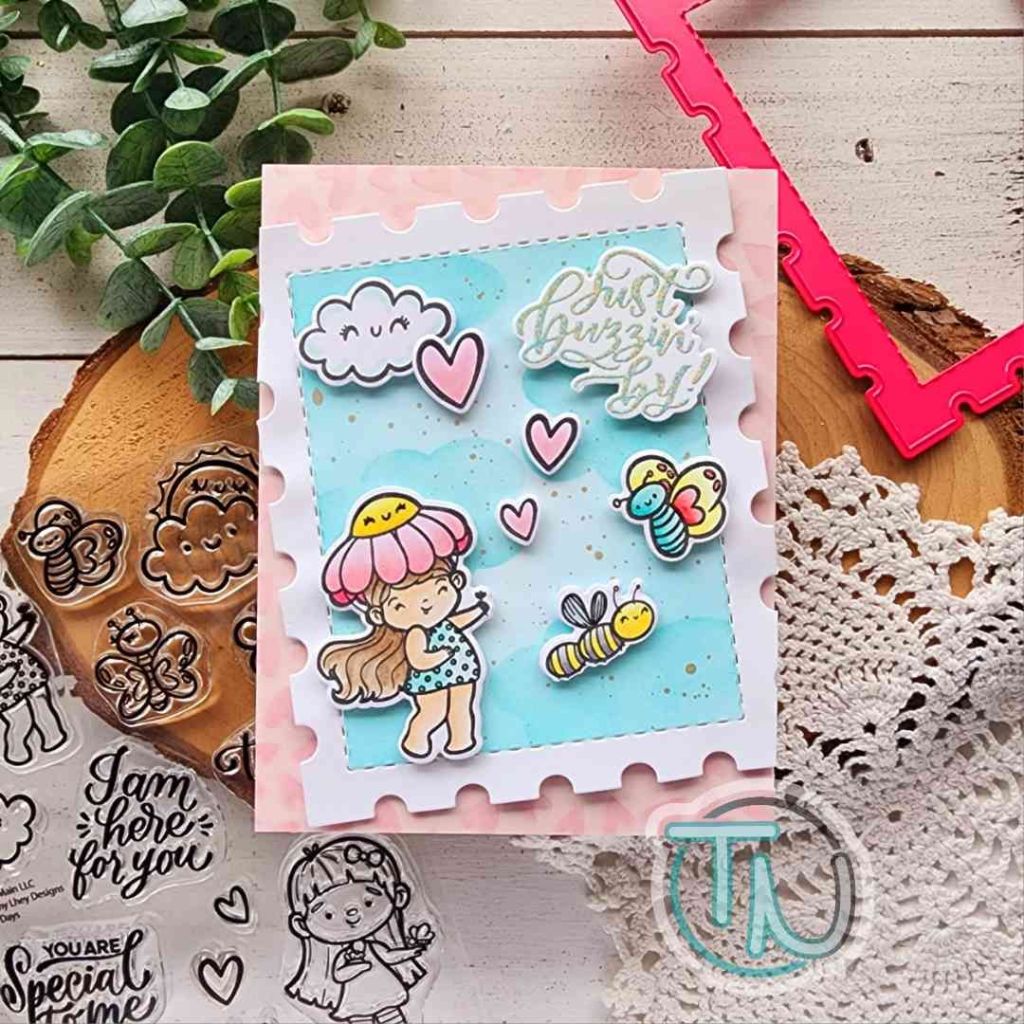
I was using a couple simple images from Sunshine Days on my journaling but really wanted to create a card so I stamped more of them to color with my copic markers. I used the coordinating dies to cut everything out and mocked them up in the arrangement I wanted to make sure I had enough to fill the scene.

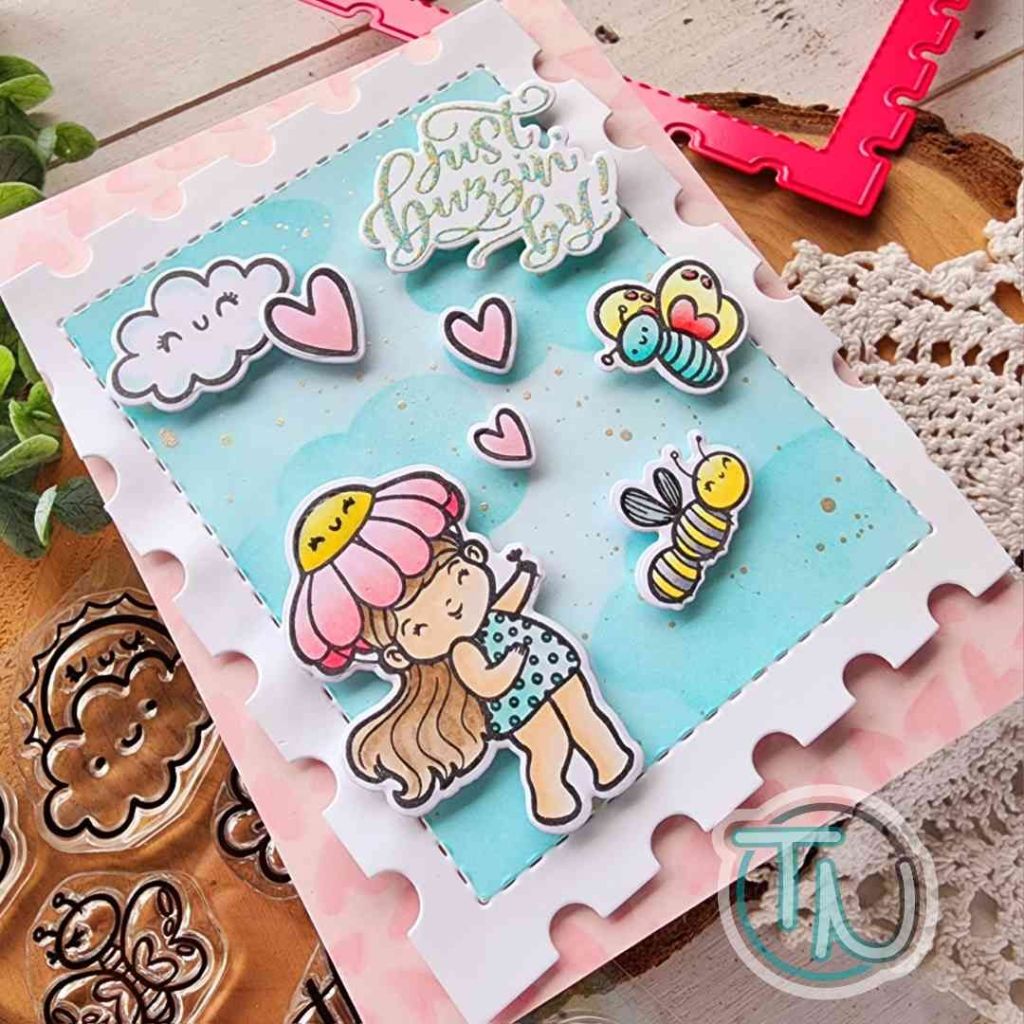
Next, I cut the largest postage stamp from white cardstock and taped off the edges. I inked it up with distress oxide ink in peacock feathers lightly, then went over it all with the Cloudy Day stencil. I splattered the background with pearl watercolor before removing the tape.

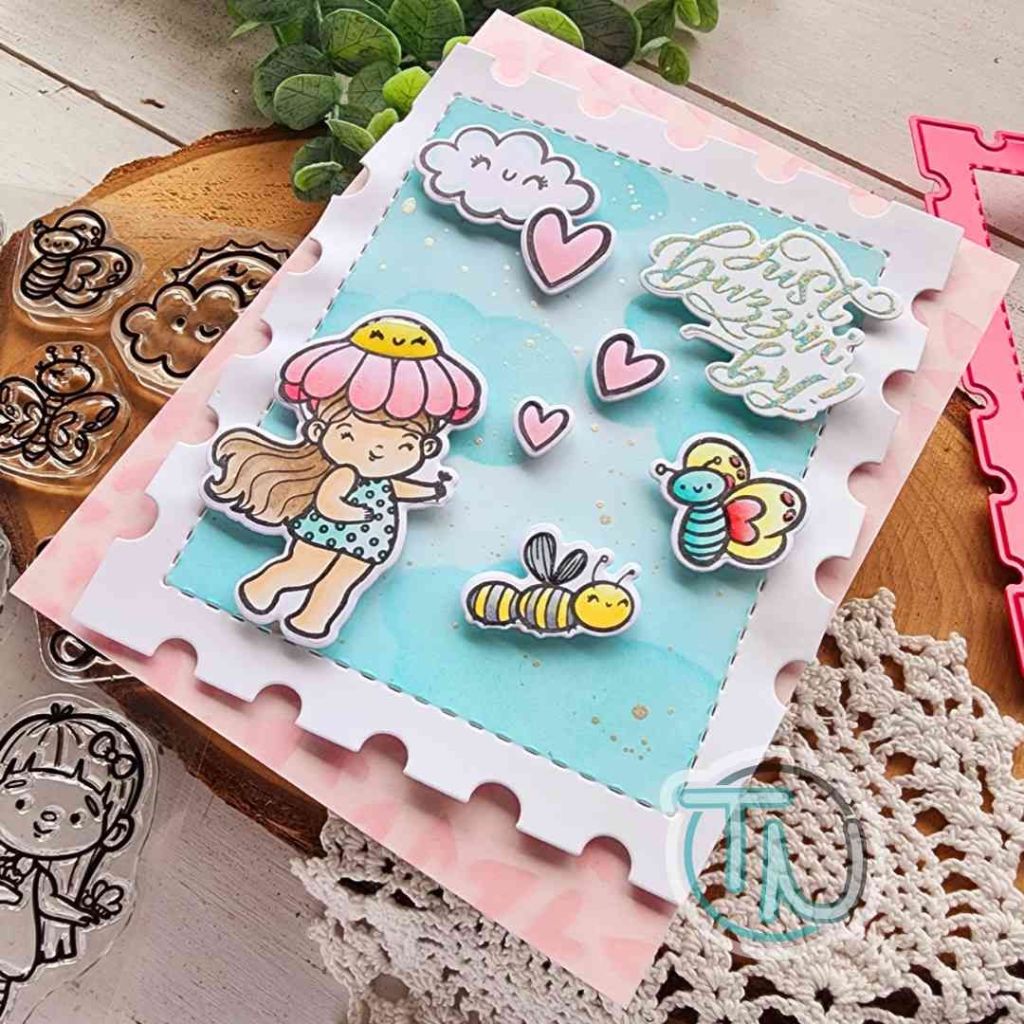
I wanted to pull pink from the images to my card front so I cut a piece of light pink cardstock to fil and lightly inked it with the Hearts a Plenty stencil for texture. I glued it to a card base with liquid glue and moved over to adding my images to the postage stamp panel.

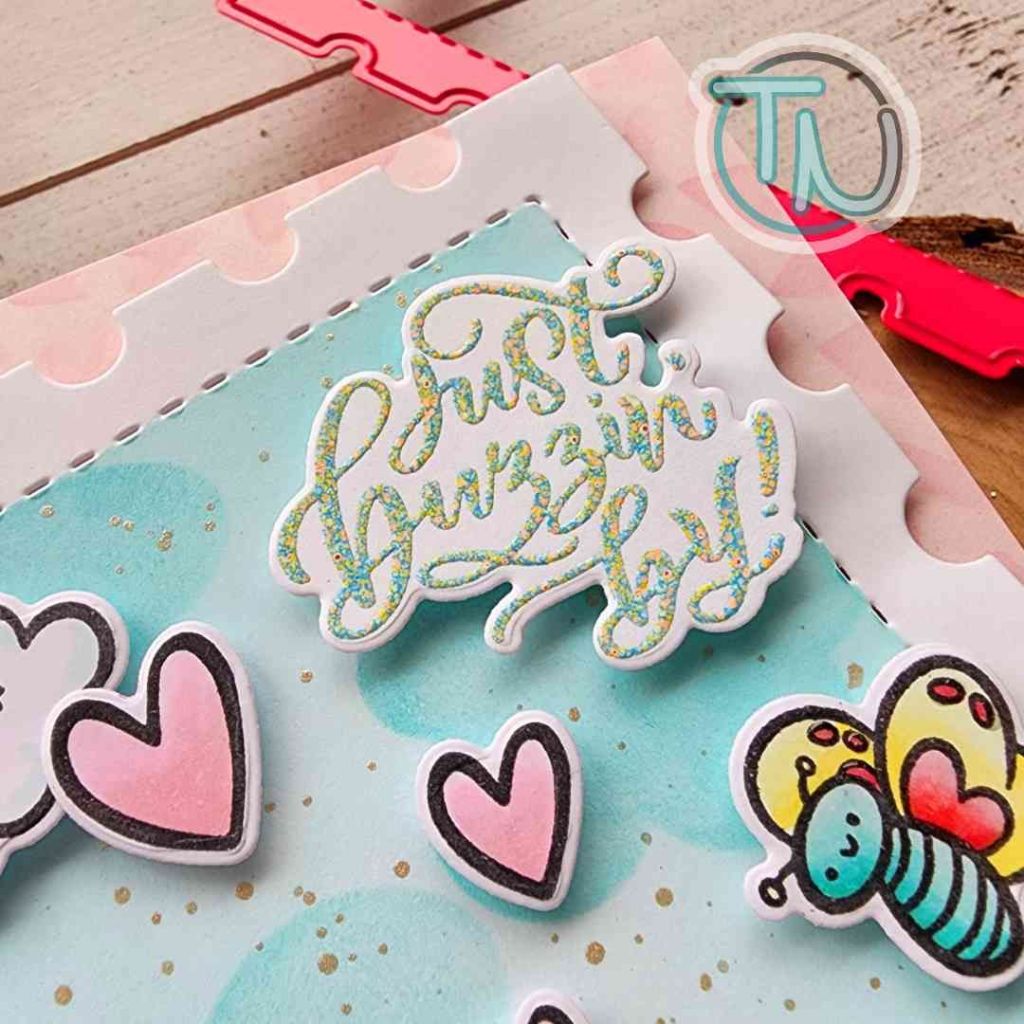
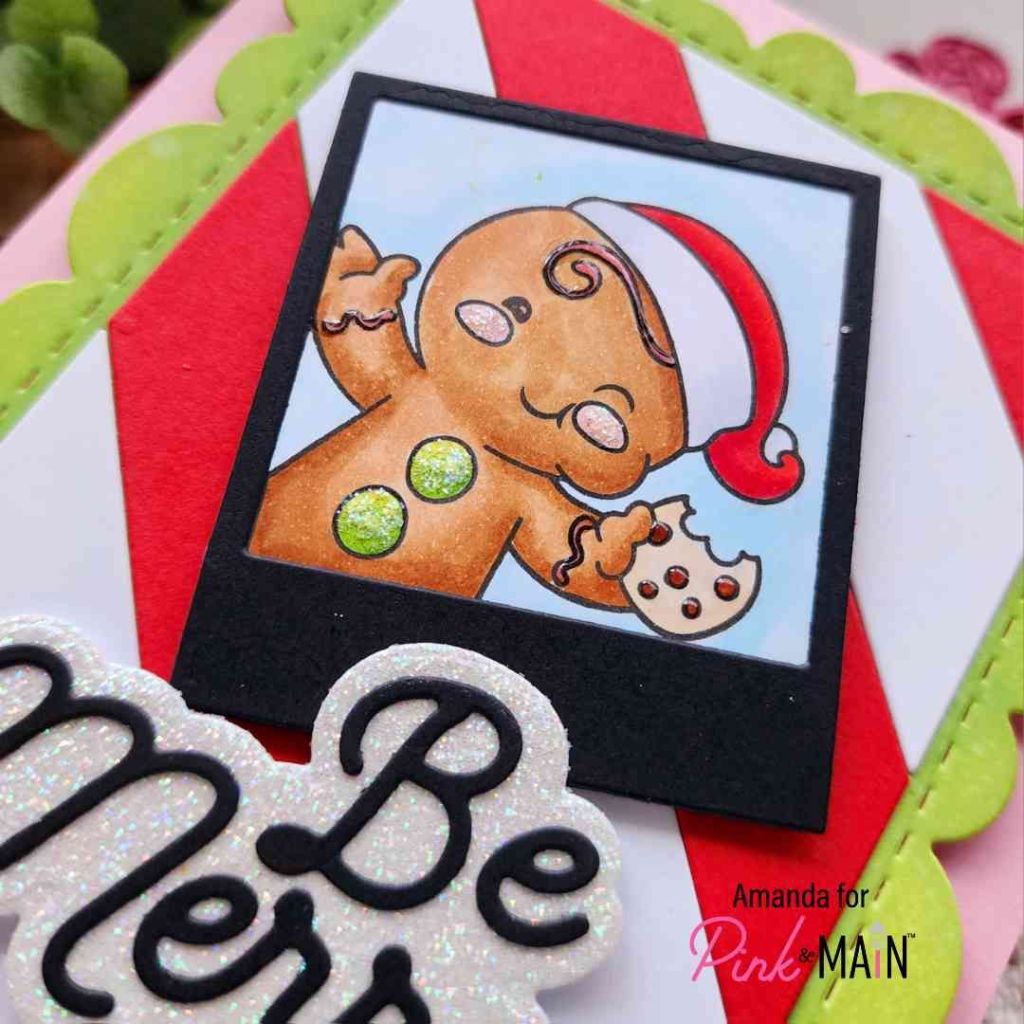
When arranging everything I left a spot for my sentiment which I heat embossed with Spring Meadow embossing powder. I had to take a close up photo of it because it’s just incredible how each color in the powder shows up beautifully!

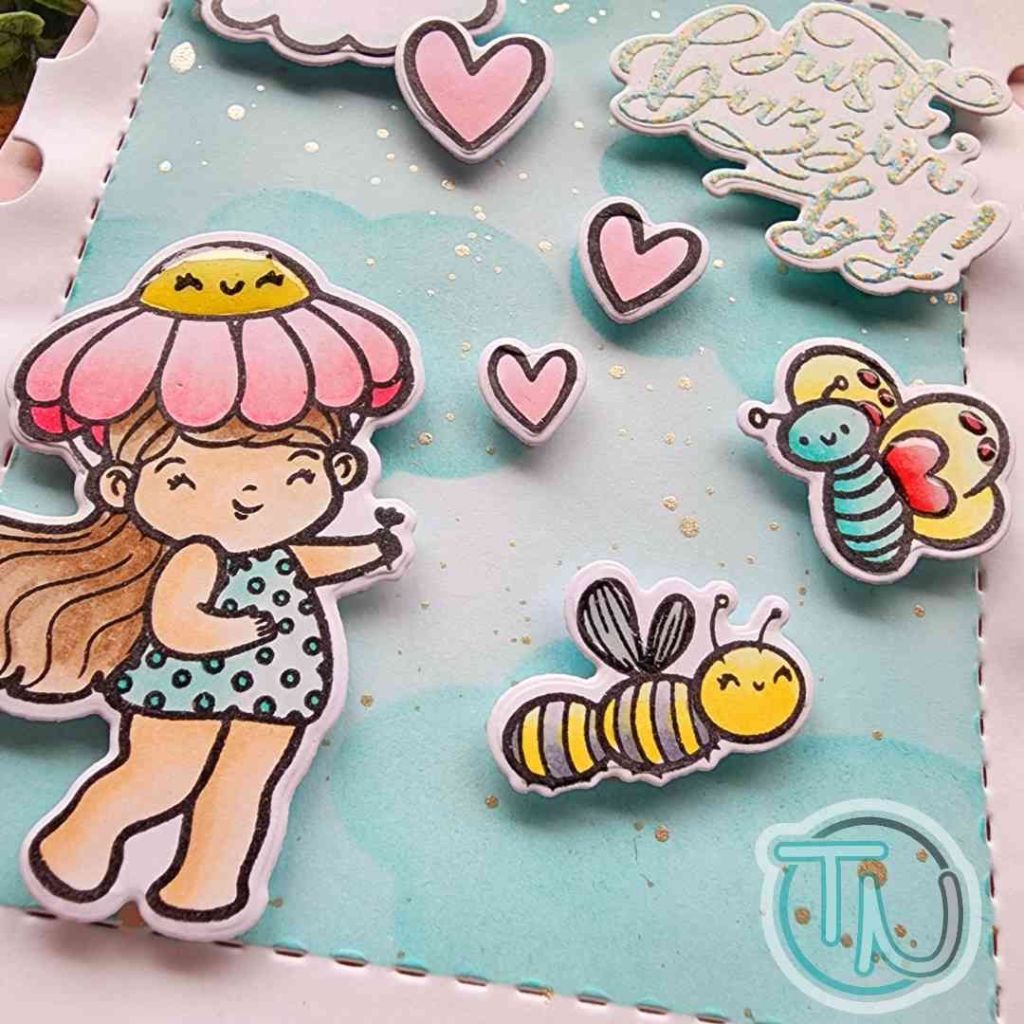
After popping the postage stamp up on the card base with foam tape, I trimmed the excess off the edges and moved on to finishing touches. For those, I just added touch of gloss to the flower center, bee wings and part of the butterfly’s wings too.

Isn’t this such a fun card!?! It made me so happy to create and I love the final product!

Products used:
Sunshine Days stamps and dies
Postage dies
Hearts a Plenty stencil
Cloudy Day stencil
Blending brushes

Distress Oxide – peacock feathers
EZ Squeeze liquid glue
Foam tape

Embossing & watermark ink
Magic anti-static brush
Embossing powder – spring meadow

I appreciate you sharing your time with me. Have a fabulous day!

Pink & Main – Best of Cluck

Hey friends! Stopping by today with some Pink & Main inspiration that was too punny and cute not to share! I needed a card for a chicken loving coworker and this set was just too perfect to pass up.

I stamped and colored my image from Chicken In, then used the coordinating die to cut it out. Next I cut an A2 piece of teal cardstock and embossed it with the Rattan embossing folder. To help the embossing stand out I went over it lightly with gathered twigs distress oxide ink, then I went over the image too. This brought the level of distressing even across the design.

I stamped and cut out the sentiment using the Sunny Greetings dies. Next, I tore and edge off the embossed panel and popped it up on a white card base with foam tape. I added the image and sentiment strip with foam squares after that.

I added washi tape to the bottom edge and a few enamel dots scattered across the design. Then I finished everything off with glossy accents on the chicken beaks.

Products used:
Chicken In stamps and dies
Sunny Greetings dies
Rattan embossing folder
Enamel dots – glossy gold
Distress Oxide Ink – gathered twigs
Foam tape
Touch of gloss

I appreciate you sharing your time with me. Have a fabulous day!

Twiddler’s Nook Keeping it Crafty Sneak Peeks

Happy Tuesday everyone! I’m popping in today to share some sneak peeks of the projects we’ll be creating at the Keeping it Crafty retreat in April. Hopefully, this will help you decide if you’re on fence about registering or not.

We’re showcasing products from Twiddler’s Nook along with Newton’s Nook, Pretty Pink Posh, Pink & Main and Thermoweb during the retreat. Your swag bags are already bursting with donated products that we’ll actually be using during the retreat, plus more fun!

There will be a Twiddler’s Nook pop-up shop on site for the day so you can see what we make and how it works in person too!

There are only a few spots left so don’t hesitate too long to register.

Click HERE for the registration form and get signed up today!

Pink & Main – I’m Stuck On You

Happy Valentine’s Day friends!!! I love making and giving valentines every year! This year I made some cards for people and some treat boxes for others. This card was for a very special someone that I’m very excited to give!

I started by choosing this sweet image from Pink & Main Prickly Hugs to stamp and color. I die cut it and set it aside to work on my background.

I’m a little extra into this pink and green combo right now so I knew my background would be pink while I was coloring the green cacti. First I die cut the Heart Spotlight cover die from white cardstock. Then I inked up the heart that comes from that with distress oxide ink in picked raspberry and kitsch flamingo.

Then I took a panel and inked it up with worn lipstick and spun sugar distress oxide and like that combo better so I went over the heart with those colors toning down the brightness. I spritzed the panel and heart with water and flicked them with black acrylic paint.

While those were drying I stamped and heat embossed my sentiment on a Large Sentiment Strip die cut. Next, I used a combination of liquid glue and foam squares to adhere everything to a card base.

For finishing touches I just added stardust Stickles to the cheek on both cacti.

Products used today:
Prickly Hugs stamps and dies
Spotlight Heart cover die
Large Sentiment Strips dies
Distress Oxide Ink – worn lipstick, spun sugar, kitsch flamingo, picked raspberry
Liquid glue
Foam squares
Embossing & Watermark ink
Magic anti-static brush
Embossing powder – frosting
Stickles – stardust

I appreciate you sharing your time with me. Have a fabulous day!

Twiddler’s Nook Spooktacular IG Hop

I can’t believe today is finally here. This has been months in the making and I’m excited to share with you the Twiddler’s Nook Spooktacular Instagram Hop! It’s a hop for us Halloween loving card makers where we come together on the 31st of each month from January through October to share fun inspiration and highlight the awesome products we offer at Twiddler’s Nook.

Today I’m sharing a fun shaker card using the Rainbow Wishes confetti as my shaker bits. I thought it was fun to add some color instead of my typical “Halloween” colors. I also used a Tonic Studios full panel shaker window which makes creating shaker cards a breeze and fun with no thick borders to hide your foam tape.

The images come from one of my favorite Pink & Main sets called Halloween Brew. Instead of going with a sentiment from the stamp set, I pulled out the Mama Elephant Big Boo and Trick dies.

For a little added spook, I used the Twiddler’s Nook blending brushes on a piece of gray cardstock with the Pretty Pink Posh Spooky Sky stencil set.

With all the layers put together, I finished things off with stardust Stickles on the stars and bubbles on my images.

Products used today:
Twiddler’s Nook blending brushes
Twiddler’s Nook Wishing on Rainbow Stars confetti
Twiddler’s Nook Pressure Pal

Tonic Studios shaker pouch
Pink & Main Halloween Brew stamps and dies
Mama Elephant Big Boo and Trick dies
Newton’s Nook Land Border dies
Pretty Pink Posh Spooky Sky stencils
Stickles – stardust
Pink & Main EZ Squeeze liquid glue

If you’d like to join us on the hop, head over to Instagram and comment for a chance to win a $20 gift certificate to the Twiddler’s Nook shop. You have until February 3 to comment. The winner will be announced on February 5.

I appreciate you sharing your time with me. Have a fabulous day!

Pink & Main – Sending Happy Mail

Hello again! Today is my last post as part of the Pink & Main design team. I’m sharing a bit of happy mail with everyone using a bit of new and old products.

I used the new Hearts a Plenty stencil with red ink for my background. I love these adorable scattered hearts! Then I cut a stitched arch from craft cardstock and embossed it with the Woodgrain embossing folder. I ink blended dark brown ink to help the detail show better, then popped it up with foam tape.

Then I pulled out the Sending Happy Mail stamp set and inked up that sweet turtle. I colored him with copic markers and used the coordinating die to cut him out. From the same set, I stamped and heat embossed the sentiment with platinum ring embossing powder, also using the coordinating die to cut it out. I adhered them both with foam squares.

For finishing touches I added touch of gloss to the heart on the envelope and a scattering of red enamel dots across the design.

This would be a super sweet valentine to send someone, or a fabulous card for your stash to share just because too.

Products used:
Sending Happy Mail stamps and dies
Stitched Arches dies
Woodgrain embossing folder
Hearts a Plenty stencil
Ergonomic blending brush
Foam tape
Touch of gloss
EZ squeeze liquid glue
Enamel dots
Magic anti-static brush
Watermark and embossing ink
Embossing powder – platinum ring

I appreciate you sharing your time with me. Have a fabulous day!

Pink & Main – Be Merry

Welcome everyone! I’m on the Pink & Main blog today squeezing in one more Christmas card before it’s too late. I pulled out some of my favorites from last year and had a blast creating this adorable card.

Remember the striped background I used a couple weeks ago? This background is the opposite pieces from that crafting session. Whenever I cut stripes from a die and have extras, I either make multiples right then or save them for later. It’s always worth it! This time I cut the wonky scalloped panel from white cardstock and inked it with distress oxide inks in mowed lawn and twisted citron, then spritzed it with water before gluing the stripes in place.

Next, I pulled out the Christmas Squares stamp set and Square Frame dies. These products work perfectly together but are great on their own too. I colored my gingerbread man with copic markers and trimmed the panel to fit behind the polaroid frame. I glued them together and added foam to the back.

Next, I cut Be Merry from black cardstock and the shadow from white glitter cardstock and glued them together. After adding foam to the back of this, I adhered both the sentiment and photo to the striped background panel. Then I cut a piece of pink cardstock to glue to my card front and popped the whole scalloped rectangle up with foam tape as well.

For finishing touches I added Touch of Gloss to the chocolate chips and gingerbread frosting. Then I added stardust Stickles to his cheeks and gumdrop buttons.

I’m hoping no more surprises pop up because I’m running out of time for last minute cards. Lol.

Products used:
Christmas Squares stamps
Square Frames dies
Diagonal Cover dies
Winter Greetings dies
EZ Squeeze liquid glue
Foam tape
Touch of Gloss
Stickles – stardust
Distress Oxide – mowed lawn and twisted citron

I appreciate you sharing your time with me. Have a fabulous day!

Pink & Main – Release Day Instagram Hop

Woohoo!!! It’s release day for Pink & Main friends! We’re going to be hopping over on Instagram at noon PST but here’s a peek and the details for my card today.

So many new Foilables, a few new CheerFoils and so many other fun things too! I used the new shattered pink CheerFoil on this awesome background panel. Then inked some distress oxide picked raspberry over the edges.

I used the new *** dies and cut love, subbing the “o” for the heart because I couldn’t resist, out of salon cardstock. For the heart though, I added a piece of adhesive sheet to the top of my cardstock before cutting the shape out. I remove the release paper after that and sprinkled sparkling cotton candy flock with glitter on it.

TIP: I did use my fingers to press the flock into the adhesive, then tapped the excess off.

From the same die set I cut the scripty you from white cardstock three times and black once, using liquid glue to adhere the layers together. Then I glued it in place over the center of my other letters.

Last, I cut a piece of black cardstock and adhered it to my card base, then I popped up the foiled panel with foam tape and my card is all finished.

I love it! I love that foil and I love these new chunky letter dies!

Don’t forget to head to Instagram at noon and hop with us for a chance to win $50 to the Pink & Main store!

Products used:
**** dies
**** Foilables
Mini Minc Machine
CheerFoil – shattered pink
EZ Squeeze liquid glue
Foam tape

Flock with Glitter – sparkling cotton candy
Adhesive sheets
Blending brushes
Distress Oxide – picked raspberry

I appreciate you sharing your time with me. Have a fabulous day!

Pink & Main – Sneak Peek Week Seeing Hearts

Hey friends! I’m on the Pink & Main blog today with a sneak peek of the release that’s coming your way on Friday! I’m seeing hearts, not stars, hearts…everywhere and it’s wonderful!

There are new Stickies coming and CheerFoil too! This wonderful set of Stickies comes with coordinating layering dies. The heart shape and the outer scallop too! Totally genius and I couldn’t wait to dive into the package!

After foiling the stickies and die cutting the pieces, I adhered the hearts with foam tape. Then I cut a slim line panel, inked it up with one layer of the Conversation Heart stencil and splattered it with Water Gems for sparkle. I used EZ Squeeze liquid glue to adhere my hearts and popped the panel up on a slimline card base that I inked the edges of with black ink.

I also stamped and colored this sweet owl from the stamp of the month, Owl My Love. I used the coordinating die to cut him out and popped him up as well. Then, for finishing touches I tied some baker’s twine around the card front.

We’re having an Instagram hop for the new release on Friday so keep an eye out for that.

Products used:
Stamp of the Month – Owl My Love
Hearts Stickies with coordinating dies
CheerFoil – tinsel gold and shattered pink

Conversation Hearts stencil
Layered Slim Line dies
Blending brush
Water gems watercolor
Foam tape
EZ Squeeze liquid glue

I appreciate you sharing your time with me. Have a fabulous day!

Pink & Main – Nice List

Happy Wednesday everyone! I’m on the Pink & Main blog today squeezing in as many extra Christmas cards as I can before we’re knee deep in hearts and all things Valentine.

I love these Santas and had to create with them again. They’re so fun with all their different poses and accents, why not pile them all together while we’re at it!

So I chose three of them to stamp and color, then I used the coordinating dies to cut them out and used liquid glue to adhere them together where they overlap. I stamped and heat embossed my sentiment at this point too, using the coordinating die to cut it out also.

For my background, I pulled out the Diagonal Cover dies. I cut the main part from green cardstock and then the stripes from red and white. I find it easier to insert my stripes back in the die upside down and use washi tape to hold them together before gluing them to the background. This time I also cut a piece of vellum the same size as the stripes and used tape runner to hold it in place before popping my images and sentiment up with foam squares.

Once that was done I popped the scalloped rectangle up with foam tape on a white card base. For finishing touches I added Touch of Gloss to all the Santas boots and mittens plus the chocolate chips, then stardust Stickles to the hats and toy bag string.

Aren’t they adorable?!? I can’t get enough of them…especially that giant cookie!

Products used:
Silly Santas stamps and dies
Diagonal Cover dies
Foam tape
Touch of Gloss
Anti-static brush
Embossing & Watermark ink
Embossing powder – frosting
EZ Squeeze liquid glue
Stickles – stardust

I appreciate you sharing your time with me. Have a fabulous day!