Ellen Hutson – Birthday Hat Slimline Cards

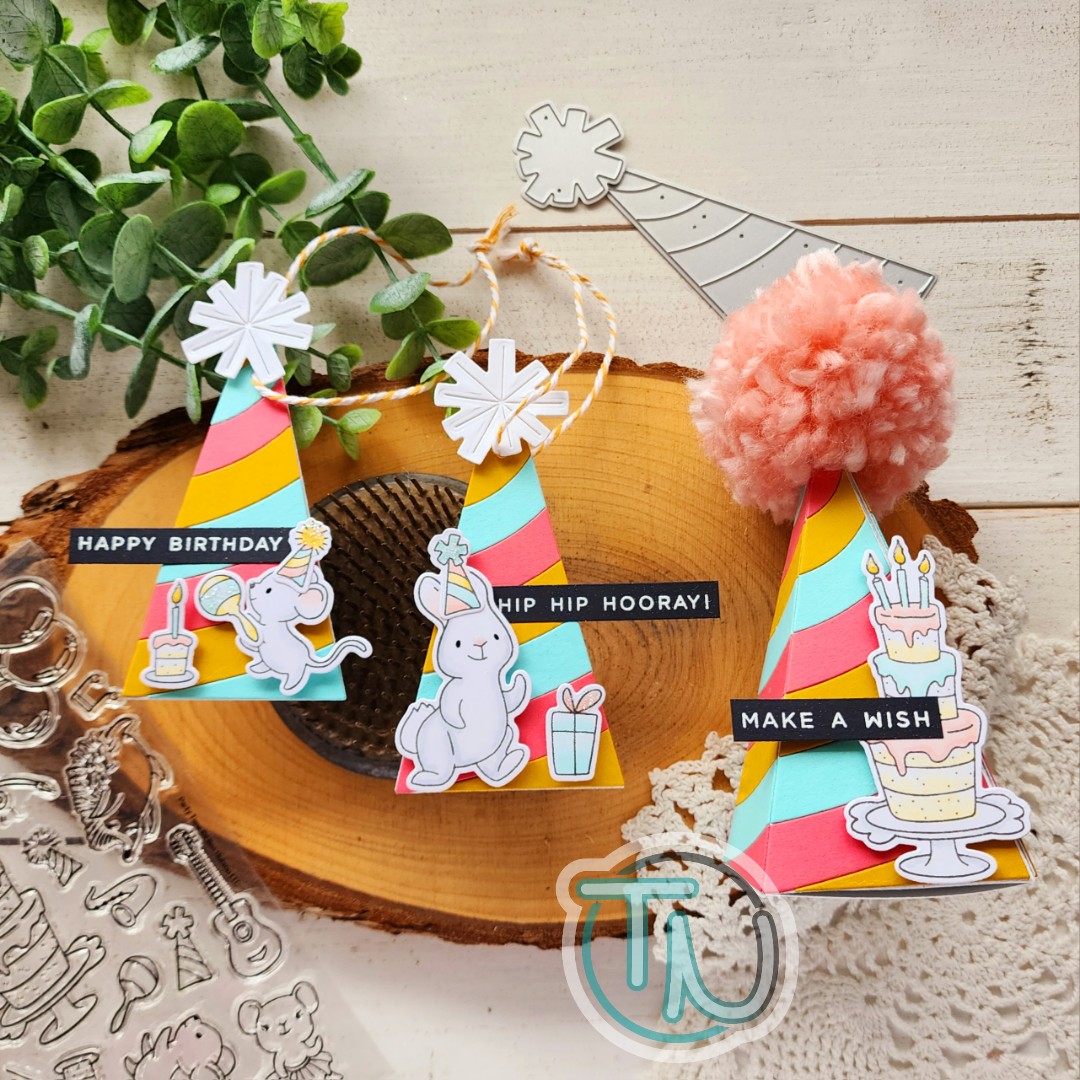
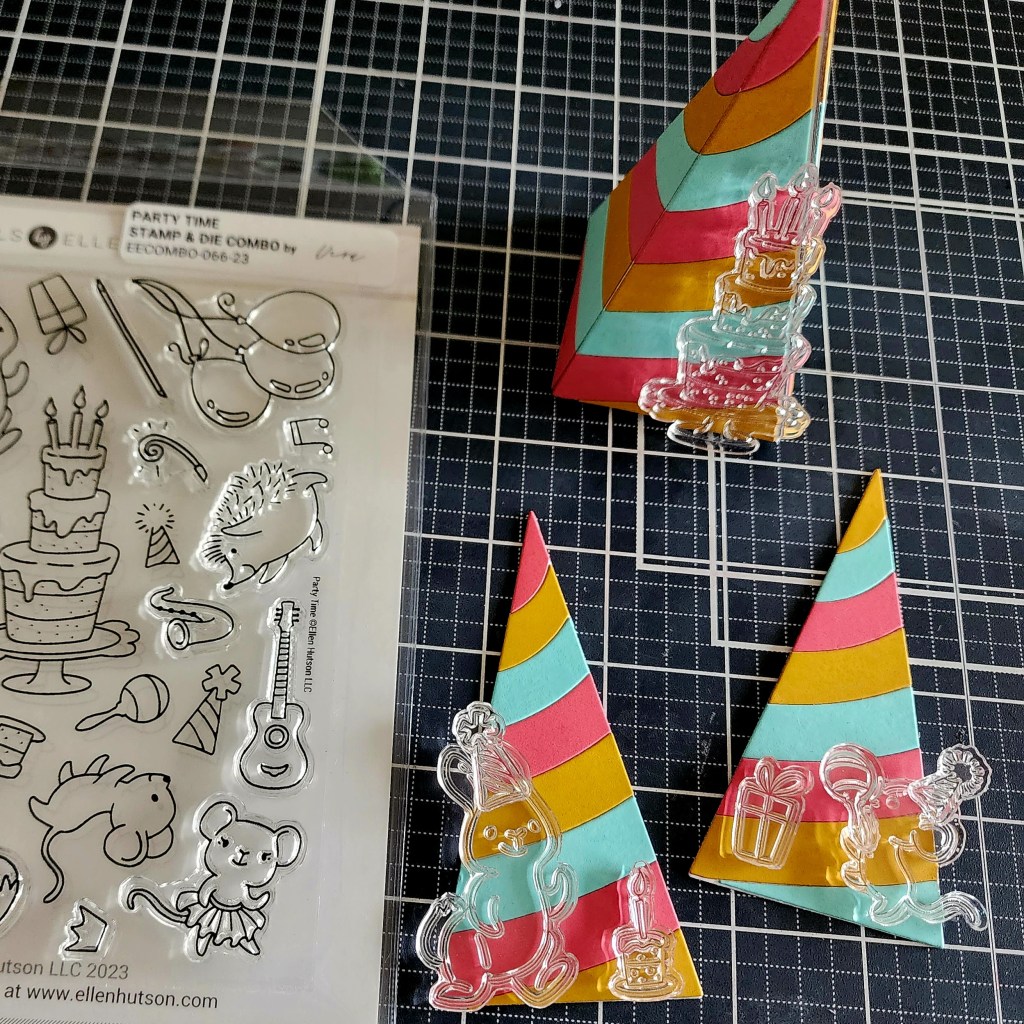
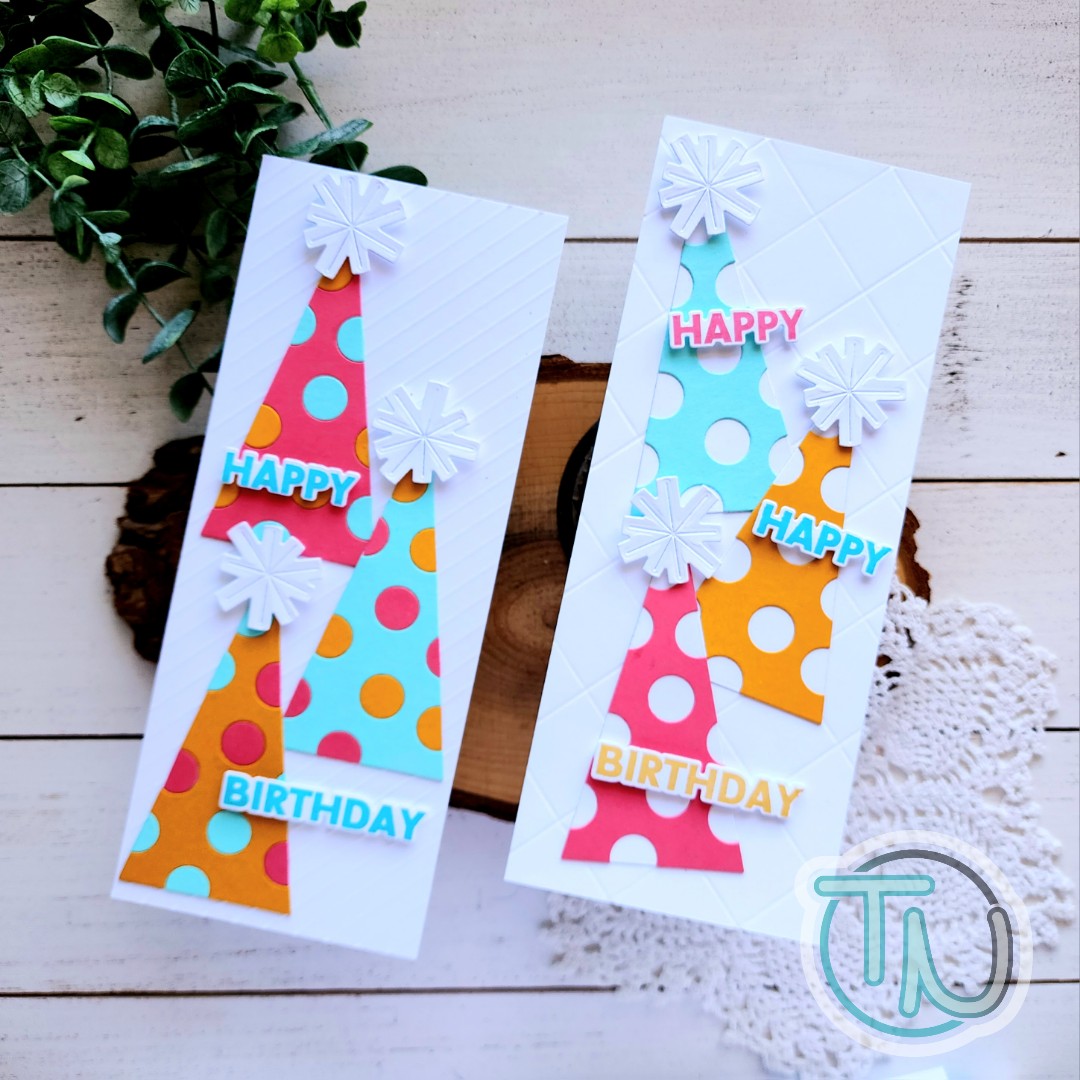
Hi there! Happy Friday everyone! If you remember, I was on the Ellen Hutson blog last Friday with a trio of cute birthday things to share featuring the most recent Essentials By Ellen release. Today I’m back with a couple of slimline cards featuring the polka dot part of the Party Hat Add On die set. I couldn’t ignore it, they were too cute! I even used the same color scheme because the cardstock was still out staring at me.

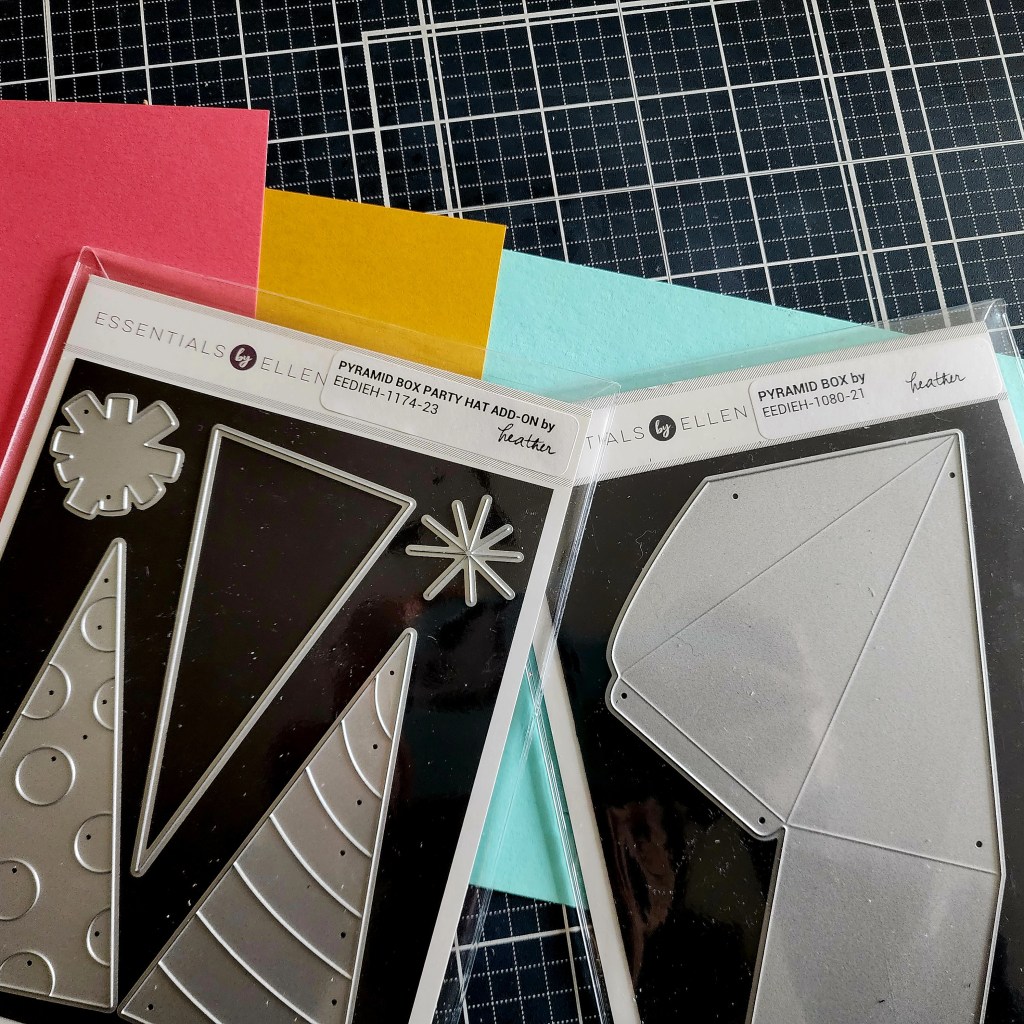
For these cards, I cut the solid backer 6 times from white cardstock and the polka dot die from each color twice. This gave me enough hats for both cards you see today.

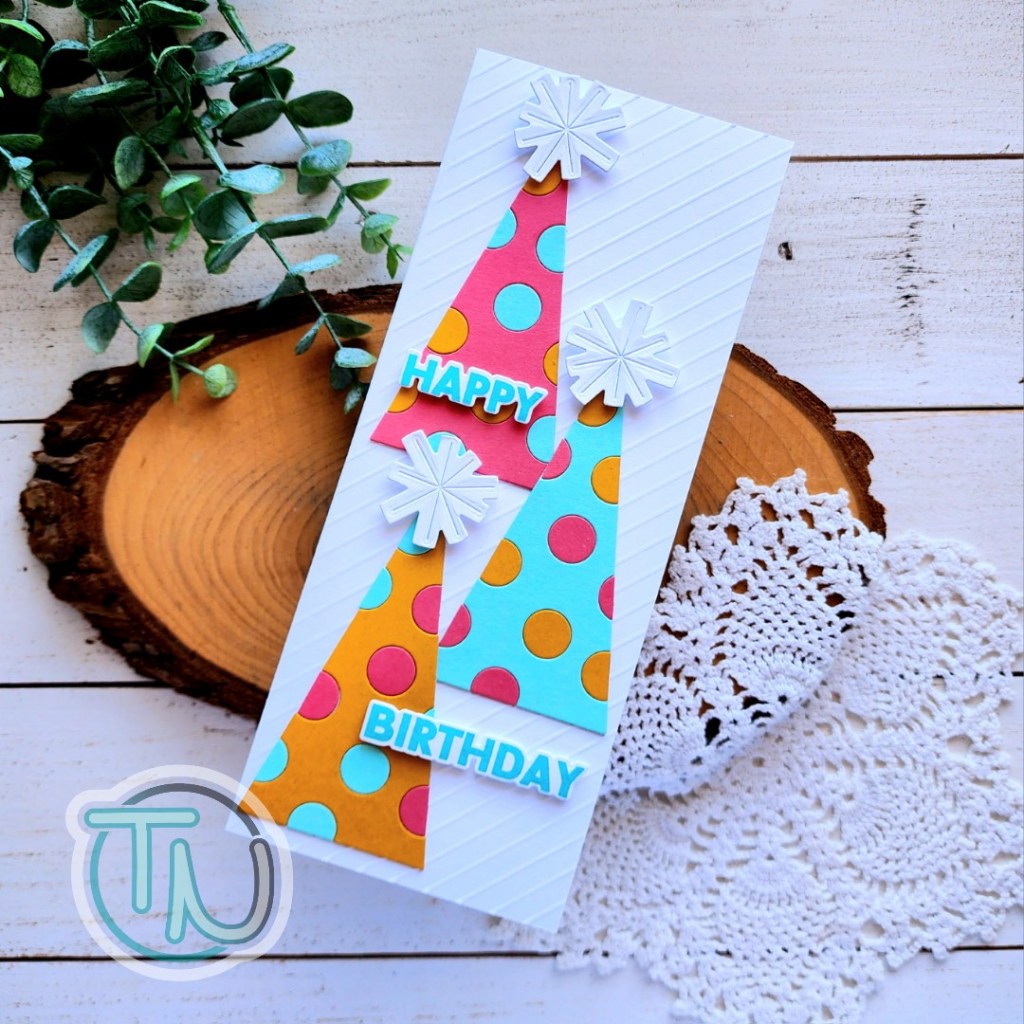
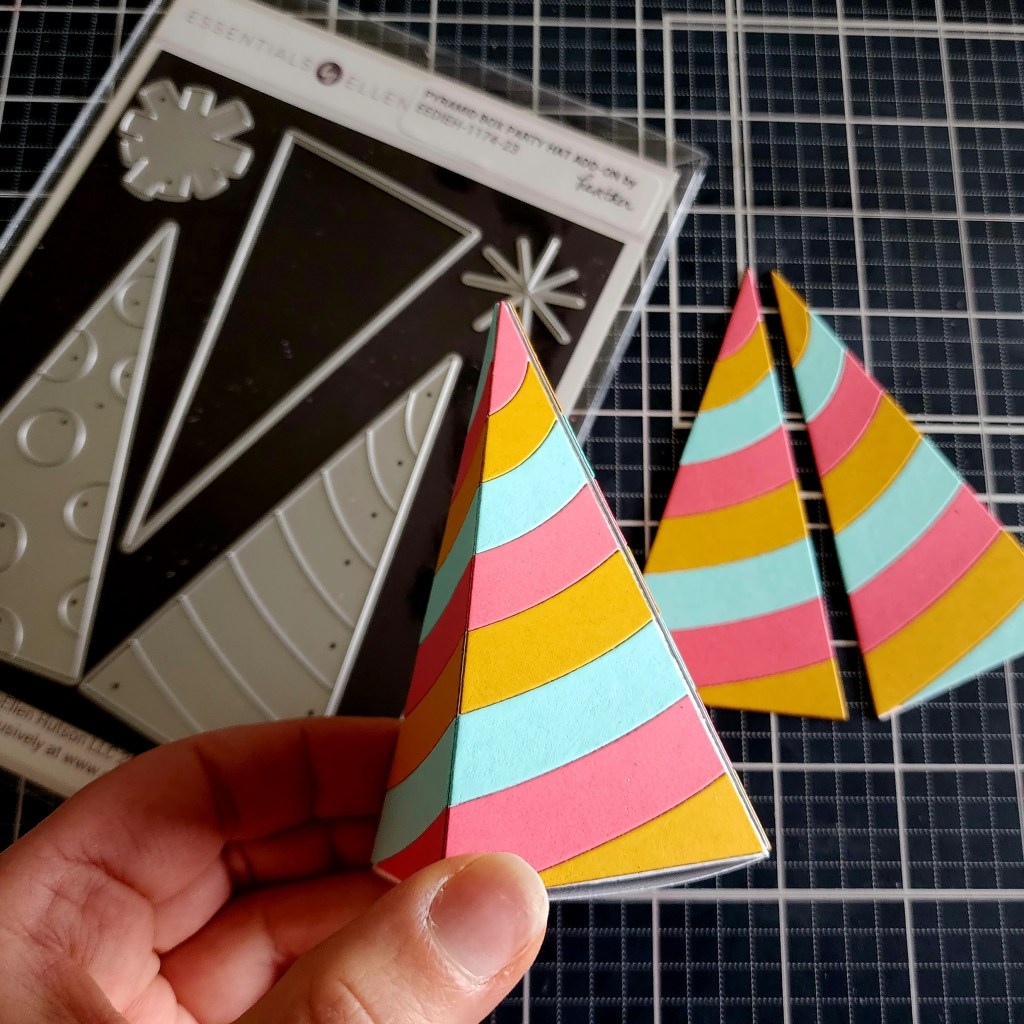
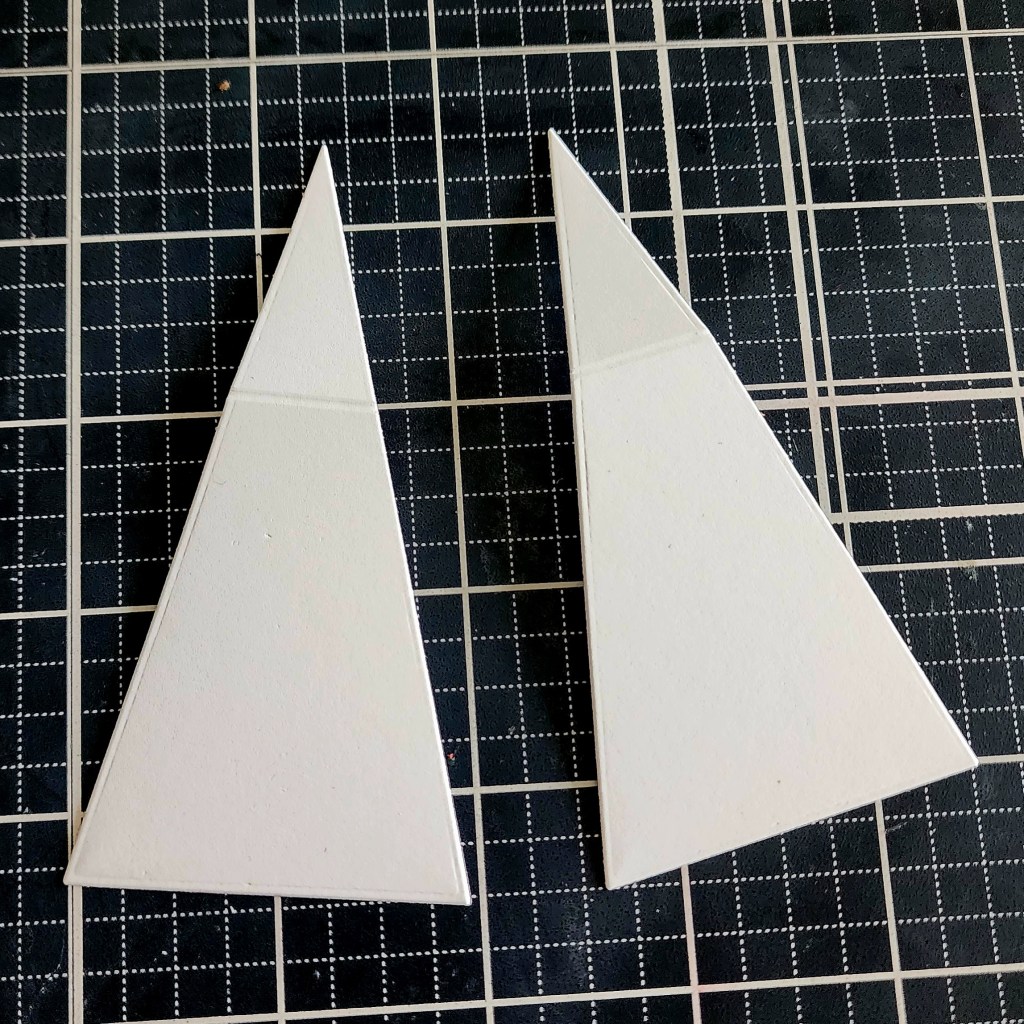
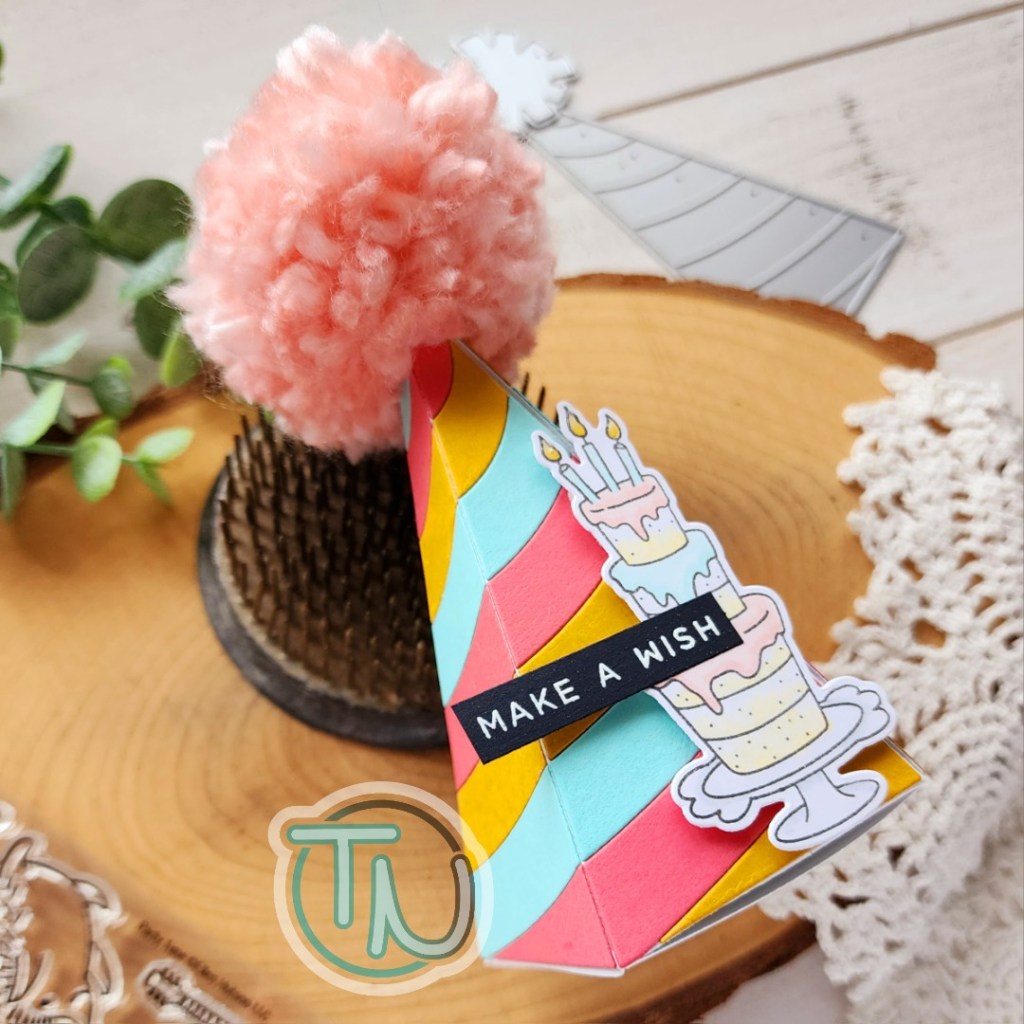
To start, I glued the main part of the polka dot hat to the white backer with liquid glue. Then I fit one set of hats with dots from the opposing two colors until the spots were full. Then I used my embellishment wand to pick each one up, dotted some glue and placed it back down. Once I thought I was done, I turned it over to see if anything fell out…I got lucky. 😉

For the background on this card, I used my scoring board to add emboss lines every quarter inch at a diagonal. I glued that panel to a slimline card base, glued each hat in place and popped the pom pom up with foam squares.

Then I used the HB2U stamps and dies to stamp and cut out my sentiment in a coordinating ink color, then popped those up with foam squares too.

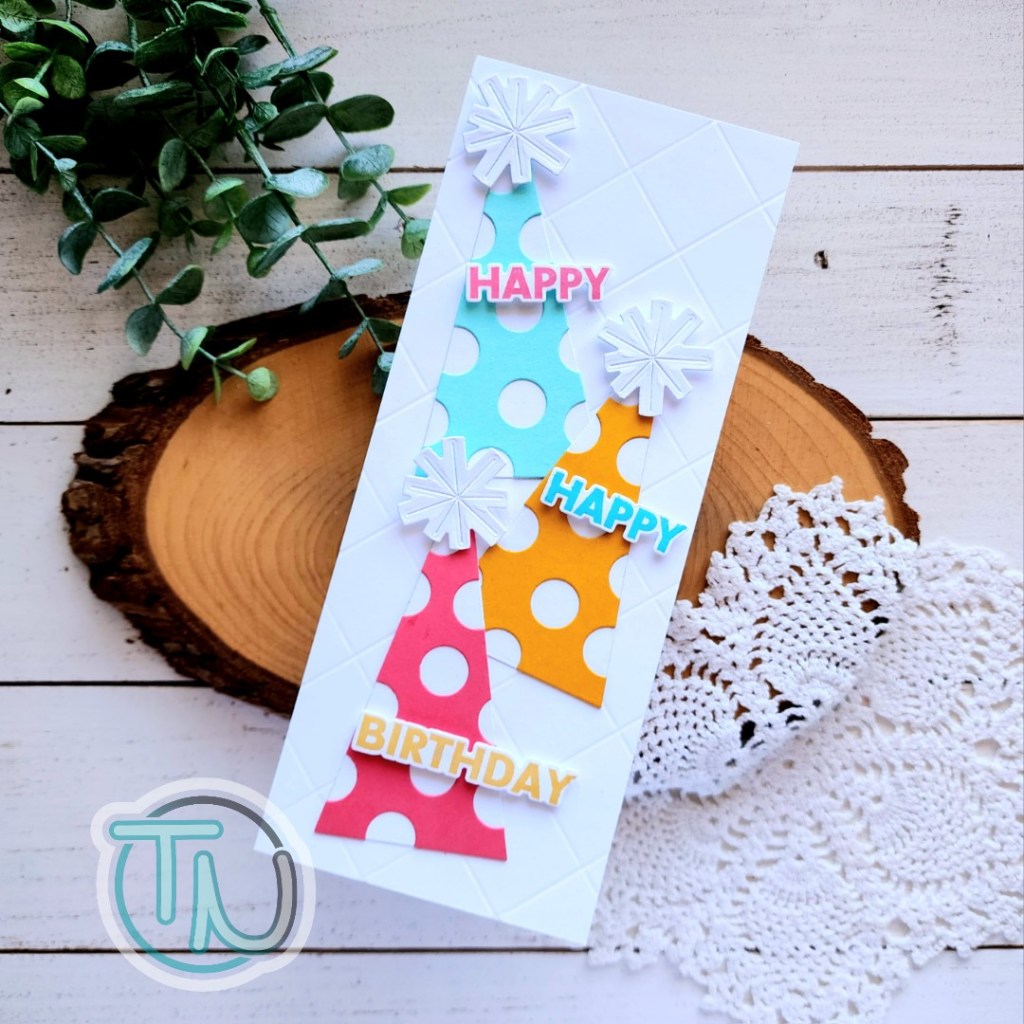
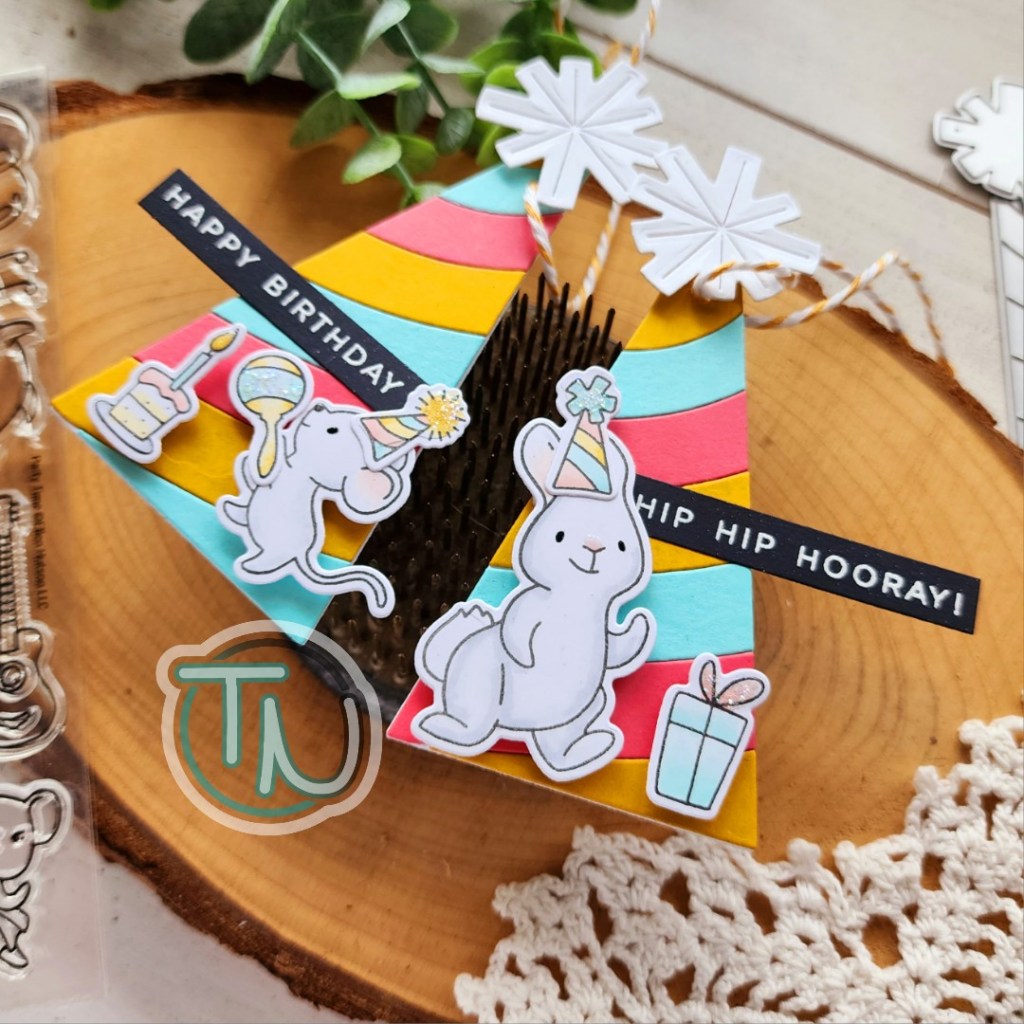
For my second card, I left the polka dots white which was much quicker but also just gives a totally different look. I like them both equally but sometimes time is not our friend and we need to be fast so this is a great option.

For the background I scored lines again – every inch, flipped it and did it again for a criss cross pattern. Notice that I glued this to the card front the other way so the emboss lines go in instead of popping up. Look at both sides if your paper when you emboss…they give different looks and both are great to use!

I used the same stamp and die set for my sentiment but pulled in all three colors this time. I also glued my hats down askew instead of straight. It’s more playful and I love that!

Products used:
Party Hat Add-on die set
HB2U stamps and dies
Foam squares
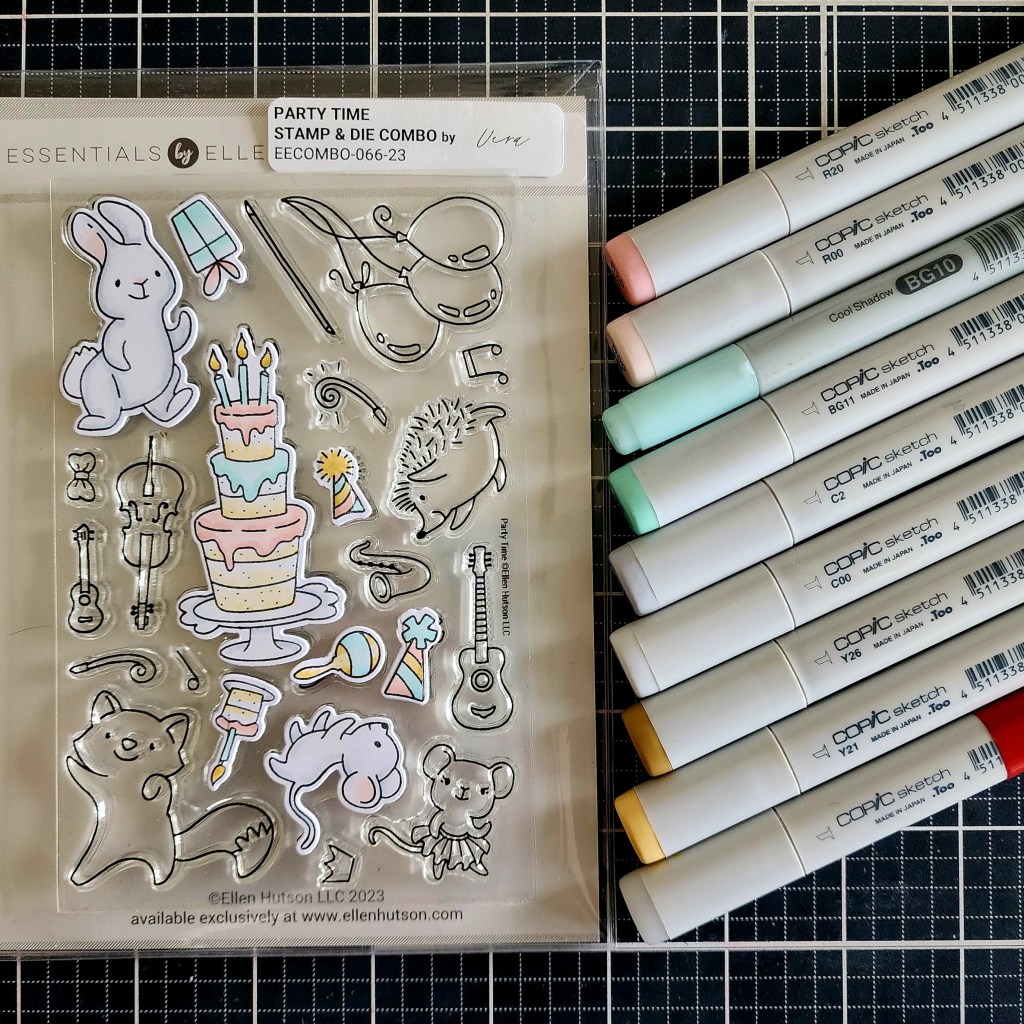
Lawn Fawn ink – sunflower, guava and mermaid

Scoring board

I appreciate you sharing your time with me. Have a fabulous day!

Ellen Hutson – Essentials By Ellen Birthday Celebration

Oh my goodness everyone! I am SO EXCITED to be guest designing over on the Ellen Hutson blog today with goodies from the most recent birthday release. There was so many amazing products but I absolutely had to use the new party hat add on dies to the pyramid box and those sweet new birthday critters too. They’re my favorite!

I’ve got a fun box and a pair of gift tags to share with you today. As we go through the process you’ll see how I literally fell into the tags while creating the gift box. It was so perfect and really fun!

First, I chose a color palette that struck me in the moment and grabbed my dies. I cut the box pieces (2) and base for the sides (6) from white cardstock. Then I decided to try the striped hat first so I cut the stripes from each color twice.

I started at the top of each triangle and just followed the same color pattern down, starting with the next in the order for each side. It worked perfectly and the stripes spiral around the box. It’s soooo cool! This also meant that I had two extra panels at the end…perfect for tags!!!

I cut two additional bases from white cardstock and used my scoring board to score them 1 1/2″ down from the point. This gave a good size area to glue the pieces to the striped panels but also left enough area to write to, from and a small message. I prefer liquid glue to adhere things like this but you could use tear tape or tape runner if you prefer.

With all of my pieces assembled, it was time to decorate them! I often play with my stamps like this before actually stamping and coloring. It gives an idea for how things will fit and if I’ll need duplicates of an image. Remember, it’s not a guarantee for not needing to go back and stamp more or switch things out in the end but it really helps the process for me.

Next, I used my copic swatch chart to find colors that matched my cardstock, then I toned them all down to the pastel shade of those. This way my images were soft and popped off the bright tags and gift box. I colored everything and used the coordinating dies to cut them all out. Aren’t they the cutest!?!

For my gift tags, I punched a hole in the top and threaded twine through the hole. Then I cut the pom pom shape in the die set and added it with a foam square so I let the twine move freely. I added my images with foam squares as well and finished them off with stardust Stickles.

Something was missing not having a sentiment though so I stamped and heat embossed the new Birthday Vibes stamp set and used the sentiment strips die to cut them all out. This is totally genius and so wonderful to have all of these sentiments at my fingertips so quickly! I trimmed the strips down and added them to the tags with liquid glue.

Now, you can totally use the paper pom pom in the die set to add fun to the top of your pyramid box as well but I just couldn’t resist adding a yarn version to my box for that something extra. Isn’t it silly and so fun!?! I love it!

There are lots of pom pom makers out there, which is what I use, but you can also just create your own with cardboard or a fork too. Just search “diy pom pom maker” on google, pinterest or youtube and you’ll see lots of ideas.

I prefer instant adhesion with things like this so I used hot glue to add mine to my box and then foam squares to add the cake and sentiment strip to the side. I finished the candles off with glossy accents for a little shine.

Products used today:
Pyramid Box die
Pyramid Box Party Hat Add-on dies
Birthday Vibes stamps
Sentiment Strips die
Party Time stamps and dies
Foam squares
Glossy accents
Stickles – stardust
Bearly Art liquid glue

I appreciate you sharing your time with me. Have a fabulous day!

Ellen Hutson – Sweet Spring Set of 4

Welcome everyone! I’m so glad you’re here! Today I’m playing with goodies from Ellen Hutson and a couple of MFT Stamps background stamps. I was inspired by Therese Calvird from the Ellen Hutson design team. Click HERE to see the card she shared that got my wheels turning.

Now, I don’t have the new skinny stripes background stamp from Ellen Hutson, or the background die but her background and use of that sweet bunny had me thinking. I do have a diagonal skinny stripe background from MFT Stamps and was able to stamp, rotate and stamp again to create my orange and green backgrounds. While I was digging for that stamp I found the sweet plaid background that I bought last year and love so much, so I couldn’t resist inking it up a couple of time too.

Then I proceeded to stamp a ton of images from Sweet Spring and color everything with my copic markers. I started with the bunny and a bundle of carrots like Therese’s card. Who could resist!?!

The second element I loved about her card was the speech bubble sentiment. It’s playful and lends itself to being more versatile outside of the Easter holiday. So I pulled out a couple of Ellen Hutson products to make my own.

The sentiments come from Small Sayings stamps, and the speech bubbles are from Heart Eyes stamps and dies which released in January.

Keeping with the sweet spring feel but not necessarily Easter, I put that cute fox in a flower pot surrounded by flower filled pots as well. Can’t you just see him popping up out of nowhere saying hello? I just love it!

All of the images have similar finishing touches with white gel pen accents, black glaze pen to open eyes and little bits of glossy accents on parts of the images like these flower centers.

This card is definitely more of an Easter feel but it’s so sweet that I just couldn’t resist. I love the bunny ears to dress up the critters and having him pop out of the egg was too cute!

I chose another generic sentiment for the front but will probably stamp something from the fun Ears to You stamp set on the inside before I mail it out.

Last but not least, these sweet chicks! They’re so fun walking in a line with the babies not following directions. The speech bubble and hearts both came from Heart Eyes. I seriously love this one!

I forgot to mention also, I trimmed the stamped backgrounds down to 4×5.25 inches and popped them up with foam tape for added dimension. If you’ve followed me for even just a minute, you know I love dimension on everything!

One more look at all four cards that I created using Ellen Hutson Sweet Spring and MFT Stamps backgrounds, inspired by Therese Calvird.

Products used today:
EBE Sweet Spring stamps and dies
EBE Heart Eyes stamps and dies
EBE Small Sayings stamps

MFT Stamps Diagonal Stripes stamp
MFT Stamps All Lined Up Diagonally stamp
Foam squares
Foam tape
White gel pen
Black glaze pen
Glossy accents

I appreciate you sharing your time with me. Have a fabulous day!

Ellen Hutson – Good Luck Bear

Happy Friday everyone! It’s a big weekend at our house. Our daughter has state championships for dance today and tomorrow. Which brings us to a two-day #tagtimesaturdays starting today and then another one tomorrow. Then I’ll take a break and be back again in the fall with more fun inspiration.

State works differently than regular competitions so there is no gift table and nothing to be sent back to her. So, instead I made this fun bear and coordinating tag for good luck and popped it in her suitcase before she left last night.

Ellen Hutson has this adorable line of stamps and dies that originated with All Inside. It’s a sweet bear, some small images and wonderful sentiments. Then they created a stitching die of bear because he’s just so perfect! I have made so many of these bears in a variety of color schemes, holding different things over the years. They never get old and are so fun to give.

Today I went with a white bear, brown nose and green accents for good luck! The die set comes with one to cut eyes but I really prefer using the flat back beads instead. These are from Trinity Stamps.

For my tags, I cut the square version in the Farmhouse Tags die set from green and white cardstock, then the banner tag in the same set from darker green cardstock. I cut the hole reinforcer for the top tag and glued it in place before stamping my sentiments and bear. I simply drew the ampersand with a black pen and we will write our message on the white tag hidden behind.

For added fun, I glued a mini green heart on his bum too! This was the smallest heart included in the All Inside die set. It makes me giggle but I do this most of the time when I create these fun bears.

Products used today:
All Inside stamps and dies
Farmhouse Tags dies
Bear Hugs dies
Felt – winter white and espresso, green was scrap from my stash
Liquid glue

Trinity Stamps Essential Embellishments Bundle

I appreciate you sharing your time with me. Have a fabulous day!

Ellen Hutson – Love You

Happy Valentine’s Day everyone!!! I hope you have a wonderful day full of love all around! Today I’m sharing one last valentine that I created over the weekend using some new cuteness from Ellen Hutson and my new distress oxide sprays from Christmas! I’m still getting the hang of these but they’re really fun to get messy with!

I started my card purely because I wanted to dress this adorable fox up and color all the things! Isn’t he the cutest!?! Once I chose all the accessories and stamped everything out, I colored with my copics and used the coordinating dies to cut it all out. I used liquid glue to assemble him and set him aside to figure out what else I wanted to do.

The next thing I thought of was the new Ellen Hutson nested heart dies. These are so fun because each one cuts a heart and a frame. So I cut one from teal cardstock and another smaller one from vellum. Then, coordinating my colors – I used distress oxide spray on a 4×5.25 inch background in abandoned coral and cracked pistachio. I glued the heart down and added the images with foam squares. I don’t like how adhesive shows through on vellum so I carefully used my foam squares to adhere the vellum heart frame at the same time.

I added the panel to a white, top fold card base with foam tape and tied twine around the top for some added interest, and it’s just cute!

Full disclosure, it would have been a million times easier to stamp my sentiment before adhering everything but sometimes I just do things that hard way. 🙂 This is when I thought the small sayings from Ellen Hutson would be the perfect addition. So I carefully stamped “LOVE you” in the bottom right corner while holding my breath and crossing my toes. Phew! Looks fabulous!

For finishing touches I added black glaze pen to the fox’s eyes and glossy accents to his nose, heart antennae, lips in the speech bubble and cupcake heart too.

Products used today:
Ellen Hutson Heart Eyes stamps and dies
Ellen Hutson Essential Hearts dies
Ellen Hutson Small Sayings stamps
Distress Oxide Spray – cracked pistachio, abandoned coral
Foam tape
Liquid glue
Glossy accents

I appreciate you sharing your time with me. Have a fabulous day!

Ellen Hutson – Hello, I Love You

Welcome everyone! This is Amanda from Twiddler’s Nook and I’m very honored and excited to be guest designing for Ellen Hutson’s January Valentine Release! It is packed full of so many amazing products and I have had so much fun creating with them. For the Instagram Release Hop I shared some projects with So Chewsy and Essential Hearts, so today I wanted to share inspiration with another set – Hello, I Love You. This one has super fun images to mix and match that give you an easy way to incorporate your sentiment with the images.

Sometimes I plan a card and get excited about the fun images, forgetting to make a place or even leave room after the fact for a sentiment. While this isn’t a horrible problem to have, it’s also fun and convenient when the sentiments are contained in your images.

To create my card today, I had a layout in mind but wasn’t sure if everything would fit how I wanted. When these occasions arise, I pull out a card base or piece of cardstock the size I’m looking to create on and play with my stamps. This helps decide how many images to stamp, and avoids doing all the work but not being able to accomplish the intended outcome too.

Here, I was hoping the speech bubble would fill the space in front of the mail truck and still keep the general square shape I was hoping to arrange my images in. Also, starting this I thought the mailbox would be enough on its own but it looked really empty until I added the envelopes to go with it. Now it looks like things are going to work great!

When I have limited time, too many options or lots of images I tend to plan out a color palette ahead of time and I make sure to keep it simple. Here I’ve kept to the basic red/yellow/blue primary color trio. To keep from things looking like a kindergarten drawing though, I chose a darker, gold/yellow, lighter pink/red and a bright blue for pop and interest. Then I threw in a light gray for shading and a couple simple colors for things like the tired and truck window. Otherwise, everything is using the same markers shown.

After coloring everything, I used the coordinating dies to cut them all out and arranged them on my white panel. Doing this, I made two decisions. First, I wanted to pop it up on the card base because I really love dimension on my card. So I trimmed it down to 4×5.25 inches to create a little frame when it’s popped up. Then, second, I didn’t like all of the white space. I also really love texture. So I chose a blue ink close to my copic color choice and blended a little blob in the middle. Be forgiving when you do this. Most of it will be covered up. Also, when dye inks dry they even out and look nicer than you think they will.

For extra texture I smooshed the ink pad on an acrylic block, spritzed it with water and used a paintbrush to flick some splatters on the panel too. You could add watercolor or metallic paint at this point for extra shimmer too!

Once the panel was dry, I added it to a white card base with foam tape and then added my images with foam squares too. Another level of dimension. It keeps them from blending in to the background, along with the inking. Then all we have to do is decide on finishing touches.

This might seem like a really small thing but it can absolutely make your card stand out among the rest. This is when I add extra shine and shimmer. Usually Stickles or Glossy Accents, sometimes both depending on the feel of the card. Today I stuck to glossy accents on parts of all of the images. The girl’s shoes and hearts, then the postage stamp and gold details for the mailbox, finally on the truck the window, light, mirror and hubcaps.

I hope you enjoyed today’s project and found something new to try in your cardmaking.

Products I used today:
Hey, I Love You stamps and dies
iCraft Foam Tape 1/16″
Scrapbook Adhesives Foam Squares 1/2″ and 1/4″
Lawn Fawn Fish Tank ink
Twiddler’s Nook blending brush and color caps
Glossy accents

I appreciate you sharing your time with me. Have a fabulous day!

Ellen Hutson – Chew Make Me So Very Happy

Hello again! I’m back to share that I’m guest designing for Ellen Hutson and the new Essentials by Ellen Valentine release! It’s absolutely incredible and I am having a blast working with it! The release is available now so click HERE to go shop! Then head to Instagram and hop with us for tons of inspiration!

Today I’m sharing a few projects with the new So Chewsy stamps and dies, plus the Essential Heart dies too! I have some simple tags that would be great for gift bags at school or maybe your office and a coordinating card and tag combo that would be perfect for a loved one or friend.

First, I stamped the images and sentiments for these tags with Catherine Pooler inks and then used the coordinating dies to cut them out. I popped the gumball up with a foam square. Then I cut a second gumball machine, punched a small hole through both layers and tied them with twine. This gives room on the black layer for a message and to/from, plus the string is long enough to tie around a goodie bag. Aren’t they so cute?!? I love these sentiments!

Next, I used some brighter Catherine Pooler inks to make a second set of gumball machines. One has a sentiment and the other does not so I could fill the shakers with different elements.

For the card, I cut a couple sizes of Essential Hearts and used the frame of one with the inside of the other to create a base for my gumball shaker. I heat embossed a sentiment on the vellum heart and layered everything on the Nordic Cross cover panel. I thought this gave some fun background texture.

Be sure to head to the Ellen Hutson shop and check out the whole release. It’s got so many different and wonderful products in it! You’re sure to find something wonderful! And be on the lookout next week for another guest post featuring one of the other new sets from the release.

Products used today:
EBE So Chewsy stamps and dies
EBE Essential Heart dies
EBE Nordic Cross cover die
EBE Mini Tag dies
EBE Small Sayings stamps
PPP Pearls – marshmallow
Catherine Pooler inks – spring fling and date night collections
Foam strips

I appreciate you sharing your time with me. Have a fabulous day!

Ellen Hutson – Merry Christmas Reindeer Die Cut Card

Welcome to my crafty space! I’m so glad you’re here today! I have a (mostly) die cut card to share with you today that is totally adorable and super fun! I used the new Ellen Hutson Sew Cute Deer die set with paper instead of felt stitching. Don’t worry, I’ll be stitching him up in felt very soon too! I just love making those fun ornaments!

Today though, I have this really fun card to share using him as a fabulous focal point on your Christmas cards! I cut all the pieces from various cardsotck colors, using glitter cardstock for the nose. I used liquid glue to adhere all the pieces together and set him aside.

Then I cut a piece of white cardstock from the Pink & Main Plaid cover die and adhered it to a white card base. Next, I stamped the sentiment and used a Pink & Main Mod Stitched Rectangle die to cut it out. Laying the reindeer and sentiment on my card front, I decided on placement. Holding the reindeer in place, I flipped it over and made marks where I would be trimming it off. This helped me keep the foam tape inside those areas to pop him up.

So, then I added the foam tape, adhered the reindeer and trimmed the edges. I used a combination of foam squares and liquid glue to adhere the sentiment rectangle.

Isn’t this just adorable and fun!?! It would be a fun design to mass produce if you have a lot of cards to make but still give great visual texture and interest.

Products used today:
Ellen Hutson Sew Cute Deer dies
Ellen Hutson It’s Christmastime stamps
Pink & Main Plaid cover die
Pink & Main Mod Stitched Rectangle dies
Liquid glue
Foam tape

I appreciate you sharing your time with me. Have a fabulous day!

Ellen Hutson/Newton’s Nook – Greetings from the North Pole

Hello everyone. Thanks for stopping by today. I was able to play with some new things that have been sitting on my desk for a minute this last weekend and I’m excited to start sharing them with you. Today I have a card featuring one of the new amazing sets from Ellen Hutson. It’s a little out of my comfort zone to try stamping in color rather than grabbing my copics and coloring everything in. But I really had a blast playing around and creating this card.

The stamp set is called North Pole Greetings. I used Catherine Pooler inks to stamp the images and Pink & Main embossing powder for the words. I cut everything out with the coordinating dies and liquid glue to adhere the little pieces together.

For my background, I inked up a white panel with the Newton’s Nook Snowfall stencil and more Catherine Pooler ink. Once the stenciling was finished, I used the ink left in my blending brush to add a little color around the edges and take away the stark white. Then I die cut the largest Newton’s Nook Framework die from vellum and heat embossed the rest of my sentiment in black.

I adhered the stamped images to the vellum with foam squares and hid tape runner behind them on the vellum to attach that to the stenciled panel. Then I added the panel to a white card base and my card is all finished.

Isn’t this super cute! I just adore that “greetings from” sentiment for Christmas. I think it’s whimsical and sweet.

Products used:
Ellen Hutson Greetings From stamps and dies
Newton’s Nook Snowfall stencil
Newton’s Nook Framework dies
Catherine Pooler Ink – Zen Garden and Urban Oasis mini collections
Foam squares
Liquid glue
Twiddler’s Nook Blending brush
Pink & Main embossing powder – licorice and frosting
Pink & Main Magic Anti-static brush
Pink & Main Watermark & Embossing ink

I appreciate you sharing your time with me. Have a fabulous day!

Ellen Hutson – Guest Designer | Many Thanks

Hello friends! Today I have the awesome opportunity to guest design for Ellen Hutson and play with that adorable bear and all his dress up accessories again! I had a hard time choosing but thought it would be fun to add to the thank you card stash with a police bear in the city.

I started my card by choosing and stamping my images. Then I colored them all with copic markers and cut them out with the coordinating dies. That is, except for Mr. Bear. His die is solid so it’s practically impossible to line it up after you’ve stamped. So today, I have a little trick to how I stamp this guy whenever I’m creating with him.

Once upon a time, at the beginning of getting this stamp set, I cut the bear shape from a scrap of cardstock and kept the negative piece in my die packaging for future use. Whenever I stamp this image, I place the negative scrap in my MISTI. Then line the stamp up in that area, use the lid to pick up the stamp and place my blank die cut shape in the void. I ink up the stamp and stamp it down. This also works to re-stamp if you didn’t get a good impression because the space holding your bear didn’t move. It works great! The image you see on the right has been double stamped because his nose didn’t cooperate and was blotchy the first time.

With my images all taken care of, I switched over to my background where I had a fun idea to create a little cityscape. I used the Essentials By Ellen Big City die to cut a border from 2 different gray cardstocks and also black cardstock. I took a white A2 panel and used a Trinity Stamps embossed edge circle stack die to cut a window. Using this window as a guide I adhered the layers of city buildings together and a pencil to mark where I needed to trim off the excess.

Next, I took a white card base and inked up my sky using distress oxide ink in fossilized amber and wild honey. Finally, I used liquid glue to adhere everything together.

I stamped and heat embossed a sentiment from Bear Ware Dress Up sentiments on the darker gray cardstock used in my buildings. I added foam strips to these and foam squares to my dressed up bear before popping them all in place on my card front.

For finishing touches I added black glaze pen to Bear’s eyes and glossy accents to his nose, the shield on his hat and car, and the car’s lights too.

Isn’t this such a fun card!?! I’m so happy with how it turned out and had a blast playing with this bear and all of his accessories.

Products used today:
Bear Ware Dress Up 1 stamps and dies
Bear Ware Dress Up Sentiments stamps
Essentials by Ellen Big City die
Trinity Stamps Embossed Edge Circle Stack dies
Distress Oxide Ink – wild honey, fossilized amber
Tombow Mono Multi liquid adhesive
Scrapbook Adhesives foam squares and strips
Sakura Glaze pen – black

I appreciate you sharing your time with me. Have a fabulous day!