Pink & Main – Hello Sweet Friend

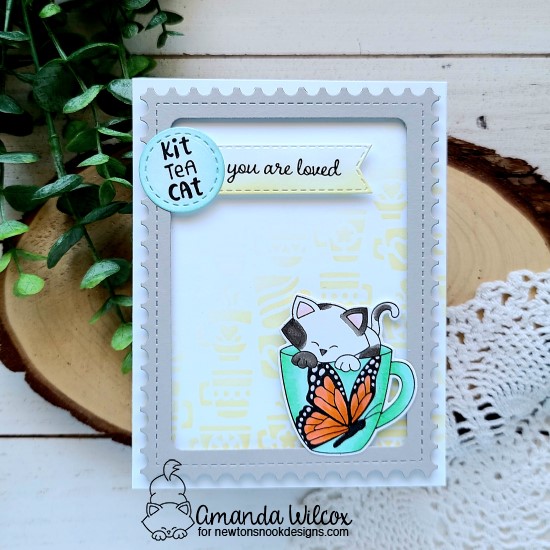
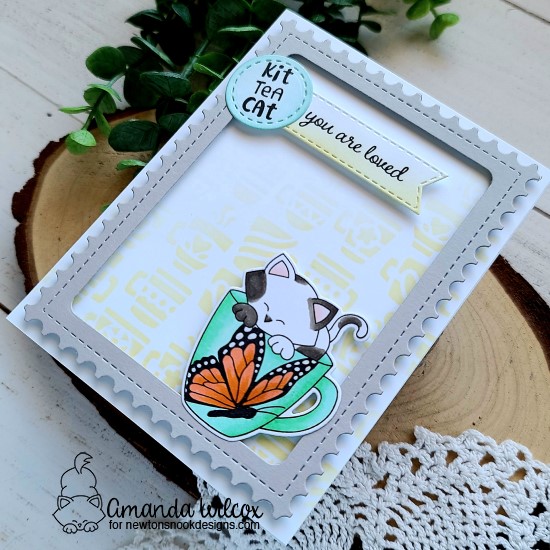
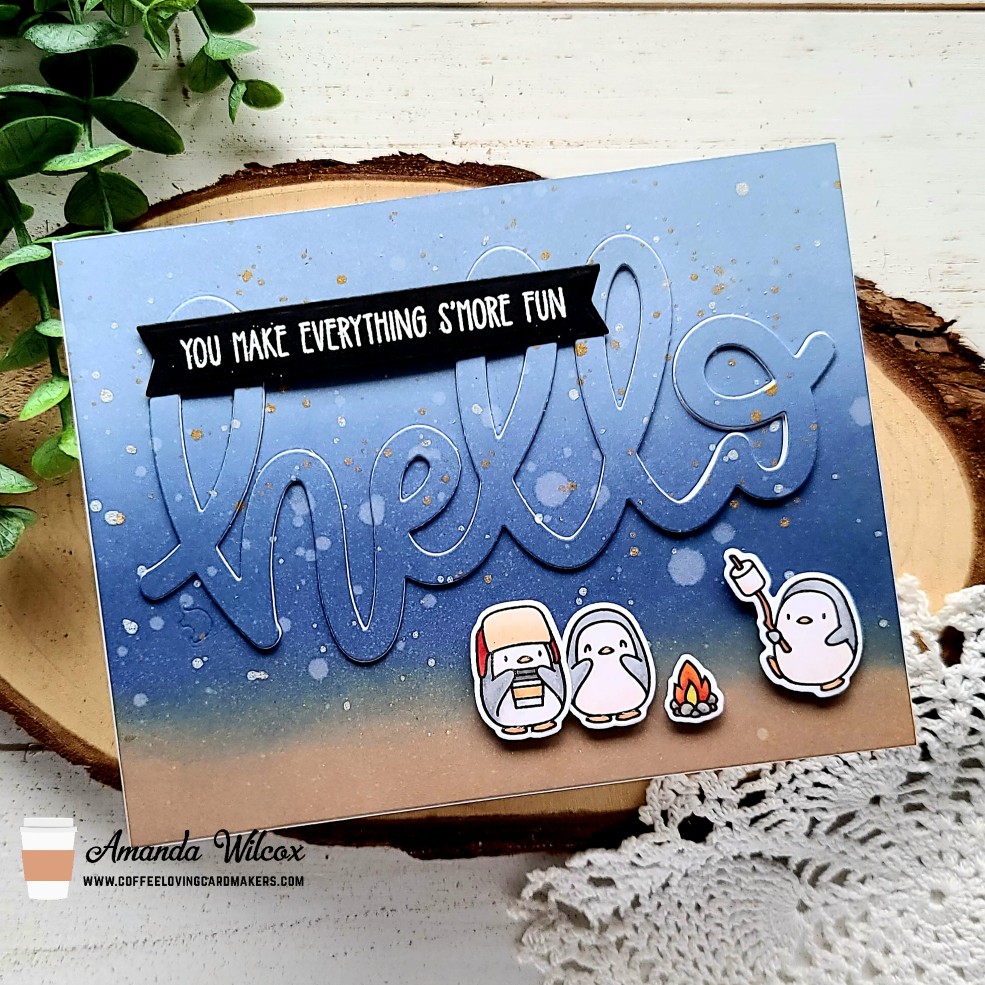
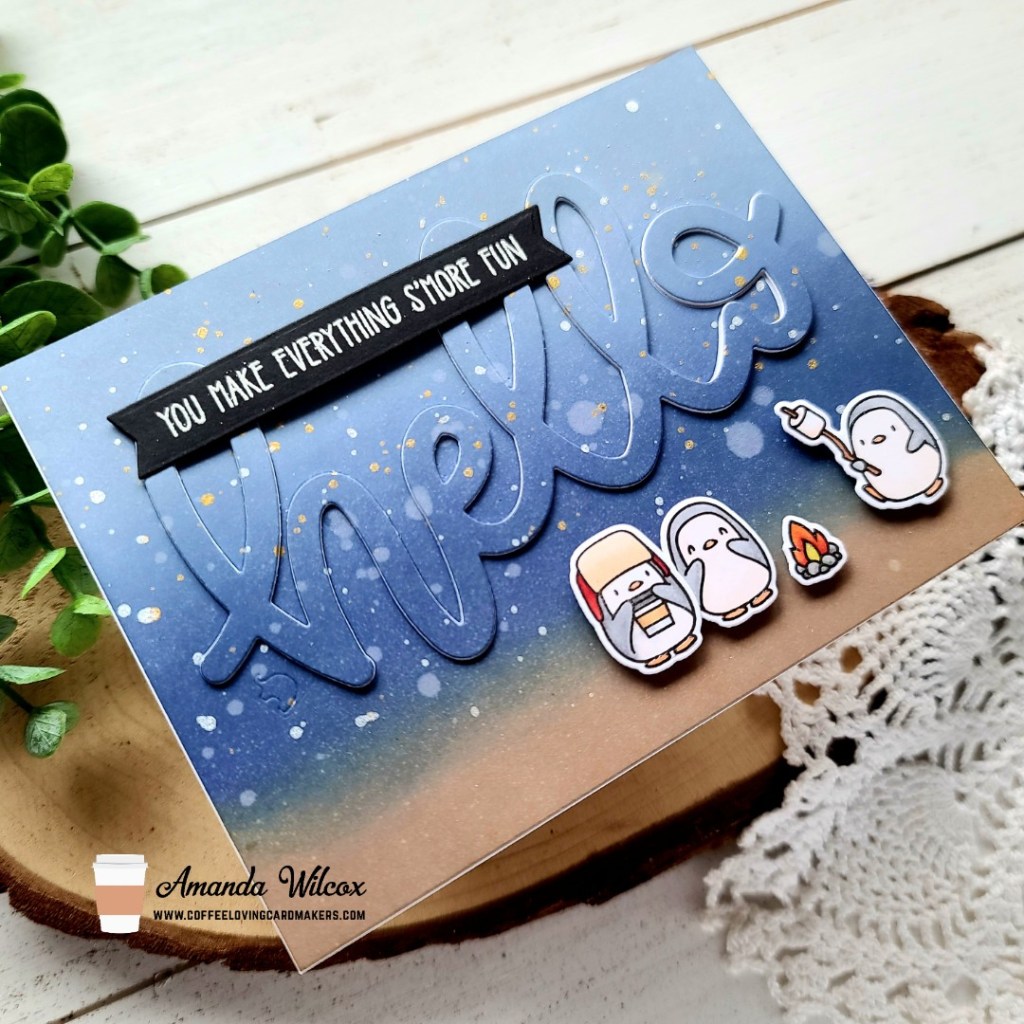
Hey everyone! I’m over on the Pink & Main blog today with this sweet card featuring one of the newly release stencils that I’m just in love with – Deco, and another image from the Gnome Matter What set. I’m also playing along with the Coffee Loving Cardmakers hop, which Pink & Main is a Super Sponsor of!

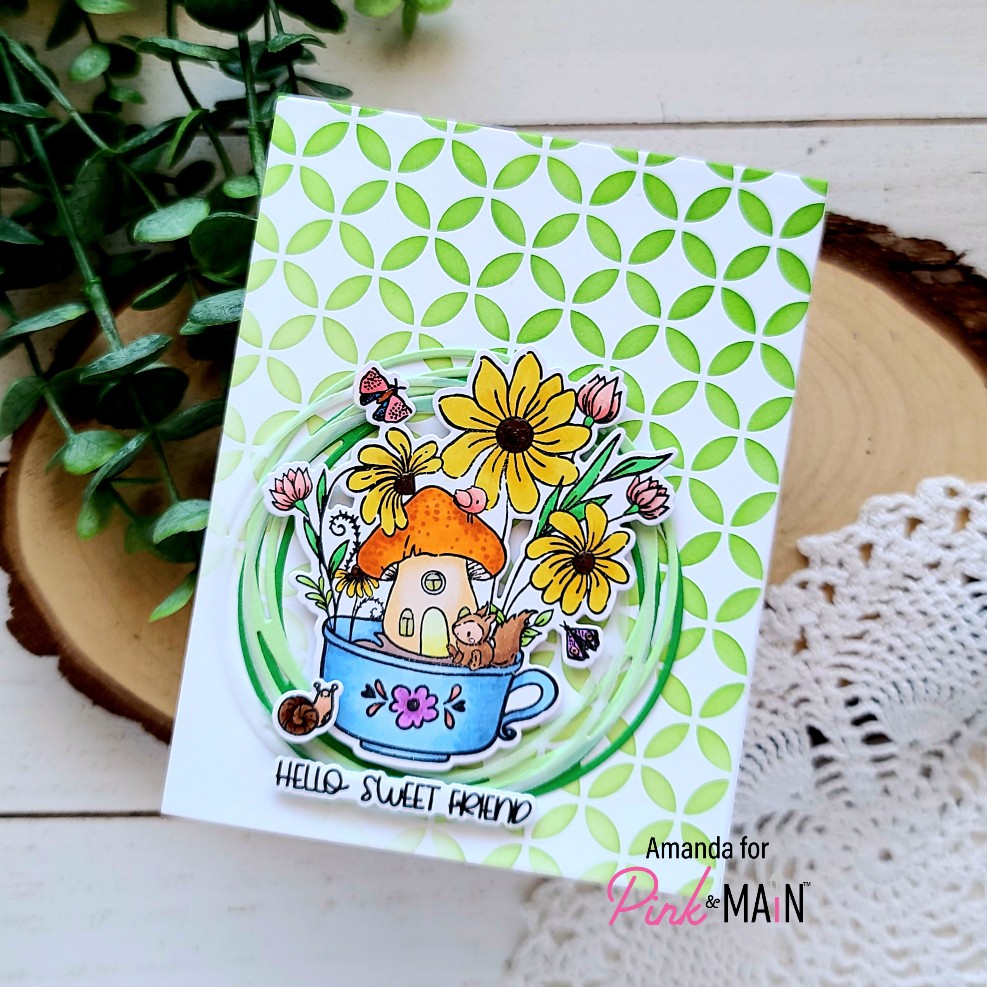
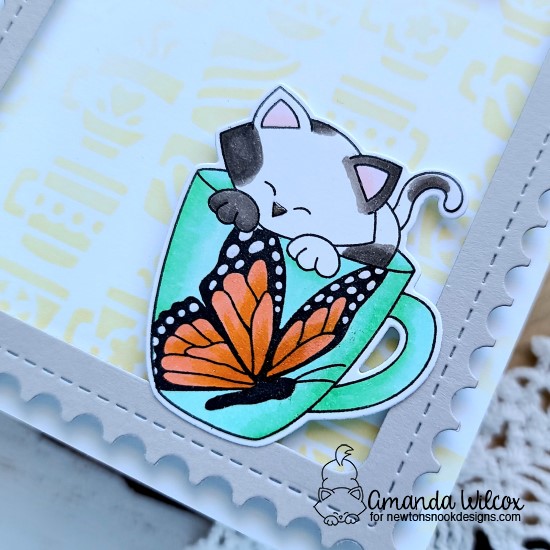
I started my card by stamping and coloring the large image from Gnome Matter What with my copics. Then I used the coordinating dies to cut it out and set it aside. Then I cut a white panel with the largest of the Layered Rectangle dies and inked up the Deco stencil over top with two different green dye inks, using my blending brush.

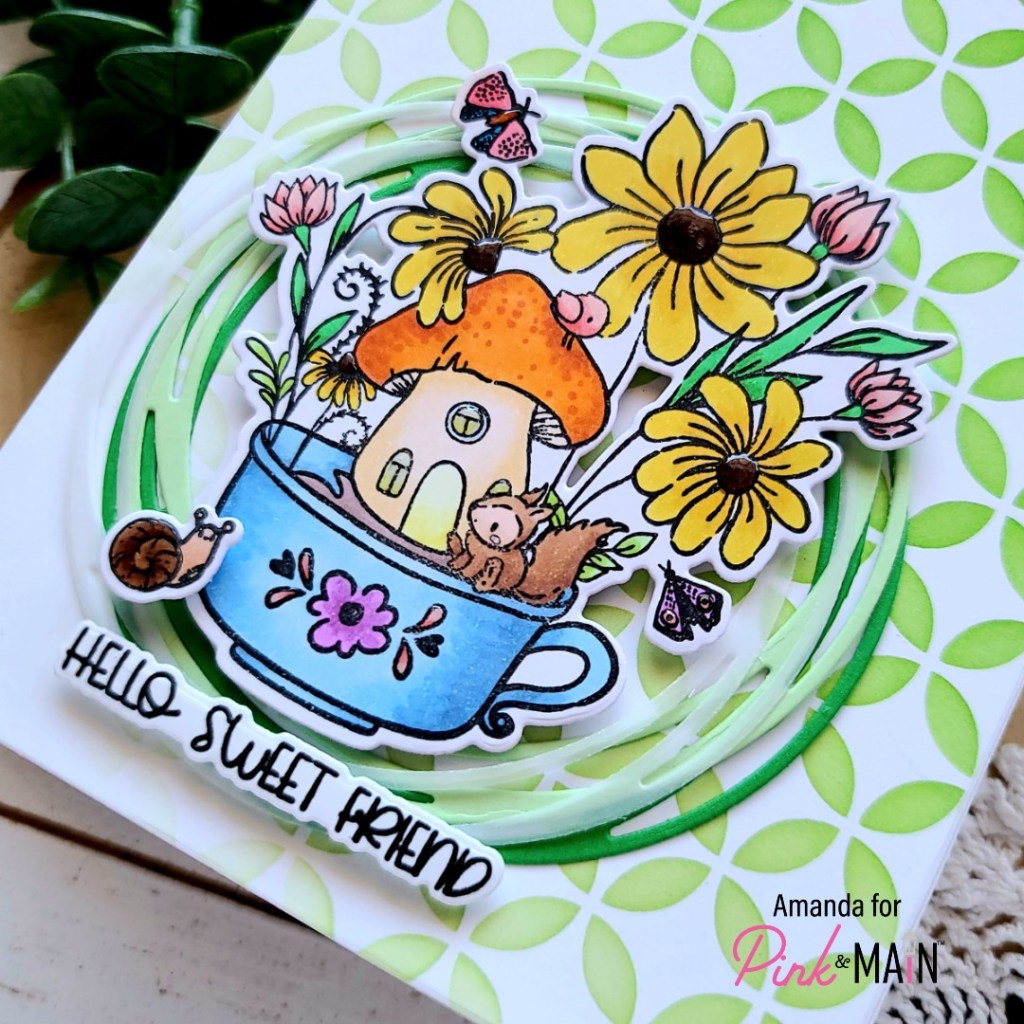
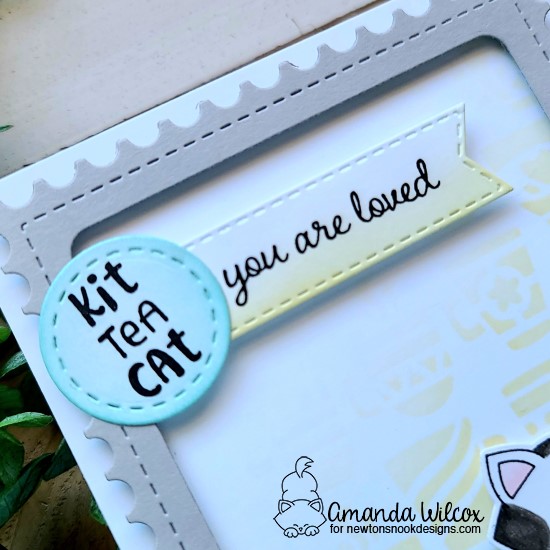
I used the new liquid glue to adhere my stenciled panel to a white card base and pulled out the wreath base 2 dies and cut three of the wreaths out. One from vellum and the other two from different green cardstocks. Then I glued them down and popped up my image with foam squares on top. I went back to choose a sentiment and thought it would be fun to add the cut little snail to the scene too. I stamped them both, colored the snail and used the coordinating dies to cut them out. I also used foam squares to adhere these to my card and moved on to finishing touches.

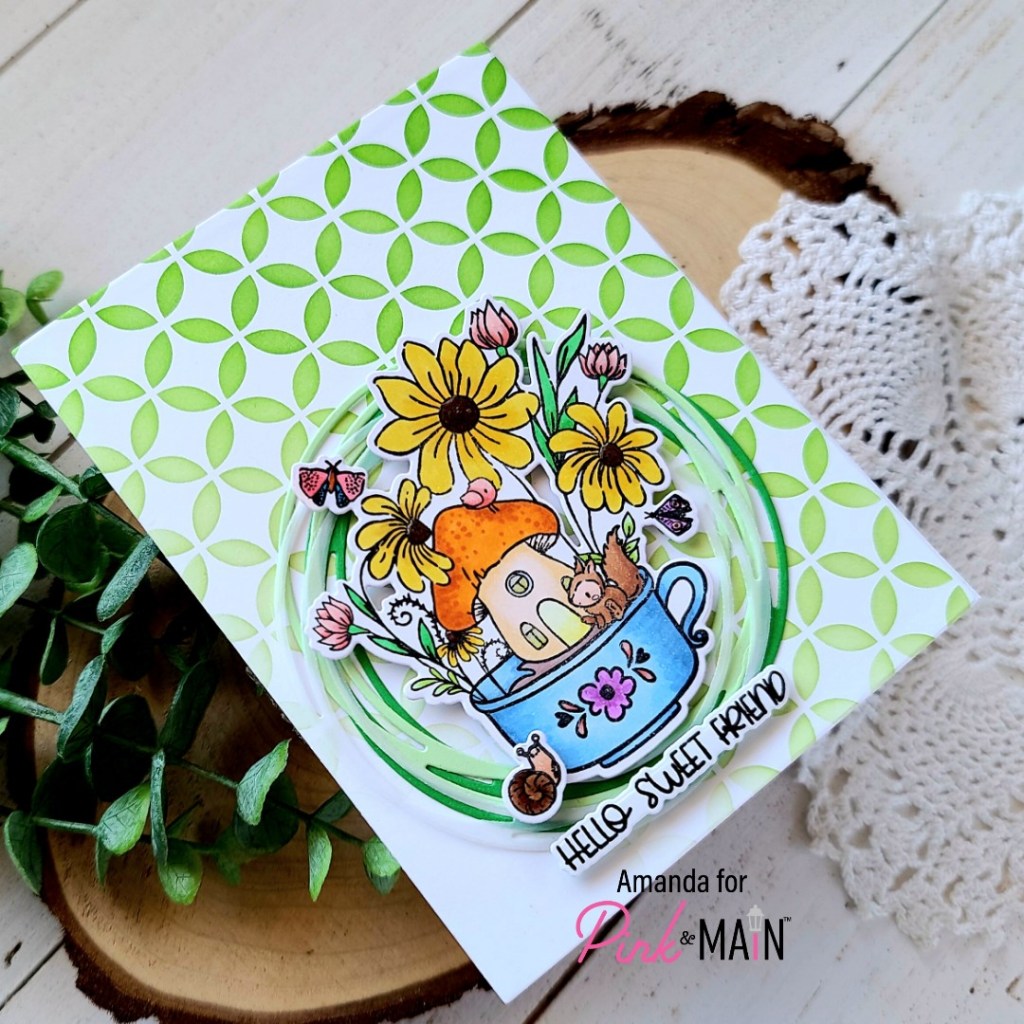
I kept it simple for finishing touches on this card by just adding glossy accents to certain areas of the images like the flower centers, snail shell, windows of the mushroom and parts of the mug.

I appreciate you sharing your time with me. Have a fabulous day!

Newton’s Nook – Kit-tea Cat

Hello again! I’m over on the Newton’s Nook blog today with a super fun caffeinated creation to get your juices flowing today! I’ll be entering it into the Coffee Loving Cardmakers Spring|Summer Hop. I really hope you’re playing along with us. It’s so fun and there is so much inspiration to be had and prizes to be won!

I am honestly, SUPER EXCITED to share this card with you today! I had the fun idea to mask off the mug from Newton’s Mug and stamp one of the Monarchs images inside it for a decorated coffee cup! I love it! I colored the image with my copics and used the coordinating dies to cut it out.

Then for my background I cut a white panel to A2 size and inked up the Mugs stencil with light yellow ink. I took the Framework dies and cut the largest rectangle, then cut the rounded rectangle from the Frames & Flags set out of the center to create a frame.

For my sentiment, I chose the first one from Newton’s Mug and stamped it on a stitched circle from the Frames Squared set. Then I added a sentiment from Heartfelt Essentials to a banner from the Banner Trio set. I inked up the edges of the circle with a light green ink as close to the mug color as I could get, then I inked up the bottom of the banner with the same yellow as the mugs stenciling.

Moving on to assembling my card, I added the stenciled panel to a white card base, then popped the frame up with foam strips. I added foam squares to Newton’s Mug and popped it in place. I used liquid glue to adhere the circle to the banner and added foam squares to the back of that before placing it at the top of the design.

For finishing touches, I added a little glossy accents to Newton’s nose and Wink of Stella glitter brush pen to the butterfly on the mug and the circle sentiment.

I appreciate you sharing your time with me. Have a fabulous day!

Trinity Stamps – Some Bunny Mug

Hi everyone! I’m back with another fun caffeinated card to share with you featuring some goodies from Trinity Stamps‘ most recent release.

For today’s card, I die cut the coffee mug card die from Bristol Smooth cardstock and heat embossed the Easter eggs from Gnome Bunny in white. Then I watercolored them with my zig clean color real brush markers. Then I took one of the extra bunny images in Slimline Bunnies, stamped him and colored him with my zigs too. I also stamped a sentiment from that set and fussy cut them both out. I popped them up on my cute mug with foam squares and this quick and fun card is all finished!

This die set comes with an optional insert for a gift card too! I haven’t decided who is getting this fun card yet but I just might add that insert to the inside and make this an extra fun surprise for someone!

Remember, the Coffee Lovers Spring|Summer Hop is still going on! I’m linking this cutie up and hope you’re playing along with us!

I appreciate you sharing your time with me.

Lawn Fawn – For You Thanks a Latte

Hello everyone! I’m back today with another fun caffeinated creation for the Spring|Summer Coffee Lovers Hop! Today I’m featuring some adorable Lawn Fawn goodies along with the Caffeinated Crafting embellishment mix for my shaker from the Twiddler’s Nook shop. This mix is part of the special that we have going on this week. Head HERE to check that out!

I started my card by die cutting the outside in stitched mug from white cardstock and inked up the center with mermaid ink and a blending brush. Then I cut the frame 8 times from white cardstock and once from teal. Next I cut the mug again from acetate. I used liquid glue to adhere my layers together, leaving the teal and acetate off until I filled the mechanism with my shaker bits. For those I die cut the beans from the mug die set from gold cardstock and also added some of the bits from the Caffeinated Crafting mix. Once it was all sealed up, I adhered a pink heart to the center and die cut the spoon from gray cardstock, adding it with liquid glue too.

To set my scene, I cut a piece of Perfectly Plaid paper to A2 size and trimmed down a piece of card gray cardstock for a table to sit my mug on. I used the simple stitched hillside border to trim the top of that. I stamped and heat embossed a sentiment from Thanks a Latte and used liquid glue to adhere my layers together, then I added those to a white card base.

Next, I die cut the scripty For You die 3 times from white cardstock and once from the same pink as the heart and used liquid glue to adhere them together. I wasn’t positive on my placement of this piece so I die cut the steam from vellum and glued it down. It ended up being mostly covered but it’s there for what it’s worth. Haha. Last, I added my mug and spoon and my card is all finished.

Are you playing along with the Coffee Lovers Hop? Be sure to head HERE to link up your caffeinated creations for chances to win tons of awesome prizes!

I appreciate you sharing your time with me! Have a fabulous day!

Coffee Loving Cardmakers – S’more Fun

I’m just going to start by exclaiming exactly how much FUN I had creating this card! It all came together just as I had hoped and it’s so STINKING CUTE!!!

Okay, backtracking a little…it’s the awesome week of the Coffee Lovers Spring|Summer Hop so I’ll continue to spam you with super fun caffeinated inspiration each day until we’re done. I hope you love it as much as I do! Let’s get cracking on today’s fun card now, shall we?!?

I started by stamping and coloring these sweet little penguins from the Mama Elephant Little Penguin Agenda set and cut them out with the coordinating dies. Then I had the brilliant idea that I wanted to die cut a large sentiment to go with them so I pulled out the big scripty hello die and started to decide just how I was going to put it all together.

Then it hit me to do the shadow technique so I cut an A2 panel and inked it up with distress oxides in gathered twigs, chipped sapphire and salty ocean. I spritzed it with water and flicked pearl and gold watercolor on it for that starry effect. I didn’t mask anything off but tried to keep it all to the blue part of the panel. Then I die cut the big scripty hello from the top portion and also cut an additional 3 from white cardstock. I used liquid glue to adhere the panel to my card base and then the words together as well.

I added foam squares to the back of my images and popped them in place. That’s when I decided my card needed a little something else so I went digging. I found this fun sentiment in the Avery Elle camping critters so I stamped and heat embossed it on black cardstock, trimmed it into a strip and adhered it with a combo of liquid glue and foam squares.

For finishing touches, I added glossy accents to the penguin beaks and feet, the fire and the coffee cup lid. Super adorable, don’t you think?

Are you playing along with us this week? Be sure to head to the Coffee Loving Cardmakers blog and link up your caffeinated projects for chances to win tons of amazing prizes!

I appreciate you sharing your time with me. Have a fabulous day!