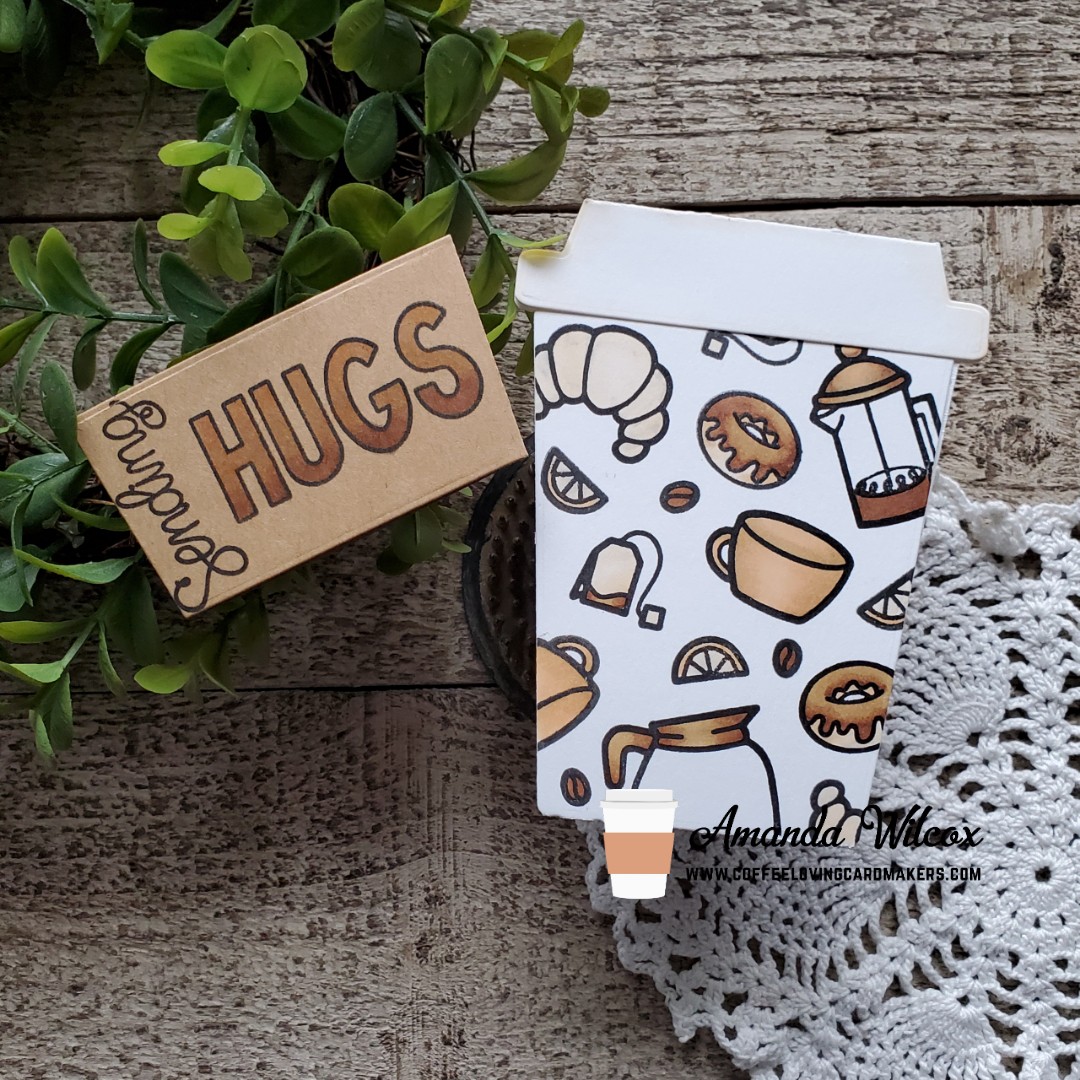
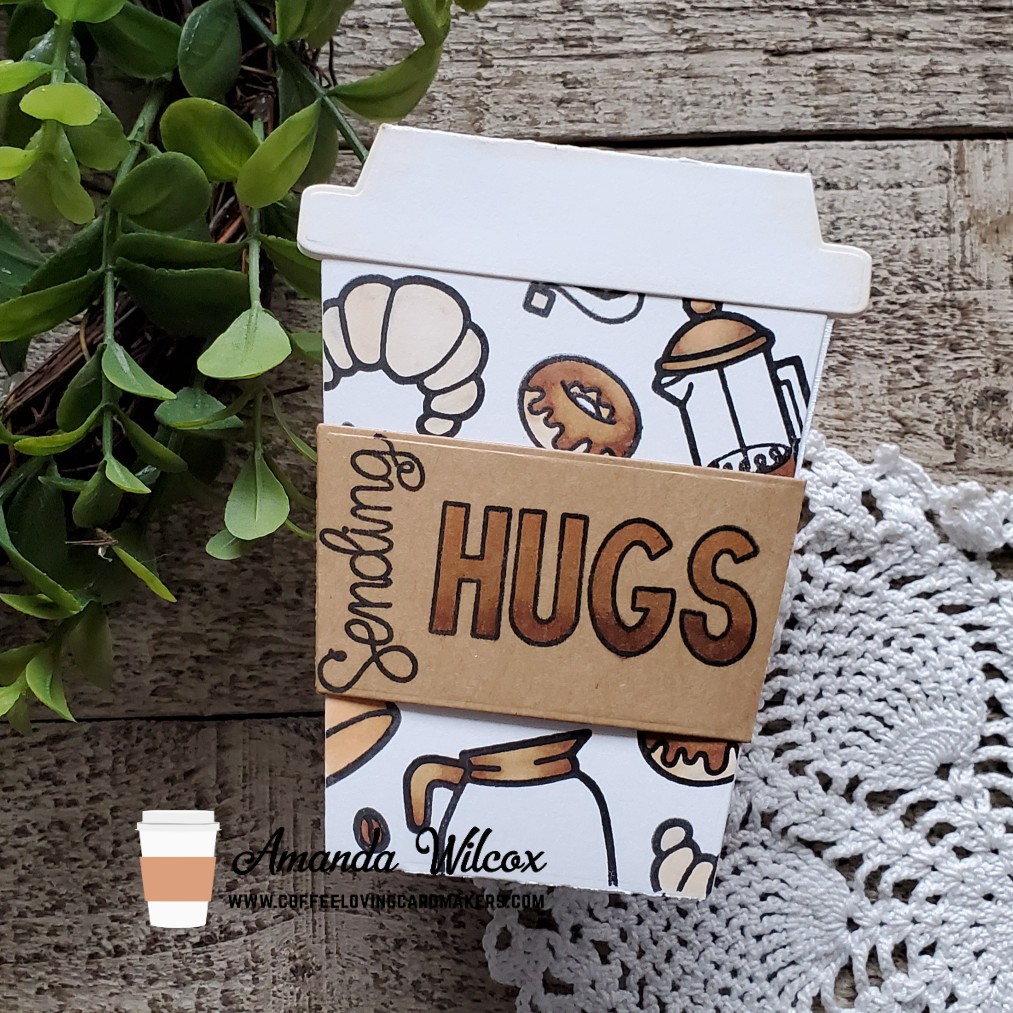
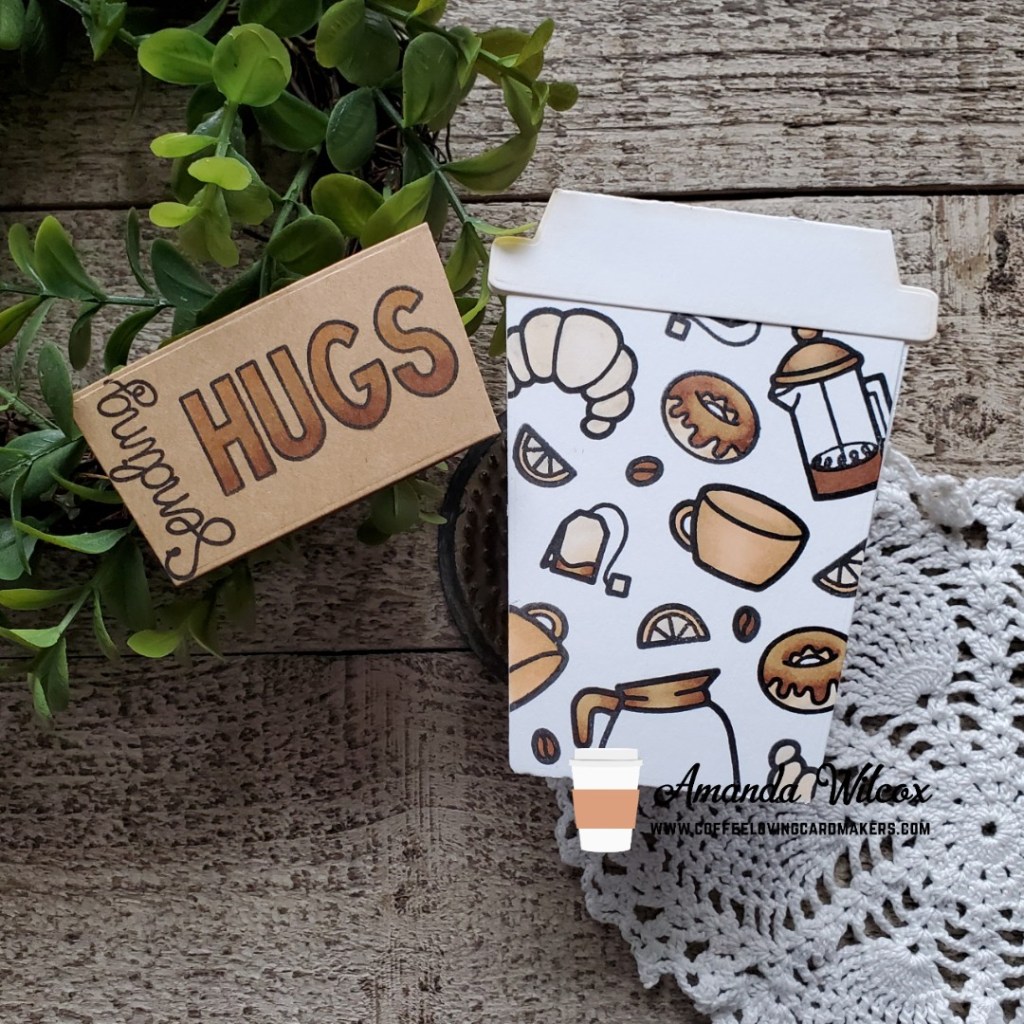
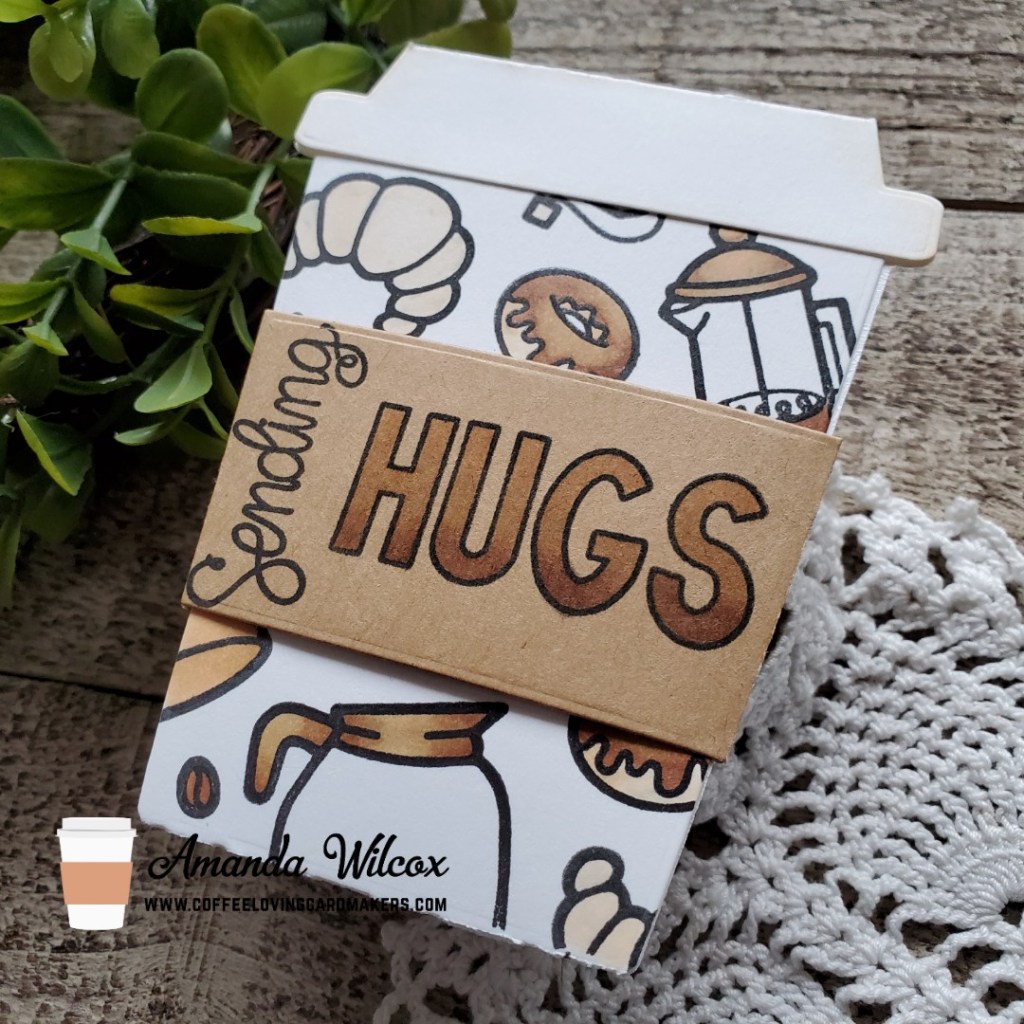
I started by die cutting my shaped coffee cup gift card holder from heavy 110 lb. white cardstock and the sleeve from kraft cardstock. Then I took my Coffee with Character stamps and stamped them randomly all over the cup. I chose a limited, sepia-toned color palette from my copics and started coloring. Then I stamped my sentiment on the sleeve and colored the letters on that with the same colors. I added a little shading on the lid with the lightest marker for some dimension too.
Here’s a look at the cup and the sleeve separated. I think it will be so fun to write a little message inside of, add a Starbucks gift card to and send it out for a little extra love to someone unsuspecting. Happy mail is the best!
Have you sent out any happy mail lately? Have you received any?? Share in the comments. We could all use some inspiration and a happy story from time to time.
I appreciate you sharing your time with me. Have a fabulous day!
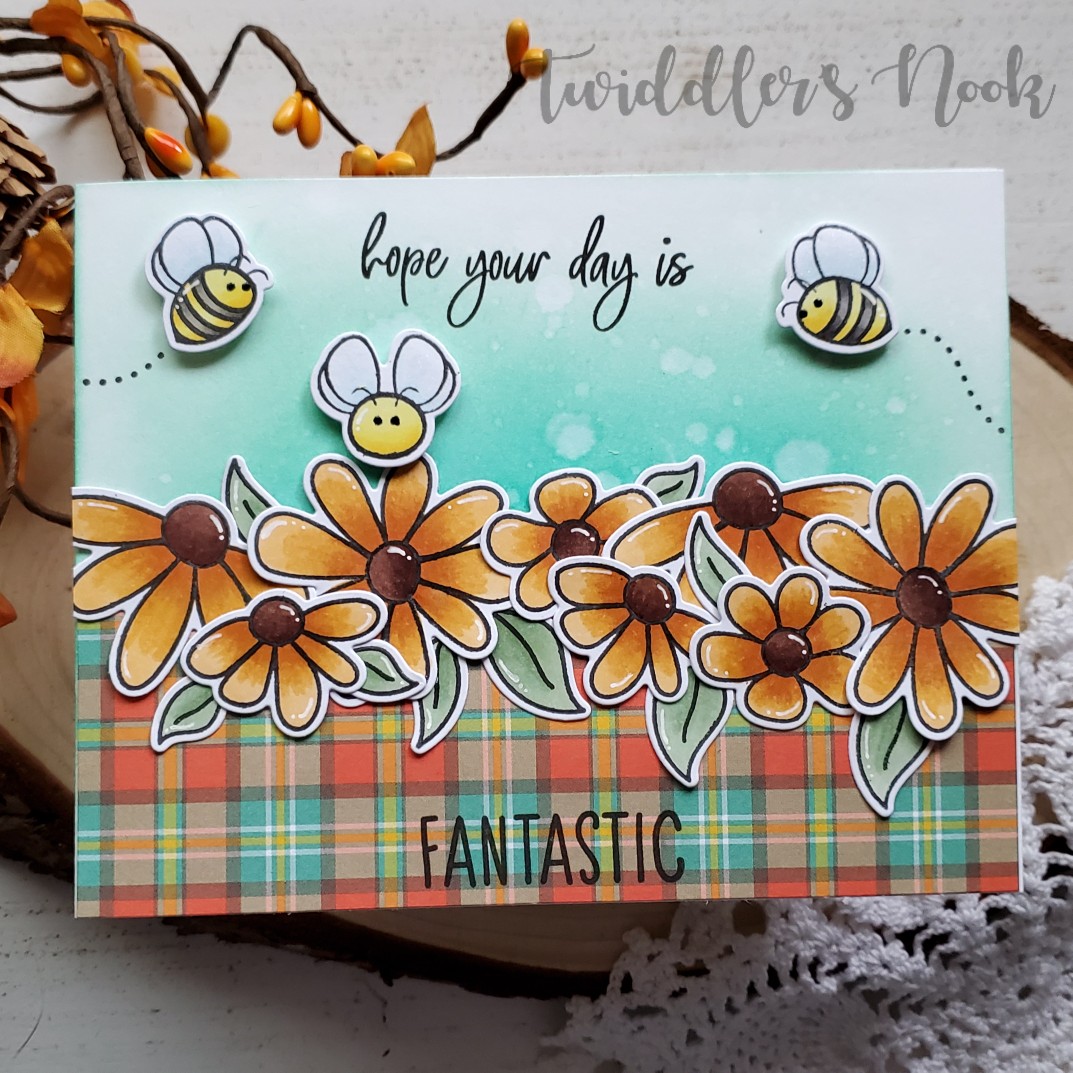
Hello again! I hope your week is going great! Today I’m excited to share a new spin on an old favorite. This Busy Bees stamp set is my all-time favorite from Honey Bee Stamps. However, I always color it for bright springy cards and today I made a point to turn it into more of a fall look. I hope you enjoy it.
Here’s how I made it:
Stamped, colored and die cut my images.
Blended Cracked Pistachio and Peacock Feathers distress inks on the card front and spritzed with water.
Adhered a strip of Lawn Fawn plaid paper to the bottom and layered my flowers on top.
Then, using the bees for reference I stamped the buzzing trails and my sentiments.
After that I popped the bees up with foam squares.
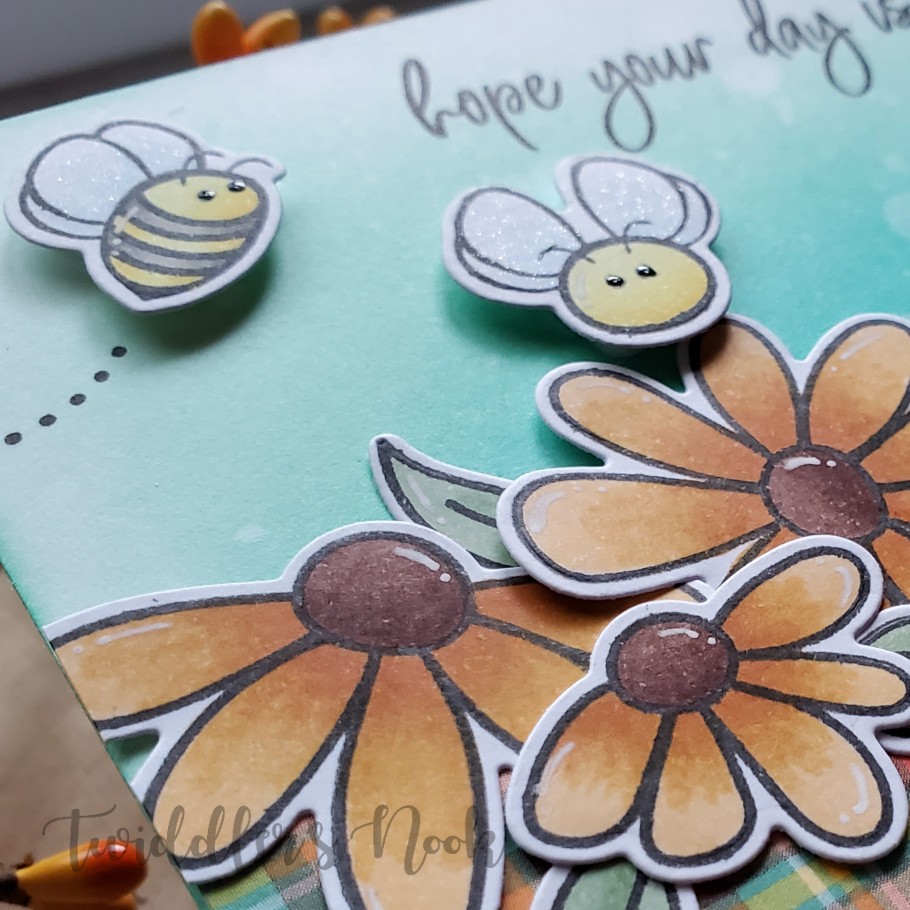
For finishing touches I added black glaze pen to the eyes, white gel pen details all over and Wink of Stella glitter brush pen to the bees wings.
Here’s a closer look so you can really see what the glaze pen and glitter brush do for the bees. It’s so cool!!! I also, really love the look of the white gel pen highlights all over. It just adds that little extra to an already fabulous card!
I’m entering this into the current Honey Bee Stamps Buzzworthy Challenge on Facebook. I’m getting into the challenges more and more. I find it super fun to look at my stamps in a different way to further how I use them.
As always, I appreciate you sharing your time with me. Have a fabulous day!
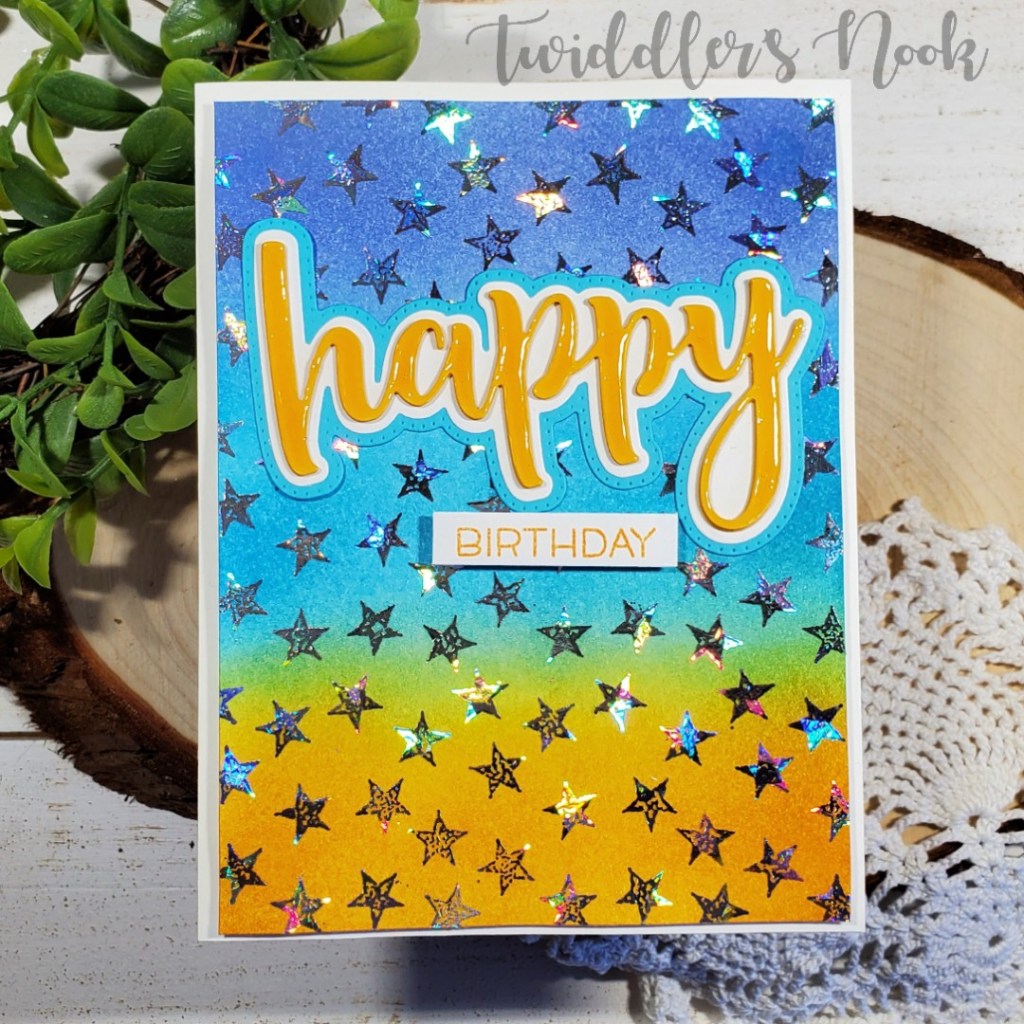
I recently purchased some Deco Foil by Therm-o-Web with no idea how I was going to use it. I intended to pick up transfer gel but that hasn’t happened yet and I was itching to get some shiny on my cards. So off to the land of Pinterest and YouTube I went. I found an older video by Jennifer McGuire (linked here) that showed how to use foil on heat embossing. So I decided to give it a go and here’s what we came up with! 😀
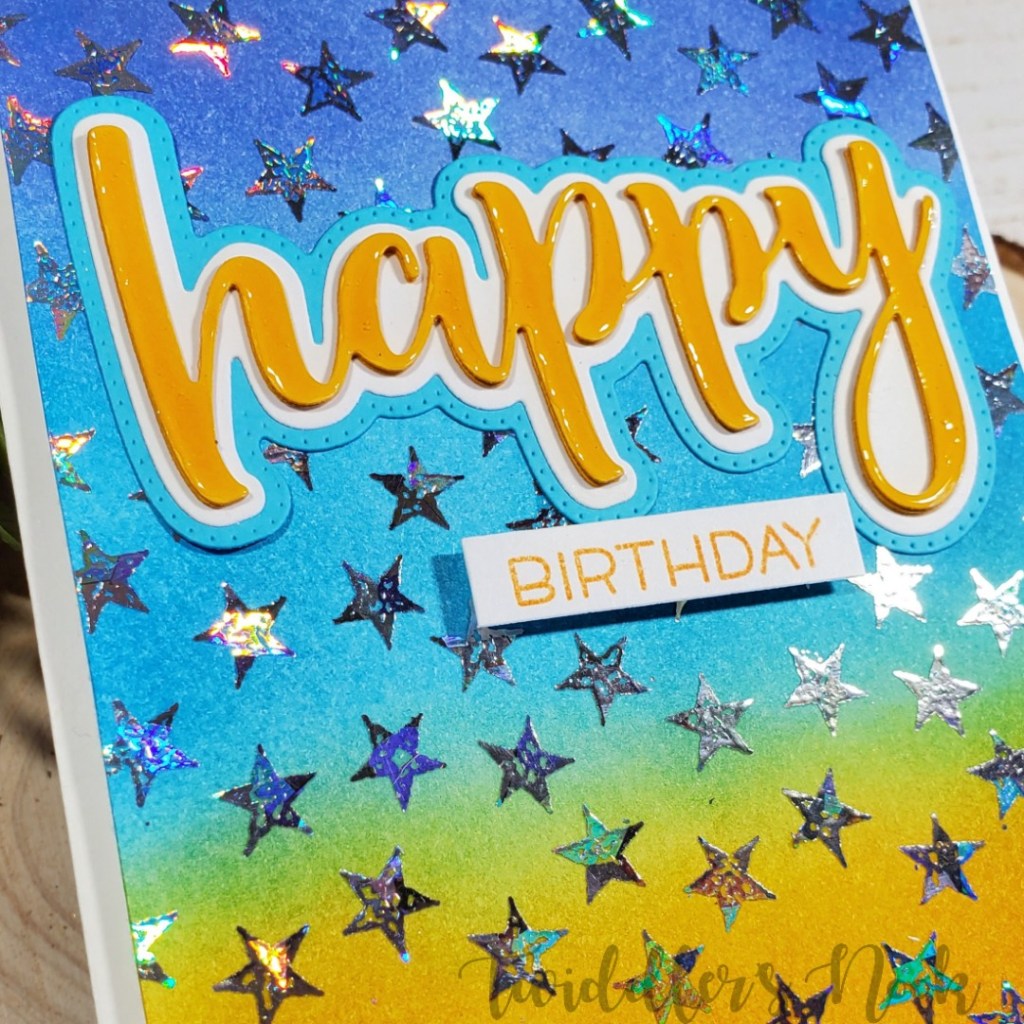
Not too shabby, if I do say so myself. The general idea I used here is distress ink blend the background, stamp and heat emboss a star background stamp. Then lay foil over my panel and run it through my laminator in a copy paper folder. Then I trimmed it down to 4×5.25 and added it to a card base with foam tape.
For my sentiments I used Honey Bee Stamps layered happy die cut. The top layer, in yellow, is die cut three times and then covered in glossy accents. This idea is another one from Jennifer McGuire in a more recent video. (linked here) Then I added birthday from Lawn Fawn Wild for You set and popped it up with foam tape.
Between the glossy words and that awesome Deco Foil background, this card is so eye catching and fun to move around in the light. I can’t wait to play around with more types of Deco Foil and with more techniques.
Have you used Deco Foil before? What techniques have you tried? Any favorites? Leave a comment below. I’d love to know!
I appreciate you sharing your time with me. Have a fabulous day!
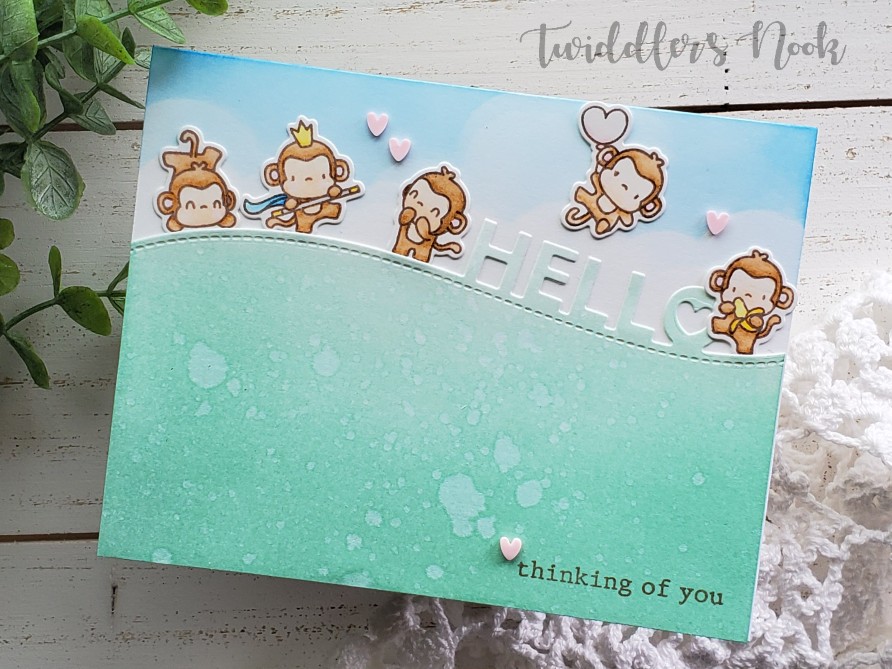
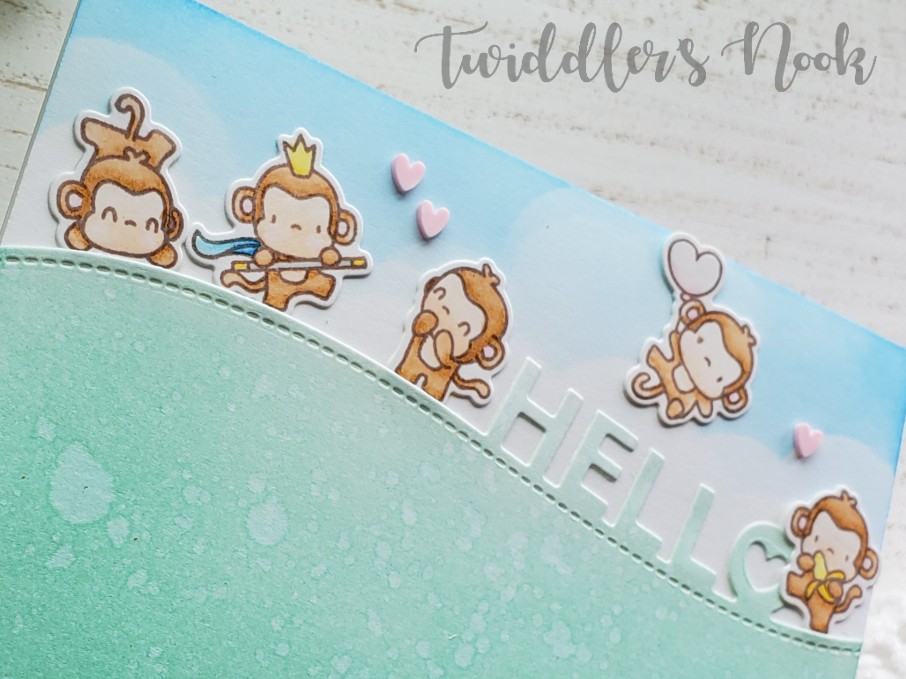
Welcome back! Thanks for stopping by to check out this adorable Mama Elephant hilly hello thinking of you card. I had an itch to color some Mama Elephant little agenda monkeys earlier this week and when my new Mama Elephant order came in the mail I thought this new die would be perfect to use with them.
Here’s how I did it.
Die cut the hilly hello from a piece of white cardstock, ink blended it with cracked pistachio distress ink and spritzed it with water.
Attached that to a card base and used a cloud stencil to add a few clouds to the sky with salty ocean distress ink.
I stamped the monkeys with Versafine vintage sepia ink on Bristol smooth cardstock and colored them with Zig Clean Color Real Brush Markers. Then die cut them all out and attached them to the card with tape runner.
I love how you can pair so many brands together and come up with a totally cohesive, adorable card like this. These monkeys have a special place in my heart and I love this soft, simple card.
As always, I appreciate you sharing your time with me. Have a great day!
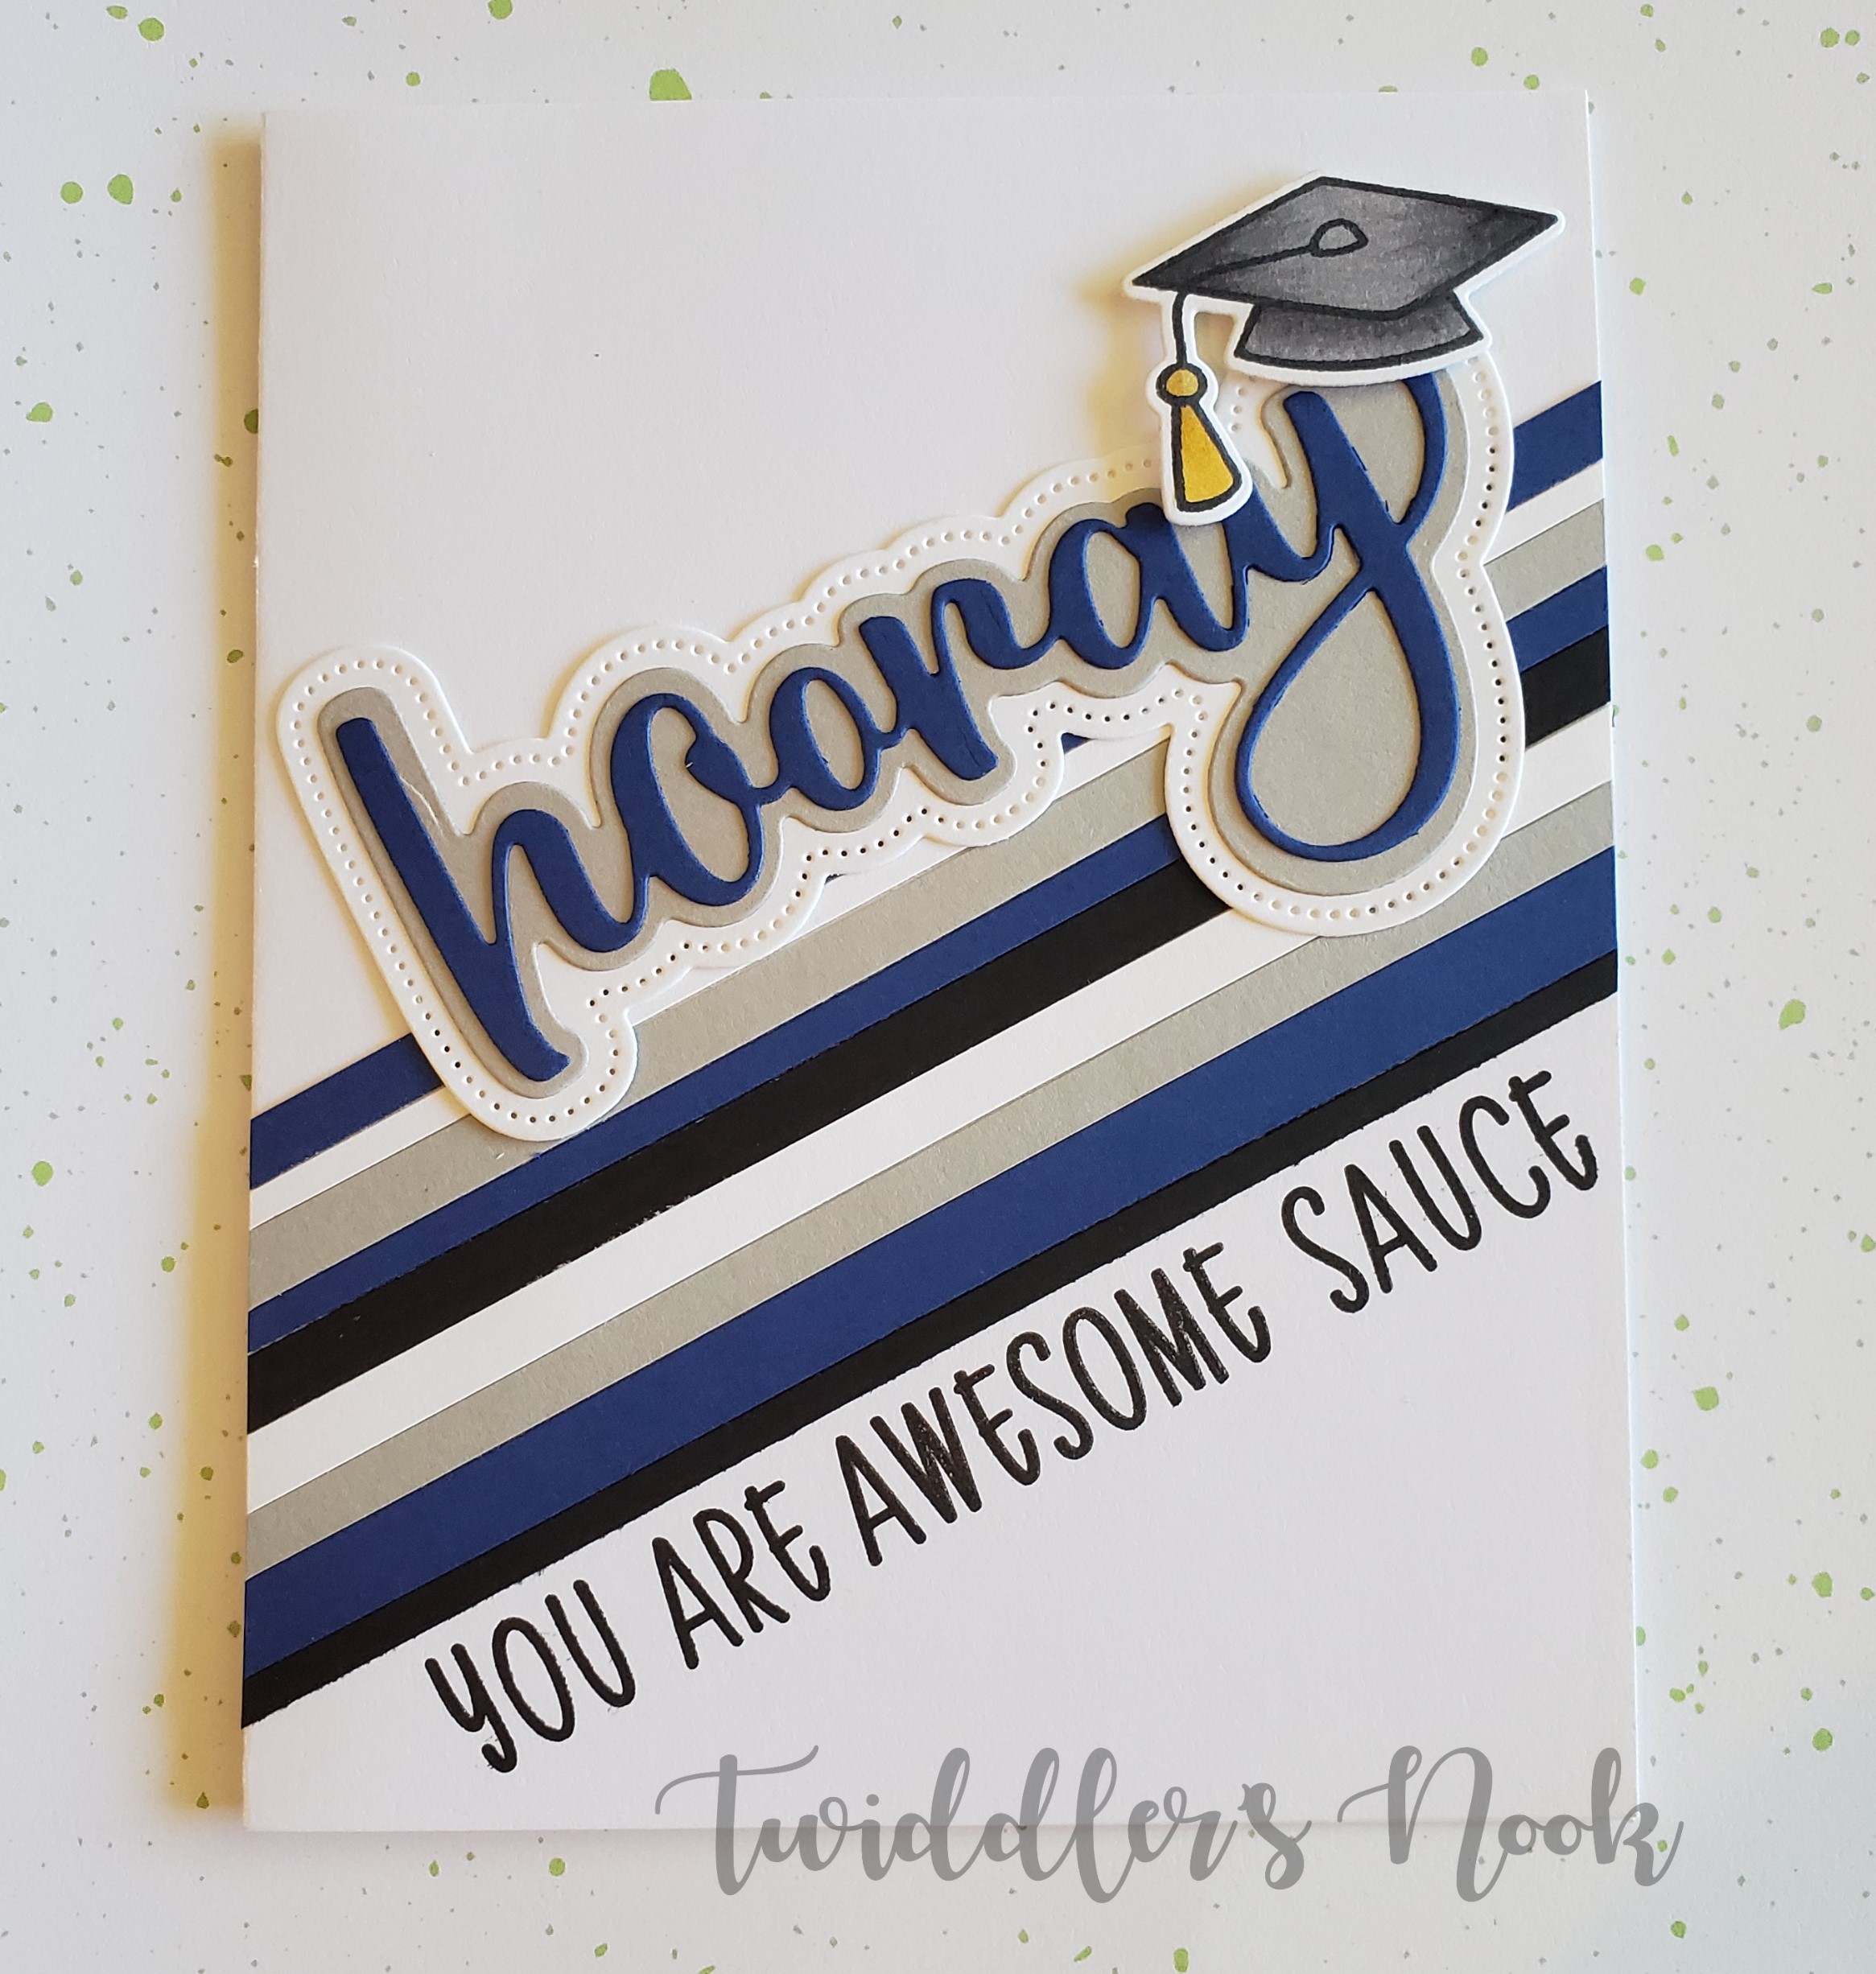
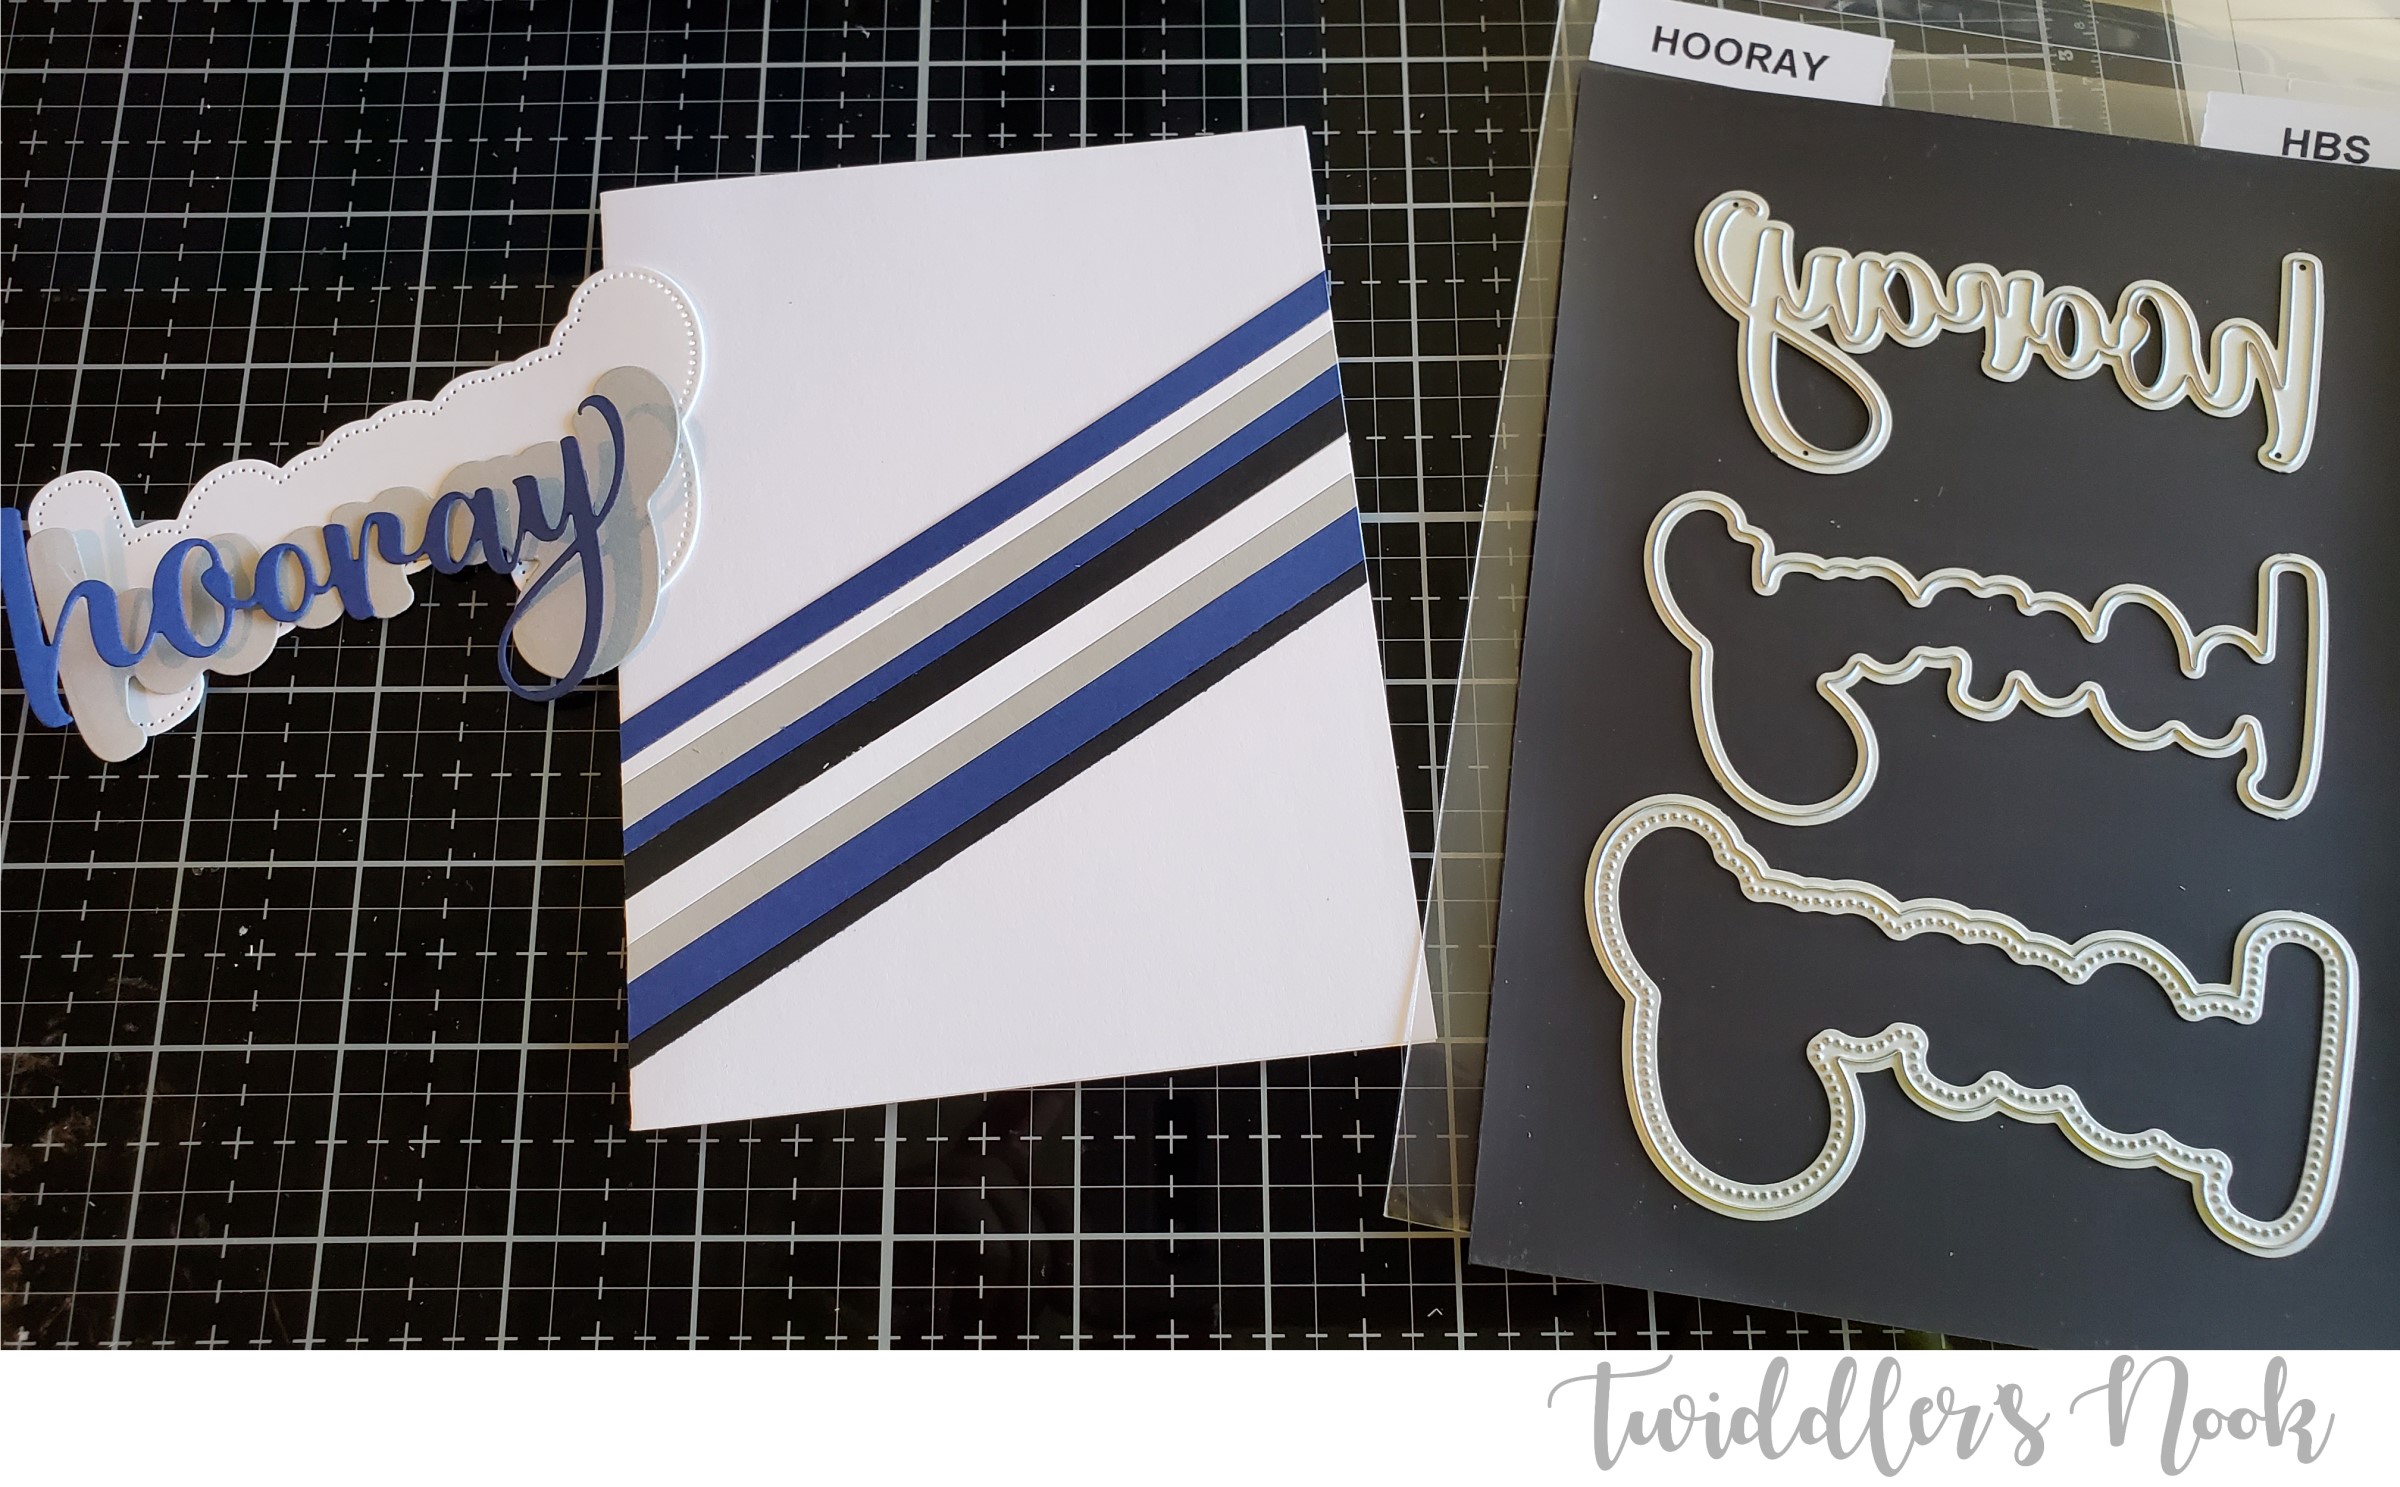
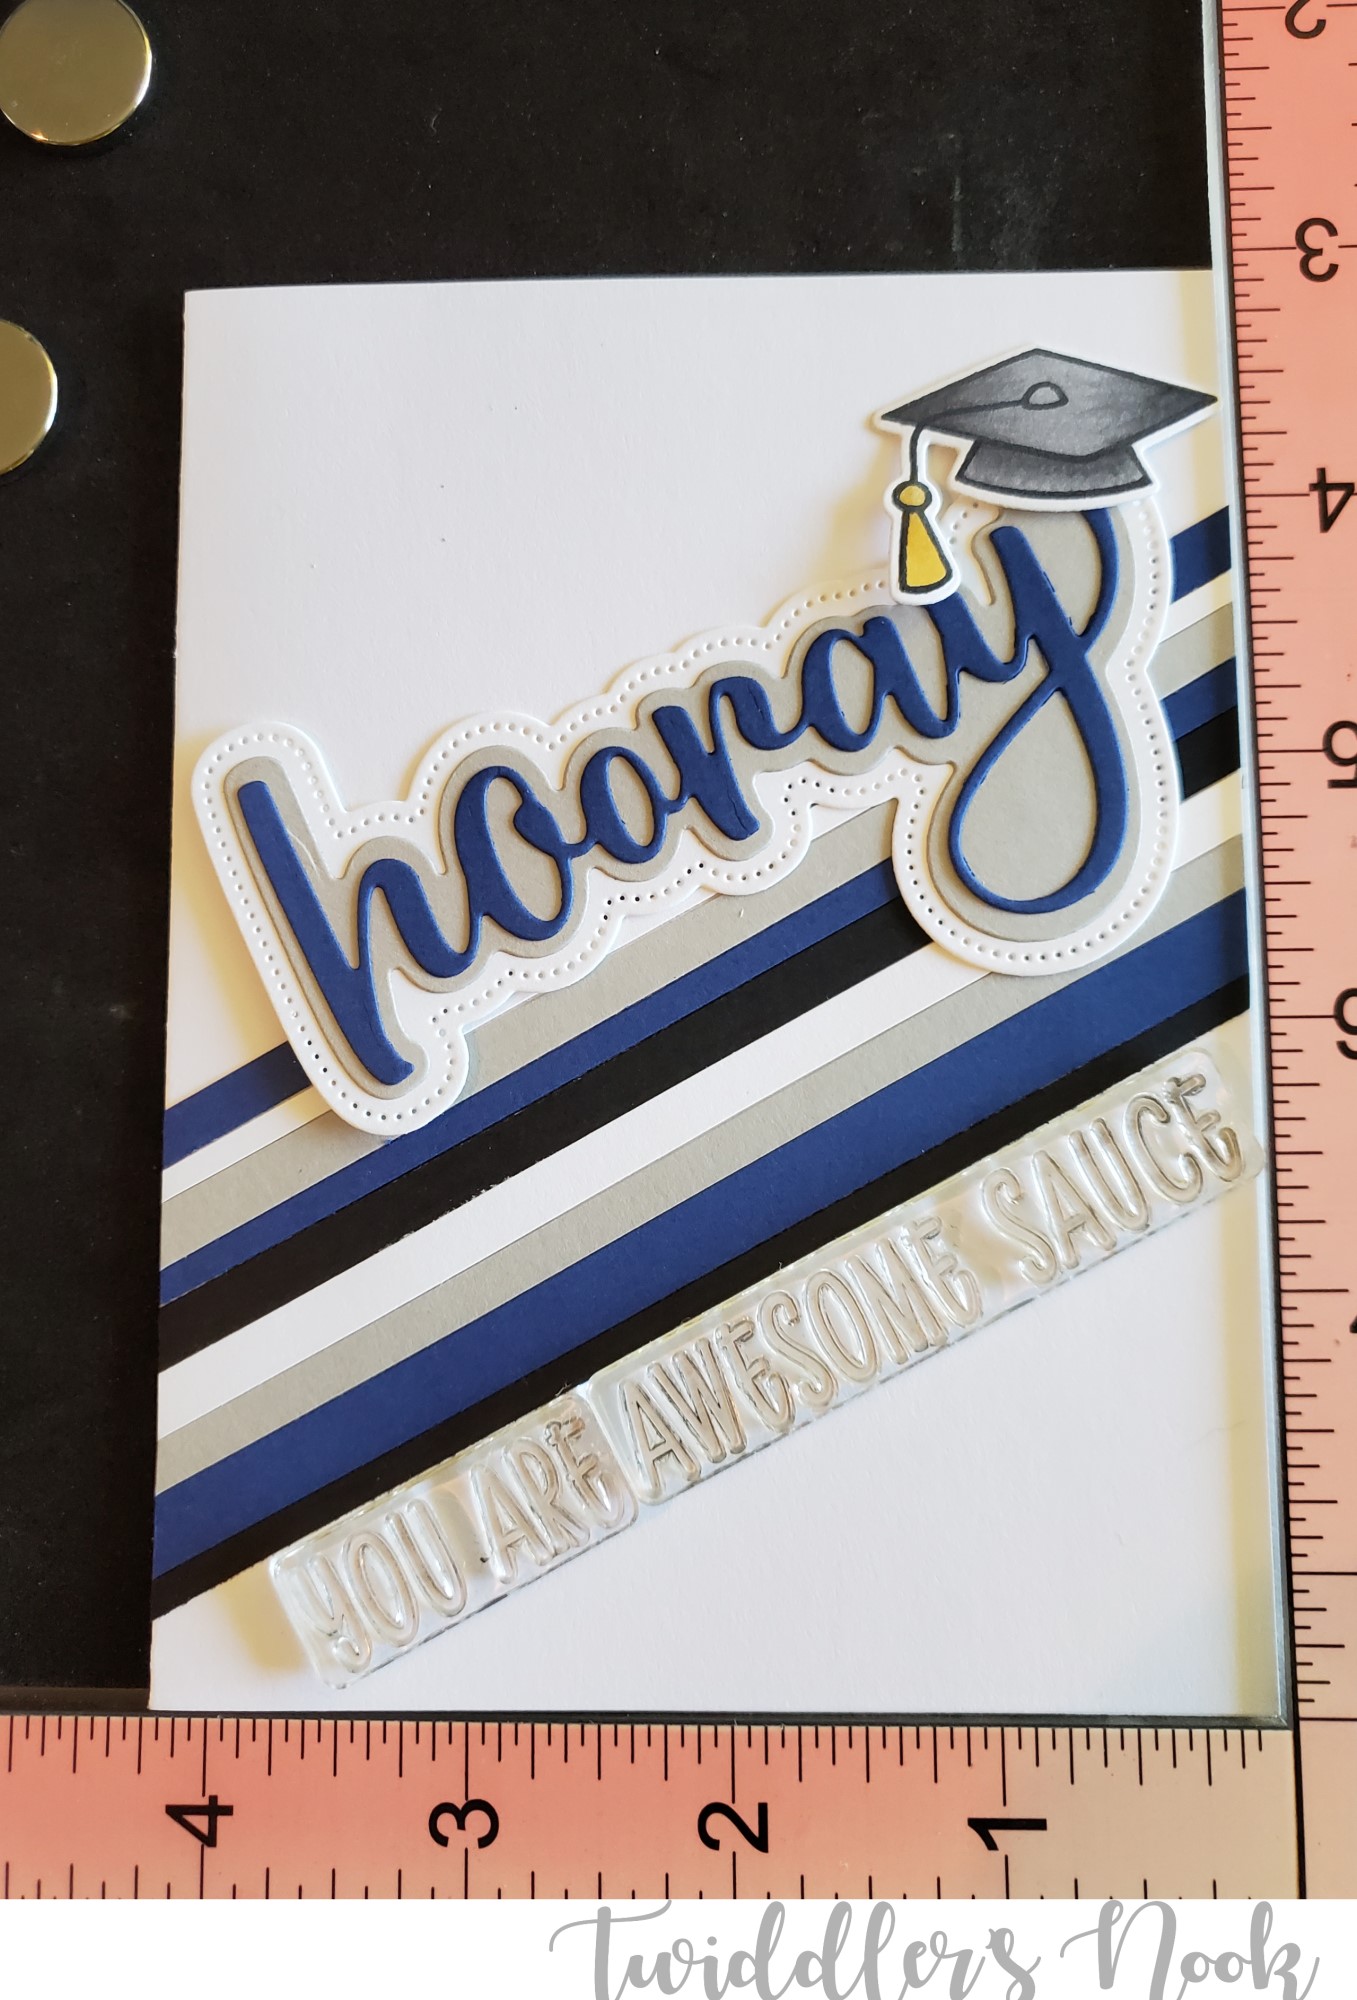
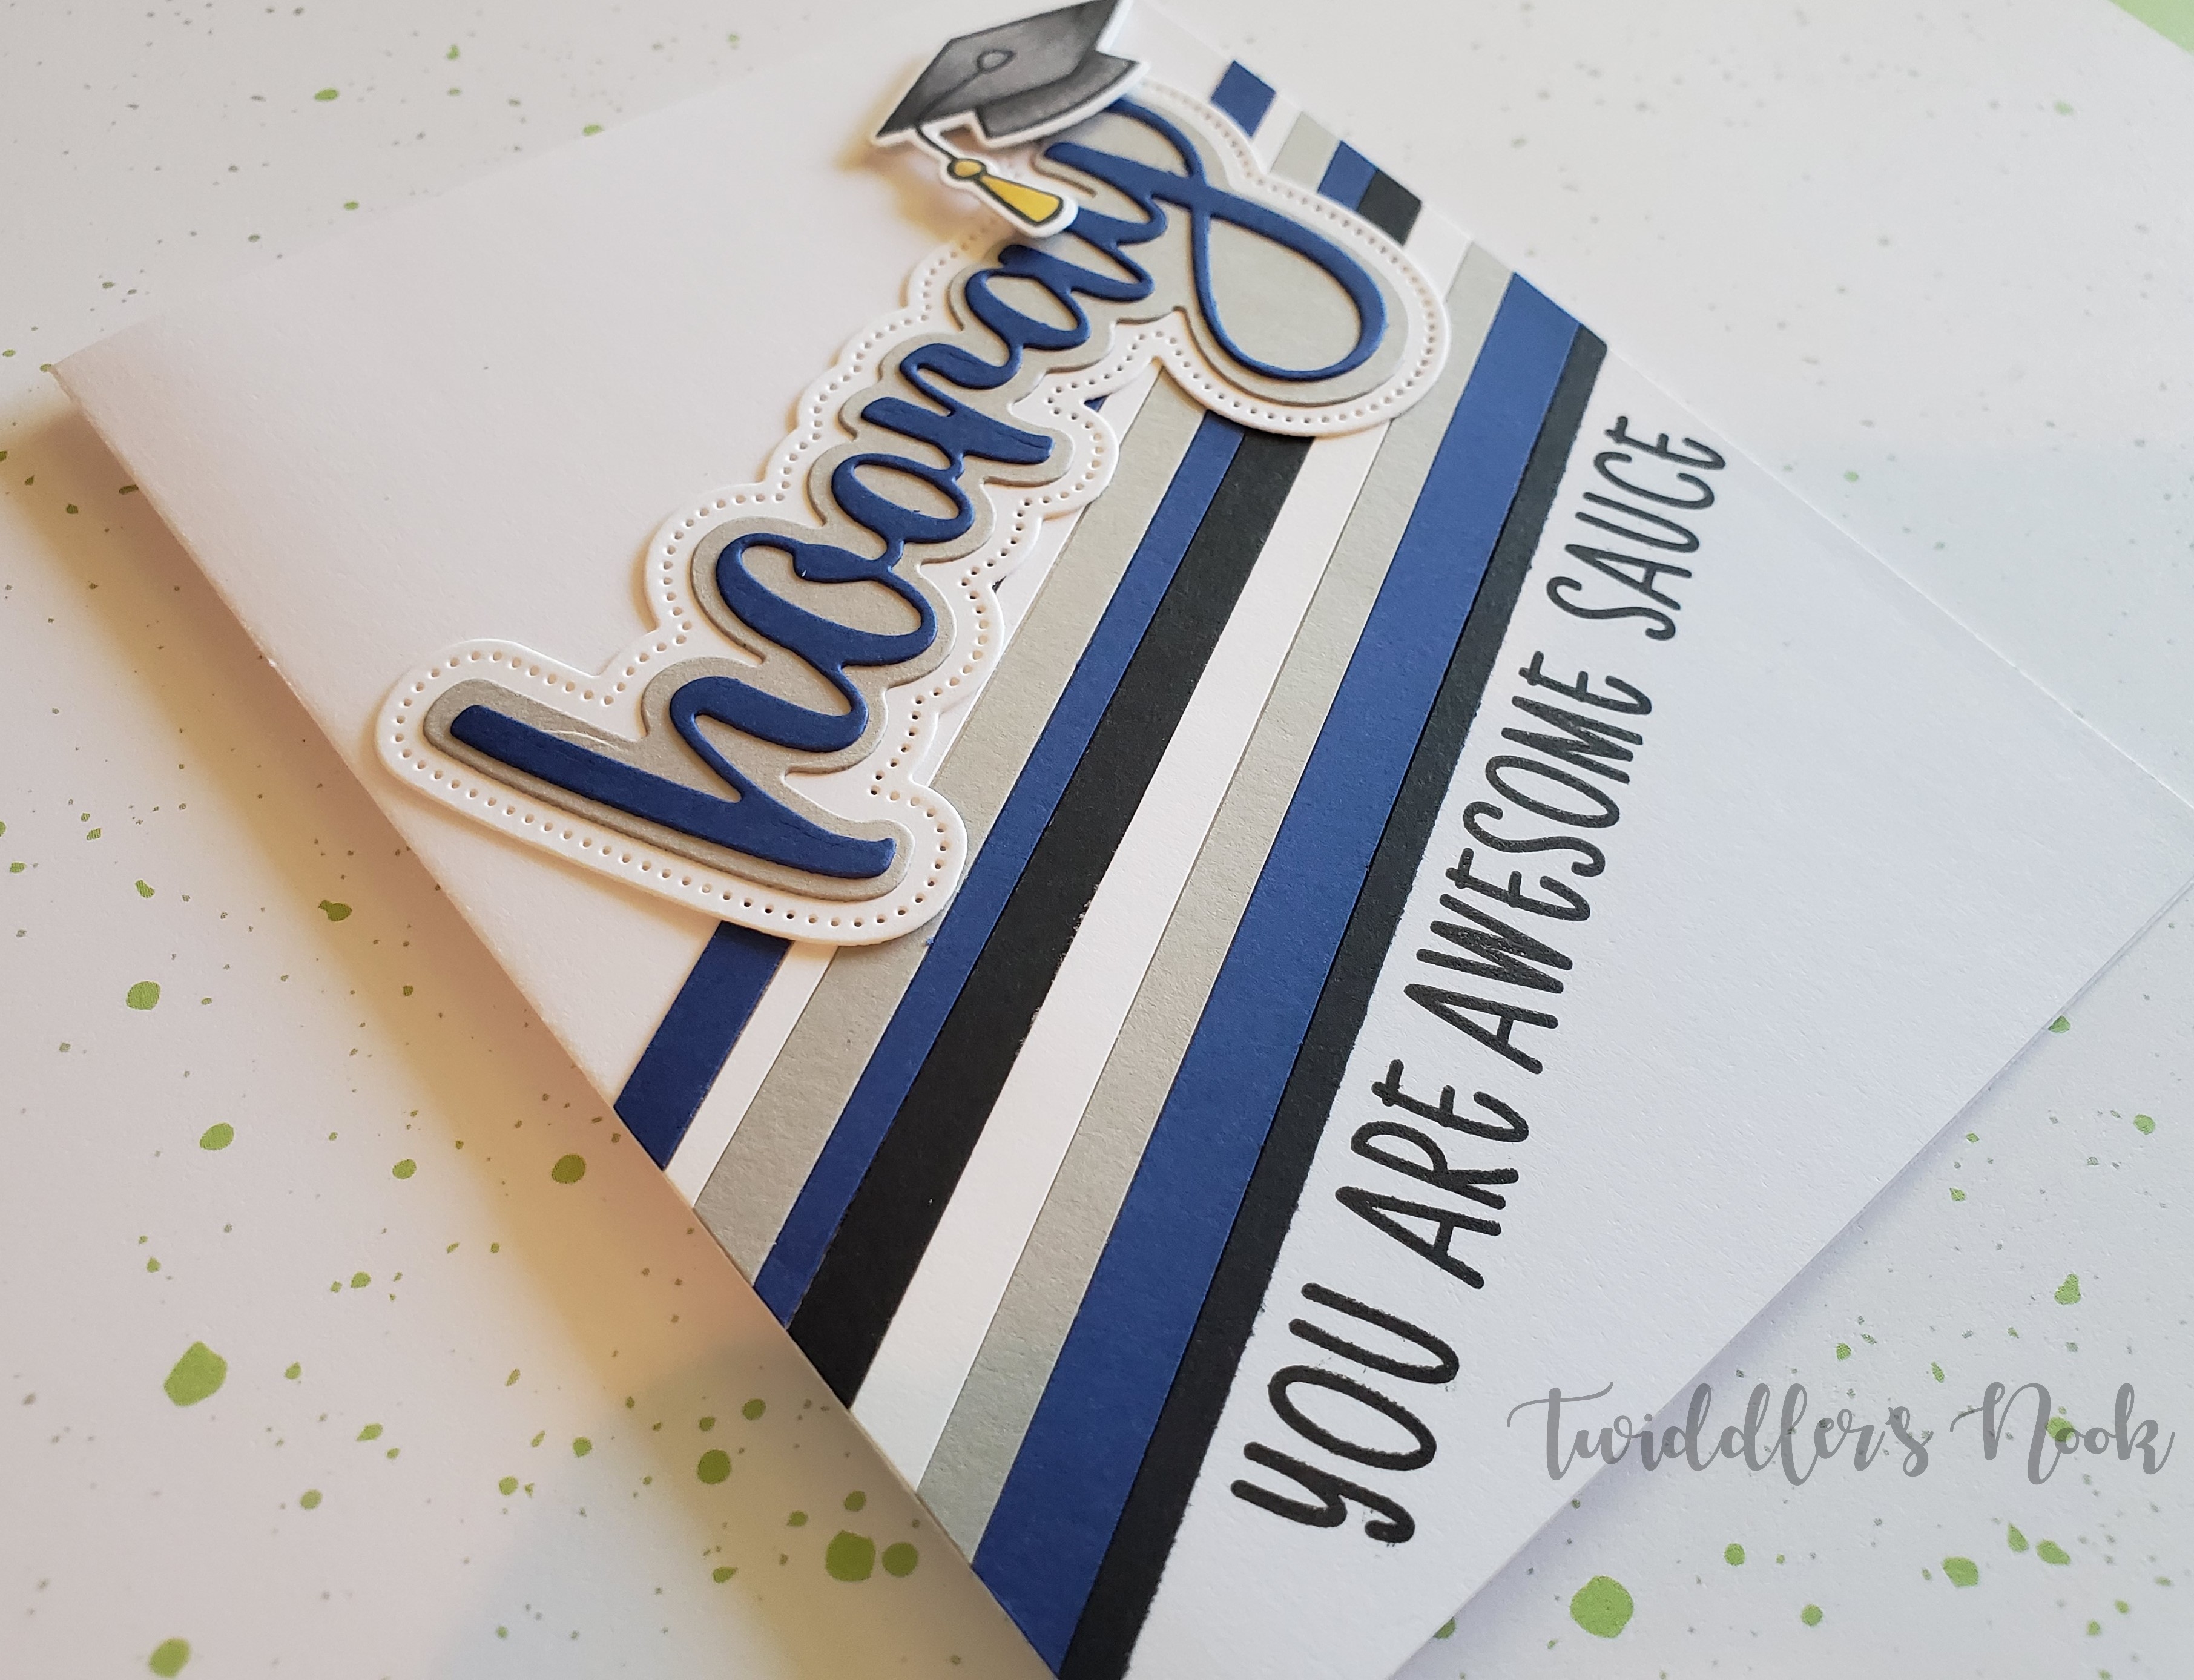
Thanks for stopping by. Today I’m here with a CAS graduation card using Honey Bee Stamps Awesome Sauce sentiment set, Hooray die cut set and Lawn Fawn Hats Off to You stamps and coordinating dies.
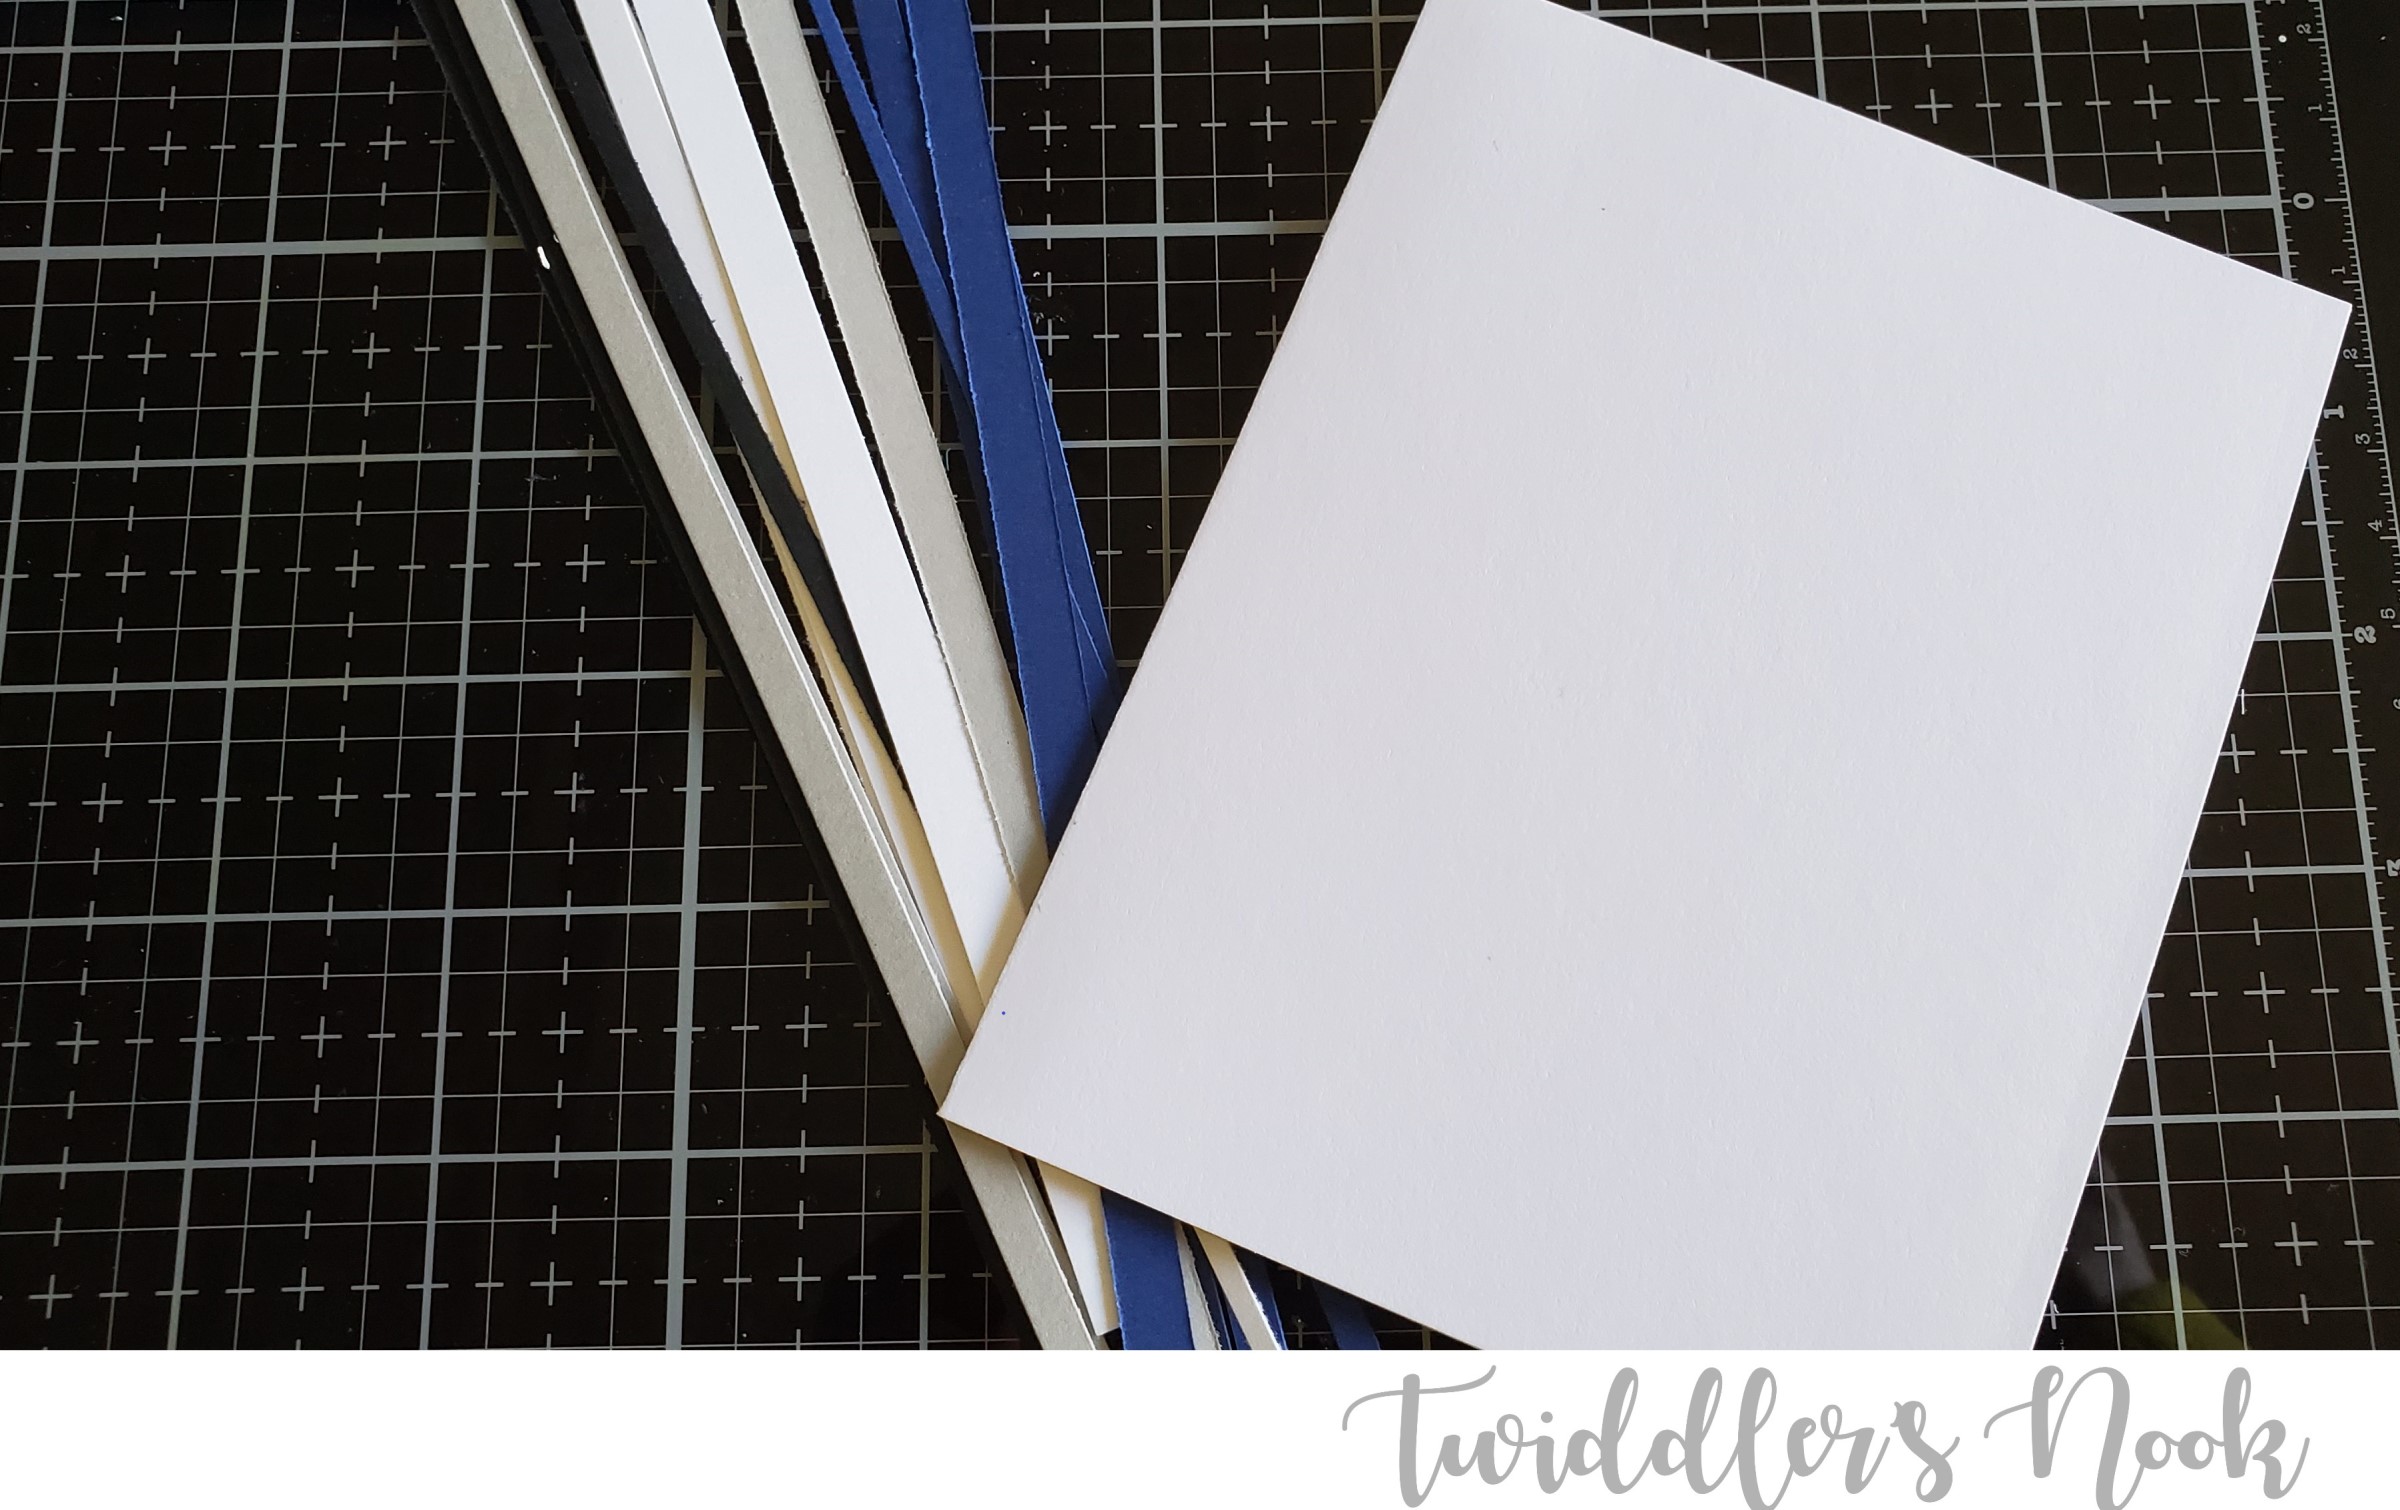
I started with a card base and chose my color palette. I took cardstock of the colors I chose and cut thin strips. I didn’t measure them, trying to make them vary in thickness. Somewhere between 1/8 inch and a 1/4 inch.
Then, I put tape runner on the section of the card that I wanted to add my stripes to and laid the strips down, pressing firmly. I trimmed the excess off the edges of the card sides.
Then I die cut the hooray sentiment from blue, gray and white cardstocks to match the stripes and glued the layers together.
I stamped, color and die cut the graduation hat from the Lawn Fawn Hats Off to You set and laid everything out. At this point I decided to add the “You Are Awesome Sauce” sentiment below the stripes.
After stamping the sentiment I glued the hooray down and popped the hat up with foam squares.
This awesome graduation card is finished and so simple to customize for any senior’s school colors.
I appreciate you sharing your time with me. Have a fabulous day!
Hi there! I hope everyone’s week is going well. I wanted to stop in today with a concept in card design that is very foreign to my brain…CAS – Clean and Simple – cards. These typically have a lot of white space, not a ton of dimension and would be great for mass producing if you needed to. My brain does NOT work this way.
Don’t get me wrong, I see them on Instagram or Pinterest and immediately fall in love with them all the time. I’ve even tried to copy the design a few times and was so uncomfortable with all the white space that the design gets totally changed and I fill it in one way or another.
Honey Bee Stamps has a Facebook page dedicated to their challenges. They hold two a month – 1-15 of the month and 16-end of the month. I hadn’t really been interested in them until lately when all these different challenges were starting to get my wheels turning. For the second half of May, the Honey Bee Stamps challenge is CAS cards with any Honey Bee Stamps you have.
After a car ride with my family Saturday morning and some serious brain storming, I came home to the craft room and set out with one mission…be okay with white space. LOL!!! And…here’s what I came up with.
For this first one, I stamped and colored my bees and flower with copic markers and die cut everything. Then, I stamped the flower stem, leaves, buzzing trails and HELLO directly on the background. Next, I took a stitched rectangle and cut it out from the middle. At this point I thought a little burst of color would be great behind the flower so I took out my distress ink in cracked pistachio and blended an area a little bigger than the flower itself. I added two additional rectangles underneath the original to pop the middle up just a bit and glued it all to the card front. I adhered the flower and bees with foam squares and finished it all off with some lavender Nuvo Crystal Drops. I really do love it!
While I was working on the first one, I wanted to see what the same concept would look like in landscape format instead.
This time I trimmed the panel down to 4×5.25 inches, and used wild honey distress ink in the corner. I stamped my flower, leaves and bee and colored them all with copic markers. I die cut everything and started to assemble. I popped up the flower and bee with foam squares and then alternated popping up and gluing leaves to the panel itself. I stamped the sentiment and buzzing trail directly to the panel. Next, I glued the panel directly to the card front and added some clear Crystal Nuvo Drops for a finishing touch.
I love both of these cards so much! It has inspired me to be okay with white space a little at a time and to think outside the box in uses for some of my other stamps. Have you created CAS cards? Do you like them? Leave a comment below and let me know.
I appreciate you sharing your time with me. Have a fabulous day!
I love creating and I love sharing what I create with those around me. I go through phases of spamming my Facebook and Instagram accounts with my creative process and end result projects. In doing so lately I thought, maybe I should focus my audience to people who actually want to see these things instead of my unassuming and innocent friends and family.
Since you’ve made it this far, I assume you’re interested in seeing fun paper creations and maybe even find some inspiration. I hope you enjoy it. Please feel free to leave me comments and let me know what you like and what you don’t. Constructive criticism is fabulous and appreciated as I find my way along this journey.
I’d like to start by sharing some cards I’ve made in the past that stuck out to me as a favorite or specific success.
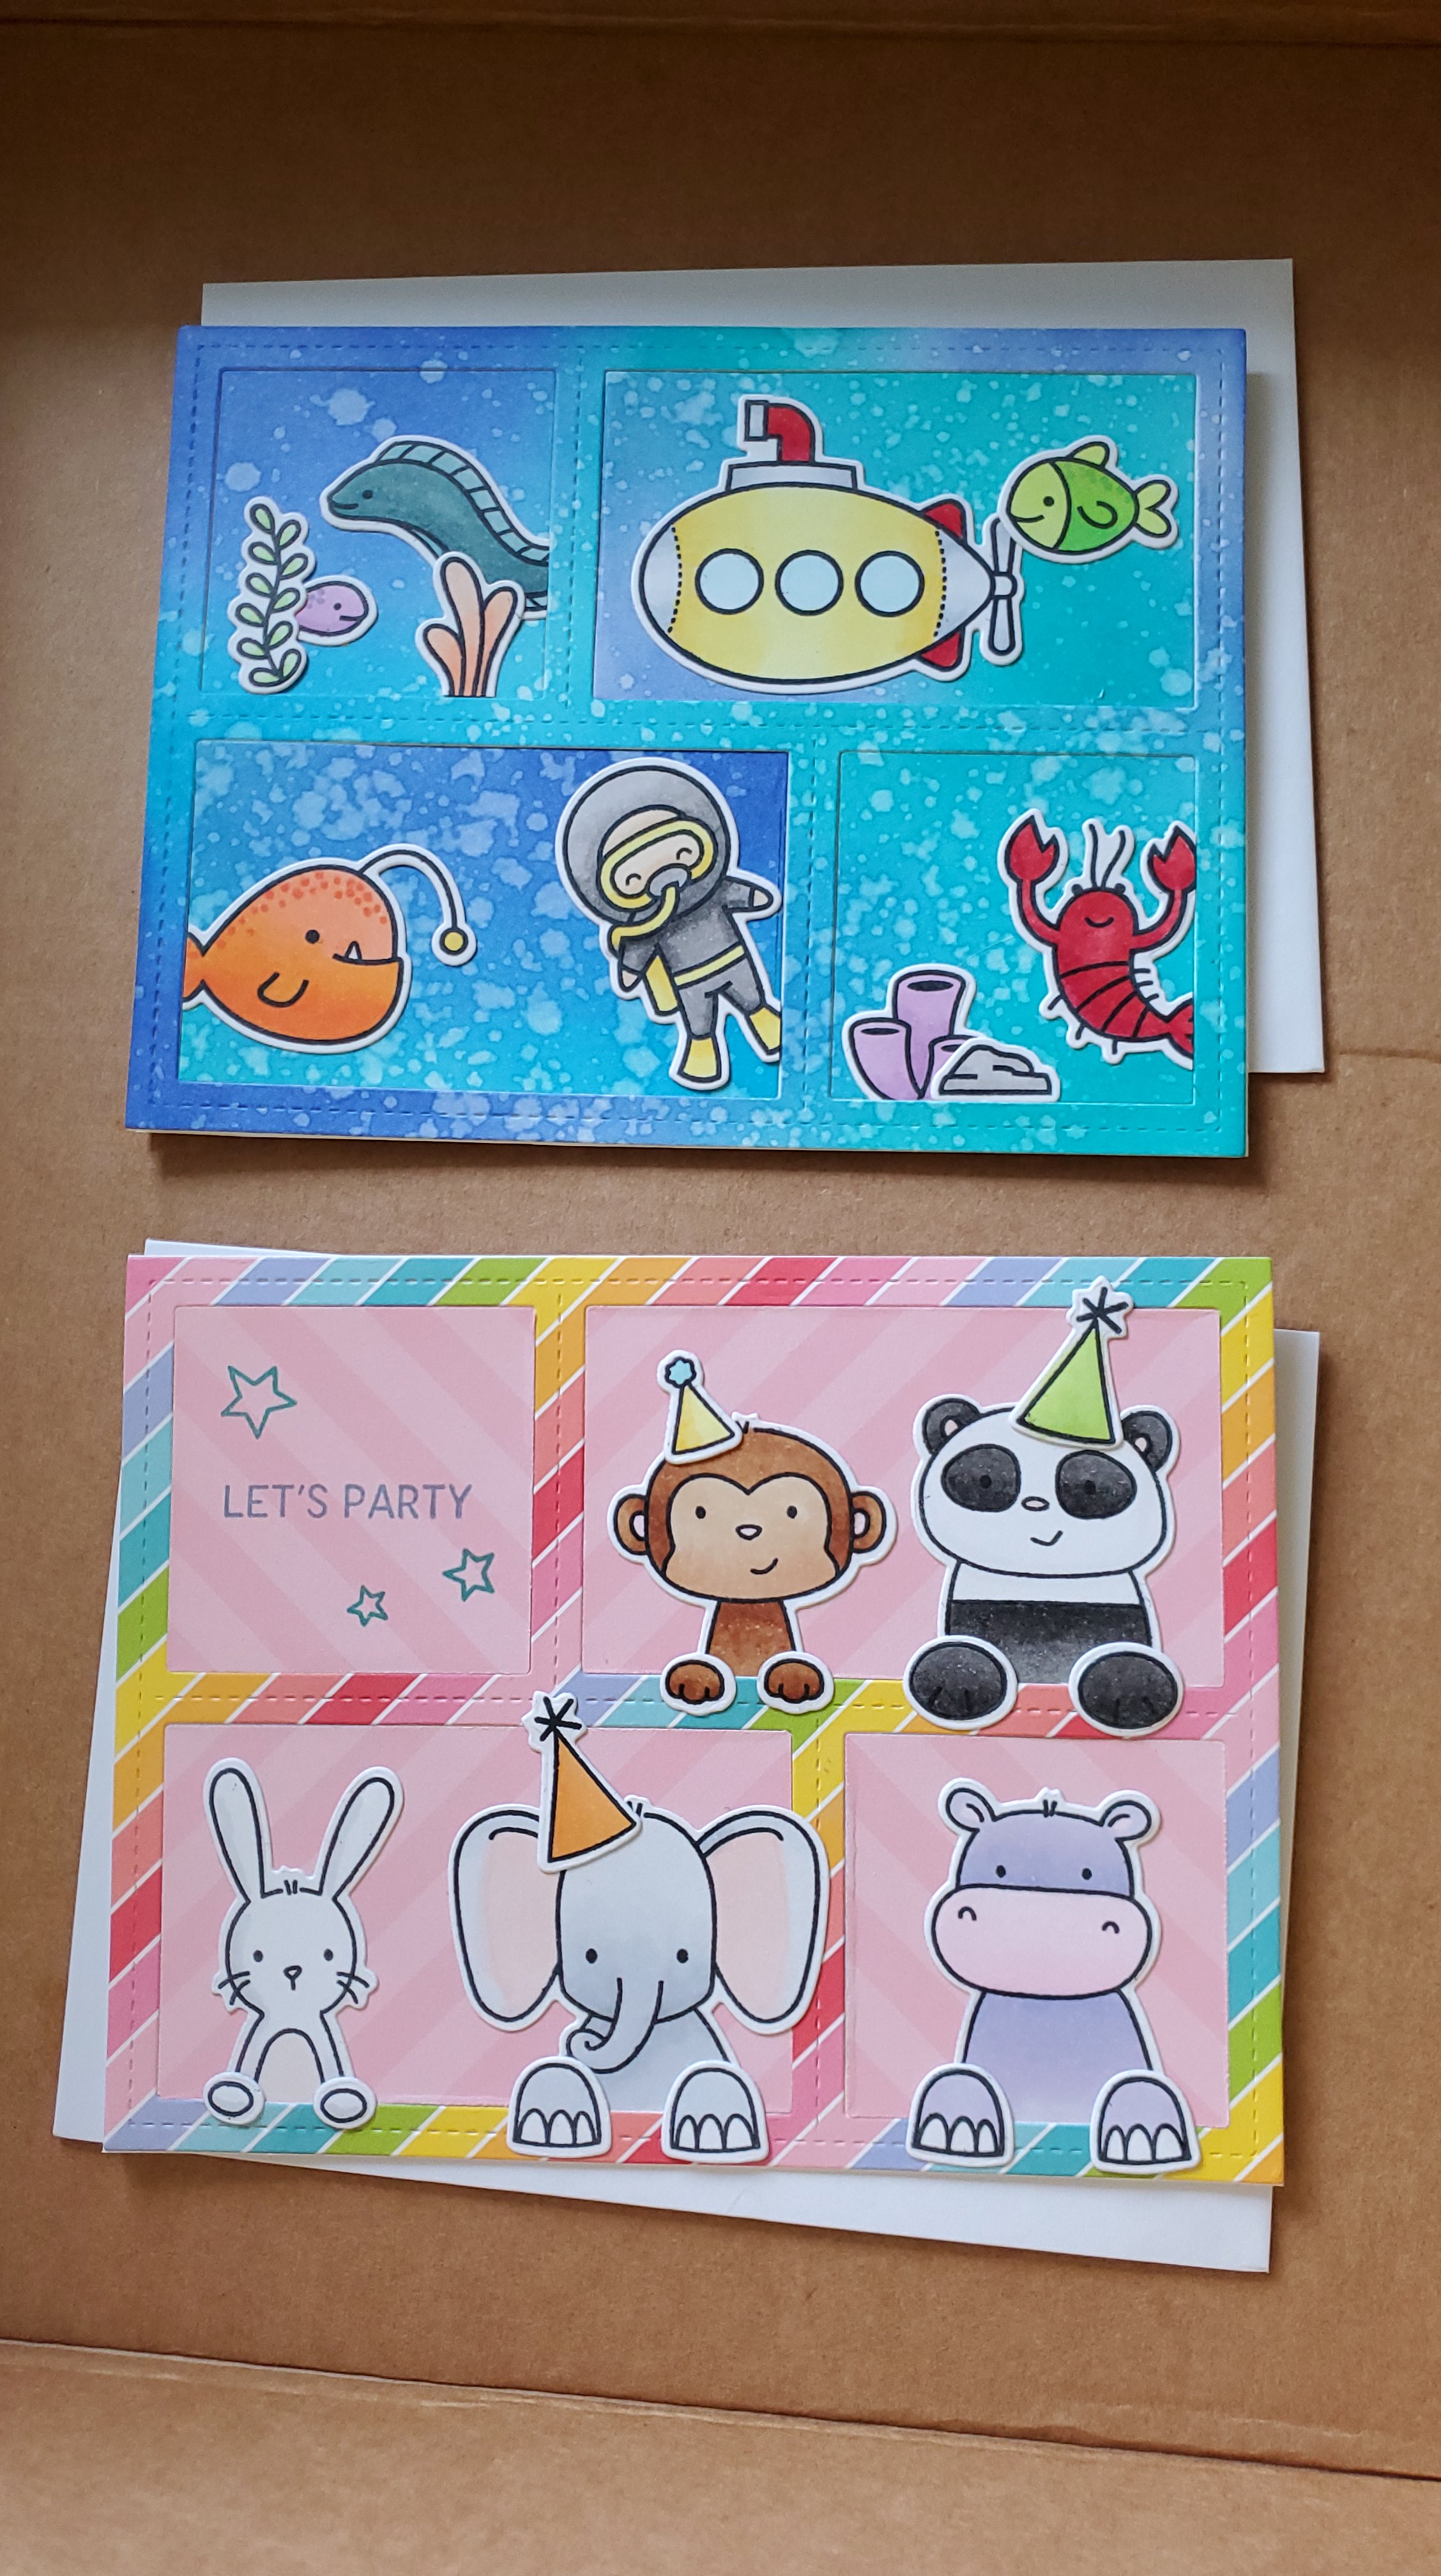
Here I’ve used the Lawn Fawn peek-a-boo backdrop die on both cards which gives you four fun windows to play with. For the top card I used distress inks to blend a water background and spritzed it with water give the cool distressed look. Then I added critters, a diver and the submarine from the Lawn Fawn You Are Sublime stamp set. It turned out so cute, I loved it! The bottom card showcases Lawn Fawn’s Really Rainbow paper and an Avery Elle stamp set called Peek-a-Boo Pals. I colored all of the stamped images in these two card with copic markers.
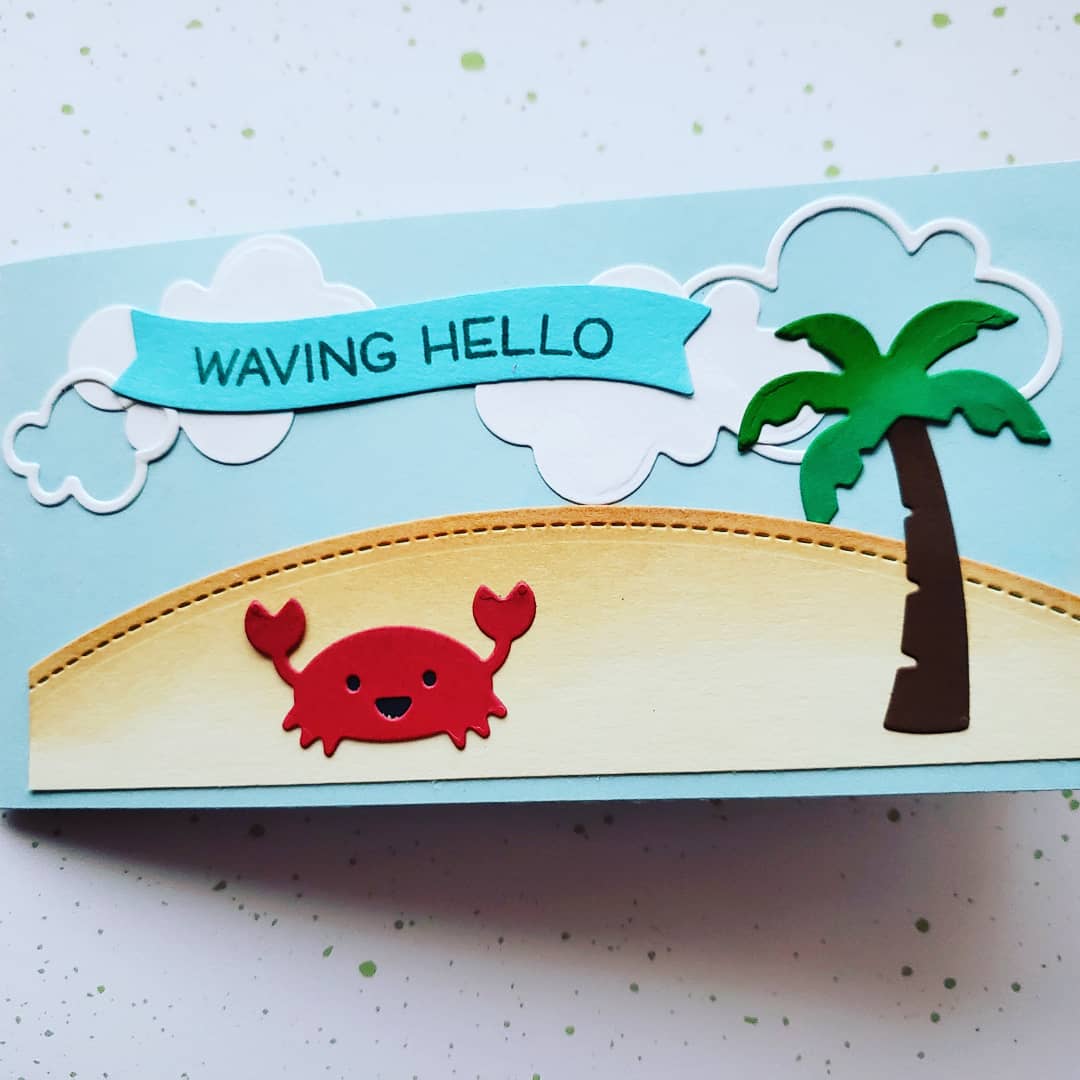
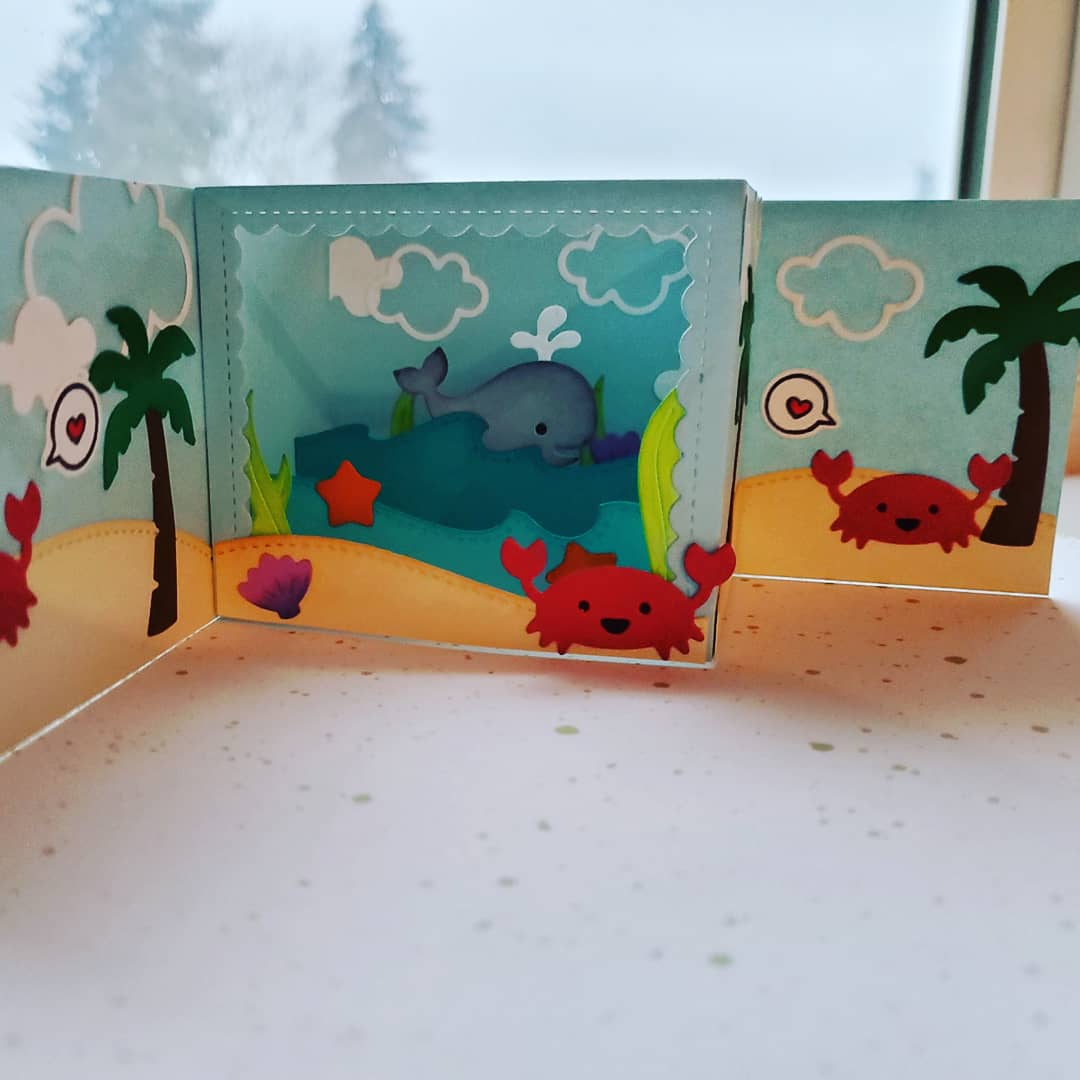
Next I am really excited to share a shadow box card features a spattering of Lawn Fawn dies. The only stamping on this card is the sentiment. I was so excited how it turned out. I love it so much!
Here is the front giving the recipient a little clue about the fun in-store when they open it. I love this little crab and palm tree. But once they open it…
there is this amazing shadow box filled with a whole ocean/beach scene! Love from the crabs all around and a little whale peeking in to say hello too! This card was so much fun to make.
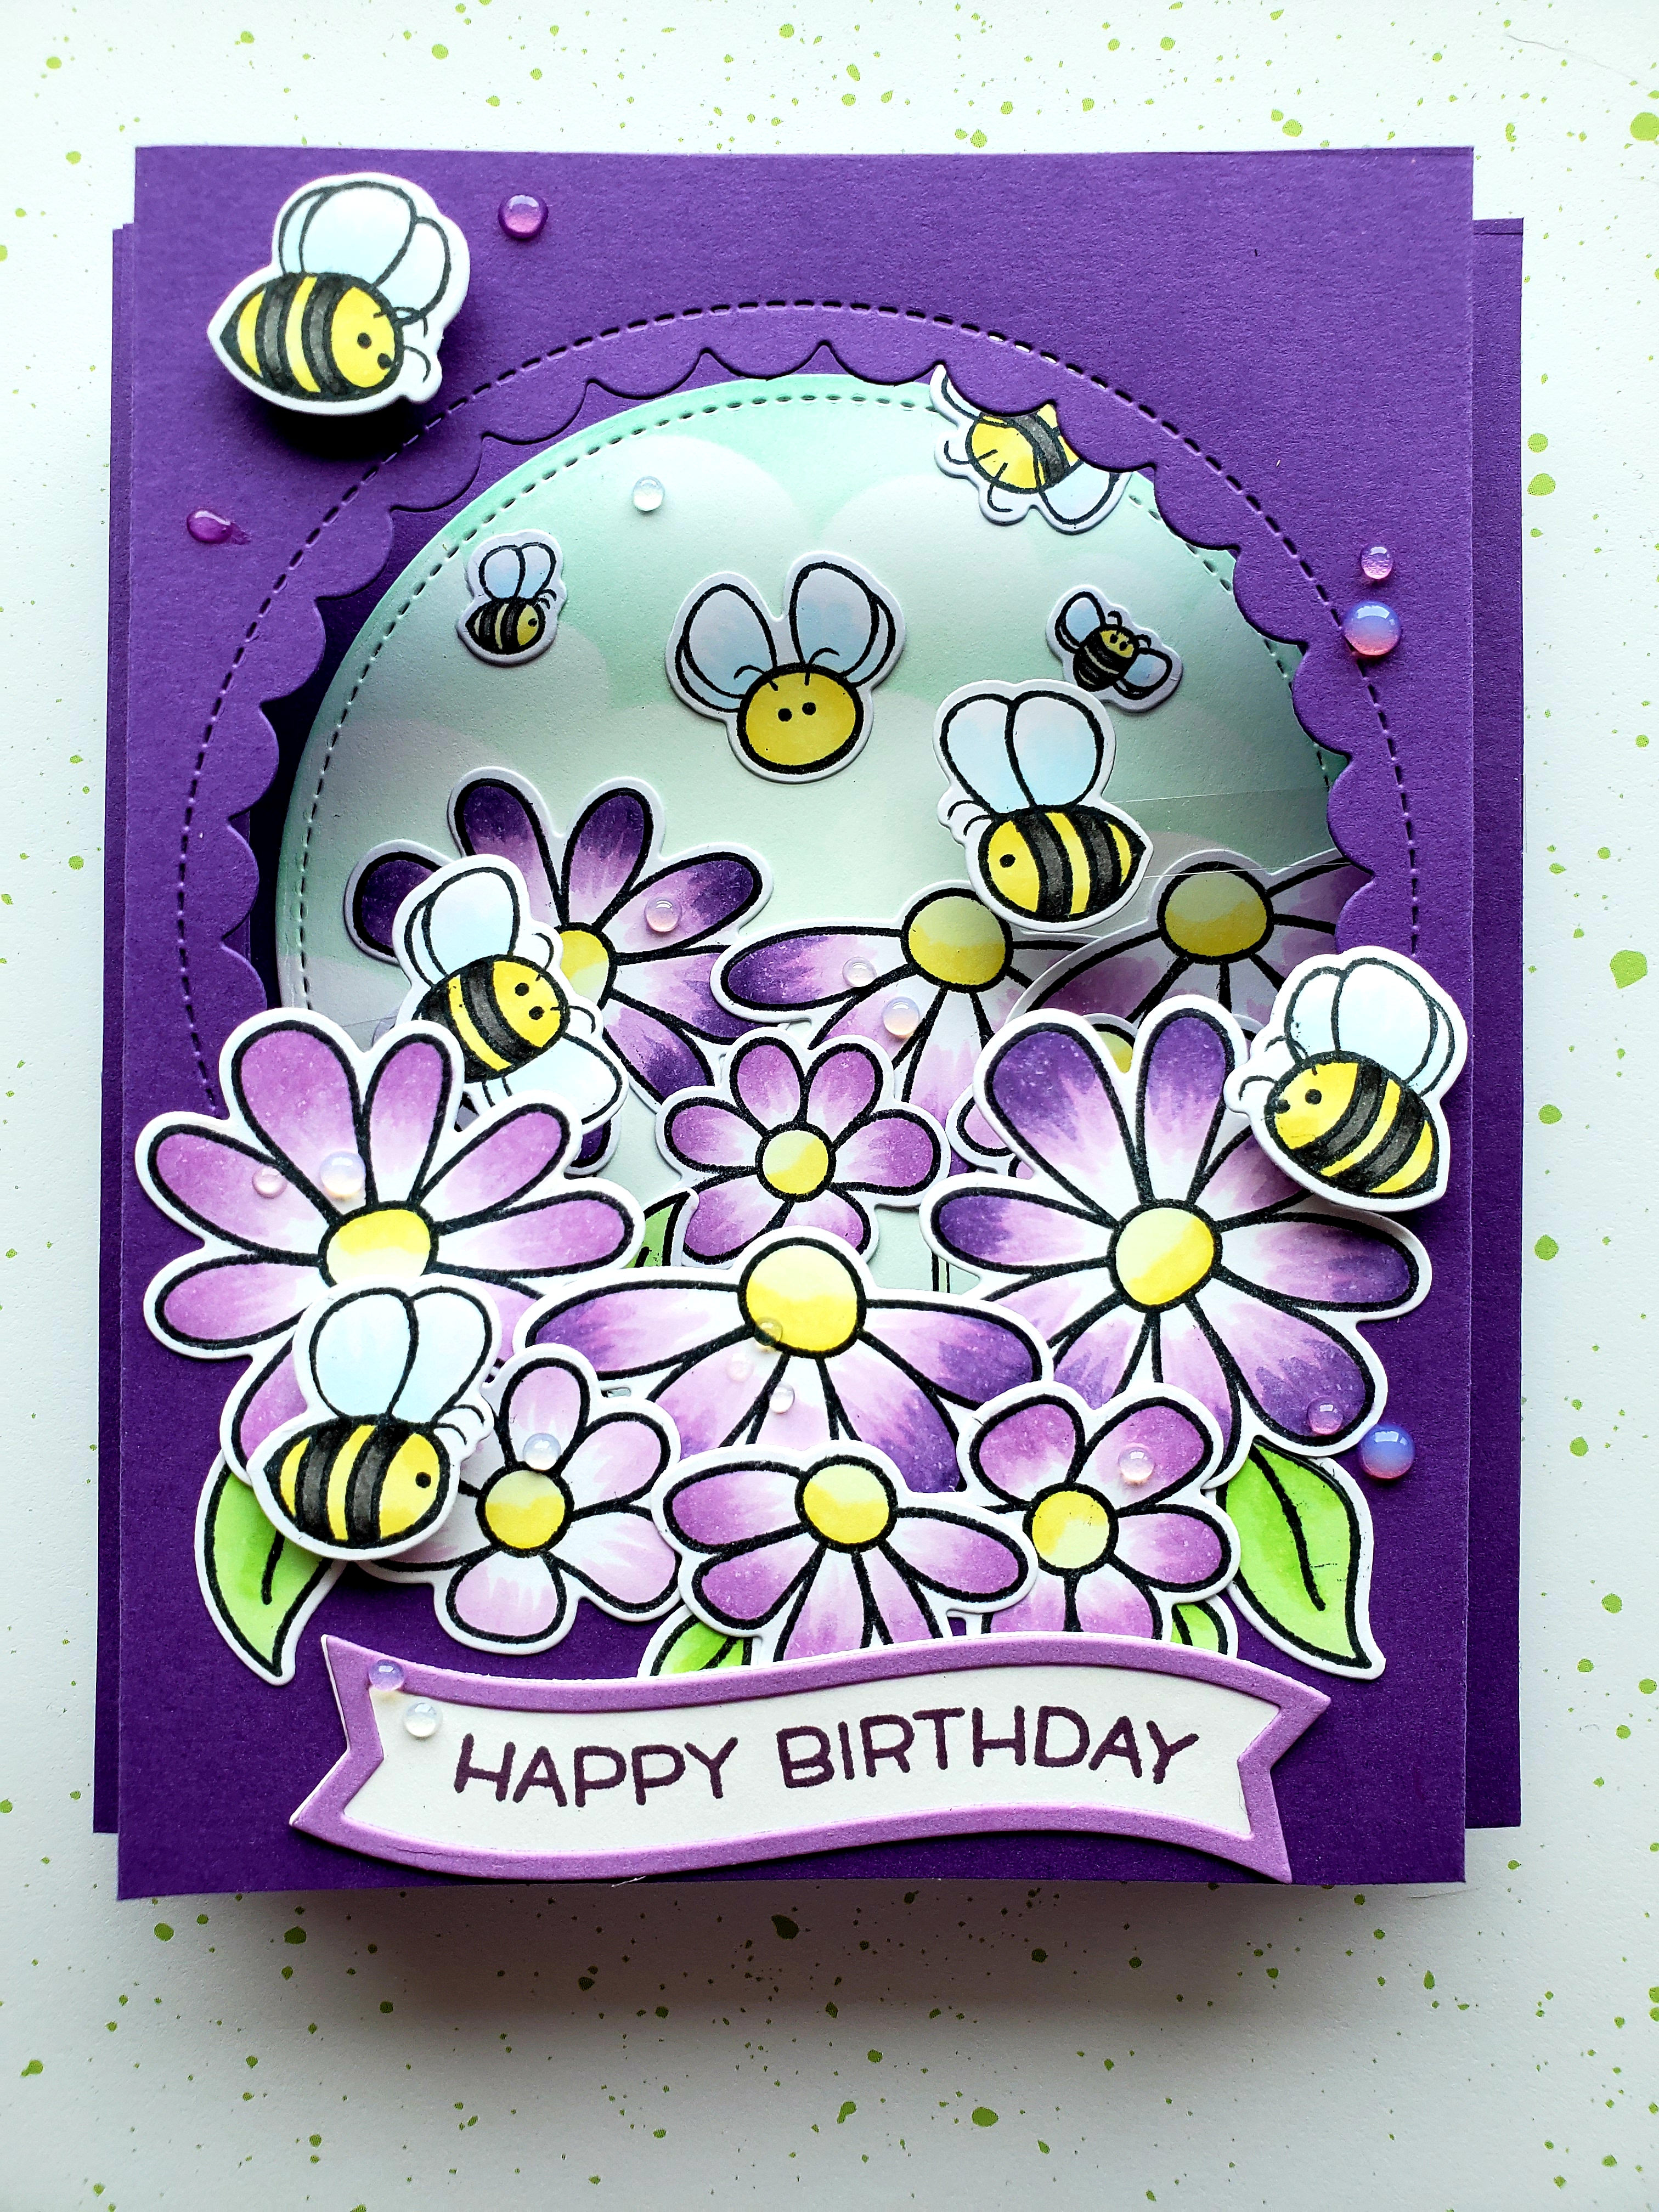
This last card is my latest pièce de résistance. It was a card for my grandma’s birthday. I spent over a week planning it out in my head and most of a day stamping, coloring and assembling it.
It features Honey Bee Stamps Busy Bees stamp set and dies, along with the Lawn Fawn Fancy Wavy Banners stamps and dies for the sentiment and finally some Nuvo Crystal Drops in Morning Dew. This is a shadow box card that squishes flat to fit in an envelope and then pops open when you pull it out. If you look carefully, two of the bees inside are mounted on clear acetate strips and move from side-to-side when you pull on the tabs of the card. It looks like they are buzzing around the flowers. I love the dimension of this card and how well the colors came together.
This is just a small sample of some cards I have made in the past few months and was excited to share. I can’t wait to share more with you and have some fun themes planned over the next few months. I hope you come back to see what I’m up to.
I appreciate you sharing your time with me. Have a fabulous day.