12 Days of Christmas Tags Winners and a Bonus Tag

Thanks so much for stopping by today to see if you’re a winner from the 12 Days of Christmas Tags series! I want to thank everyone who took a moment to check out my creations, like, comment and share the love through this event and every day. It really does mean a lot and I love reading the comments to see what catches people’s eye and what draws them in. Thank you! Thank you! Thank you!

Today I wanted to share a bonus tag with you as well. But if you’re really here for the winners, you don’t have to wait, just scroll down to the bottom of this post. ❤

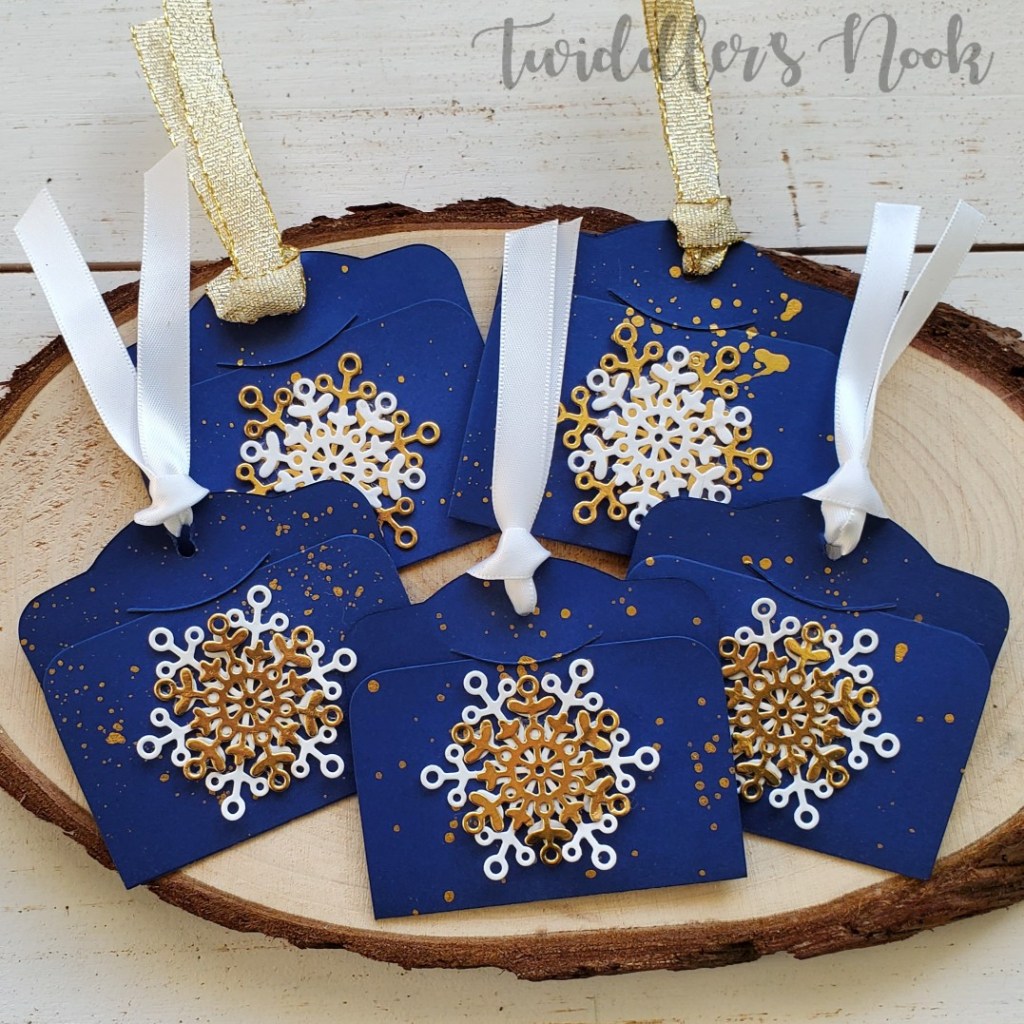
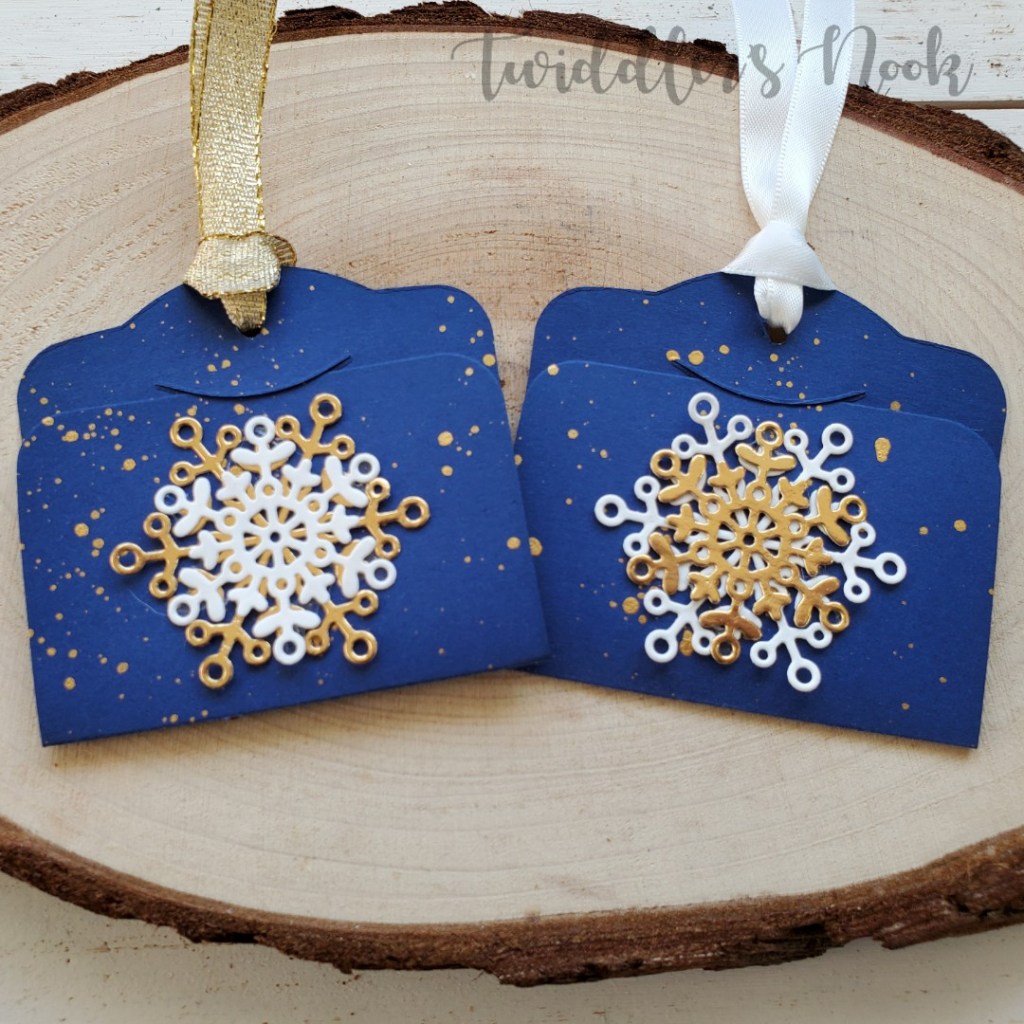
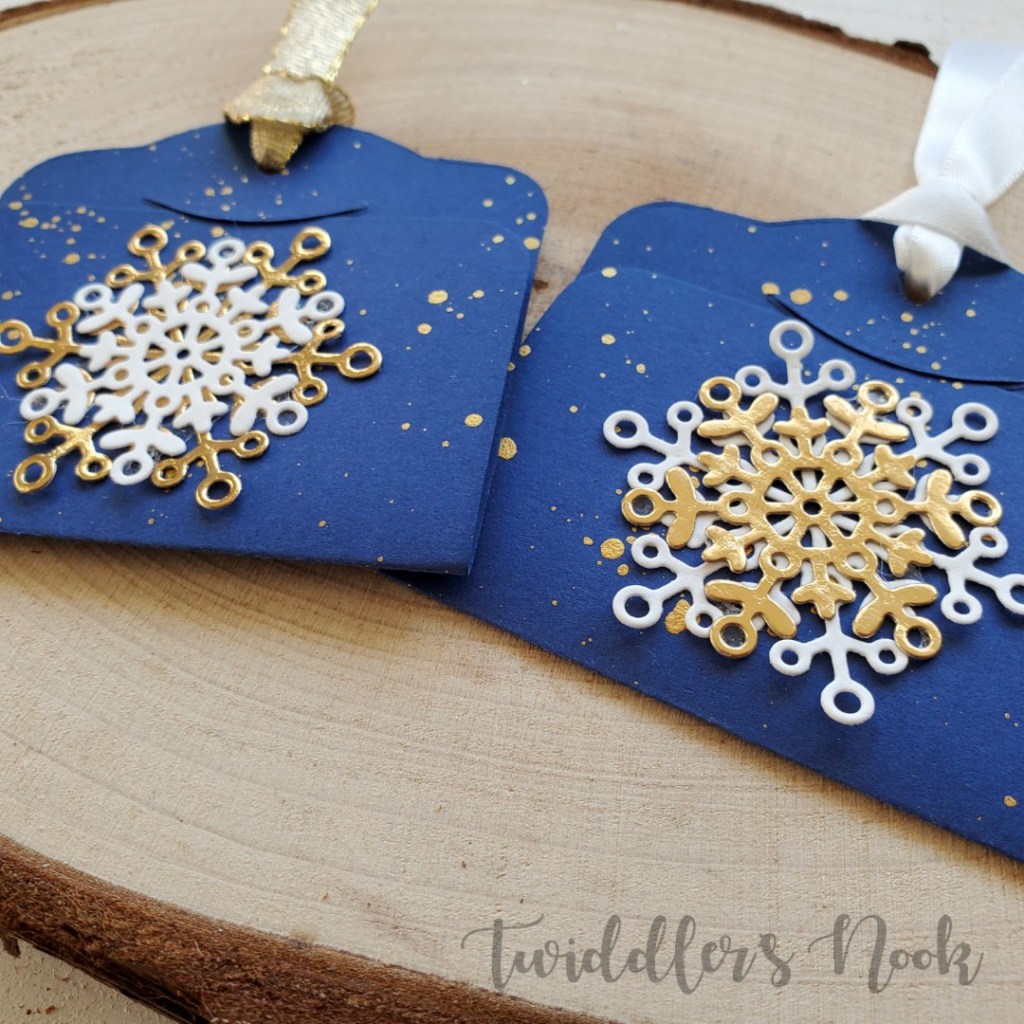
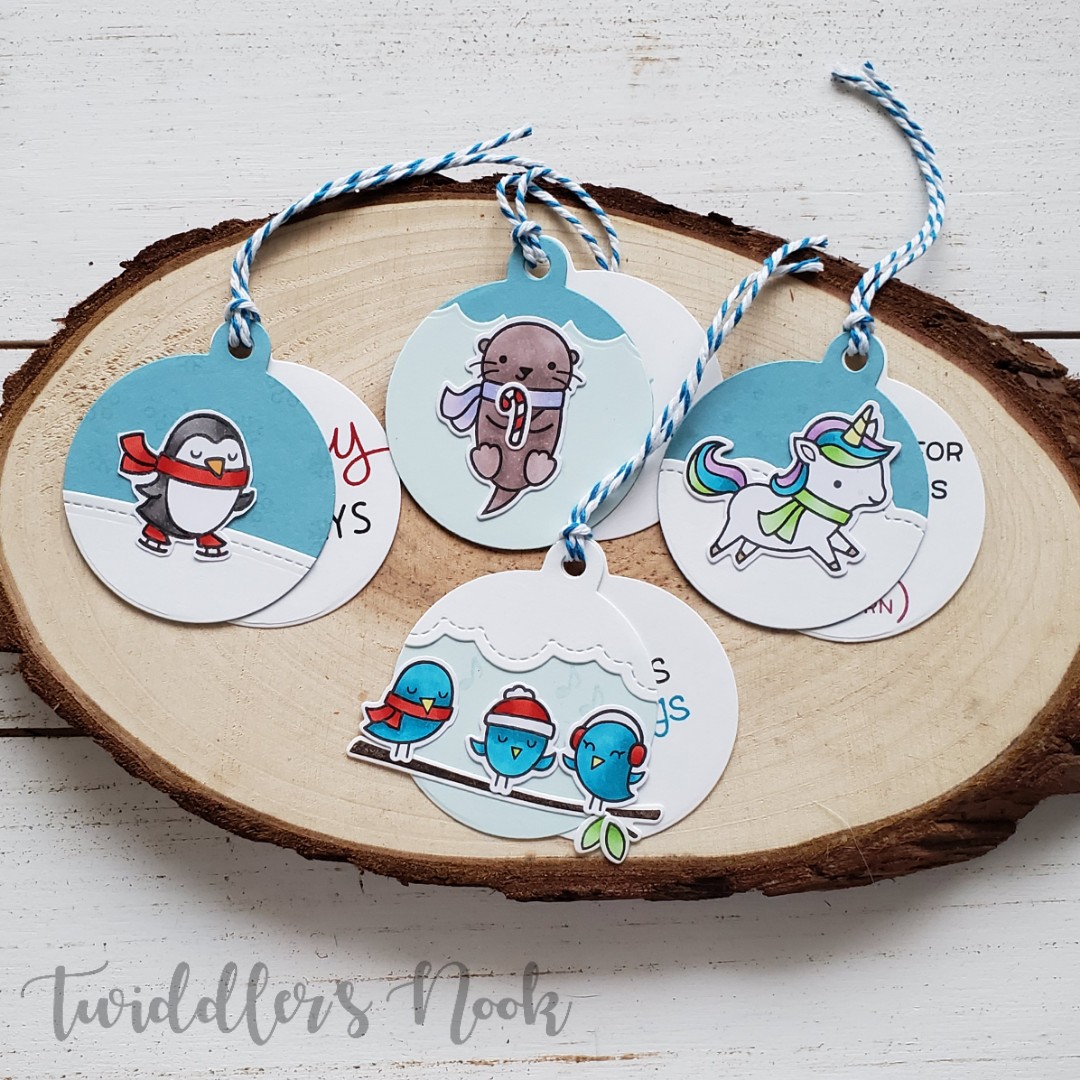
This tag is a mash-up between Trinity Stamps and Lawn Fawn dies. I took the bear from Have an Ice Day, stamped, colored and die cut him and then started on my tag shape. I wanted something I hadn’t used but I didn’t have any other true tag die cuts so I made my own again. I die cut the add-on to the flippin’ awesome as my base in white and dark blue cardstock and again in iridescent vellum. Then cut the vellum with a simple stitched hillside border to make my ice.

Next, I took my blue tag base and splattered it with gold and pearl watercolor and adhered the ice to it. Then I glued the white tag to the back so I can add the recipient’s name later on. I popped up my bear with foam squares and added a holly jolly candy cane from Trinity Stamps to the bear’s hand.

For finishing touches I added glossy accents to the skates and bear’s nose. Then, I took my Wink of Stella glitter brush pen to the scarf, mittens and tops of the boots. I also added black glaze pen to the bear’s closed eye and then some ribbon through the hole I punched.

This is also one going under my tree for Christmas so the secret name was die cut and glued to the back just the the others. I hope you’ve enjoyed this series! Thank you for hanging out with me!

On to the WINNERS!!!!!!!!!

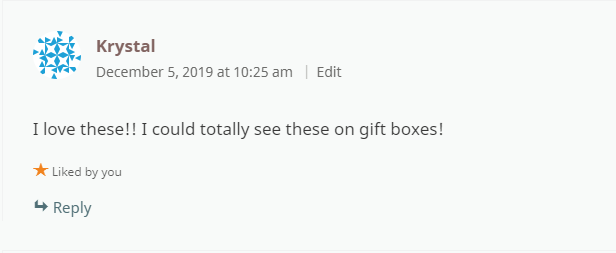
Winner 1 – $15 gift card to Newton’s Nook
The random number generator chose Day 4, comment 8 which was Krystal.

Winner 2 – Loaded enveloped of fun goodies that I made
The random number generator chose Day 5 and the IG comment picker chose @beccay217.

Winners please direct message me on Instagram or Facebook or email me at twiddlersnook@gmail.com to claim your prizes. You have until Monday at 6 p.m. PST or I will choose new winners.

I appreciate you sharing your time with me. Have a fabulous day!

12 Days of Christmas Tags – Day 12

Oh my goodness everyone! We did it! We made it 12 days of so many fun tags! We started with lots of mass production ideas and then transitioned into those more personal gift tags. So many ideas!

Thank you so much for joining me! Words cannot express how fun and rewarding it is to hear that you enjoy what I create and maybe even get a little inspired to make something fun too.

On with the show for today’s tag! I pulled out my Lawn Fawn stamps and dies again because I really wanted to make this snow globe into a tag!

To do this one, I stamped, colored and die cut my images. Then die cut another plain white snow globe for the backing.

I assembled my images on the front, popping up the snowmen with foam squares and flying everything else down. But when it was time to adhere the two pieces I pulled out my tiny tags set and die cut the top of the circle ornament tag and glued it in between my snow globes! Voila! String hole! (Yes, I feel like a genius in this moment. 😂)

For finishing touches on this fun tag I added glossy accents to the snowman noses and the globe label. Then I took my Wink of Stella glitter brush pen and went over the scarves, hats and Santa in the sky.

Once the glossy accents was dry, I added black glaze pen to the eyes and buttons and white gel pen accents throughout.

Look at all the shimmer and shine! You all have to know by now how much I love extra! 😉

Very last, just like the others recently, I die cut the recipient’s name and glued it on the back, then added baker’s twine to the top.

Don’t forget there are prizes to be won. Comment each day on here, on my Instagram post for the day and then head to Caffeinated Craftiness and do the same for her. Four comments per day gives you a shot at any one of four prizes!

I appreciate you sharing your time with me. Have a fabulous day!

12 Days of Christmas Tags – Day 11

I can’t even believe we’re already to day 11 of this fun series! I have so many more ideas to share and I’m out of time! I suppose there’s always next year.

For today’s tag, I’m using this cute mini set from Newton’s Nook called puppy present.

I used my paper trimmer to cut a custom tag and then inked the background with my ornaments stencil. Then I glued it to white cardstock and cut it out again. This helps with stability and a place for the name layer in. Next, I stamped, colored and die cut 3 puppies from the set and started to assemble. I used washi tape along the edge of the tag to create a “floor” and popped the puppies up with foam squares. The I die cut a speech bubble and stamped my sentiment. This is popped up as well.

I threaded some baker’s twine through the hole and started on finishing touches. First off was black glaze pen to the eyes and white gel pen accents to the images.

Then I added glossy accents to the noses and Wink of Stella glitter brush pen to the speech bubble, hat trim and package bows.

And then, last of all I die cut the recipient’s name from the same green cardstock and glued it to the back.

Don’t forget there are prizes to be won. Comment each day on here, on my Instagram post for the day and then head to Caffeinated Craftiness and do the same for her. Four comments per day gives you a shot at any one of four prizes!

I appreciate you sharing your time with me. Have a fabulous day!

12 Days of Christmas Tags – Day 10

Thanks so much for joining me again today. I’m having a blast making special tags for someone specific! Today I’m sharing another one that will be under our tree Christmas morning.

I decided to make a star shaped under the sea tag this time. Super simple but so much fun! I used all Lawn Fawn products on this tag. I stamped and colored the images with my copics, then die cut them all out and arranged my scene on the star tag.

After everything was adhered down I added white gel pen accents to the images, black glaze pen to the critter eyes, glossy accents to the lights on the seaweed tree and Wink of Stella glitter brush pen all over various images.

The gloss on the lights makes them look like they are lit and the glitter all over is so much fun!

I’m so happy with how this fun tag turned out. Last of all I die cut the recipient’s name and glued it on the back. But once again, that’s a secret for now. 😉

Don’t forget there are prizes to be won. Comment each day on here, on my Instagram post for the day and then head to Caffeinated Craftiness and do the same for her. Four comments per day gives you a shot at any one of four prizes!

I appreciate you sharing your time with me. Have a fabulous day!

12 Days of Christmas Tags – Day 9

Oh my goodness, we’re already three quarters of the way through our series! This has been so fun and has stretched my creative thinking in new ways. I love it! I hope you’re enjoying it too!

Today I’m sharing a different take on Christmas tags…the opposite of mass production. ❤

I really wanted to make a special tag for a special gift we’re giving this Christmas so I treated it like a smaller card front. I used the Newton’s Nook – Newton’s Tobbogan stamps and dies paired with the snowfall stencil for this one.

I blended distress ink on a panel and went over it with white and my stencil. Then I used my Cricut to cut it into a tag, plus 2 white tags of the same size. Then I used a stitched hills die to cut a snow hill and adhered it. I took my image and popped it up with foam squares and then stamped and heat embossed my sentiment. Finally I added this really fun velvet ribbon to the tag whole and moved on to finishing touches.

For those, I added white gel pen accents throughout and wink of stella glitter brush pen to the hats. Then I took glossy accents and put them on kitty noses, mouth and toe beans; plus the scarves and hats all have shiny accents too.

The very last thing I did was die cut the recipient’s name from the same pink, blue and purple colors as the tag’s color palette and glued it to the back. That part is a secret though. 🙂

Don’t forget there are prizes to be won. Comment each day on here, on my Instagram post for the day and then head to Caffeinated Craftiness and do the same for her. Four comments per day gives you a shot at any one of four prizes!

I appreciate you sharing your time with me. Have a fabulous day!

12 Days of Christmas Tags – Day 7

Thanks for stopping by today! We’re all the way to day 7 of our series and I’m really excited about today’s tags. I bought this Flora and Fauna stamp set at least a month ago, hoping to have a chance to use it. These tags were the perfect excuse!

Do you ever have leftover from another project laying around that you don’t want to waste? I hate that and it usually drives me nuts until I find a use for it. Today’s tags started with that. Those white panels were the centers of the frames from Day 5! Pair them with these great Flora and Fauna stamps and we have adorable, easy to mass produce tags!

I used my Misti to stamp the pieces one at a time so it went really fast. I saved the Fa La La for last because I knew I wanted to heat emboss it in gold. After that was done, I die cut the base and glued them all together, adding black twine to the top.

I made 10 of these tags in about 20 minutes total, which is pretty quick for me. You could save even more time if you didn’t heat emboss and just used another color of ink too! I will be honest, I contemplated adding Stickles to all of the berries but I held back…this time. 🙂

Don’t forget there are prizes to be won. Comment each day on here, on my Instagram post for the day and then head to Caffeinated Craftiness and do the same for her. Four comments per day gives you a shot at any one of four prizes!

I appreciate you sharing your time with me. Have a fabulous day!

12 Days of Christmas Tags – Day 6

Thank you so much for stopping by today. We’re half way done with our 12 Days of Christmas Tags series already. I can’t believe it. Today I have an all die cut treat holder tag to share with you.

The tags are cut from an oldie but goodie die from Stampin’ Up called Two Tags. I can’t count how many times I’ve reached for this one over the years. It’s so versatile for so many things.

Today I die cut one of the tags from dark blue cardstock and inked the edges with faded jeans distress ink. Then I splattered it with gold watercolor. Next, I die cut the two smallest snowflakes from the November Spellbinders Small Die of the Month in gold and white cardstock and adhered them to the front. I looped some ribbon through the hole in the top and voila!

I have a hard time with decisions on projects like these so whenever possible I just make half one way and half the other. Above you can see that I did some with white ribbon and others with gold. Then I also flip flopped with snowflakes were white or gold. I love them both and just couldn’t pick a winner.

When you open the flap there is an Andes mint glued inside with removable adhesive that rubs away really easily. That still leaves one whole side for you to write a message on if you’d like.

Treat or no treat, these are beautiful and I’m ecstatic with how they turned out. I’m telling you, gold is my holiday color this year.

Don’t forget there are prizes to be won. Comment each day on here, on my Instagram post for the day and then head to Caffeinated Craftiness and do the same for her. Four comments per day gives you a shot at any one of four prizes!

I appreciate you sharing your time with me. Have a fabulous day!

12 Days of Christmas Tags – Day 5

Hello! Today I’m so excited to share my very first shaker tags! I’ve been wanting to make something like this for quite a while and everything just came together in my head perfectly. I’m so happy with how they turned out!

The supplies I used today were all Avery Elle. I started by die cutting the Shaker Tags and then blended distress inks on the panels. Then I die cut the frames 4 times for each tag and glued them together. I die cut an additional frame from white cardstock and the base again from acetate for my window and glued those together.

I set the stacked tags aside to dry while I colored my images from Polar Playtime. I love these little guys so much! I planned out the placement and stamped my sentiments before adding all the shaker bits to the inside and sealing it all up.

I just love how these turned out! The coordinating colors are so much fun and I also love the non-traditional color palette that just kind of happened by accident. Sometimes things just work out.

Don’t forget there are prizes to be won. Comment each day on here, on my Instagram post for the day and then head to Caffeinated Craftiness and do the same for her. Four comments per day gives you a shot at any one of four prizes!

I appreciate you sharing your time with me. Have a fabulous day!

12 Days of Christmas Tags – Day 4

Welcome back everyone! today I’ve got a set of 4 fun double tags to share with you. They are easy to make with just about anything in your stash.

To make each of these I cut a white circle tag – mine happen to be from Close to My Heart but tons of companies make them. This is where the sentiment is stamped and your to/from goes on the back.

Then I cut more of the same size tag in blues and a couple more from white to add clouds, ice and water. I stamped, colored and die cut my images and began building them all.

The images were from a bunch of Lawn Fawn winter sets: winter sparrows, winter otter, winter penguin, and winter unicorn. I always have fun playing around with the mini sets they come out with!

After the scenes were adhered together, I took the scene and coordinating sentiment tag and looped twine through them. These were super easy to come together and absolutely adorable! Also, perfect to personalize that gift for someone special in your life.

Don’t forget there are prizes to be won. Comment each day on here, on my Instagram post for the day and then head to Caffeinated Craftiness and do the same for her. Four comments per day gives you a shot at any one of four prizes!

I appreciate you sharing your time with me. Have a fabulous day!

12 Days of Christmas Tags – Day 3

Hello everyone! Today I’m sharing 2 sets of the same tags. One take a little longer and the other is fabulous for mass production if you have lots to make. Let’s jump right in!

These tags are from the awesome Lawn Fawn sets – Slow Down and Enjoy and For You Deer. I was so excited when they came out that I’ve just made them over and over again. Sometimes they are tags, others are bookmarks. I also just hang the critters on things because they are so stinking fun to make!

Today, I did the same tags twice. The ones above are colored with copics which took a little bit of time. Not a ton but definitely more than the ones below.

These were cut from colored cardstock and then the accent colors were added with colored pencil. Both versions are super cute and really, the recipient could use them for bookmarks after they take them off of the gift too!

I never tire of the adorable Lawn Fawn critters. They’re just so much fun!

Don’t forget there are prizes to be won. Comment each day on here, on my Instagram post for the day and then head to Caffeinated Craftiness and do the same for her. Four comments per day gives you a shot at any one of four prizes!

I appreciate you sharing your time with me. Have a fabulous day!