Lawn Fawn – For You Thanks a Latte

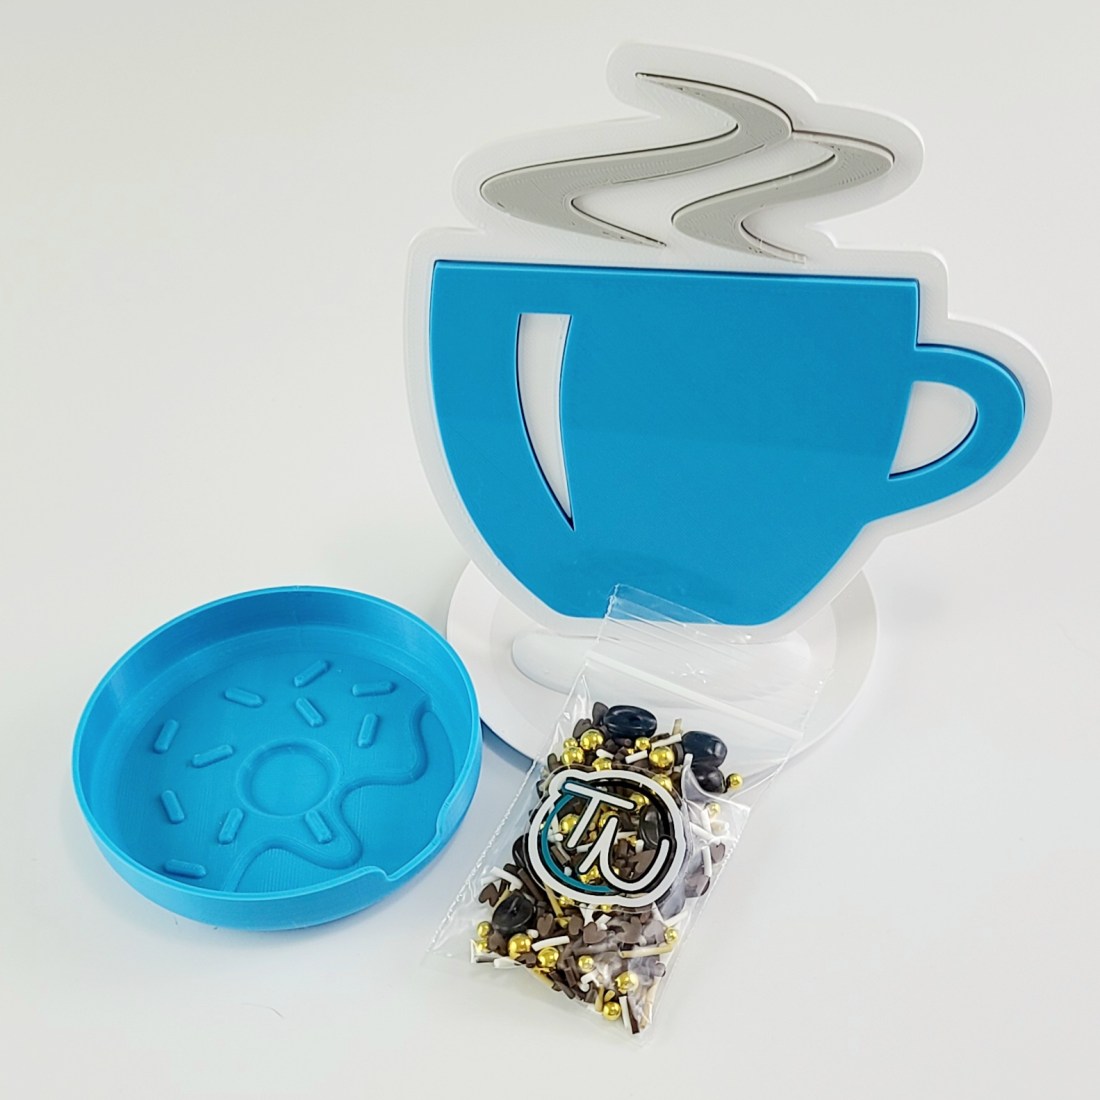
Hello everyone! I’m back today with another fun caffeinated creation for the Spring|Summer Coffee Lovers Hop! Today I’m featuring some adorable Lawn Fawn goodies along with the Caffeinated Crafting embellishment mix for my shaker from the Twiddler’s Nook shop. This mix is part of the special that we have going on this week. Head HERE to check that out!

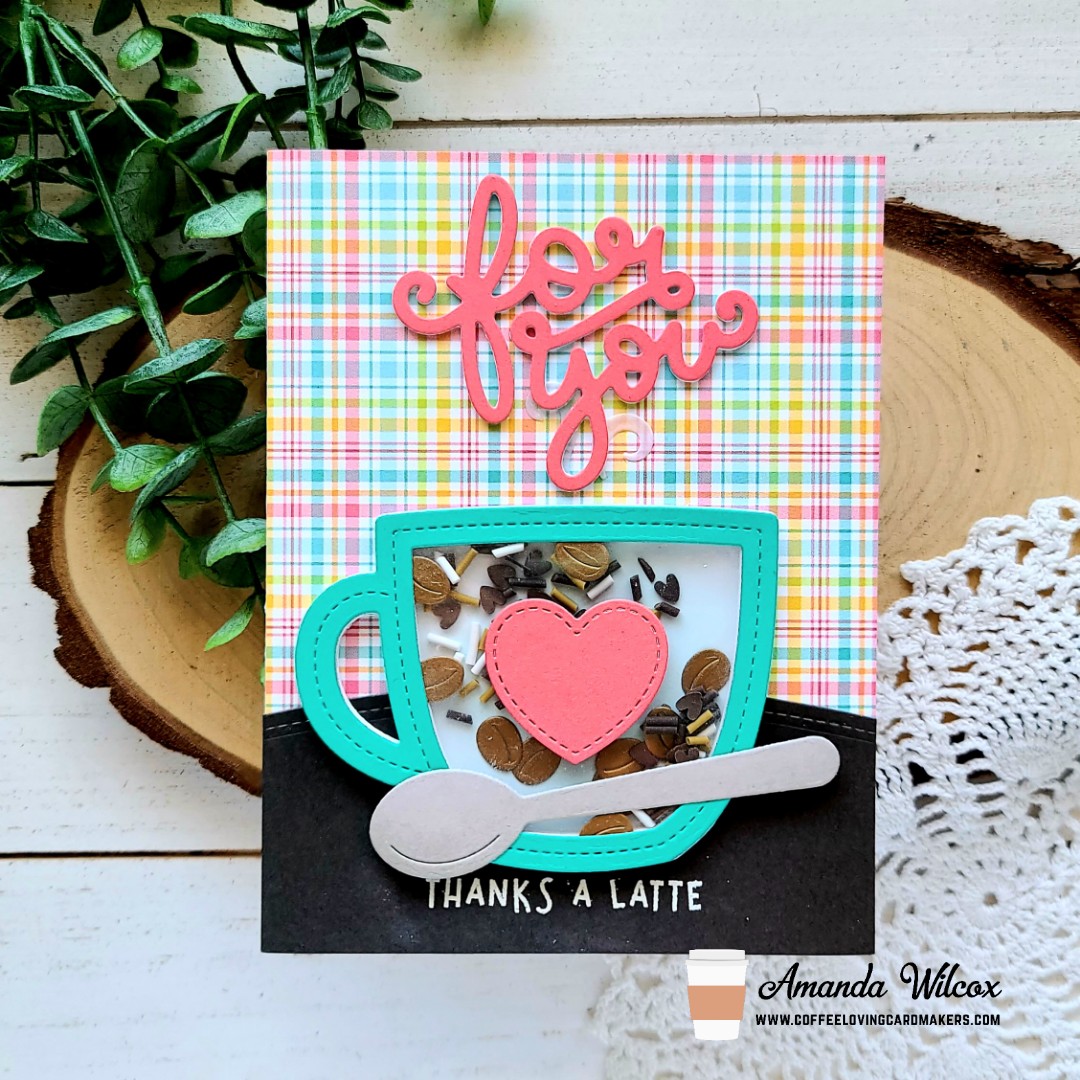
I started my card by die cutting the outside in stitched mug from white cardstock and inked up the center with mermaid ink and a blending brush. Then I cut the frame 8 times from white cardstock and once from teal. Next I cut the mug again from acetate. I used liquid glue to adhere my layers together, leaving the teal and acetate off until I filled the mechanism with my shaker bits. For those I die cut the beans from the mug die set from gold cardstock and also added some of the bits from the Caffeinated Crafting mix. Once it was all sealed up, I adhered a pink heart to the center and die cut the spoon from gray cardstock, adding it with liquid glue too.

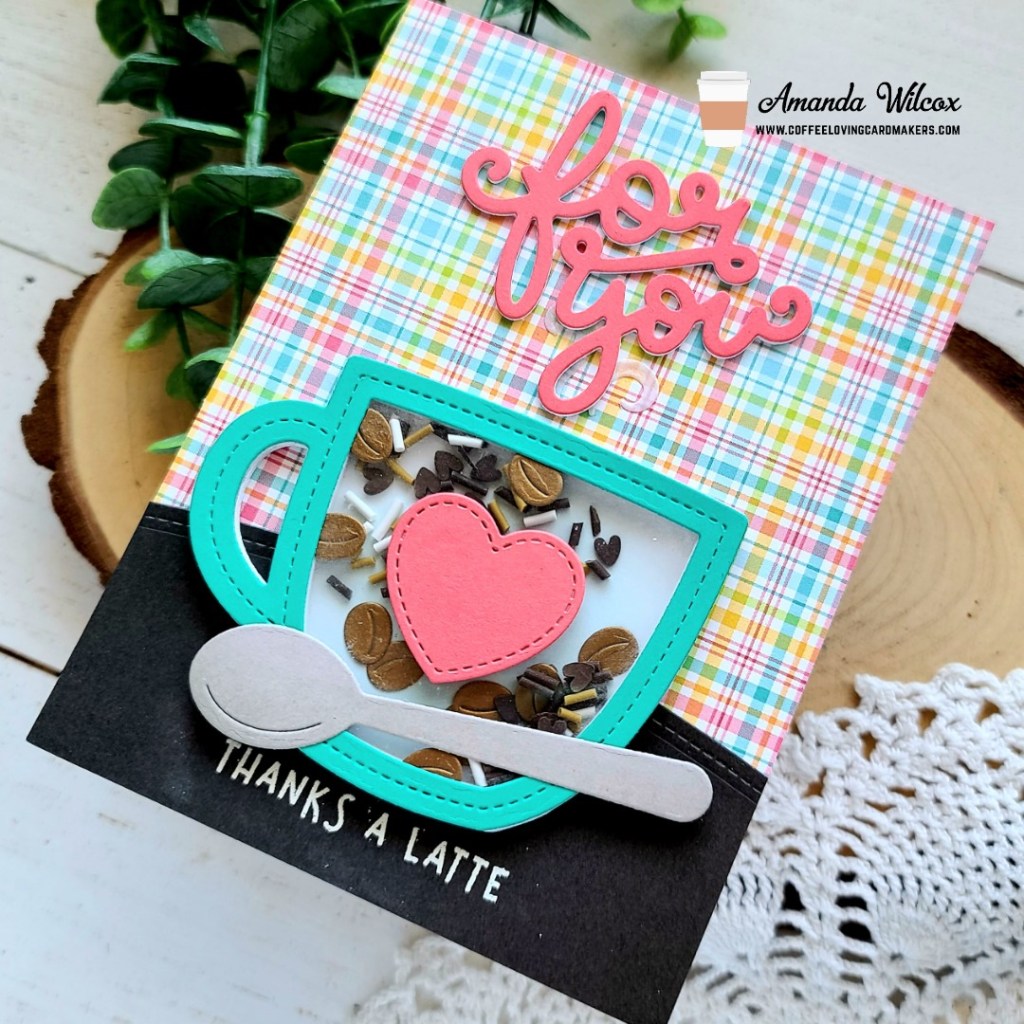
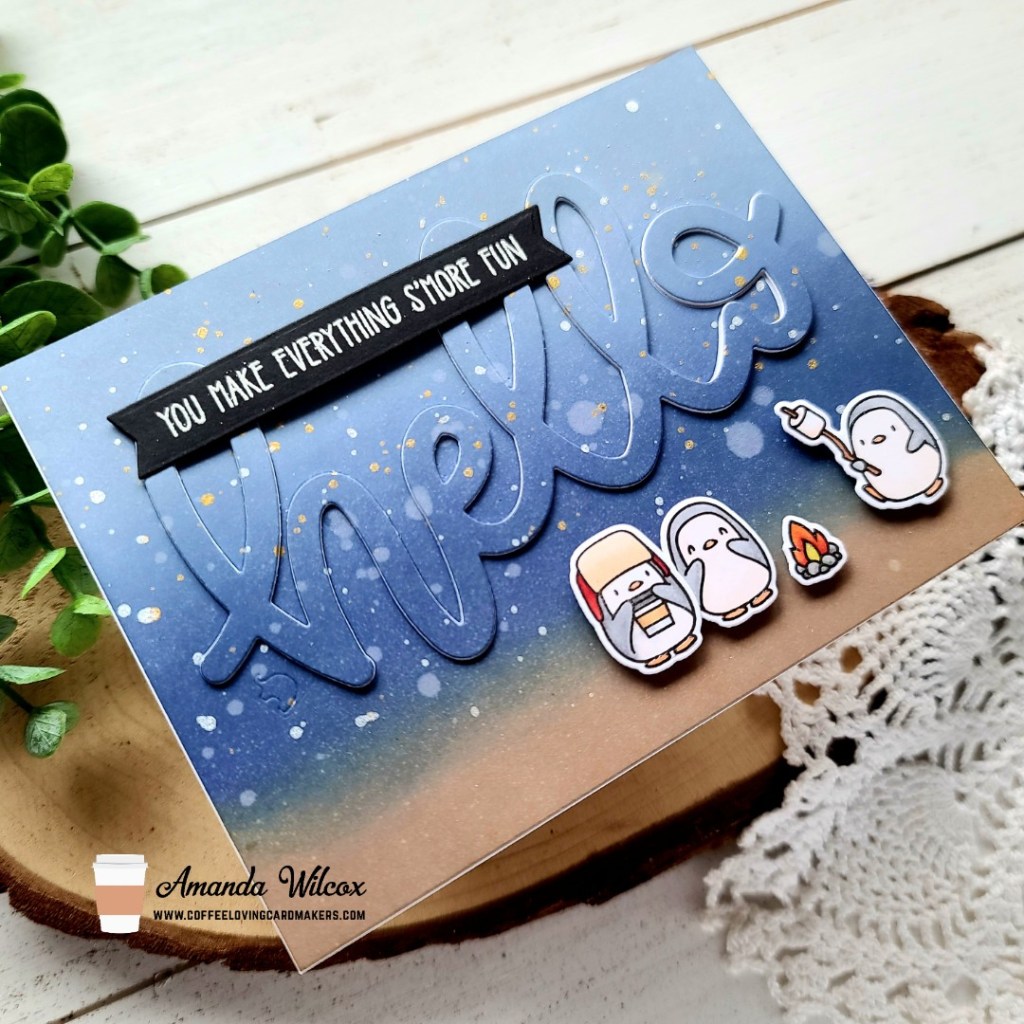
To set my scene, I cut a piece of Perfectly Plaid paper to A2 size and trimmed down a piece of card gray cardstock for a table to sit my mug on. I used the simple stitched hillside border to trim the top of that. I stamped and heat embossed a sentiment from Thanks a Latte and used liquid glue to adhere my layers together, then I added those to a white card base.

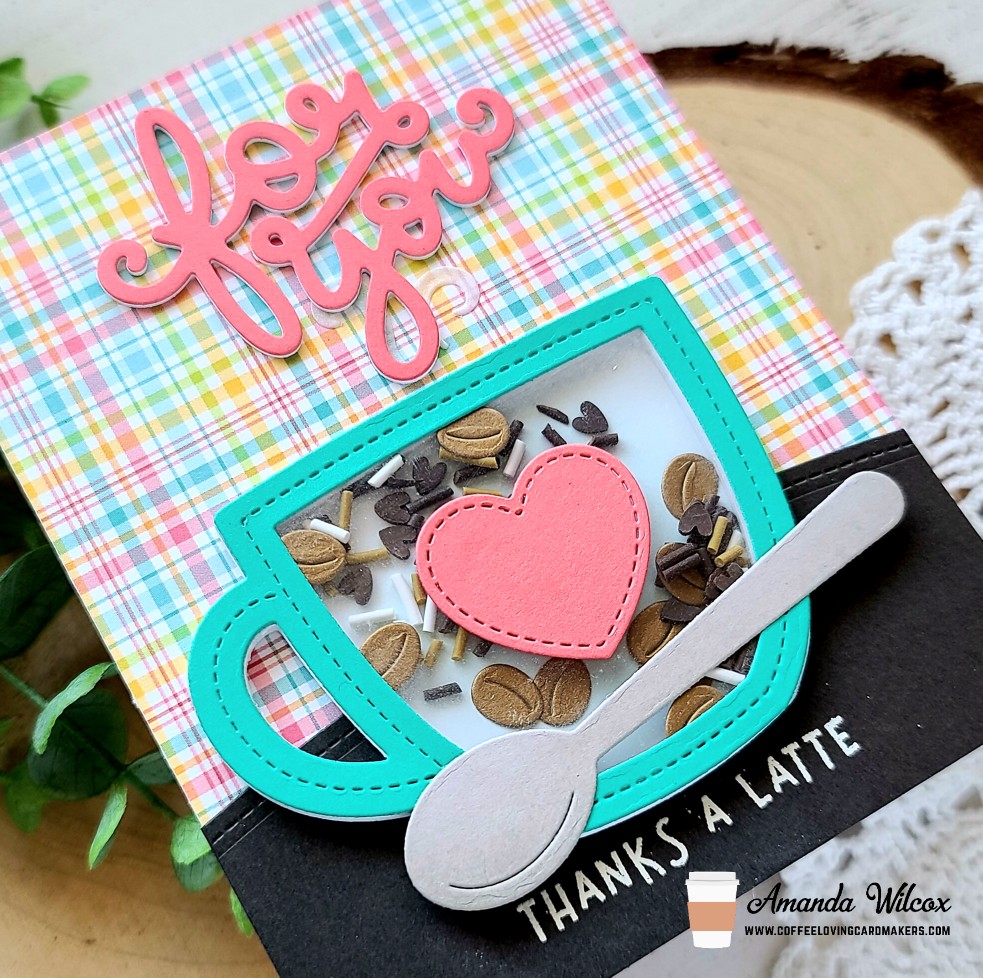
Next, I die cut the scripty For You die 3 times from white cardstock and once from the same pink as the heart and used liquid glue to adhere them together. I wasn’t positive on my placement of this piece so I die cut the steam from vellum and glued it down. It ended up being mostly covered but it’s there for what it’s worth. Haha. Last, I added my mug and spoon and my card is all finished.

Are you playing along with the Coffee Lovers Hop? Be sure to head HERE to link up your caffeinated creations for chances to win tons of awesome prizes!

I appreciate you sharing your time with me! Have a fabulous day!

Trinity Stamps – Sunnyside Up Release Day

Happy weekend everyone!!! I’m super excited to be popping in today to share that it’s release day for Trinity Stamps and we’re having an Instagram hop to celebrate! Here’s the fun card I have over on my Instagram today, but be sure to head there and comment for chances to win!

This new set is called Spring in my Step so I just had to play with this cute gnome a little extra. I stamped my images and colored them with copics, then cut them out. I thought it would be fun to make a circle shaped card so I used the embossed circle stack to cut a card base, card front and a slightly smaller circle for my scene. I used blending brushes and dye inks to ink them all up.

I die cut one of the smaller circles with the slimline scenic border grass die and glued it to the sky. I popped this up with foam tape on the circle card front. Then I glued my flowers down and popped the chick and butterfly up with foam squares. I stamped my sentiment on a slimline stitched banner and popped it on with foam squares as well.

Now, because this is a super special card, I added my gnome with an action wobbler!!! He’s so fun to play with! Now, after I did that I pulled out my glossy accents to finish everything off and forced myself to set it aside to dry before playing some more.

My daughter jumped in to help me video this cute gnome in action! Have a look!

Isn’t that just so much fun!?! We love it! Now, head over to Instagram and hop along with us for more inspiration!

Coffee Loving Cardmakers – S’more Fun

I’m just going to start by exclaiming exactly how much FUN I had creating this card! It all came together just as I had hoped and it’s so STINKING CUTE!!!

Okay, backtracking a little…it’s the awesome week of the Coffee Lovers Spring|Summer Hop so I’ll continue to spam you with super fun caffeinated inspiration each day until we’re done. I hope you love it as much as I do! Let’s get cracking on today’s fun card now, shall we?!?

I started by stamping and coloring these sweet little penguins from the Mama Elephant Little Penguin Agenda set and cut them out with the coordinating dies. Then I had the brilliant idea that I wanted to die cut a large sentiment to go with them so I pulled out the big scripty hello die and started to decide just how I was going to put it all together.

Then it hit me to do the shadow technique so I cut an A2 panel and inked it up with distress oxides in gathered twigs, chipped sapphire and salty ocean. I spritzed it with water and flicked pearl and gold watercolor on it for that starry effect. I didn’t mask anything off but tried to keep it all to the blue part of the panel. Then I die cut the big scripty hello from the top portion and also cut an additional 3 from white cardstock. I used liquid glue to adhere the panel to my card base and then the words together as well.

I added foam squares to the back of my images and popped them in place. That’s when I decided my card needed a little something else so I went digging. I found this fun sentiment in the Avery Elle camping critters so I stamped and heat embossed it on black cardstock, trimmed it into a strip and adhered it with a combo of liquid glue and foam squares.

For finishing touches, I added glossy accents to the penguin beaks and feet, the fire and the coffee cup lid. Super adorable, don’t you think?

Are you playing along with us this week? Be sure to head to the Coffee Loving Cardmakers blog and link up your caffeinated projects for chances to win tons of amazing prizes!

I appreciate you sharing your time with me. Have a fabulous day!

Coffee Loving Cardmakers – Spring|Summer Hop

Hey friends! It’s time for the Spring|Summer Coffee Lovers Hop! Be prepared for a week chock full of awesome caffeinated inspiration! Once again, Twiddler’s Nook has the privilege of being a Super Sponsor for the hop. This time we’re running a special package deal for all of you caffeinated crafters.

Our Coffee Mug Die Cut Stand, Donut Embellishment Tray and a package of Caffeinated Crafting embellishment mix for $24 during the week of the hop. CLICK HERE to head over to the shop and pick yours up!

Be sure to comment on this post as well because we’re giving away 2 – $20 gift certificates to the shop as part of the hop itself.

Thank you so much for all of your support throughout the year and happy crafting everyone!!!

Pink & Main – Hello Beautiful Sneak Peek

Hey friends! I’m back this afternoon to share a little sneak peek of the upcoming Pink & Main release with you! It’s a little bit of a different release this time but it’s packed full of soooo much goodness! I can’t wait for you to see on Saturday!

For today’s card, I started by using a new cool stencil called Fidgety with some blue dye ink and my blending brush. Then I went over parts of it with texture paste and set the panel aside to dry. However, when it was drying and I was choosing my background panel color, I decided to flick them both with watered down black acrylic paint. Then I actually left both panels alone to dry all the way. (I’m a very impatient crafter so we left the house to get some coffee. Fun family adventures.)

When we came back, I die cut the panels with the stitched slimline dies and I moved on to my sentiment and images. I actually started with my sentiment which is from the Beautiful slimline dies. I cut the words from the new Happy paper pad and the shadow from one of the styles of amazing holographic pads that are coming too! I told you…soooo much goodness! I also cut the words from white cardstock 3 times and adhered all 4 layers together with, you guessed it, new glue that is coming! It’s fantastic! I use it on everything now!

I stamped a couple of cuties from Little Cherubs and colored them with my copics. Then I used the coordinating dies to cut them out. Then I moved on to assembly of this sweet card.

I used the new liquid glue to adhere the yellow panel to a card base. Then popped the stenciled panel up with foam tape. I also popped the sentiment and images up with foam squares and moved on to a couple of finishing touches.

For those, I simply added some unicorn Stickles to the hearts that the cute little cherubs are holding and black glaze pen to their eyes.

I absolutely love how this card turned out! But more than that…I’m SUPER excited for you all the check out the Pink & Main release on Saturday. It’s so cool and you’re going to love it all!

I appreciate you sharing your time with me. Have a fabulous day!

Miss Ink Stamps – Some Bunny Special

Welcome! Welcome! Today I have a couple of really sweet Easter cards featuring Miss Ink Stamps Springtime Bunnies stamps and Thermoweb Basket of Fun foiled toner sheets for backgrounds.

These toner sheet packs from Thermoweb come on white cardstock and kraft. I thought it would be fun to do a card with each one using the Easter egg pattern and the Miss Ink Stamps Springtime Bunnies images. So I heated up my laminator and foiled them with lilac foil. I stamped my images and colored them with copics. Then I ran that sheet through the scan-n-cut and switched gears to decide on my final layouts.

For this card, I adhered my foiled panel to a white card base, opened the card up and ran it through my die cutter with a My Favorite Things arched window. I inked up the edges of the window with light purple ink and also inked up the inside of my card with a little shadow of light green ink. Then I arranged my images so they showed through the window, gluing them down with liquid glue, saving one chick for the front of the window. I also stamped a sentiment in the same purple ink and trimmed it into a strip, adhering it down with liquid glue.

Here’s a look at the inside of the card. Plenty of room to write a message that won’t show through the window but also something sweet and cute to see on the inside too!

Now let’s take a look at the kraft base card that I made as well.

For this one, I adhered the Easter egg panel to a card base with liquid glue. Then I trimmed a white strip of cardstock about an inch wide and inked the top with light purple ink and popped it up with foam tape. I used my MISTI to stamp a sentiment on the bottom and arrange my images, adhering them with a combination of liquid glue and foam squares.

For finishing touches on both of these cards, I just added glossy accents around the various images. Thinks like bunny noses and eyes, chick beaks and feet and stripes and dots of the various Easter eggs.

I appreciate you sharing your time with me. Have a fabulous day!

Trinity Stamps – Hey Chick! Sneak Peek

Hello everyone! It’s sneak peek time for the upcoming Trinity Stamps Sunnyside up release that is happening on Saturday! Super exciting stuff we’ve got to share with you! Today I’m over on the Trinity blog sharing a sneak that peeks a handful of the different sets coming! It was so fun to combine a bundle of secondary images from the sets to create a happy Easter card.

I inked up my background with distress oxide inks to create a faux ground and fun sky. I used mowed lawn and twisted citron for the grass, with spun sugar and tattered rose for the sky. After that was blending, I added the lots of dots stencil and went over the sky with tattered rose again. Then I splattered it with water and flicked watered down tattered rose ink on the panel. Next, I die cut the panel with the largest embossed rectangle die. To create the skinny white frame, I took 2 of those dies and taped them down and cut a white panel.

I used liquid glue to adhere the inked panel to a card base, then the frame to that. Then I used a combination of foam squares and liquid glue to adhere my images down creating my scene. Then I cut the phrase “hey, chick!” from the graham cracker alphabet dies three times and used my quickie glue pen to adhere them together, then to the card front.

Moving on to finishing touches, I added star dust Stickles to the chick cheeks and bits of the butterflies. Then I finished things off with glossy accents on various parts of the Easter eggs, chick beaks and feet, and butterflies.

We’re having an Instagram hop on Saturday so I hope you head there and hop along with us. There will be tons of inspiration and prized to be won too!

I appreciate you sharing your time with me. Have a fabulous day!

Birch Press Design – Easter Hugs

Hello everyone! I’m over on the Birch Press Design blog today sharing a trio of cards to share featuring the petal egg layering set and a few different backgrounds to pair it with.

To start off today’s cards, I just pulled out a variety of cardstock colors – glitter and not – and started cutting the layers of the petal egg. It was so fun to mix and match, and just play, with all of them once they were cut out.

After I decided on the layers that I wanted to use together, I ended up with three complete eggs and thought it would be fun to make three cards to share with you today.

For my backgrounds, I used layer A and C of the Field of Blooms set. Then for my third card I pulled out the Memory Box spring plaid paper pad and chose one of the beautifully foiled pieces to use.

I used liquid glue to adhere all of my egg layers together and decided I wanted the backs to be solid so the background panels didn’t show through. Since there isn’t a solid egg shape I traced one of the dies three times and cut inside the tracing line and glued it to the back of my layers. If anything hung over, I just used my scissors to trim off the excess. Super easy and forgiving if you don’t fussy cut well.

I used liquid glue to adhere the Field of Blooms backgrounds to white card bases and then used foam tape to add the plaid paper, which I had trimmed down to 4×5.25 inches. Then for my sentiment, I went with the hugs honey script dies. I cut the shadow from vellum and then the words from the same paper as the bottom layer of the egg it was coordinating with.

I adhered the sentiments with liquid glue and the popped the eggs up on each background with foam tape. For finishing touches I added Twiddler’s Nook baubles to each one. This first one has gold to play off the gold foiling in the patterned paper.

Then I used silver baubles for this one because I thought the bright colors worked well with the bright silver.

And for this final card, I chose pearls because it’s got a bit softer colors and I just loved how they worked with the pink glitter paper on the top layer of the egg.

I appreciate you sharing your time with me. Have a fabulous day!

Newton’s Nook – Bunny Tails Duo

Hello again! I’m over on the Newton’s Nook blog today sharing a fun set of cards I made using the fun bunny tails stencil. Isn’t it just the cutest with those fluffy tails sticking out everywhere!?! I love them! For release week I made rainbow tails so today I’m sharing fuzzy ones and foiled, shiny ones too!

I originally wanted to see what the bunnies looked like inked up with white pigment ink on kraft cardstock and had planned to give them fuzzy white tails but changed my mind after I inked up the second panel with those cute light brown bunnies. These cards were super fun and really quick to come together.

For both cards I started by inking the stencils up and then used Thermoweb transfer gel on the tail portion and set them aside to dry before running the panels through my laminator with pink melon deco foil and white latte deco foil flock. Let’s take a closer look at the foiled one first.

After foiling those cute bunny tails, I die cut the panel with a scalloped rectangle from frames & flags. Then I die cut a banner from the same set, flipped the die and cut it again to create a double-ended banner. I stamped the Hello Spring stamp and colored it with my copics.

I cut a piece of pink cardstock to match the pinks in the foil and markers I chose to color my image. Then I inked the edge with picked raspberry distress oxide, flicked it with water, pearl watercolor and black soot distress ink so it’s got some texture and interest. I adhered this panel to a card base then popped up the stenciled panel and banner with foam tape.

For finishing touches on this card, I added some pink glitter glue from my stash to the bunny’s tail, pink letters and tulip. Then I added unicorn Stickles to the flower center and glossy accents to the bunny’s nose. It’s such a bright, happy card! I’m really wishing for lots of sunshine after making it.

Now for the panel with the fuzzy tails! I stamped images from Hoppy Greetings and colored them with my copic markers. Then I used the coordinating dies to cut them out. I also die cut part of a rounded rectangle from frames & flags and then used the land borders to cut the top into some grass. I inked it up with twisted citron and mowed lawn distress oxide inks and spritzed it with water.

I added foam tape to my images and grass and added them to the stenciled panel. Then I added foam tape to that and popped it onto a teal card base I had created. Next, I moved on to some simple finishing touches. On this card I just added glossy accents to the flower centers, bunny’s nose and toe beans and called it finished.

These cards are so fun and perfect for spring! My daughter always gets really excited for Easter so I think I create more decorations, cards and things for it because we’re just in the mood and it all makes us happy. I’ve also always had a thing for bunnies. They are too cute and these bunnies are no exception!

Did you have a favorite between today’s cards?

I appreciate you sharing your time with me. Have a fabulous day!

Therm O Web – Hello Spring

Hello everyone! I’m really excited to announce that I’ve joined the Therm O Web team! Today I have a sweet card for you featuring the bunny print from the newly released Basket of Fun toner sheets pack.

Here is a list of all the products I used on today’s card:
Basket of Fun Toner Sheets
Ocean Blue Deco Foil 
Cracked Pistachio Distress Oxide
Squeezed Lemonade Distress Oxide
Scattered Straw Distress Oxide
Paperie Ink Hello Hummingbirds stamps
Therm O Web tape runner XL
iCraft 3D foam squares
Glossy Accents
Sakura white gel pen
Sakura black glaze pen
Wink of Stella clear glitter brush pen 

To start things off I decided that I wanted to use the bunny toner sheet from Basket of Fun and Ocean Blue deco foil. I pulled out my supplies, trimmed my deco foil and placed the foil and toner sheet in my parchment paper transfer sheet. Then I turned on my laminator and while it was heating up, I stamped my images and colored them with my copic markers. I’m not a fussy cutter so I used my scan-n-cut to cut the images out and set them all aside. Once my laminator was good and hot, I ran the sandwich through and revealed the beautifully foiled blue bunnies! Super cute!

I didn’t want a white background with my bunnies though so this is when I chose distress oxide colors to blend over the panel. I went with cracked pistachio, squeezed lemonade and scattered straw. After blending, I used a cloth to wipe off excess ink from the foiled areas and spritzed my panel with water. Then I decided for a little added interest to flick some watered down black acrylic paint on the panel too.

Now for the fun part! I used my tape runner to adhere the foiled panel to a white card base. Then I added foam squares to the back of all my images and put them in place where I wanted.

I really enjoy adding some little bits of finishing touches to my cards so I started these with white gel pen accents on all the images and then went in with a black glaze pen for the eyes. I love the added shine and interest this gives the critters.

Then the last two things I did was add glossy accents to the bunny’s nose and hummingbird’s beaks and feet. For a teeny bit of shimmer I added Wink of Stella glitter brush pen to the hummingbird wings too.

I hope you found some fun inspiration to create something wonderful. I appreciate you sharing your time with me. Have a fabulous day!