Newton’s Nook – December Release Day 3

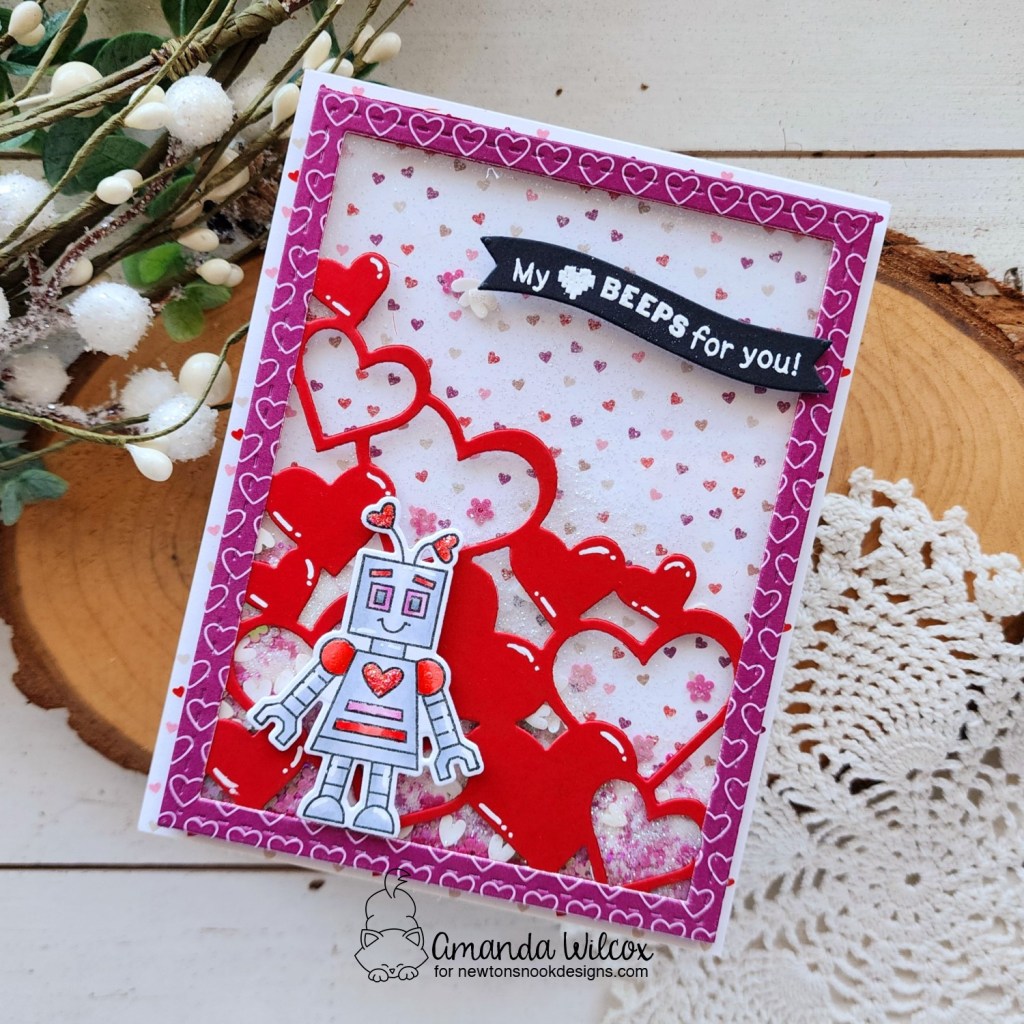
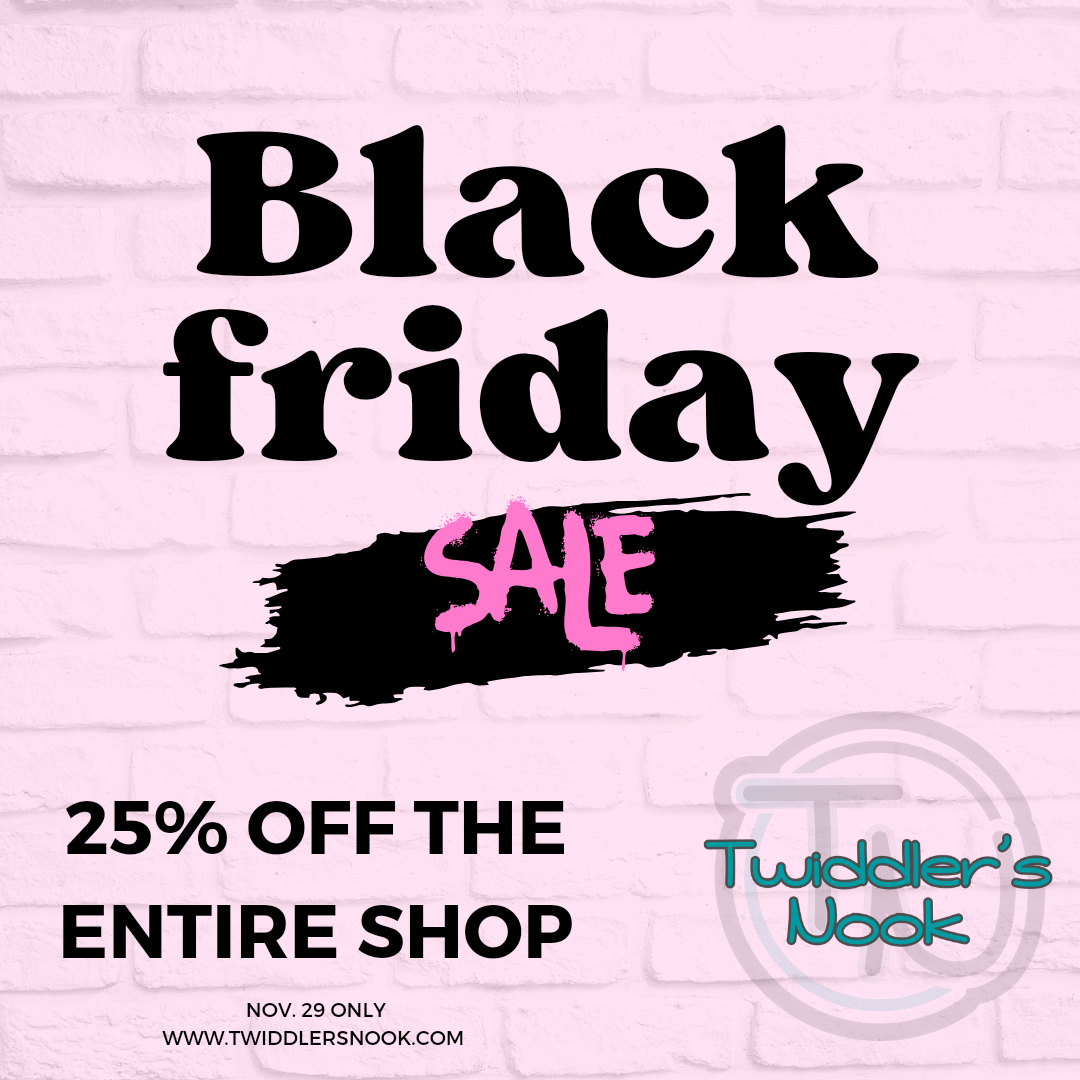
Woohoo!!! It’s the final day of release reveals and tomorrow you all get to shop the new release! I’m so excited for the two cuties we have to introduce today!

Newton’s Cookie Jar and Puppy’s Cookie Jar stamps and dies

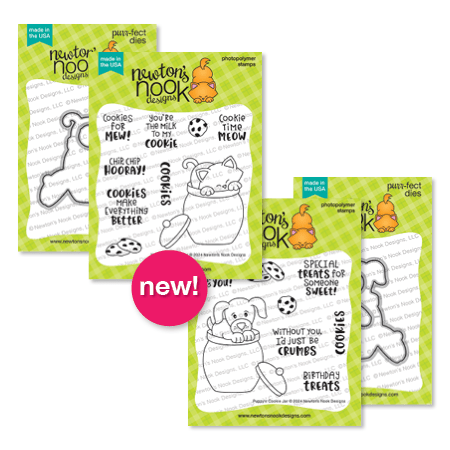
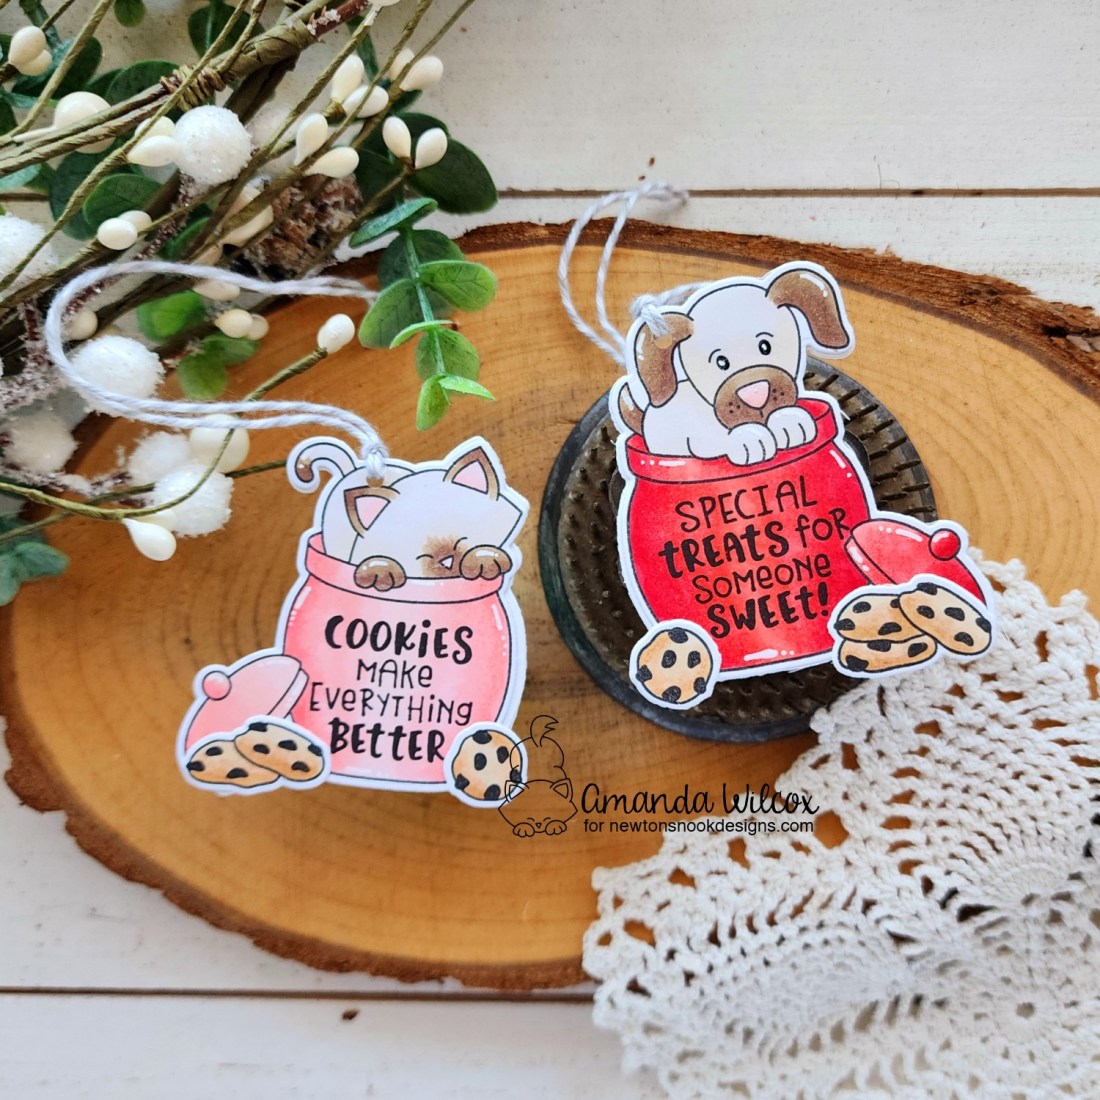
Are you in love? I totally am! These are more of the amazing sets where the sentiments can be stamped inside the cookie jar if you want too! I love these! Also, I can’t wait to paper piece the cookie jars and make them cool patterns from the paper pads!

Today I kept it simple and stamped and colored all the images from both sets with copic markers. Then I stamped sentiments on each jar and used the coordinating dies to cut everything out.

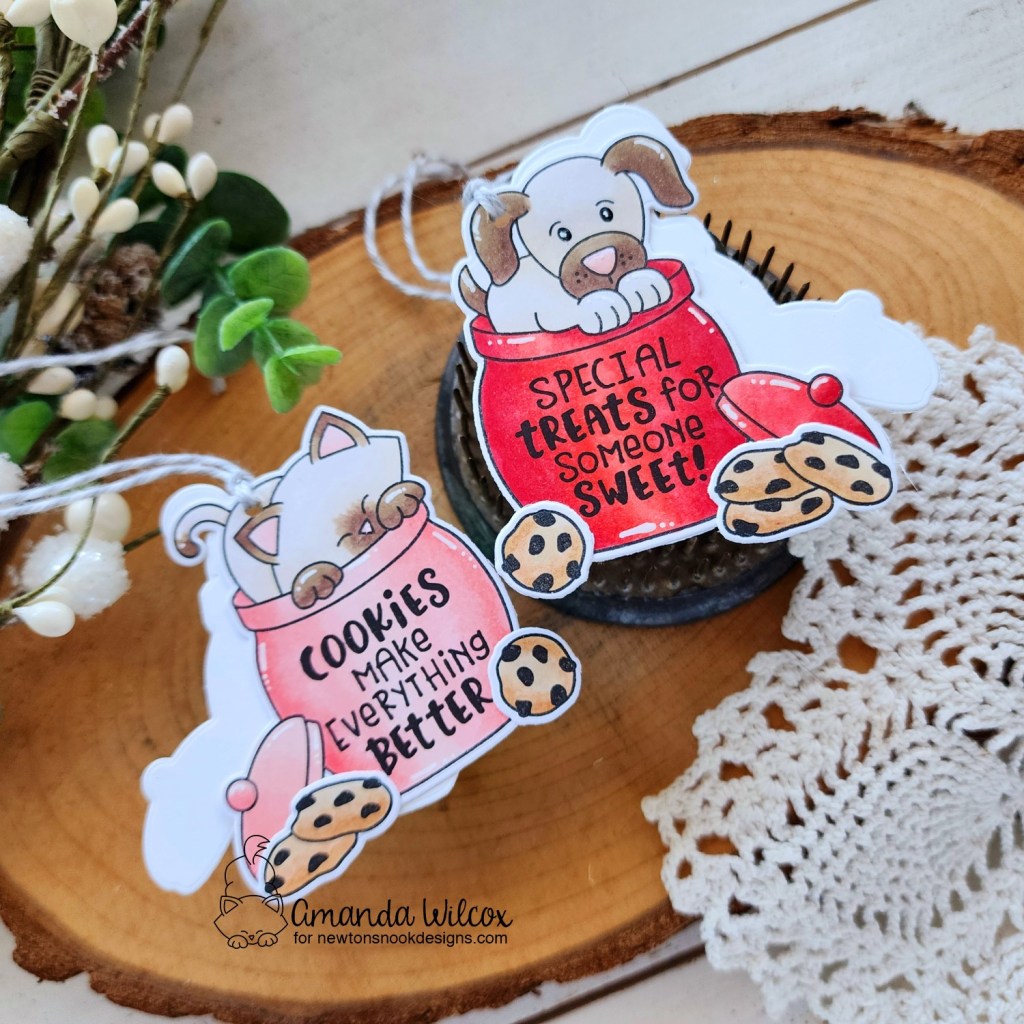
I used liquid glue to adhere the cookies to the front of each cookie jar, then die cut a second jar image. I lined them up and punched a hole in both layers, threaded twine through both, creating two gift tags. Can you just picture these cuties attached to a package of homemade cookies?!? I can’t wait to use these!

Enter to Win a $25 Prize!

One lucky winner will receive a $25 store credit to spend at Newton’s Nook Designs online shop! The winner will be chosen at random from the collective blog posts featuring our new products this week. For a chance to win, leave comments on the Design Team Member Blog Posts (see list below) from Tuesday December 10th through Thursday December 12th. You will not know which blog has been chosen so the more you comment on the better your chances are of winning! You have until Thursday, December 12th at 9 pm ET to comment — winners will be announced on the NND blog on Friday, December 13th.

Check out all the awesome Design Team Blogs below to enter:

Newton’s Nook Designs
Donna Idlet
Larissa Heskett
Samantha Mann
Diane Morales
Farhana Sarker
Amanda Wilcox

Newton’s Nook – December Release Day 2

Welcome back everyone! Today we have a new reveal to share with you and a fun shaker card too!

Charming Hearts Frame dies

I love the pile of hearts inside the frame and the fact that this set also has an optional “Love” word die to use too!

For my card today, I chose a couple patterns from the Lovely Hearts paper pad – one for the frame and another for the background. I also cut the frame from red cardstock for my actual hearts.

I pulled out a previous Valentine set – Love Bots – to add more cuteness to my card. I stamped and colored the image with copic markers and heat embossed the sentiment on a banner in the A7 Frames die set.

My shaker bits are a mix of flower confetti, glitter and white clay hearts. I love mixing and matching different shaker bits to create my own mix to fix the design of the card.

For finishing touches I added white gel pen highlights all over and some stardust Stickles to the robot.

Enter to Win a $25 Prize!

One lucky winner will receive a $25 store credit to spend at Newton’s Nook Designs online shop! The winner will be chosen at random from the collective blog posts featuring our new products this week. For a chance to win, leave comments on the Design Team Member Blog Posts (see list below) from Tuesday December 10th through Thursday December 12th. You will not know which blog has been chosen so the more you comment on the better your chances are of winning! You have until Thursday, December 12th at 9 pm ET to comment — winners will be announced on the NND blog on Friday, December 13th.

Check out all the awesome Design Team Blogs below to enter:

Newton’s Nook Designs
Donna Idlet
Larissa Heskett
Samantha Mann
Diane Morales
Farhana Sarker
Amanda Wilcox

Spellbinders – Advent Calendar Check In

Hi everyone! I’ve been having a blast with my Spellbinders Advent Calendar this year and wanted to share. I open the package every morning and then create with that day’s item in the evening. It’s been so much fun and a great way to unwind. My posts have all been on social media so I wanted to do a few round ups on here so share with you all.

Here are the creations I made using days 1 through 9.

Day 1

Day 2

Day 3

Day 4

Day 5

Day 6

Day 7

Day 8

Day 9

If you didn’t pick up the Advent Calendar ahead of time but want to get in on the action, here are links to a few places that still have them in stock.

Spellbinders

Scrapbook.com (stitching version only)

ScrapbookPal

I appreciate you sharing your time with me. Have a fabulous day!

Newton’s Nook – December Release Day 1

Hi friends! I’m so happy that Newton’s Nook is having a heart-filled December release! We can get a jump on Valentine crafting over the holiday break and I’m so excited for it! Today we have a few release reveals to share and I’ve got a project for you too!

Reveals today include Valentine Postage Sampler stamps and dies, Valentine Word Trio dies and Lovely Hearts paper pad. Isn’t is all just beautiful!?! I love it!

I happened to use all three of today’s reveals on my project together. My background is from the new paper pad and my sentiment is one of those fabulous bold bars from the Valentine Word Trio. I got two-for-one by cutting it twice and swapping the letters out. Then I just saved the other one for later.

For my postage stamps, I chose to stamp and color the images, plus use the coordinating dies to cut them out. This way I could cut the Postage Stamp Layout from white cardstock and add ink to the inserts without masking the images off. After the color was added I used liquid glue to adhere the images and stamped a few of the postal images on random spots.

For finishing touches on this card I added stardust Stickles to various small areas on the postage stamp images. Loving that sparkle!

Enter to Win a $25 Prize!

One lucky winner will receive a $25 store credit to spend at Newton’s Nook Designs online shop! The winner will be chosen at random from the collective blog posts featuring our new products this week. For a chance to win, leave comments on the Design Team Member Blog Posts (see list below) from Tuesday December 10th through Thursday December 12th. You will not know which blog has been chosen so the more you comment on the better your chances are of winning! You have until Thursday, December 12th at 9 pm ET to comment — winners will be announced on the NND blog on Friday, December 13th.

Check out all the awesome Design Team Blogs below to enter:

Newton’s Nook Designs
Donna Idlet
Larissa Heskett
Samantha Mann
Diane Morales
Farhana Sarker
Amanda Wilcox

Doodlebugs – Holly Jolly Gift Card Holder

It’s Mix it up Monday on the Doodlebugs blog and we’re getting ready for the holidays with a sweet gift card holder today. I feel like we give and get gift cards more often in recent years than ever before and, honestly, I’m not mad about it. It’s super fun to open and then you relive it all over again when it’s time to go shopping!

To take that a step further, I love giving them when I have a moment to create extra fun holders for them too! This Pretty Pink Posh gift card bag is top on my list to decorate for sure!

Today I created a red gift card bag and then added some fun Lawn Fawn dies to decorate it. Peppy Penguin just couldn’t stay out of the hot cocoa. I tried, I really did. Lol.

My hot cocoa mug is the Lawn Fawn Outside In Stitched Mug with some marshmallows and whipped cream, along with the spoon sticking out. I did some light ink blending a cinnamon dots on the whipped cream. Everything is adhered together with liquid glue.

I added the Pretty Pink Posh Holly Jolly sentiment across the mug with liquid glue and popped the mug and Peppy on the gift card bag with foam tape. For finishing touches I just added some glossy accents to the Christmas lights and tissue paper inside the bag to hide the gift card.

Products used:
Lawn Fawn Peppy Penguin dies
Lawn Fawn Outside Ink Stitched Mug dies
Pretty Pink Posh Gift Card Bag dies
Pretty Pink Posh Holly Jolly dies
Liquid glue
Reverse tweezers
Foam tape
Glossy accents

I appreciate you sharing your time with me. Have a fabulous day!

Miss Ink Stamps – Snow One Like You

Hi friends! Happy Thursday to you all!!! I’m popping in with Miss Ink Stamps inspiration today. I am still making a few more Christmas cards before they all hit the mail and wanted to share this one.

I started by stamping my images from Snow One Like You and colored them with my copic markers. I used my scan-n-cut to cut them out, added foam to the back and set them aside.

Next I inked up a panel with the Frosty Flakes stencil using light blue ink. I removed the stencil and added another layer of the same ink over the top. Then I started die cutting using the layers in the Oh Happy Day Frame die set. I cut the stenciled panel and added it to a white card base with foam tape.

Next, I cut the scallop frame and tiny insert from white cardstock. This is one die. Because of that I had an extra white and red frame in my pocket that wasn’t used previously and thought they would be PERFECT for this card. I used liquid glue to adhere everything to the stenciled panel. I used my images as a guide and stamped my sentiment, then popped those in place too.

For finishing touches I added white gel pen highlights all over. Then I came in with glossy accents on the snowman eyes, buttons and nose; and stardust Stickles all over the snow on the tree.

How is your Christmas card stash coming along? Or have you already mailed them? I’m almost there but not quite. And I seem to keep adding people to the list which doesn’t help my case.

Products used today:
Snow One Like You stamps
Frosty Flakes stencil
Oh Happy Day Frame dies

Blending brush
Glossy accents
Stickles – stardust
Lawn Fawn ink – forget me not
Foam tape

I appreciate you sharing your time with me. Have a fabulous day!

Doodlebugs – Peppermint Postage

Happy Mix it up Monday everyone! I had some fun playing with the Lawn Fawn peppermint border dies a while ago. I just made a bunch of them for fun but didn’t have a plan. Then I walked past my craft room the other morning and this design hit me. I ran in and sketched it out on a sticky note and came back to create it later on.

Since my peppermint borders were already created at this point, I glued them to a piece of pink cardstock and used the Mama Elephant Postage Frame dies to cut it out. I discarded the outer frame and kept the inside. Then I cut a white postage frame and used washi tape to adhere the inside to the frame.

I stamped a fun sentiment from the Mama Elephant Everything Nice set and used the coordinating die to cut it out. Then I stamped the bunny in the Mama Elephant Holiday Huggers set and colored it with copic markers. After using the coordinating die to cut it out too I hooked his paws over the sentiment and glued them together.

I didn’t want a plain white card base so I drug my cilantro ink pad across a white card base for color and texture at the same time. Then I assembled everything with foam tape and squares. Gotta love that dimension!

For finishing touches today I added black glaze pen on the bunny’s eyes and glossy accents on his nose and the while parts of the Santa hat.

How is your holiday card stash coming along? I am definitely getting there quickly. Thank goodness because it’s about time to pop these babies in the mail!

Products used:
Mama Elephant Holiday Huggers stamps and dies
Mama Elephant Everything Nice stamps and dies
Mama Elephant Postage Frame dies
Lawn Fawn Peppermint Border dies
Foam tape
Glossy accents
Sakura gelly roll glaze pen – black
Liquid glue
Lawn Fawn ink – guava and cilantro

I appreciate you sharing your time with me. Have a fabulous day!

Spellbinders – Felt Stitch & Create

Hi friends! I’m popping in with a couple of fun “not a card” projects I created lately for Spellbinders. The new Felt Stitch & Create line from Nichol Spohr is my favorite thing ever right now! I have completed two projects so far but I have two more in process on my craft table now. They’re so fun and easy to create!

First off, I created this fun home decor wall hanging using the new Pumpkin Lane House die set. I cut all the bits from Benzie felt and stitched with DMC embroidery floss. Then I wrapped velvet ribbon around an embroidery hoop and added some fabric and felt to create a background. Then I just used hot glue to assemble my scene to that. I finished it off by wrapping more ribbon around the fastener at the top and it’s ready to hang up.

While I was creating that large hoop I remembered extra stock I had of the mini 3″ hoops from past paper creations and it gave me this idea. I lined the back with patterned paper and used foam squares to pop the holly and berries up in the center. These come from the Candy Cane stitching set. I finished it off with a velvet bow and hanger on the top and a sentiment banner on the bottom.

Products used:
Spellbinders Felt Stitch & Create dies
Benzie felt
Spellbinders Delivering Joy dies
Foam squares

I appreciate you sharing your time with me. Have a fabulous day!

Doodlebugs – Presents for All Occasions

Happy Mix it up Monday everyone! On the Doodlebugs blog today sharing a little reminder that all the stamps and dies you have that are presents, birthday or other work great for Christmas too. That usually goes for the other way around while we’re at it!

I pulled out the new Mama Elephant Surprise Gifts set, which is not holiday at all, at wanted to make a Christmas card with it. So I colored my images accordingly with copic markers, used the coordinating dies to cut them out and some liquid glue to adhere my cute little scene.

Now that we’re on our way to holiday, I pulled out the Pretty Pink Posh Layered Christmas Trees stencil set and inked it up on a piece of light green cardstock. For the final layer I skipped inking and got a little messy with texture paste though. OMG do I love this stuff! It’s the perfect texture add-on if you ask me.

When that was dry, I trimmed it to fit an A2 card base and glued it on the front. I popped up the piggy and gifts and added a Mama Elephant Winter Banner Greeting. The array of options in these sentiment sets is amazing! Highly recommend!

I digress. Back to the card. For finishing touches today I added black glaze pen to the piggy’s eyes and nostrils. Then I added stardust Stickles to the heart he’s holding and white gel pen highlights to all the gifts.

Products used:
Mama Elephant Surprise Gifts stamps and dies
Mama Elephant Winter Banner Greetings dies
Pretty Pink Posh Layered Christmas Trees stencils
Blending brushes
Texture paste
Liquid glue
Foam tape
White and black gel pen
Stickles – stardust

I appreciate you sharing your time with me. Have a fabulous day!