Newton’s Nook – You’re a PURR-fect Friend!

Hello again. I have some sweet valentine inspiration to share with you today featuring Newton’s Nook stamps, dies and stencils.

Some of these holiday stamps don’t get enough love so I get excited when I’m digging and find something I love that I haven’t created with much. That’s how today’s card came about.

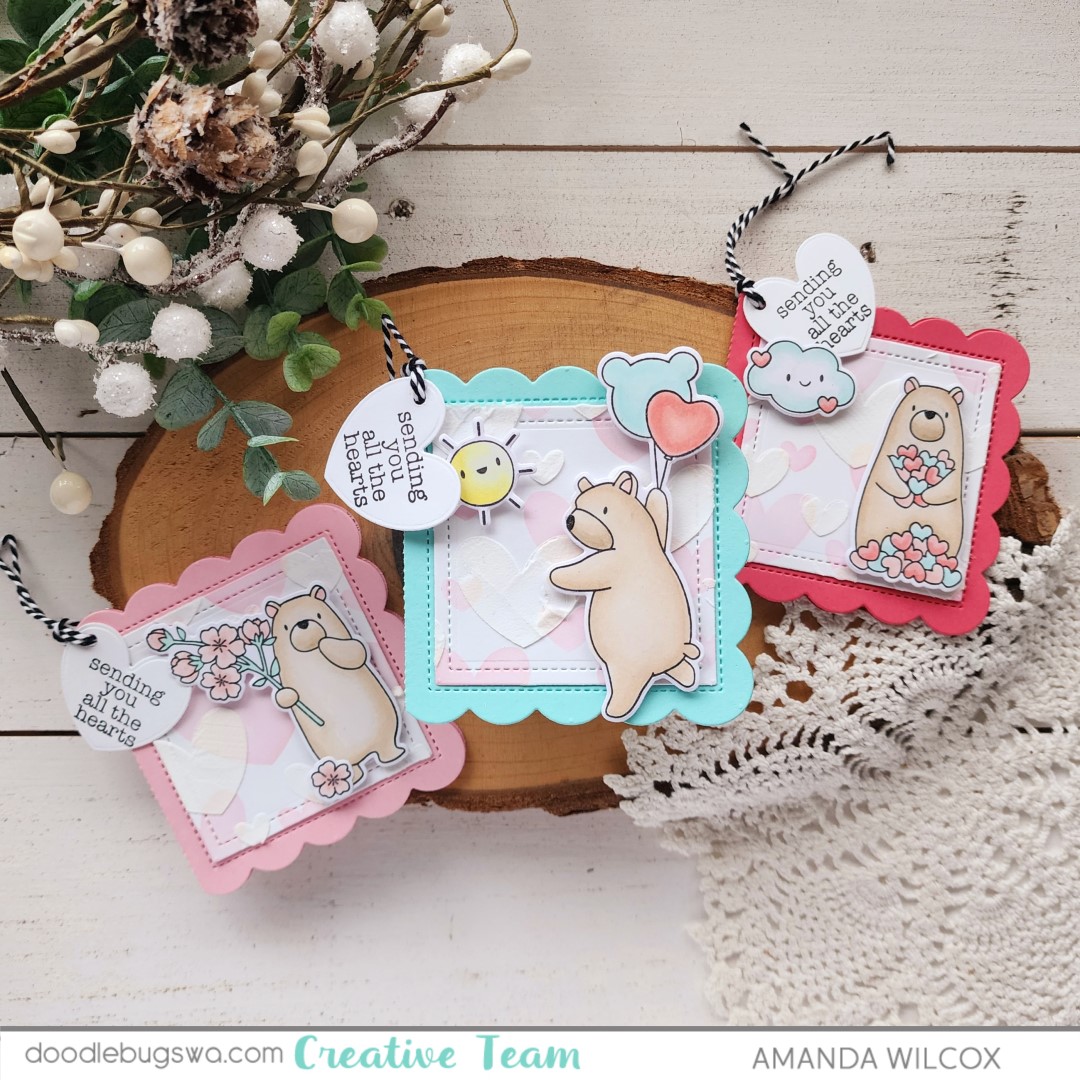
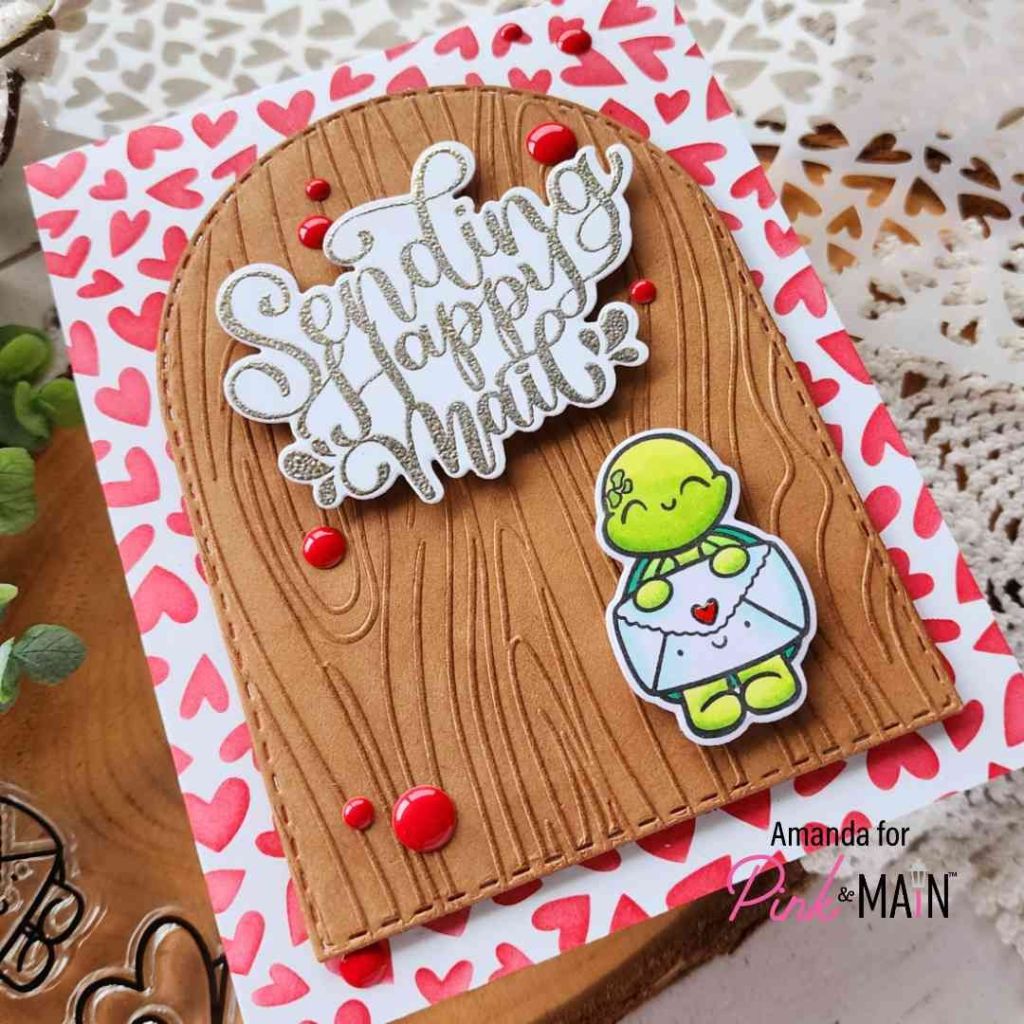
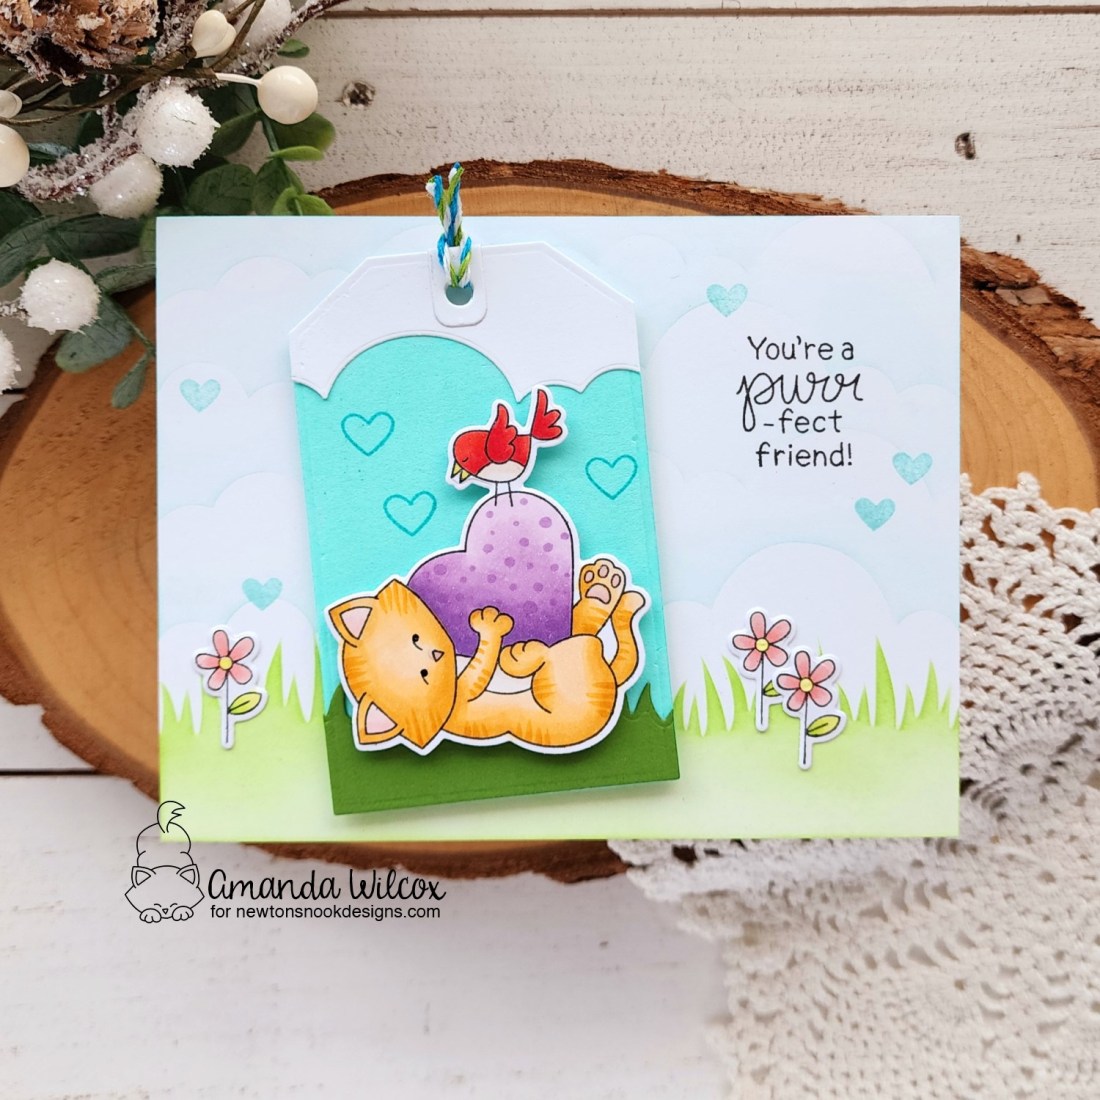
I stamped and colored the main image and some flowers from Newton’s Valentine and used the coordinating dies to cut them out. Then I used the Fancy Edges Tag, Land Borders and Sky Borders dies to create a mini scene tag to put it on.

Everything wasn’t fitting how I thought it would on the tag so I used Clouds and Hills & Grass stencils to create a coordinating scene on a card front to match my tag.

I stamped my sentiment in the sky and added some solid hearts for fun. Then I took the outline heart and stamped those on the tag so it all coordinates but the tag is bolder. I glued the flowers to the grass and popped the tag up with foam tape.

For finishing touches I added glossy accents to the flower centers, bird’s beak and Newton’s nose and toe beans. Then I added black glaze pen to Newton’s eyes so they stand out more.

Do you send out Valentine’s Day cards? I only send a handful but they are so fun to create, I definitely couldn’t skip this holiday!

Products used:
Newton’s Valentine stamps and dies
Fancy Edges Tag dies
Land Borders dies
Clouds dies
Grass & Hills stencil
Clouds stencil

Blending brushes
Lawn Fawn inks – mermaid, jalapeno
Liquid glue
Foam tape
Glossy accents
Sakura black glaze pen

I appreciate you sharing your time with me. Have a fabulous day!

Doodlebugs – Mini Valentines Note Cards Make Great Tags

Welcome to Mix it up Monday for the Doodlebugs blog. Once again, we are mixing our favorite companies together on the same projects. Today we’ve got awesome Pretty Pink Posh stencils and dies with a splash of Mama Elephant stamps and dies. I made a trio of mini note cards and turned them into tags. These are fabulous for tying to a goodie bag of treats or to the handle of a gift bag too!

I started this project by stamping and coloring all of the images from Mama Elephant Beary Good Day with my copic markers. I used the coordinating dies to cut the images out and set them aside to cut my note card pieces.

I chose the Pretty Pink Posh Mini Scallop Card for today’s project. I cut the inside square panel from white cardstock three times. Then I took the Pretty Pink Posh Layered Hearts stencil and inked one layer with Lawn Fawn ballet slippers ink and the second layer I spread texture paste through and let it sit to dry. I cut the actual scalloped card from a few different cardstocks in my stash while those were drying.

I used liquid glue to adhere the stenciled panel to the front of each card and then popped the images up on each one with foam squares. Instead of fitting a sentiment on each card somewhere, I chose my favorite one and stamped it on a heart from Mama Elephant’s Heart Pocket dies.

I punched a whole in each card and heart and threaded them together with some baker’s twine. Then I used a Wink of Stella glitter brush pen to add some shimmer to something on each card – flower centers, certain tiny hearts, the sun, a balloon – you get the idea. Then I also added glossy accents to the bear’s noses on each card.

I’m super excited to be gearing up for Valentine’s Day already. I absolutely love giving valentines to everyone I know! It’s so fun.

Products used:
Mama Elephant Heart Pocket dies
Mama Elephant Beary Good Day stamps and dies
Pretty Pink Posh Mini Scallop Card dies
Pretty Pink Posh Layered Hearts stencils
Blending brush
Lawn Fawn ballet slippers ink
Liquid glue
Glossy accents
Texture paste
Wink of Stella glitter brush pen
Stencil pal

I appreciate you sharing your time with me. Have a fabulous day!

Miss Ink Stamps – All Smiles

Happy Thursday friends! I’m sharing so many smiles with you today featuring fun from the Miss Ink Stamps Alice Collection. This stamp and die set and stencil are part of the new add on release. I was over the moon to see more Cheshire Cats to play with this time around. I love him in the movies and stories!

I started by stamping and coloring all of the kitties in the All Smiles stamp set. Then I used the coordinating dies to cut them all out. I decided that I wanted something for them to be on so I die cut the smallest tag from the Tags die set in black cardstock for each one. I also stamped and die cut my sentiment with a banner.

Next, I took a piece of purple cardstock and die cut it with the largest frame in the Oh Happy Day die set. I pounced seedless preserves distress oxide ink of the Cheshire Smiles stencil. Oxide ink is thick and if I try to blend through stencils I always end up with mucky blotches so pouncing is the way to go for me.

After removing the stencil, I lightly blended the same ink around the edges of the panel. I splattered it with water and flicked purple watercolor on the panel and mini tags too.

I added the cats to the tags with foam squares. Then I added the sentiment to the center of the panel with foam strips and arranged my cat tags around that with liquid glue. Finally, I popped the panel up on a white card base with foam tape.

For finishing touches I just added glossy accents to the kitty noses for a little shine on each one.

Products used:
All Smiles stamps and dies
Cheshire Smiles stencil
Oh Happy Day dies
Tags dies

Foam tape, strips and squares
LH Colors watercolor – purple
Touch of Gloss
Liquid glue
Lawn Fawn Extra Sentiment Banners dies

I appreciate you sharing your time with me. Have a fabulous day!

Doodlebugs – New Year, Birthday Card Restock

Welcome back everyone and Happy New Year! I’m on the Doodlebugs blog today getting a jump on birthday cards. These Build a Gift dies from Pretty Pink Posh are fantastic for every occasion through the year.

I die cut a bunch of pieces from white, green and teal cardstocks and used liquid glue to assemble them it lots of different combinations. Then, pulling from the gift colors, I blended green distress oxide inks on a white panel and spritzed it with water. Then I used the Spellbinders Floating Balloons 3D embossing folder on it.

I cut a strip of black cardstock to create a floor, glued it to my balloon panel and then started gluing down packages, stacking as I went. It’s so fun!!!

For my sentiment, I hot foiled Happy Birthday from the Spellbinders Giant Party Balloon hot foil and die set. I used the coordinating die to cut it out and glued it in place. Finally, I added foam tape the back and popped it up on a white card base.

What kind of cards do you start stocking up on at the beginning of the year? Birthday and thank you are my top two for sure!

Products used:
Pretty Pink Posh Build a Gift dies
Spellbinders Floating Balloons 3D embossing folder
Spellbinders Giant Party Balloon hot foil and die set
Spellbinder hot foil – silver
Distress Oxide Ink – mowed lawn. twisted citron and shabby shutters
Liquid glue
Foam tape

I appreciate you sharing your time with me. Have a fabulous day!

Newton’s Nook – Happy New Year

Happy New Year my friends!!! Thank you for your continued love and support, whether you’re new or you’ve been here since the beginning, I truly appreciate each one of you. So I created a New Year card to share with all of you.

I created a fun fireworks scene using the Newton’s Nook Fireworks stencil and distress oxide inks. I randomly chose some brighter colors to pounce through my stencil in hopes the tint would show up over the black cardstock. It did a little but not as much as I hoped so I also went in and splattered the panel with pink and yellow metallic watercolors too.

I stamped and colored the main image from Newton’s New Year with my copic markers before cutting it out with the coordinating die. I wanted him to pop against the background so I cut a vellum scalloped circle and then went ahead and cut another smaller circle for my sentiment with the same die set. I wanted the teal to match my coloring so I colored the circle with my copic markers as well.

I found yellow cardstock in my stash that matched Newton’s hat so I cut it down and adhered it to an A2 size card with liquid glue before popping up the background panel with foam tape. Then I added Newton to the vellum circle with foam squares along with the sentiment and hid tape runner behind them to adhere those to the fireworks panel.

For finishing touches I added glossy accents to the bottle labels and Newton’s nose, plus a white clay heart above my sentiment.

Wishing you all a Happy New Year full of love and joy!!! Sending crafty hugs too!

Products used:
Newton’s New Year stamps and dies
Fireworks stencil
Frameworks dies

Distress oxide inks
Foam tape
Glossy accents
Liquid glue

LH Colors watercolors
Twiddler’s Nook Sweethearts embellishments

I appreciate you sharing your time with me. Have a fabulous day!

Pink & Main – Sending Happy Mail

Hello again! Today is my last post as part of the Pink & Main design team. I’m sharing a bit of happy mail with everyone using a bit of new and old products.

I used the new Hearts a Plenty stencil with red ink for my background. I love these adorable scattered hearts! Then I cut a stitched arch from craft cardstock and embossed it with the Woodgrain embossing folder. I ink blended dark brown ink to help the detail show better, then popped it up with foam tape.

Then I pulled out the Sending Happy Mail stamp set and inked up that sweet turtle. I colored him with copic markers and used the coordinating die to cut him out. From the same set, I stamped and heat embossed the sentiment with platinum ring embossing powder, also using the coordinating die to cut it out. I adhered them both with foam squares.

For finishing touches I added touch of gloss to the heart on the envelope and a scattering of red enamel dots across the design.

This would be a super sweet valentine to send someone, or a fabulous card for your stash to share just because too.

Products used:
Sending Happy Mail stamps and dies
Stitched Arches dies
Woodgrain embossing folder
Hearts a Plenty stencil
Ergonomic blending brush
Foam tape
Touch of gloss
EZ squeeze liquid glue
Enamel dots
Magic anti-static brush
Watermark and embossing ink
Embossing powder – platinum ring

I appreciate you sharing your time with me. Have a fabulous day!

Doodlebugs – Merry Christmas From Us

I’m over on the Doodlebugs blog today with a Merry Christmas from the Doodlebugs team to all of you! We hope you have a wonderful holiday, spent with those you love.

To create my card, I stamped images from Pretty Pink Posh Holiday Stockings. I used the coordinating dies to cut them out and liquid glue to adhere my stocking gifts in place. I stamped and heat embossed a sentiment and used a Lawn Fawn banner die to cut it out.

Next I used the Spellbinders In the Pines embossing folder on a piece of green cardstock. I trimmed that down to 3.75×5 inches and lightly went over the embossing with a darker green ink to help it show up better.

I took my Lawn Fawn ballet slippers ink pad and drug it across the edges of a white card base, then cut white glitter paper down to 4×5.25 inches and glued it down. I popped the embossed panel up with foam tape and then added my sentiment and stockings with foam squares.

For finishing touches I added glossy accents and stardust Stickles to bits and pieces in all of the stockings.

Products used:
Pretty Pink Posh Holiday Stockings stamps and dies
Spellbinders In the Pines embossing folder
Lawn Fawn Extra Sentiment Banners dies
Embossing powder
VersaMark ink
Anti-static brush
Lawn Fawn Ink – jalapeno and ballet slippers
Liquid glue
Glossy accents
Stickles – stardust

I appreciate you sharing your time with me. Have a fabulous day!

Pink & Main – Be Merry

Welcome everyone! I’m on the Pink & Main blog today squeezing in one more Christmas card before it’s too late. I pulled out some of my favorites from last year and had a blast creating this adorable card.

Remember the striped background I used a couple weeks ago? This background is the opposite pieces from that crafting session. Whenever I cut stripes from a die and have extras, I either make multiples right then or save them for later. It’s always worth it! This time I cut the wonky scalloped panel from white cardstock and inked it with distress oxide inks in mowed lawn and twisted citron, then spritzed it with water before gluing the stripes in place.

Next, I pulled out the Christmas Squares stamp set and Square Frame dies. These products work perfectly together but are great on their own too. I colored my gingerbread man with copic markers and trimmed the panel to fit behind the polaroid frame. I glued them together and added foam to the back.

Next, I cut Be Merry from black cardstock and the shadow from white glitter cardstock and glued them together. After adding foam to the back of this, I adhered both the sentiment and photo to the striped background panel. Then I cut a piece of pink cardstock to glue to my card front and popped the whole scalloped rectangle up with foam tape as well.

For finishing touches I added Touch of Gloss to the chocolate chips and gingerbread frosting. Then I added stardust Stickles to his cheeks and gumdrop buttons.

I’m hoping no more surprises pop up because I’m running out of time for last minute cards. Lol.

Products used:
Christmas Squares stamps
Square Frames dies
Diagonal Cover dies
Winter Greetings dies
EZ Squeeze liquid glue
Foam tape
Touch of Gloss
Stickles – stardust
Distress Oxide – mowed lawn and twisted citron

I appreciate you sharing your time with me. Have a fabulous day!

Doodlebugs – Thank You Cards for the Holiday Season, with Two-for-One Backgrounds

Hi there. I’m on the Doodlebugs blog today with an idea for thank you cards using two-for-one backgrounds so you can make more quicker during the holiday season. I know I always need to stock up on thank you cards this time of year so having a similar layout or two-for-one (or more) backgrounds are super helpful!

Today I cut the Mama Elephant TYSM cover die from light green and kraft cardstocks. I took white card bases and glued all the pieces in place with liquid glue.

If you were really in a pinch, you could stop here and just add some splatter or gems for interest and be done, or even leave them as is too. We all know I’m extra so I have a hard time with that.

Instead of stopping, I pulled out the Pretty Pink Posh Winter Drinks stamp set and stamped a bunch of different cups and a couple of the steam image. I used copic markers to color everything and the coordinating dies to cut it all out.

I stamped and heat embossed a sentiment from the set and die cut it with a sentiment strip. I grouped the images together and popped everything up on foam squares and strips over the “sooo” portion of the sentiment. You can still see what it’s saying and I love how the sub-sentiment adds warmth to the card.

For finishing touches I just added white gel pen highlights to the cups.

Products used:
Mama Elephant TYSM cover die
Pretty Pink Posh Winter Drinks stamps and dies
Pretty Pink Posh Sentiment Strips dies
Liquid glue
Foam squares and strips
Sakura Gelly Roll white pen

I appreciate you sharing your time with me. Have a fabulous day!

Pink & Main – Release Day Instagram Hop

Woohoo!!! It’s release day for Pink & Main friends! We’re going to be hopping over on Instagram at noon PST but here’s a peek and the details for my card today.

So many new Foilables, a few new CheerFoils and so many other fun things too! I used the new shattered pink CheerFoil on this awesome background panel. Then inked some distress oxide picked raspberry over the edges.

I used the new *** dies and cut love, subbing the “o” for the heart because I couldn’t resist, out of salon cardstock. For the heart though, I added a piece of adhesive sheet to the top of my cardstock before cutting the shape out. I remove the release paper after that and sprinkled sparkling cotton candy flock with glitter on it.

TIP: I did use my fingers to press the flock into the adhesive, then tapped the excess off.

From the same die set I cut the scripty you from white cardstock three times and black once, using liquid glue to adhere the layers together. Then I glued it in place over the center of my other letters.

Last, I cut a piece of black cardstock and adhered it to my card base, then I popped up the foiled panel with foam tape and my card is all finished.

I love it! I love that foil and I love these new chunky letter dies!

Don’t forget to head to Instagram at noon and hop with us for a chance to win $50 to the Pink & Main store!

Products used:
**** dies
**** Foilables
Mini Minc Machine
CheerFoil – shattered pink
EZ Squeeze liquid glue
Foam tape

Flock with Glitter – sparkling cotton candy
Adhesive sheets
Blending brushes
Distress Oxide – picked raspberry

I appreciate you sharing your time with me. Have a fabulous day!