Newton’s Nook – Sparkle and Shine with Foiling Christmas Lights

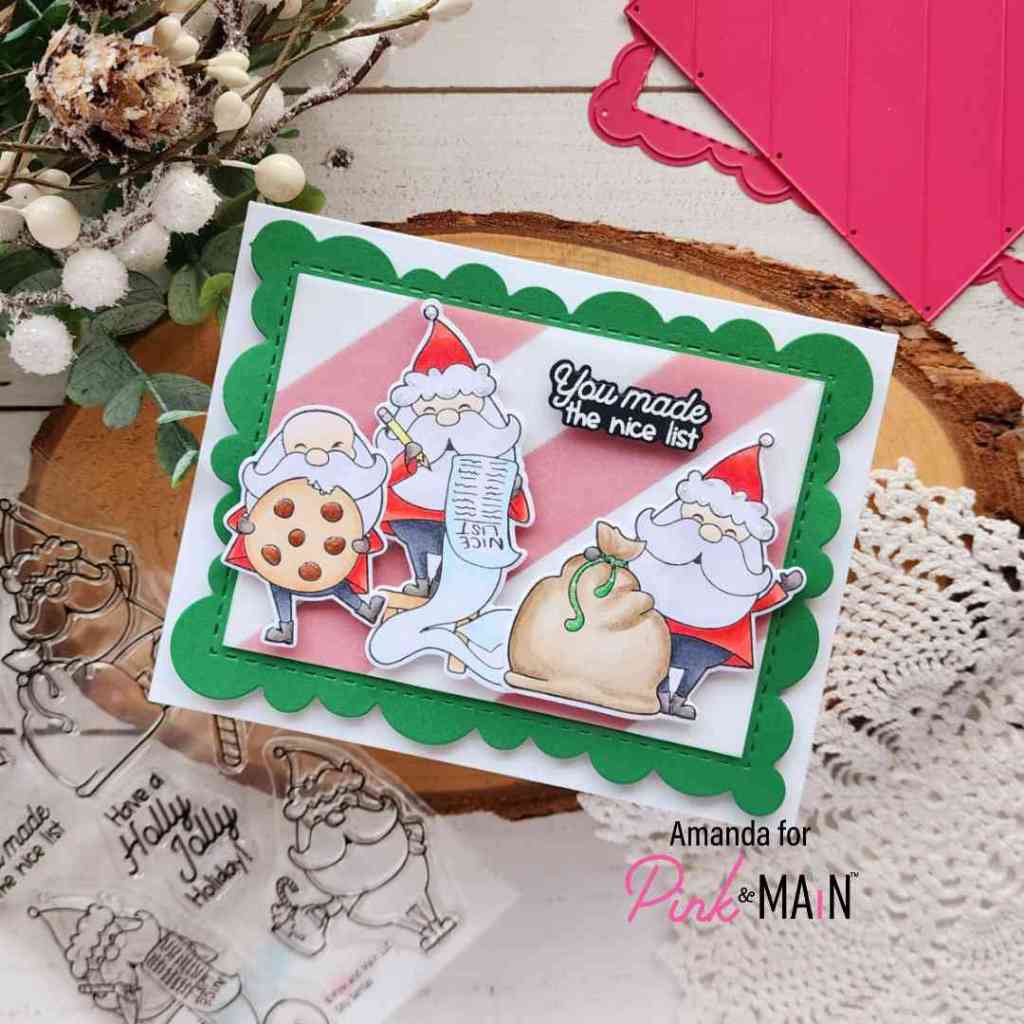
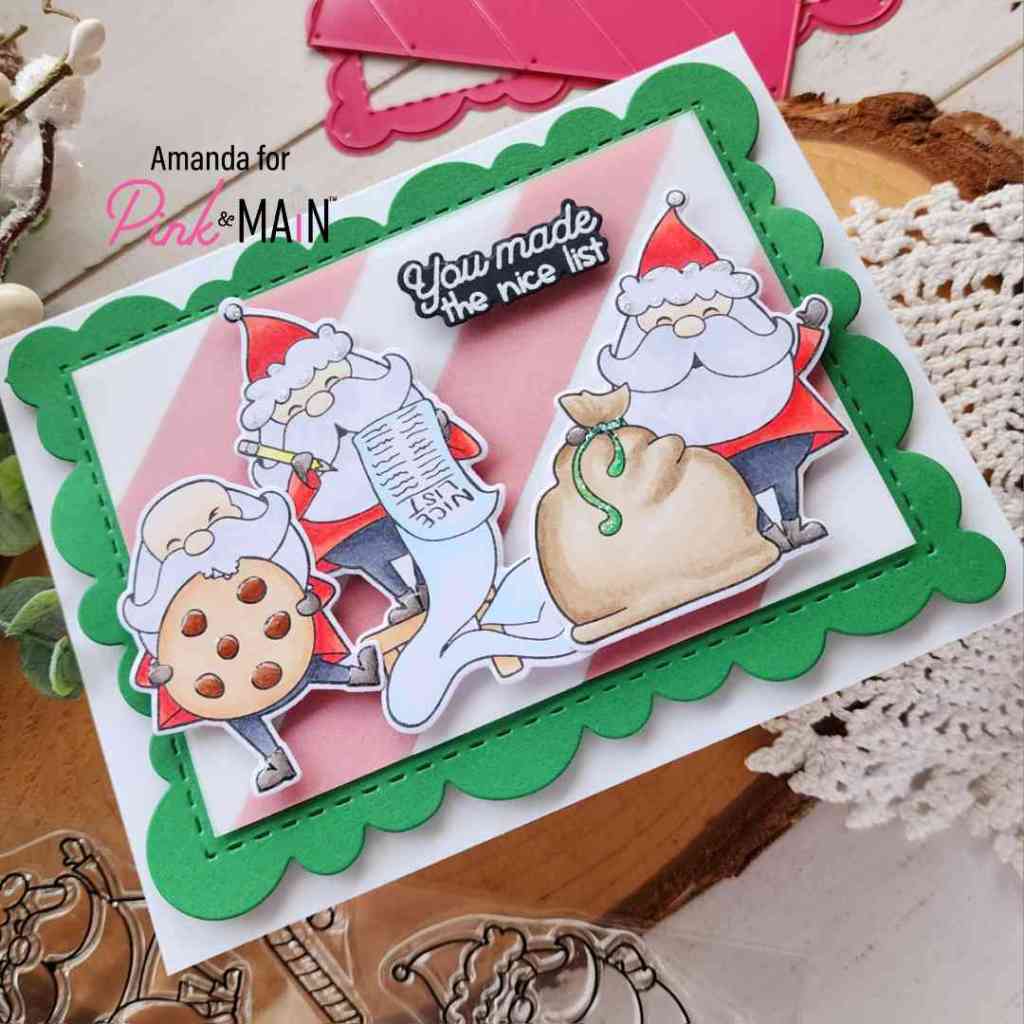
Welcome again! I have a Newton’s Nook fun, foiled card using the old school way – transfer gel instead of hot foiling. This is a great way to use your stencils for added shine and interest on your cards.

The Light Strings stencil is a 2-piece set so I started with the cord and inked it green on a piece of white cardstock. Then I spread Thermoweb transfer gel blanco through the second layer, which has all the lights. I set it aside to dry and came back later.

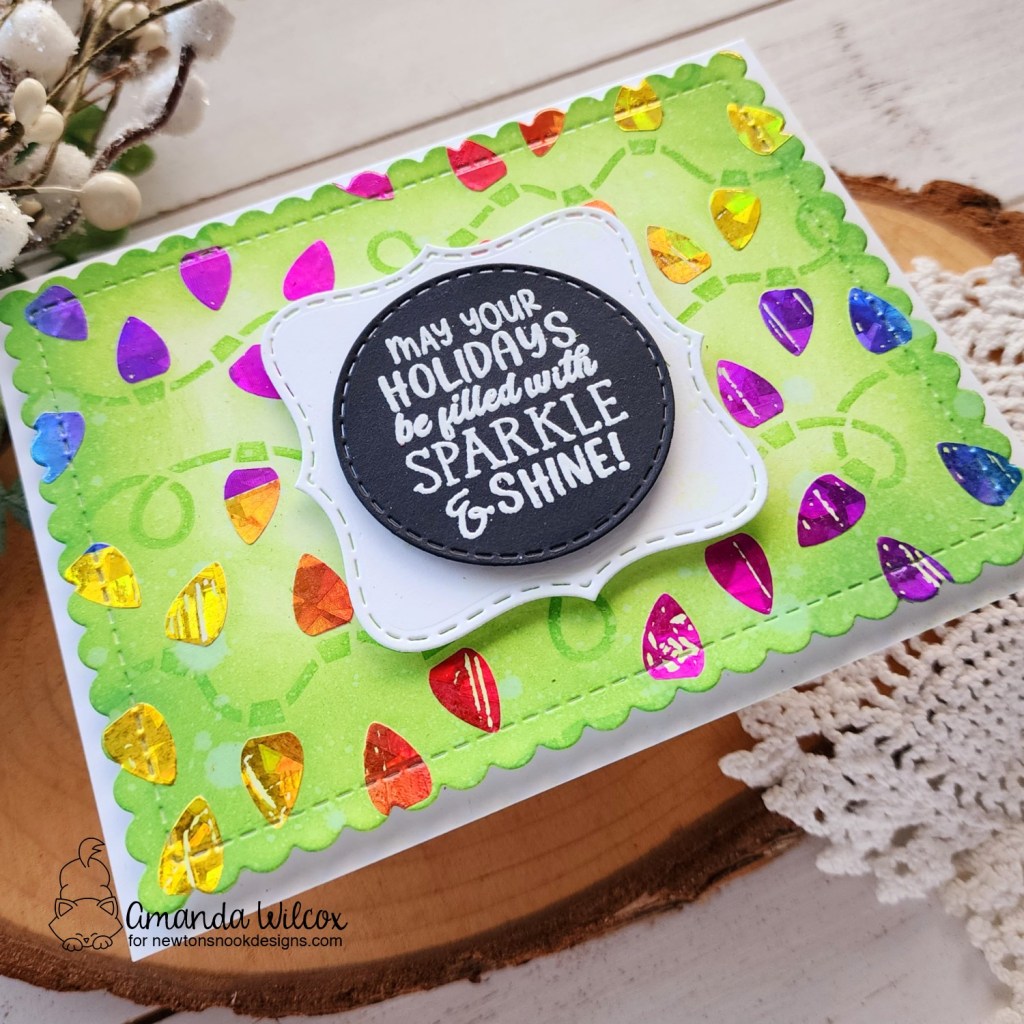
While it was drying I stamped and heat embossed a sentiment from Oval Snowflakes on black cardstock. I used a Circle Frame die that fit perfectly to cut it out. Then I got the Frames Squared die set out and cut a white label shape from there.

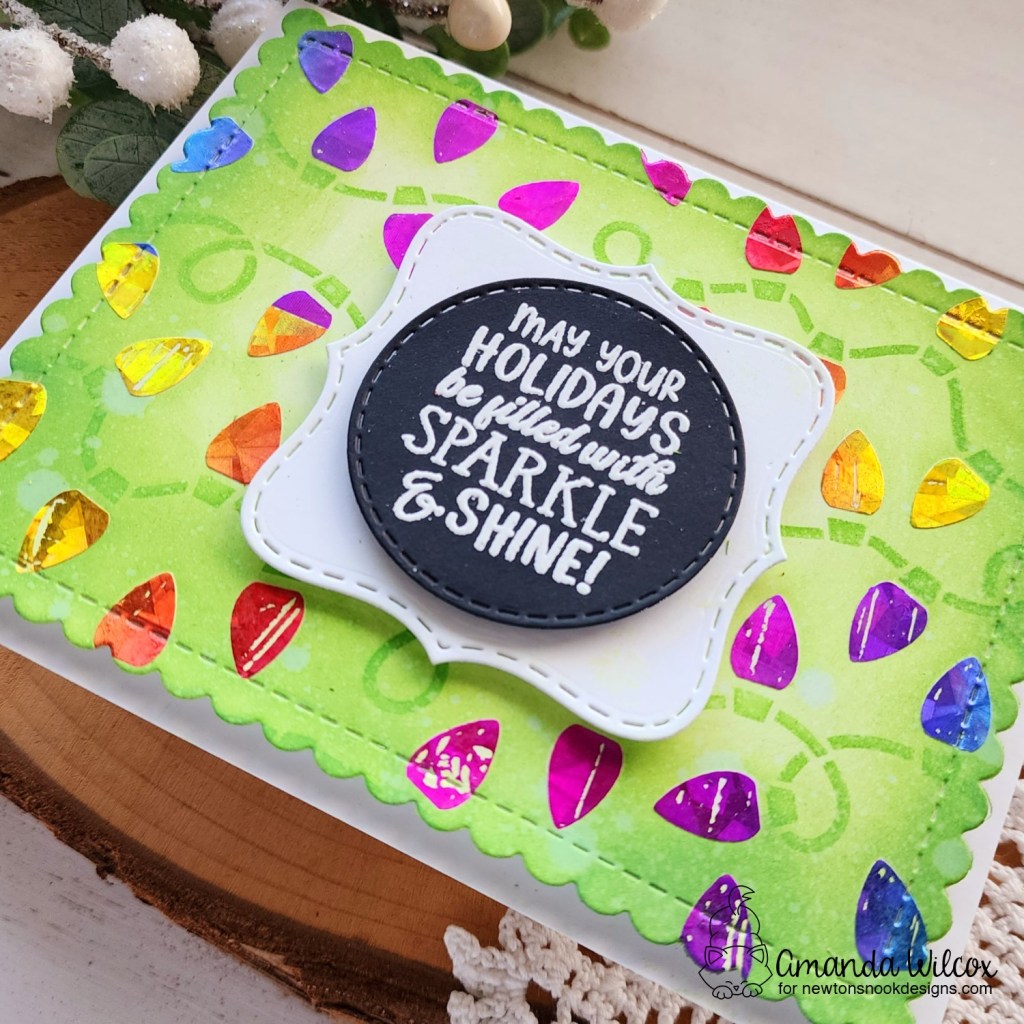
When the transfer gel was dry, I ran it through my laminator in a Craft & Carrier sheet with shattered rainbow foil. After foiling I die cut the panel with the largest Frames & Flags die and popped it up on a white card base with foam tape. Next I added the label and sentiment circle with the same foam.

Products used:
Newton’s Nook Light Strings stencils
Newton’s Nook Snowflake Oval stamps
Newton’s Nook Frames Squared dies
Newton’s Nook Circle Frames dies
Newton’s Nook Frames & Flags dies

Thermoweb transfer gel blanco
Thermoweb stencil pal
Thermoweb shattered rainbow foil
Thermoweb foam tape roll
Pink & Main magic anti-static brush
Pink & Main embossing ink

Pink & Main embossing powder – frosting

I appreciate you sharing your time with me. Have a fabulous day!

Pink & Main – Sneak Peek Week Seeing Hearts

Hey friends! I’m on the Pink & Main blog today with a sneak peek of the release that’s coming your way on Friday! I’m seeing hearts, not stars, hearts…everywhere and it’s wonderful!

There are new Stickies coming and CheerFoil too! This wonderful set of Stickies comes with coordinating layering dies. The heart shape and the outer scallop too! Totally genius and I couldn’t wait to dive into the package!

After foiling the stickies and die cutting the pieces, I adhered the hearts with foam tape. Then I cut a slim line panel, inked it up with one layer of the Conversation Heart stencil and splattered it with Water Gems for sparkle. I used EZ Squeeze liquid glue to adhere my hearts and popped the panel up on a slimline card base that I inked the edges of with black ink.

I also stamped and colored this sweet owl from the stamp of the month, Owl My Love. I used the coordinating die to cut him out and popped him up as well. Then, for finishing touches I tied some baker’s twine around the card front.

We’re having an Instagram hop for the new release on Friday so keep an eye out for that.

Products used:
Stamp of the Month – Owl My Love
Hearts Stickies with coordinating dies
CheerFoil – tinsel gold and shattered pink

Conversation Hearts stencil
Layered Slim Line dies
Blending brush
Water gems watercolor
Foam tape
EZ Squeeze liquid glue

I appreciate you sharing your time with me. Have a fabulous day!

Newton’s Nook – Happy Holidays

Hi friends. I’m on the Newton’s Nook blog one last time for 2023 sharing a sweet holiday card with you. I actually combined a few products this time and love how it all came together.

I started by ink blending distress oxide ink on a white panel. I chose faded jeans and chipped sapphire for a deeper, gray-blue. Then I heat embossed Snowflake Oval in the center of the panel and used the largest scalloped oval in the Oval Frames set to cut it out. Next, I chose a snowman from Snow Much Fun to stamp and color with my copic markers. I used the coordinating dies to cut him out and set those aside.

I pulled the blues in my snowman from the background but the greens came from this hot foiled sentiment banner I had saved from a previous foiling session. It uses the Holiday Greetings hot foil plates and Banner Duo dies. Using the green again, I chose light green cardstock and ink blended the Holiday Foliage stencil on it.

For my layers, the background panel is adhered with liquid glue and everything else with foam tape. Then I finished things off with stardust Stickles and Touch of Gloss on bits of my snowman.

I hope you’re enjoying your holiday season!

Products used:
Snow Much Fun stamps and dies
Snowflakes Oval stamps
Holiday Greetings hot foil plates
Banner Duo dies
Oval Frames dies
Holiday Foliage stencil

Blending brushes
Distress Oxide Ink – faded jeans and chipped sapphire
Lawn Fawn Ink – walnut, celery stick, lobster
Foam tape
Stickles – stardust
Touch of gloss
Liquid glue

I appreciate you sharing your time with me. Have a fabulous day!

Doodlebugs – Stretch Your Dies from Christmas through Winter and Beyond

Hi friends! I’m on the Doodlebugs blog today stretching some fabulous Christmas dies into Valentine’s Day and that gave me ideas for all year long too! It’s so nice when products can be used for more than one time a year.

I fell in love with the latest Mama Elephant release and thought this fun mug from Spellbinders would be a great combo for some lovely hot cocoa to share. I used cardstock from my stash to die cut all of the pieces and liquid glue to adhere everything together.

Then, I took a white panel and ink blended peacock feathers and salvaged patina distress oxide inks. I splattered it with water and pearl watercolor. Then glued my cover panel on top and inserted the centers of the Os where they belonged.

I popped the mug up with foam squares toward the bottom of my card. Then I added some more hearts, one holding my sentiment. The smaller ones are from the mug dies and the larger one is from the new Mama Elephant Heart Pocket die set.

I love the shimmer of the watercolor on the background and the sparkle from the glitter paper on the mug. They are simple ways to add a little extra to your card designs.

After I created this love filled mug, I was thinking that it would be easy to add snowflakes through winter and change your sentiment to a thank you. I always need extra thank you cards through the holidays.

Products used:
Mama Elephant Heart Pocket dies
Mama Elephant Beary Good Day stamps
Mama Elephant XOXO Grid Cover die
Spellbinders Merry Mug Creations dies
Liquid glue
Foam squares
Distress Oxide Ink – peacock feathers, salvaged patina

LH Colors watercolor – pearl

I appreciate you sharing your time with me. Have a fabulous day!

Newton’s Nook – New Year Fireworks Spectacular, Stretching your Stamps for Other Themes

Hey friends! I’m on the Newton’s Nook blog and super excited to share my card today! I’m using 4th of July themed products for a super spectacular Happy New Year card and I can’t be more happy with how it turned out.

I inked up a white piece of cardstock using the Fireworks stencil. After removing the stencil I went over all the areas lightly with another layer of the same color ink. Then I splattered the panel with silver watercolor and set it aside to dry.

White that was drying I pulled out Newton’s 4th of July stamp set and stamped that adorable kitty on the firecracker. I colored it similar to the fireworks colors and used the coordinating die to cut him out. Next I stamped my sentiment from Newton’s New Year in the same pink from the stenciling and cut it out with a Circle Frame die. I also inked the edges of this so it wasn’t stark white.

I trimmed the stenciled panel down to 5.25×4 inches and added foam tape to the back. Before adhering it I went around the edges of my white card base with speckled egg distress oxide ink. After all of that I popped my image and sentiment up with foam squares.

For finishing touches I cut and glued some stars from the Sky Scene Builder die set around and added touch of gloss to Newton’s nose and collar tag, as well as the flames on the firecracker.

Isn’t this a fabulous way to ring in the new year?!? I love it!

Products used:
Newton’s Nook Fireworks stencil
Newton’s Nook Newton’s 4th of July stamps and dies
Newton’s Nook Newton’s New Year stamps
Newton’s Nook Circle Frames dies

Distress Oxide Ink – speckled egg
LH Colors – silver watercolor
Foam tape
Touch of gloss

Twiddler’s Nook Blending brushes
Lawn Fawn dye inks – ballet slippers, celery stick, mermaid

I appreciate you sharing your time with me. Have a fabulous day!

Miss Ink Stamps – Deck the Halls

Welcome back everyone. Today I have inspiration for quick scene “coloring” using Miss Ink Stamps stencils, dies and stamps. As things get closer to Christmas, we have less and less time to sit and color detailed scenes, but maybe you still really want to create with those gorgeous images. Here’s one solution for you.

To start my card, I stamped the bunny images I wanted cut out and colored them with copic markers. Then I used my scan-n-cut to cut them all out and set them aside.

Next I cut the stitched rectangle from EIEIO Frames die set and stamped the large background image in brown ink on it. Then, without adding ink to my blending brushes, I went around the edge with my teal brush, then over the tree trunks with brown and last the trees themselves with green. It just gives the background a glow of color so it’s not stark white but really took no time at all.

Next, I took an A2 white panel and inked up the Candy Stripes stencil with red ink. After removing the stencil I went around the border with the same color so there wasn’t any white but you could still differentiate the stripes.

I used liquid glue to adhere my layers together and to a card base, then I popped up my images and sentiment banner.

Products:
Woodland Hearth stamps
EIEIO Frames dies
Candy Stripes stencil

Blending brushes
Liquid glue
Foam squares

Embossing & Watermark Ink
Embossing powder – frosting
Magic Anti-static brush

I appreciate you sharing your time with me. Have a fabulous day!

Pink & Main – Nice List

Happy Wednesday everyone! I’m on the Pink & Main blog today squeezing in as many extra Christmas cards as I can before we’re knee deep in hearts and all things Valentine.

I love these Santas and had to create with them again. They’re so fun with all their different poses and accents, why not pile them all together while we’re at it!

So I chose three of them to stamp and color, then I used the coordinating dies to cut them out and used liquid glue to adhere them together where they overlap. I stamped and heat embossed my sentiment at this point too, using the coordinating die to cut it out also.

For my background, I pulled out the Diagonal Cover dies. I cut the main part from green cardstock and then the stripes from red and white. I find it easier to insert my stripes back in the die upside down and use washi tape to hold them together before gluing them to the background. This time I also cut a piece of vellum the same size as the stripes and used tape runner to hold it in place before popping my images and sentiment up with foam squares.

Once that was done I popped the scalloped rectangle up with foam tape on a white card base. For finishing touches I added Touch of Gloss to all the Santas boots and mittens plus the chocolate chips, then stardust Stickles to the hats and toy bag string.

Aren’t they adorable?!? I can’t get enough of them…especially that giant cookie!

Products used:
Silly Santas stamps and dies
Diagonal Cover dies
Foam tape
Touch of Gloss
Anti-static brush
Embossing & Watermark ink
Embossing powder – frosting
EZ Squeeze liquid glue
Stickles – stardust

I appreciate you sharing your time with me. Have a fabulous day!

Doodlebugs – Truckload of Christmas Wishes

Hey there! Thanks for stopping by today. I’m still full into the Christmas cardmaking/crafting mode. How are you doing on your holiday crafts? It seems the more I finish, the more I add on to the list to do.

Today I had fun with the Pretty Pink Posh Christmas Trees stencil. I inked up the first two layers with Lawn Fawn ink – celery stick and doe, then I spread glitter paste through the last stencil for a subtle glittery background.

While that was drying I stamped and colored images from Mama Elephant Delivery by Truck and Deliver Winter Joy. I used the coordinating dies to cut everything out and a little liquid glue to adhere my truckload and driver. Because of my background panel I also glued the window cutout for the truck back in place so it’s not see-through.

I stamped and heat embossed a sentiment from Pretty Pink Posh Sentiment Strips Christmas and die cut it, plus a background banner using Pretty Pink Posh Sentiment Strip dies. I used liquid glue to adhere these together and then foam squares and strips to pop everything up on my stenciled panel.

After adhering the panel to a card base, I tied jute twine around the top and switched to finishing touches. Today I added glossy accents to the truck lights, penguin beaks and parts of the ornaments. Then I switched to stardust Stickles for the frosting ornaments and penguin’s bowtie.

Products used:
Mama Elephant Delivery by Truck stamps and dies
Mama Elephant Deliver Winter Joy stamps and dies
Pretty Pink Posh Christmas Trees stencil
Pretty Pink Posh Sentiment Strips dies
Pretty Pink Posh Sentiment Strips Christmas stamps
VersaMark ink
Embossing powder – white
Lawn Fawn Ink – doe and celery stick
Blending brushes
Liquid glue
Foam squares and strips

I appreciate you sharing your time with me. Have a fabulous day!

Mama Elephant – Wreath Shaker Card

Hello everyone. I’m popping in with a fun little card I made last weekend using some older, but new to me, Mama Elephant products. I had passed on the fun wreath dies when they came out but when Mama Elephant had their Thank You Sale, I decided to pick them up, plus a couple of other things.

First I chose eight cute Little Agenda Snowmen to stamp and color. Then I used the coordinating dies to cut them all out. I kept to a fairly traditional Christmas color palette with a splash of teal because it’s me.

Then I cut all the pieces to my wreath and bow. I used a little ink blending on the bow to make the bottom layer a smidge darker. Then I used liquid glue to adhere everything. There isn’t a die that cuts a solid piece to make the wreath a shaker so I traced it on acetate and cut it by hand.

I added Twiddler’s Nook Snow Queen embellishments to each circle opening before sealing it up with the acetate layer. When I glued the top green wreath layer down I was careful to only add adhesive to the outer edge so I could tuck my snowmen underneath.

Finally I popped the bow up with a foam square and added a sentiment strip across the card front. To make this a shaped card, I just cut another wreath “shadow” shape from white cardstock, scored it about 1/2″ from one edge and adhered it to the back by just that 1/2″ hinge.

Products used:
Mama Elephant Little Agenda Snowmen stamps and dies
Mama Elephant Wreath Shaker dies
Mama Elephant Easy Xmas Greetings stamps and die

Liquid glue
Foam squares

Magic anti-static powder brush
Embossing powder – frosting
Embossing & Watermark ink

Touch of gloss
Twiddler’s Nook Snow Queen embellishments

I appreciate you sharing your time with me. Have a fabulous day!

Pink & Main – Snowflake Gift Tag Set

Happy Wednesday friends! I’m on the Pink & Main blog today sharing a set of gift tags I created using the ADORABLE penguins from Cup of Good Cheer. There was no way I could choose one or two of these images and we all need gift tags this time of year, so I stamped them all out plus the little extra cookies and lollipops too!

I had the idea for gift tags right away, but I originally thought I would use a typical tag shape, then I remembered my favorite layered snowflake dies and immediately switched gears! I pulled out some Pink & Main cardstock for the layers and chose my copic colors from there.

I used coordinating dies to cut the colored images out. Plus I also added a white cardstock layer and a vellum layer for my snowflakes.

I used EZ Squeeze liquid glue to adhere all the snowflake layers together. Then I pulled out the trusty, dusty (very dusty) Crop-a-dile to punch holes and add rivets to my tags. I haven’t done this for ages but I LOVE how it looks!

Before I forget to mention, after adhering the snowflake layers, before punching holes and adding penguins, I splattered the snowflakes with Water Gems watercolor. I chose the Caribbean color because it went with the cardstock best.

Then I popped the penguins up with foam squares and added Touch of Gloss to each one in various spots. All the penguin beaks for sure, then other pieces like cookies, candy, and the like.

Last, I threaded some organza ribbon through the holes and these beauties are ready for gifts!

Products used today:
Cup of Good Cheer stamps and dies
Stacked Snowflakes dies
Water Gems Sparkling Watercolors
EZ Flow Water Brushes
EZ Squeeze liquid glue
Touch of gloss
Foam squares

I appreciate you sharing your time with me. Have a fabulous day!