Miss Ink Stamps – Happy Birthday to a-wooooo!

Happy Thursday everyone! I’m here today with a scene card featuring stamps and stencils from Miss Ink Stamps. This card started with me just playing around, layering the Scene Builder: Treeline stencil on a piece of white cardstock. That thing is like magic to use! Then I started digging through my stamps to see what I wanted to pair with it and landed on Wolf Pack for a fun wilderness scene.

For the background stenciling, I used blending brushes and Lawn Fawn dye inks. I started with the top row of trees and then shifted the stencil down to see what a second row would look like. Then I slid the whole stencil up to use the other side as a mask and inked up a beautiful blue sky.

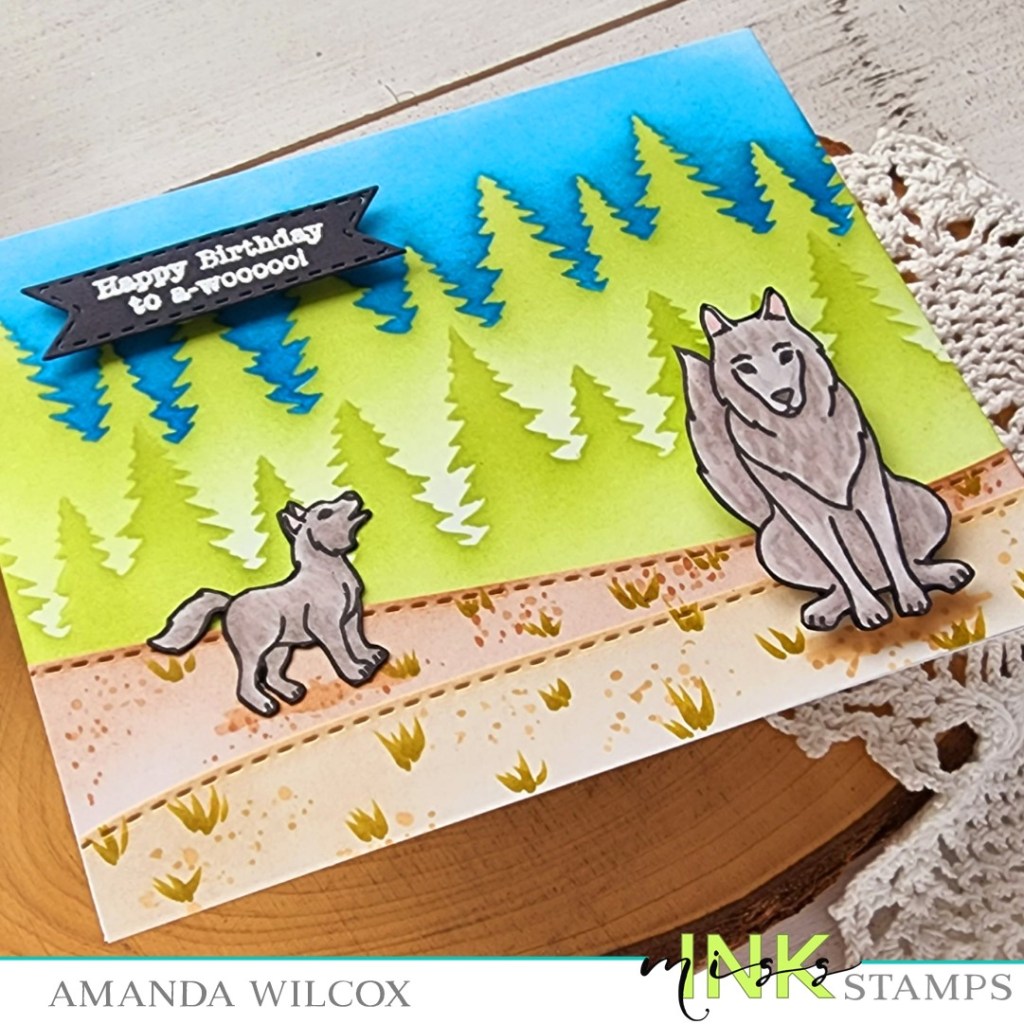
Next, I stamped two images from Wolf Pack and colored them with copic markers. I fussy cut them out and went around the edges with a black pen to clean them up a bit. Next, I took a scrap of white cardstock and cut it into two hills. I blended some brown dye ink on it and came in with similar copic markers to add texture and green for tufts of grass.

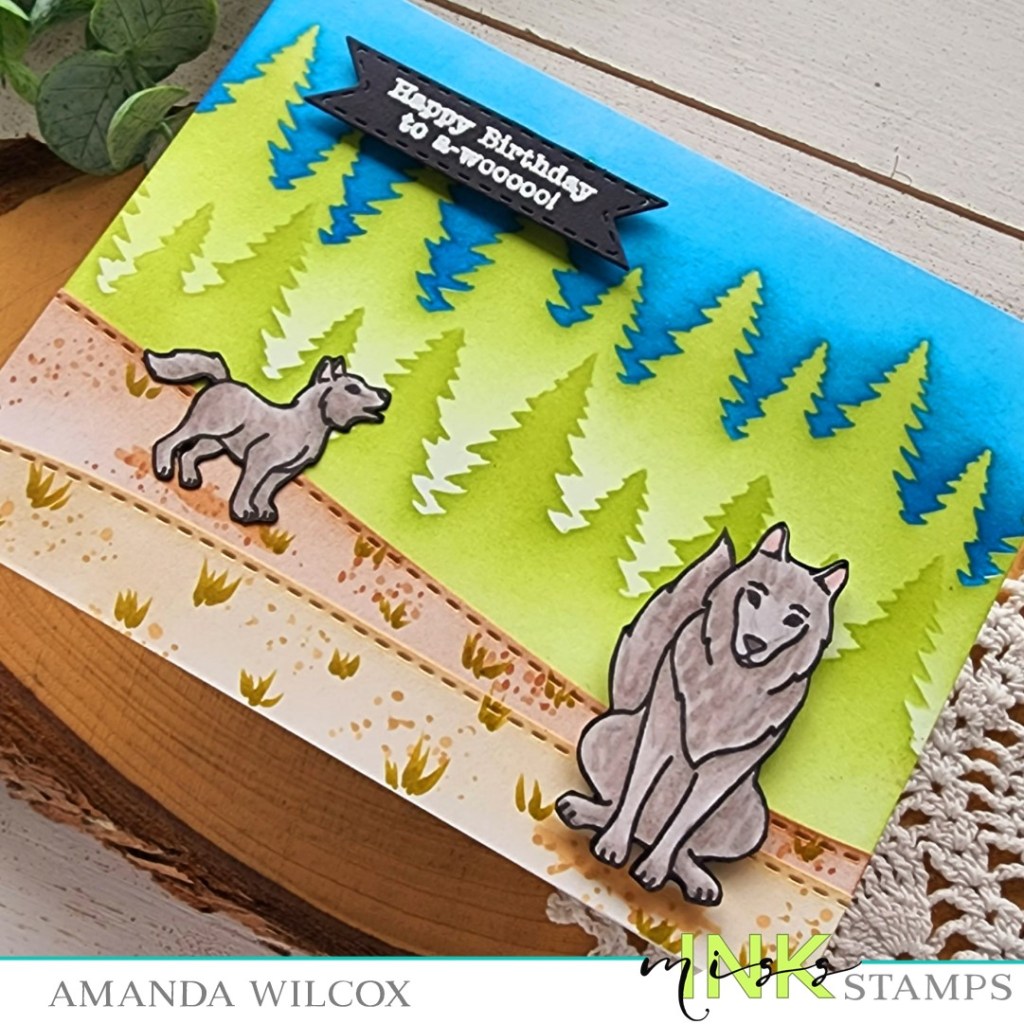
To assemble my card, I adhered the background panel to a white card base, then glued the two hills down on that. I adhered the little wolf with liquid glue and popped the big one up with foam squares. Last, I stamped and heat embossed a sentiment on black cardstock and die cut it with a stitched banner. I added it with foam squares to the upper left of the design.

Sometimes it’s difficult to come up with masculine feeling designs but I think this card really achieved that. I held back on the typical bling and extras that I think change that feel and totally love how it turned out!

Products used today:
Wolf Pack stamps
Scene Builder: Treeline stencil
Blending brushes
Lawn Fawn dye ink
Foam squares
Bearly Art liquid glue

I appreciate you sharing your time with me. Have a fabulous day!

Mama Elephant – Little Agenda Mini Scene

Welcome, welcome! I’m so glad you’re here! Today I have a really fun card to share featuring Mama Elephant goodies, new and old. I love how well these products play together over time. It makes it so fun to shop your stash and use things that you may have forgotten about.

I picked up a few sets from the most recent Mama Elephant release and had so much fun creating this little scene card using the Little Agenda House stamps and dies. I shopped through my stash of Little Agenda critters and decided on this sweet kitty purely because the recipient of this card is very much a cat person.

Once I had my images die cut, I created a circle using the Mama Elephant Combo Circle dies. These are so fun and innovative. I pulled from the colors of the house for the scallops and inked a little sunshiny shadow behind my images. The images are adhered with a combo of liquid glue and foam squares. Then I stamped and heat embossed sentiments from the Easy Sentiments set and cut them out using the coordinating die. I chose the one I wanted and added it to the circle with a foam strip.

For added interest in the background I cut the Grid Window background panel and adhered it to a white card base. Then I popped the scallop circle up with foam tape and added a few red clay hearts. Last, I added some glossy accents to the door knob, flowers and heart on the envelope.

I just adore this sweet card and had to much fun creating it.

Products used today:
Little Agenda House stamps and dies
Little Agenda Cats stamps and dies
Combo Circle dies
Grid Window die
Easy Sentiments stamps and dies

Foam strips and squares
Glossy accents
Twiddler’s Nook Sweethearts clay embellishments
Bearly Art liquid glue

I appreciate you sharing your time with me.

I buy all of my Mama Elephant goodies from Doodlebugs and have a coupon code for 15% off your first purchase from there. Click HERE and treat yourself!

Trinity Stamps – Happy Independence Day Cupcake Card

Happy Independence Day to all of my USA friends! Today I’m guest designing on the Trinity Stamps blog and couldn’t resist using the new Cupcake Card die set to create a really fun 4th of July themed card to share! Creating this card just reminded me how fun it is to take things typically meant for something specific and twisting things like color schemes and sentiments to broaden their use.

To start today’s project, I pulled out the dies from the set I intended to use and cut everything from white heavy weight cardstock. I folded the card base on the score line and set it aside to add color to my pieces.

Here’s a quick and easy photo to show you the colors I used for all the pieces. It’s really simple when you break it down. I inked up the cupcake liner with distress oxide in blueprint sketch and salty ocean. Then I added it and the frosting piece to my splatter box and flicked watered down ink in both blues to both pieces. I removed the liner paper and flicked some candied apple on the frosting to bring that classic red into the mix. I set those aside to dry while I colored the remaining pieces with copic markers.

Next, I pulled out the Simply Sentimental – Happy stamps and dies out to work on my sentiment. I cut the shadow from vellum and the word “happy” from white cardstock 4 times and adhered them all together with liquid glue. Then I stamped “Independence Day” from the stamp set in black ink and used the smallest Embossed Edge Rectangle die to create a sentiment strip.

To assemble all my pieces, I used liquid glue starting with the cupcake liner piece first, then the cupcake and finally the frosting and cherry. I added “happy” with liquid glue and popped the sentiment strip up with foam tape.

For finishing touches, I added glossy accents to the cherry and one Jelly Drop Heart embellishment below the sentiment.

I hope you enjoyed today’s project and find some inspiration to create something fun to share with someone.

Products used today:
Cupcake Card dies
Embossed Edge Rectangle dies
Simply Sentimental – Happy stamps and dies
Jelly Drop Hearts – red
Foam tape
Bearly Art liquid glue
Distress Oxide Ink – blueprint sketch, salty ocean, candied apple
Glossy accents

I appreciate you sharing your time with me. Have a fabulous day!

Pink & Main – Sending Sunny Smiles

Happy Friday crafty friends! Today, I’m over on the Pink & Main blog with a super fun and summery feeling slimline card. I wanted some stencil texture for my background but not anything bold so I decided to try Glossy Gel on its own. It’s so cool! Have you tried it yet?

To start my card, I stamped and colored images from the new Summer Snow Globe Scenes stamp set and colored them with copics. I used the coordinating dies to cut them out and set them aside while I got messy.

I started by inking an oversized panel with teal ink from the top left, fading down to nothing. Then I sprayed the Curly Waves stencil with pixie spray and placed it over the panel. I spread Glossy Gel through the stencil fading like the ink. I removed the stencil, cleaned up and set it aside to dry.

Once the panel was dry, I pulled out the Layered Slim Line dies and cut the largest from orange cardstock and then skipped one and used the next size down to cut the stenciled panel. I splattered the orange and stencil panels with orange ink, then also splattered the stencil panel with the same teal ink for extra texture. Next, I added the images with a combination of foam squares and EZ Squeeze liquid glue on the far right end.

Then, I wrapped orange twine around the other end, stamped and die cut the sentiment and added it with foam squares. I added foam tape to the back of the whole panel, avoiding the twine and popped it up on the orange panel. Finally, I added liquid glue to that and added it to a slimline card base.

For finishing touches, I added glossy accents to the stripe on the surf board, parts of the seashell and the bear’s nose. Then I added black glaze pen to the sun’s eyes and unicorn Stickles to the rays o f the sun and starfish too.

Have you tried out the fun glossy gel yet? I’d love to know in the comments if you always add glitter or flock, or if you’ve tried it alone like I did today.

Products used:
Summer Snow Globe Scenes stamps and dies
Curly Waves stencil
Glossy Gel
Palette knives
Layered Slim Line dies
Sunny Greetings dies
EZ Squeeze liquid glue
Foam tape and squares
Pixie Spray
Stickles – unicorn
Glossy accents

I appreciate you sharing your time with me. Have a fabulous day!

Miss Ink Stamps – Always Look on the Bright Side

Hello everyone! I’m so happy to be back. I had a very long week and weekend with work and didn’t get to craft a single minute. It was pretty much torture. But today I’m back at it sharing a card using Miss Ink Stamps stencils and a sentiment stamp for a muted boho rainbow vibe.

Today I started with an oversized panel of a very light olive green cardstock I found in my stash. Then I inked it up with various parts of the Artsy Abstract stencils using blending brushes and dye inks. I started with the “blob” layers, adding some here and there.

Then I chose one of the rainbows from the Rainbow Builder set and inked it up over the top. Once that was added, I went back to the Artsy Abstract stencils and used the detail layer to add some interest here and there around the panel. I die cut the stenciled panel and a dark blue cardstock scrap with the Trinity Stamps Embossed Edge Rectangle dies for my card front.

Before adhering everything together, I stamped and heat embossed a sentiment from Sunshine and Rainbows in white under the rainbow. Then I glued the blue panel to a card base and popped the stenciled panel up with foam tape. I finished the card off by tying some twine around the left side. I love the texture this brings to the vibe of the card.

Products used today:
Artsy Abstract stencils
Rainbow Builder stencils
Sunshine and Rainbows stamps
Embossing ink and powder
Foam tape

I appreciate you sharing your time with me. Have a fabulous day!

Pretty Pink Posh – Stomping By Card and Tag Combo

Hi again! Today I’m popping in to share a really fun card and tag combo using the super adorable dinosaurs from the Pretty Pink Posh June release. I had so much fun creating these and wanted to share them with you.

I started by stamping and coloring a bundle of images from Dinosaur Friends and Dinosaur Additions and colored them with my copic markers. I had too many for my mini scene so I thought it was a perfect opportunity to create a coordinating tag.

For the card, I ink blended the top third of an A2 size piece of white cardstock with distress oxide ink in blueprint sketch and rustic wilderness. Then I spread gold glitz gel through the stars on the Dino Dig stencil. When that was dry, I added a piece of white cardstock with foam tape and adhered a 1/4 inch strip of black cardstock to the top edge with scrappy tape. I added my images with a combo of foam squares and liquid glue.

This is when I had the idea to split the sentiment between the stamp and the new Script Hello die cut. So I carefully masked and stamped part of the sentiment in the sky and heat embossed it in white, then die cut hello 3 times from black cardstock and adhered it with liquid glue. I think this turned out super cute and fun!

I still had this cute T-Rex and his bones leftover, along with some dino footprints, that just couldn’t go to waste. So I cut the Birthday Circles tag from white cardstock twice, as well as the circle die from the set. I inked one circle up the same as the card front and adhered my images. I lined the back of both tags with acetate, sprinkled some star glitter on one and glued them together with scrappy tape for an instant bond.

I added the dino circle to the front side but didn’t want the back to be ugly so I stamped Rawr! and added the footprints with foam squares. I thought it was a fun little touch.

I hope you enjoyed these little projects using lots of Pretty Pink Posh June release products!

Products used today:
Dinosaur Friends stamps and dies
Dinosaur Additions stamps and dies
Dino Dig stencil
Hello Script die
Birthday Circles dies
Foam squares and tape
Glitz Glitter Gel – gold
Stencil Pal
Glossy accents
Scrappy tape – 1/8″ and 1/4″
Bearly Art liquid glue
Distress Oxide Ink – blueprint sketch, rustic wilderness

I appreciate you sharing your time with me. Have a fabulous day!

Pink & Main – Life is Better in Flip Flops

Woo-hoo! Happy Friday crafty friends! We did it! We made it through another awesome week. Today I’m popping in with a bit of summery fun inspiration featuring stamps, dies, a stencil and an embossing folder from the most recent Pink & Main release! Phew! That’s a lot of goodies but it’s SOOOO COOL! Let’s check it out.

I started by stamping my Stay Cool image and then used the coordinating stencil to apply ink over the different areas with a blending brush, essentially “coloring” in my image. I know there are other products out there like this but this is my first time trying it and I was totally blown away! It was so fun and easy to do! Next, I used the coordinating die to cut the image out, along with a sentiment from the set too.

Switching gears to my background, I cut a circle from white cardstock using the Layered Circles dies and another from orange cardstock using the Zig Zag Circle dies. I ran the white one through my die cutter with the Roundabout embossing folder to add fun texture to it. Then I went over the whole thing with a blending brush and light purple ink. I used EZ Squeeze liquid glue to adhere the circled together and popped my image up on it with foam tape.

Next, I ink blended some seedless preserves distress oxide ink around the edge of an A2 panel and spritzed it with water. Then I popped the zig zag circle up with foam tape and added my sentiment below that with foam squares. To finish everything off, I added some orange twine around the top of the card and tied it in a bow. I also used a scattering of enamel dots across the design for a little extra shine and interest, tying in colors from the ink blending.

Products used today:
Stay Cool stamps, dies and stencil
Layered Circles dies
Zig Zag Circles dies
Roundabout embossing folder
Enamel dots
Ergonomic blending brushes
EZ Squeeze liquid glue
Foam tape and squares

I appreciate you sharing your time with me. Have a fabulous day!

Pretty Pink Posh – June Release Instagram Hop

Hello again! I’m super excited to be taking part in the Pretty Pink Posh Instagram Hop for the June release today. I have a really simple but SUPER FUN card to share with you!

I used the new Layered Dinosaurs stencil set to ink up a panel. These guys are so absolutely adorable and the stencils are layered so perfectly that they are easy to ink in different colors with little to no masking. It’s fabulous! I can’t wait to try different color palettes to change the look.

Once my panel was inked up, I trimmed it to A2 size and adhered it to a white card base. Then I cut a 1/2 inch strip of black cardstock and a 1/4 inch strip of green and adhered them together. I used foam strips to add them to the left edge of my card. Then I stamped and heat embossed a sentiment from Dinosaur Friends on a Stitched Labels die and popped that up with foam squares in the upper middle of my stenciled panel.

Isn’t this card just too fun!?! I love the entire June release from Pretty Pink Posh and can’t wait to create so many different projects with it! Head to Instagram and hop along with us for a chance to win a gift card to the shop.

Products used today:
Dinosaur layering stencils
Dinosaur Friends stamps
Stitched Labels dies
Foam strips and squares

I appreciate you sharing your time with me. Have a fabulous day!

Miss Ink Stamps – Let Your Creativity Bloom

Happy Thursday everyone. Thank you stopping by today. I have a little Miss Ink Stamps inspiration to share with you featuring a few stencils and the Blooming Brushes stamp set. This set is gorgeous and I have definitely not given it enough love.

To start my card, I chose a few images to stamp out and colored them wtih my copic markers. I used the scan-n-cut to cut them out and adhered the flowers to the tip of the large paint brush with liquid glue.

Next, I switched to stenciling my background using the Ins & Outs Hollywood masking stencil set. First I inked the inner section with light teal, then layered the Perfectly Plaid stencil over the opening and inked it with the same teal to darken the plaid texture. Then, I removed both stencils and lined up the outline layer for the Hollywood set and spread gold glitz glitter gel through it. I set the panel aside to dry and came back later to ink up the edges with a light brown ink.

I smooshed some of the ink from both ink pads on an acrylic block, added a few drops of water and splattered both colors all over the panel. Then I watered down some white acrylic paint and splattered that on the panel too. Once that was dry, I stamped my sentiment in the upper left area of the plaid section and adhered my images with foam squares.

For finishing touches I came in with glossy accents on the flower centers and white gel pen highlights to all of the images.

Products used today:
Blooming Brushes stamps
Ins & Outs: Hollywood masking stencils
Perfectly Plaid stencil
Glitz Glitter Gel – gold
Foam squares
Glossy accents

I appreciate you sharing your time with me. Have a fabulous day!

Trinity Stamps – We Wish You a Yappy Birthday

Welcome everyone! I’m super excited to be celebrating, once again, with Trinity Stamps for their birthday release that went live a couple weeks ago. It’s packed full of so many amazing products and today I have a slimline card featuring one of the new stamp sets – Puppy Party.

The main image in the set is perfectly sized for a slimline card, which is what I created but I found another fun way to string those pups along. Let’s get started.

I started my card by stamping and heat embossing images from the set on Bristol Smooth cardstock. Then I used Zig Clean Color Real Brush markers and a water brush pen to watercolor them. Once they were dry, I used the coordinating dies to cut them out. Then the real fun started.

I cut a slimline panel measuring 8.5×3.5 inches and pulled out some distress oxide inks – abandoned coral and dried marigold. I love them together so much! I think they might be one of my favorite combos. I inked up the panel with some stripes because I wanted shading below my pups on the card.

I spritzed the panel with water and blotted it dry. Then I splattered pearl watercolor all over it and black acrylic paint too. A fun way to save a step and add more shimmer – I don’t rinse my watercolor brush between the pearl and black paint so the black gets a little metallic shimmer in it too. If you don’t like that look, just rinse your brush and start fresh.

Next, I cut my puppy line into thirds and arranged everything on my card front so I could adhered things where I want them. Everything is adhered with foam squares and then the whole panel is popped onto a card base with liquid glue. Once that was dry, I used my scissors to trim anything hanging over the edge.

I think this card is so fun and love how the line of dogs just keeps going and going and going. It kind of cracks me up a little. Not to mention the fantastic punny sentiments in the set too! They’re all great!

I truly hope you enjoyed today’s project and found some inspiration to create something wonderful to share with someone.

Products used today:
Puppy Party stamps and dies
Distress Oxide Ink – abandoned coral and dried marigold
Foam squares

I appreciate you sharing your time with me. Have a fabulous day!