I'm a wife, mom, craft blogger and designer for Newton's Nook, Pink & Main, Miss Ink Stamps and Pixi Dust Designs. I also create as an affiliate for Spellbinders and guest design for other companies. Welcome to my crafty place. I hope you enjoy looking around.
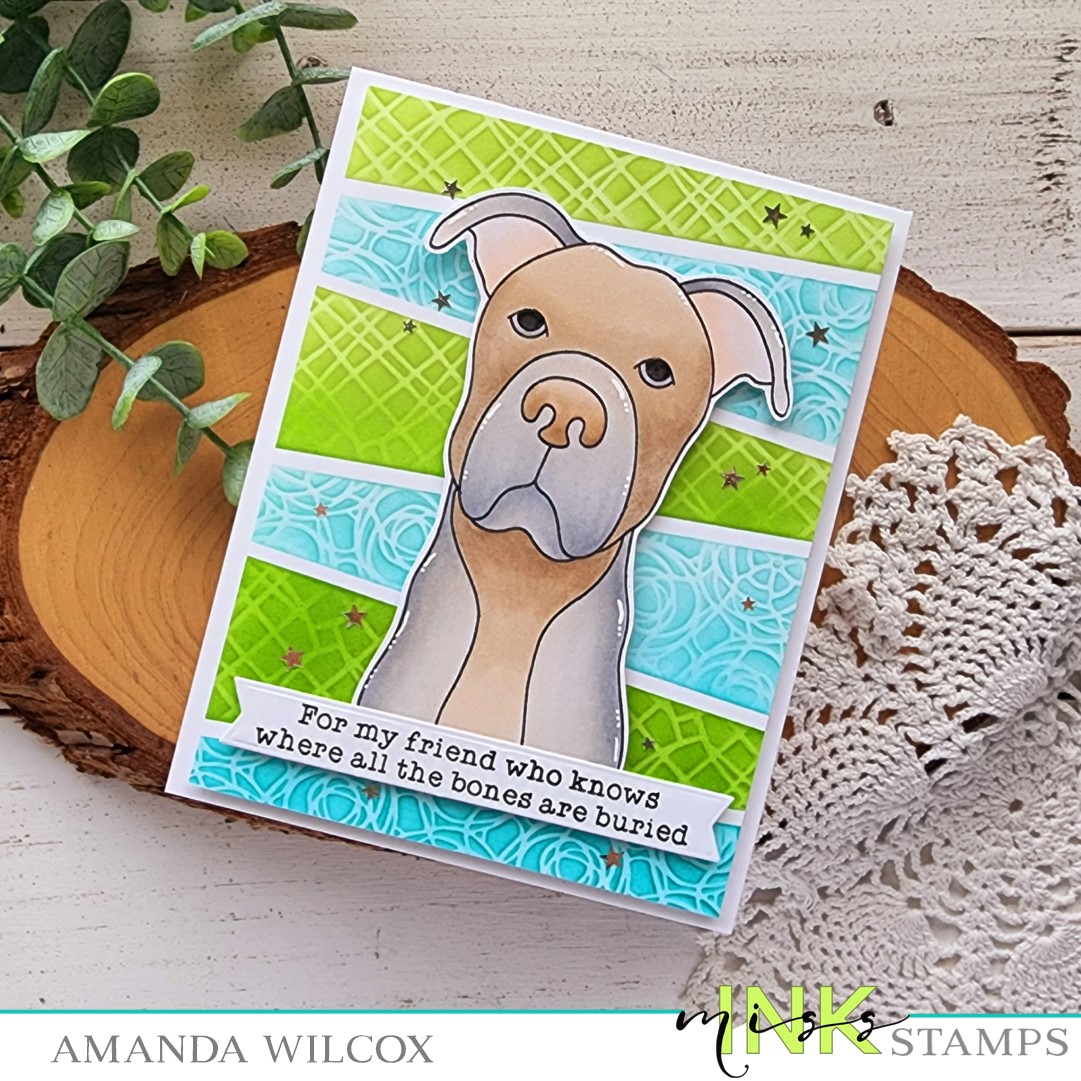
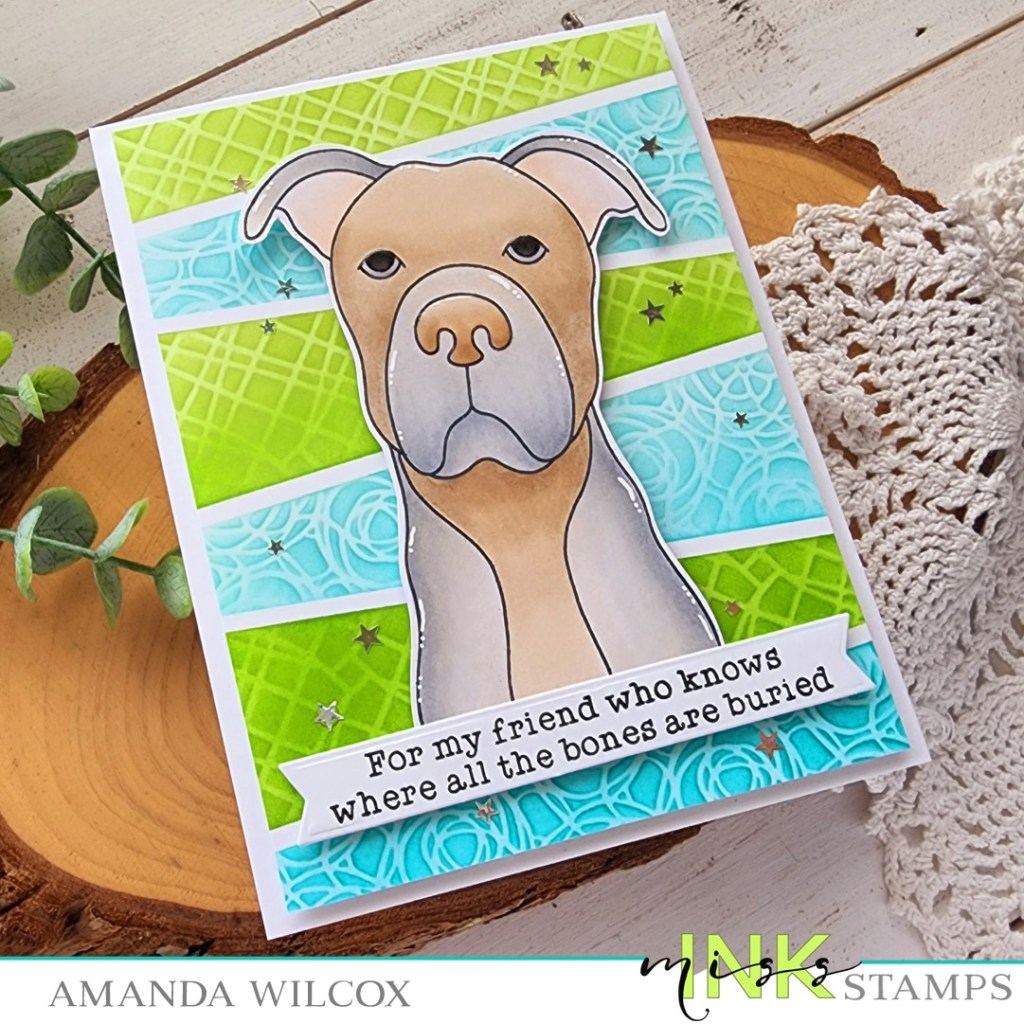
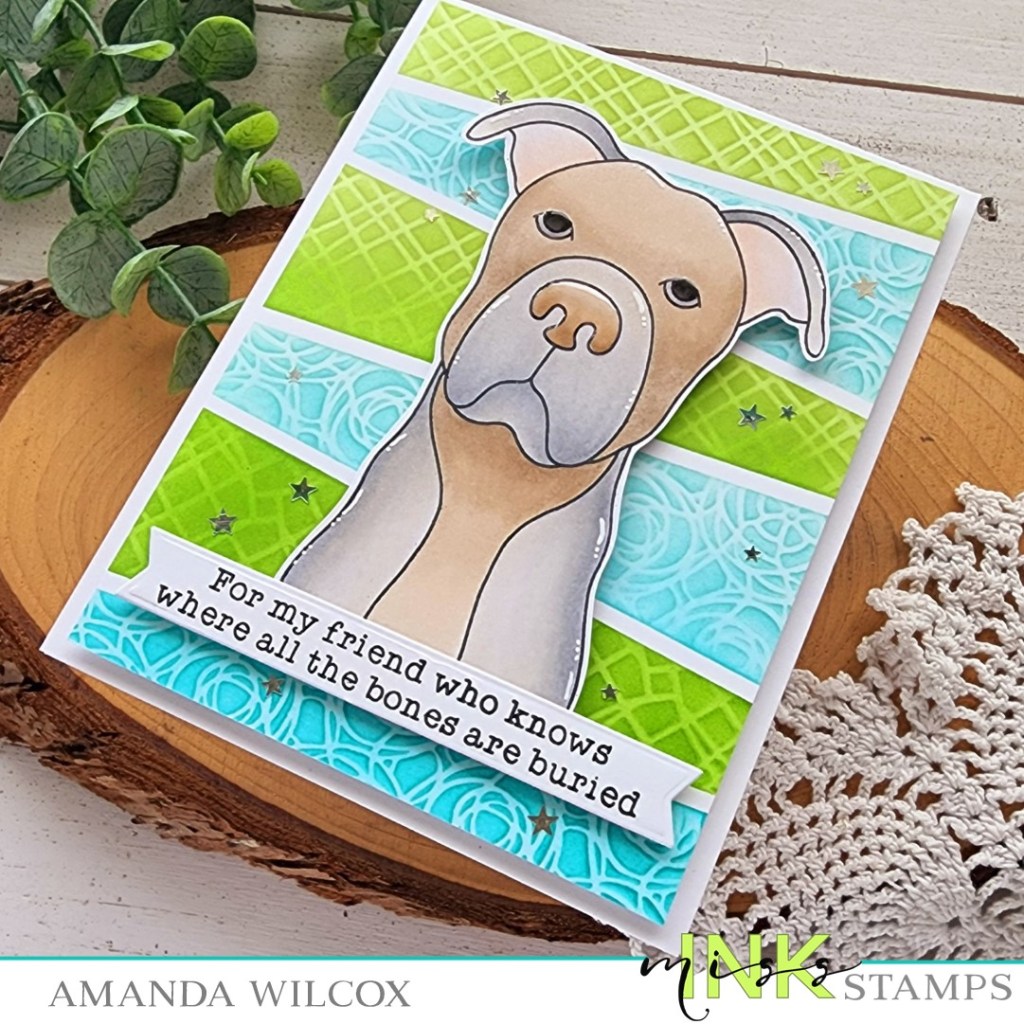
Happy Thursday everyone. I hope your week is going good. Today I have some new Miss Ink Stamps inspiration featuring some stencil layering and that fabulous pup – Slim! I have fun coloring him in different combos each time, and the sentiments in this set get me giggling too!
I stamped and colored slim with my copic markers first, then fussy cut him out and set him aside. Next, I chose a sentiment, stamped and die cut it with a banner die and glued the two together. I love my dimension so I added foam tape to the back of these and switched gears to my background.
I knew that I wanted to use the new Diagonal Stripes Mask stencil so I started with that. You just place it over your cardstock, ink it up however you like, rotate it 180 degrees and ink it again to fill in all the spots perfectly. It’s so cool! Today I inked them up in gradient greens and teals, then layered another stencil over the top and added more of the same ink color to add texture to each space. The green has the square dance stencil over top and the teal has pocket full of posies.
I trimmed the stenciling down to 4×5.25 inches and popped it up on a white card base with foam tape, then added my image and sentiment. For finishing touches, I added white gel pen highlights and glossy accents to Slim’s eyes and nose. Last, I glued a scattering of stars from the champagne star dust sequin mix.
I had lots of fun getting inky and coloring Slim in a brand new combo for me. I hope you enjoyed today’s project too.
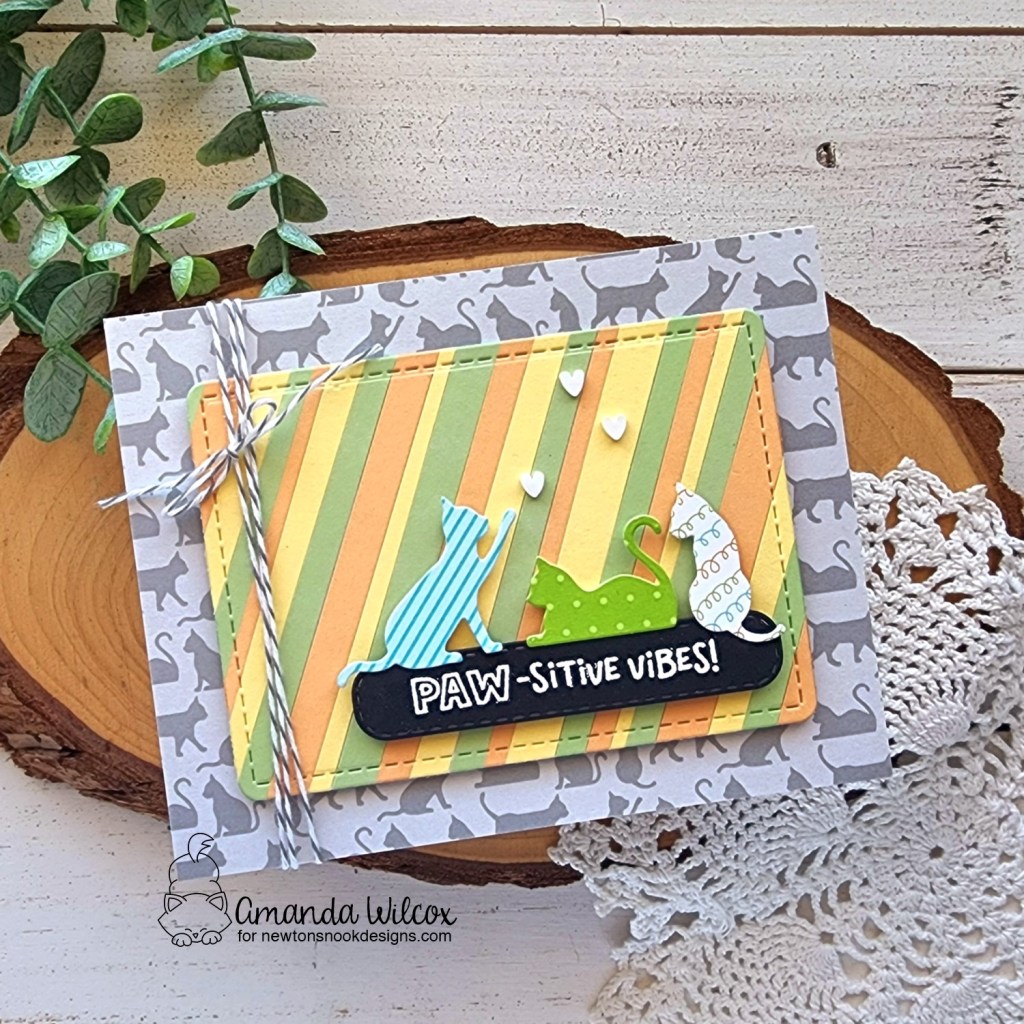
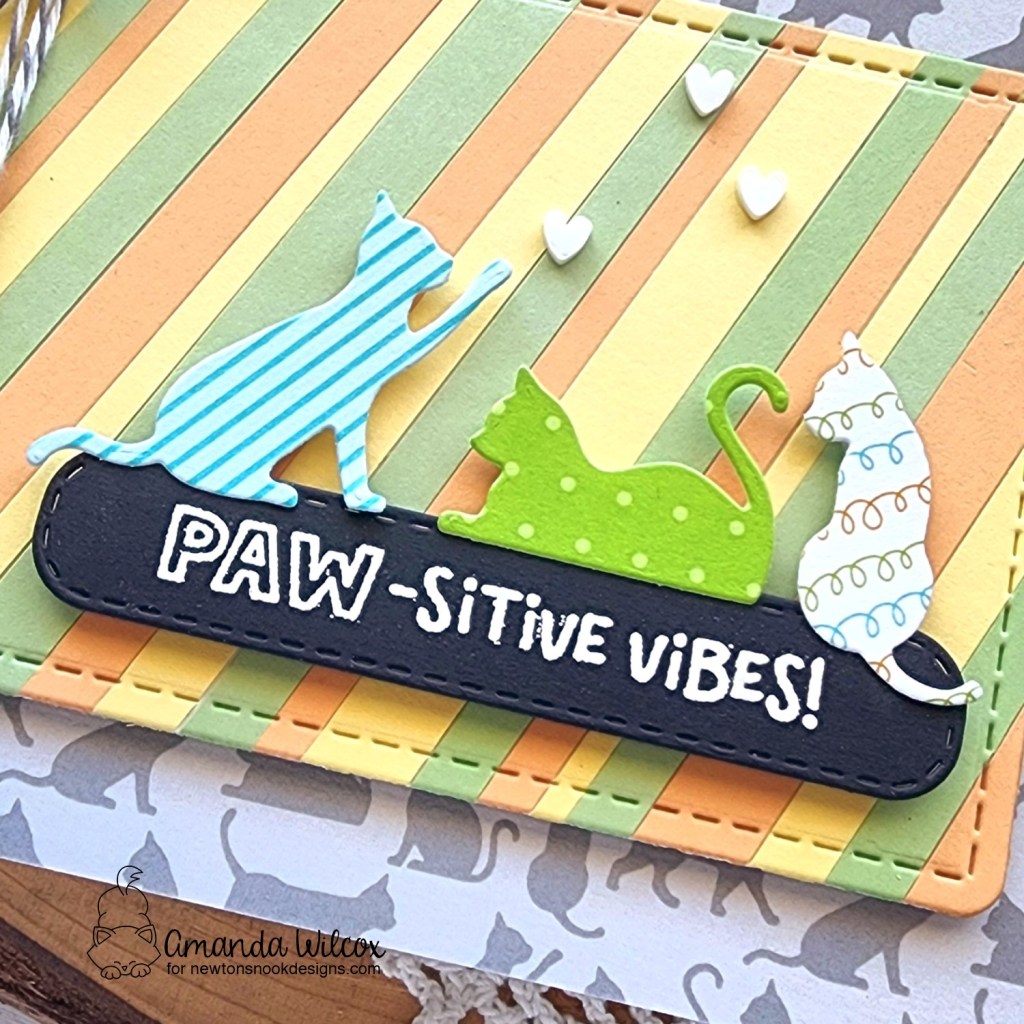
Hey friends! Today I’m over on the Newton’s Nook blog sharing an adorable card that requires no coloring. I used a new paper pad and die set to create adorable kitty images and a fun sentiment to tie it all together.
This whole card started with me choosing a simple color palette and cutting strips of cardstock at random widths to create a background. I adhered the strips to a piece of copy paper with tape runner and used the rounded rectangle in the Frames & Flags die set to cut it out. After looking at the panel cut out, I realized I had chosen colors that go great with the new A Cat’s Life paper pad! So I ran with it.
I chose a neutral colored piece from the pad for my card front and glued it down. Then popped the striped panel up with foam tape. Next, I chose 3 more patterns of paper and cut the Cat Silhouettes from them. I haven’t even cut these dies apart yet, and just cut them all from each pattern, keeping the rest for another project later on.
Next, I chose a sentiment from Heartfelt Meows and heat embossed it on a banner from the Banner Trio die set. I added the kitties and sentiment with foam squares onto the striped panel.
For finishing touches, I glued 3 white hearts from the Twiddler’s Nook Sweethearts clay embellishment mix above the cats and tied some gray twine around the left side of the card front.
Super simple and really fun with all of the patterns and textures together!
Hey friends! I’m so happy to be celebrating with Trinity Stamps for their Sweet Summer Celebration release! Today we have a blog hop for inspiration and chances to win. I have two cards to share with you today and will be back in the coming weeks with more!
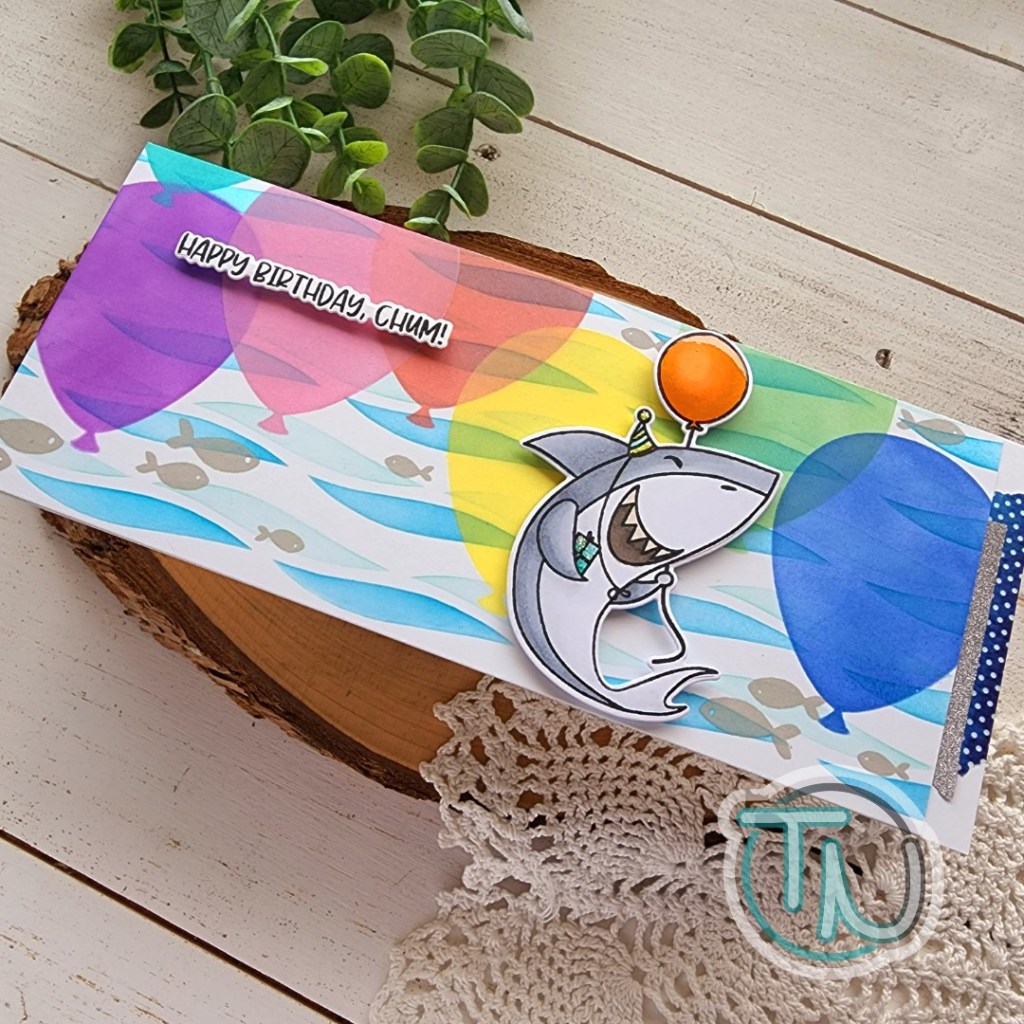
First up, I have a super fun birthday slimline featuring the new Birthday Shark stamps and dies along with a couple of previously release stencil sets for fun!
I started my card by stamping and coloring that adorable shark with my copic markers. Then I used the coordinating die to cut it out, along with stamping and cutting a sentiment too. I love that these dies cut the coordinating sentiments from the set! It’s my favorite!
For the background panel, I took a piece of white cardstock and used dye inks with the Waving Hello stencil in teal and blue inks. Then I layered the Layered Balloons stencils over that using distress oxide inks because they are pigment and will sit on top of the other ink, rather than blending together. I thought it helped set the scene a bit more.
Next, I took the fish in the set and used a gray dye ink to stamp them in the background before popping my shark and sentiment up with foam squares. Before adhering this to a card panel, I trimmed it down to about 8×3.5 inches and added some washi tape to the right edge of the card base. I used liquid glue to adhere the panel and moved on to finishing touches.
There’s a lot going on in this fun scene, so I just added glossy accents to the shark’s balloon and unicorn Stickles to his party hat and gift.
Isn’t this just adorable and so much fun! I can hardly wait to give this one away! It’s going to be such a hit.
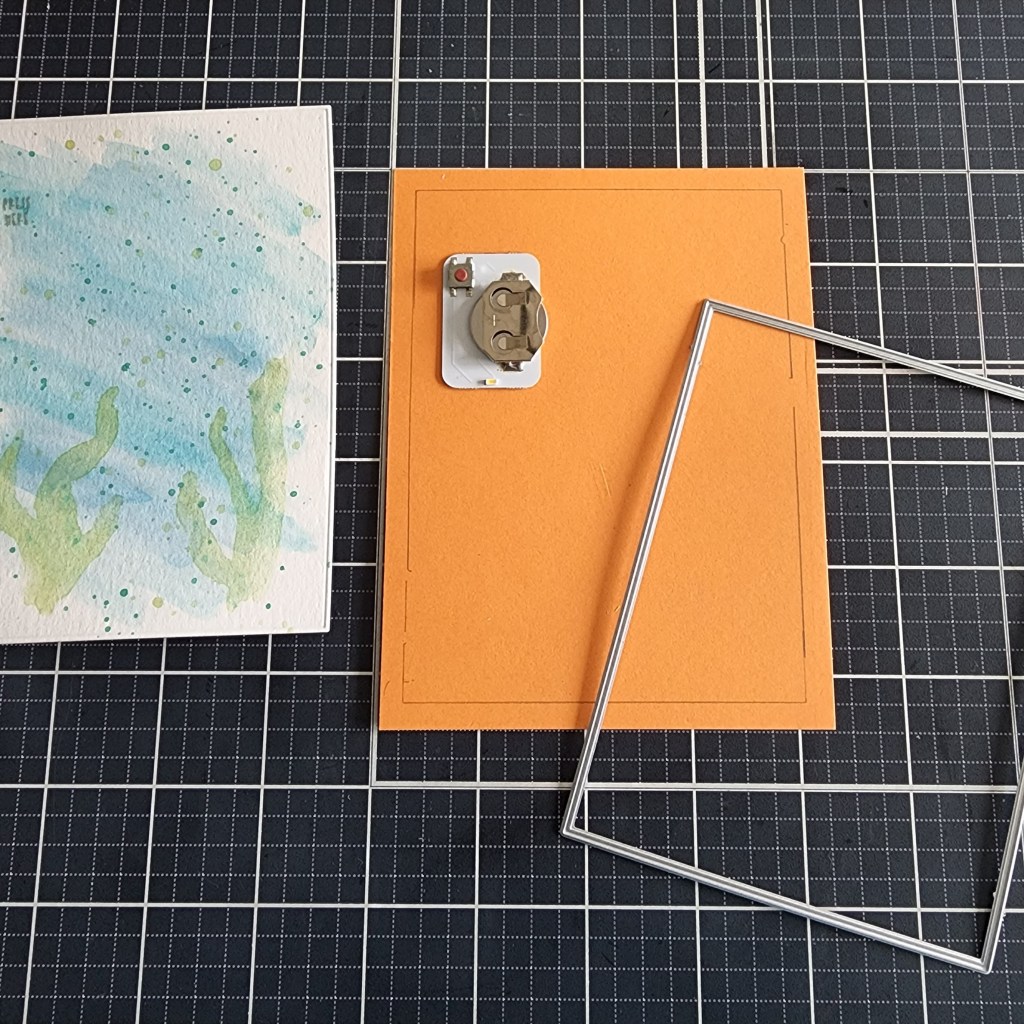
Now, for my second card, I have a fun interactive, light-up card featuring the Little Light stamps and dies and a soft watercolor background.
I stamped and colored the main image with my copic markers and cut it out. Then I stamped and heat embossed my sentiment on black and used a coordinating die to cut that out too. Then I started playing with some watercolors to create a simple background.
Once those were dry, I used an Embossed Edge Rectangle die to cut the watercolor panel down and started deciding where to position my light behind it.
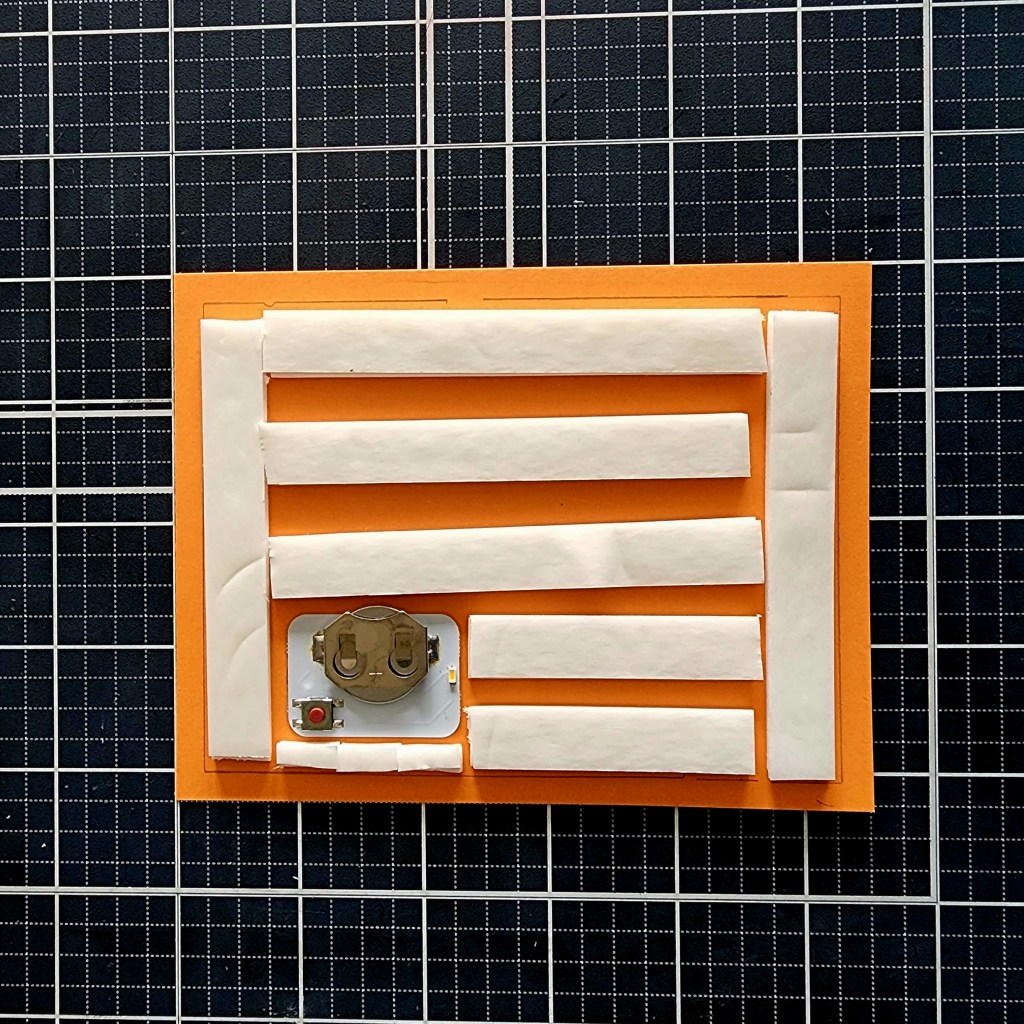
I traced the inside of the die I used onto a piece of orange cardstock the size of my card front and set my EZ Light on it about where I thought it would go. I laid the watercolor panel on top and the fish image on that. Nothing is glued down! I pressed where the button was to make sure the light was shining in the correct area and carefully removed the panel so I could trace the light location. This might sound complicated but it’s super easy.
I used tear tape to adhere the light in place and then covered the panel with double thick foam inside the pencil line. Remember, I traced the inside of the die so this line won’t show at all and you don’t have to worry about erasing it. Next, I removed the release paper and adhered the watercolor panel on top.
I stamped “press here” in a blue ink close to the watercolor background, cut it out and glued it in place with liquid glue. Then I added the fish and sentiment with foam squares for some dimension and interest.
Ready to see this fun card all lit up?!? Drum roll please….
Isn’t it so much fun?!? I love it and had so much fun creating it.
Remember, this is a blog hop for the release. There are two $50 gift cards to the Trinity Stamps shop up for grabs. Comment here, hop along and comment on all of the other posts to up your chances of winning. The hop ends June 15 at 11:59 PDT. Winners will be announced on the Trinity Stamps blog.
Next in line for the hop is the incredible and amazing Katie Brooks!
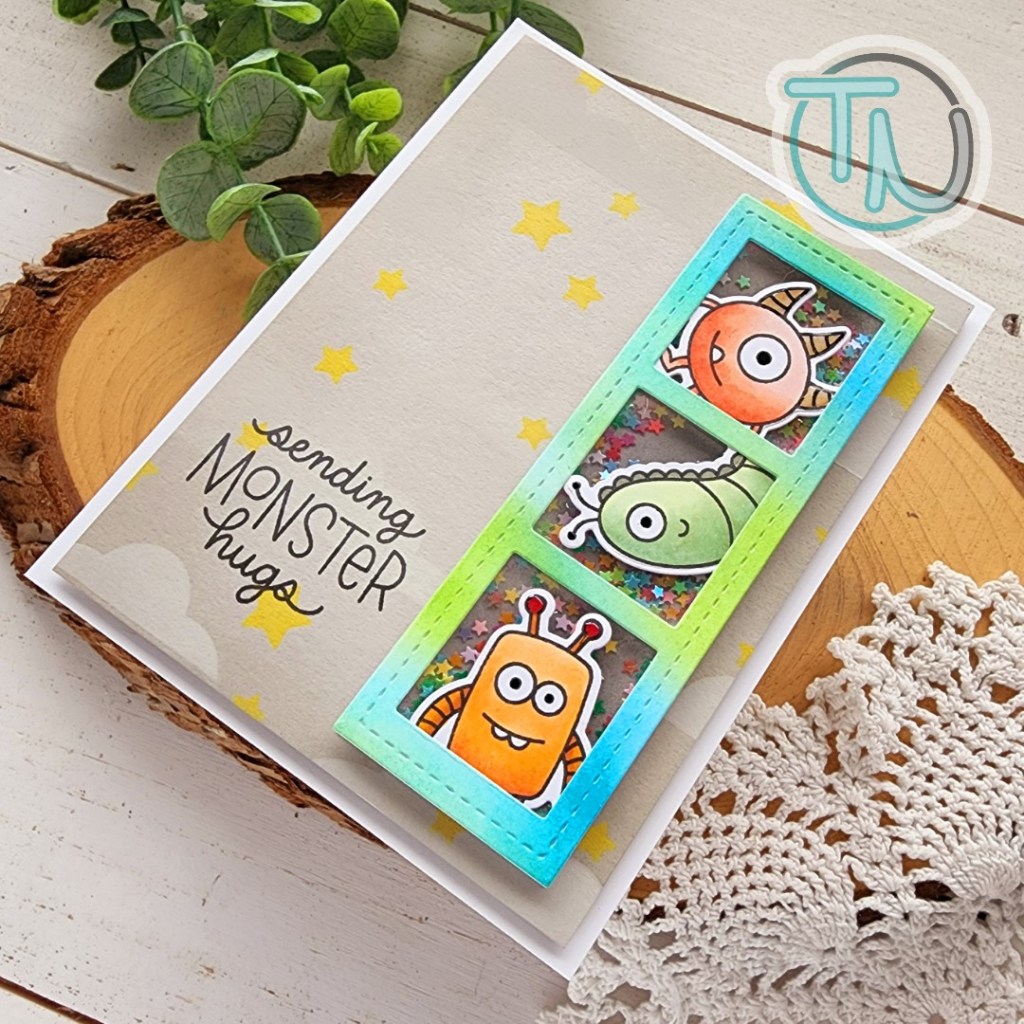
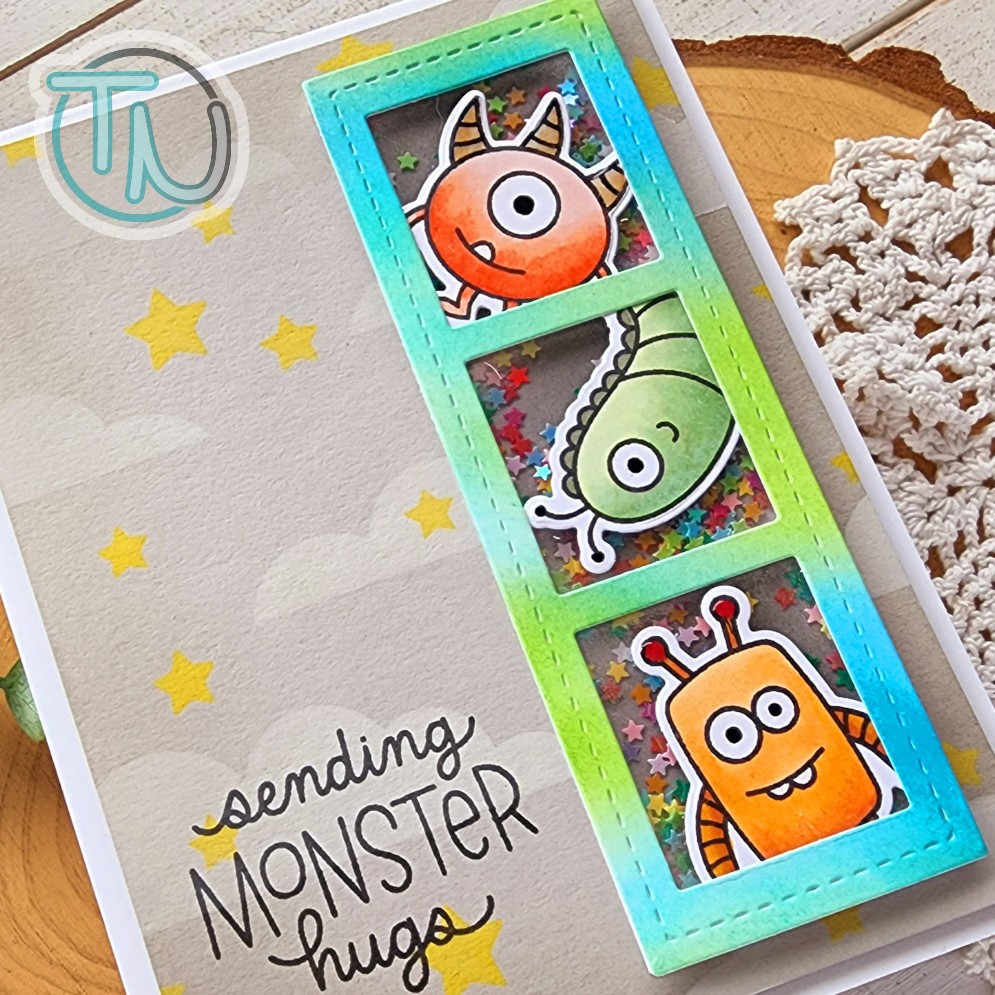
Hey crafty friends! I’m popping in this afternoon with a fun shaker card I create this weekend with my most recent Pretty Pink Posh haul. It wasn’t a huge order but it had somethings I have been wanting for a while and was very excited to play!
I knew I wanted to pair some cute monsters with the stitched film strip die, so that’s where I started. Once I chose my images, I stamped and colored them with copic markers, using the coordinating dies to cut them out. Then, instead of cutting a white film strip frame, I inked up a scrap of cardstock with blue, teal and green inks and cut my frame from that. I love how this part turned out. To keep the background neutral, I inked up a strip of white cardstock lightly with black ink.
To turn the stitched film strip die into a shaker, I adhered the monsters behind the inked frame and then glued a piece of acetate to that. I added foam tape to the film strip frame and filled the wells with Wishing on Rainbow Stars embellishments from Twiddler’s Nook and sealed the panel up with the black ink blended strip I had ready to go.
For a little outer space whimsy, I decided to use two of the three layers from the Spooky Sky stencil set. I started with a 4×5.25 inch panel of gray cardstock and inked the edges with gray ink for a little depth. Then I used white pigment ink on the cloud stencil layer and finished the panel off with yellow ink on the star layer. Using the shaker strip as a guide, I stamped my sentiment in the lower left corner and then added the panel to a card base with foam tape.
I used liquid glue to add the shaker strip to the card from and finished the whole design off with black blaze pen on the eyes and glossy accents on the antennae and horns of the monsters.
I think secretly I’m ready for Halloween or something. I keep being really drawn to all of the things I would usually pull out for spooky crafting. This totally makes me giggle. I suppose it’s like those who love Christmas all year long.
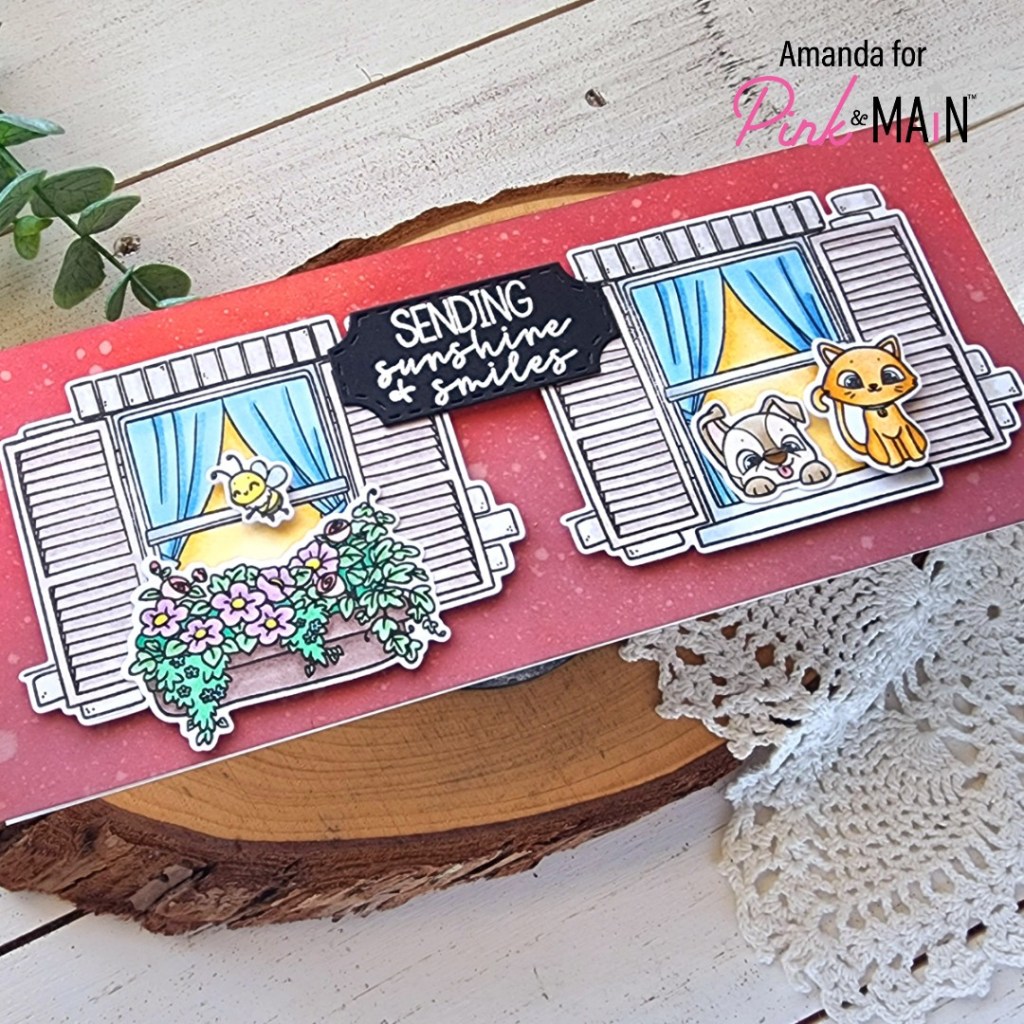
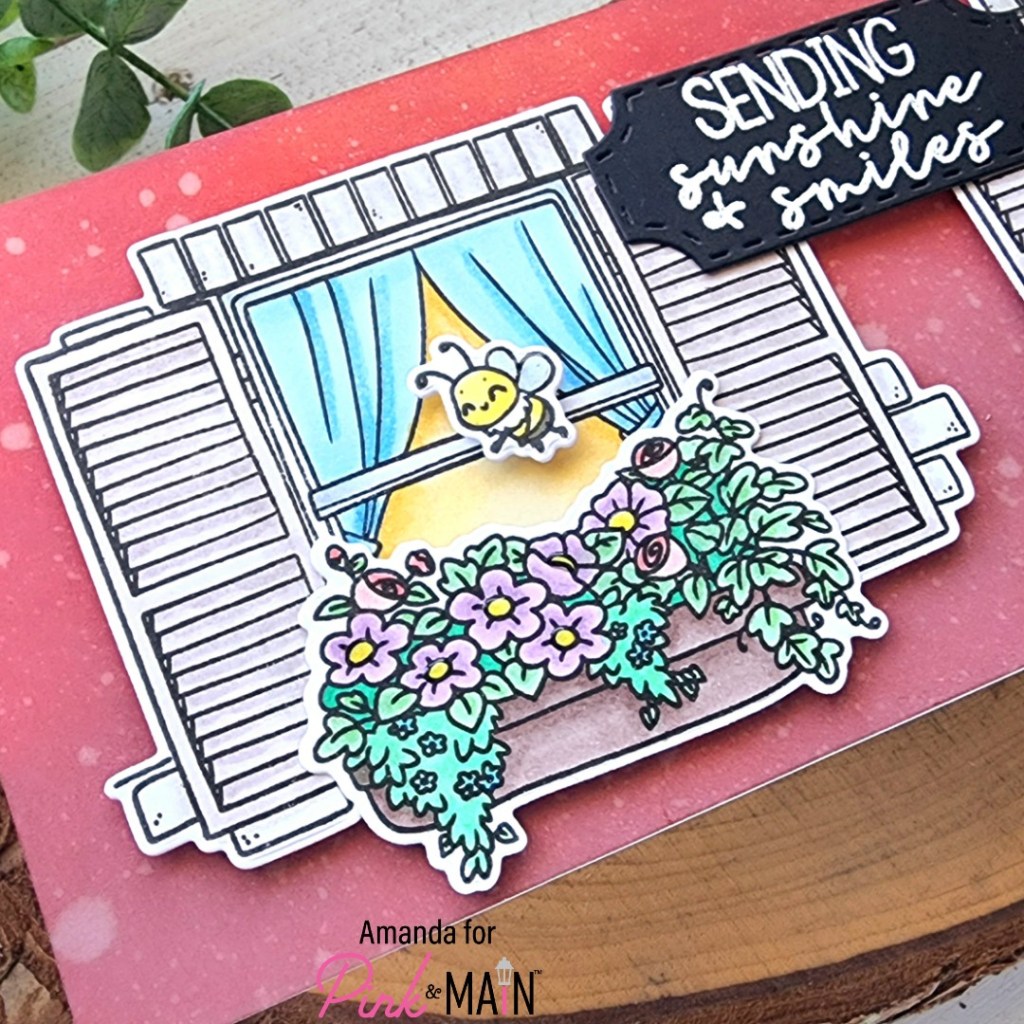
Welcome everyone! Today I’m over on the Pink & Main blog sharing this slimline card featuring the newly released Window View stamp set. When I pulled this set out to play with, I immediately wondered if I could fit multiple windows on a slimline card. I absolutely LOVE the fact that I can easily fit two like the front of a house. It’s so fun!
Once, I realized that, I chose the “decorations” for each window and stamped all my images. I colored them with copic markers and used the coordinating dies to cut everything out. I adhered the flower box and puppy with liquid glue and popped the kitty and bee up with foam squares.
Next, I inked blended a slimline panel with aged mahogany and fired brick distress oxide inks. I spritzed the panel with water and blotted it dry before adhering it to a slimline card base measuring 8.5×3.5 inches. I wanted a more substantial sentiment than the one in the Window View set so I went digging and found this cute one in the Spring Sayings stamp set. I stamped and heat embossed it with Icicle embossing powder and cut it out using the smallest Notched Corners die.
I added the windows with foam tape and then layered the sentiment in the upper center with a foam squares and liquid glue where it overlaps the windows. Then I moved on to finishing touches, adding glossy accents to various parts of the images like flower centers and bee wings.
For the critter window, I just added glossy accents to their noses and the kitty’s tag. Aren’t they literally the cutest thing ever?!? I just love their faces!
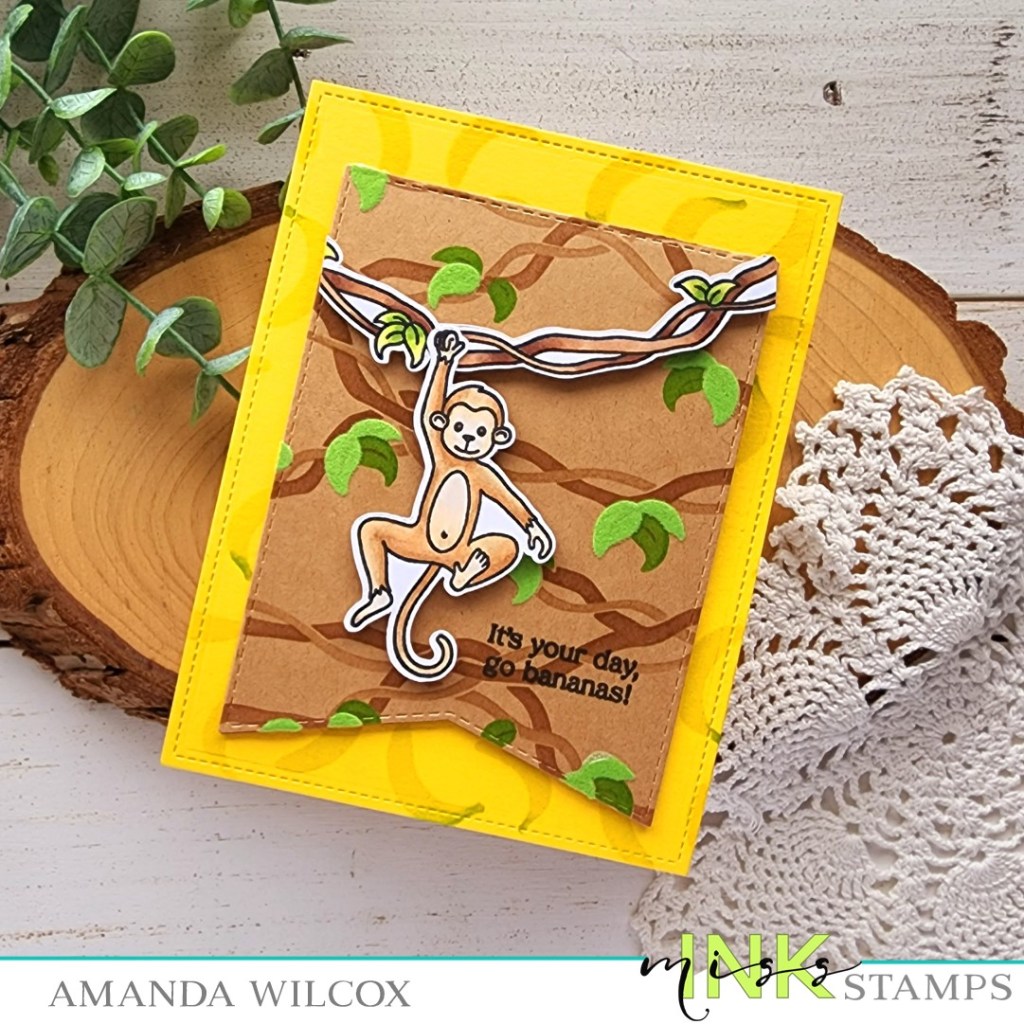
Hey friends! I have a really cool Miss Ink Stamps card to share with you today. It opens in a fun way and I did a little deco foil flock with my stenciling for added interest.
I started by die cutting a yellow panel from an A2 stitched rectangle die. I inked it up with the bananas stencil, first with yellow ink and then a little green on the tips of the banana stems for some dimension.
Next, I cut a stitched banner from kraft cardstock and started inking it up with the Jungle Vines stencils set. I started with two browns on the vines and green for one layer of leaves. For the second layer, I spread Thermoweb transfer gel blanco through it and set it aside to dry. While it was drying, I stamped and colored a monkey and the vine image from Go Bananas and cut them out with the scan-n-cut. After the leaves were dry and the laminator was heated up, I ran the banner through with green deco foil flock in a craft & carrier sheet. I love the fuzzy texture in the background.
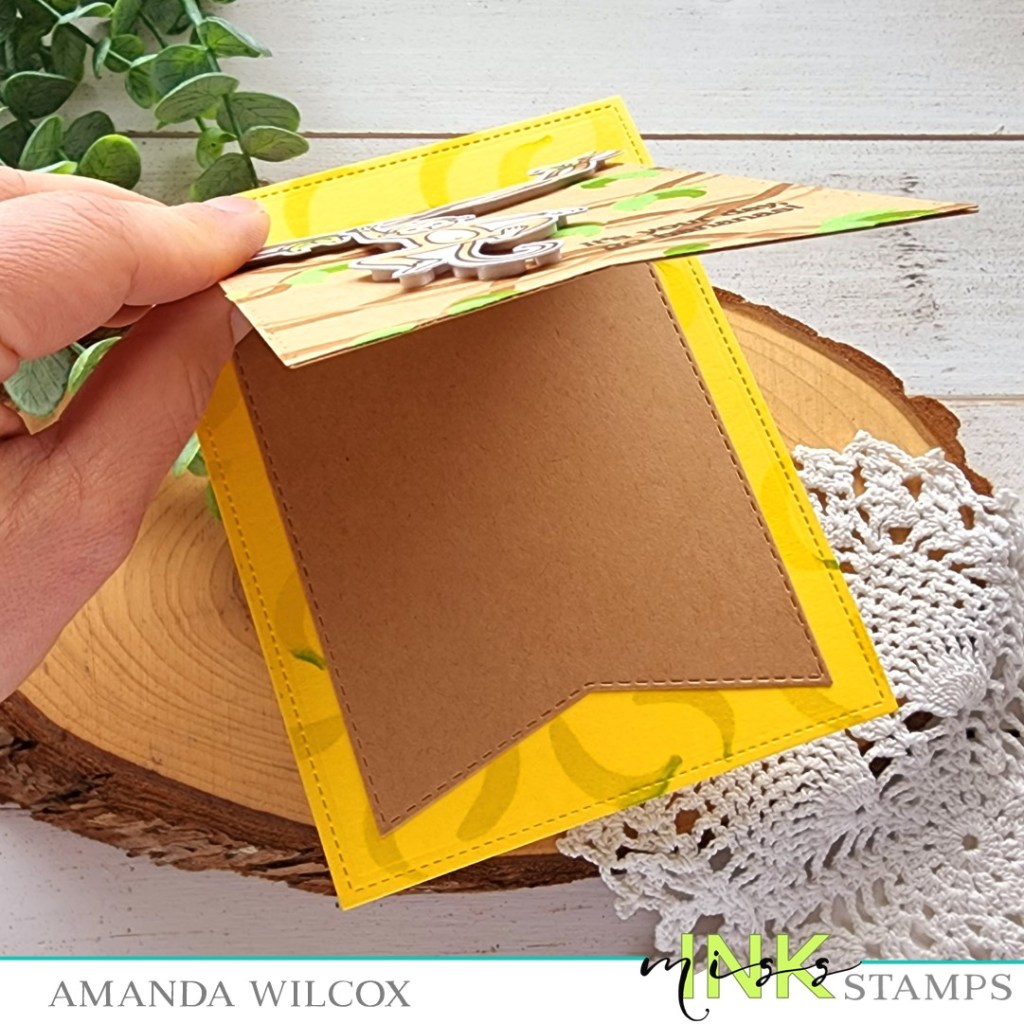
For this card, you lift the banner up to write your message. It doesn’t open like a traditional card at all. To do this, I cut two more stitched banners, the same size from kraft cardstock and also a scrap as long as the banner and about an inch wide. I scored that down the middle and adhered it to the back of the stenciled banner, then to the back of the other banner. I used the third banner to adhere to the back of the stenciled one, hiding the hinge I created. It’s purely cosmetic and not necessary to make your card open.
Before adding my images, I placed the banner in my MISTI and stamped a sentiment on the lower right. Then I added the images with foam strips and trimmed off the excess with scissors. Last, I added this to the yellow panel, and my card is all finished.
Isn’t it so much fun!?! If you wanted extra space to write or maybe hide a gift card or something, you could always mount this on a regular card base but you totally don’t have to!
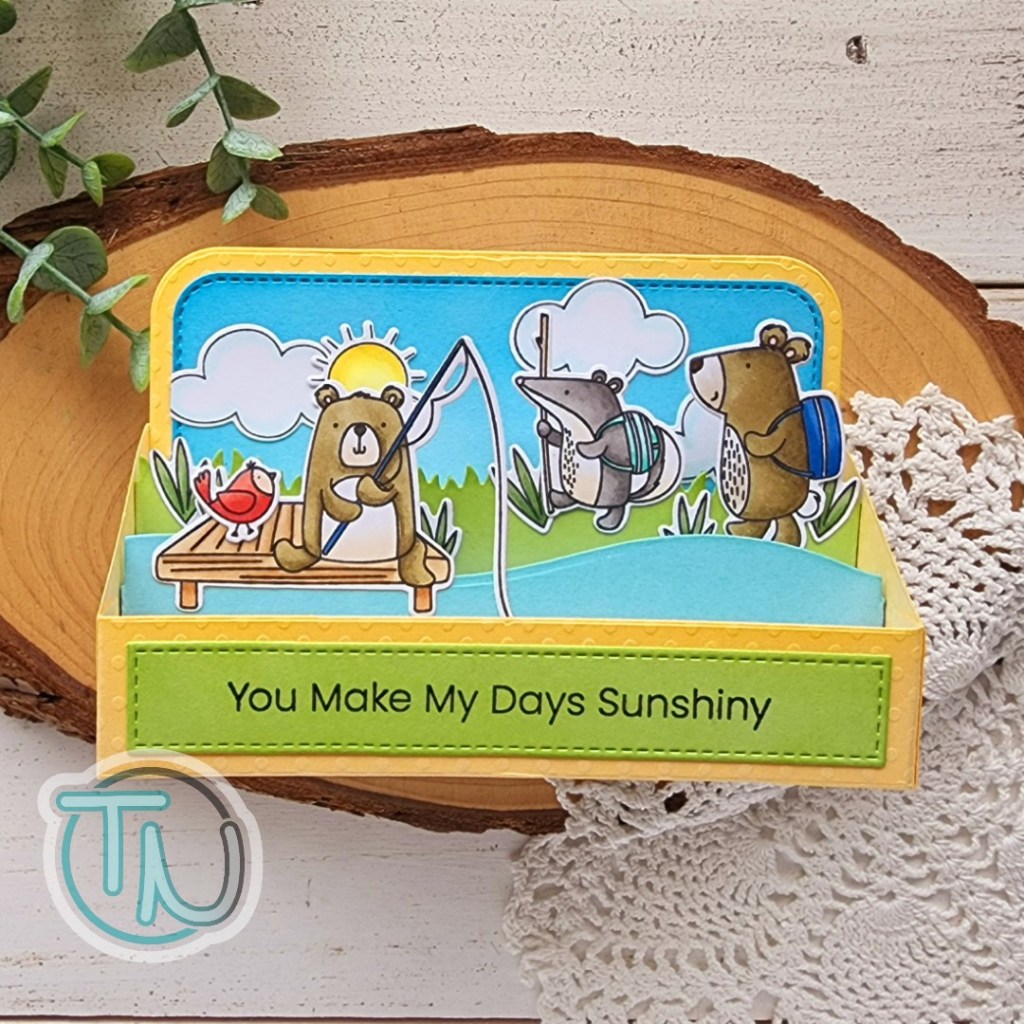
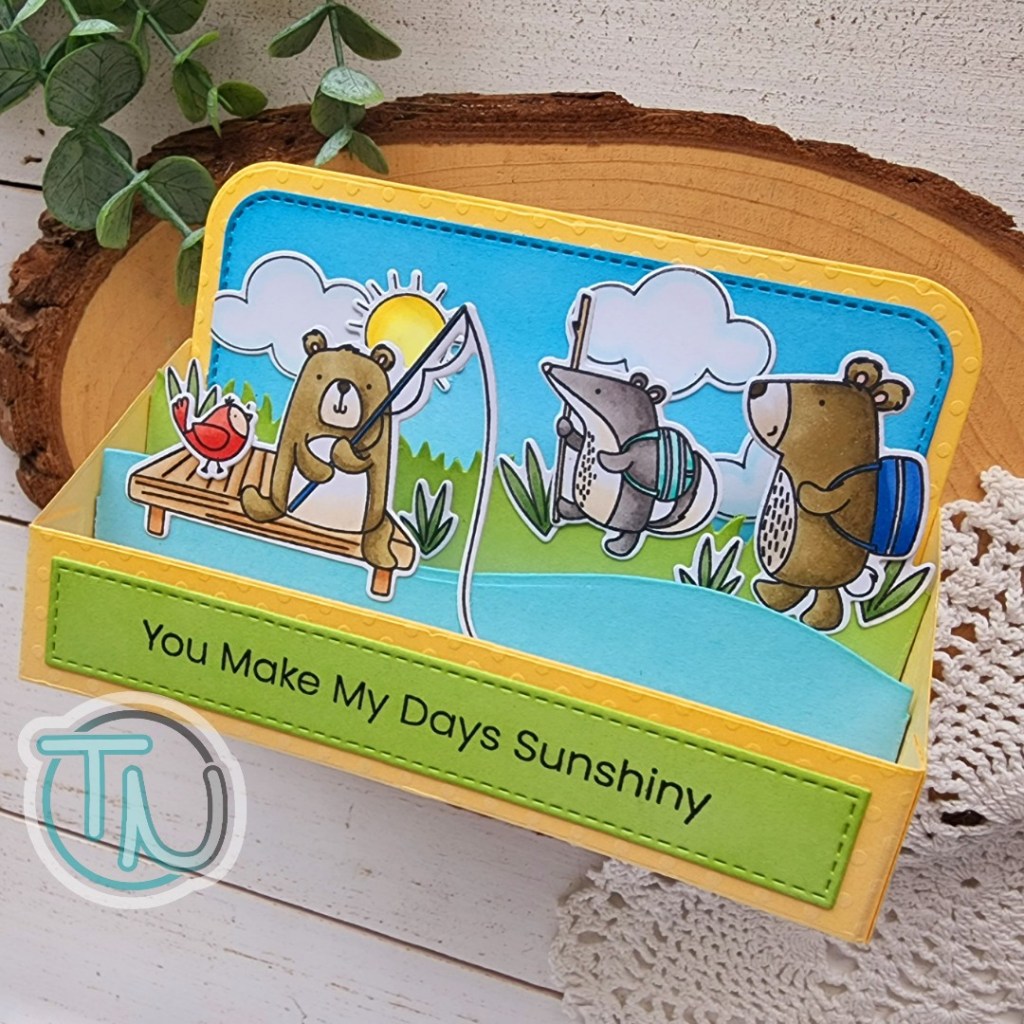
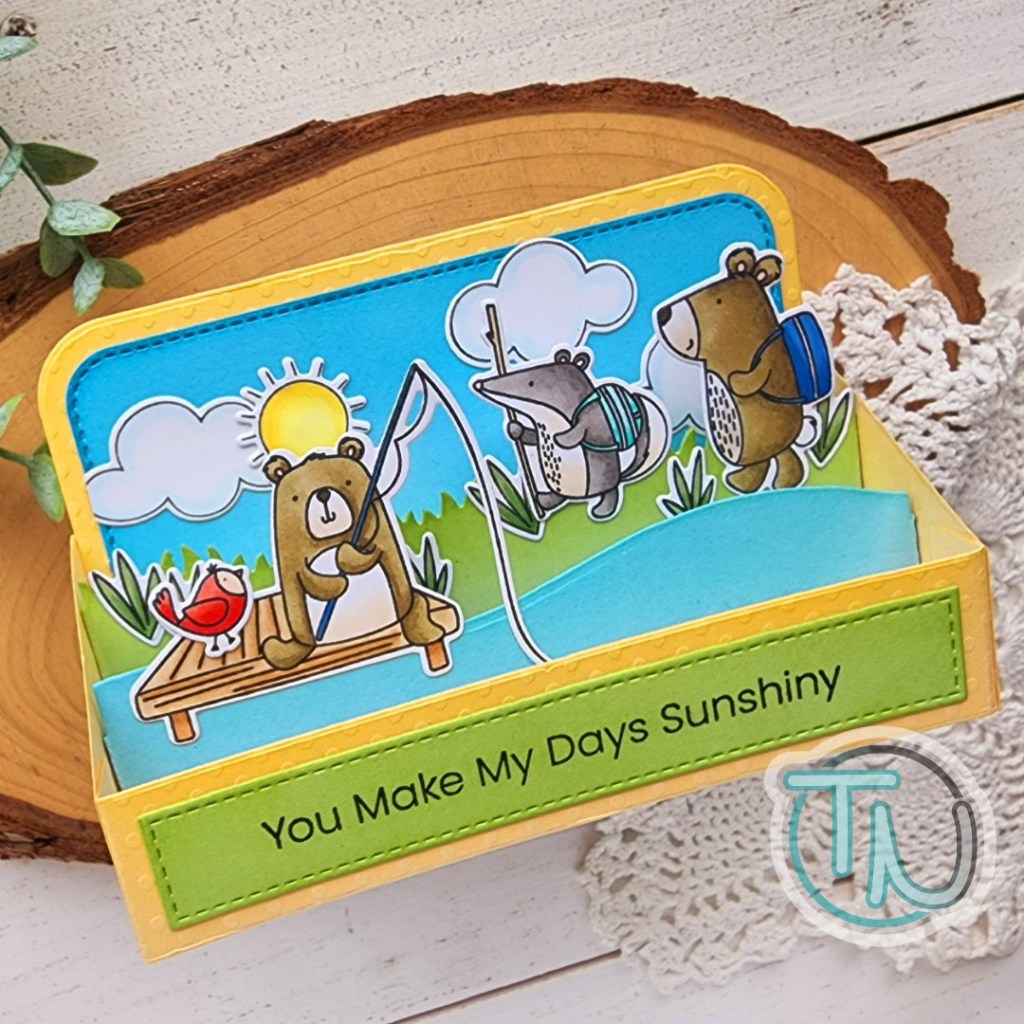
Hello everyone. Thanks for stopping in today. I recently made a few purchases from MFT Stamps and have been playing with a set here and there when I have a moment. Today I have a card featuring one of those stamp sets and the mini slimline outside the box level up dies that I also snagged finally!
For some reason I really fell in love with these sweet critters from the Outdoor Adventures stamp set. I stamped the images, plus lots of extra grass patches, and colored everything with my copic markers. I used the coordinating dies to cut them out and set them aside to work on my box card pieces.
I cut the main pieces from a yellow dot texture cardstock in my stash and the stitched panels from green. Then I cut a snow drift insert to act as my water and a grassy hill insert for my ground. The back panel is cut from the same blue as the water but I inked the edges with different colors to offset them a bit.
I stamped the sentiment from the You Make My Days Sunshiny stamp set on the stitched panel and then started assembling everything. I used scrappy tape for all of the box pieces and liquid glue to add the images to the inserts.
Once everything was together, the sky looked really sparse so I went digging and found the sunshine and clouds in the same set as the sentiment so I stamped, colored and cut them out too. I think that really finishes off this fun scene, don’t you?
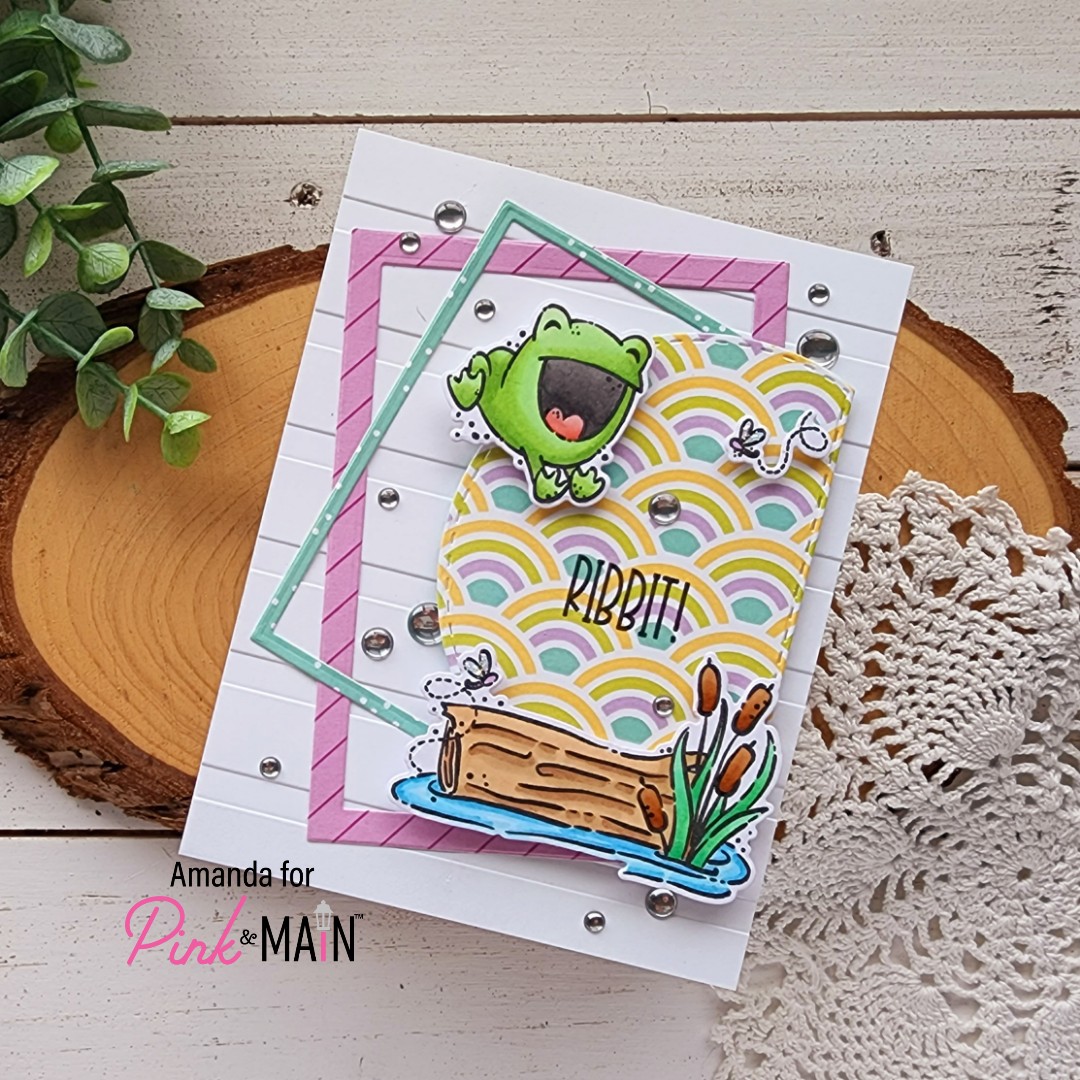
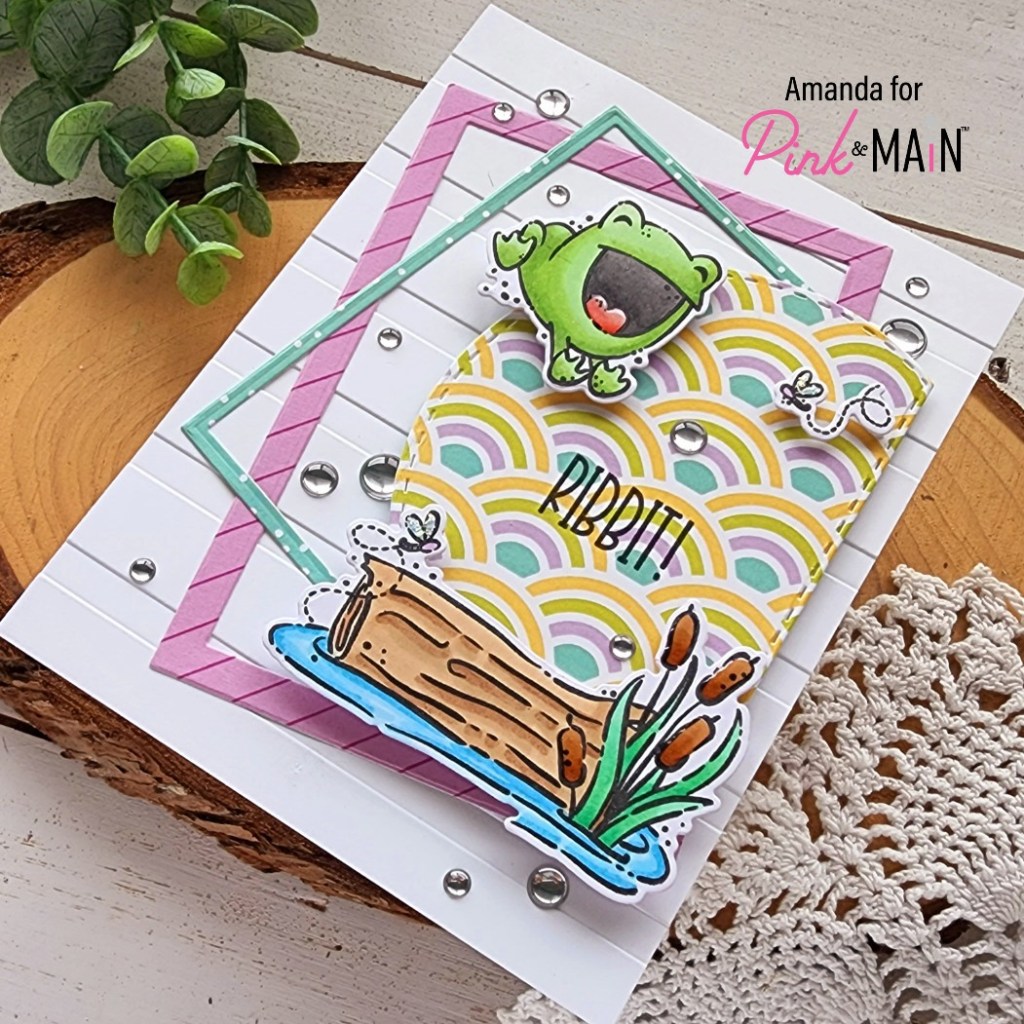
Hello everyone! I can’t even begin to explain how excited I am to share today’s card. Do you ever create something that you’re just so perfectly happy with that you’re beaming and love looking at it over and over again? That’s seriously how I am with this card today. I don’t know what it is exactly but I love it so much and I really hope you do too!
I started this card by stamping a few images from the May Stamp of the Month – Ribbit, and colored them with my copic markers. I used the coordinating dies to cut them out and they sat on my desk for a few days because I just couldn’t decide what I wanted to do. Then one night, it all just came together!
My background panel is embossed with the Wide Stripes embossing folder and adhered to a white card base. Then I cut a couple of frames using the A2 Layering Rectangles dies and the Hooray paper pad. Those are adhered with EZ Squeeze liquid glue. Finally I cut the largest Double Stitched Dome from another piece of Hooray paper and popped it up with foam squares. I arranged my images around the dome and popped them up as well.
Totally flying by the seat of my pants, I placed the whole thing in my MISTI and stamped the RIBBIT! sentiment in the center of the dome between that adorable from and the log at the bottom. I seriously love it!
Finally, for finishing touches I added a massive scattering of Silver Glossy Dots around the whole design and glossy accents on things like the cattails and frog’s tongue. I also added unicorn Stickles to the dragonfly wings for extra sparkle.
Isn’t this card so cool!?! I just love it so much and can’t wait to share it with someone soon!
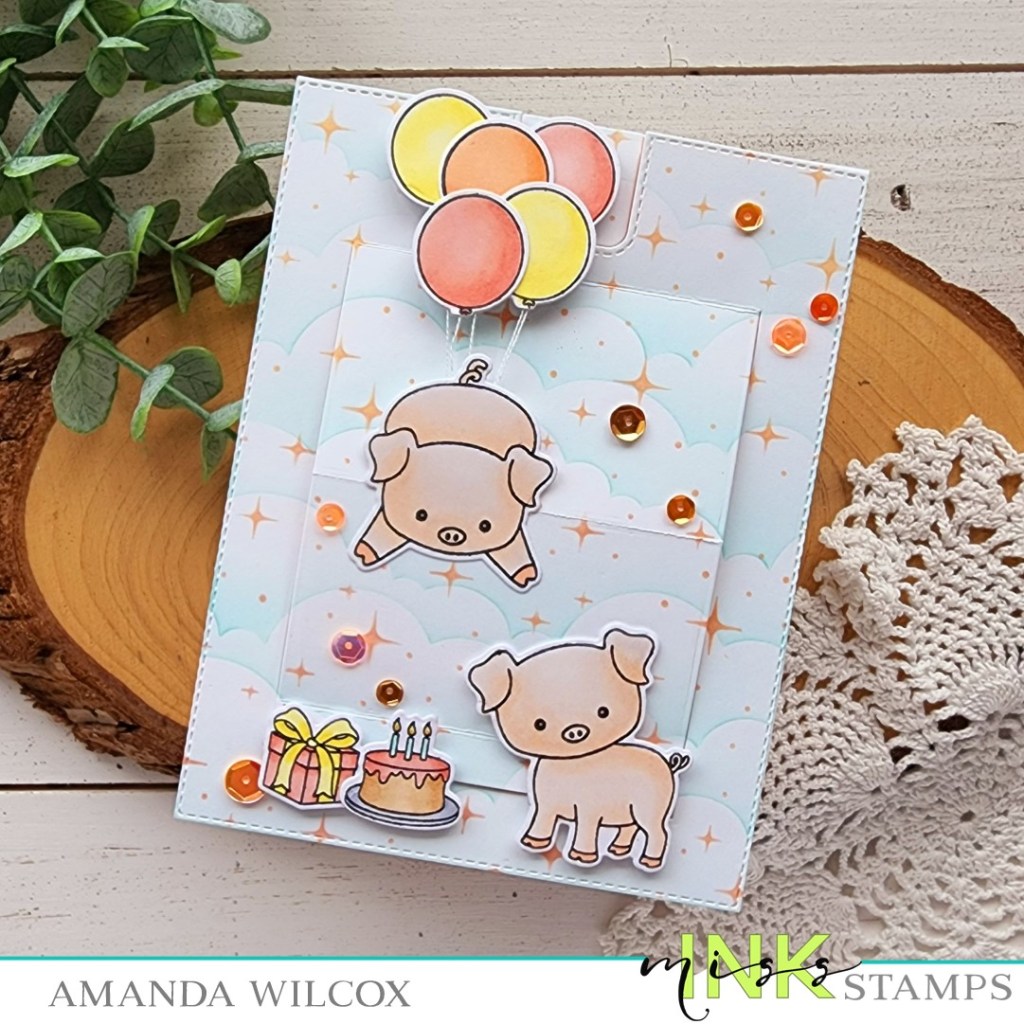
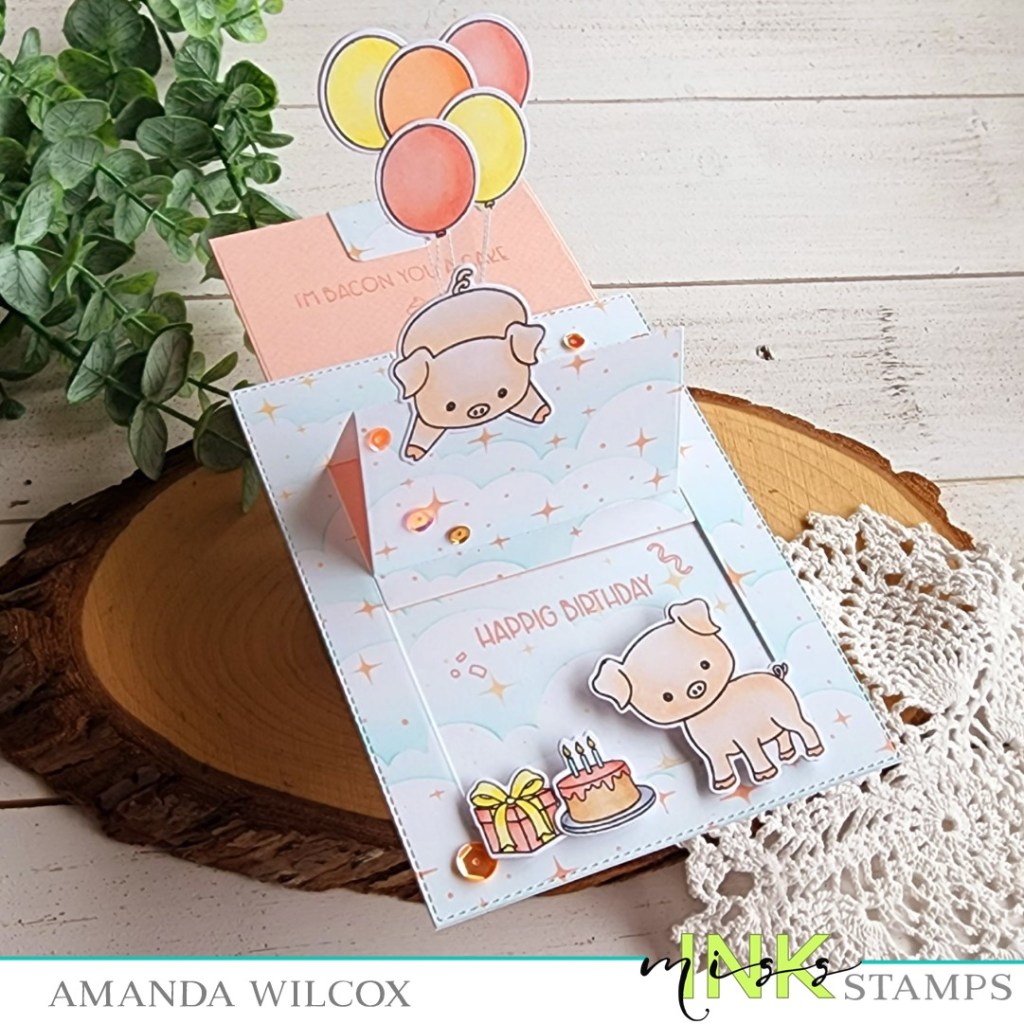
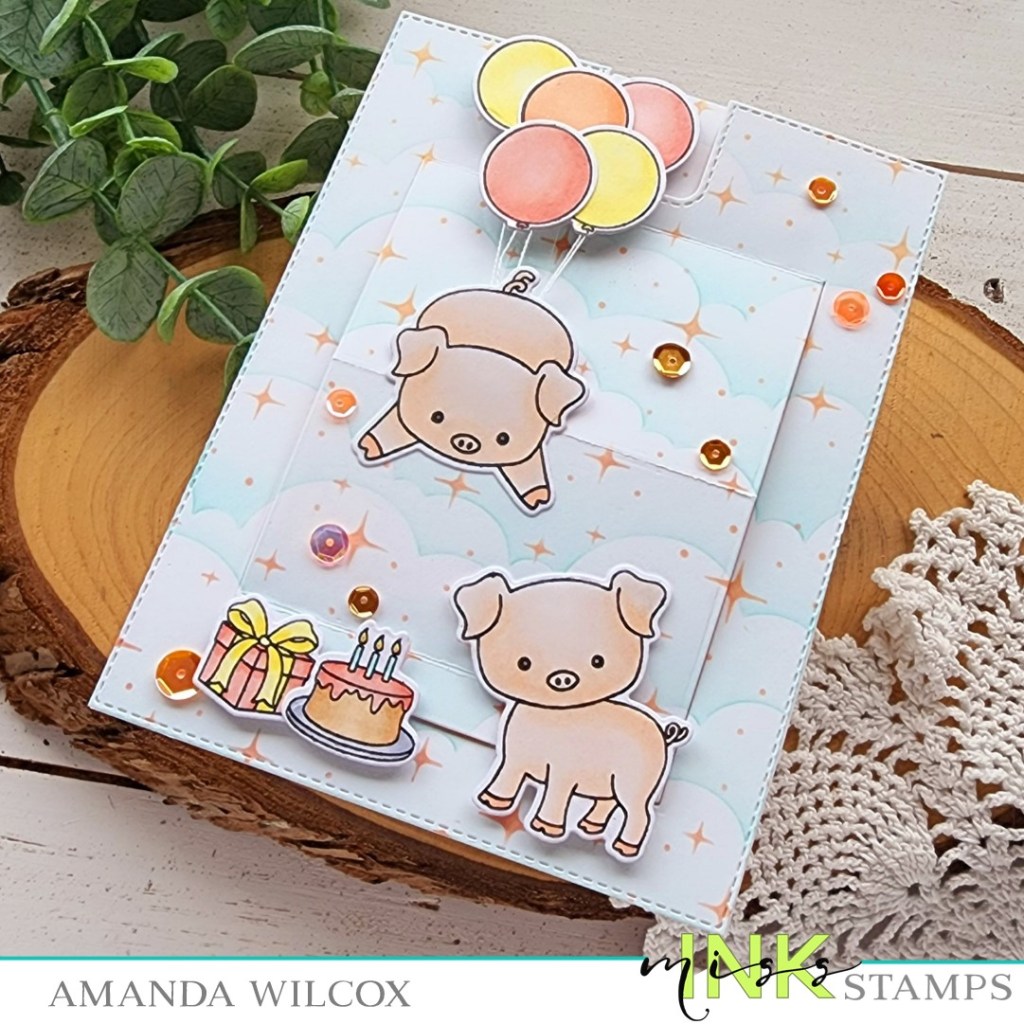
Hello everyone. Thanks for stopping by today. This project was an absolute blast to create and by the time I was adding sentiments, I was cracking up. It was so great! I hope you enjoy it too.
Here’s a look at the card all folded up flat like it would come out of the envelope. For the front I used the Punny Farm Pigs stamps and dies from Miss Ink Stamps. I colored everything with my copic markers and cut it all out. Then I took an A2 panel and inked up the Scene Builder: Clouds stencil on it plus an extra for underneath. I layered the Sparkles stencil over the top and chose a peach ink for that to tie in the color palette I used in my coloring.
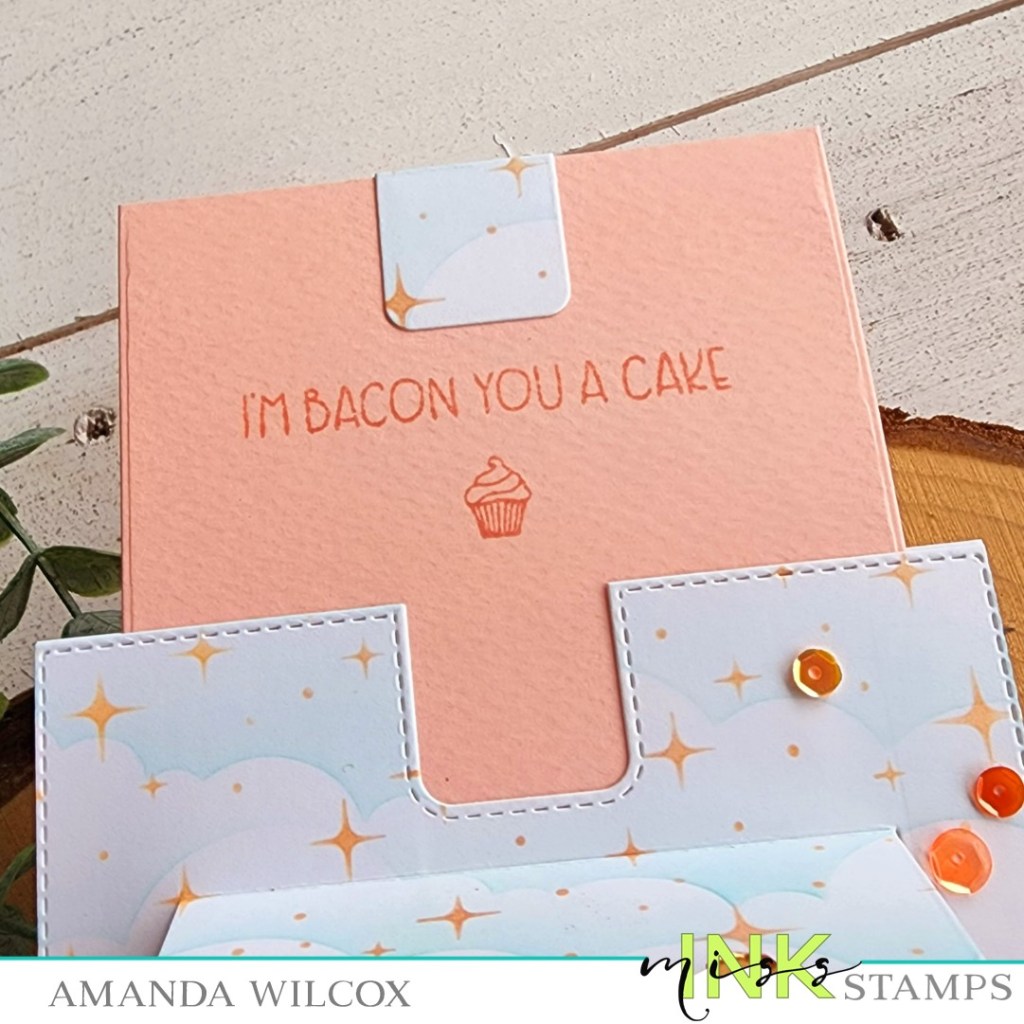
Next, I cut the main front panel with the Heffy Doodle Slider Card die and also created a peach card for the pull out portion. Using all the pieces as my guides, I stamped sentiments on the inside panel and the pull out one as well. I added some confetti around “Happig Birthday” and a cupcake below “I’m Bacon You a Cake” for fun.
Here’s a little look at the pull out panel. I just think all the puns are so fun!
I used scrappy tape to adhere my pieces together and added it all to a white card base. Then I trimmed the stamped strings off the balloons and added string to them instead. I pulled them taut and adhered them to the back of the piggy. I connected the two with a strip of acetate and glued the pig to the card panel below the fold line only. Be careful here or your mechanism won’t work.
I adhered the other piggy, cake and gift with foam squares only on the bottom portion so the slider still moves but they stay put. Then I finished everything off with a scattering of fun sequins.
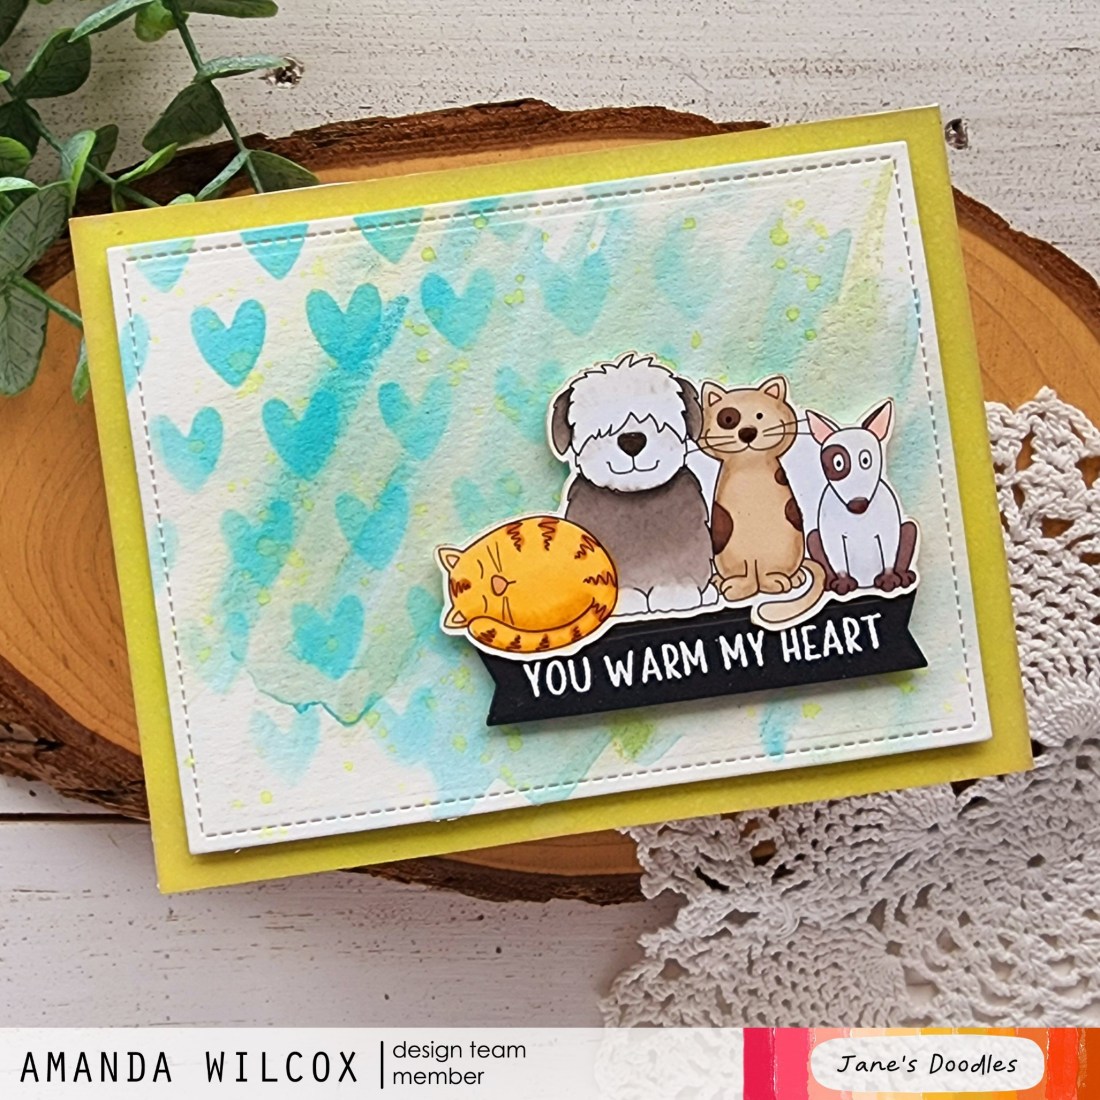
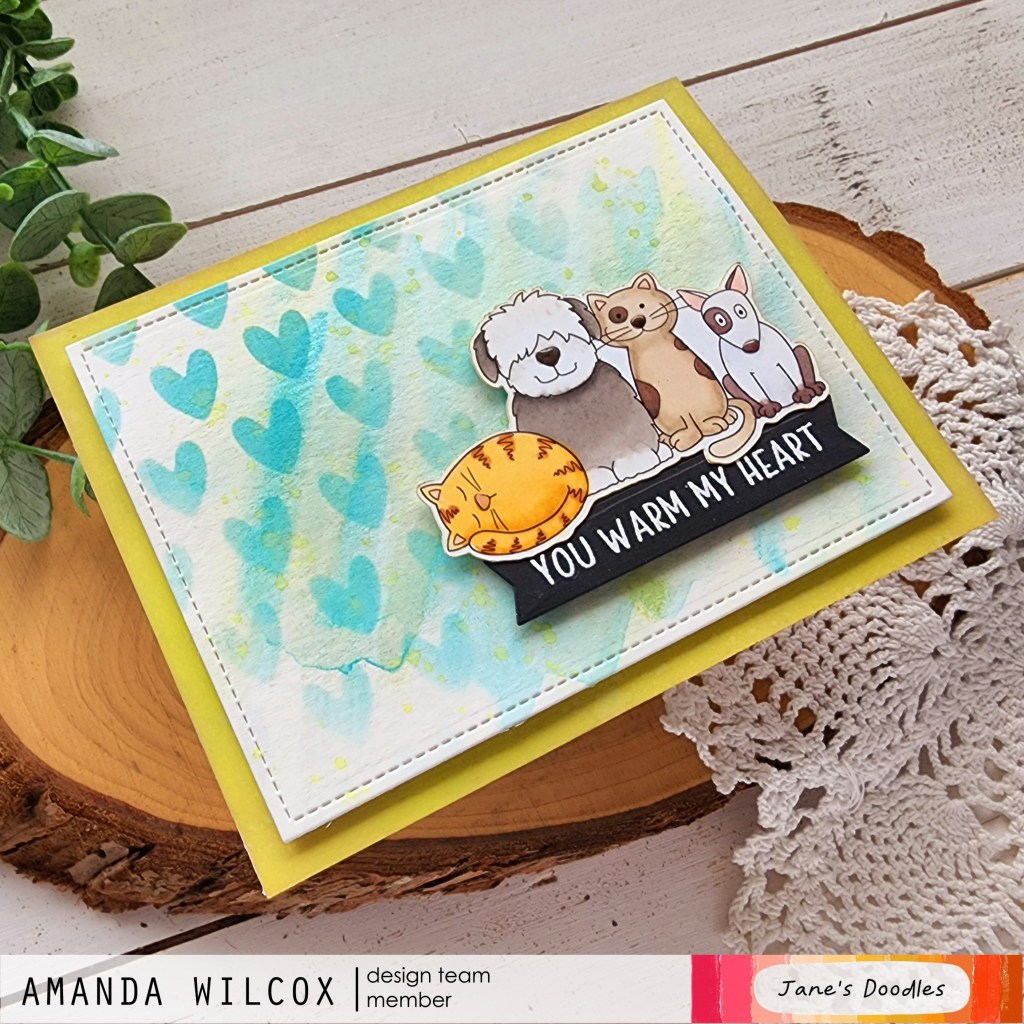
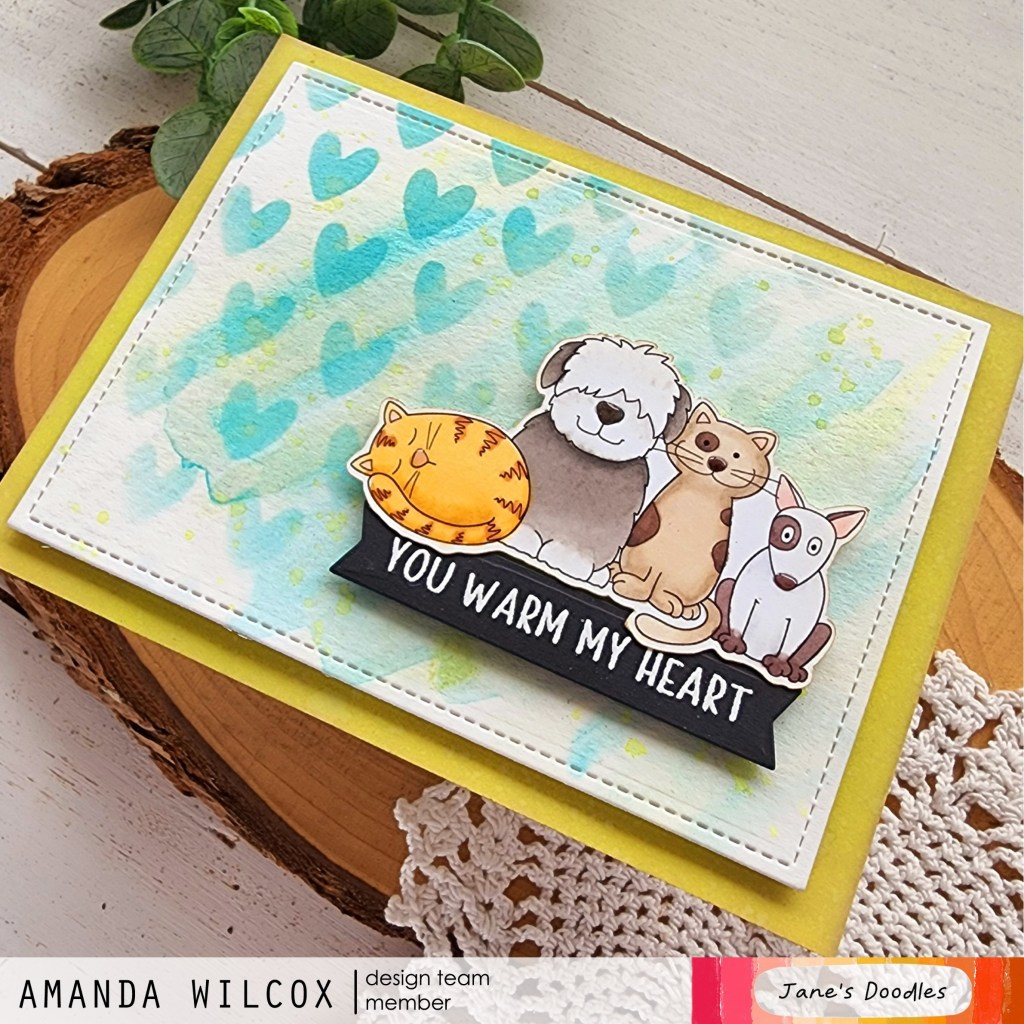
Welcome friends! I have a sweet watercolor card to share with you today featuring Jane’s Doodles stamps and stencil, paired with my new LH Colors watercolors for some sparkle and texture in the background.
I knew I wanted to create a card with these sweet kitties and pups from the Jane’s Doodles Cats and Dogs digital stamp set, so I printed them out and colored them with my copic markers. I used the scan-n-cut to cut the image out and set it aside to play with a watercolor background.
I cut an oversized panel of watercolor paper and slopped some water on it with a big brush. Then I added limeade and pool party from the LH Colors Summer Fun collection randomly on the paper. I heat dried it a couple of times in the middle to get some layers but when I was finished I wanted it to have more texture. So, I pulled out the Hearts stencil and inked it with salvaged patina distress oxide ink. Then I splattered some watered down twisted citron distress oxide on the panel to bring in the limeade watercolor. Once the panel was dry I cut it down with the largest of the Lawn Fawn Small Stitched Rectangle Stackables dies.
Last, I inked a white panel with twisted citron distress oxide ink for my base panel but didn’t like how bright it was so I toned it down with tea dye distress oxide very lightly. I glued that panel to a card base and popped up the watercolor panel with foam tape. Before adding my critters, I stamped and heat embossed a sentiment from Love You and cut it out with a Pink & Main Large Sentiment Strip die.
Finally, I added the sentiment strip and critters with foam squares on the lower right corner of the card. To finish things off I just added glossy accents to all of their noses.