I'm a wife, mom, craft blogger and designer for Newton's Nook, Pink & Main, Miss Ink Stamps and Pixi Dust Designs. I also create as an affiliate for Spellbinders and guest design for other companies. Welcome to my crafty place. I hope you enjoy looking around.
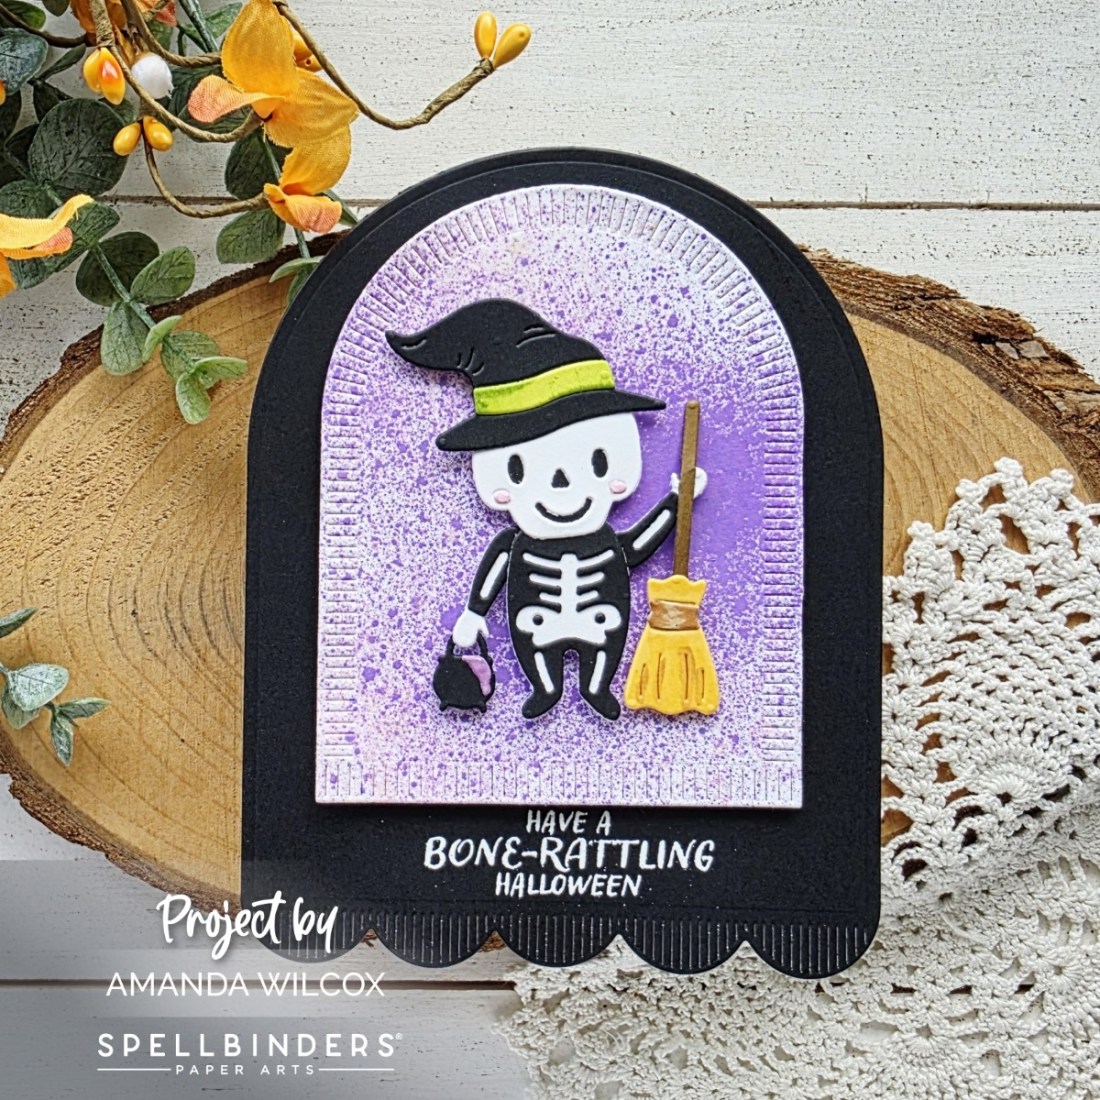
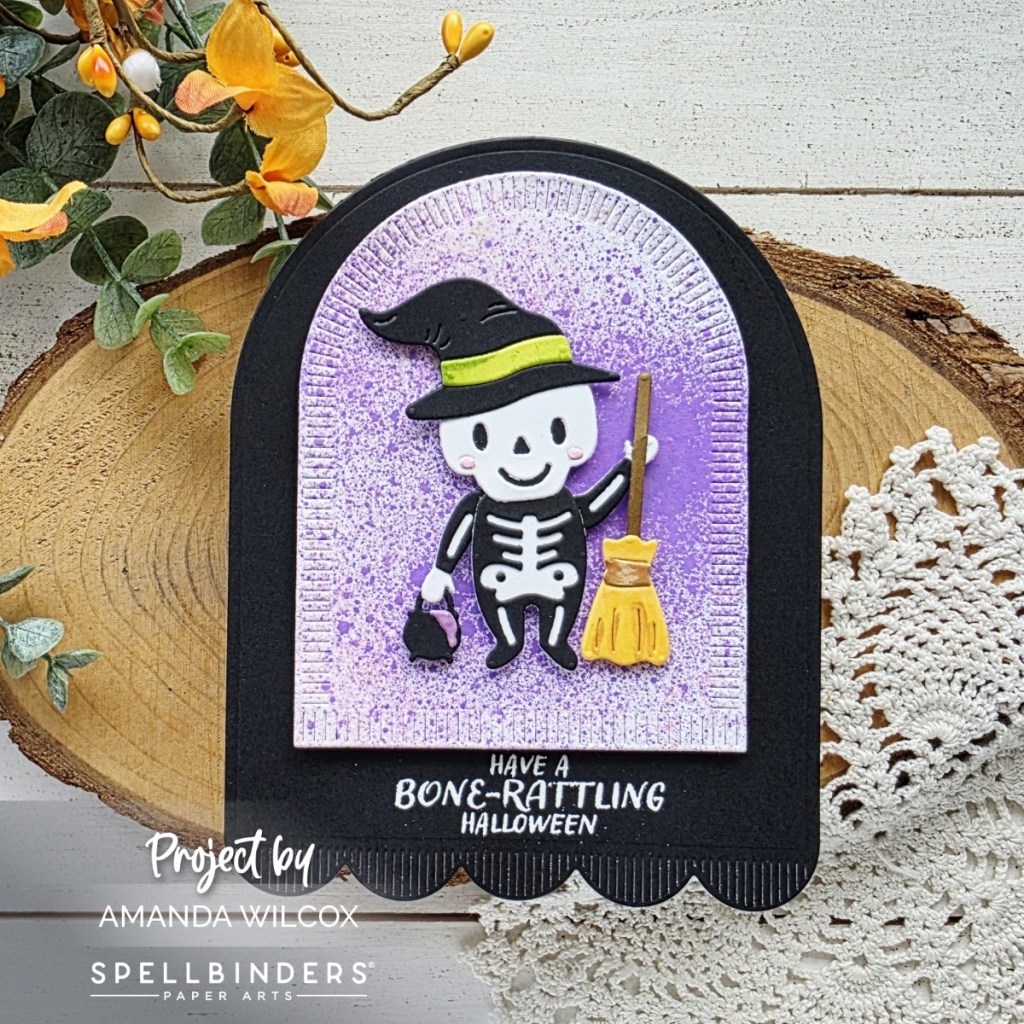
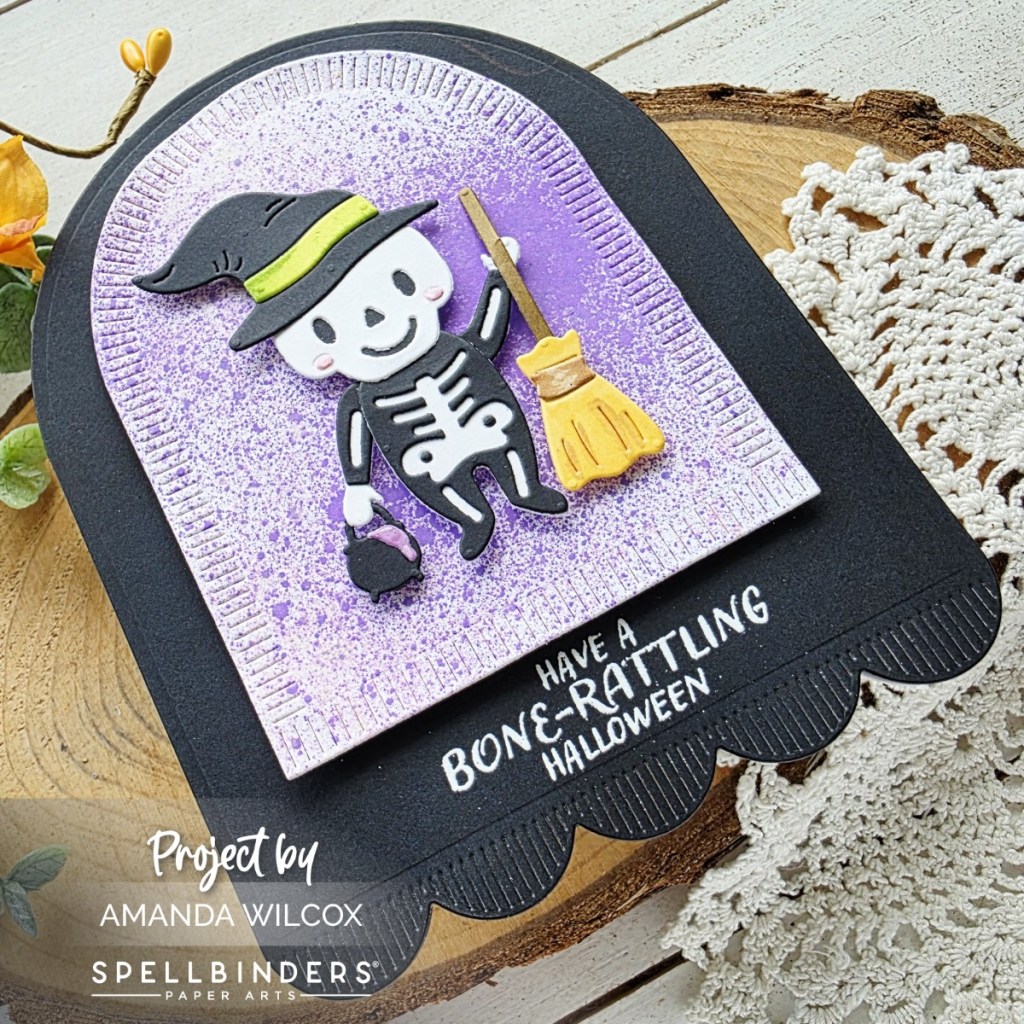
Keeping things spooky but adorable and fun, we’ve got the most perfect addition in today’s envelope! How cute is this skeleton witch and their cauldron and broom! I love it all!
After building my character, I couldn’t resist a little distress oxide spray for a fun and bright background. Then, instead of centering the arch panel, I scooted it up a little so I could heat emboss my sentiment right underneath it.
To make this a shaped card, I took the largest background die and cut it a second time from white cardstock. Then I scored a line about 1/2 inch from the top and glued the back to the front just on that little flap. After the glue dried I folded it open and used a bone folder to solidify the crease.
Grab your 13 Days of Craftoween HERE and join in the fun!
I appreciate you sharing your time with me. Have a fabulous day!
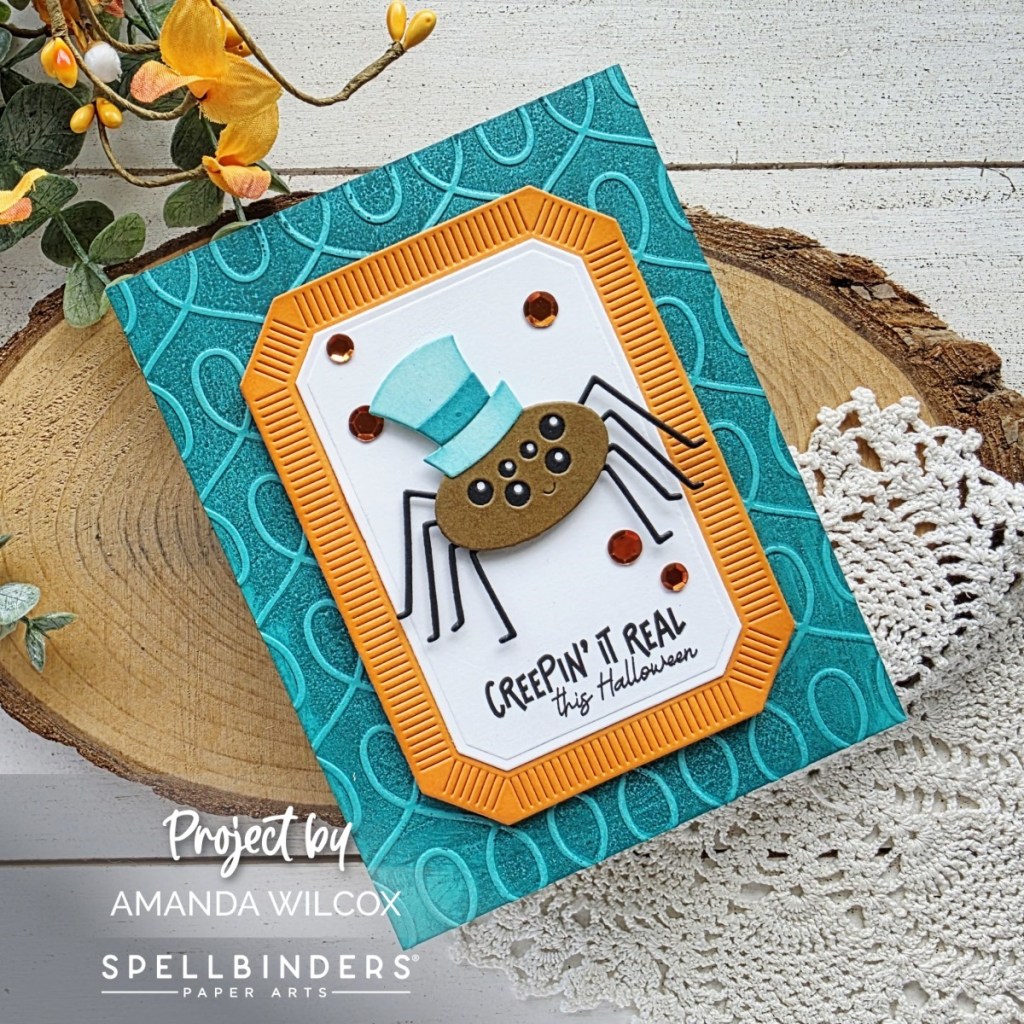
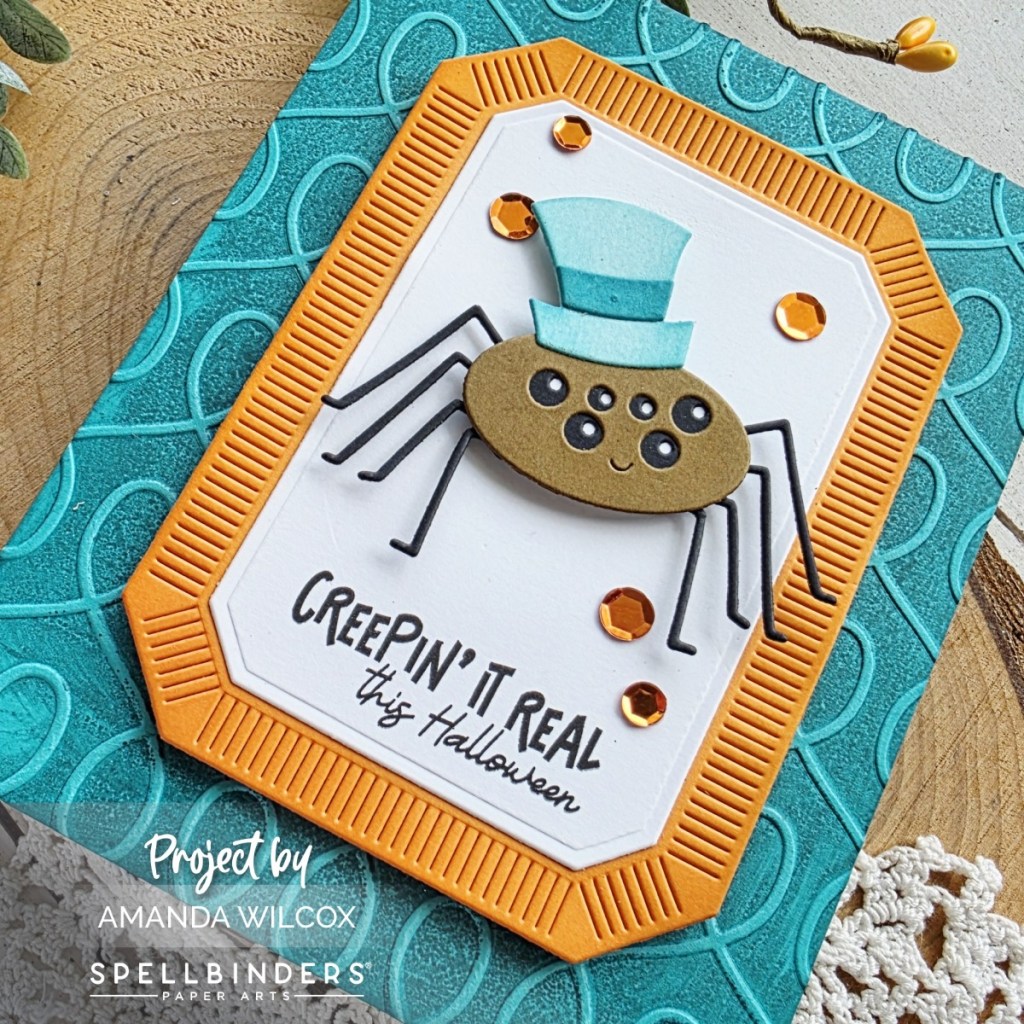
Okay friends. When I opened day 5 in my Craftoween calendar I got a little spooked because spiders, duh! But in reality he’s pretty darn cute and really fun to build! Another genius design!
I also couldn’t resist straying from your typical Halloween colors today and adding a little teal for fun and whimsy. I inked up my Loops embossing folder before running it through my die cutter which gave that awesome dimension with the texture!
And I finally found the perfect opportunity to add some of the awesome sequins included in the kit for a little shine and interest.
Grab your 13 Days of Craftoween HERE and join in the fun!
I appreciate you sharing your time with me. Have a fabulous day!
Hi everyone! I’m popping back in to celebrate the Ranger Ink | Simon Hurley Create release today! It’s got a fun array of stamps, dies and stencils, along with new pastes for some messy fun!
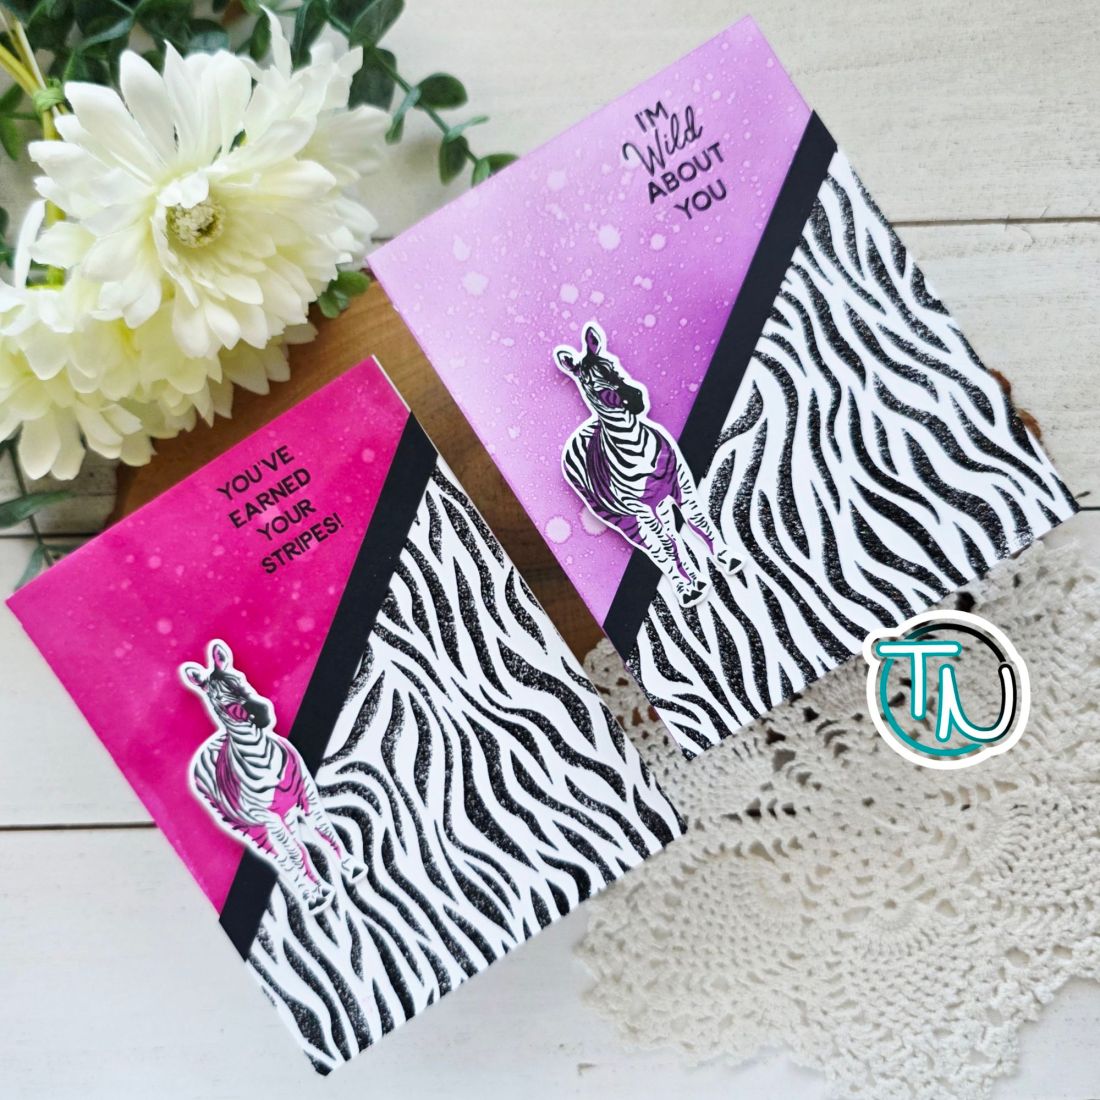
Today I have two cards to share because my background gave me a two-for-one and I couldn’t resist!
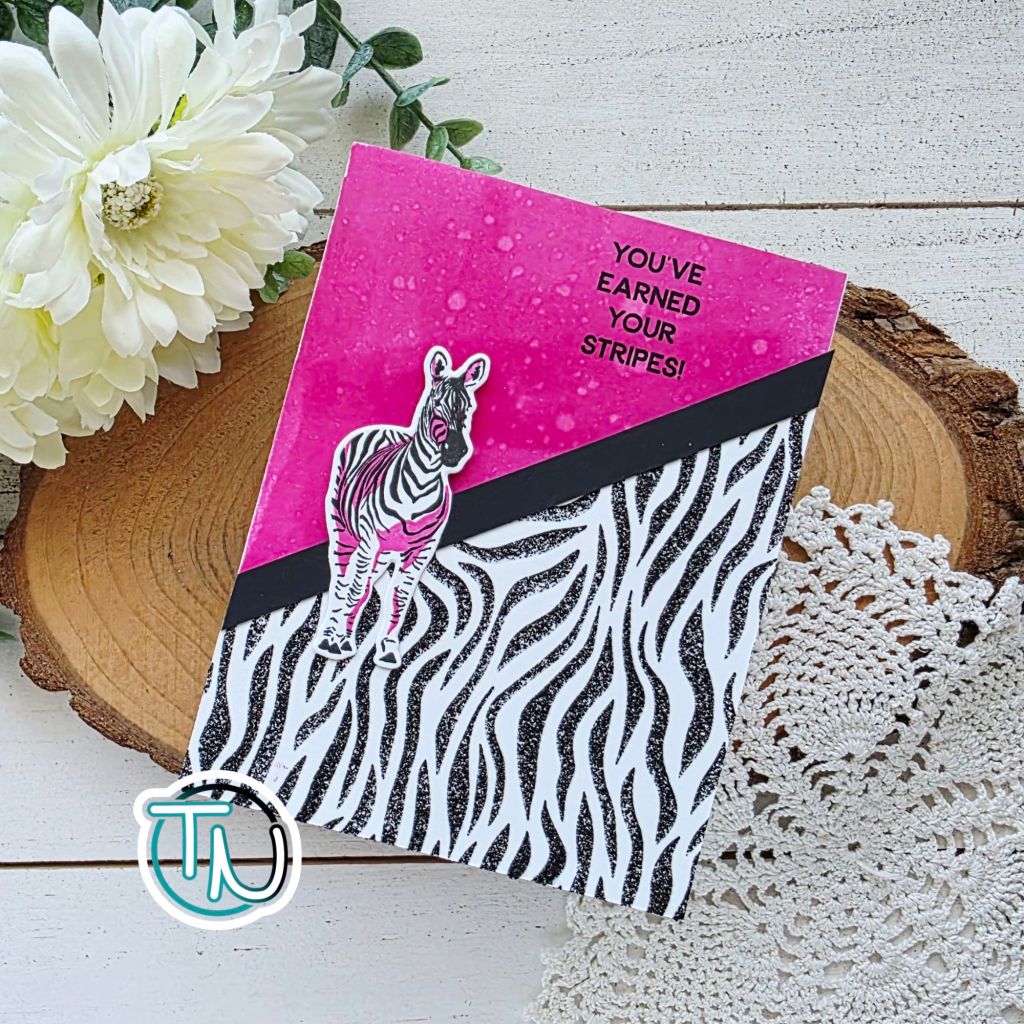
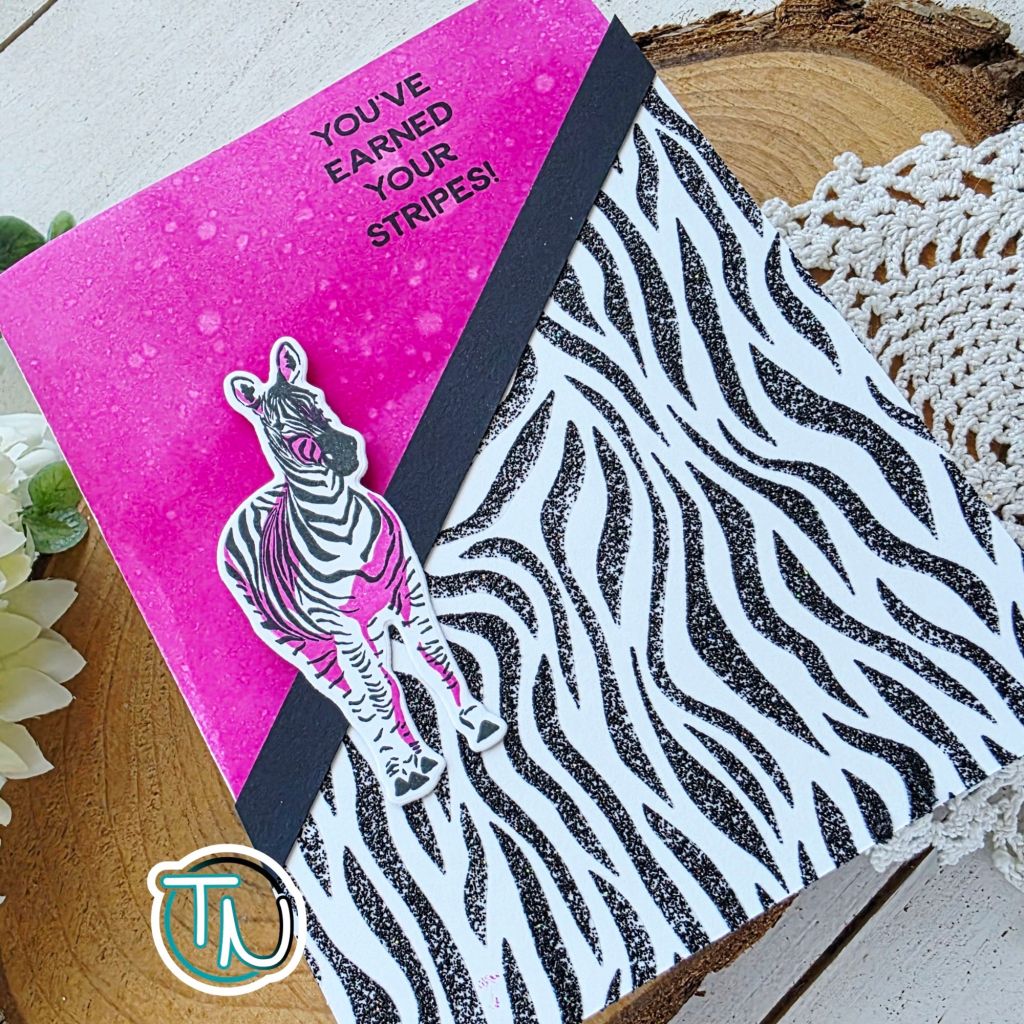
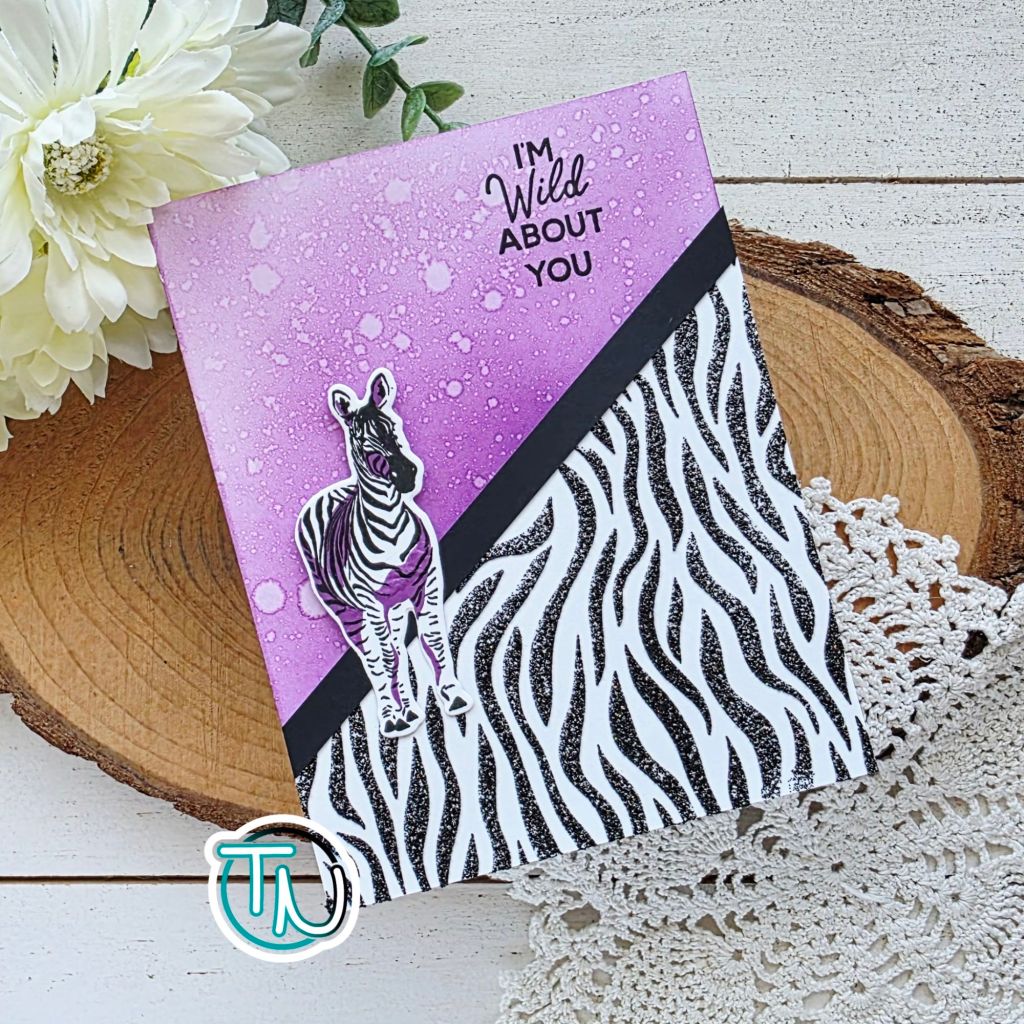
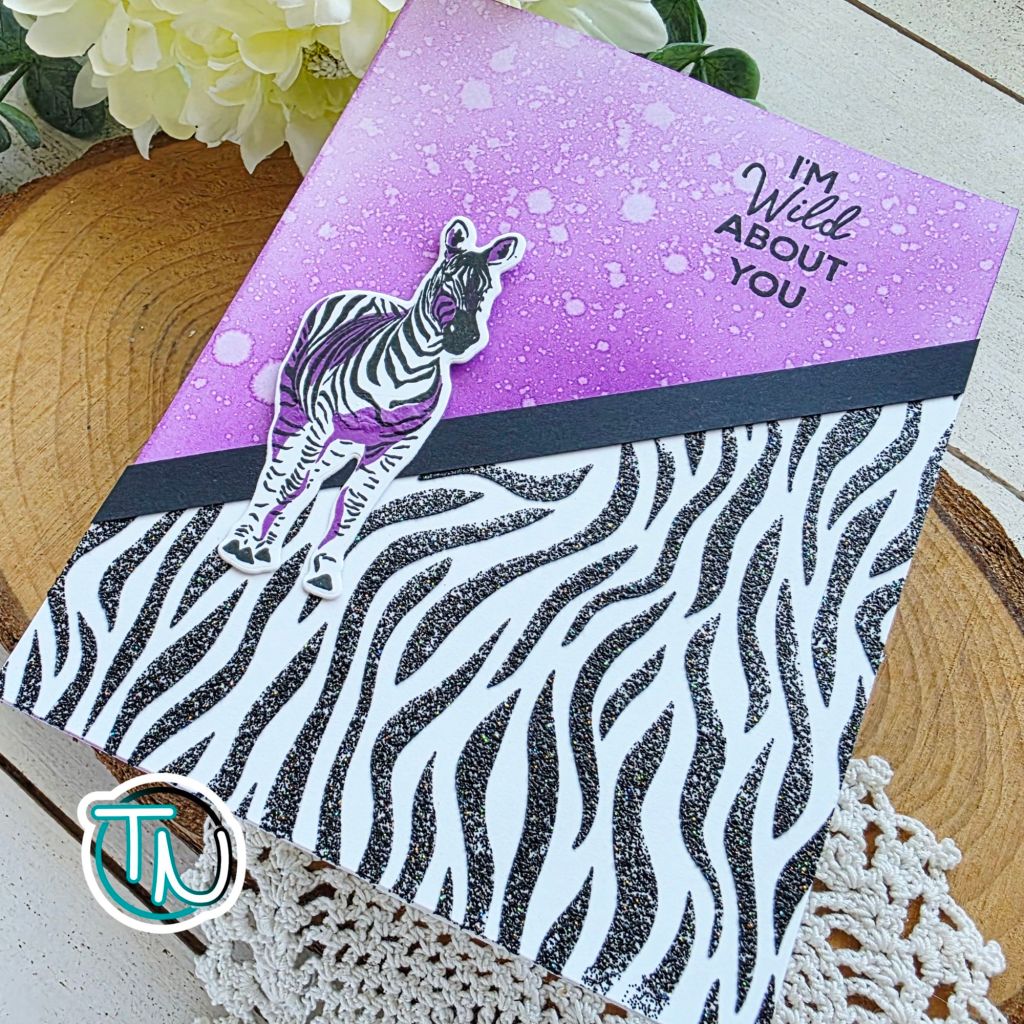
After I received my package of all the goodness in this release, I spent and evening getting messy creating different backgrounds, playing around with the different mediums and stencils. One of the backgrounds I created was this fun new Astro Paste called black widow. It’s a fabulous black glitter and was screaming to be used on this awesome Zebra stencil.
Once the background was dry, I just chopped it in half at an angle. Then I chose a couple of fun colors to stamp my zebra accents in and used the coordinating dies to cut them out. This one is prom queen from the Stellar Ink collection.
For my pink background, I drug the pad directly on the card front and splattered it with water for instant color and fun texture. Then to assemble, I popped the zebra panel up with foam tape and added a black strip across the seam. I added the zebra with half foam squares and half liquid glue so it lays flat. Then I stamped my sentiment using my MISTI.
Same vibe for my 100% Juice version but this time, I used a blending brush to ink up the card front for a softer, ombre look. I also splattered it with water. Stellar Ink is my favorite for this reaction. It’s so severe and looks amazing!
I have so many other cards I’m super excited to share with you using this new collection so stay tuned over the next week or so!
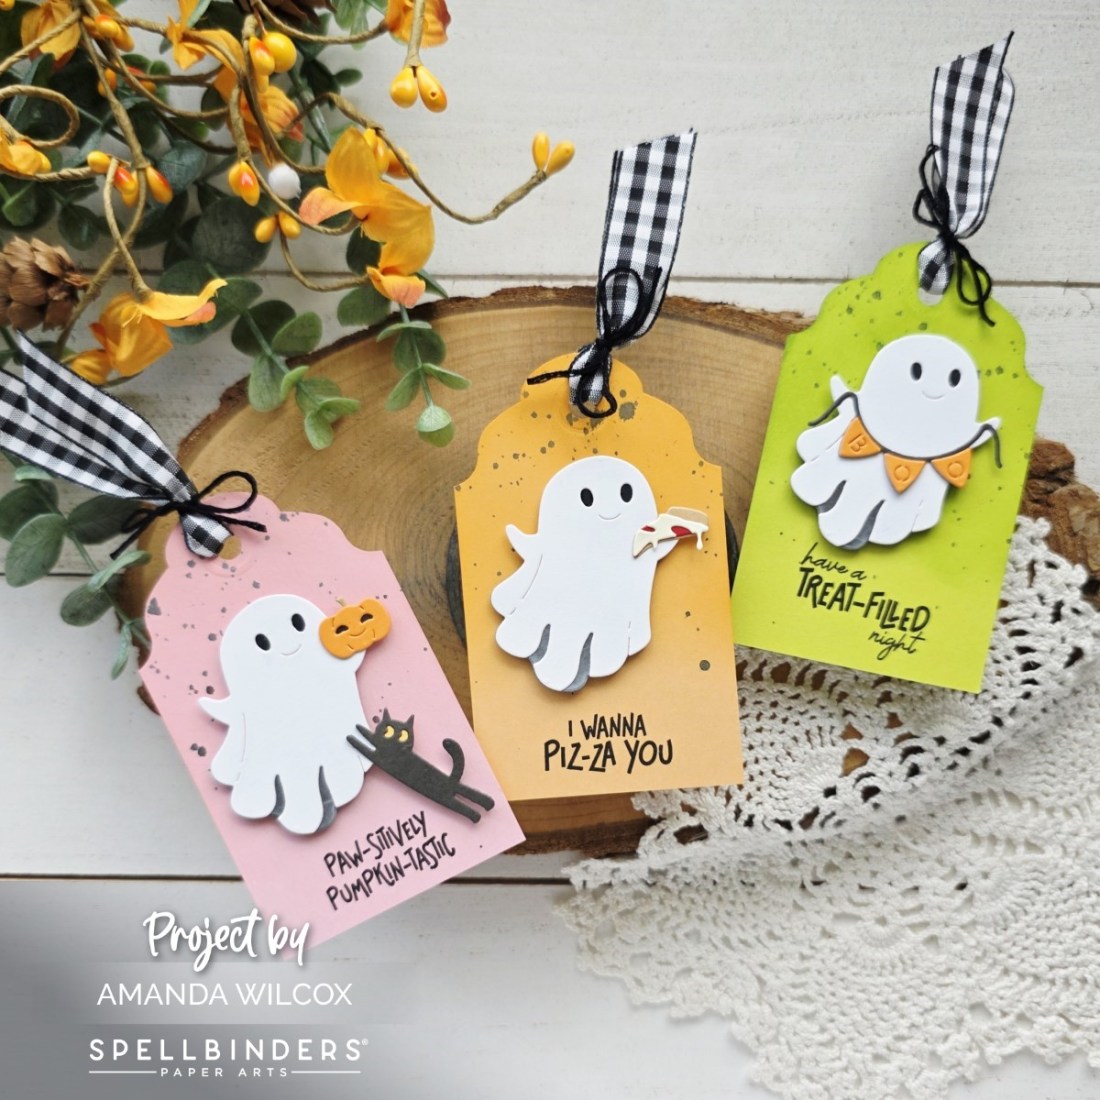
Today’s reveal for the Spellbinders 13 Days of Craftoween required multiple projects because there was no way I could choose which fun thing or coordinating sentiment to use with this fun ghost! Can you really blame me though?!?
So after building all these fun ghosties and their accessories/buddies, I chose some background color cardstock and used the Spellbinders tag topper punch to create my own custom size tags. I ink blended the tops of each tag for a little depth and splattered some black paint for interest.
Then I stamped the coordinating sentiment on the bottom and popped the images up with foam squares. I used the same gingham ribbon and embroidery floss combo on each tag and seriously cannot wait to use them this year!
Which is your favorite?
Grab your 13 Days of Craftoween HERE and join in the fun!
I appreciate you sharing your time with me. Have a fabulous day!
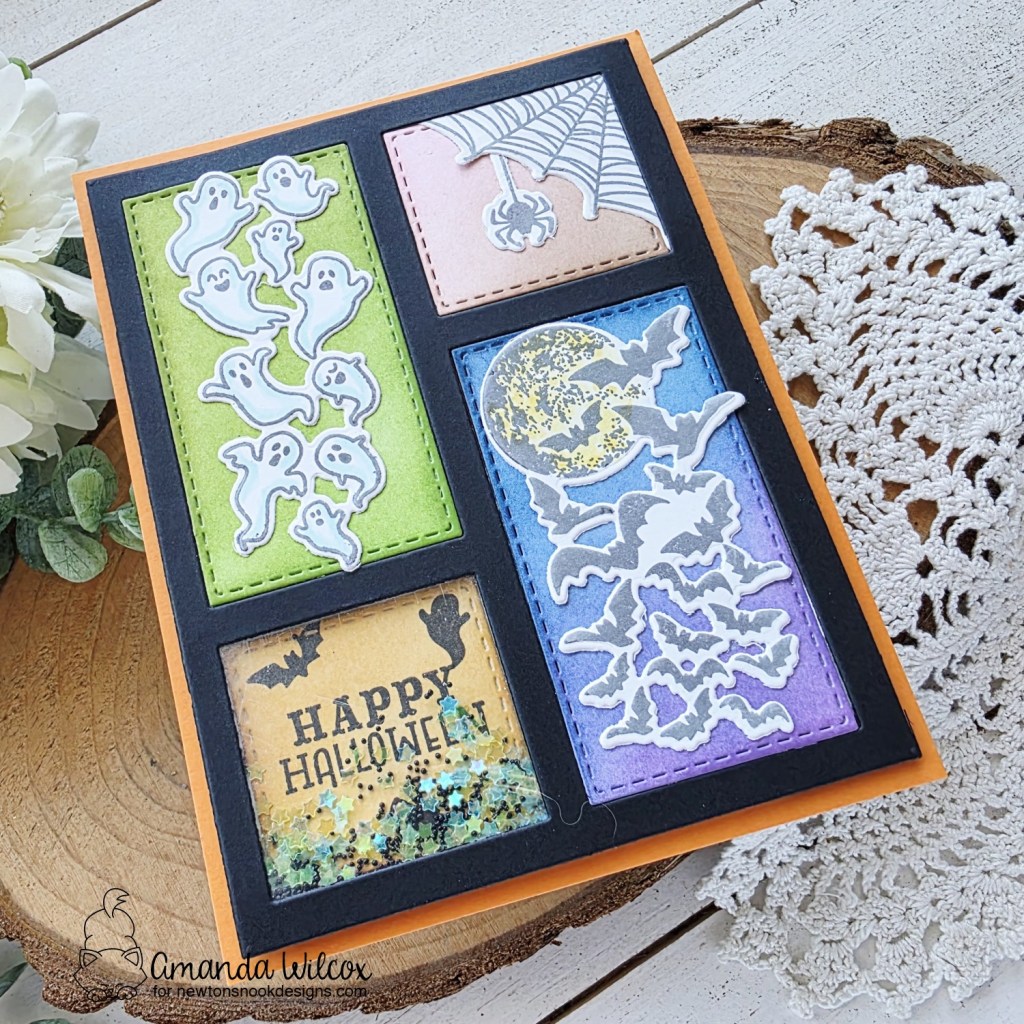
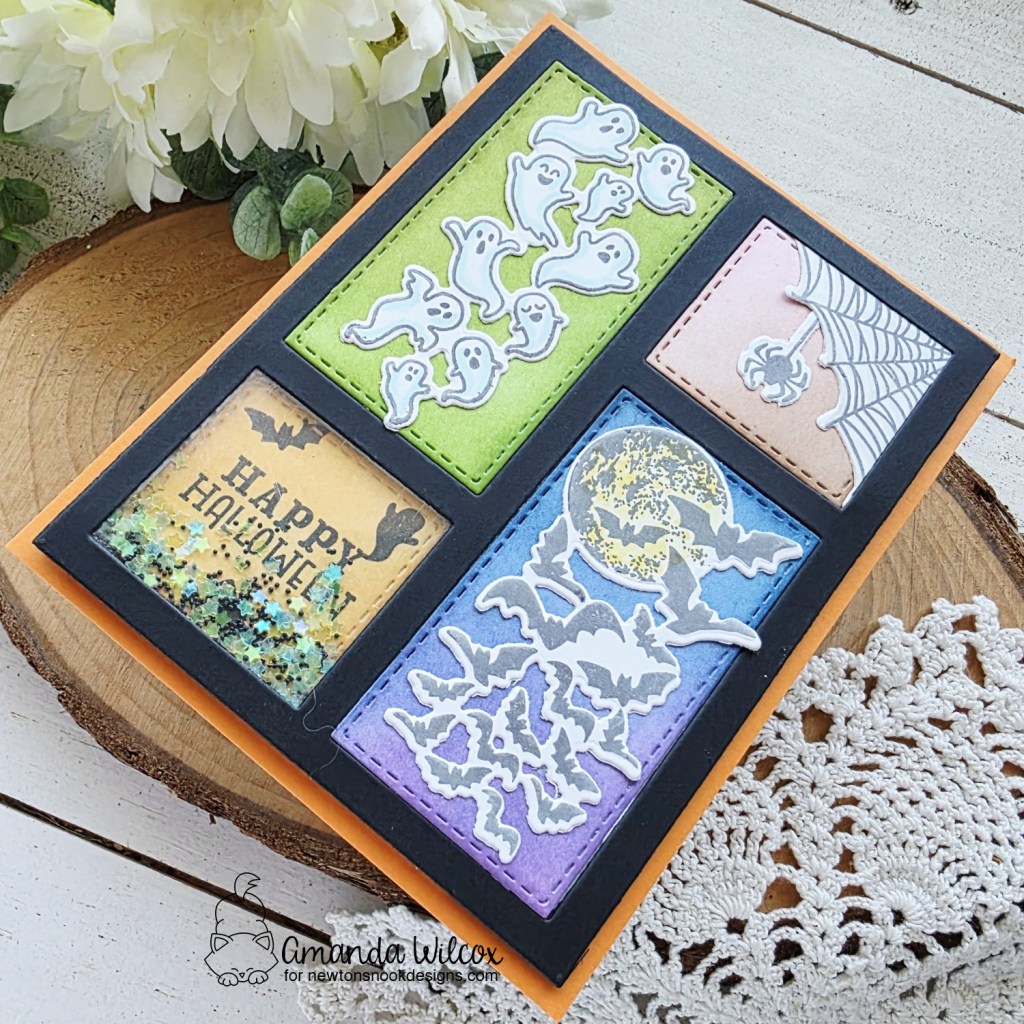
Hi friends! I’m over on the Newton’s Nook blog today sharing another bit of Halloween inspiration. This time I took one of the awesome card front layout dies and turned it into a partial shaker card with some fun spooky elements.
This is the A2 Card Layout 2 die. Since the beginning of this die, I’ve kept all the white inserts from times when I just needed the frame so I had those already and just needed to cut it out once for the black frame. Then I ink blended each insert with blending brushes and dye inks.
Next, I stamped colored and die cut images from the Spooky Stories set and glued them to the ink blended panels. On the orange panel I stamped my sentiment and some small images directly to it before creating the shaker portion.
I added some fun star confetti and microbeads as shaker bits and sealed it up. Then popped the whole panel up on an orange card base with foam tape.
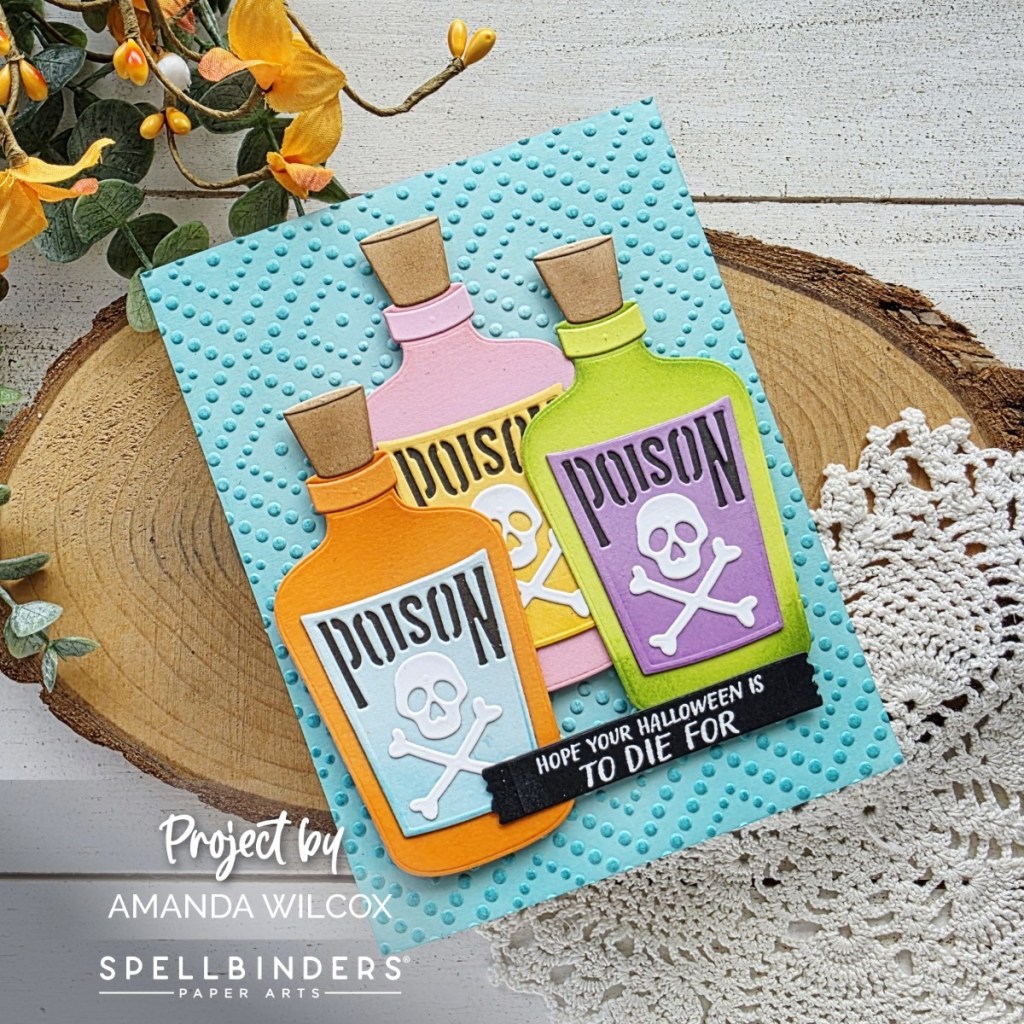
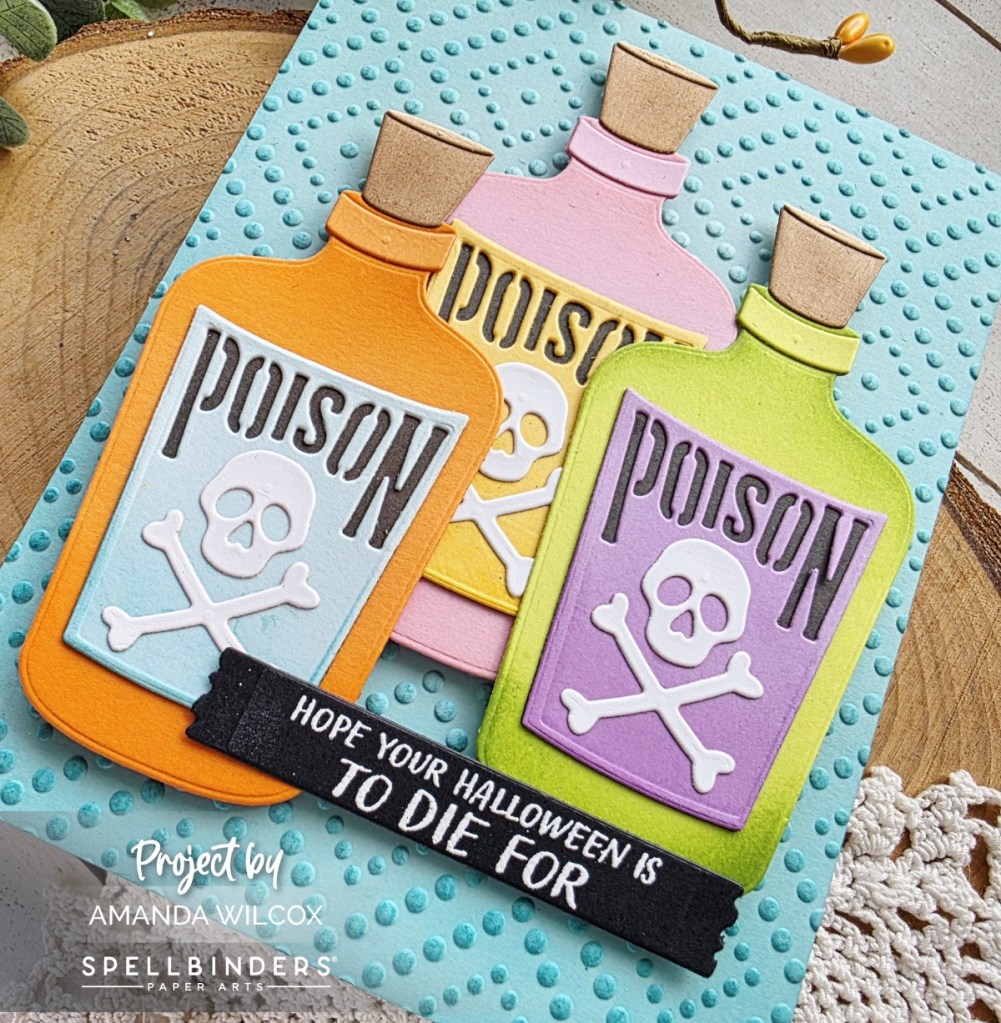
Alright my frightful friends! Are we ready for today’s fun reveal?!? I loved it so much I made three without blinking. They’re so cool and versatile in the way of changing the label to anything you can imagine!
Today I added the sentiment on a banner from North Pole Sentiments die set. It fit perfectly and allowed so much more of the fun embossed background to show.
This embossing folder is called Dazzling Dots and I inked it up with teal ink to help it pop, fading as I went up. Also, in my typical fashion, everything is popped up with foam tape.
Grab your 13 Days of Craftoween HERE and join in the fun!
I appreciate you sharing your time with me. Have a fabulous day!
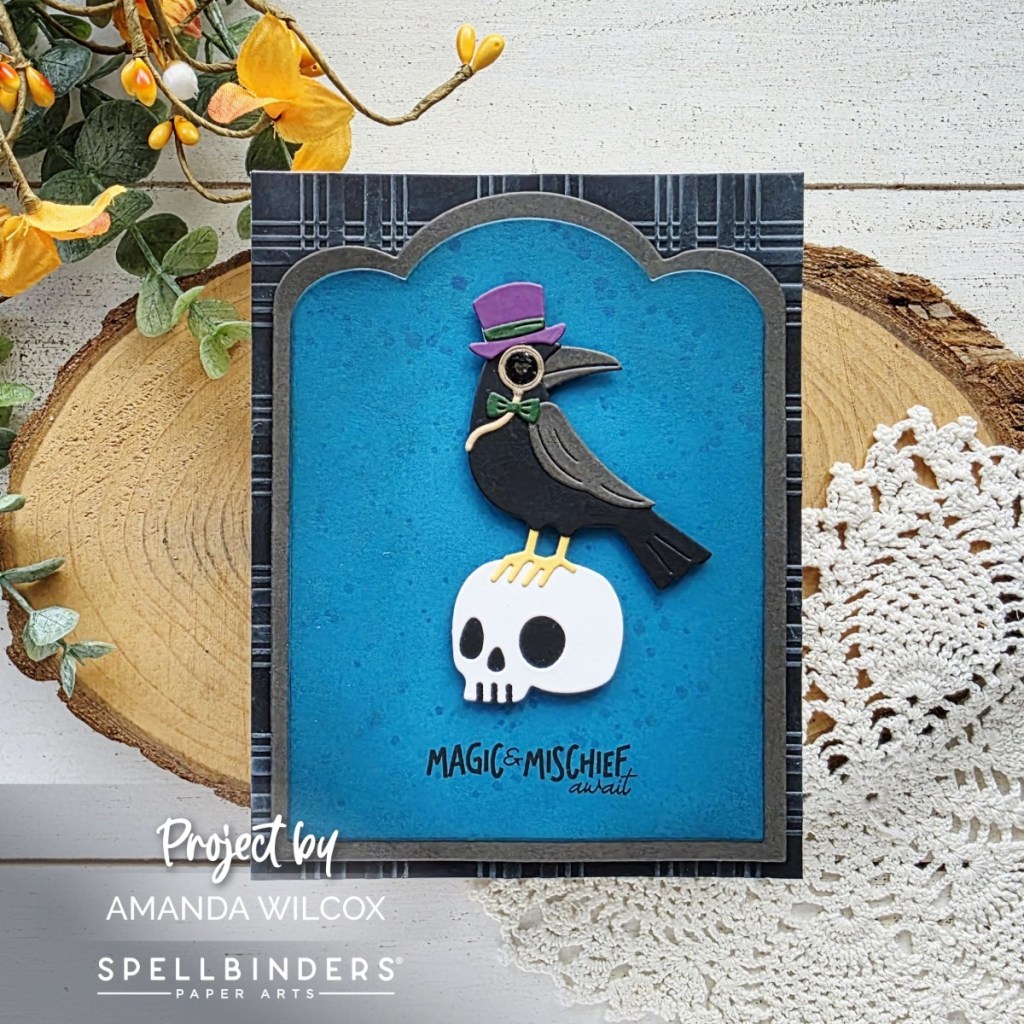
We’re back for day 2 of our Craftoween crafting and today is a little spookier than the start but I love it equally! Don’t you?!?
It’s speaking Edgar Allen Poe to me in my dreams! He’s wonderfully eerie and would be fabulous to perch on so much more than this awesome skull!
I paired him with the Plaid Company embossing folder and Scallop Labels nested dies. I inked the plaid background with white ink to help it pop and splattered the front panel with dark teal ink for some interest as well.
Grab your 13 Days of Craftoween HERE and join in the fun!
I appreciate you sharing your time with me. Have a fabulous day!
Welcome ghosts and ghouls! It’s the first day of Spellbinders 13 Days of Craftoween! Where we reveal a spooky fun creation each day to inspire your creepiest crafting! I hope you love it as much as I did creating them all!
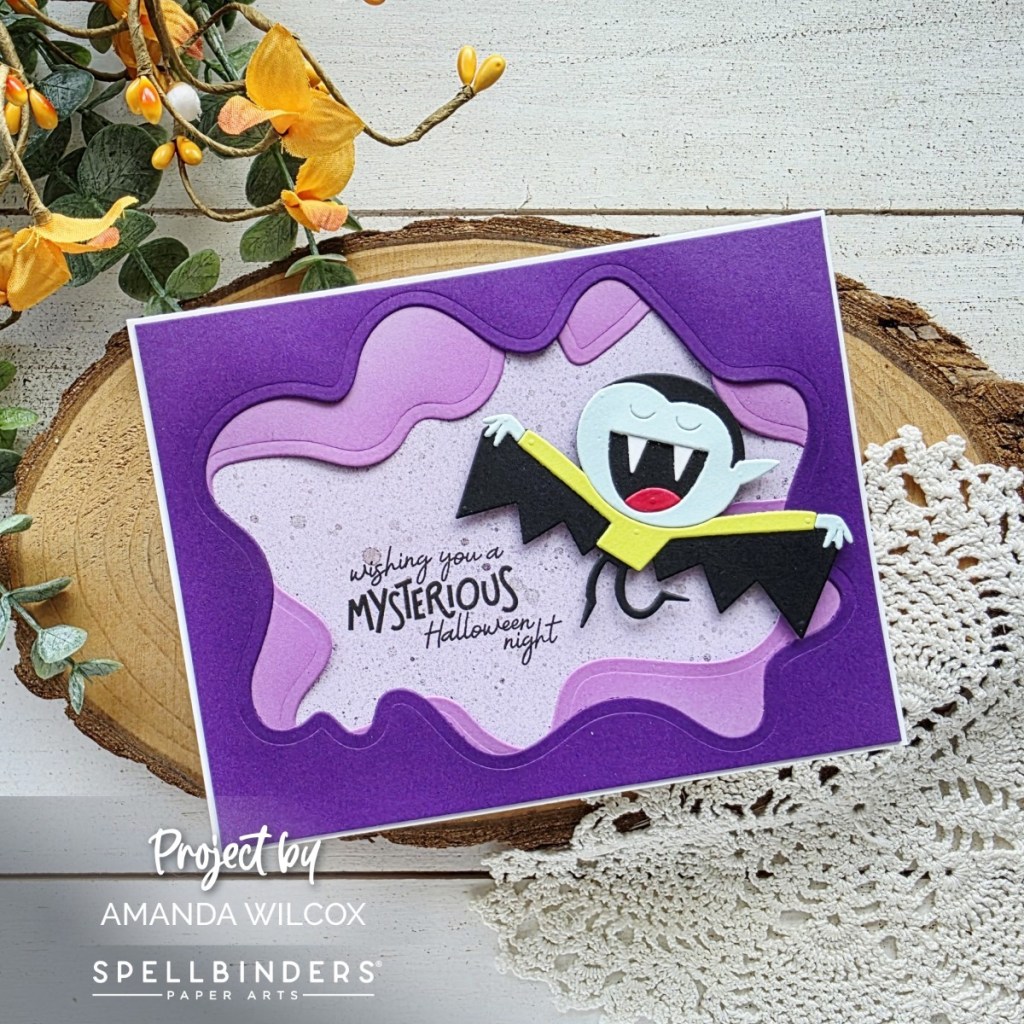
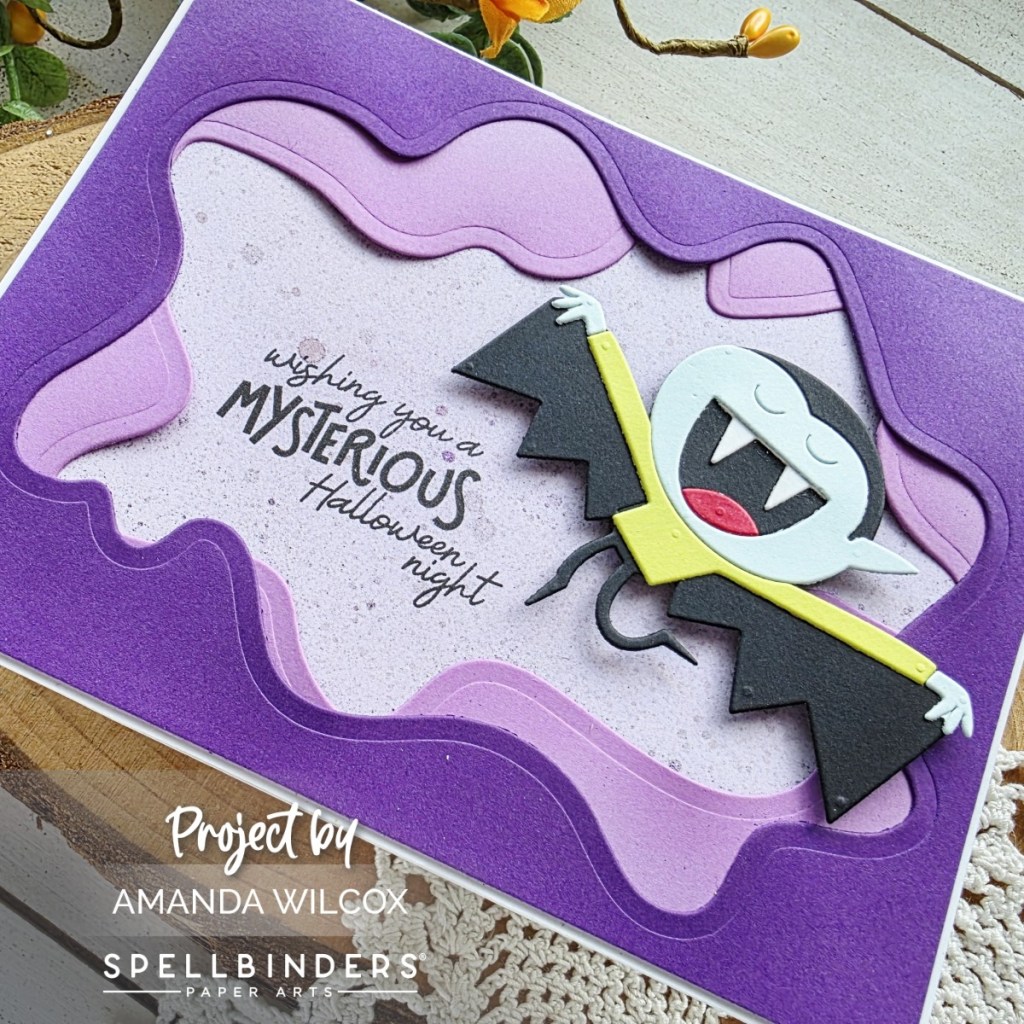
Today we have this absolutely spectacular little Dracula to build. He was so much fun and crazy simple to assemble. These dies are brilliantly designed!
You’ll notice the sentiment stamps and embellishments that I use through all 13 days of this project are from the kit. Today I added the Underwater Tunnel dies to add interest and whimsy to the design.
Grab your 13 Days of Craftoween HERE and join in the fun!
I appreciate you sharing your time with me. Have a fabulous day!
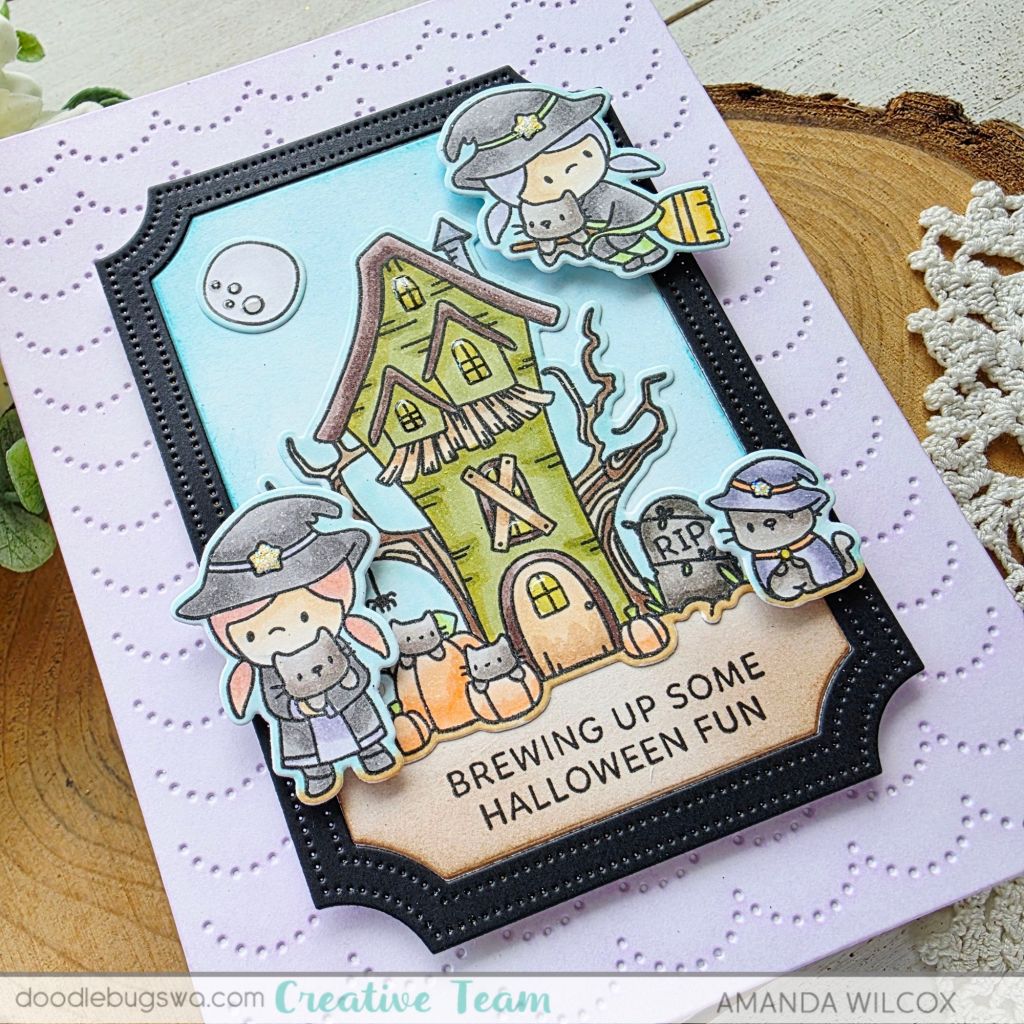
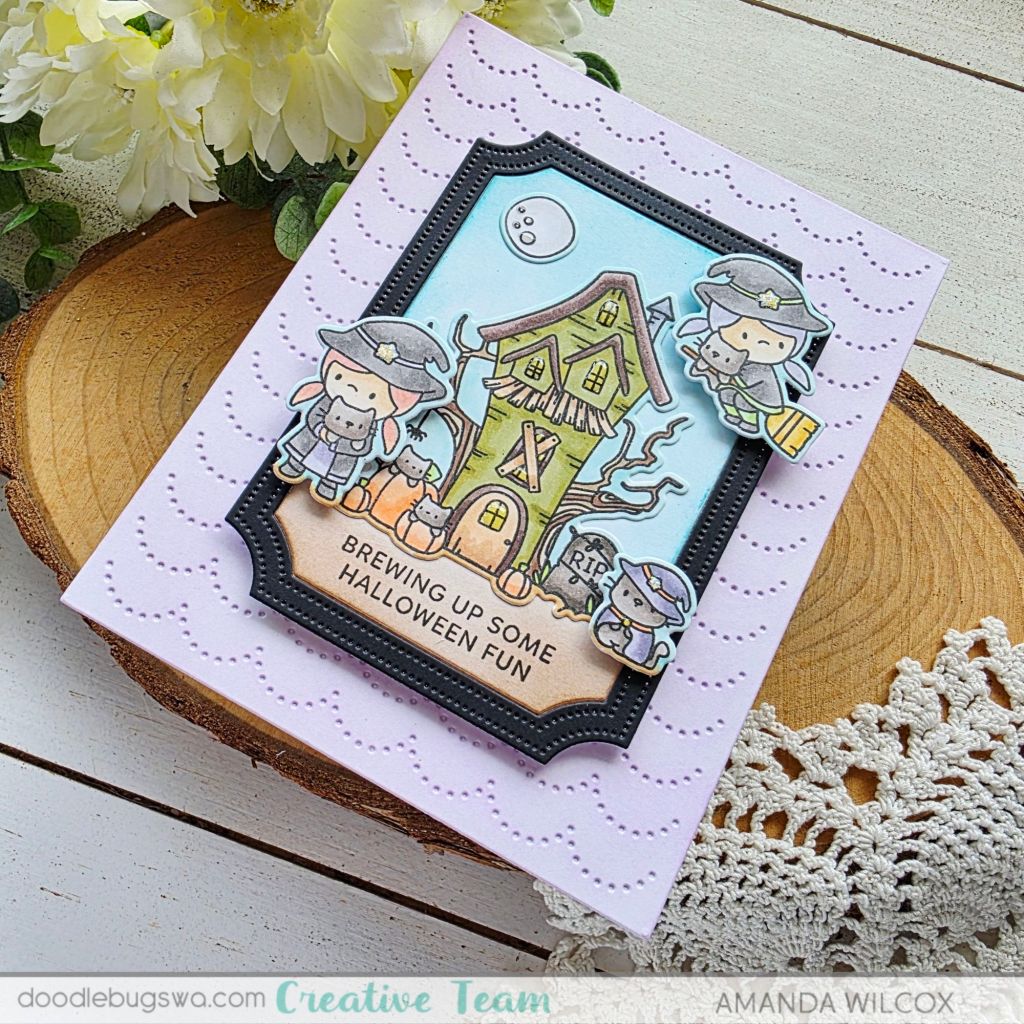
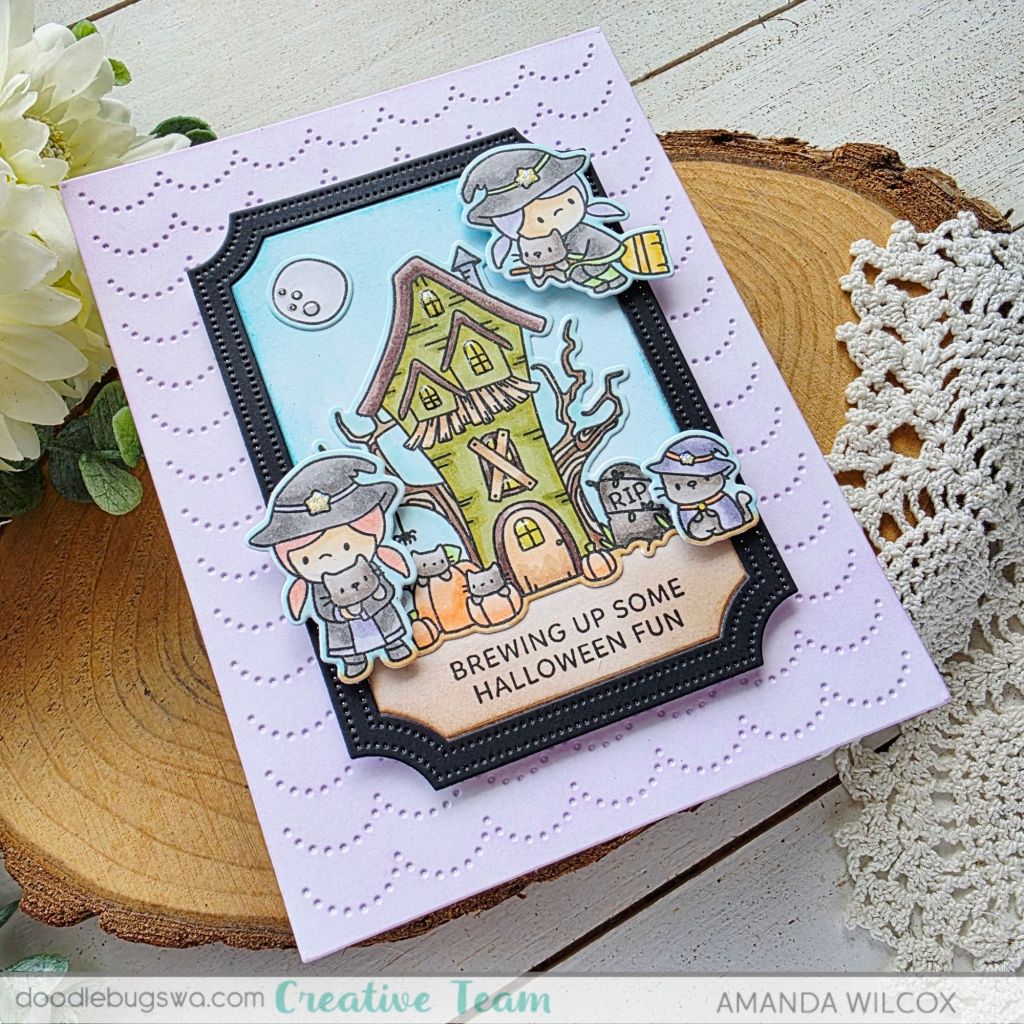
Happy Mix it up Monday everyone! I’m creating for the Doodlebugs shop as usual, but the shop blog is no longer being used so I thought it would be important to keep things going here in case anyone has questions on the creation process.
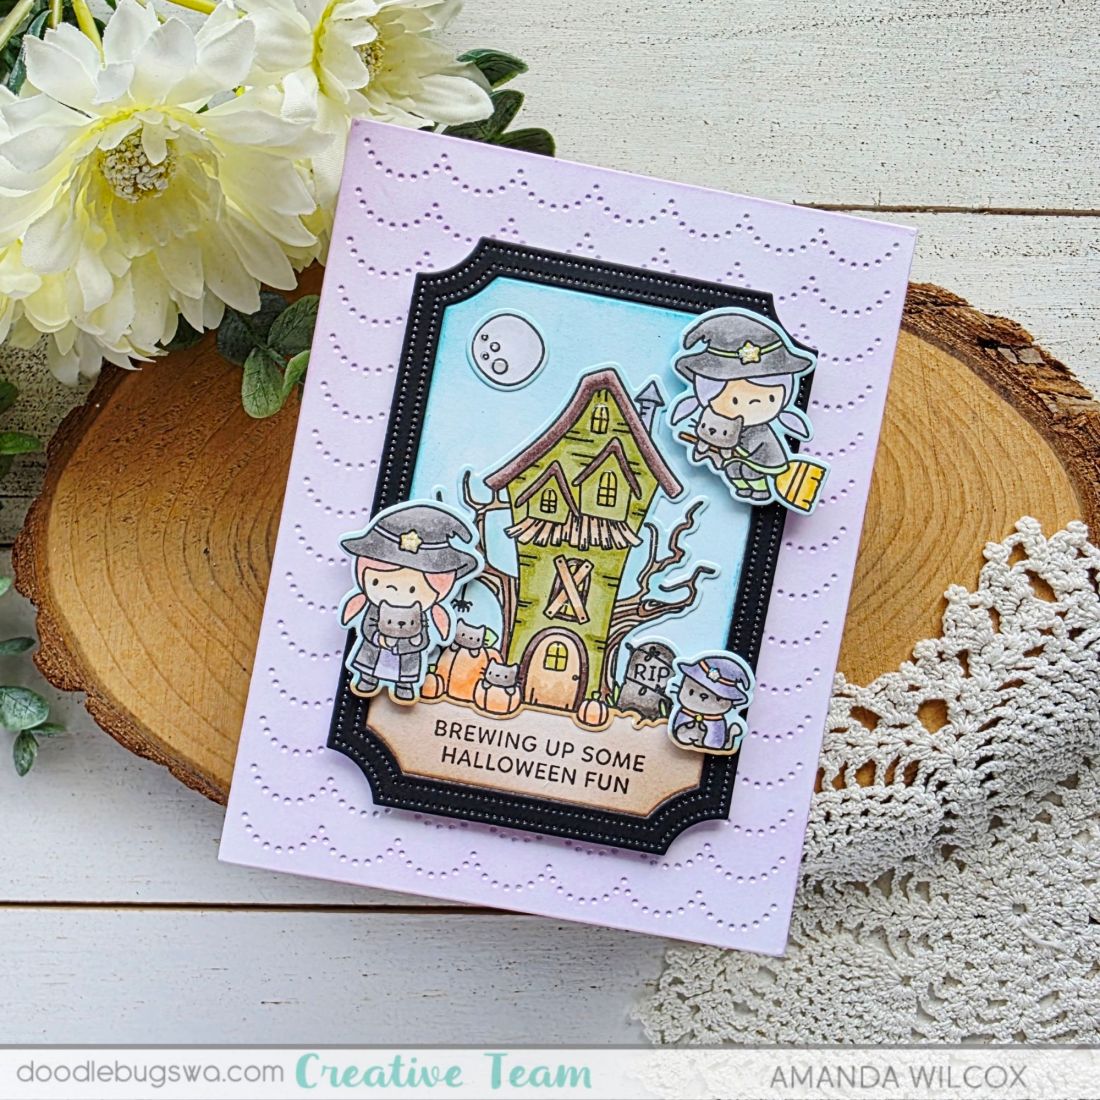
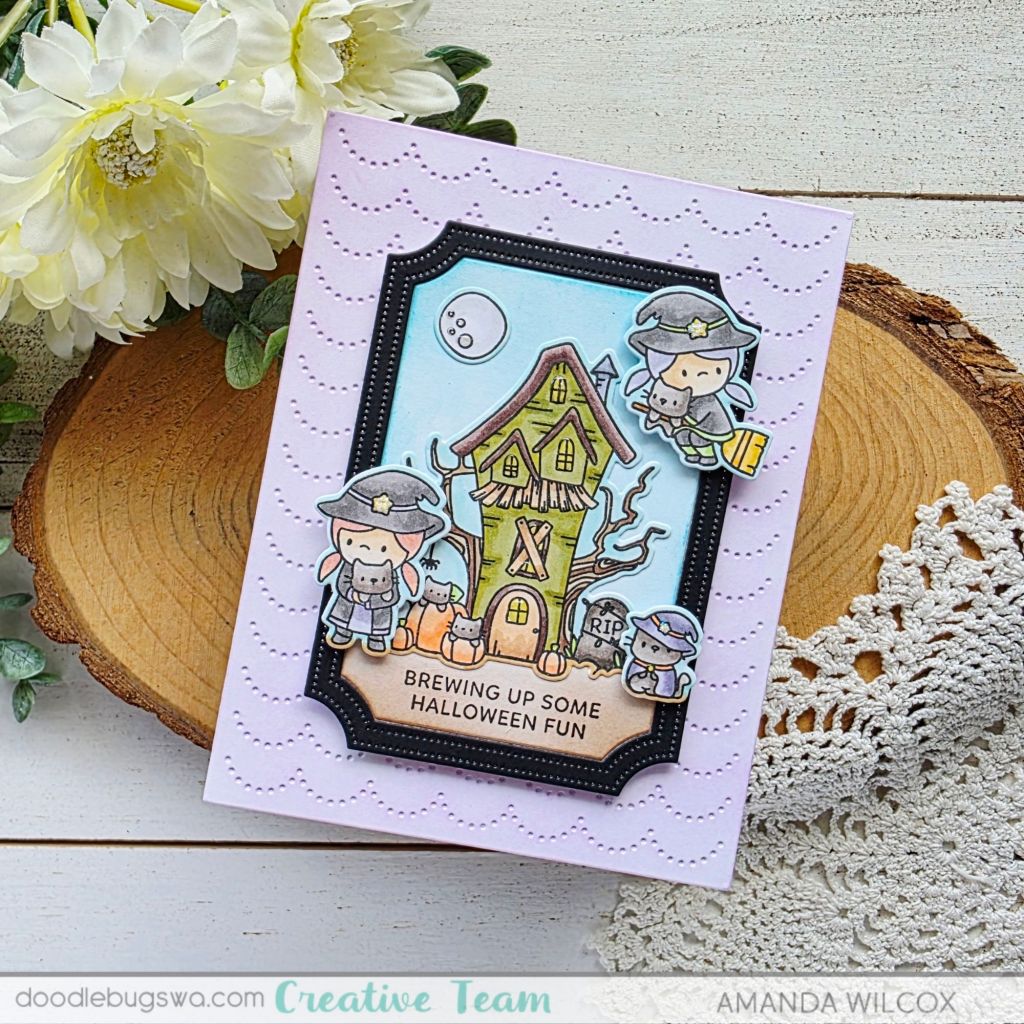
Today I’m playing with Mama Elephant spooky goodness and adding some Pretty Pink Posh and Waffle Flower dies to round things out.
I started by choosing images from Mama Elephant Bewitched to stamp, color and die cut out. The Mummified set came out in the same release and would be a lot of fun to mix with this or substitute if you have that one but like this layout.
Next, I cut the Waffle Flower Nested Piercing Ticket Frame from black and white cardstock. I kept the white insert and ink blended it for my scene with teal and brown inks, adhering the insert to the black frame with washi tape on the back side. I glued the house and moon directly to the panel and quickly thought it would be cool to color the edges of the images to match, so I did. Then I placed the scene in my MISTI and stamped the sentiment from Pretty Pink Posh Sentiment Strips | Fall on the bottom.
Next, I popped the witches and kitty up with foam squares on my scene panel. To add more interest to the background, I cut a piece of white cardstock with the Pretty Pink Posh Pierced Scallops cover plate and ink blended it with purple ink to coordinate the reoccurring color in my images.
I glued the scallop panel to a card base and popped the scene panel up with foam tape. Then I finished the design off with glossy accents and stardust Stickles on bits of the images – windows, moon, stars, etc.
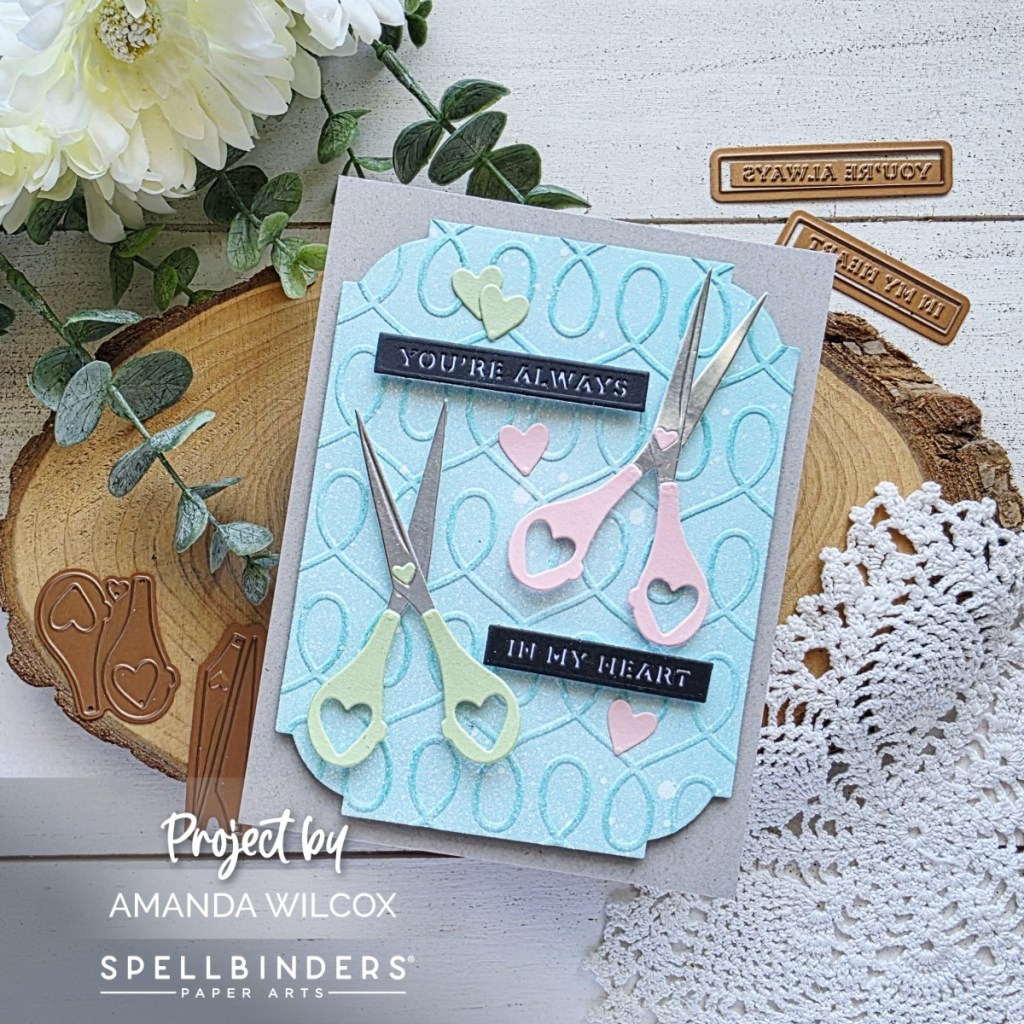
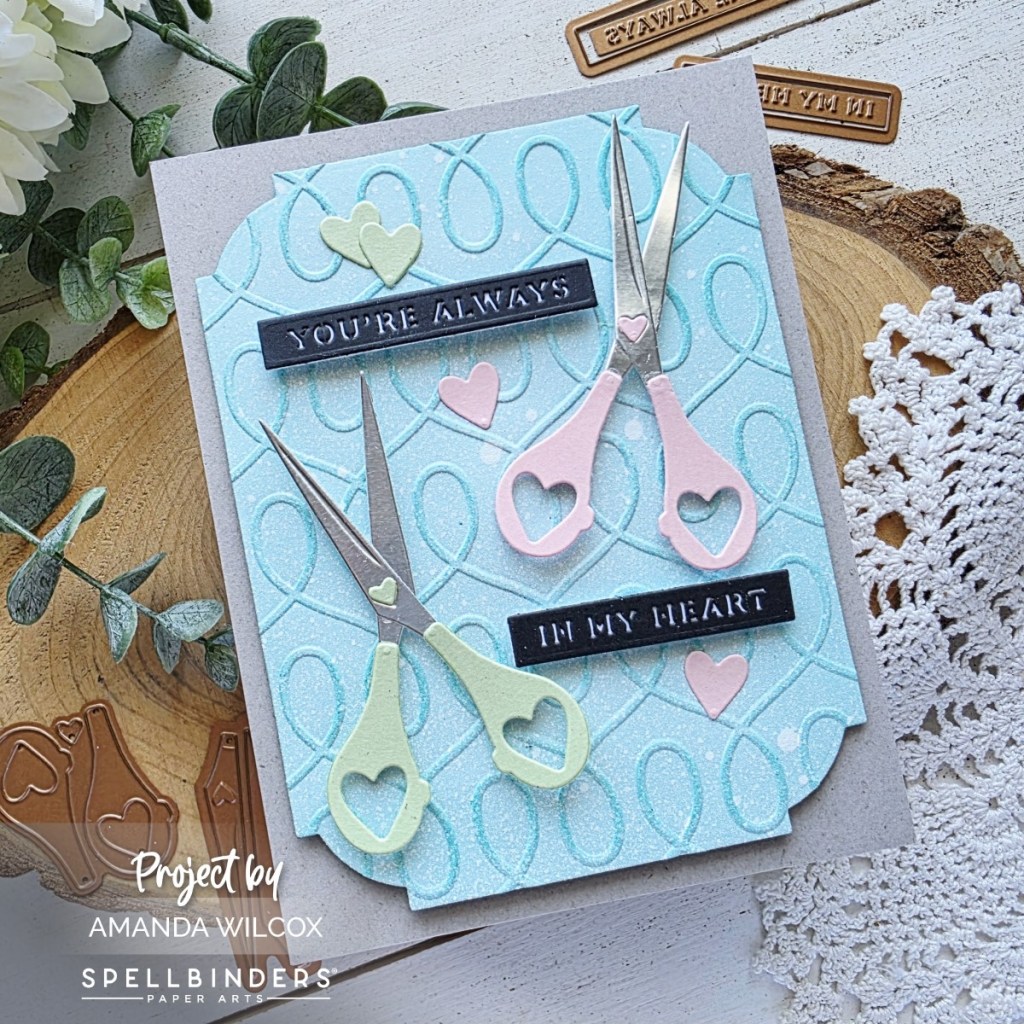
Hi friends. I’m honored to be sharing my card with you today. Spellbinders released this sweet die set called Sharon’s Scissors in honor of Sharon Kilma, a longtime craft shop owner who suddenly passed from heart disease earlier this year. A portion of the proceeds for this die set are being donated to the American Heart Association.
It’s a wonderful small die set, including a sentiment and everything. Today I cut the scissors from pink and light green cardstocks, with the blades from silver foil cardstock. I used liquid glue to adhere the pieces together. Then I cut my sentiment strips from black and a backer in white to help the sentiment show better.
Next, I die cut a Notched Rectangle from teal cardstock and embossed it with the Loops embossing folder. I ink blended it with darker teal ink and splattered it with white. I chose gray as a soft neutral for my card front and then popped the loops panel up with foam tape.
Next, I glued the hearts directly to the panel and popped the scissors and sentiment strips up with foam squares and strips.