Blog

Miss Ink Stamps – Mugs and Kisses

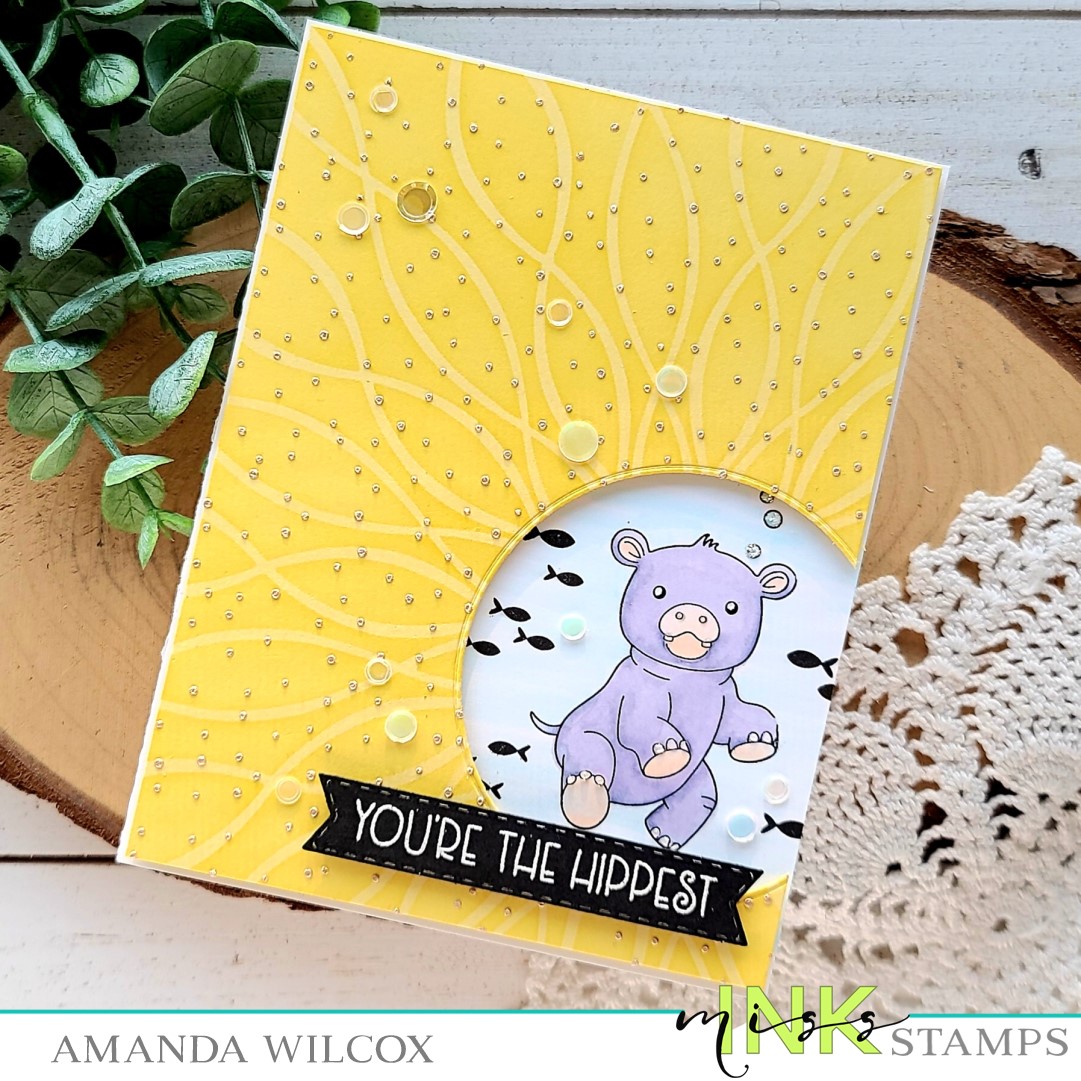
Hello again! I have a festively fall Miss Ink Stamps card to share with you today featuring the Pumpkin Spice Latte gnomie and some other products as well.

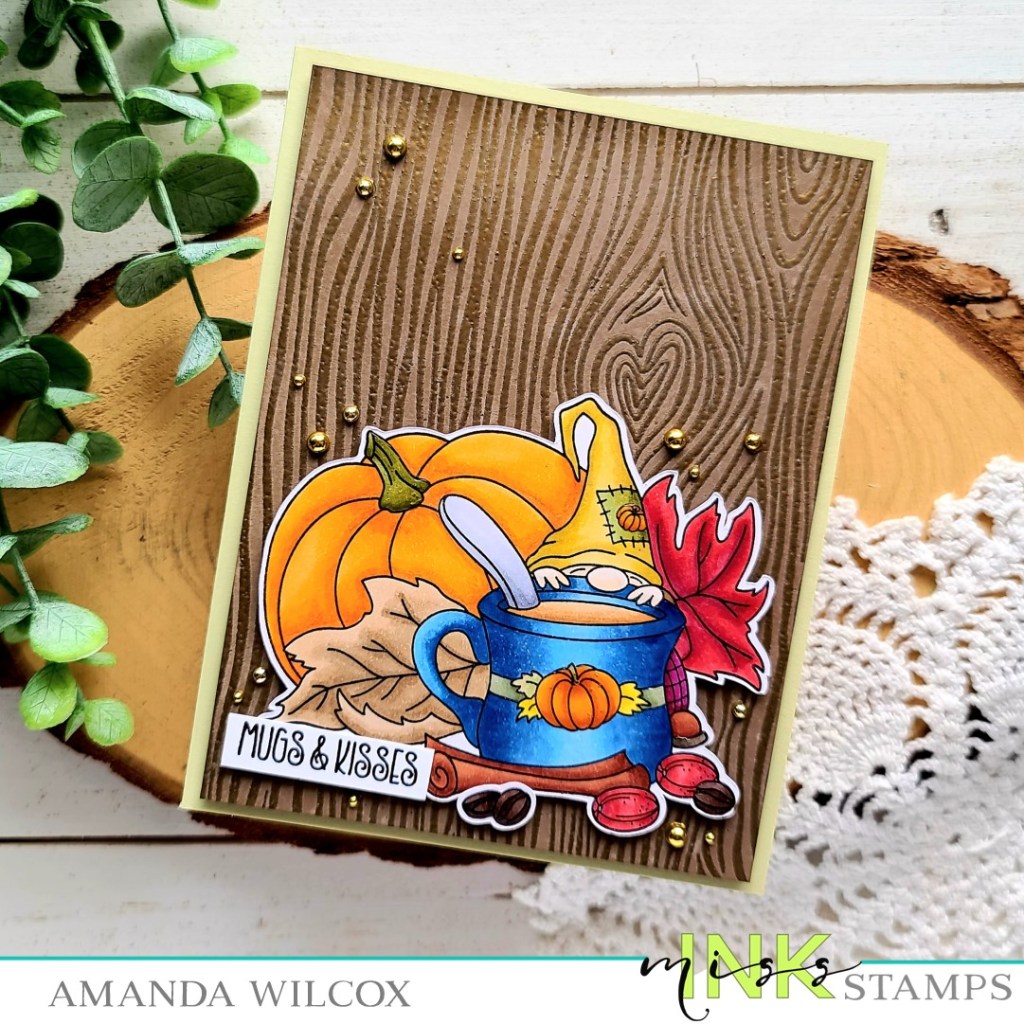
I started my card by stamping the Pumpkin Spice Latte image and colored it with my copics. Then I used the scan-n-cut to cut it out and started digging through stencils for a background. Nothing was really working for me so I switch to finding a sentiment in the Brewtiful stamp set and stumbled on the Woodgrain background stamp and thought it would give a fun feel.

I heat embossed it in gold on a piece of brown cardstock. Then I went over the whole panel with gathered twigs distress oxide ink and spritzed it with water. I trimmed it to 4×5.25 inches and added foam tape to the back. I popped it on a light green card base and then added foam tape to the back of my images.

I stamped a sentiment from Brewtiful and trimmed it into a strip adding it below the main image. Then I finished things off with a scattering of gold baubles from the Twiddler’s Nook shop and some glossy accents on things like pumpkins, accents on the mug and the coffee beans.

Products used on today’s card:
Pumpkin Spice Latte stamps
Brewtiful stamps
Woodgrain Background stamps
Twiddler’s Nook Gold Baubles
Distress Oxide Ink – gathered twigs
Copic markers
Glossy accents
Foam tape

Newton’s Nook – Your Laundry Just Got Cuter

Hello everyone! Today I’m over on the Newton’s Nook blog with a sweet little baby card. I made this for some friends expecting a baby boy very soon. It was super fun to get inky messy and come up with this cute thing in the end.

I started by stamping one of the bibs from Bitty Bibs and colored in with my copics. Then I used the Baby Bib dies to cut it out along with the lacy border and bow. I glued the layers together and switched to my background.

I wanted some flocked clouds but other texture as well so I went digging in my stencils. I came out with the Serene Stripes stencil and inked it up starting in the center, fading out, with a light teal ink. Then I spread Thermoweb Transfer Gel Blanco through the Cloudy Sky stencil. I removed the stencil and set my panel aside to dry while I cleaned up. Once my laminator was heated up I ran the panel through with a decofoil flock transfer sheet in white latte. Then I die cut the panel wtih the scalloped rectangle in the Frames & Flags die set.

To bring the focus on my cute little bib, I die cut the inverted scallop frame from the Framework die set from yellow cardstock. Then deciding on how to do my sentiment came perfectly…I die cut the tag from the same Framework set out of white cardstock and stamped half of my sentiment in green on that. Then I heat embossed congratulations on blue cardstock and cut it into a strip.

Next, I added foam tape, strips and squares to everything! You know how I like dimension. For assembly, I adhered a green panel to a white card base with liquid glue, then popped the stenciled panel in place. Next, I added the yellow frame and the bib, then my sentiment below.

To finish things off I added black glaze pen to the bear’s eyes and glossy accents to his nose. Then I came in with some acrylic bubbles from my stash and glued them across the design.

I’m so happy with how this fun card turned out! Baby and sympathy cards are not my forte so I tend to only make them when they are needed. It helps to have motivation and a recipient in mind for me.

Products used on today’s card:
Bitty Bibs stamps
Baby Bib dies
Framework dies
Frames & Flags dies
Serene Stripes stencil
Cloudy Sky stencil
Thermoweb Transfer Gel Blanco
Thermoweb Decofoil Flock – white latte
Stencil Pal
iCraft Ultrabond liquid adhesive pen
Foam strips, squares and tape
Glossy accents
Blending brush
Copic markers – YG11, YG13, B02, B00, E30, E31, E34, E44, E49, E50, E51, R00
Lawn Fawn ink – mermaid and jalapeno

I appreciate you sharing your time with me. Have a fabulous day!

Trinity Stamps – Spooky Stenciled Scene Card

Welcome! Welcome! Come in! We mustn’t lurk in doorways dear, it’s rude! Hehe! Spooky like Ursula, I’ve got quite a scene card to share with you today! I had so much fun playing with stencils and layering inks to create this card! I hope you enjoy it too!

I really wanted to play with the new Trinity Stamps dies that coordinate with last year’s Pumpkinhead layering stencil. So I started with that. I die cut the pumpkins from orange cardstock and the stems from green. Then used the stencil to add depth and dimension to them. I die cut a spooky face from one and backed it with black to make it scary instead of lit up.

Then for my background panel I inked up the October Night Sky stencil. I started with the trees on each side and then filled in the dark spooky air. For these I used dye inks and my blending buddy brushes. Then for the fog I came in with speckled egg distress oxide ink so that it sits on top of the other images a little, really giving that eerie feeling. Last, I inked up the bats with VersaFine onyx black ink because it gives a dark crisp layer and also stamped my sentiment in the same ink. This came from the Pick of the Patch stamp set.

I die cut my scene with the Modern Embossed Rectangle Stack die and adhered it to a white card base. Then I added foam squares to my pumpkins and popped them up at the bottom of my scene, which finishes off my card.

Typically I come in with shiny and sparkly things but I refrained on this card because I just love the Halloween spooky vibe it has!

Products used on today’s card:
Pumpkinhead stencils and dies
Modern Embossed Edge Rectangle dies
October Night Sky stencils
Blending buddy brushes
foam squares

I appreciate you sharing your time with me. Have a fabulous day!

Jane’s Doodles – Oh Crab!

Happy weekend everyone! I have a fun little slimline watercolor card to share with you today. Every once in a while I just get the itch to watercolor and get messy so that’s what I did for this bright, fun oops, forgot your birthday card.

To start, I stamped and heat embossed my images from Jane’s Doodles Under the Sea stamp set. Then I used my Zig Clean Color Real Brush markers and a water brush pen to watercolor all of them. When I do this, I really prefer either watercolor paper or bristol smooth. These markers blend so well on them! After they were dry I used the scan-n-cut to cut them all out.

Next I die cut a mini slimline stitched panel and inked it up with distress oxide inks – gathered twigs for the ground and salty ocean with cracked pistachio for the water. Then I stamped some other images and a sentiment on them with VersaFine onxy black ink. I find this ink sits on top of the oxides really well and dries perfectly!

Finally, I added foam squares to my images and popped them all in place. Then I used liquid glue to adhere my panel to a card base measuring 3×6 inches and created a mini slimline envelope to go with it!

I mean, at least it’s a happy looking card to apologize for messing up. Haha! Am I right?!? 😉

Products used on today’s card:
Jane’s Doodles Under the Sea stamps
Trinity Stamps Mini Slimline Card and Envelope Builder dies
Trinity Stamps Mini Slimline Stitched Panel dies
Distress Oxide Ink – gathered twigs, salty ocean, cracked pistachio
Foam squares
Scrappy tape – 1/4 inch

I appreciate you sharing your time with me. Have a fabulous day!

Pink & Main – Spooky Infinity Shaker Cards

Hello again! I have been totally immersed in everything fall and Halloween lately and just loving it! Today I’m over on the Pink & Main blog with a couple of infinity shaker cards featuring some older products paired with the new Hello Bootiful! These ghosties are just super fun so I couldn’t stop at one card.

To start my cards, I stamped the images from Hello Bootiful and colored them with my copic markers. I used the coordinating dies to cut them out. Next, I stamped and heat embossed sentiments from the set on black cardstock and used the large sentiment strip dies to cut those out too.

To create my card front, I cut a piece of black cardstock to A2 size and slipped it inside a plastic sleeve I used to store my cards in. These are a bit oversized so I lined the back with the new EZ tear tape and folded the sides in to secure them. Then I poured some of the new extra fine glitter in the top and sealed that up too.

It did that twice, once with foliage glitter and one with pumpkin spice. Then I die cut the spider web cover die with white cardstock and iridescent vellum and glued them to the front of the shakers. I thought it would be fun to add a frame so I cut 2 black reverse scalloped rectangles and glued those down next.

I added foam squares to the back of my images and sentiment strips and placed them on the shaker panels next. Then I moved on to finishing touches.

For those I added glossy accents to ghost cheeks and tongues. Then unicorn Stickles on the spider and the boo letters the ghosts are holding.

Because of the minor bulk on the back of these panels, I went ahead and used more EZ tear tape to adhere the shaker card fronts to white card bases.

After that, these super cute cards are all finished and ready to go!

Products used on today’s cards:
Hello Bootiful stamps and dies
Spider Web Cover Plate die
Reverse Scallop Rectangle dies
Large Sentiment Strip dies
Super Fine Glitter – foliage and pumpkin spice
EZ Tear Tape – 1/4 inch
EZ Squeeze liquid adhesive
Glossy accents
Stickles – unicorn
Foam squares

I appreciate you sharing your time with me. Have a fabulous day!

Twiddler’s Nook Shop – Labor Day SALE

Hey there friends!!! Just popping in to let you know that we’re having a sale this weekend in the Twiddler’s Nook Shop! We’re offering 20% off your entire purchase from today through Monday, Sept. 6. Also, if you spend over $35 you get free shipping too!

For a bit of added fun this weekend, if you type the word “dinglehopper” in the notes to the seller portion at checkout I will add an extra surprise in your package! Click HERE to head to the shop and look around.

Have a happy and safe holiday weekend! Enjoy that last bit of summer before the kiddos head back to school if they haven’t already or maybe get a little extra crafting in.

Crafty hugs my friends!

I appreciate your support more than you all know!!! Have a fabulous day!

Miss Ink Stamps – You’re the Hippest

Hello everyone! Thank you so much for stopping by today. I have a super cute, punny hippo card to share with you today featuring Miss Ink Stamps stencils and Hippo Hooray stamp set.

To create my card, I cut a white cardstock panel to A2 size and a yellow cover panel 1/8 inch smaller on both sides. This makes the yellow panel measure 4 1/8 x 5 3/8 inches. Using my hippo stamp as a guide, I cut a circle off the edge of the yellow panel.

Then I places both panels in my MISTI and lined up the stamps. I removed the yellow one and stamped my images. Then I used my copics to color the hippo and a light blue for a watery background.

Next, I sprayed my floral wave offset stencil with pixie spray and stuck it to the yellow panel. I inked it up with a brighter yellow ink and a blending brush. I removed that stencil and taped the tiny snowfall stencil down next. This time I spread champagne metallix gel from Thermoweb through it. I removed the stencil and cleaned everything up. While it was drying, I stamped and heat embossed a sentiment, then die cut it with a banner from Trinity Stamps Mini Slimline Card and Envelope Builder die set. It fits most of these sentiments perfectly!

Moving on to assembly and finishing touches, I adhered the colored panel to a white card base. Then I backed the yellow panel with foam tape and popped it in place. Last I added foam squares to the sentiment banner and added it to the bottom of the circle cut out.

For finishing touches I went over the hippo eyes with black glaze pen and when then dried I gave it a white gel pen highlight. I added glossy accents to the hippos teeth and feet. I gave the bubbles a little unicorn Stickles for fun and then finished things off with a scattering of Trinity Stamps seashore confetti mix.

Products used on today’s card:
Miss Ink Stamps Hippo Hooray stamps
Miss Ink Stamps Floral Wave Offset stencil
Miss Ink Stamps Tiny Snowfall stencil
Thermoweb pixie spray
Thermoweb Metallix Gel – champagne
Stencil pal
Ultrabond liquid adhesive
Foam squares
Trinity Stamps Embossed Edge Circle dies
Trinity Stamps Mini Slimline Card and Envelope Builder die set
Trinity Stamps Blending Buddy
Trinity Stamps Seashore confetti mix
Trinity Stamps Pick Up Stick

I appreciate you sharing your time with me. Have a fabulous day!

Trinity Stamps – You’re FA-BREW-LOUS

Hello my fa-brew-lous friends! So happy for you to join me today! I am beyond excited about how today’s card turned out. I just love the bright, spooky Halloween feel that it gives. And it was ridiculously fun to create!

I started by die cutting the elements from the new Boo Brew die set from Trinity Stamps. I just wanted to play around with the dies and see how they went together. Well, it was too fun and I immediately had an idea! So I cut 3 cups with the intention of the black one to look like a cauldron. I didn’t want the orange pumpkin mugs to look the same so I did the spider for one and the jack-o-lantern face for the other. I used liquid glue to adhere all the elements together and moved on to my background.

With all the awesome orange and black it was a no-brainer for me to make a slime green background. Lol! I inked it up with one layer of the snowfall stencil and then used Rina K Glitter Glitz Gel on the second layer. After it dried I die cut it with the largest stitched slimline die. This die gives a 1/8″ border so I adhered it to a black slimline card base for a teeny black border.

I popped each mug up with foam tape for extra visual texture. Here’s a closer look at the spidery pumpkin mug. I think this might be my favorite!

But the face on this jack-o-lantern is pretty frightfully cool too! I just love him!

Last, but not least, our ghostly cauldron is pretty awesome! To finish things off I stamped a sentiment from Fa-BREW-lous in the same green ink I used on the stencil and die cut it with a banner from the slimline scalloped panels and banners die set. To get it shorter I cut one end, realigned the banner to be shorter and then cut the other end. This totally extends the use of your dies whether they are too long or too short.

I had a blast creating this card and could seriously make these little mugs for days and days! Next up is definitely a fall rendition for pumpkin spice because that is literally what I wait for all year long!

Products used on today’s card:
Boo Brew dies
Snowfall stencil
Slimline Stitched Panel dies
Slimline Scalloped Panels and Banners dies
Blending Buddy brush
Rina K Glitz Glitter Gel – green
Stencil Pal
Foam tape
Ultra Bond liquid adhesive

I appreciate you sharing your time with me. Have a fa-brew-lous day!!!

Coffee Loving Cardmakers – Alcohol Blending Card Duo

Welcome everyone! Today I’m over on the Coffee Loving Cardmakers blog with a pair of cards featuring some great new goodies from the Trinity Stamps release that went live last Friday.

To create these cards, I started with a scrap of yupo paper and some alcohol pearl inks and did a little blending. Once that panel was dry, I cut it in half which happened to fit perfectly behind this new cafe cup die cut from Trinity! Meant to be? I think so!

I die cut an embossed edge rectangle from white cardstock and then cut the mug window from there. I used my MISTI to stamp a sentiment under each window from the Fa-brew-lous stamp set and switched over to my card bases.

While each base is created from brown cardstock, I decided to decorate them slightly different. This first one has leaves from the new Autumn Impressions stamp set stamped in dark brown ink all around the edge. Then the white panel is popped up with foam tape. I die cut a second white rectangle to put on the inside for my message too. Then I finished things off on the front with a few coffee beans from the Crafty Roast clay embellishment mix.

For my second card, I stamped the encouragement text background stamp in the same brown ink. I popped the white panel up and finished things off with a few crystal clear rhinestones.

These cards were super quick to create and could be addicting to mass produce. I love playing with alcohol ink blending and always end up with extra backgrounds which works great with this new die!

Products used on today’s cards:
Cafe Cup die
Modern Embossed Edge Rectangle dies
Fa-brew-lous stamps
Encouragement Text background stamp
Autumn Impressions stamps
Crystal Clear Rhinestones embellishment mix
Crafty Roast Clay Coffee Bean embellishment mix
Alcohol Pearl Ink – mineral and smolder
Yupo paper
Foam tape

I appreciate you sharing your time with me. Have a fa-BREW-lous day!!!

Pink & Main – Long Legged Cuties

Hey friends! I have some fun cards to share today using the leftovers of a card I made ages ago. These are all pull of Pink & Main goodness and are the result of a card I made for them back in June. Click HERE to check out the original post.

Whenever I make rainbows like these I end up with 6 rainbows in the end. Most of the time I make all of the cards immediately but this time I just tucked the rainbows away for another day. Well, that finally came because these new long legged cuties were just too perfect for the occasion. So I used the new Bearly Wait bear and the sentiments in it for a few. Aren’t they adorable?!?

But I didn’t feel like doing all bears when this adorable flamingo from Stand Tall is just as perfect and fun!

These were just a few quick cards that were fun to create and I wanted to share for more inspiration!

Products used:
Stand Tall stamps and dies
Bearly Wait stamps and dies
Rainbow dies
Let’s Polka embossing folder
Large Sentiment Strip dies
Glossy accents
Copic markers
Stickles – unicorn

I appreciate you sharing your time with me. Have a fabulous day!