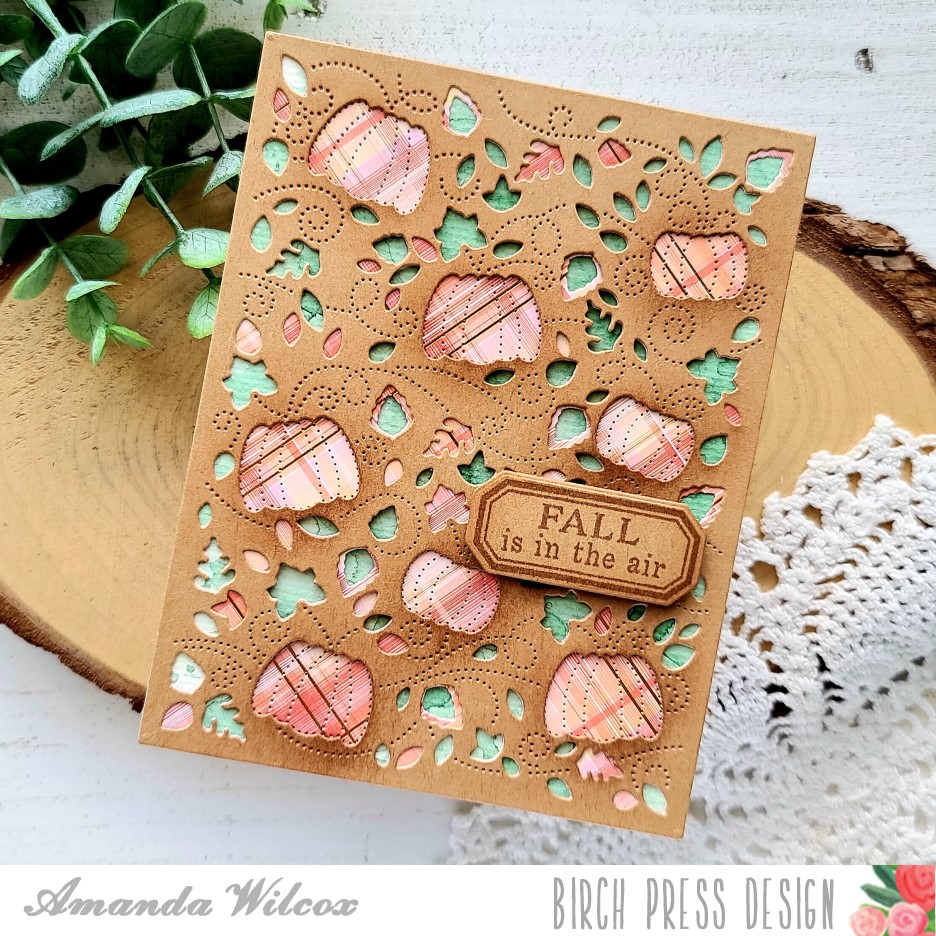
Happy weekend again my friends! I hope your day is starting off wonderfully! I’m over on the Birch Press Design blog today with a fall-themed card that just makes my heart so happy! I’m really ready for the season change and all the things that come with it like pumpkin spice, chai lattes, crisp mornings and pumpkin patch fun! Hence, today’s card theme!!!
For my layers, I did some ink smooshing on watercolor paper for the green layer. Then a fabulous foiled plaid paper for the middle. And finally, I ended with ink blending over the die cut panel on kraft cardstock for the top.
Keeping things muted, with no harsh black lines, I chose to stamp my sentiment in brown ink as well. I love the overall look of this fun card! Lots of visual texture and fabulous fall colors!
If you’d like the full step-by-step tutorial, please head over to the Birch Press Design blog HERE and check it all out!
I appreciate you sharing your time with me. Have a fabulous day!
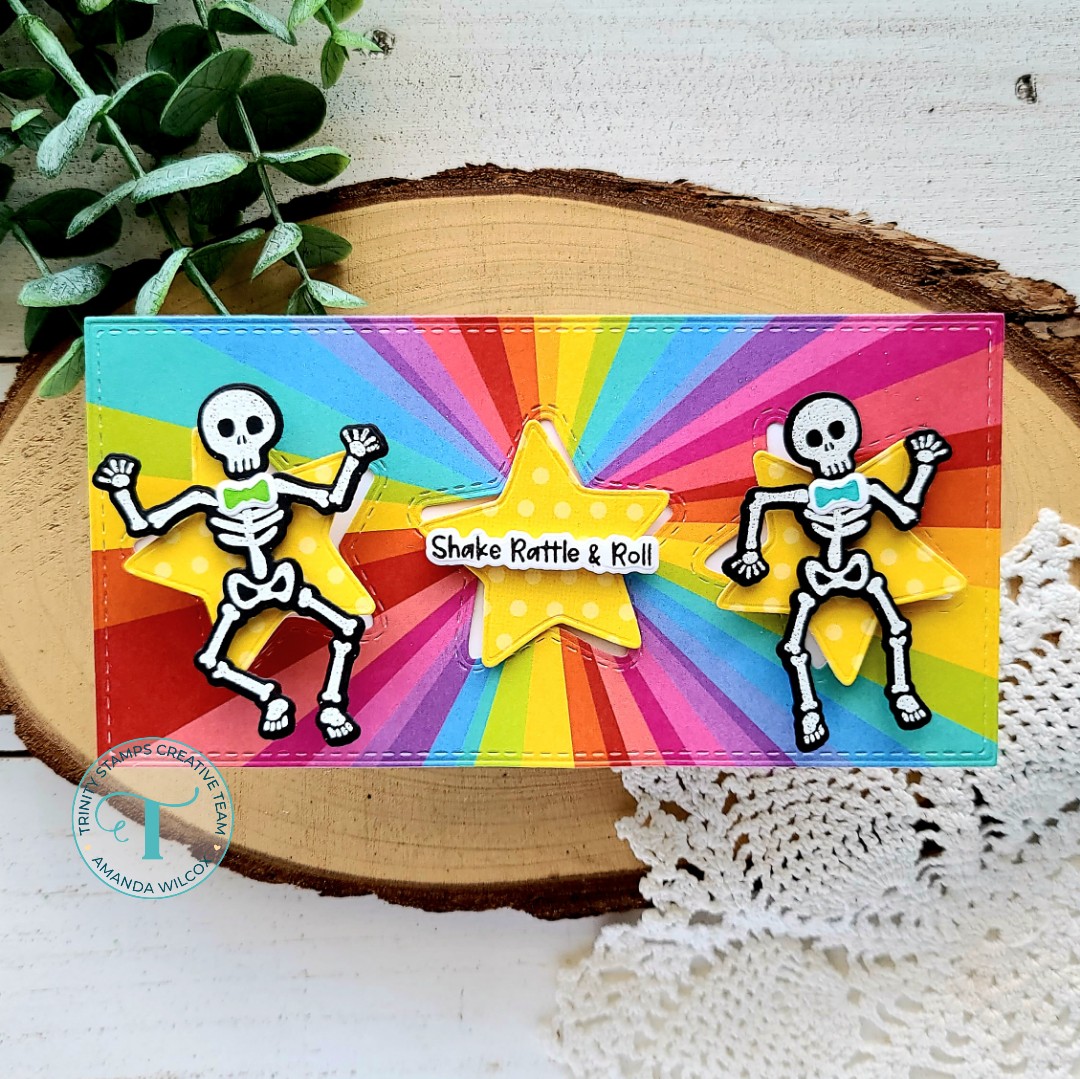
Hey friends! I’m super excited to share that the new Trinity Stamps Autumn Impressions release is available for purchase finally! It is completely slam packed with a huge amount of amazing product! Today I have a really fun card to share featuring a stamp and die set and a stand-alone die as well. Plus, it’s interactive which makes it that much more fun!
Today I started by stamping and heat embossing the super fun skeletons from Shake Your Bones on black cardstock with white embossing powder. I stamped a couple of the bows in green and teal ink, then used the coordinating dies to cut them out. I also stamped a sentiment from the set and cut it out as well.
For my background, I used a piece of patterned paper from the rainbow brights pack and cut it with the new star trio mini slimline die. I cut it a second time to get some contrasting stars from the yellow polka dot paper in the same pack.
Time to move on to our interactive elements. I adhered a strip of white cardstock along the back of the rainbow panel covering all the star openings. Then I used a small circle die to cut a hole in the far right star. I also die cut another circle slightly larger so it wouldn’t fit through the hole I made. I stacked 3 foam squares on this circle and pushed it through the hole. I removed the release paper and adhered my yellow star. Then I popped my skeleton up with foam squares too.
The far left skeleton is adhered to the star with foam squares the same way but the star is attached with and action wobbler. This gives you your shake and the right-hand skeleton gives you your roll.
Next, the middle star is attached with foam squares slightly off kilter for a little added interest and the sentiment is popped up on foam strips.
To help the rolling skeleton move freely, I added foam tape to the back of the rainbow panel and adhered the whole thing to a mini slimline card base measuring 3×6 inches.
Isn’t this a super fun, non-Halloween way to use the skeletons? I had so much fun putting this card together!
To celebrate the release today we’re having a fun hop over on Instagram. Be sure to head over there and check out all the great inspiration! Then click HERE to go to the shop and see all the amazing contained in this new release!
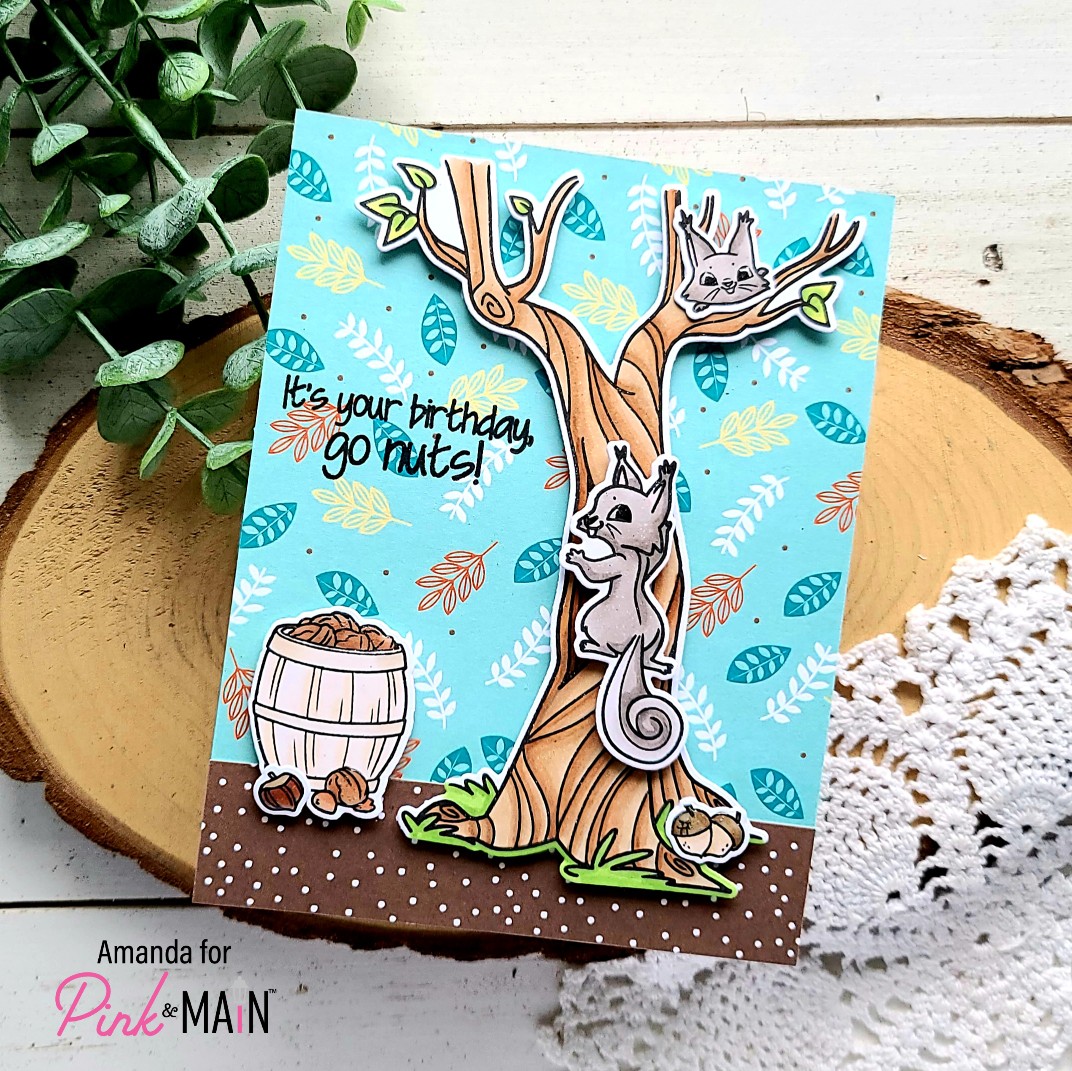
Hello again everyone! I’m over on the Pink & Main blog today with another fun fall-themed card using one of the new August release stamp sets called Oh Nuts! Since last summer when we had a teeny baby squirrel literally fall into our lives, I’ve had an extra special place for them and am drawn to all the cute squirrel things I see. So it was a no-brainer that I just had to use this new set immediately!
To start, I stamped a bundle of the images from the set and colored them all with my copic markers. I used the coordinating dies to cut them out and switched to my background. For that, I decided to play with the new Pumpkin Season paper pad. I’m absolutely swooning, in love over this entire pad! It’s the best for this fall-loving girl!
I thought the blue leafy paper was great for a sky so I cut it to A2 size and then trimmed a 1 inch strip of the brown dotted sheet for my ground. I adhered them together with my EZ Squeeze liquid adhesive and then to a white card base. Next, I added foam squares to all my images so I could decide final placement.
Using those as a guide in my MISTI, I stamped my sentiment in the open air spot on the left side of the tree. Then I removed the release paper from my images and popped them all in place.
For finishing touches on this card, I added glossy accents to the squirrel’s eyes and noses and then to all the nuts.
Don’t these cuties just look mischievous, like they’re getting away with something. I just love it! It totally cracks me up!
I hope you enjoyed today’s card and found a little inspiration to create something wonderful and share it with someone!
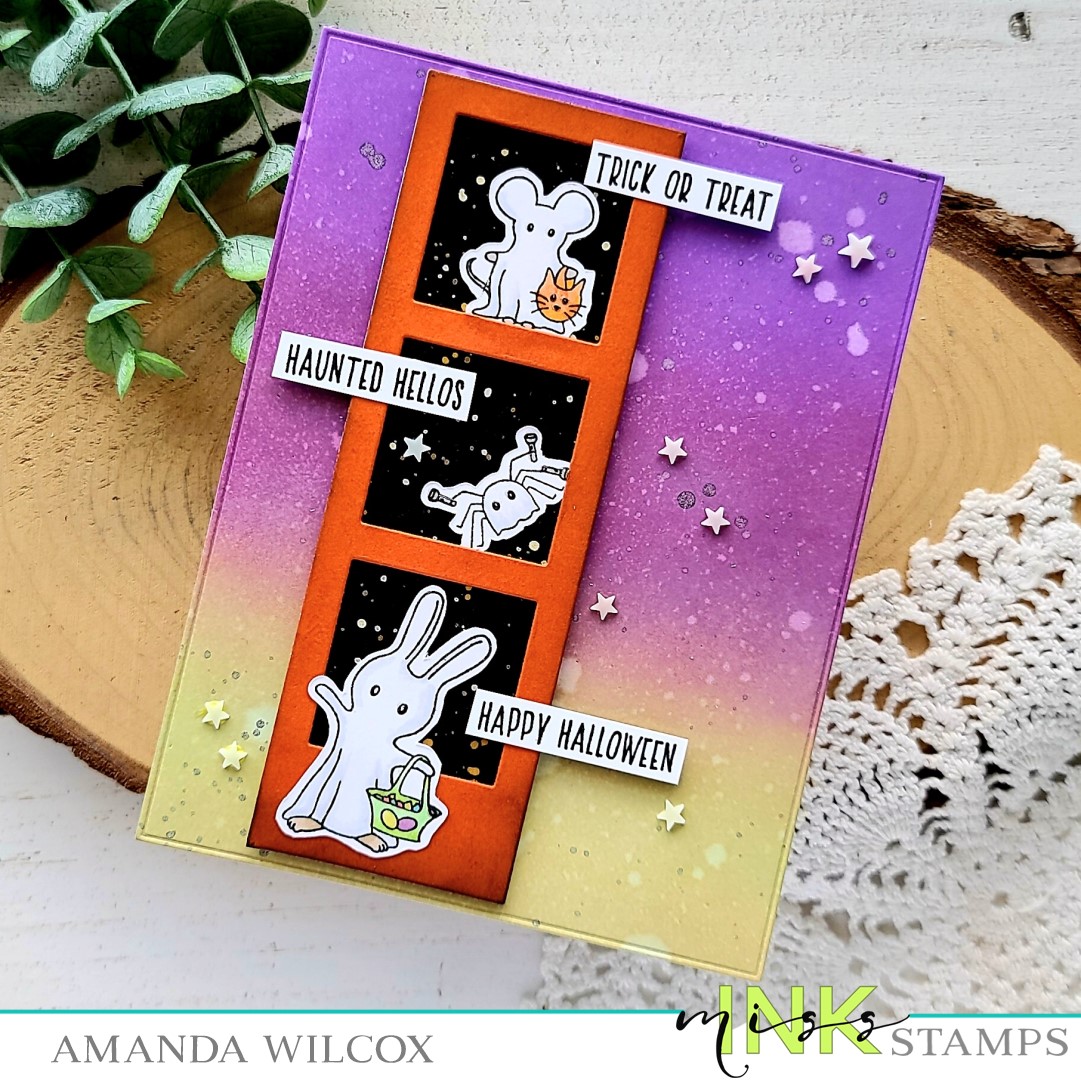
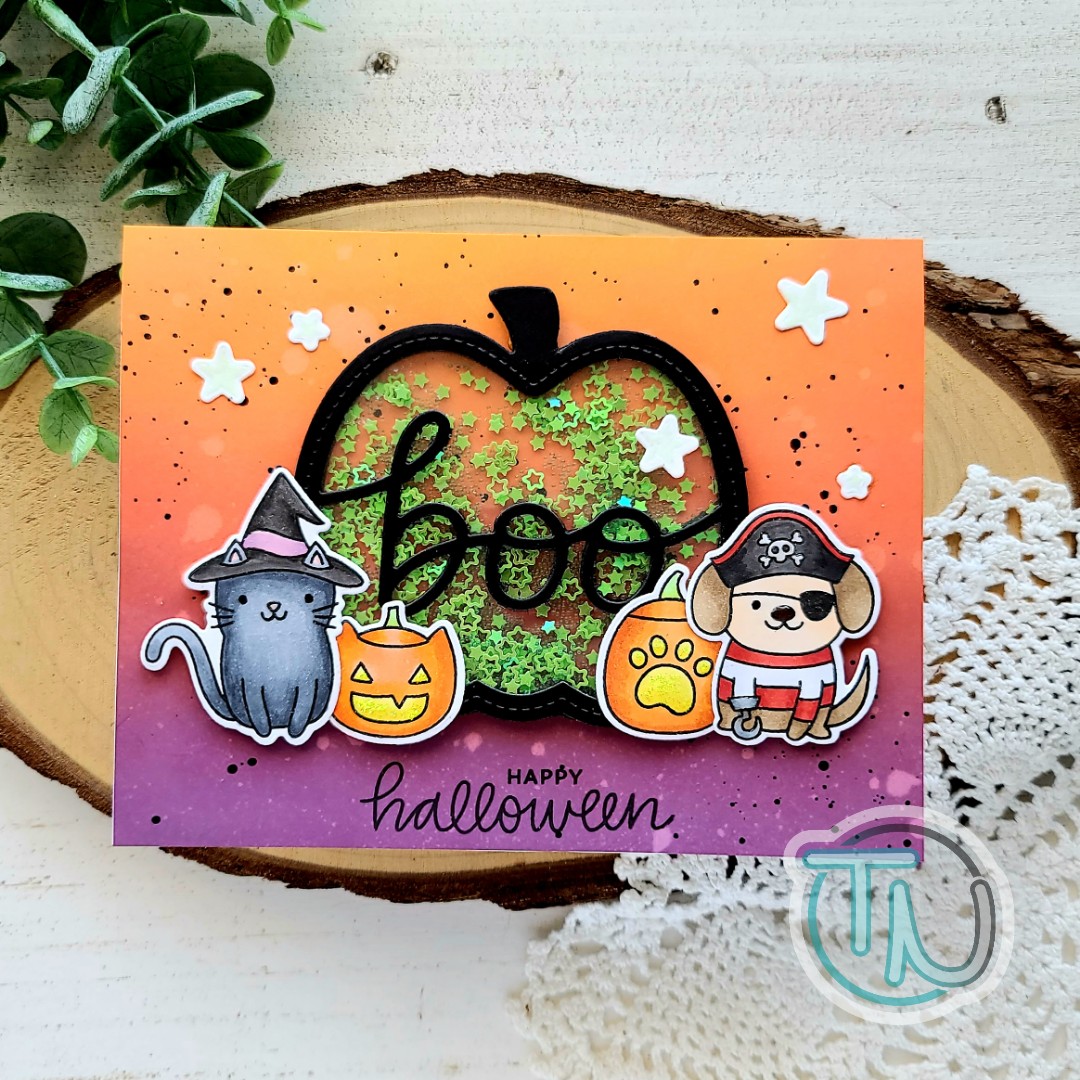
Hello everyone! I’m popping in with a fun card featuring some adorable Halloween critters from Miss Ink Stamps. I got this set last year and love it so much! I was super happy to be able to pull it out again and ink it up.
Today I’ve paired it with some great ink blending and an MFT Stamps photo booth strip die for a fun design element.
I started by stamping and coloring the critters from Boo Crew with my copic markers. Then I used the scan-n-cut to cut them out. Next, I cut the photo booth strip die from orange cardstock and inked the edges up with black soot distress ink. Then I cut a black panel slightly smaller than that and flicked some pearl and gold watercolor on it. Once it was dry I glued the two together and added my critters to it.
Next, I ink blended a panel with distress oxides in wilted violet, seedless preserves and twisted citron. Then I spritzed the panel with water and flicked some watered down black paint on it too. Once the panel was dry I die cut it with a Trinity Stamps Modern Embossed Edge Rectangle die. I adhered the panel to a card base and then popped the photo booth strip up with foam tape.
Last, I stamped a few sentiments from the set on a strip of cardstock and trimmed them apart. I used a combination of liquid glue and foam strips to adhere them in place. For finishing touches I adhered a scattering of glow-in-the-dark stars from Twiddler’s Nook and added a little glossy accents to the critters eyes.
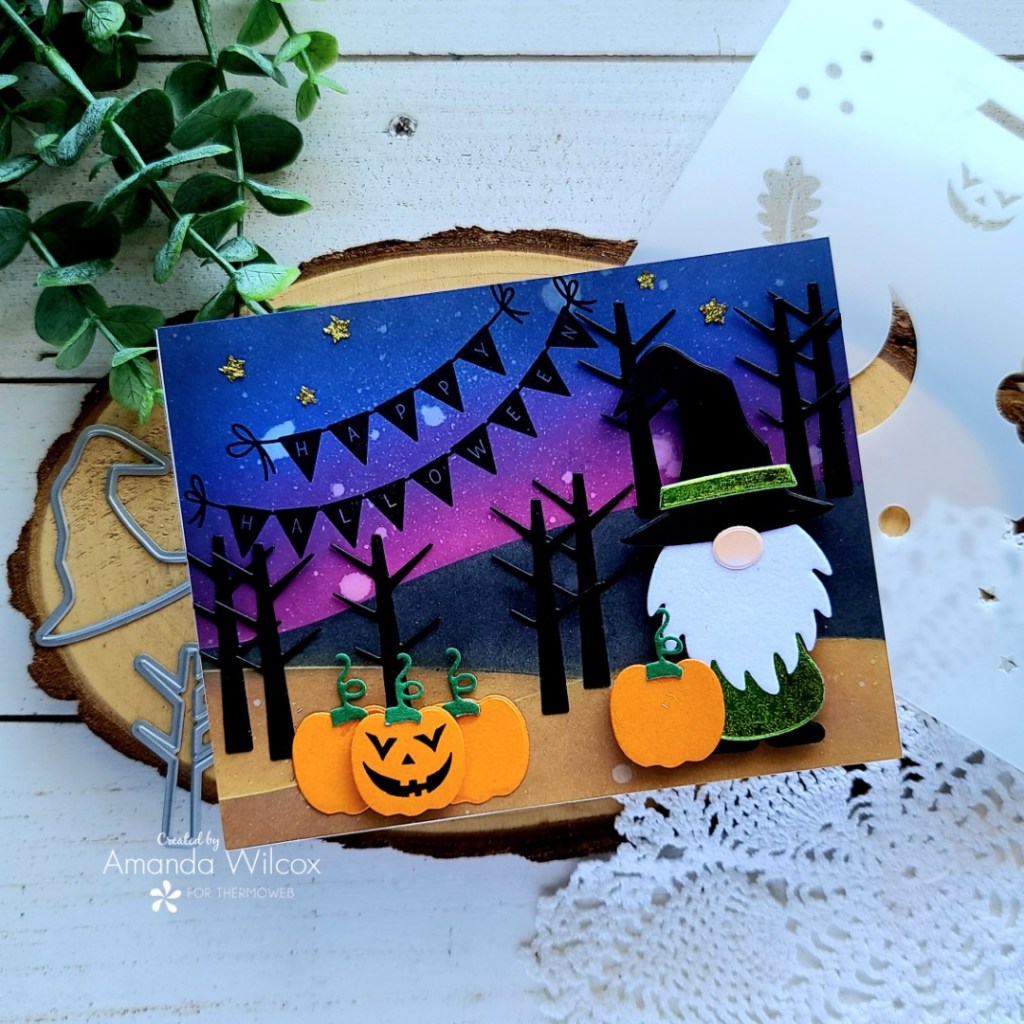
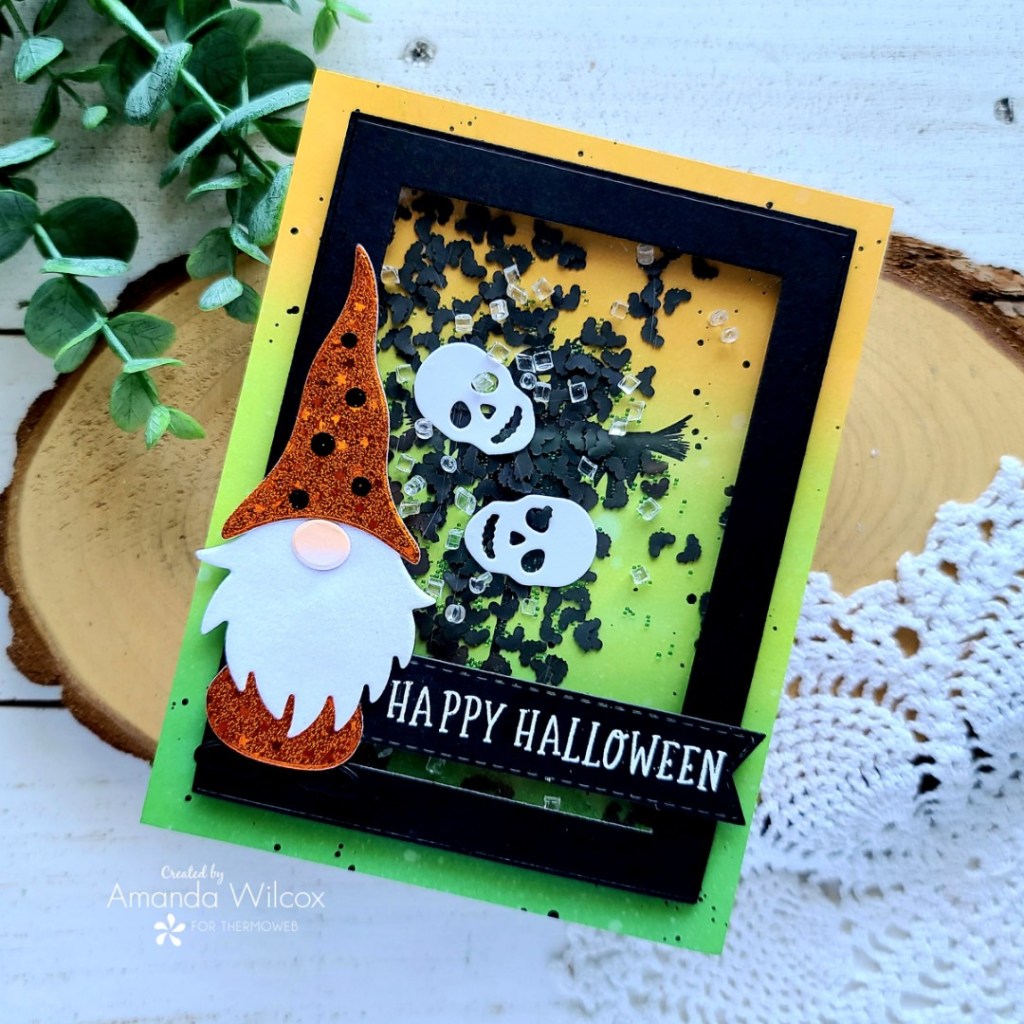
Hi everyone! Last year Thermoweb and Gina K Designs partnered to bring an absolutely adorable and fun gnome themed Christmas card kit. It’s got stamps, dies and a stencil that all coordinate together. So much fun! They were such a hit that they sold out super fast! Well, this year they’re back PLUS there’s an adorable fall add-on to go with it! I’ve got 2 Halloween cards to share over on the Thermoweb blog today.
After playing around with the gnome dies and creating two different cuties to play with. I chose one and created a fun scene card with him. Lots of ink blending, shine and texture going on here and I love it all!
For my second card I made a shaker and filled it with bats, skulls and some clear bits for added interest and shake-ability. Lol. Technical terms…
For all the details and a step-by-step tutorial for both of these cards, head over to the Thermoweb blog and check it all out.
I appreciate you sharing your time with me. Have a fabulous day!
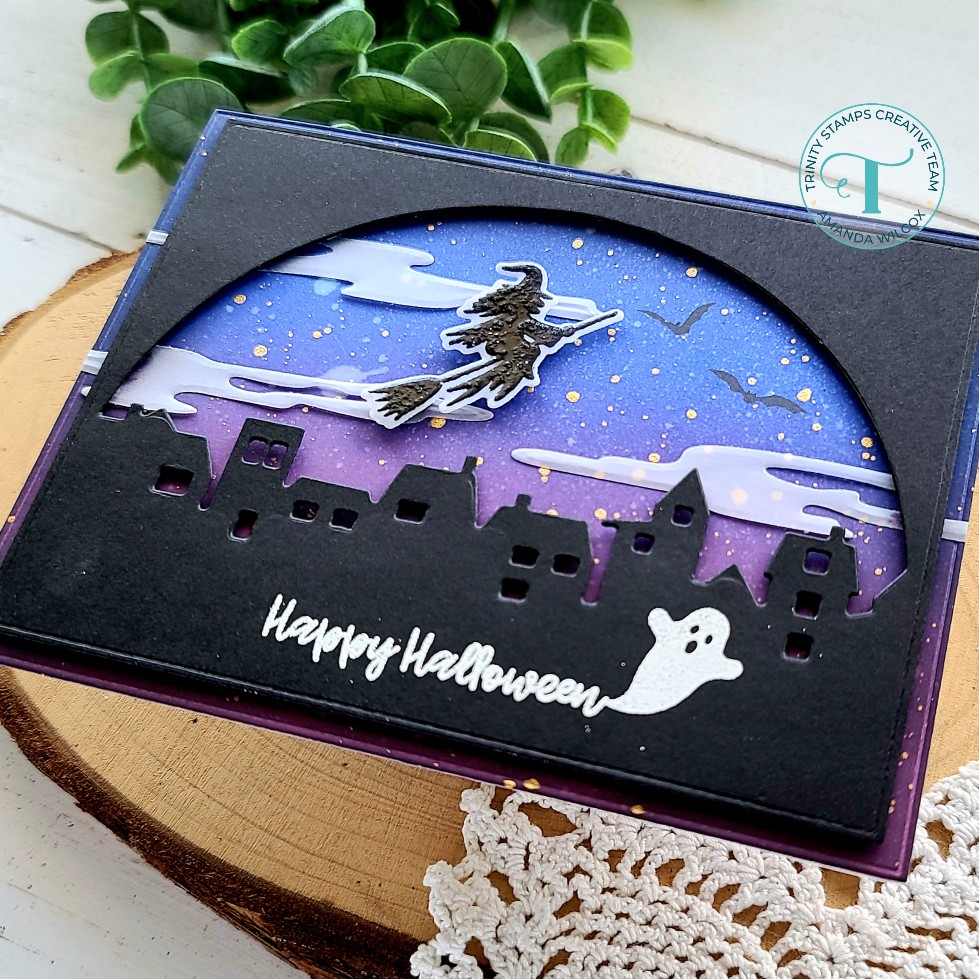
Hey friends! It’s been a minute since I’ve checked in. I hope you’re all doing well. I’m back and sharing a sneak peek today of the upcoming release from Trinity Stamps. Today I have a card featuring a new die called Moonlit Town and a stamp and die combo called Nightscape Scene Builder. These work perfectly together but also great on their own too!
For my card today, I ink blended a background night sky with distress oxide inks in seedless preserves, wilted violet and blueprint sketch. Then I went around the edge with distress ink in black soot. I spritzed the panel with water and flicked some gold watercolor on it for stars. Then I cut this panel and a black one with the embossed edge rectangle stack dies.
I stamped and heat embossed a sentiment and ghost in white. I die cut some fog from vellum which gave me the idea to heat emboss my witch on vellum so I didn’t have any stark white outlines on a card without white anywhere. To fill in the sky a bit I stamped some really cool bats off to one side and started assembling my layers.
I added foam to the back of the black panel and stuck my vellum fog bits to that, then I adhered it to the ink blended panel. Next, I popped my witch up with foam squares. Last, using liquid glue I adhered the whole thing to a white card base.
Let me just say that this new Nightscapes Scene Builder set has much more to offer than Halloween too! These cards are going to be happening year round! It’s so much fun! Stay tuned for all the goodness to come to the store this Friday, Aug. 27!
Happy weekend my friends! I’m still on the Halloween roll so I have another fun one to share with you today. It’s a shaker card featuring lots of goodies from Pretty Pink Posh – some from the new release and some older.
I started my card by die cutting the boo shaker die twice from black cardstock. Then I cut 2 pieces of vellum to fit and used liquid glue to adhere it to the back of one and front of another. Then I lined the edge with foam tape, sprinkled my shaker bits and sealed it up. This way my shaker mechanism is it’s own thing and I can move it around to decide final placement.
Next, I stamped and colored images from Halloween Pals with my copic markers and used the coordinating dies to cut them out. Then I arranged them around my Shaker mechanism and used liquid glue to adhere them where possible.
Next, I decided to ink blend my background…big shocker, I know. Haha. I used seedless preserves, ripe persimmon and carved pumpkin. I spritzed it with my distress sprayer and flicked black acrylic paint on it too. After trimming the ink blended panel down, I adhered it to an A2 card base and adhered my shaker and images with a combination of foam squares and liquid glue.
Full transparency…didn’t like how plain it was and wanted another sentiment so I carefully used my MISTI and stamped Happy Halloween below the shaker. Then I stamped and heat embossed the stars in the set with glow in the dark embossing powder, die cut and adhered them with liquid glue as well. This made me super happy!
I went and hid in my closet with my card and boy did those stars glow! It was super cool and made me happy. After this was a success I went back to the craft room for finishing touches on my card.
I used black glaze pen on the critter eyes and glossy accents on their noses, hats and the pup’s hook. Then I used Stickles on the pumpkin openings for glitzy light coming through their jack-o-lanterns.
I had so much fun creating this card and hope you liked it too!
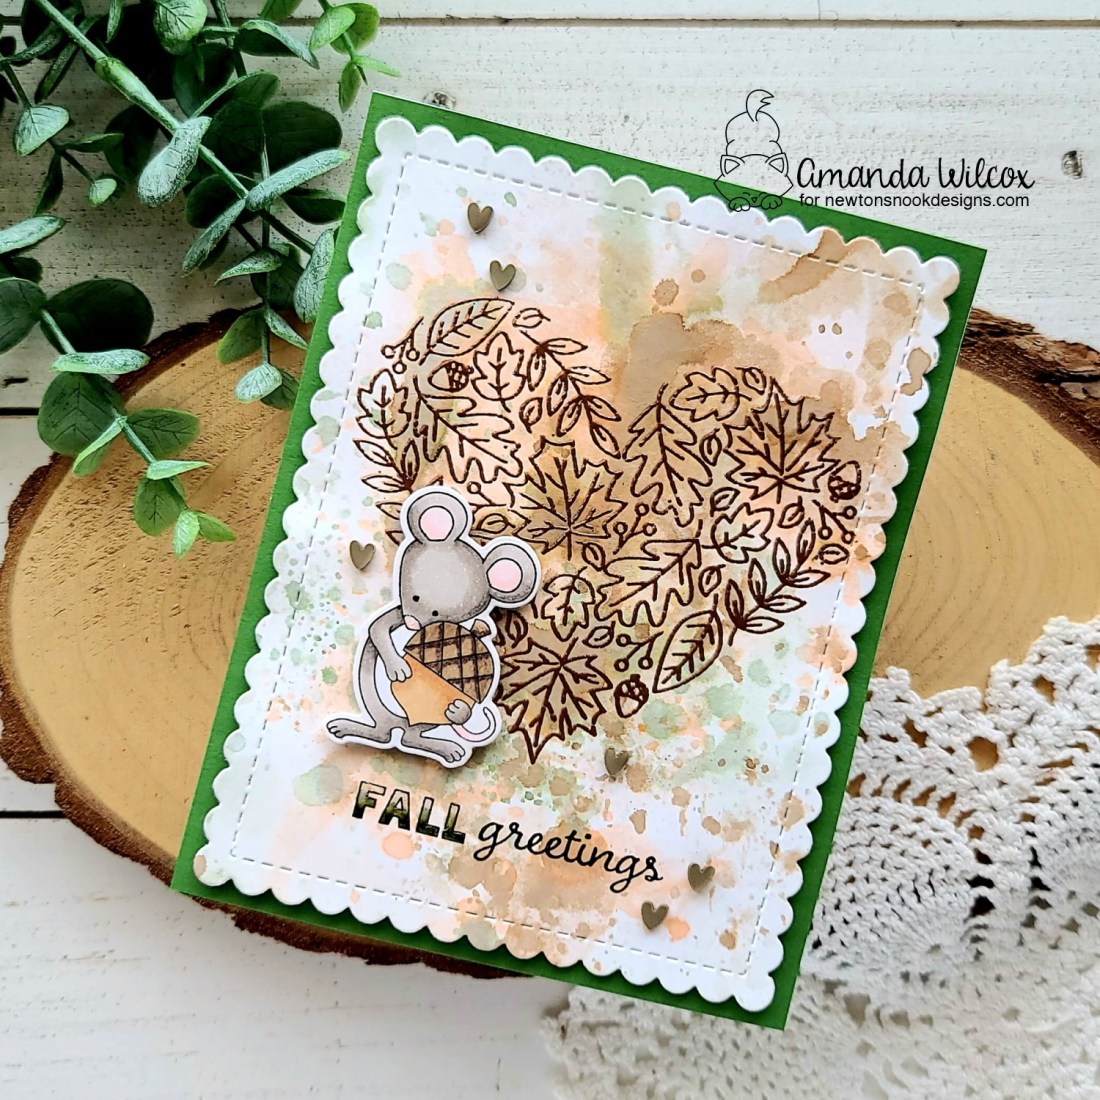
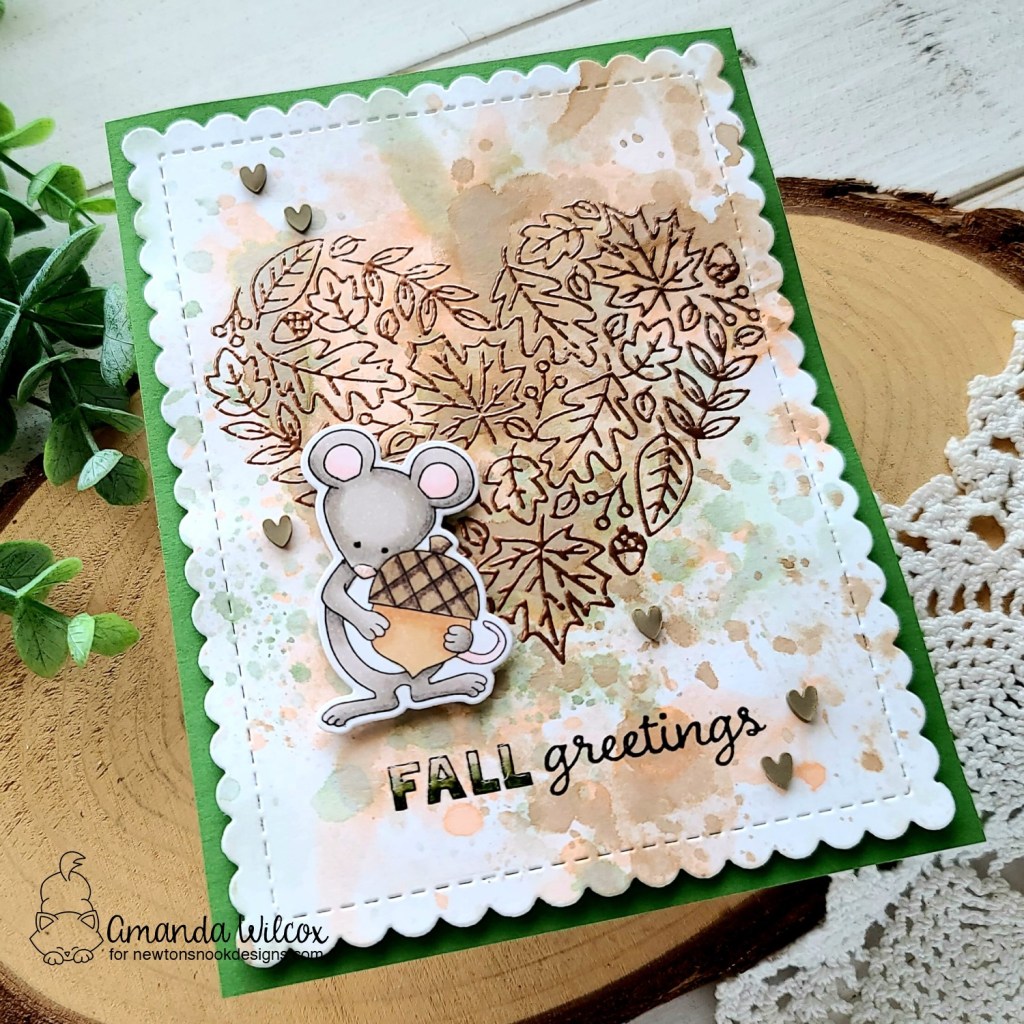
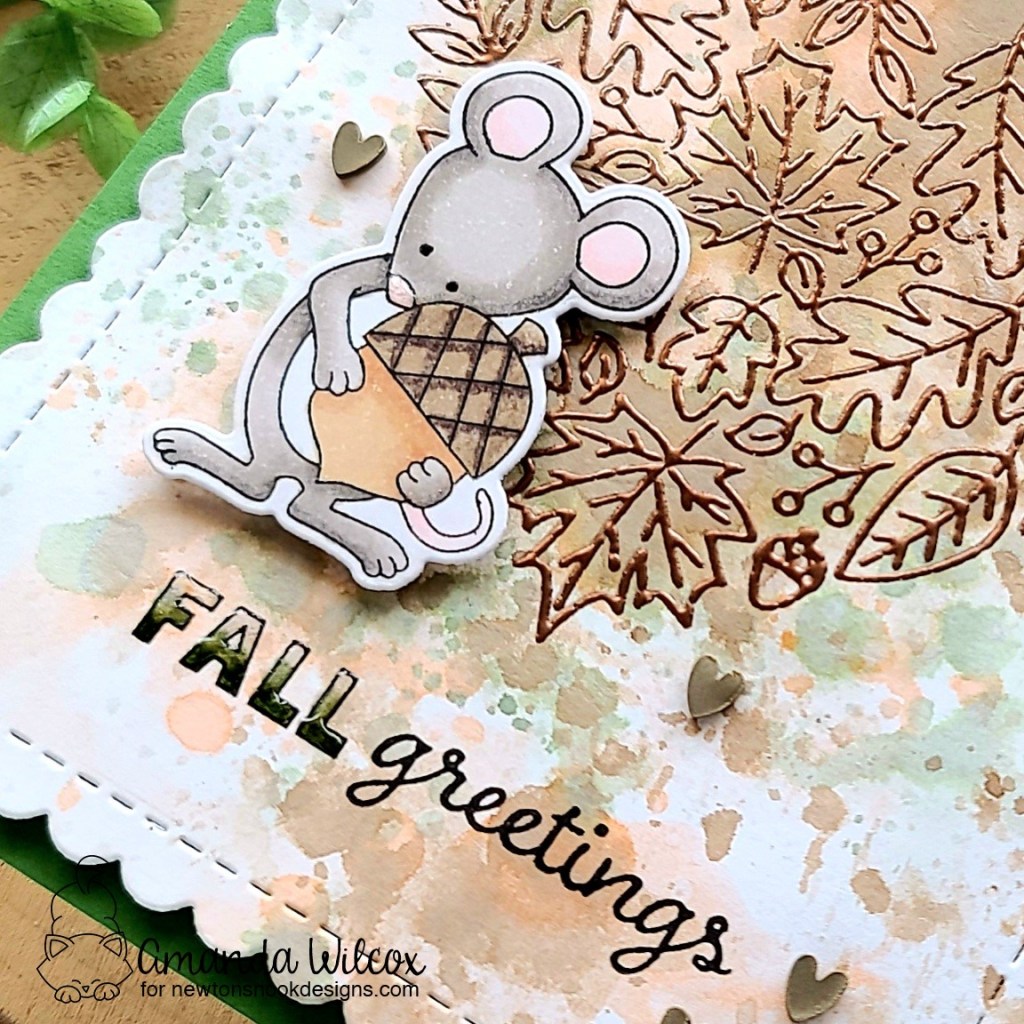
Hey, hey my fabulous friends!!! If you haven’t already, head over and pick up your fabulous fall goodies from the Newton’s Nook release! It’s available for purchase today! YIPPEE!!!
When I was playing around, creating backgrounds for the release, I ended up with an extra and couldn’t resist making another card with it to share with you today!
For this background, I did some ink smooshing with Tombow Dual Brush markers on a white panel. I chose brown, orange and green and made sure to heat the panel in between for that awesome layering effect. If you don’t dry it in between, your colors can get muddy. But if you do, they layer on top of each other and give a much more impactful look.
When the panel was completely dry I die cut it with the scalloped rectangle in Frames & Flags die set. Then I stamped the Heartfelt Fall stamp in Versamark ink and heat embossed it with copper embossing powder.
Next, I stamped another mouse from Autumn Mice and colored him with my copic markers. Then, I used the coordinating dies to cut him out. For this card I decided to stamp my sentiment on the background panel and use Tombow markers to color the word “fall” in kind of an ombre effect.
For assembly, I adhered a green cardstock panel to a white card base, then popped the background panel up with foam tape. Next, I popped the mouse up with foam squares.
For finishing touches I added glossy accents to the word “fall” on the sentiment, the mouse’s nose and black glaze pen to his eyes. Last, I glued a scattering of brown clay heart embellishments around the design.
Voila! This sweet card is all finished and ready for fall to get here so it can be mailed out!
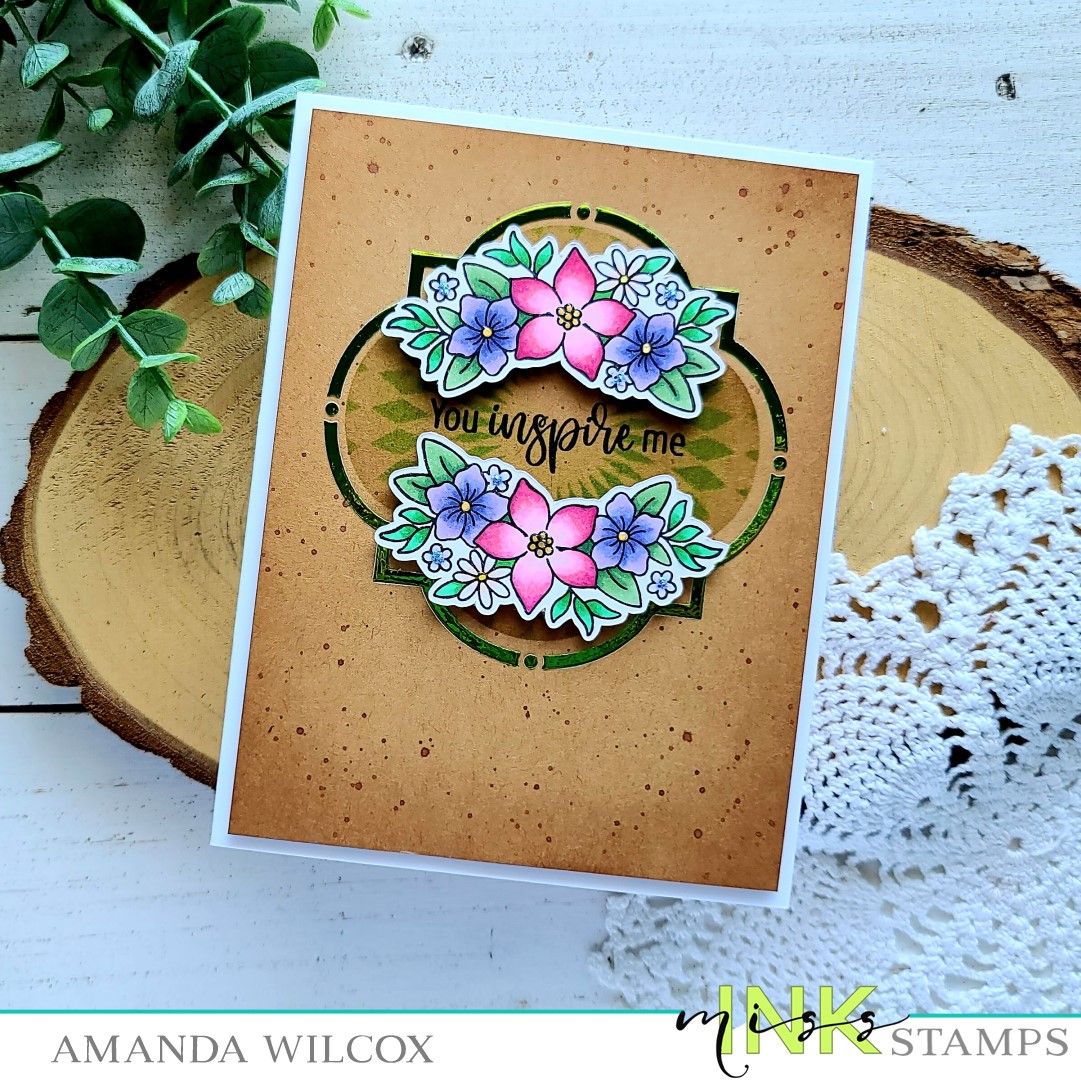
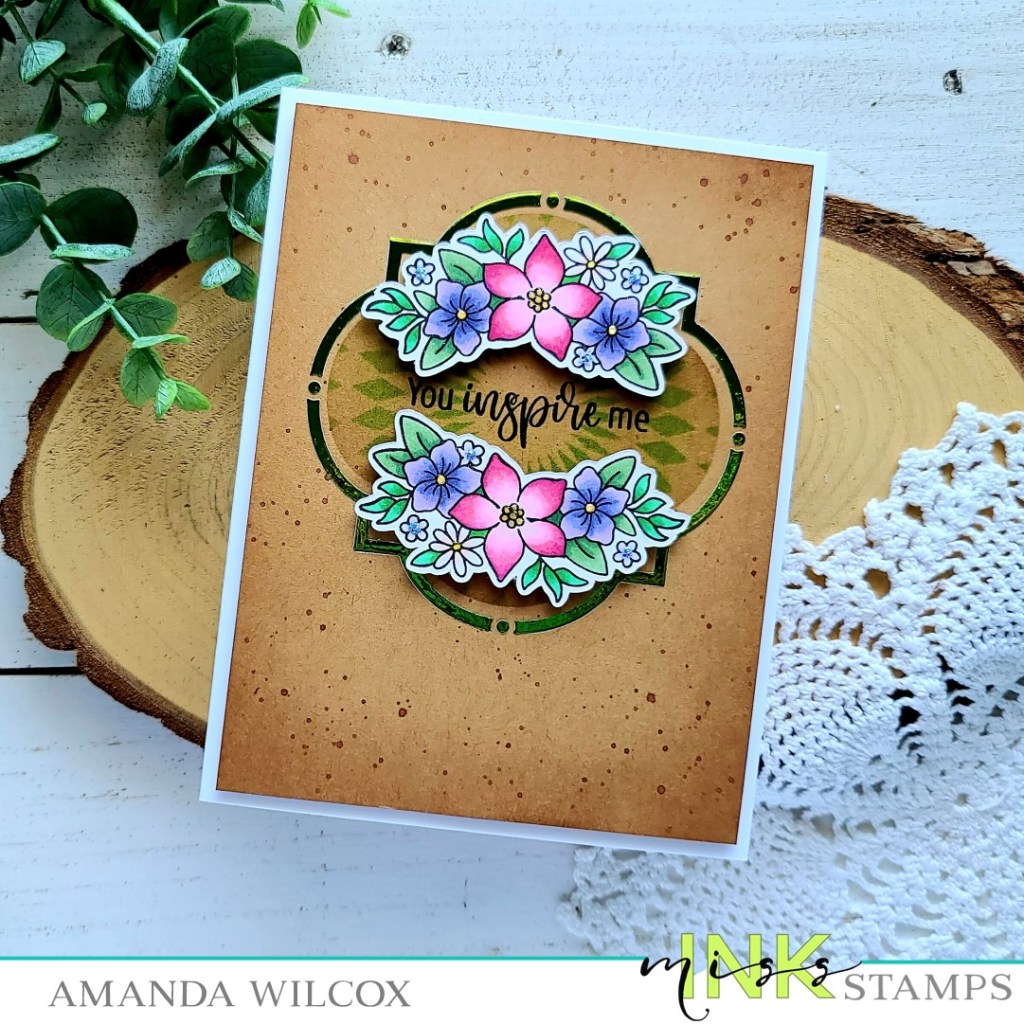
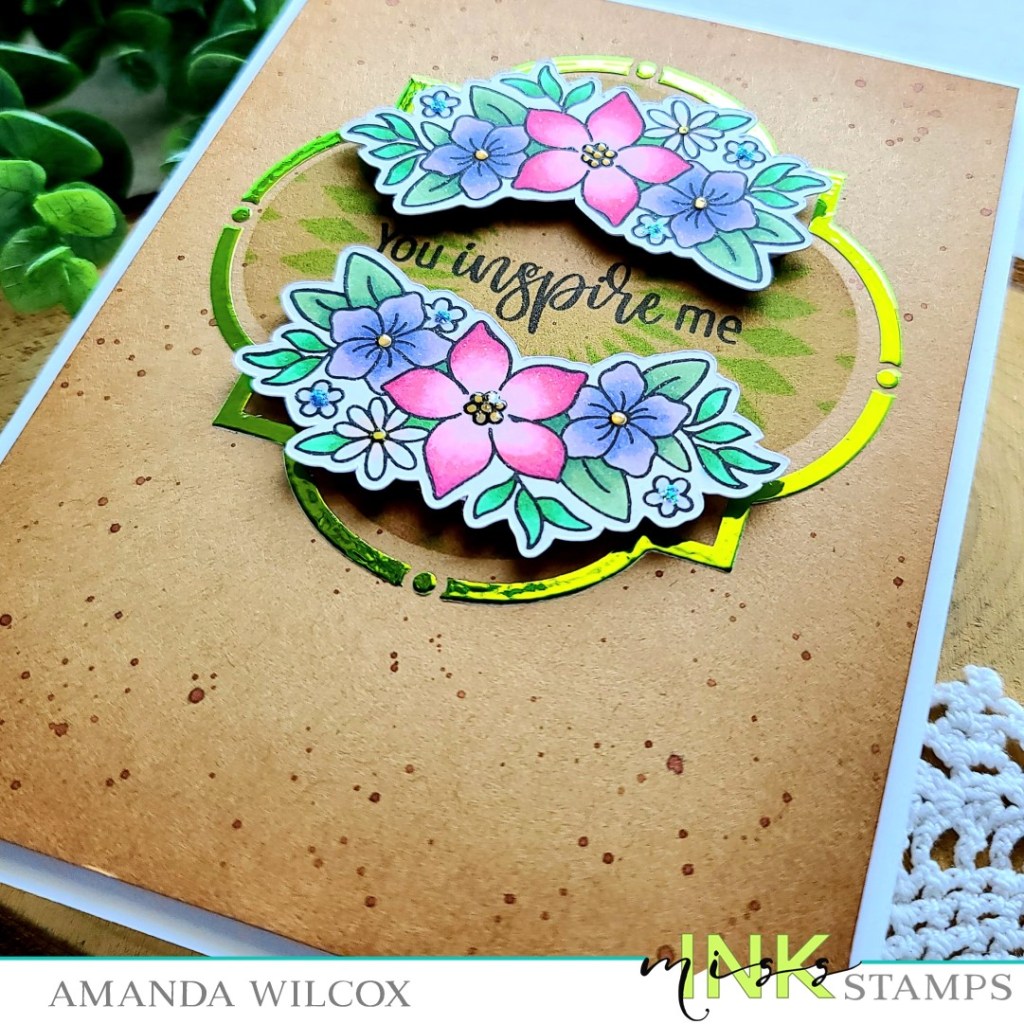
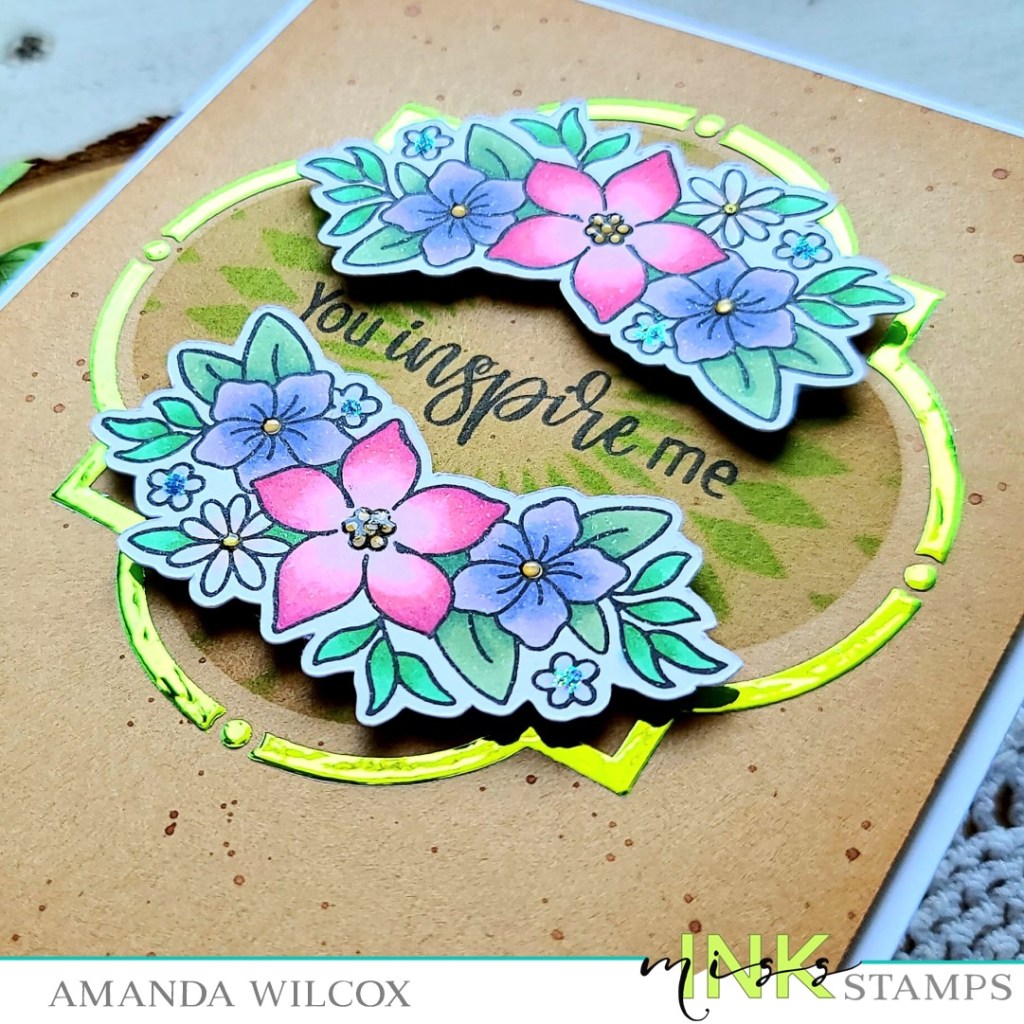
Welcome back friends! I’m here to share a card featuring stamps and stencils from Miss Ink Stamps today. I got a little inky and also did a little foiling for some bling on today’s card. Let’s jump right in.
I started by choosing one of the floral images from the new Blooming Brushes stamp set. I stamped it twice, colored it with my copic markers and used the scan-n-cut to cut them out. Next, I cut a kraft panel to 4×5.25 inches and centered up the smaller Ins & Outs Quatrefoil stencil on it. I inked it up using a blending brush and brown ink. Then I centered the Circular Harlequin stencil and used a green ink on that. I removed both stencils and then taped down the Quatrefoil frame stencil in place. I spread Thermoweb transfer gel blanco on that and set it aside to dry.
Once it was dry, I heated up my laminator and ran it through with grass green decofoil. After removing that I decided to add texture to the panel so I flicked watered down brown ink all over. Once that was dry I used the floral images as a guide and stamped my sentiment in the center. Then I added foam tape to the back and adhered it to a white card base.
Next, I added the floral images with foam squares and moved on to simple finishing touches. For that I just used glossy accents on the flower centers with the exception of the small blue ones. For those I added some waterfall Stickles.
I can hardly believe we are actually to the final day of reveals for the Newton’s Nook August release! It’s been so fun sharing creations with you and I hope you’ve enjoyed it too! Today we have 2 more stamp sets to reveal and I have a card to share for each.
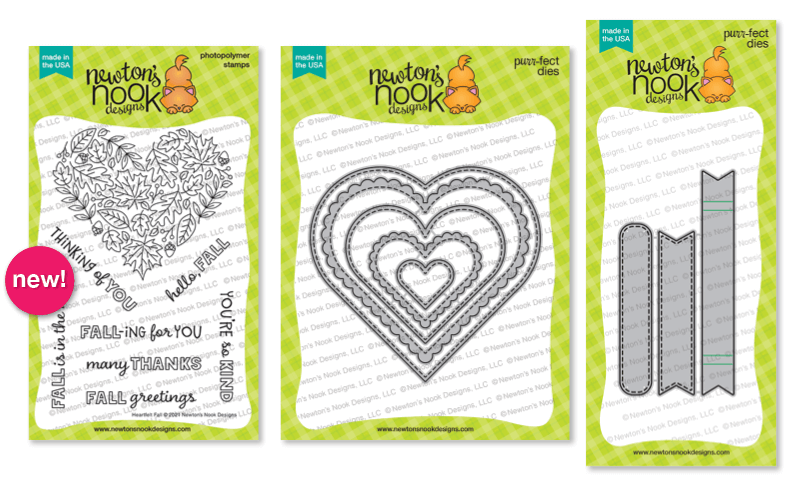
Heartfelt Fall stamps
Signs of Fall stamps and dies
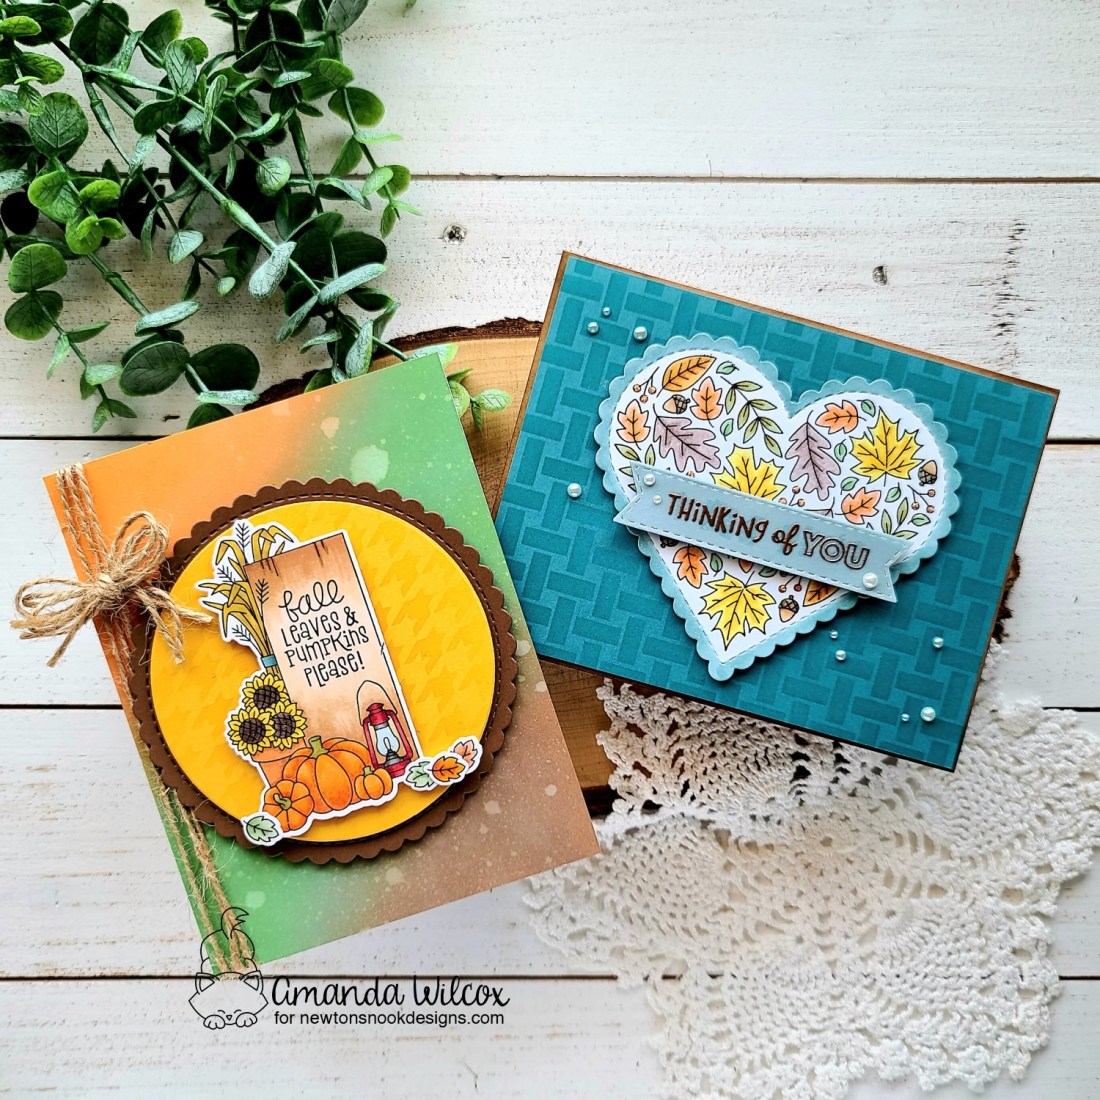
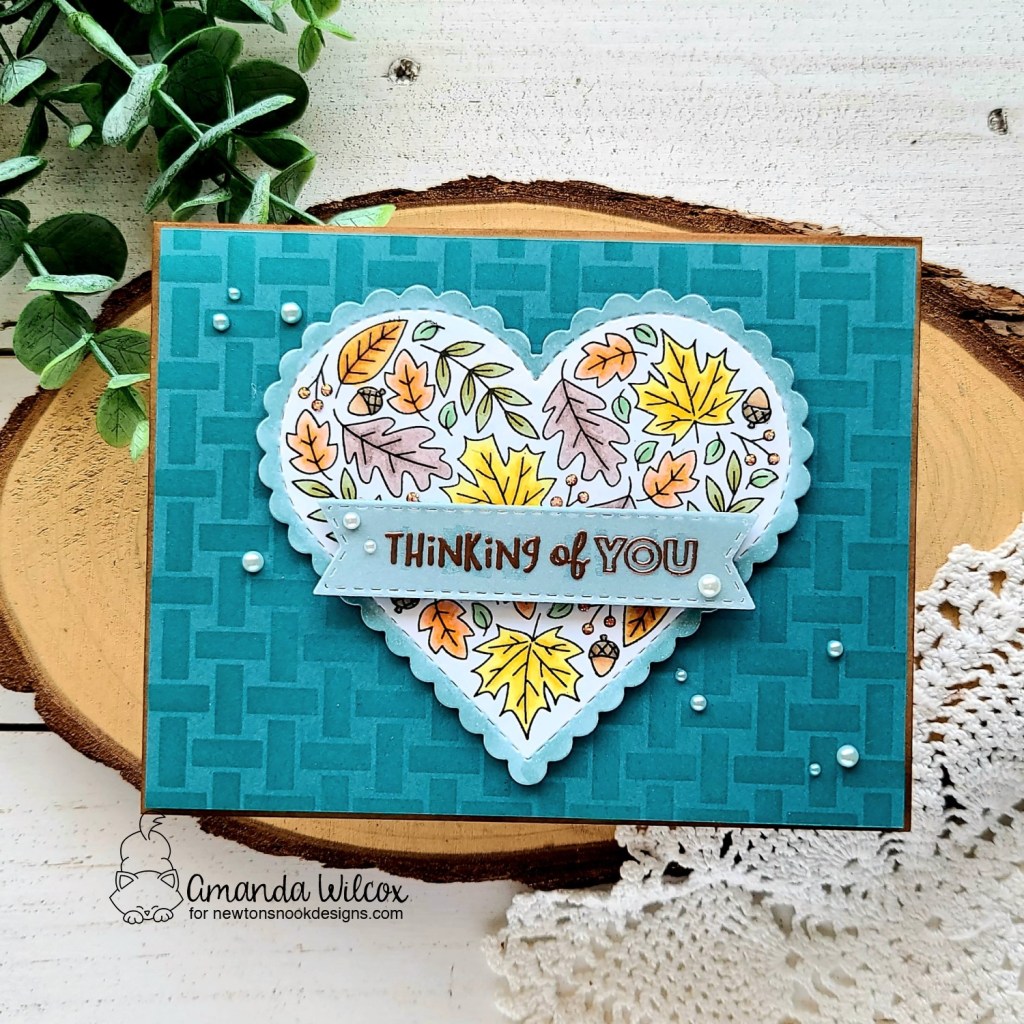
First I’m going to share my card featuring the Heartfelt Fall stamp set. I shared a heat embossing technique with you for these busy background stamps so today I wanted to share a version where I colored the whole thing with my copic markers. It was so relaxing and colored up very quickly considering the size of the images.
After I colored the leaves, I die cut the image with the scalloped heart in the Heart Frames die set. Then I went around the edge with a teal marker to help the leaves pop a little more. Next, I took a darker teal panel and trimmed it to 4 1/8×5 3/8 so it left a really thin border of the card base but not much. I inked this panel up with a darker teal ink and the Basketweave stencil. This panel is popped up with foam tape and so is the heart.
For the sentiment, I die cut a vellum banner from the Banner Trio set and heat embossed the sentiment in copper. Then I cut another banner from the same teal cardstock as the stenciled panel. I carefully hid adhesive behind the heat embossing to adhere the 2 together and then added them to the heart with foam squares. For finishing touches on this card, I added a scattering of pearls from my stash across the design.
For my final card I am using the awesome Signs of Fall stamp set. Today I’m using it on its own to really make it the focal point but I have plans to definitely combine it with other great Newton fall images very soon!
I stamped and colored the images in the set with my copic markers and used the coordinating dies to cut them out. Then I placed the sign image back in my MISTI and stamped a sentiment on the sign. It’s so cool how all of these sentiments fit in the sign or you could use them out of it too!
Next, I die cut a scalloped circle from Circle frames from brown cardstock and another circle from yellow. Then I did some tone-on-tone inking with the Houdstooth stencil and adhered my layers together with foam tape.
For the background panel, I ink blended distress oxides on a white panel in gathered twigs, mowed lawn and carved pumpkin. I spritzed it with water and adhered it to a card base. I wrapped twine around the left side and tied it in a bow. Then I popped the focal circle in the center of the card front.
For finishing touches I added glossy accents to the flower centers, pumpkin stems and glass on the lantern. This card is the epitome of fall to me. I just love the colors and the image and it makes me crave crisp mornings and crunchy leaves!
Would you like to win the “Signs of Fall” or the “Fall Roundabout” Stamp Set? We will choose ONE lucky winner for each stamp set!
Here’s how to win: Comment on the NND blog and Design Team blogs (see list below)! The winner will be chosen at random from the collective reveal posts. Make sure to check out each of their blogs and comment for your chance to win. You will not know which blog has been chosen so the more you comment on the better your chances are of winning! You have until Thursday August 19th at 9pm ET to comment — winners will be announced on the blog post on Friday, August 20th.
Check out all the awesome Design Team Blogs below to enter: