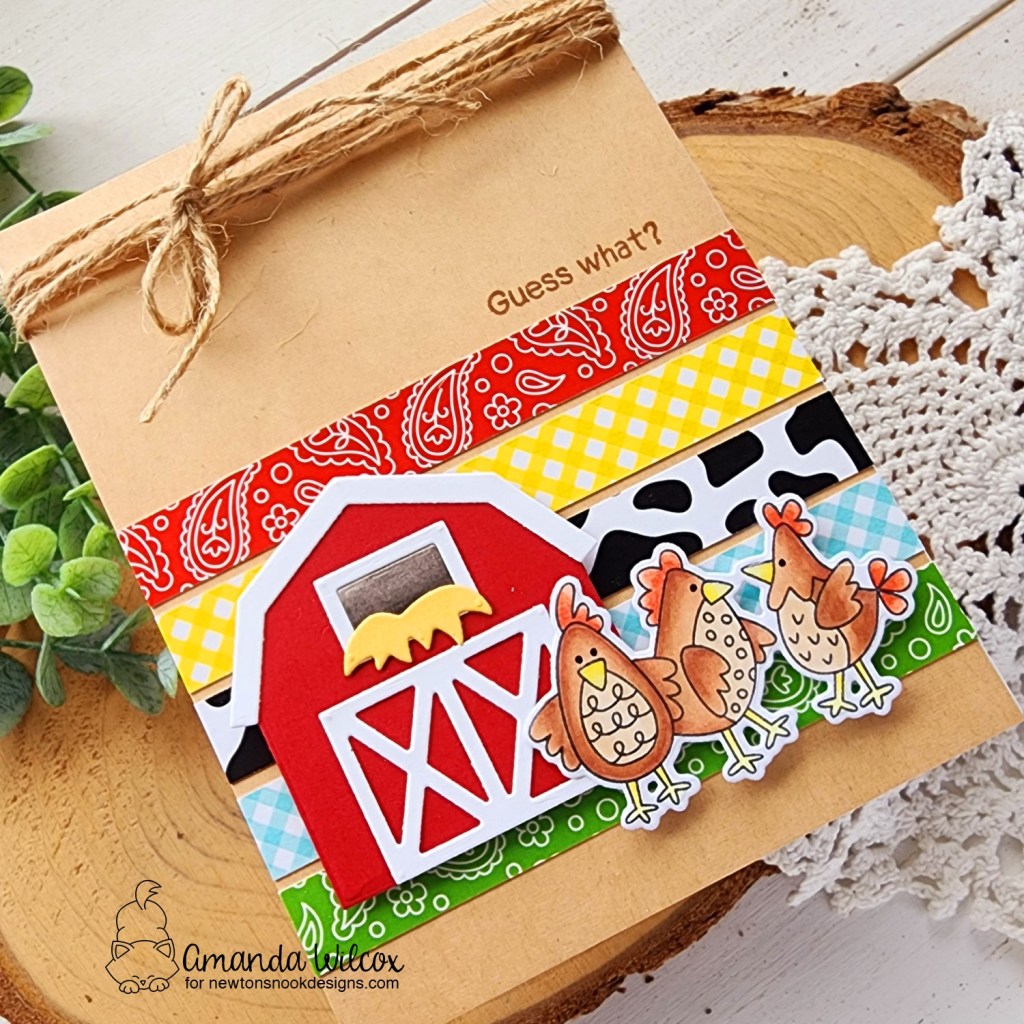
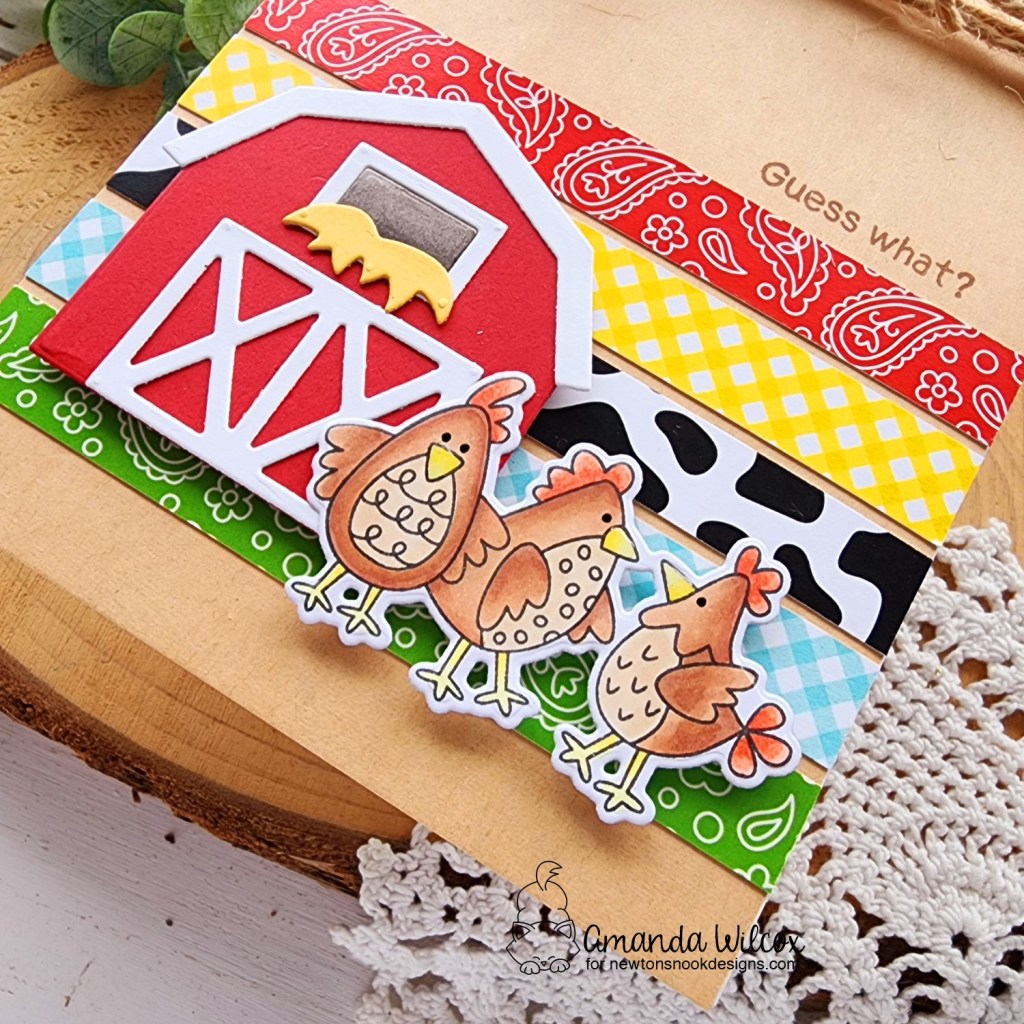
Hello everyone! I’m over on the Newton’s Nook blog today and I just couldn’t put the cute new farm goodies away just yet. But I also pulled out an older and REALLY fun farm set to go with it too!
For this card, I created another cute barn, using liquid glue to adhere all the details to the main barn piece. Then I cut a bunch of strips from the new Farmyard paper pad, gluing them to a piece of kraft cardstock.
I pulled out Cluck and chose one of the image to pair with my barn. After coloring it with copic markers, I used the coordinating die to cut it out. I added the barn and chickens with foam squares on the kraft panel. Then I chose the opener to my sentiment and stamped it above the top strip in brown ink.
I glued the panel to a white card base and wrapped jute twine around the top for some texture and interest. Then I popped it in my Misti and stamped on the inside of my card too! If you didn’t laugh at this, you must have a much more sophisticated humor level than I do because I get a kick out of this every time I look at it!
Okay, back to the front for finishing touches. We kept those simple with black gel pen on the eyes and glossy accents on the chickens’ beaks.
Is this not a super silly and fun card to send?!? I love it!
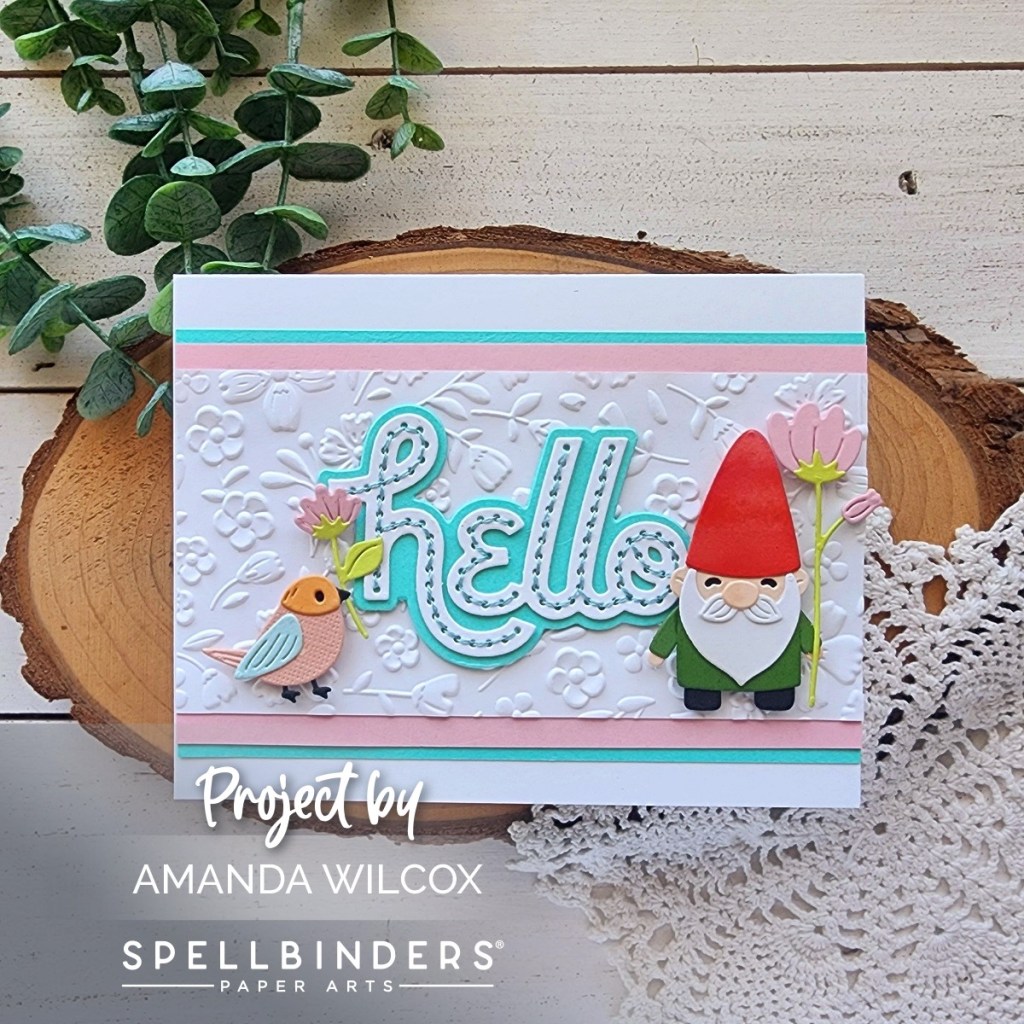
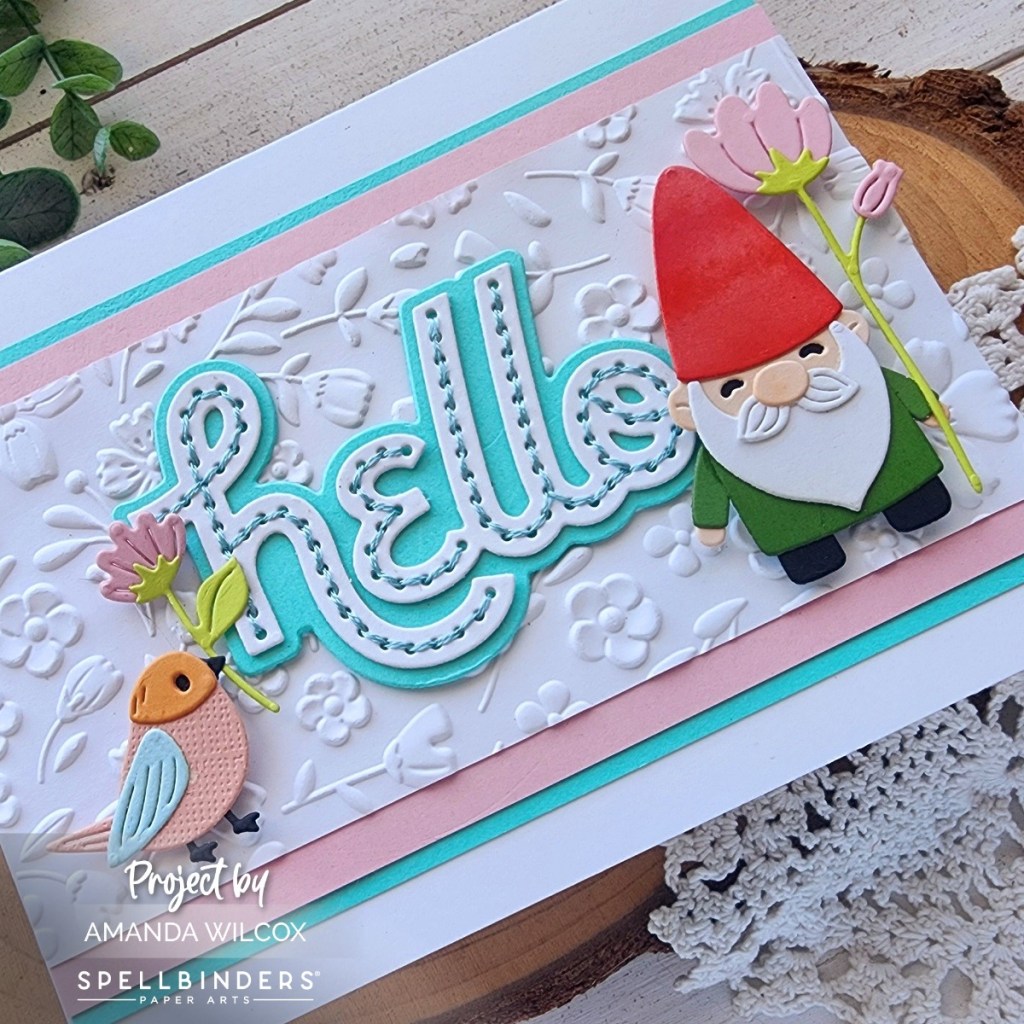
Hey friends, have you seen the new Spellbinders Out and About release? It’s an absolutely adorable collection of small die sets that go perfectly with the new Scout Die Cutting Machine! Today I have a card using a couple of the new dies that was SO FUN to put together!
This card features the Garden Buddies and Stitched Hello sets. Garden Buddies is going to be so much fun to create in all the different color combos, I’m sure of it! And the Stitched Hello is going to be awesome with and without stitching which is great when you don’t have as much time on your hands.
Have you checked out the adorable new Scout Die Cutting Machine yet too? It’s the perfect size for these small projects and for taking on the go with you! I’m not usually one for having all the versions of something but this was so inviting to me with the prospect of crafting on the go again. I used to pack up once a month and craft with a friend but it became cumbersome. This die cutter is a game changer for that. Or even moving from my craft room to the downstairs to hang out with my family.
Whether you’re interested in the Scout machine or not, please check out the Out and About Collection! It’s SO MUCH FUN! I’ll be back later in the week with another project using two more die sets from this collection that you’re going to LOVE!
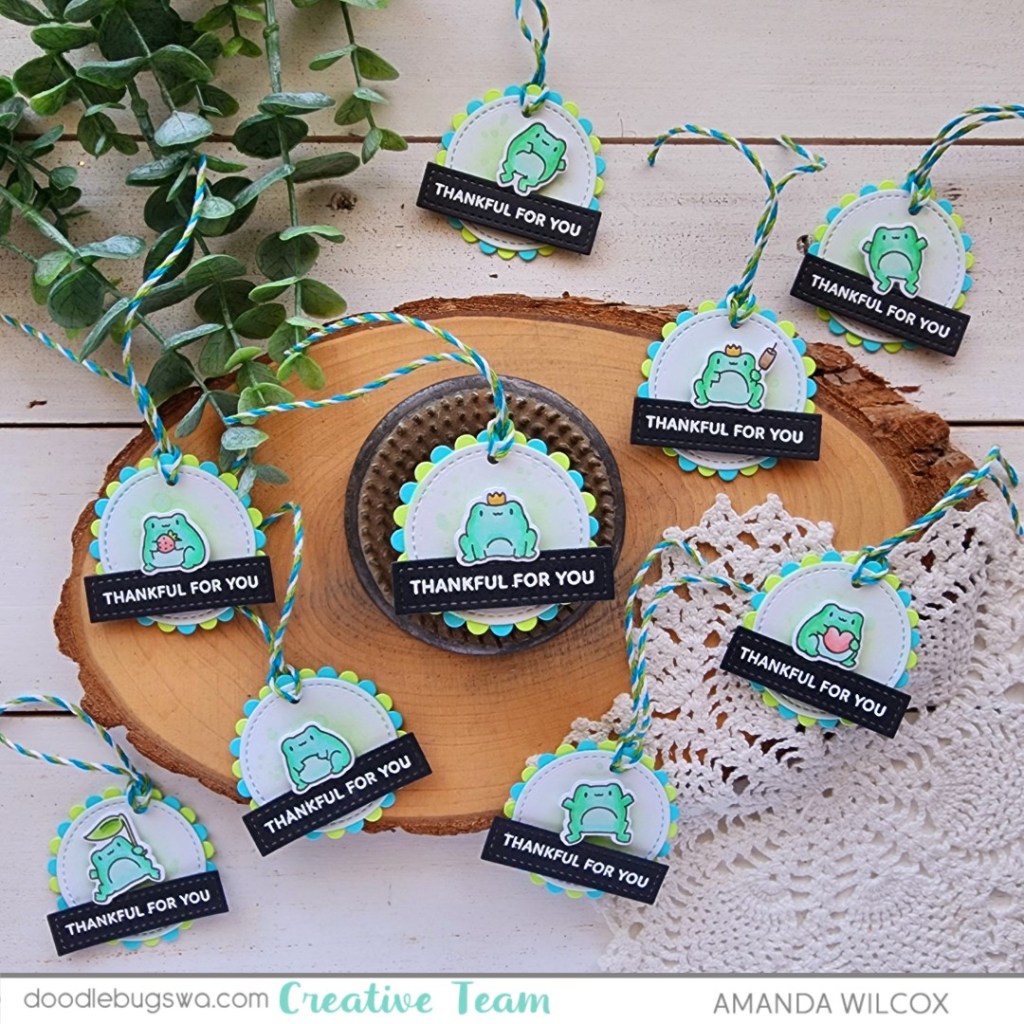
Hello everyone! For this week’s Mix-it-up Monday I’m sharing a gift tag project I created for work. We just had our annual Conference last week and I made gift bags for some of the Board as an end of year thank you to them. You know I can’t have gift bags without cute tags to go with them. So I spent a little bit and assembly lined a batch of froggy cuteness.
This whole project started with me playing around with the Mama Elephant Combo Circle creative cuts. They’re so fun and I thought they would be great for a different tag. Once I chose my scallop colors I started die cutting all the pieces – 2 white centers (front and back), a blue scallop and a green scallop.
I couldn’t decide which little agenda critters to use so I solicited my daughter’s help and she chose my favorite frogs. I can’t get enough of them. So I stamped out nine different ones, colored them all and used the coordinating dies to cut them out.
After assembling the layers of the combo circles, I blended a little green and teal inks in the center and splattered them with cracked pistachio distress oxide ink.
While the splatter was drying, I stamped and heat embossed a sentiment from Pretty Pink Posh Sentiment Strips | Fall and cut them out with a Pretty Pink Posh Sentiment Strip die. This die set and the coordinating collection of sentiments will not collect dust on your shelf. I promise. I am constantly reaching for them to add that perfect something.
Last, I popped the sentiment strips and frogs up with foam squares and strips. I used a Fiskars hole punch and threaded some twine through the holes. Now these are ready to be tied to the bags and handed out.
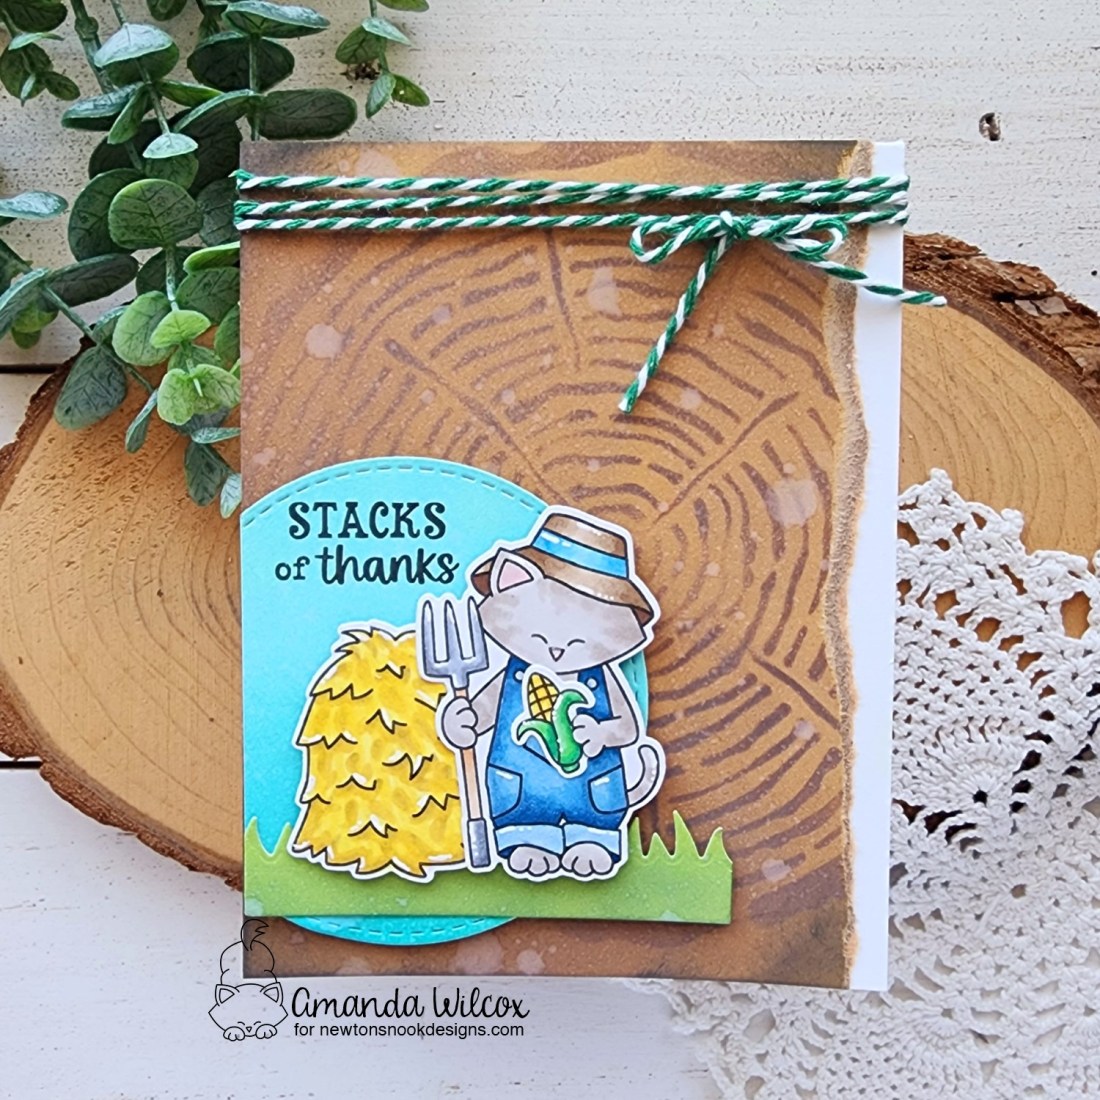
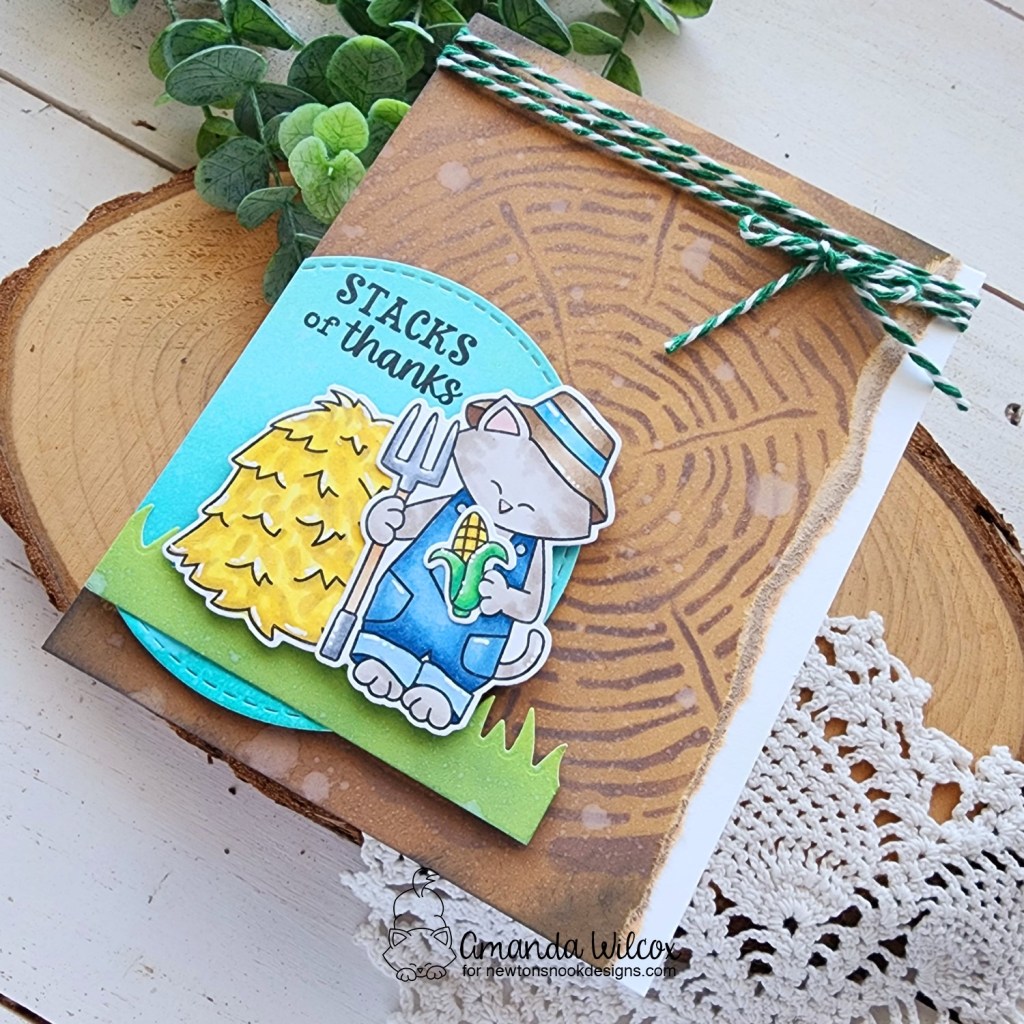
For the final day of Newton’s Nook June Release reveals, we’re rounding out the farm feeling with Newton heading back to the country too.
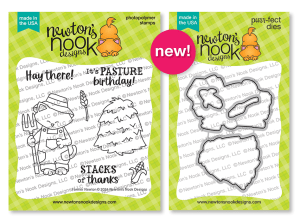
Farmer Newton Stamps and Dies
Is he not the cutest in his little overalls and pitchfork?!? I’m smitten with him and those fun sentiments!
For this card, I stamped and colored everything with copic markers. After cutting it all out with the coordinating dies, I used a craft knife to cut a slit by Newton’s paw so he would properly hold the ear of corn. I couldn’t resist myself.
I inked up a circle from the Circle Frames die set and also a scrap I cut the top off of with the grass die in the Land Borders die set. After stamping my sentiment I glued the grass line in place and popped the images up with foam squares.
For the background I inked up a piece of kraft cardstock with the Tree Rings stencil using distress oxide inks. Then I tore the edge off and popped it up with foam tape on a white card base.
Finally I added the mini scene to that with foam tape, trimming off the excess hanging off the edge. Then I added white gel pen highlights to the images and tied some fun twine around the top of the card for a little extra.
Enter to Win a $25 Prize!
We will be choosing two lucky winners to win a $25 store credit for Newton’s Nook Designs online shop! The winners will be chosen at random from the collective blog posts featuring our new products this week. For a chance to win, leave comments on the Design Team Member Blog Posts (see list below) from Monday June 17 through Thursday June 20th. You will not know which blog has been chosen so the more you comment on the better your chances are of winning! You have until Thursday, June 20th at 9 pm ET to comment — winners will be announced on the NND blog on Friday, June 21st.
Check out all the awesome Design Team Blogs below to enter:
Today we switch gears from the buzz of the beehive to the sounds of the farm! These new dies and paper pad are SO FUN and will go great with previously released products too!
Tractor and Barn Die Sets
Farmyard Paper Pad
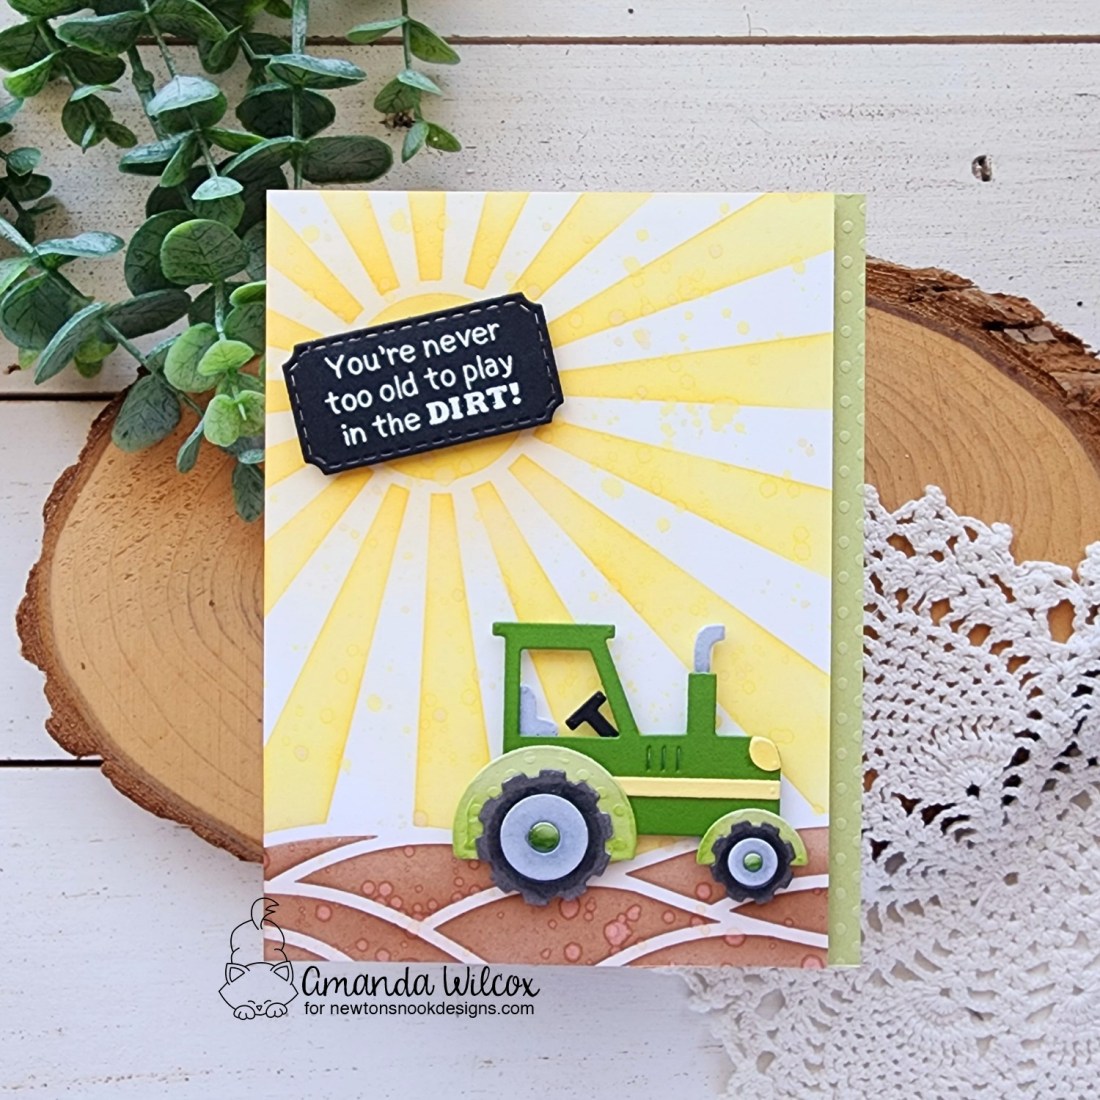
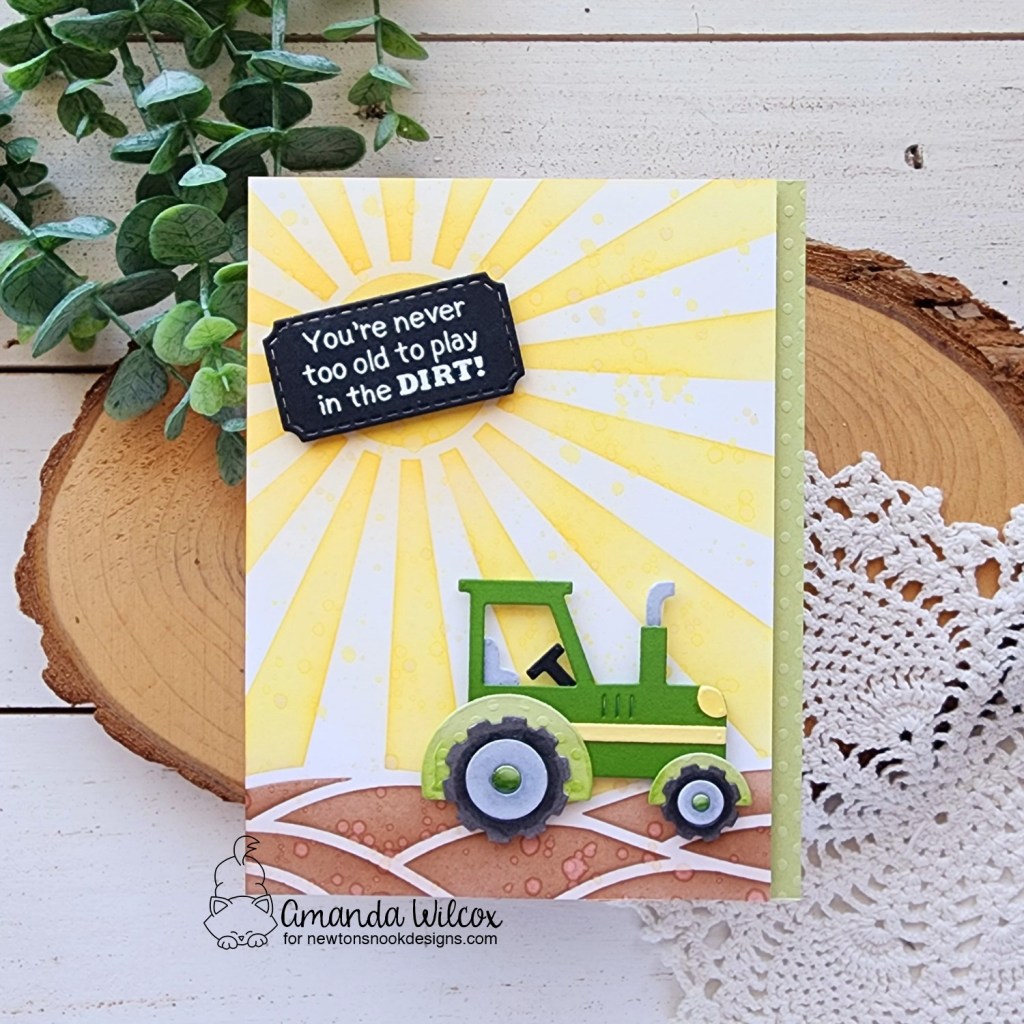
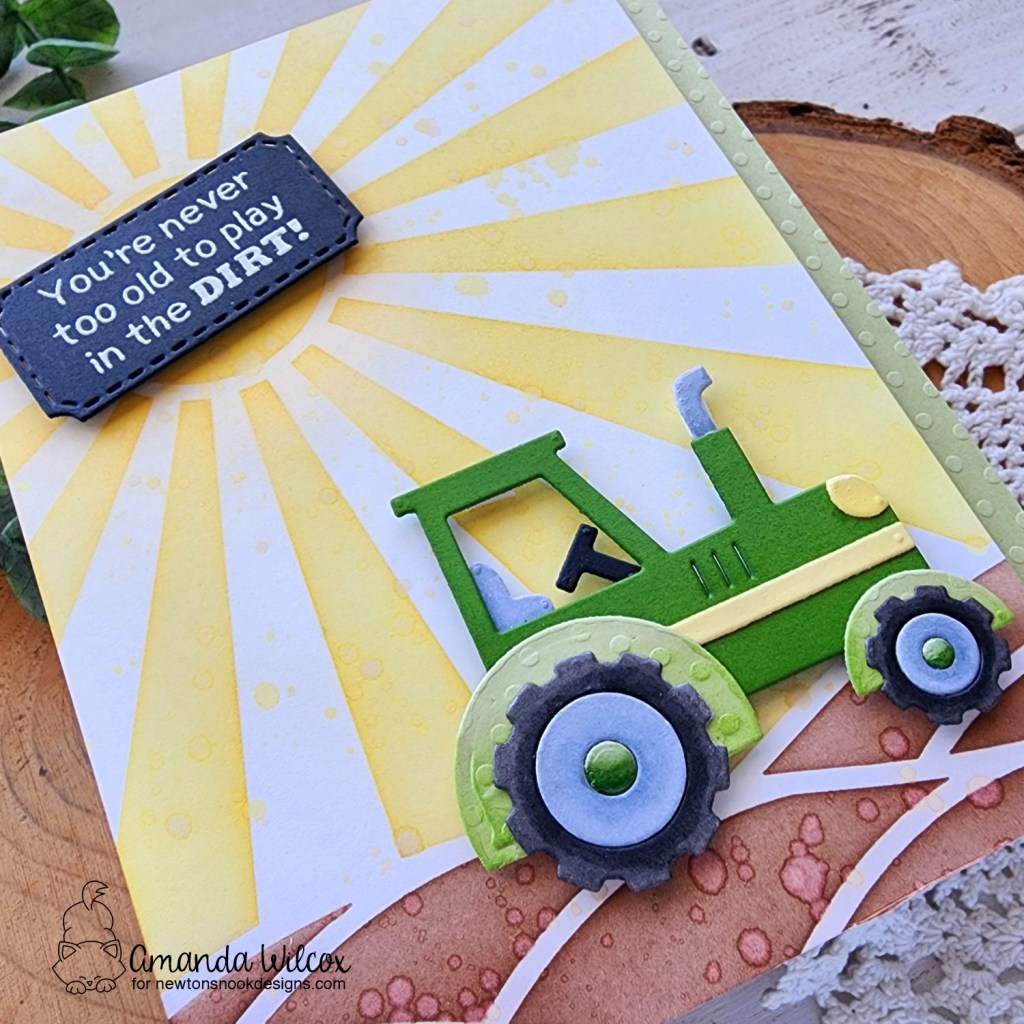
Today I have two separate cards for you featuring all of today’s reveals. First off let’s play with the new Tractor die set.
I pulled out some traditional John Deere colors for my first tractor because who can resist?!? Isn’t is the cutest!?! It cut out and glued together in a jiff and will be so fun to try in lots of colorways.
I inked up a background panel with the Sunscape stencil and splattered it with water for some texture. Then I trimmed the edge off and popped it up on a white card base. I didn’t love the white edge after all so I cut the same paper from the wheel wells of the tractor and added it instead. Now, I love that!
I cut the smallest Framework die from black cardstock and heat embossed a sentiment from Farming Fun. Next, I popped the tractor and sentiment up with foam squares and added glossy accents to the tractor headlight and wheel centers.
For the Barn dies, I couldn’t resist adding some of the Farmyard paper pad to the mix. That cow print just makes me smile!
After cutting the barn out and gluing it together with liquid glue, I thought it would be a great background to add one of the new Hexagon Frames behind it. I inked that up with the Hills & Grass and Cloudy Sky stencil before popping the barn up with foam tape.
Next, I cut the cow print paper with the largest Framework die and then cut a banner from the Banner Trio set. The sentiment here is a sneak coming to you tomorrow in the final day of reveals. (Stay tuned!)
Before putting everything together, I took a red ink pad direct to my card base for color and texture. Then I popped everything up with foam tape for lots of great dimension. The finishing touches today are just a scattering of enamel dots for more pops of color.
Enter to Win a $25 Prize!
We will be choosing two lucky winners to win a $25 store credit for Newton’s Nook Designs online shop! The winners will be chosen at random from the collective blog posts featuring our new products this week. For a chance to win, leave comments on the Design Team Member Blog Posts (see list below) from Monday June 17 through Thursday June 20th. You will not know which blog has been chosen so the more you comment on the better your chances are of winning! You have until Thursday, June 20th at 9 pm ET to comment — winners will be announced on the NND blog on Friday, June 21st.
Check out all the awesome Design Team Blogs below to enter:
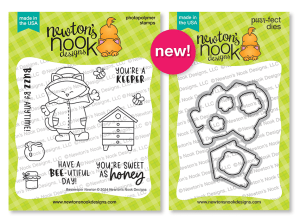
Back for more buzzy fun? I’m so glad! Today we have sweet Newton joining in on the bee brigade and he’s so cute!
Beekeeper Newton Stamps and Dies
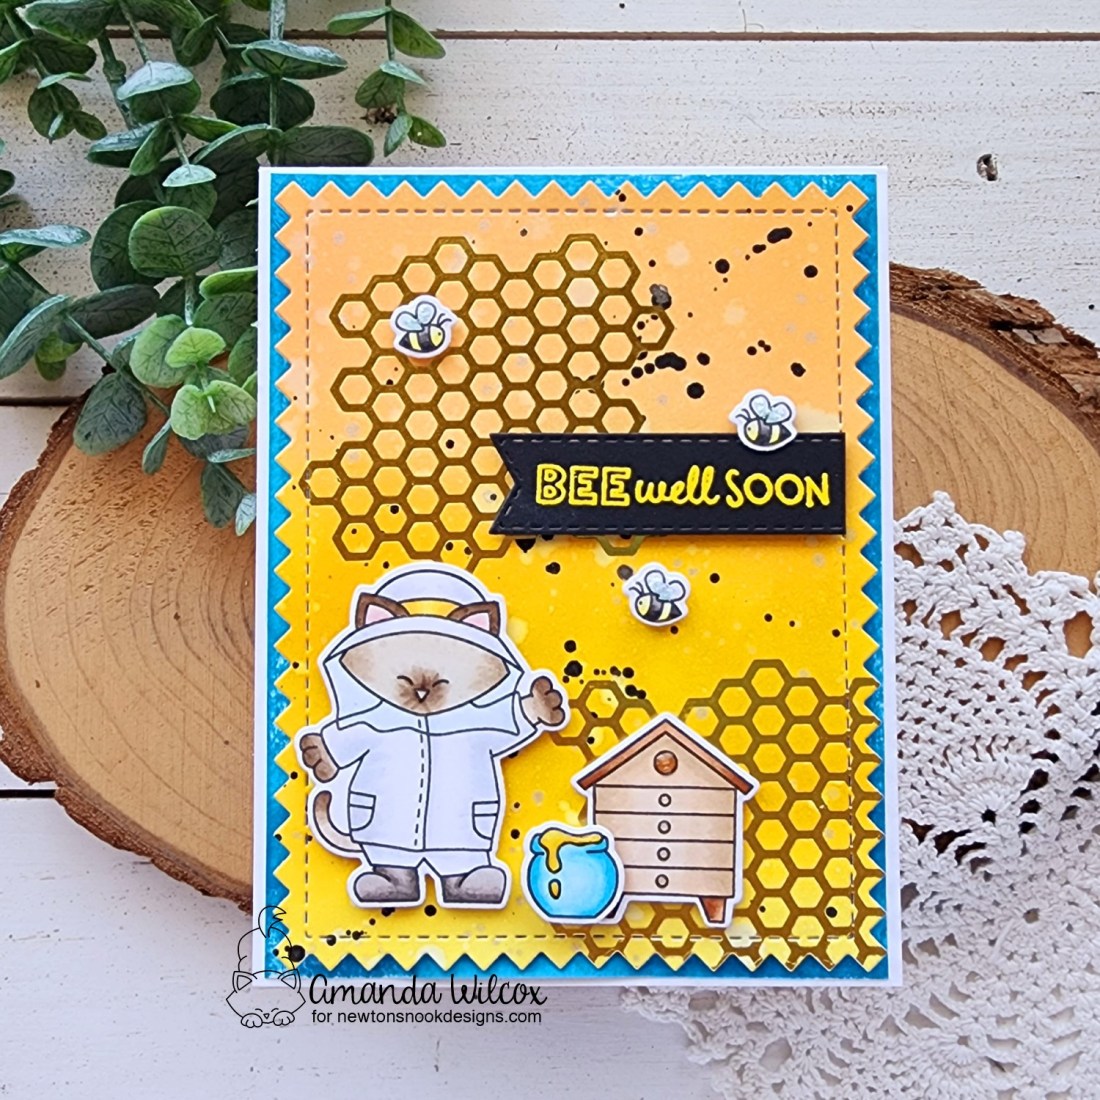
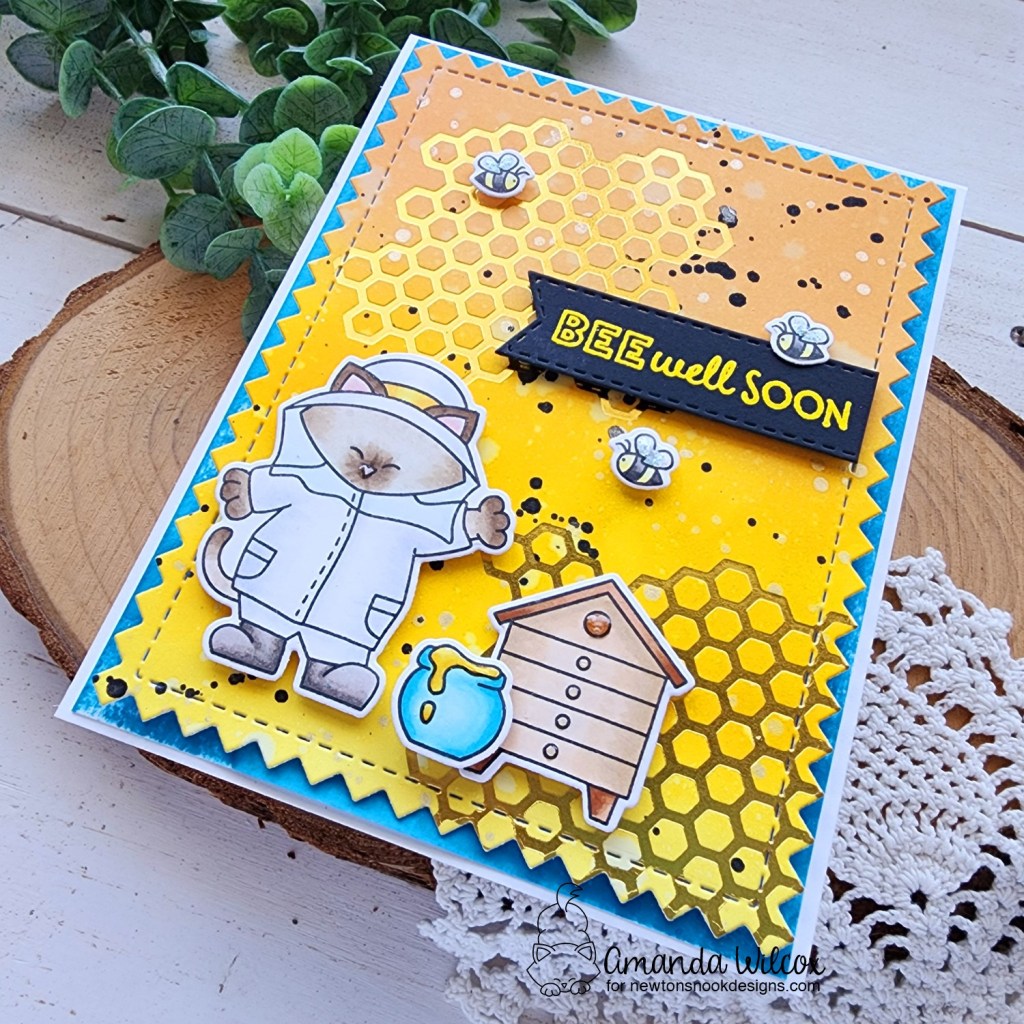
Today my card features this adorable new set with yesterday’s Honeycomb hot foil plates too!
I started by ink blending distress oxide inks on a white panel and doing the usual splatters. After letting it dry over night, I hot foiled the new honeycomb plate on it twice. Then I die cut the panel with the largest Frames & Tags die.
Next, I stamped and colored images from Beekeeper Newton and cut them out with the coordinating dies. I cut another banner from the Banner Trio set and heat embossed a sentiment from yesterday’s Heartfelt Honeycomb set with yellow embossing powder this time.
I took a bright blue ink pad direct to paper on a piece of cardstock measuring 4×5.25 inches and glued it to a white card base. Then I popped up the foiled panel with foam tape and followed that by adding all the images and sentiment strip with foam squares as well.
For finishing touches I added stardust Stickles to the bee wings and glossy accents to Newton’s nose, the honey on the pot and parts of the bee box.
Enter to Win a $25 Prize!
We will be choosing two lucky winners to win a $25 store credit for Newton’s Nook Designs online shop! The winners will be chosen at random from the collective blog posts featuring our new products this week. For a chance to win, leave comments on the Design Team Member Blog Posts (see list below) from Monday June 17 through Thursday June 20th. You will not know which blog has been chosen so the more you comment on the better your chances are of winning! You have until Thursday, June 20th at 9 pm ET to comment — winners will be announced on the NND blog on Friday, June 21st.
Check out all the awesome Design Team Blogs below to enter:
Welcome friends! It’s the start of an amazing release week from Newton’s Nook! We’re excited and having so much fun creating with all of these new products. Today’s reveals are buzzing with fun!
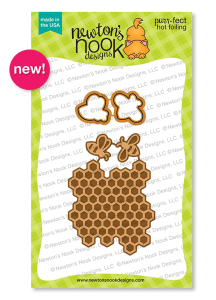
Honeycomb Hot Foil Plates
Hexagon Frames Dies
Heartfelt Honeycomb Stamps and Dies
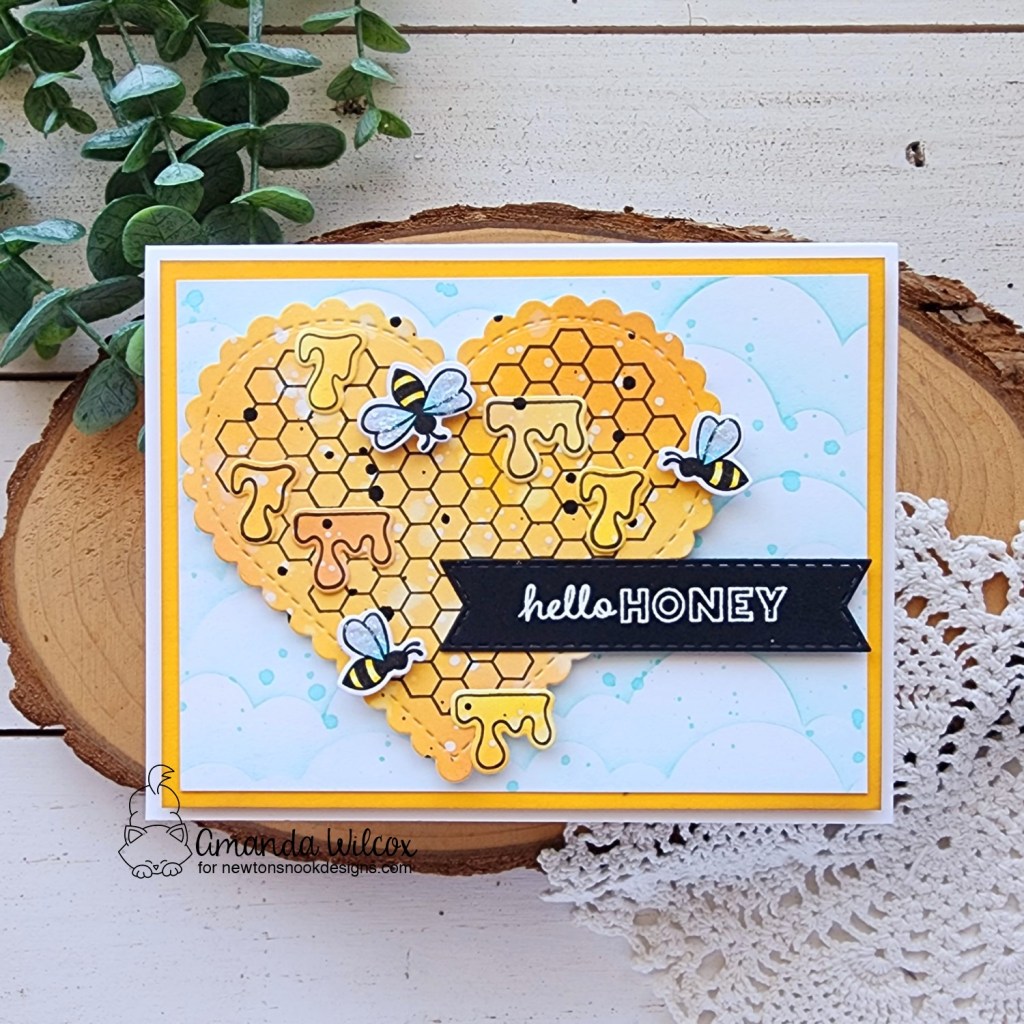
With all of these fun new reveals, I have two cards to share with you today. My first one focuses solely on the new Heartfelt Honeycomb stamps and dies. Which I had a blast creating with!
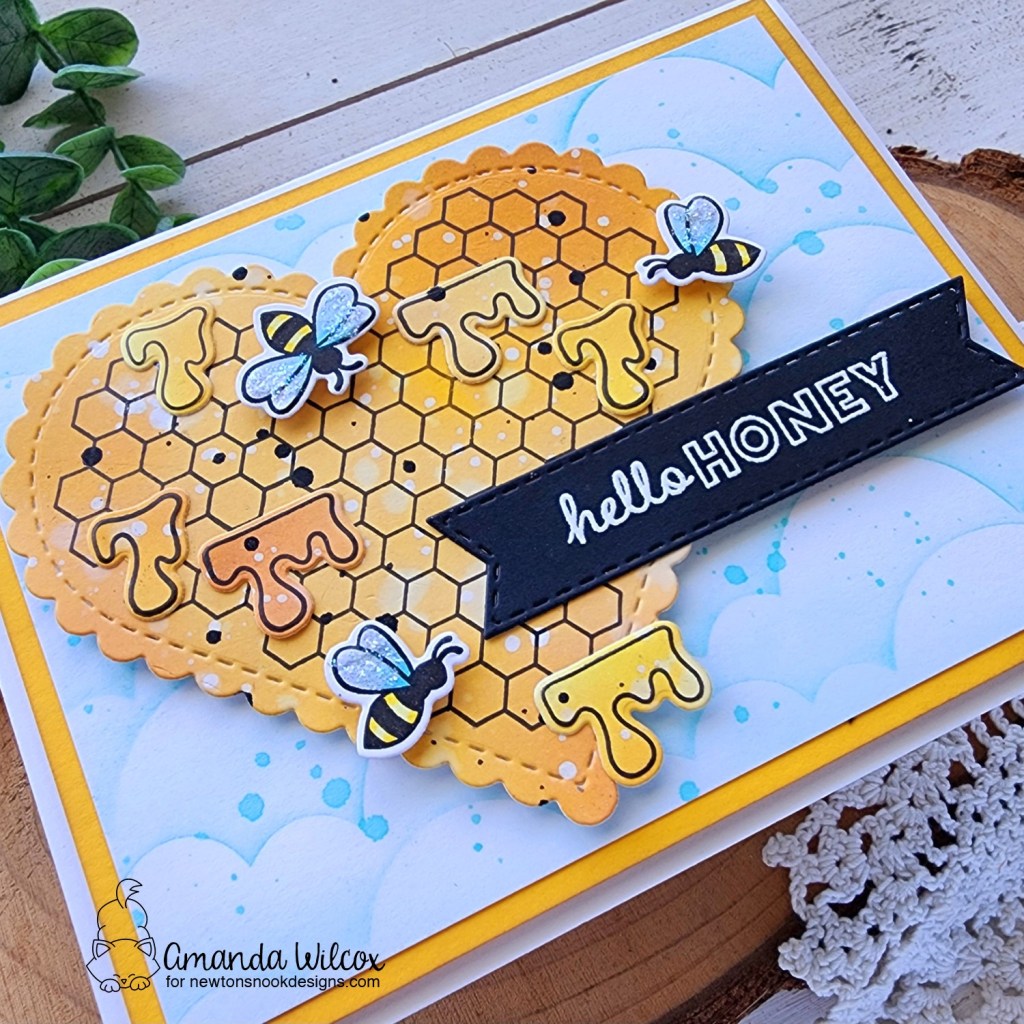
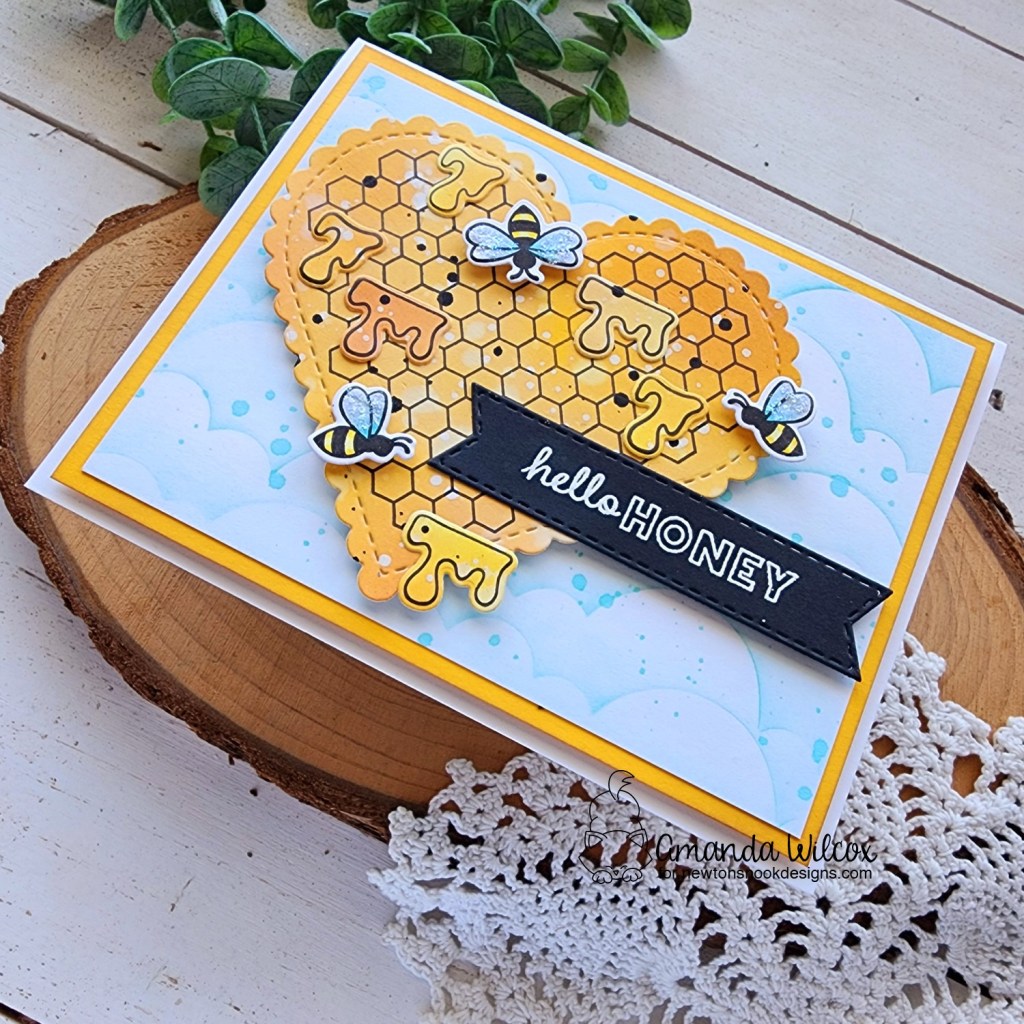
I pulled out my distress oxide inks in a variety of yellow/gold colors and blended a whole panel. Then I spritzed the panel with water, blotted it dry and splattered it with white and black paint, leaving it to dry while I stamped and colored some bees.
I die cut all of the elements and used liquid glue to adhere the dripping honey, and foam squares for the different bees. Then I die cut a banner from the Banner Trio set and heat embossed a sentiment on it, using liquid glue to adhere it hanging off the right side.
For my background panel I inked it using the Clouds stencil and splattered it with teal ink after the stenciling was done.
I trimmed the stenciled panel down to 3.75×5 inches and glued it on a piece of yellow cardstock measuring 4×5.25 inches. I popped the panel up on a white card base and then popped the honeycomb heart and sentiment strip up on it with foam tape.
For finishing touches on this card I added stardust Stickles to the bees wings.
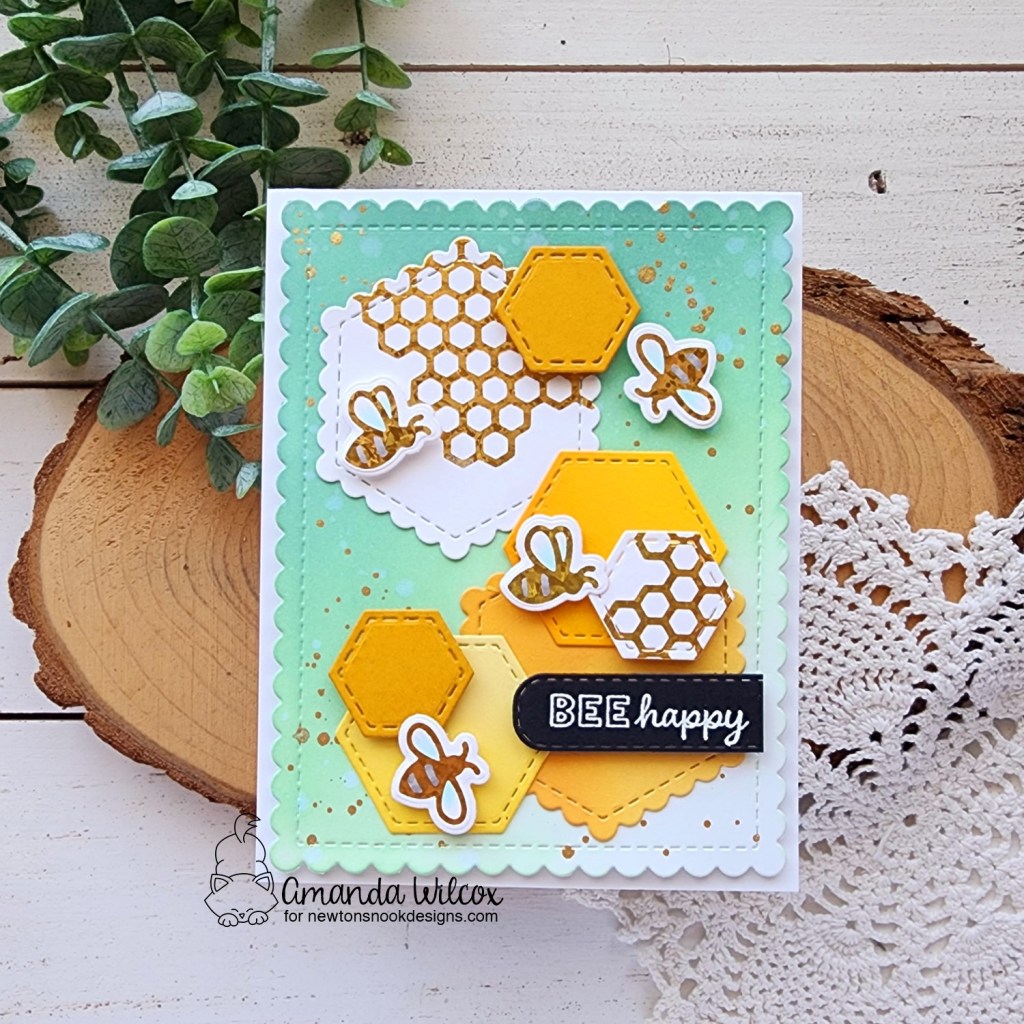
Isn’t this card dripping with sweetness? I love it! How we switch gears to the new Honeycomb hot foil plates and Hexagon Frames dies. These are solid winners and this card was one of my favorites of the release!
To start, I hot foiled the honeycomb image and bees with a shattered gold hot foil from Thermoweb. I used the coordinating dies to cut the bees and different sizes from the Hexagon Frames to cut the honeycomb. I added a few other yellow cardstocks from my stash and kept cutting different sizes of hexagons.
I ink blended a panel cut from the largest Frames & Flags dies with pine needles and cracked pistachio distress oxide inks. After ink blending, I spritzed it with water and flicked gold watercolor all over it.
While the watercolor was drying, I stamped and heat embossed a sentiment on another banner from the Banner Trio die set.
Before adhering all my layers together, I did simple copic coloring on the bees. Then I added everything to the inked panel with a combination of liquid glue and foam squares. Once that was complete, I added the whole panel to a white card base.
Enter to Win a $25 Prize!
We will be choosing two lucky winners to win a $25 store credit for Newton’s Nook Designs online shop! The winners will be chosen at random from the collective blog posts featuring our new products this week. For a chance to win, leave comments on the Design Team Member Blog Posts (see list below) from Monday June 17 through Thursday June 20th. You will not know which blog has been chosen so the more you comment on the better your chances are of winning! You have until Thursday, June 20th at 9 pm ET to comment — winners will be announced on the NND blog on Friday, June 21st.
Check out all the awesome Design Team Blogs below to enter:
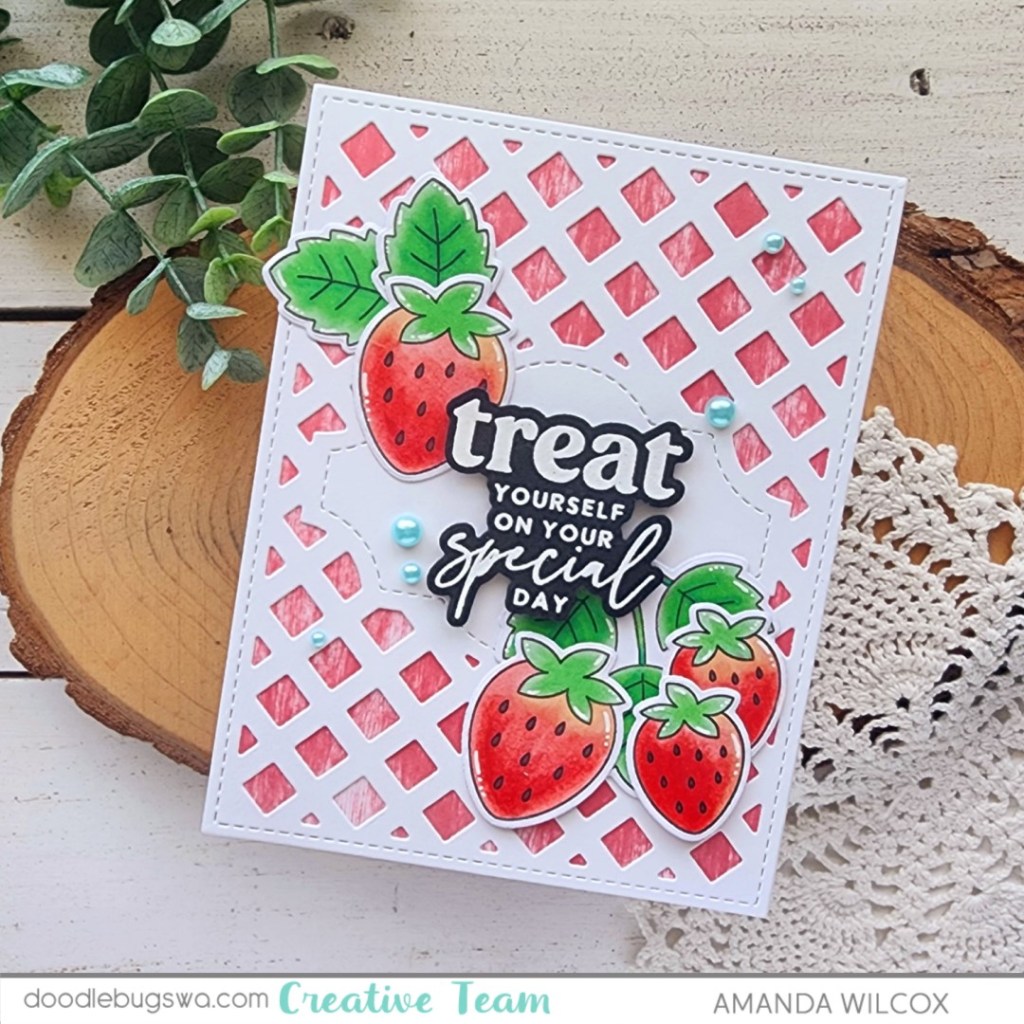
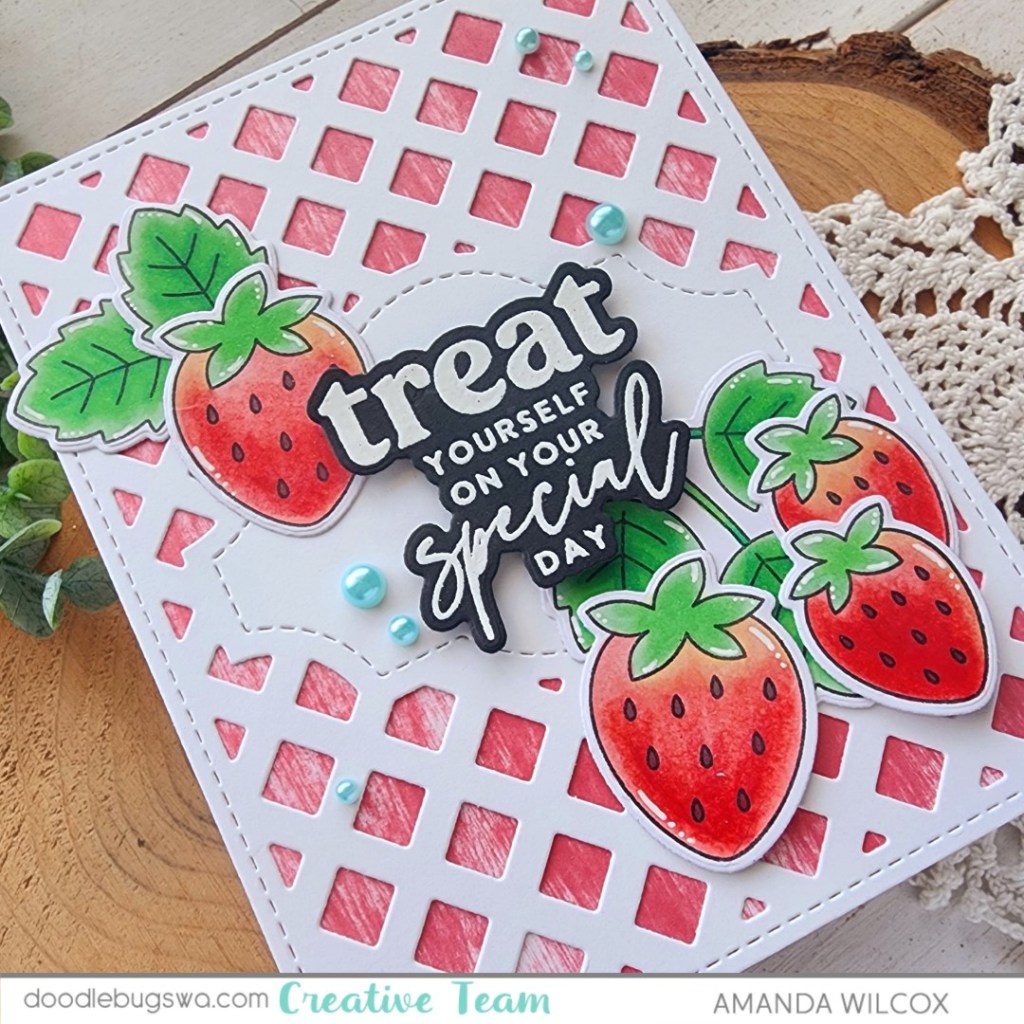
Hello everyone! It’s time for another mix-it-up Monday on the Doodlebugs blog. Today we’re mixing all the strawberry things together again in a different way. I love how bright today’s card turned out! It’s so sweet you can almost taste it.
I started with the Pretty Pink Posh Fresh Berries stamp set. I stamped out a few berries and leaves, coloring everything with copic markers before using the coordinating dies to cut it all out.
Next, I stamped and heat embossed a sentiment from the Waffle Flower Birthday Wishes stamp set and cut it out with the coordinating die. I also cut a Waffle Flower Sweet Lattice panel for my background.
With all the pieces ready to go, it’s time to assemble some. Using the sentiment as a guide on the background panel, I used liquid glue to adhere the strawberries and foliage in place. Then I added the sentiment with foam squares so there is some dimension.
Not wanting white on white for my background, I took the Lawn Fawn guava ink pad direct to my card base for some textured color. Then I used liquid glue to adhere the lattice in place.
For finishing touches I added a few Spellbinders pearls and white gel pen highlights to the images.
Products used: Waffle Flower Sweet Lattice die Waffle Flower Birthday Wishes stamps and dies Pretty Pink Posh Fresh Berries stamps and dies Lawn Fawn guava ink Liquid glue Foam squares Spellbinders Pearls – fashion topaz Sakura gelly roll pen – white
I appreciate you sharing your time with me. Have a fabulous day!
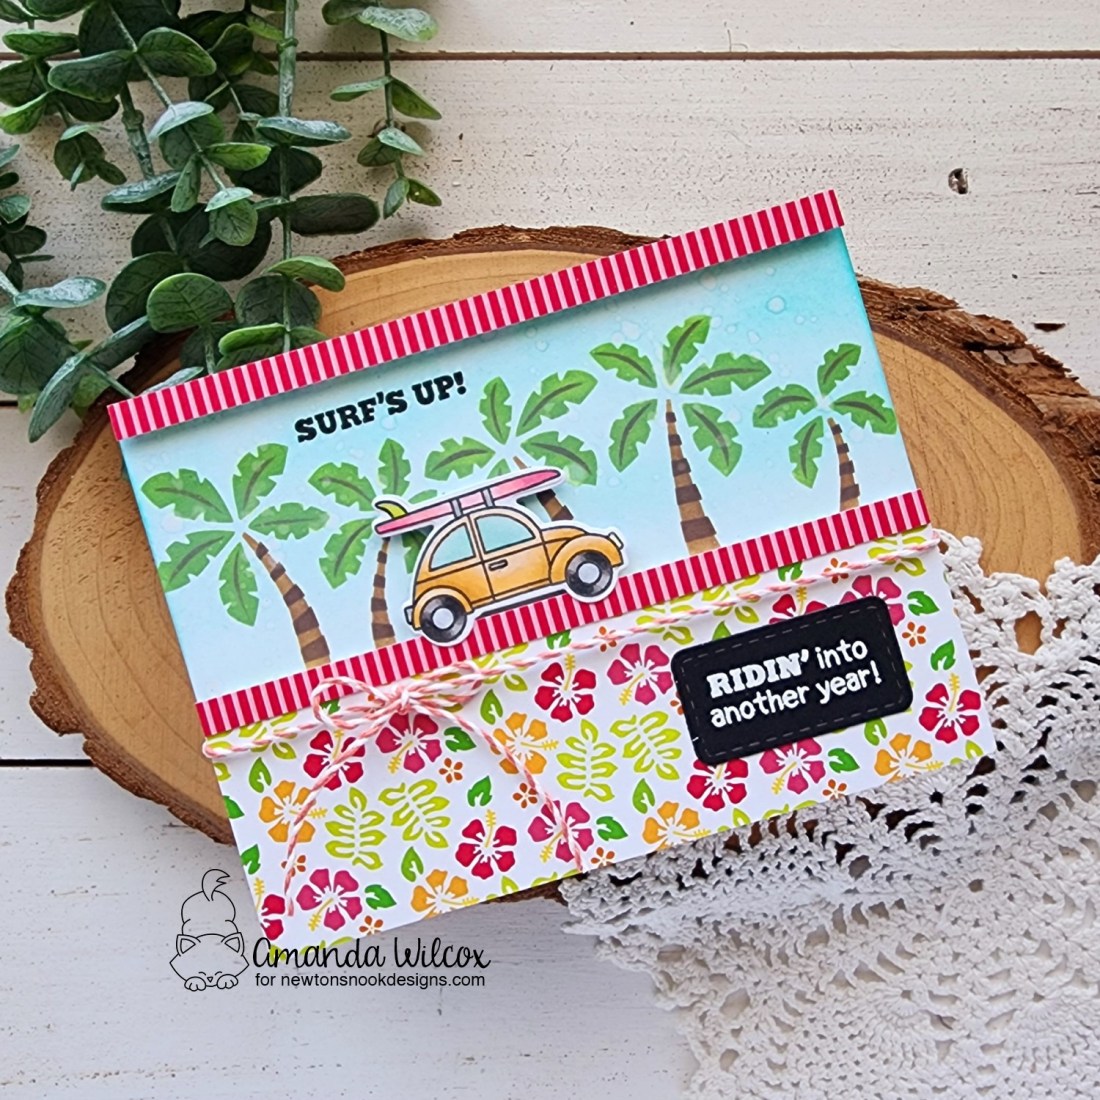
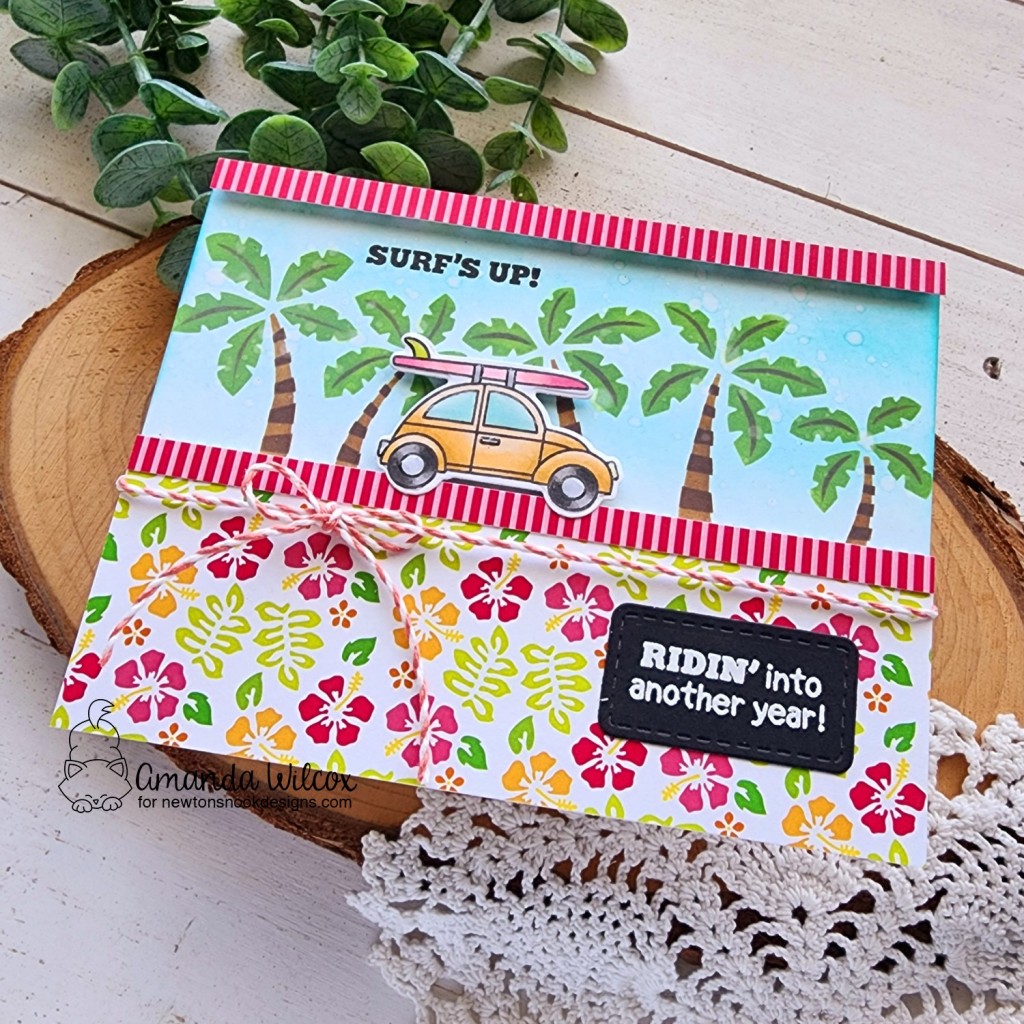
Welcome! I’m over on the Newton’s Nook blog today with a fun summer themed birthday card. I had some stenciling and stamping fun creating this card and pulled my color palette from the bright, fun patterned paper.
For today’s card, I wanted the summer theme so I went digging through my stash and landed on Beach Bound stamps, the Palm Tree Line stencil and the Summertime paper pad. With all of that in front of me, I knew it was going to be a bright, fun card!
I inked up a piece of white cardstock lightly with teal dye ink, then used the Palm Tree Line stencil with distress oxide inks so they would sit on top of the teal and not mix colors. Then I chose patterned paper from the Summertime pad to trim the top and bottom of my palm trees. Cutting the strips down, I adhered them with foam tape.
I stamped and colored the awesome Bug in Beach Bound, cutting it out with the coordinating die. I added it with foam squares. Next, I chose two sentiments from the set. I stamped one in the sky and heat embossed a second on a rounded rectangle from the Basic Frames die set. That one is glued directly to the card with liquid glue.
For finishing touches I added glossy accents to all the “metal” parts of the car plus the windows. At this point I thought it would be cool to distress the background. Not too risky so I spritzed my hand and flicked the water on the tree line. In reality, it’s better to do before assembling but sometimes these things happen.
Just like my next finishing touch…the twine. I had a skinny opening behind the patterned paper and decided it was a grand idea to thread the twine through so I could have that extra accent. It didn’t harm anything but took some perseverance. Lol.
Where there’s a will, there’s a way! And most of the time we make things work even if they’re a little out of order.
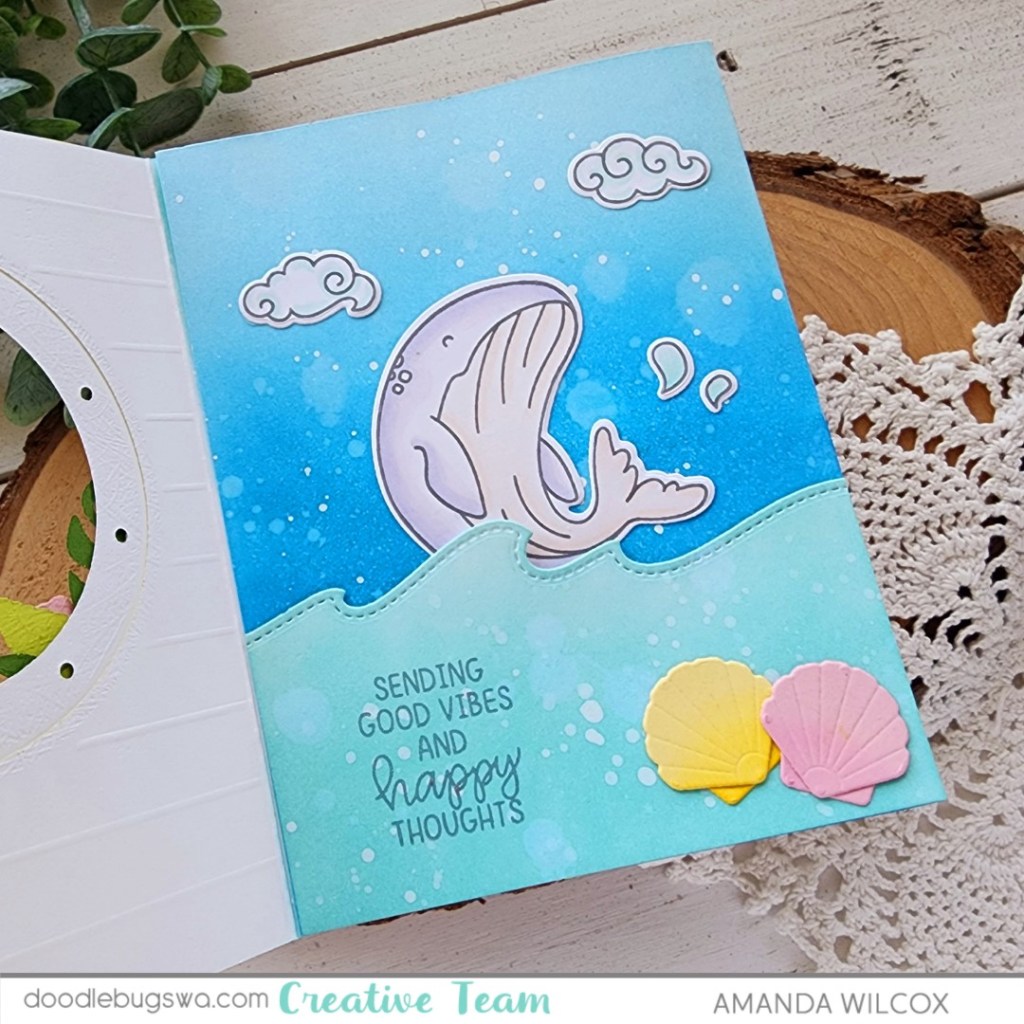
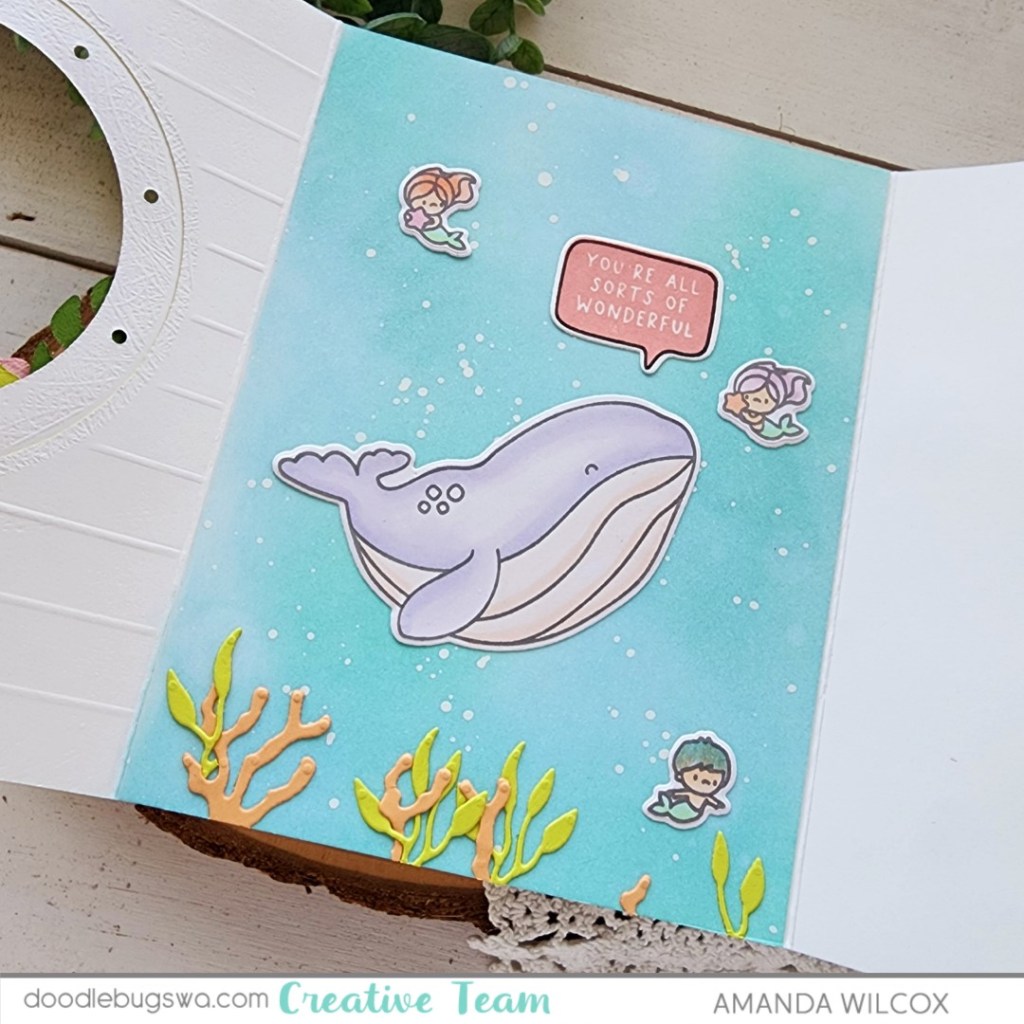
Hey everyone! Today’s mix-it-up Monday is packed full of amazing! I went a little extra coloring some images from the Mama Elephant Me and My Whale set. After cutting everything out and playing around I had a fun thought to make a window card that opened into the scene but I had too much so I went a step further and created a tri-fold card with an ever unfolding scene and still room to write a message.
Okay, starting things off, you just need 2 regular card bases, flip one backwards and slide them together. You’ll glue the back flaps together and it will give you a tri-fold card base to work with.
My front panel is scored every half inch for a shiplap look on the front. Then ink blended with peeled paint distress oxide ink. I used the Spellbinders Coastal Escape View die set to cut my window and add all of the fun porthole decorations to the front. My sentiment is from Mama Elephant’s Essential Tag Sayings. It has a great bubble font that stands out perfectly.
For the scene our card opens up to, I inked a wave panel with salvaged patina and the card flap itself with salty ocean and tumbled glass. The seashells are more great dies from the Spellbinders Coast View set and the other images are from Mama Elephant Me and My Whale. This sentiment comes from Mama Elephant’s Mixed Wishes Greetings.
Our final descent brings us to the center of the card and down in the depths with more Me and My Whale images, paired with a little coral and seaweed from the same Spellbinders die set. I did pull in another sentiment set from Mama Elephant because I couldn’t resist the whale talking to his mermaid friend. This one is called Simple Friends Bubbles and it stamps and die cuts 6 sentiments at once!
The background on this panel is ink blended with mermaid lagoon and tumbled glass distress oxide inks. All of the panels were also spritzed with water and splattered with white paint for texture.
Because of the nature of this card, everything is glued flat and there are no extra embellishments on the inside. I always get nervous that the dimension will ruin the layer above it or pages will stick together. So I kept it all simple except for a little stardust Stickles on the stamen of the front flowers.
It has been years since I’ve created a card this extra. I loved taking my time and enjoying the entire process of this project. I’d love to know if you create cards this involved or like to keep it simple.
Products used: Mama Elephant Me and My Whale stamps and dies Mama Elephant Simple Friends Bubbles stamps and dies Mama Elephant Mixed Wishes Greetings stamps Mama Elephant Essential Tag Saying stamps Spellbinders Coastal View dies Lawn Fawn Stitched Wave Border dies Distress Oxide Ink – peeled pain, mermaid lagoon, salvaged patina, tumbled glass, salty ocean Liquid glue Stickles – stardust Scoring board
I appreciate you sharing your time with me. Have a fabulous day!