Blog

Waffle Flower – New Release

Oh my goodness everyone! I’m so excited to be part of the new release of updated Waffle Flower Grip Mats! They’re even better than before plus there are new sizes that make so much sense for different styles of crafters!

There are different bundles available as you can see above, or there is a the complete bundle for all the sizes too. I was sent the Stencil Bundle which is absolutely perfect for how I use the mats. I highly recommend them for all types of crafters because they can be used in a variety of ways. Today I have a couple of cards to share with you that I created using the new Grip Mats and some fabulous Waffle Flower stencil sets.

First off, I knew it was prime time to pull out the new Postal Collage 4th of July stencil set! So, I die cut the postal collage base from white cardstock and placed it on my mat. Today I used the 5.5×8.5 mat and it was perfect. I inked up layer after layer, keeping my paper in place on the mat, just swapping out the next layer of the stencil set.

My final stencil layer was when I added Thermoweb transfer gel blanco instead of ink. Everything stayed in place perfectly, even when spreading the paste around and scraping the excess off. I removed the last stencil and peeled my postal collage off to set aside and dry. The paper stayed in place but also peeled off easily without warping or bending it either.

Once the transfer gel was dry, I placed shattered gold transfer foil on the panel and ran it through my mini Minc. The reveal was so fun on this panel. I love the sparkle and shine on it! From there I pulled out the Postal Collage and Postal Collage 4th of July stamp sets to add details to my stamp sheet. This was scary at first but really fun as I got more comfortable.

Last, I stamped and heat embossed a sentiment from Postal Collage 4th of July and cut it with a banner die. I added a piece of patterned paper from the Berry Sweet Gingham paper pad to a white card base, popped the postal collage up with foam squares and then popped the sentiment banner up on that.

There was no way I was stopping at one card with my Grip Mat out and begging to be played with. Stenciling on this tool is addicting because it takes stress and anxiety out of the equation.

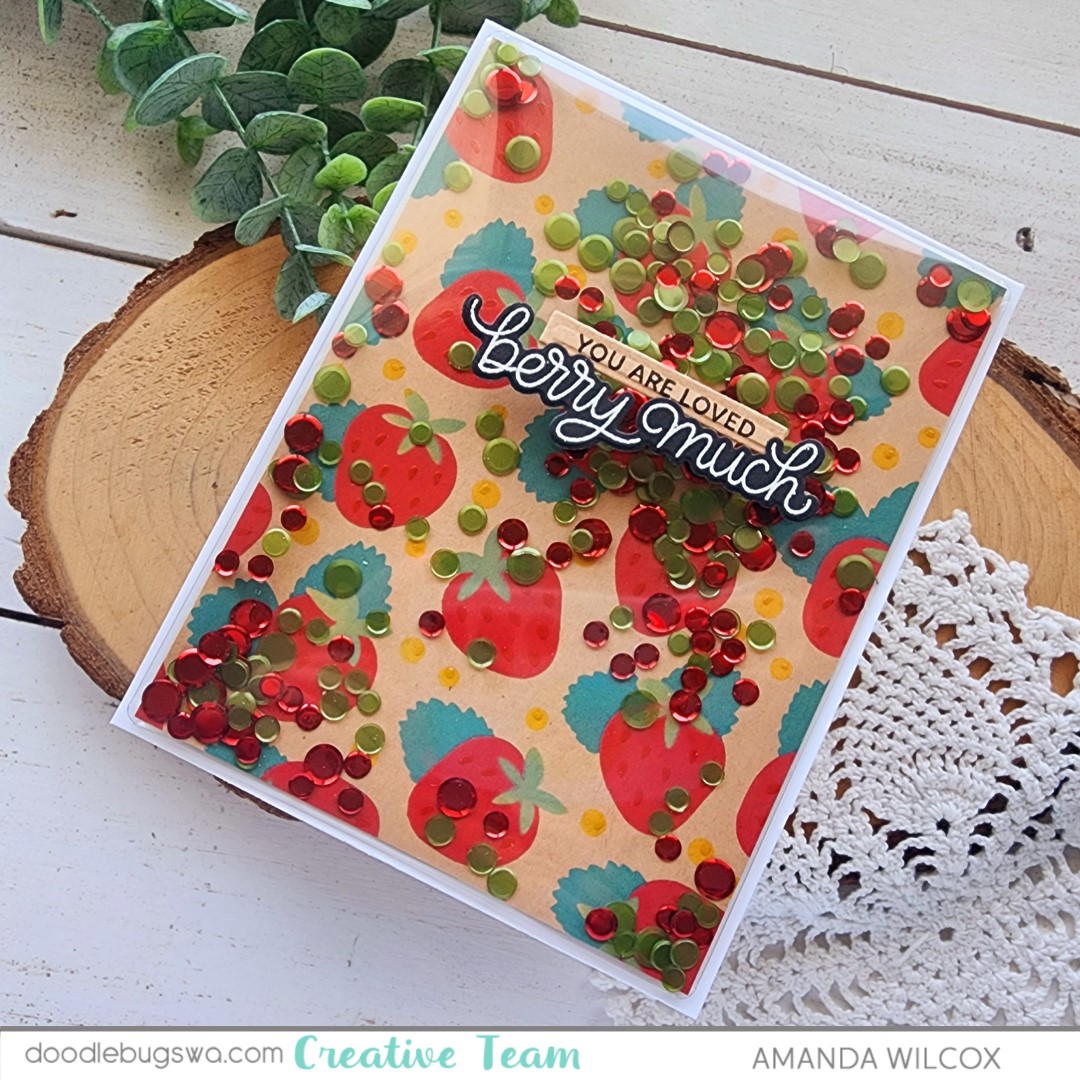
I chose the Sweet Strawberry stamp, die and stencil combo to create with next. I stamped my image on a piece of white cardstock and then transferred it to my Grip Mat. I immediately went to work inking up section by section to color my image in. It was so smooth and really fun!!!

Once the inking was done, I die cut a Sweet Lattice panel from teal cardstock. Layering it over my white card base was too stark so I inked the card front up with tattered rose distress oxide ink. Then I spritzed it with water and flicked white paint on the card front and lattice panel.

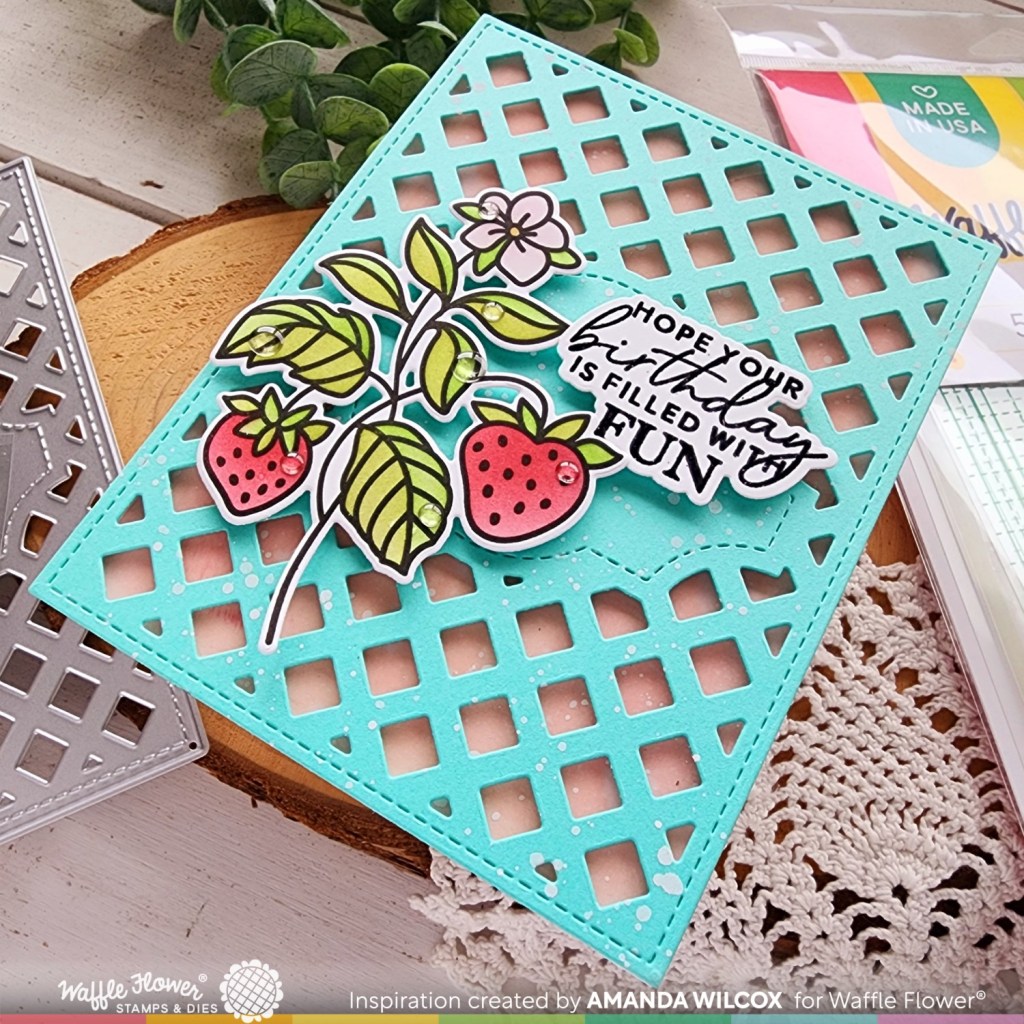
Once that was all dry, I popped the lattice panel up with foam strips, and did the same with my strawberries and sentiment with foam squares. Moving on to finishing touches, I went ahead with some subtle clear enamel dots looking like dew drops on the image.

I know it was a lot today but I really hope you’ll check out the Waffle Flower Grip Mats, and then think about the other pretty goodies too. These Grip Mats are all they’re cracked up to be and more. It’s a fabulous tool that you will not regret purchasing. And if you have to choose one size, go a little bigger than you think so you can get more use out of it down the road if your crafting style changes.

Products used:
Waffle Flower Grip Mats – Stencil Bundle
Waffle Flower Postal Collage die
Waffle Flower Postal Collage 4th of July stencils and stamps
Waffle Flower Postal Collage stamps
Waffle Flower Berry Sweet Gingham paper pad
Waffle Flower Sweet Strawberry stamp, die and stencil combo
Waffle Flower Sweet Lattice die
Waffle Flower Birthday Wishes stamps and dies
Foam squares and strips
Liquid glue
Enamel Dots – clean and clear
Distress Oxide Ink – tattered rose
Blending brushes

Thermoweb Transfer Gel Blanco
Stencil pal
Thermoweb shattered gold transfer foil

Magic anti-static brush
Embossing & Watermark ink
Embossing powder – frosting

I appreciate you sharing your time with me. Have a fabulous day!

Doodlebugs – A Berry Fun Full Card Front Shaker

Welcome to mix-it-up Monday on the Doodlebugs blog! We’re creating a quick and fun full card front shaker with a summery strawberry theme. We’ve had a little relapse in weather but I’m not giving up on summer crafting in the slightest!

I started my card today by inking up the Waffle Flower Strawberries background stencil set. To be sure the ink showed up really well on my kraft base, I used distress oxide inks. The colors I chose were candied apple, pine needles, mowed lawn and mustard seed. Then I spread a little glossy gel through the final seed layer for subtle shiny details.

Once the glossy gel was dry, I trimmed the panel to 4×5.25 inches and wrapped a Waffle Flower shaker cover around it. I only adhered 3 sides at first, pouring in my shaker bits and then securing the last side down. I used tear tape for this because it’s strong and instant. I find it works best with the plastic shaker covers. My sequins are from Pretty Pink Posh and Spellbinders.

Next, I stamped and heat embossed a sentiment from Pretty Pink Posh Fresh Berries and used the coordinating die to cut it out. Then I stamped another small sentiment from Pretty Pink Posh Sentiment Strips | Valentine and cut it out with the smallest Pretty Pink Posh Sentiment Strip die. I adhered both of these to the front of my shaker panel with foam strips.

Last of all, I added more tear tape to the back of the shaker panel and adhered it to a white card base. Once again, the tear tape is great against the plastic and gives you instant bond.

Now, just give it a little shake, shake, shake and it’s ready to go!

Products used:
Waffle Flower Shaker Covers
Waffle Flower Strawberries stencil set
Waffle Flower Grip Mat
Pretty Pink Posh Fresh Berries stamps and dies
Pretty Pink Posh Sentiment Strips | Valentine stamps
Pretty Pink Posh Sentiment Strips dies
Pretty Pink Posh Mossy Green confetti
Spellbinders Red smooth discs
Foam strips
Tear tape – 1/4″
Distress Oxide Ink – pine needles, mowed lawn, mustard seed, candied apple
Glossy gel
Palette knife

I appreciate you sharing your time with me. Have a fabulous day!

MFT Stamps – You’re Dino-mite

Happy weekend everyone! I’m heading to the Stamp and Scrapbook Expo in Puyallup, WA right now and I’m very excited about it! If you’re there, message me so I can find you and say hello.

Today though, I have been chomping at the bit to get this sweet dinosaur card on my blog and share with you all. It features the My Favorite Things Fierce Friends set. I love all things dinosaurs and had to order these the moment the release was live. Unfortunately it takes eons for my packages to get from south Florida all the way to Oregon so I always have to wait. #firstworldproblems

Here’s a peek at my adorable card. I chose to stamp my images with brown copic-friendly ink and keep the colors softer. Lately, this style has been very relaxing and fun. I’m using copic colors I never reach for and love the look I’m getting too.

After coloring, I used the coordinating dies to cut everything out and played around with placement, landing on a landscape card instead of portrait and I bold background too. The patterned paper came from the MFT Stamps Colorful Canvas paper pad. Then I framed my background panel with a kraft to break things up.

I ink blended distress oxide inks lightly on the background panel, starting with scattered straw and then spraying the panel with a distress sprayer. I blotted that dry and splattered the panel with fossilized amber and white paint for texture.

Using my images as a guide, I stamped my sentiment and then started assembling all of the layers. The ink blended panel is glued to the kraft one with liquid glue, then popped up on the patterned paper with foam tape. Then the volcano image is glued to the inked panel with liquid glue and the dinosaurs are all added with foam squares.

I seem to shy away from shiny and sparkly when I used the brown and gray copic-friendly inks so there are no finishing touches on this card. It’s all done and I REALLY love it!

Products used:
MFT Stamps Fierce Friends stamps and dies
MFT Stamps Colorful Canvas paper pad

Distress oxide ink – scattered straw and fossilized amber
Foam tape and squares
Liquid glue

I appreciate you sharing your time with me. Have a fabulous day!

Twiddler’s Nook Spooktacular – Happy Haunting Shaker Card

Hey friends! It’s that time again…the 31st of the month equals the Twiddler’s Nook Spooktacular Instagram Hop! Today I’m sharing a fun shaker card mixing some of our embellishments together for a custom shaker look.

For my card today, I stamped some images from the fun Lawn Fawn Booyah stamp set and colored them with copic markers. After cutting them out with the coordinating dies, I used liquid glue to assemble my dressed up ghosts. Then I went digging in my stash for a fun die set to create a shaker window frame with. I landed on the Pretty Pink Posh Stitched Torn Rectangle dies. I used the two largest to cut a frame from kraft cardstock. I kept the inside to use as my background as well.

I was thinking spellbook when I pulled the MFT Stamps typewriter background stamp out to stamp on the kraft panels. After stamping, I used gathered twigs distress oxide ink to ink the edges of the frame and center of the panel.

For an added little bit of spooky, I cut the Lawn Fawn Cute Cobweb from white cardstock and colored the spider. Then I used liquid glue to adhere it to the under side of the shaker frame. After that I added acetate to the frame and foam tape in preparation for the shaker bits.

I inked up a piece of dotted purple cardstock with wilted violet and then black soot so it was dark but not totally black. I glued that to a card base, then added the center kraft piece to that. I sprinkled all the shaker bits in the center and sealed it up with the frame.

Finally, I popped the images up with foam squares, along with a heat embossed sentiment that came from the Booyah stamp set. I added a little glossy accents to the witch’s hat and vampire’s treat bag for finishing touches.

Products used:
Twiddler’s Nook Pressure Pal
Twiddler’s Nook Pixie Dust micro beads embellishments
Twiddler’s Nook Glow in the Dark Stars and Moons embellishments
Twiddler’s Nook Happy Jacks embellishments

Lawn Fawn Booyah stamps and dies
Lawn Fawn Extra Sentiment Strips dies
Lawn Fawn Cute Cobweb dies

Pretty Pink Posh Stitched Torn Rectangles dies
MFT Stamps Typewriter background stamp
Distress Oxide Ink – gathered twigs, black soot, wilted violet
Foam tape and squares
Touch of gloss

Remember to head to Instagram and hop along for a chance to win $20 to the Twiddler’s Nook shop!

I appreciate you sharing your time with me. Have a fabulous day!

Waffle Flower – Gull-tastic Birthday

Welcome everyone. Thanks for stopping by today. I recently picked up the majority of the amazing Waffle Flower summer release with all of its beachy glory! I simply couldn’t choose and will be going back for the rest of it soon. It’s just too much fun!

I started this card by just playing with the Waffle Flower Beach Umbrella die and stencil combo and the Inquisitive Seagulls dies. Both of these products are so fun and could be used for lots of types of cards too.

Next, I took a piece of kraft cardstock, inked the edges and random stamped the sand texture included in the Inquisitive Seagulls stamp set. After that I took a scrap of teal cardstock and inked it with peacock feathers and splattered it with water. After that dried I stamped a sentiment with Lawn Fawn peacock ink. I love the subtle tone-on-tone look here.

Next, I glued the kraft layer to the bottom of a card base and the teal to the top section. Then I took a strip of white cardstock and tore the edges to resemble the foam of the wave coming in. I glued that down and then added the umbrella with foam squares and seagulls with liquid glue.

For finishing touches I added glossy accents to the seagull eyes and center of the umbrella.

Loving this new release and very excited to have some more time to play around with the rest of what I snagged very soon.

Products used:
Waffle Flower Inquisitive Seagulls stamps and dies
Waffle Flower Beach Umbrella die and stencil
Waffle Flower Grip Mat

Liquid glue
Foam squares
Glossy accents

Blending brushes

I appreciate you sharing your time with me. Have a fabulous day!

Doodlebugs – Strawberry Shake-It-Up

Hey friends! Let’s shake it up for mix it up Monday! I’m on the Doodlebugs blog today with this ADORABLE strawberry shaker card. Isn’t it the cutest thing?!?

I had a general design in mind so I pulled out my Mama Elephant Boxed Drinks stamps and dies. I really wanted to make a strawberry milk carton so naturally I reached for the sweet cow and hammy holding strawberries to go with it. I colored everything with copic markers and used the coordinating dies to cut them out.

Next, I used the Mama Elephant Grid Window cover die to cut a green front panel. I lined the back with acetate and then each window with foam strips. I wanted to make sure the shaker bits stayed in each window and didn’t fall all the way to the bottom. Then I took a piece of white cardstock and ink blended pink fading to nothing for each row of windows. I filled each window well with Pretty Pink Posh Strawberry Shortcake embellishments, removed the release paper and sealed it up with the ink blended panel.

I added my images with foam squares. Then stamped and die cut a sentiment strip with the Pretty Pink Posh Sentiment Strip dies. I ink blended the bottom of that with the same pink for a little interest from the stark white too.

For finishing touches I added glossy accents to all the strawberries, the straw and noses on both critters. It’s fun and adds a little something but doesn’t take away from the awesome shaker happening in the background!

Products used:
Mama Elephant Boxed Drinks stamps and dies
Mama Elephant Grid Window cover die
Pretty Pink Posh Sentiment Strip dies
Pretty Pink Posh Strawberry Shortcake embellishments
Blending brushes
Lawn Fawn ballet slippers ink
Foam strips and squares
Glossy accents

I appreciate you sharing your time with me. Have a fabulous day!

Miss Ink Stamps – This Little Piggy

Hi friends! I’m back with another fun card using one of the recently release stencil sets from Miss Ink Stamps. This Little Piggy is beyond adorable and was so fun to ink up. After I created this one, I also realized how perfect they would be for creating sets of cards to have in your stash or maybe as a gift for someone too.

After inking the stencil layers, I took my teal blending brush and went around the “sky” area for a light tint to take away the stark white. I also did the same with my green blending brush along the bottom. Then I die cut the panel with the scalloped rectangle in the EIEIO Frames die set.

I stamped a sentiment in the upper right open area from Punny Farm Pigs. Isn’t it perfect!?! I adore these sentiments!

Next, I cut a piece of purple cardstock and glued it to a white card base before popping the stenciled panel up with foam tape.

It just takes a fairly simple card a step up and makes it feel more put together. But you all know I love my foam tape. Layers on layers make me happy.

If you haven’t yet, stop by the Miss Ink Stamps shop and check out the new line of layered stencil sets. There are lots of different kinds available.

Products used:
EIEIO Frame dies
This Little Piggy stencils
Punny Farm Pigs stamps

Blending brushes
Lawn Fawn inks
Foam tape
Liquid glue

I appreciate you sharing your time with me. Have a fabulous day!

Newton’s Nook – Newton’s Birthday Delights

Hi there. I’m so glad you’re here. Today I’m happy to be on the Newton’s Nook blog sharing a fun birthday card with lots of texture and sparkle. I hope you love it!

I started by stamping the ice cream image in Newton’s Birthday Delights and colored it with my copic markers. I used the coordinating die to cut it out and set it aside. Moving on to the background, I chose the Cascading Stars stencil and inked pink on pink cardstock for a subtle background. Then I splattered it with pearl and pink watercolors.

While the watercolor was drying, I cut a scalloped square from vellum using the Frames Squared die set. At that point I realized the larger circle in the same die set was the perfect size for my sentiment. So I cut a white one and used cracked pistachio distress oxide ink to stamp it. It matched my bottom ice cream scoop perfectly!

Once the watercolor was dry, I tore the bottom edge off and popped it up on a white card base. Then I added the ice cream image to the vellum square, hid tape runner behind the image and adhered that to the card base. I trimmed off the excess and popped my sentiment circle up on the other side of the card front. This also secures the other portion of the vellum without seeing any glue.

For finishing touches, I tied pink twine around the top of the card and tied it in a bow. Then I added white gel pen highlights to the image and glossy accents to the kitty noses and cherry on top. Last, but not least, I put two red clay hearts on the sentiment circle to carry the red over and balance things a little.

Products used:
Newton’s Birthday Delights stamps and dies
Frames Squared dies
Cascading Stars stencil

Blending brush
Watercolor – pink and pearl
Foam tape and squares
Tape runner

Sweethearts clay embellishments

I appreciate you sharing your time with me. Have a fabulous day!

MFT Stamps – Tweet Friends

Hi there! Today I’m sharing a card featuring my favorite jenoblade line of images from MFT Stamps. This set is called Tweet Friends. The images are super cute and the sentiments are a great variety of occasions. Although, I’m sure you’ll notice that I didn’t use one on the front of my card. It’s always nice to have a few cards on hand that can be versatile to any need in the moment. Scene cards like this are perfect to leave blank until you’re ready to use them.

To create my card, I stamped images from Tweet Friends and colored them with my copic markers. Using the coordinating dies, I cut them all out and set them aside to work on a background panel.

I ink blended sky and ground with distress oxide inks on a piece of white cardstock and splattered it with water. Once that was dry I came in with white paint splatter too. After the paint dried, I cut the panel to 3.75×5 inches and lined the back with foam tape.

Then I cut down a piece of patterned paper from one of my many MFT paper pads and glued it to a card base. After popping the inked panel up on the foam tape, I did the same with the images.

For finishing touches, I added stardust Stickles to the large flower centers and white gel pen highlights to all of the images. I also added black glaze pen to the bird’s eyes and glossy accents to the water in the bird bath and bird beaks.

Products used:
Tweet Friends stamps and dies
Colorful Canvas paper pad

Distress Oxide Ink – salvaged patina, twisted citron and mowed lawn
Stickles – stardust

Liquid glue
Touch of gloss
Foam tape and squares

I appreciate you sharing your time with me. Have a fabulous day!