Blog

My Favorite Things – Sending Paper Hugs

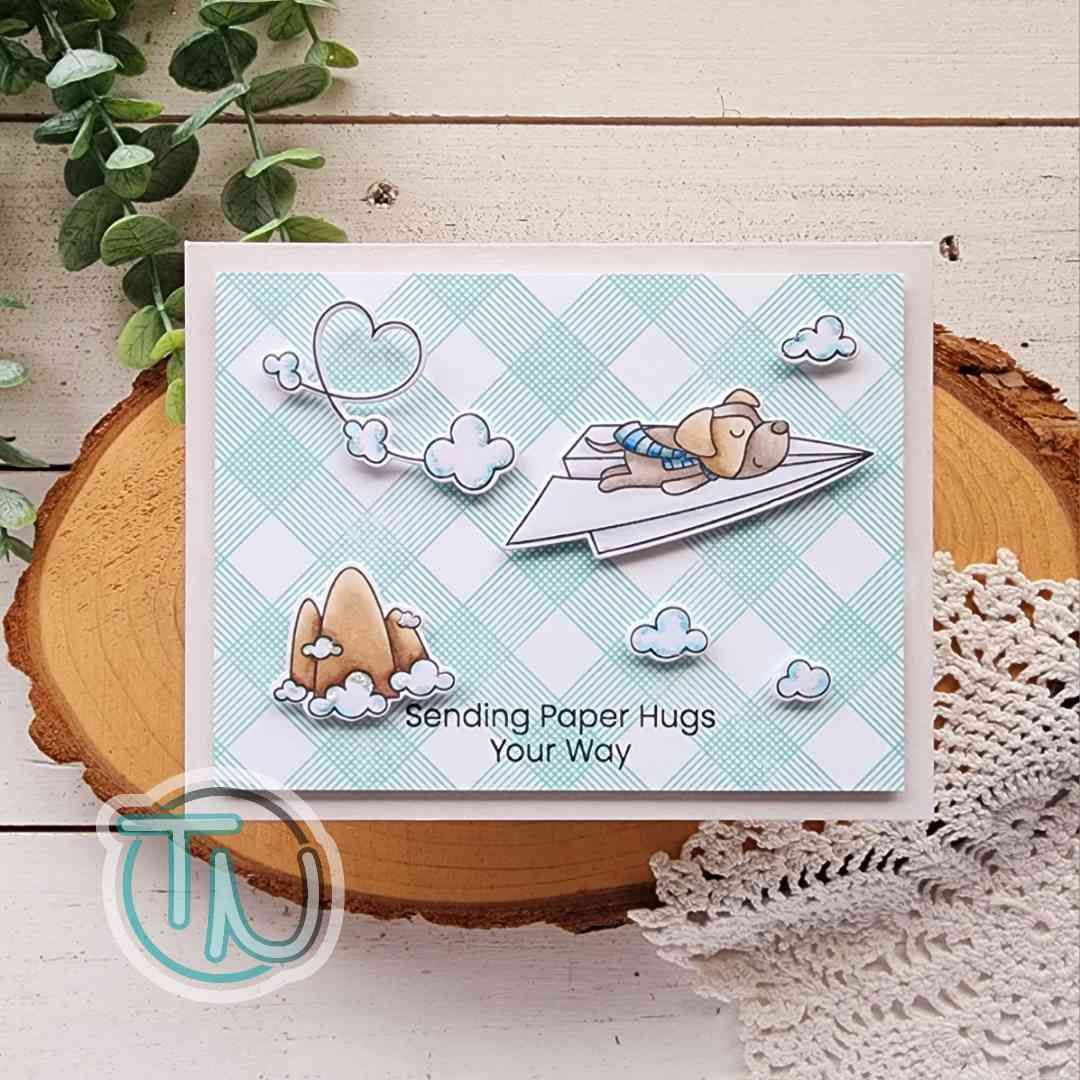
Oh my word! I absolutely fell in love with these sweet pups from MFT Stamps the moment I saw them! It’s not often that I jump on the moment a release is live and snag something for fear of not getting it. These were one of those things. I love them so much!

So this weekend I carved out a little time to ink them up and play just a little bit. Isn’t he so serene just floating through the air!?! Adorable!

So, I stamped and colored everything with copic markers, then used coordinating dies to cut them out. I think technically my pup is flying the opposite way he should for the heart clouds but I still like it.

I cut a piece of 3.75×5 inch cardstock and stamped it with a retired MFT Stamps background stamp using a light teal ink. I also stamped my sentiment in the center bottom of the panel and then added my images with foam squares.

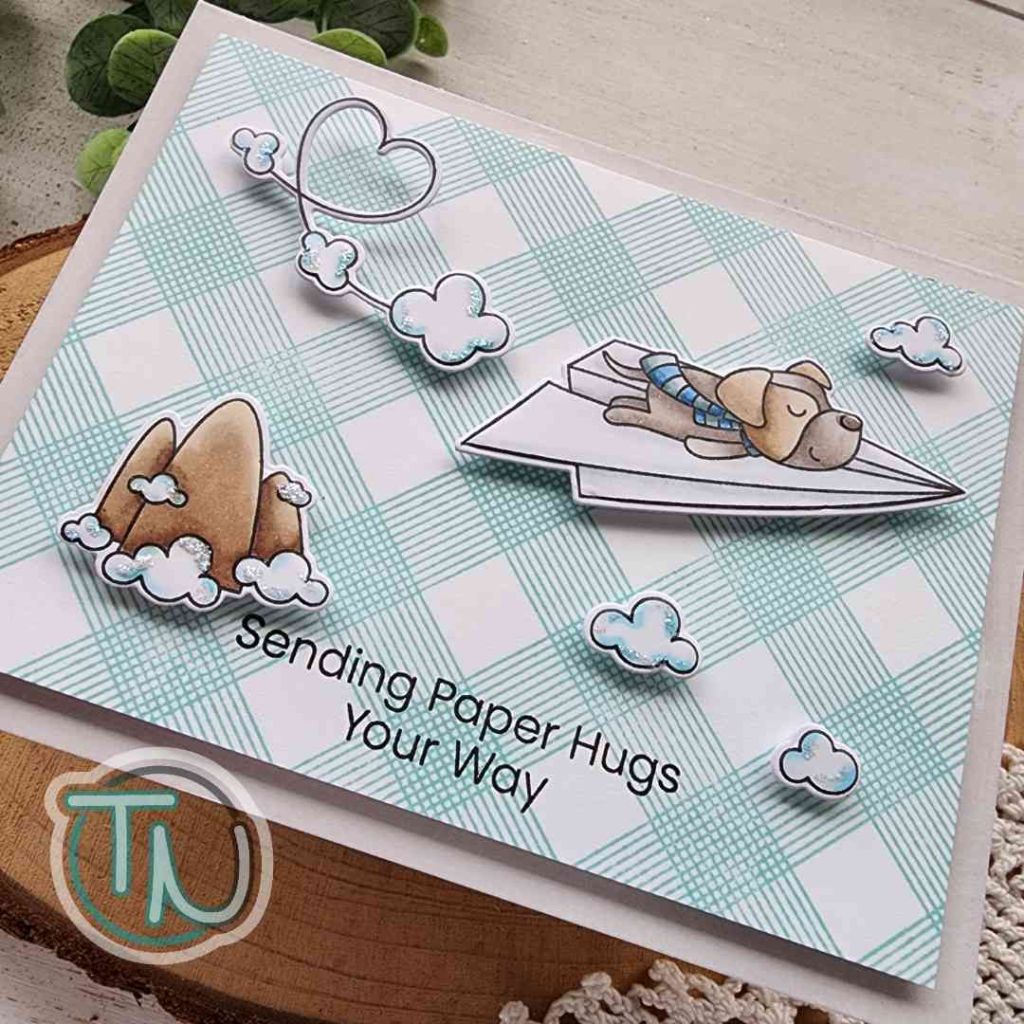
I took my Distress Oxide Lost Shadow ink pad direct to paper to create a gray card front before popping my decorated panel up with foam tape. Then I finished things off with glossy accents on the puppy’s nose and stardust Stickles on all the clouds.

I can’t wait to color all of the images in this set! I think they should be attached to paperclips to use at my desk. Don’t you? How happy would that be?!

Products used:
MFT Stamps Paper Planes stamps and dies
MFT Stamps All Lined Up Diagonally background stamp (retired)

Distress Oxide Ink – lost shadow
Lawn Fawn Ink – mermaid
Stickles – stardust
Glossy accents
Foam tape and squares

I appreciate you sharing your time with me. Have a fabulous day!

Newton’s Nook – Designer’s Nook

Hey friends! It’s been a while since I reminded you about the Newton’s Nook Designer’s Nook Newsletter.

It’s an email newsletter that goes out every Tuesday with a special project from one Newton’s Nook design team member to you. It’s got extra info, how to, tips and tricks, and always more inspiration!

Here’s a little sneak peek of my project tomorrow! Oh my word am I excited to share it with everyone!

If you’re not signed up yet, click HERE and do it before you miss out on any more ideas and inspiration!

I appreciate you sharing your time with me. Have a fabulous day!

Doodlebugs – Sending Love and Hugs Die Cut Card

Happy Monday friends! We’re mixing things up on the Doodlebugs blog for another bit of valentine inspiration before the big day arrives. I had fun with dies and embossing today.

I adore this new Pretty Pink Posh XOXO border so that’s where things started for this card. I just cut the main piece from light gray cardstock and one heart from light pink. I still wasn’t sold on what to do so I went digging in my stash and came across the adorable Spellbinders Sweet Birdie.

I used some pink, melon and peach cardstocks from my stash to create my bird and cut a heart for the border from each color too. I glued all the hearts directly to the border except the darkest one which is popped up with a foam square. I ran a white panel through the die cutter with the Spellbinders Tiny Dots embossing folder for my background and glued the border to the bottom. Then I popped the birdie up with foam squares to match the popped up heart.

I stumbled on this ribbon in my stash to tie around the top of my panel and added a tag from the Spellbinders Envelope of Wonder collection. The sentiment comes from the stamp set in that collection too. After tying the bow I added foam squares to the tags to keep them in place.

For finishing touches I just added glossy accents to the birdie’s eye and beak. Isn’t this such a sweet valentine?

Products used:
Pretty Pink Posh XOXO border die
Spellbinders Tiny Dots embossing folder
Spellbinders Sweet Birdie dies
Spellbinders Envelope of Wonder dies
Spellbinders Envelope of Wonder Sentiments stamps
Foam squares
Liquid glue
Glossy accents

I appreciate you sharing your time with me. Have a fabulous day!

Miss Ink Stamps – Release Day

Happy Saturday friends! It’s release day for Miss Ink Stamps, yay!!! I’m delighted to share my fabulously sarcastic birthday card with you featuring the new Potions Class stamp set.

I started by stamping and coloring lots of images from the new Potions Class stamp set, then cut them all out. For my background panel, I inked up parts of the Magical Newspaper stamp and randomly pressed it on a piece of gray cardstock. This is a big 6×6 stamp and I didn’t use my MISTI or a block with it because I wanted the imperfections. I also used gray ink on gray cardstock so it wasn’t bold and distracting but gave interest and texture in the background.

Next, I drug the gray ink pad across the panel in a few spots and also used a blending brush to add more dark spots here and there. With whatever ink was left on my brush, I went over the die cut potions images so they weren’t stark white on the edges. I glued the background panel to a card base and then the shelves and bottles went on next.

I added the professor image with foam squares and then tied my sentiment tag around the top of the card. The heat embossing was bright white and I didn’t like that so I went over it with my blending brush to try and dirty it up too. It seemed to work, although I don’t know if it will rub off in the envelope.

Head to the Miss Ink Stamps shop to check out the whole release for today. There’s magic and muggle products available, something for everyone.

Products used:
Potions Class stamps and dies
Magical Newspaper stamp

Tags dies
Blending brush
Lawn Fawn ink – narwhal
Foam squares
Magic anti-static brush
Embossing powder – frosting
Embossing and watermark ink

I appreciate you sharing your time with me. Have a fabulous day!

Pretty Pink Posh – Quick and Simple Valentines

Hey there! I’m so glad you stopped by today. I’m sharing a fairly quick and simple valentine card using stencils and dies from the January Pretty Pink Posh release. These products are not getting old in the slightest so I hope you’re not bored seeing ways to use them! They’re so fun to create with in different ways.

Today I started by playing with the Half Hearts stencil. I inked it up in an ombre effect light to dark from top to bottom. I used Lawn Fawn guava and peach fuzz inks with my blending brushes. Then for the second stencil layer, I spread iridescent glitz gel through it so I had some sparkle.

While that was drying I went through my cardstock stash and found almost perfect matches to the ink colors to cut hearts from. I used the new Stitched Hearts dies and liquid glue to adhere them together. Then I stamped and heat embossed a sentiment from Sentiment Strips | Valentine stamps and the Sentiment Strips dies.

To assemble everything, I popped the stenciled panel up on a white card base, glued my hearts together and popped them up with foam tape. Then Took my sentiment banner and popped it up with a foam strip over the hearts.

This card came together so quick but you could make it even quicker by substituting the glitz gel for more ink blending instead.

Products used:
Half Hearts stencils
Stitched Hearts dies
Sentiment Strips dies
Sentiment Strips | Valentine stamps

Foam tape
Liquid glue
Glitz gel – iridescent
Lawn Fawn ink – guava and peach fuzz

I appreciate you sharing your time with me. Have a fabulous day!

Miss Ink Stamps – New Release Sneak Peek

Hey friends! It’s the start of sneak peeks for the Miss Ink Stamps release which is this Saturday! Today I have a silly and fun card featuring On a Roll. It makes me giggle because we have cats and know how real it can be.

This was a simple card to pull together and was a lot of fun to create. I started by coloring the image and using the scan-n-cut to cut it out. Then I stamped and heat embossed my sentiment, cutting it out with a banner die.

I used the Big Paw Prints stencil on a piece of green cardstock with darker green ink. Then I splattered the panel with a different, darker green and also white paint. After it dried I trimmed the panel down to 4×5.25 inches and popped it up on a white card base.

I added the image and sentiment strip with foam squares as well. Then I finished things off with black glaze pen on the kitty’s eye and glossy accents on his nose and the holder for the roll of toilet paper.

Check out the rest of the design team today and tomorrow for sneaks of other sets that are coming and be ready for the big day on Saturday. I’ll be back then with another card for release day.

Products used:
On a Roll stamps
Big Paw Prints stencil

Blending brushes
Lawn Fawn ink – artichoke and jalapeno
Sakura glaze pen – black

Foam tape and squares
Touch of gloss
Sentiment banner die

I appreciate you sharing your time with me. Have a fabulous day!

Twiddler’s Nook Spooktacular IG Hop

I can’t believe today is finally here. This has been months in the making and I’m excited to share with you the Twiddler’s Nook Spooktacular Instagram Hop! It’s a hop for us Halloween loving card makers where we come together on the 31st of each month from January through October to share fun inspiration and highlight the awesome products we offer at Twiddler’s Nook.

Today I’m sharing a fun shaker card using the Rainbow Wishes confetti as my shaker bits. I thought it was fun to add some color instead of my typical “Halloween” colors. I also used a Tonic Studios full panel shaker window which makes creating shaker cards a breeze and fun with no thick borders to hide your foam tape.

The images come from one of my favorite Pink & Main sets called Halloween Brew. Instead of going with a sentiment from the stamp set, I pulled out the Mama Elephant Big Boo and Trick dies.

For a little added spook, I used the Twiddler’s Nook blending brushes on a piece of gray cardstock with the Pretty Pink Posh Spooky Sky stencil set.

With all the layers put together, I finished things off with stardust Stickles on the stars and bubbles on my images.

Products used today:
Twiddler’s Nook blending brushes
Twiddler’s Nook Wishing on Rainbow Stars confetti
Twiddler’s Nook Pressure Pal

Tonic Studios shaker pouch
Pink & Main Halloween Brew stamps and dies
Mama Elephant Big Boo and Trick dies
Newton’s Nook Land Border dies
Pretty Pink Posh Spooky Sky stencils
Stickles – stardust
Pink & Main EZ Squeeze liquid glue

If you’d like to join us on the hop, head over to Instagram and comment for a chance to win a $20 gift certificate to the Twiddler’s Nook shop. You have until February 3 to comment. The winner will be announced on February 5.

I appreciate you sharing your time with me. Have a fabulous day!

Newton’s Nook – I Whaley Love You Bookmark Tag

Hi friends! I’m on the Newton’s Nook blog today sharing a sweet love themed bookmark tag. I really love creating with this die set. The long tag shape is different and works great for decorating a slimline card, a bookmark and a gift tag too!

Today I started with my tag first and that led the way for my color palette. I cut the tag from a gray-blue cardstock in my stash and inked it up with the Waves stencil using a slightly darker blue ink. Then I shifted the stencil and messily spread texture paste through it for a little mixed media feel. I set that side to dry while I stamped and colored my images.

I chose the whale from Tides of Love and colored it with copics close to the color of my cardstock. Then I went digging for extra small images to add and found these awesome seashells in Summer Moments. I used the coordinating dies from each set to cut everything out. Finding the best shape for my sentiment came from the Circle Frames die set. I didn’t like the stark white though so I used the same copic markers as the seashells to color that too.

I used liquid glue to add the seashells to the bottom of the tag and the sentiment circle. Then I popped the whale and senitment circle up with foam squares. I cut a second tag from white cardstock, layered them together and threaded ribbon through the hole. I tied that with jute twine and finished things off with glossy accents and stardust Stickles on the whale.

I had Valentine’s Day in mind when I created this but it really would be fabulous for an anniversary or just because gift too.

Products used:
Tides of Love stamps and dies
Summer Moments stamps and dies
Bookmark dies
Circle Frames dies
Waves stencil

Blending brush
Stencil pal
Texture paste
Lawn Fawn deep sea ink
Foam squares
Touch of gloss
Liquid glue
Stickles – star dust

I appreciate you sharing your time with me. Have a fabulous day!

Miss Ink Stamps – Valentine Rainbows

Happy Tuesday everyone! I wanted to share more valentine inspiration featuring a few stencils from Miss Ink Stamps today. We’ve got new release sneak peeks starting Thursday so you get bonus Miss Ink Stamps content from me this week. So fun!

I started with the Rainbow Builder stencils in all pinks and reds. Then went over the bottom with the Scene Builder: Clouds stencil using pink ink for the clouds and pink Glitz Gel from Thermoweb for the detail layer. I stamped a sentiment from Fall Bouquet in the lower left corner using my MISTI since I was too impatient to wait for the glitz gel to dry.

I set the panel aside and pulled out the Oh Happy Day Frame dies and cut the scalloped frame from pink and black cardstocks. I used liquid glue to adhere them to the stenciled panel and popped that whole thing up on a white card base.

For finishing touches on this card I just added glossy accents to the stenciled heart so it had a little shine and stood out more than just ink.

Isn’t this a sweet card, perfect for Valentine’s Day, which is going to sneak up on us very quickly!?!

Products used:
Rainbow Builder stencils
Scene Builder: Clouds stencil
Fall Bouquet stamps
Oh Happy Day Frames dies

Foam tape
Liquid glue
Thermoweb glitz gel – pink
Blending brushes
Lawn Fawn inks – ballet slippers, guava, lobster, chili pepper
Touch of gloss

I appreciate you sharing your time with me. Have a fabulous day!

Doodlebugs – Valentine Train with Stenciled Background

Choo! Choo! We’re boarding the sweetest train you’ll ever see to the Doodlebugs blog today. It’s mix it up Monday and I’m excited to share my ideas for today’s post.

I was recently playing with the newest Pretty Pink Posh release, coloring this adorable Valentine Train set and brainstorming what I could add to the empty train car. I love that it’s included in the set because it immediately makes this a set for all occasions. Today I was happy to keep with the valentine theme and pull in some adorable Mama Elephant Little Agenda Bears to the mix.

I used the coordinating dies to cut everything out and liquid glue to assemble it all. Then I inked up the new Pretty Pink Posh Half Hearts stencil using Lawn Fawn ballet slippers ink. After the panel was inked, I splattered it with watercolor paints and let it dry.

For assembly, I glued the panel to a white card base and added the train track to the bottom. Then I added the train with foam squares and the puffs of smoke with liquid glue. Last, I popped up my couple of bears in the sky with foam squares too. I placed the card in my MISTI and stamped a sentiment from Pretty Pink Posh Sentiment Strips | Valentine in a light gray ink.

For finishing touches I added black glaze pen to the bears eyes and noses and glossy accents to things like random hearts and train wheels. Not too much but a little shine here and there to go with the shimmer in the watercolor.

Products used:
Pretty Pink Posh Valentine Train stamps and dies
Pretty Pink Posh Half Hearts stencils
Pretty Pink Posh Sentiment Strips | Valentine stamps
Mama Elephant Little Agenda Bears stamps and dies
Sakura black glaze pen
Liquid glue
Blending brushes
Lawn Fawn ink – ballet slippers and narwhal
Glossy accents

LH Colors watercolor – vanilla

I appreciate you sharing your time with me. Have a fabulous day!