Blog

Pink & Main – Sneak Peek Winter Foiling Fun

Welcome friends! I’m on the Pink & Main blog today sharing a sneak peek of Friday’s release. There are lots of fun products coming your way – new foiling fun, cute critters and fun dies too! Today I’m using a new die and Foilables too!

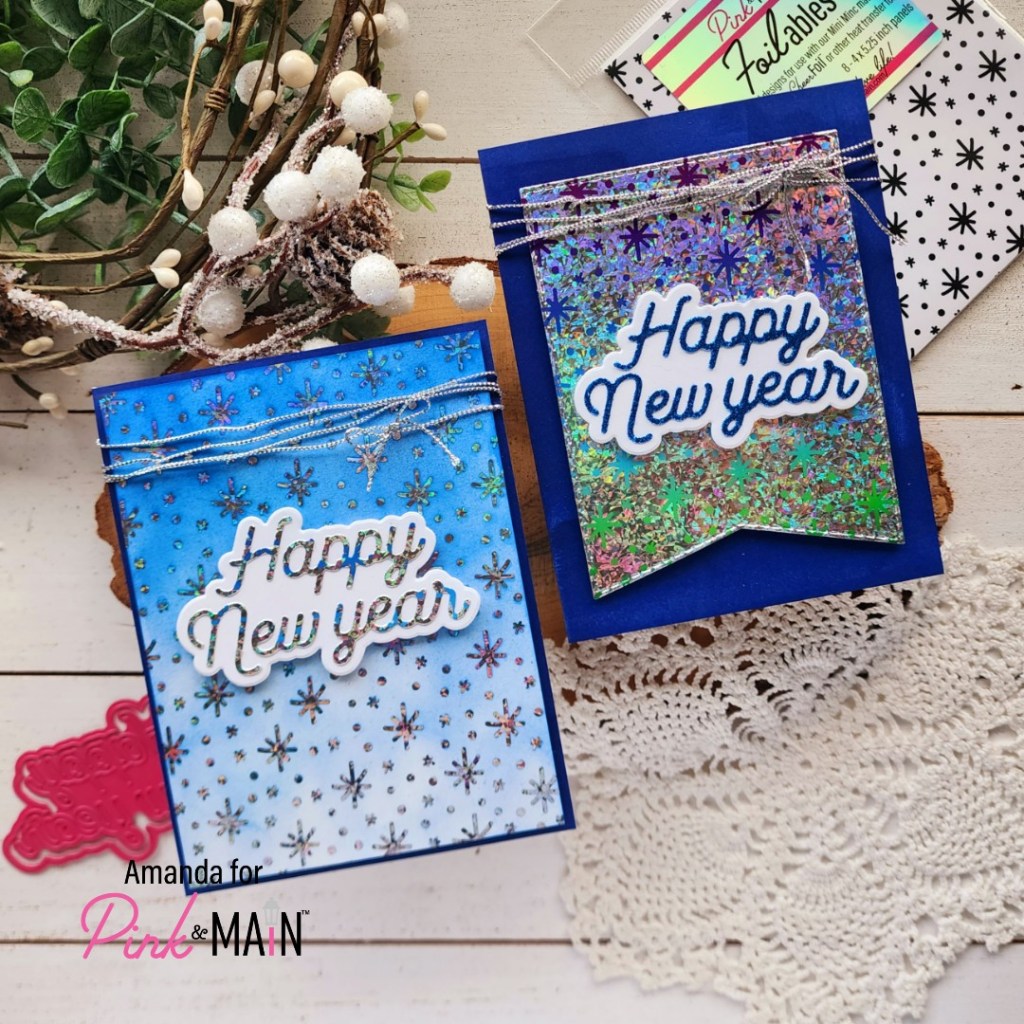
I did the two-for-one technique with my foiling today. The card on the right is the new Funky Flakes Foilables using an upcoming foil too. Next I took the negative foil and ran it through on one of the Bright Ombre Foilable sheets. Now we’ve got two foiled panels to create cards with.

I ink blended barbershop ink on the first one darker at the top, fading as I went down. Then I took this new Happy New Year die and cut my sentiment from the other foiled panel, right in the center. I glued the letters to a white shadow die cut and popped it up with foam tape on the original foiled panel.

I took my barbershop ink pad direct to a piece of cardstock to create matching blue paper and glued it to a card base. Then I popped the snowflake panel up with foam tape and wrapped silver wire ribbon around the whole thing for added interest.

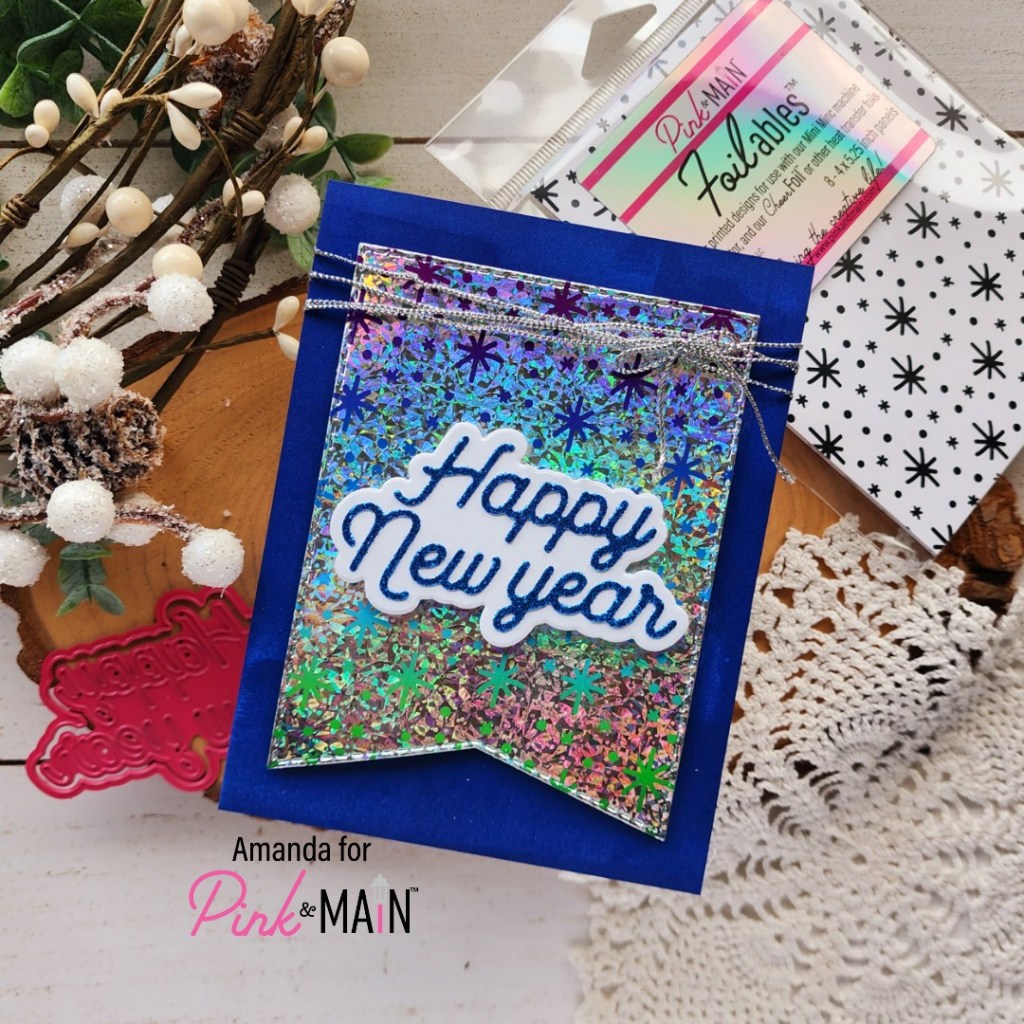
Next, we have the second panel with words cut right out of the center of it. Easy to cover up with the shadow die from that set. So I cut another set of words from blue glitter paper and glued it all together. I cut the foiled panel with a large fishtail banner die and repeated the same process as the first card.

Foam tape layers between everything and I drug my ink pad along another piece of white cardstock for that same rich blue background. I also added the same wire ribbon because I really like how it looks.

New Years is always a blingy, flashy holiday to me so all this bright and happy foiling is perfect for the occasion!

Products used:
Happy New Year dies
Large Fishtail dies
CheerFoil
Funky Flakes Foilables
Bright Ombre Foilables

Mini Minc Machine
Winter Glitter paper pack
Foam tape
EZ Squeeze liquid glue
Barbershop ink
Blending brush

I appreciate you sharing your time with me. Have a fabulous day!

Newton’s Nook – November Release Reveals Day 3

This is actually the final day of release reveals for this month’s Newton’s Nook release. It’s bitter sweet but I hope you’re ready for so much cuteness and are prepared to shop your hearts out tomorrow!!!

Newton’s Reading List stamps and dies

Puppy’s Reading List stamps and dies

I had a blast coloring these images and then had the whole family weigh in on the book titles because #1 it was way too hard to choose and #2 they were cracking me up so I had to share the joy!

For Newton’s Reading List, I cut another Fancy Edges Tag and inked it up with the Petite Paw Prints stencil before popping Newton up with foam squares. Then I inked a white panel with the Meow stencil using orange ink. After I removed the stencil I added a light layer of the same ink all around the edges. I cut this panel from the largest Framework die.

I didn’t like the white card base around the edges so I added a layer of gray cardstock before popping the orange panel up with foam tape. Then I added my tag with another layer of foam tape. You know I love dimension. Then I finished things off with glossy accents here and there.

For Puppy’s Reading List, I pulled out A Dog’s Life paper pad to add layers to my background. I cut strips about 1 3/4″ and 2 1/2″, then covered the seam with a 1/4″ red strip. Next, my image is popped up on a scalloped circle from the Circle Frames die set.

I finished this card off the same way with glossy accents all around on the glasses, collar tag and book spines. Last, I added baker’s twine around the top, tied in a bow.

Enter to Win a $25 Prize!

We will be choosing two lucky winners to win a $25 store credit for Newton’s Nook Designs online shop! The winners will be chosen at random from the collective blog posts featuring our new products this week. For a chance to win, leave comments on the Design Team Member Blog Posts (see list below) from Monday November 13 through Wednesday November 15. You will not know which blog has been chosen so the more you comment on the better your chances are of winning! You have until Wednesday, November 15th  at 9 pm ET to comment — winners will be announced on the NND blog on Friday, November 17th.

Check out all the awesome Design Team Blogs below to enter:

Newton’s Nook Designs
Donna Idlet
Ellen Haxelmans
Larissa Heskett
Samantha Mann
Zsofia Molnar
Diane Morales
Farhana Sarker
Tatiana Trafimovich
Amanda Wilcox

Newton’s Nook – November Release Reveals Day 2

Today’s new set is going to be so fun for all of us who love creating scene cards! I don’t do them often anymore but they can be so much fun and a different way to create, which I love!

Cozy Home stamps and dies

Can you hardly stand it?!? There are so many fun images to mix and match together. You can create the perfect little cozy room and use one of the adorable sentiments to connect it all together.

I chose a variety of fun images from the set to color and die cut. Then I arranged them together to create a mini scene. For my background, I chose the largest scalloped circle from the Circle Frames die set.

I used the striped stencil layer from the Retro Sun & Palms set to add texture and color to my background. It happens to fit perfectly in that circle! Then I added my images with foam squares. I stamped and heat embossed a sentiment on the smallest circle in the Circle Frames set and popped it up on that as well.

Last, I glued teal cardstock to a white card base and inked the edges with brown ink to add depth and distressing. Then I popped my circle panels up on that with foam tape. For finishing touches I just added glossy accents to the kitty nose, flame and book spines.

Enter to Win a $25 Prize!

We will be choosing two lucky winners to win a $25 store credit for Newton’s Nook Designs online shop! The winners will be chosen at random from the collective blog posts featuring our new products this week. For a chance to win, leave comments on the Design Team Member Blog Posts (see list below) from Monday November 13 through Wednesday November 15. You will not know which blog has been chosen so the more you comment on the better your chances are of winning! You have until Wednesday, November 15th  at 9 pm ET to comment — winners will be announced on the NND blog on Friday, November 17th.

Check out all the awesome Design Team Blogs below to enter:

Newton’s Nook Designs
Donna Idlet
Ellen Haxelmans
Larissa Heskett
Samantha Mann
Zsofia Molnar
Diane Morales
Farhana Sarker
Tatiana Trafimovich
Amanda Wilcox

Newton’s Nook – November Release Reveals Day 1

We’re at it again. It’s time for the November release from Newton’s Nook and it’s cozier than cozy! Grab a cuppa and a comfy blanket to hop through for amazing inspiration this week! First up…

Heartfelt Coffee (coordinates with Heart Frames dies)

Coffee Beans and Coffee Mug hot foil plates

Coffee Silhouettes dies

Aren’t all of these incredible? I had so much fun creating! Today I have a pair of tags plus two cards to share with you!

I couldn’t resist cutting and gluing together a bunch of the new Coffee Silhouette shapes and once I had them all over my desk I had to figure out what to do with them. Tags seemed perfect and given the colors I chose I went with the fun Cup of Cocoa stamp set for my sentiments.

Next I pulled out my Glimmer Hot Foil machine and tested out the new Coffee Beans hot foil plate with gold shattered foil. After that I inked up the panel with distress oxide inks in all the random brown tones. I spritzed the panel with water and flicked white paint on it too. I just wanted a bunch of texture.

Then I stamped and colored the Heartfelt Coffee image with my copic markers. I used the largest scallop heart from the Heart Frames die set to cut it out and popped it up with foam tape in the center of my panel.

Last, I stamped and heat embossed a sentiment from the same set on a banner from the Banner Trio die set and carefully adhered it with liquid glue. For finishing touches I added glossy accents to the hearts on the coffee cups in the image.

I kept things simple for my Coffee Mug Hot Foil card because I felt like that awesome coffee mug spoke for itself! I hot foiled it with rose gold foil and pulled my colors from that. I die cut a kraft panel with the largest Framework die and inked it up with the Mugs stencil using tattered rose distress oxide ink.

Next, I splattered that with white paint and inked the edges of my white card base with the same distress oxide ink. After the paint was dry I popped up all my layers with foam tape and my card was all finished.

Enter to Win a $25 Prize!

We will be choosing two lucky winners to win a $25 store credit for Newton’s Nook Designs online shop! The winners will be chosen at random from the collective blog posts featuring our new products this week. For a chance to win, leave comments on the Design Team Member Blog Posts (see list below) from Monday November 13 through Wednesday November 15. You will not know which blog has been chosen so the more you comment on the better your chances are of winning! You have until Wednesday, November 15th  at 9 pm ET to comment — winners will be announced on the NND blog on Friday, November 17th.

Check out all the awesome Design Team Blogs below to enter:

Newton’s Nook Designs
Donna Idlet
Ellen Haxelmans
Larissa Heskett
Samantha Mann
Zsofia Molnar
Diane Morales
Farhana Sarker
Tatiana Trafimovich
Amanda Wilcox

Doodlebugs – Hanging Ornaments Card Duo

Happy Monday friends! To mix things up today for the Doodlebugs blog I’m playing with the new Spellbinders ornament dies – there are a few fun sets depending on your style – and Pretty Pink Posh stencils and dies for the background. And of course I got carried away and made too many ornaments for one card so we’ve got two, just for fun!

Like I eluded to above, I started these cards by just pulling out the Spellbinders Festive Ornaments dies and started cutting pieces. I wanted to make a million of them all because they’re so cute but I focused on my top favorites and cut the pieces for those. I just used cardstock in my stash and actually didn’t have a plan for pairing them up at all.

But once they were all glued together, I immediately put these three together and loved the combo! So I pulled out the new Pretty Pink Posh Winter Words stencil and inked green on green cardstock for a subtle background. Then I stamped a sentiment from Spellbinders Santa’s Sippin’ Sayings and heat embossed it white.

After popping the ornaments up with foam tape I threaded fishing line through them for the look of them hanging but nothing too bold to take away attention from the cute ornaments themselves. I secured the fishing line with washi tape on the back of the panel and then glued it to a card base.

But I still had this adorable light ornament left over and this sentiment in the same stamp set was just calling it’s name. So instead of making more for another card in the same design I thought I would let it shine all on its own. I did use the same stencil on this background panel before die cutting it with the largest Pretty Pink Posh Eyelet Rectangle die although my dark red ink isn’t quite dark enough for this paper.

I heat embossed my sentiment on the bottom of the panel and popped the ornament up the same as the others. Then I threaded fishing line all the same again and popped the eyelet panel up on a white card base.

Aren’t these so fun!?! I can’t wait to make more, including the other sets with the critters and characters in them. These would make great tags and ornaments for your tree too! Lots of ideas!!!

Products used:
Spellbinders Santa’s Sippin’ Sayings stamps
Spellbinders Festive Ornaments dies
Pretty Pink Posh Eyelet Rectangles dies
Pretty Pink Posh Winter Words stencil
Blending brushes
Lawn Fawn Ink – cilantro and chili pepper
Foam tape
Liquid glue
VersaMark
Embossing powder – white
Powder tool
Reverse tweezers

I appreciate you sharing your time with me. Have a fabulous day!

Miss Ink Stamps – Drink Happy Thoughts

Hey friends! I’m stopping by today with an extra Miss Ink Stamps card to celebrate the Coffee Loving Cardmakers Fall | Winter Hop! Miss Ink is a super sponsor and has a super fun array of caffeinated products to create with!

I started by stamping and coloring the gorgeous image in Coffee with copic markers. Then I fussy cut it out. Yes, you read that right. I actually fussy cut something. Then I die cut a circle and heat embossed a sentiment from the same stamp set on it.

Last week I created a rainbow card when I used the outside frame from the EIEIO Frame dies. Well, of course I kept the inner scalloped rectangle and today I’m using it on this card. I went ahead and cut a vellum stitched rectangle from the same die set.

To put everything together, I started with the coffee cup and sentiment, gluing them together with liquid glue. Then I added foam tape to the back and adhered them to the vellum. I hid adhesive behind those two things to attach the vellum to the scalloped panel. Then I tied my twine around the top before adding foam tape to the back so I could avoid that area. I attached the main panel to the card front and added some glossy accents to the flower.

Are you playing along with the Coffee Lovers Hop? There are so many sales and prizes and tons of fun! I hope you are!

Products used:
Coffee stamps
EIEIO Frames dies

Foam tape
Glossy accents

I appreciate you sharing your time with me. Have a fabulous day!

Pink & Main – Warm & Cozy Wishes

Hello everyone! I’m back with more caffeinated inspiration from Pink & Main! This mug stamp set is one of my forever favorites and I couldn’t pass the chance to ink it up and play. Today I chose the scarecrow mug and a few small images to go with him.

I colored everything with copic markers and used the coordinating dies to cut it all out. Then I used a craft knife to cut a slit and slid the sunflower into the top of the mug. I used liquid glue to keep it in place and also added my acorn and leaves the same way.

I chose two patterns of paper from the Cozy Critter paper pad and cut them out with the largest Stitched Arch die. I trimmed the woodgrain down to about an inch and glued them together. Then I cut an Extra Large Sentiment Strip and heat embossed my sentiment on that.

Next, I tied twine around the top of the arch and held it in place with washi tape. I added the sentiment banner and images with foam squares and then carefully added foam strips to the back of my arch, avoiding the twine.

I didn’t like the white border so I inked my card base with crushed olive distress oxide ink and then popped the panel in place. I like how all of the color tones have that fabulous fall feel!

To finish things off I added stardust Stickles to the scarecrow cheeks and Touch of Gloss to the acorn top and sunflower center. A little sparkle and shine never hurts!

Products used:
Cocoa For You stamps and dies
Cozy Critter paper pad
Stitched Arches dies
Extra Large Sentiment Strip dies
EZ Squeeze liquid glue
Foam tape
Touch of gloss
Embossing and watermark ink
Embossing powder – frosting
Magic anti-static brush

Stardust stickles

I appreciate you sharing your time with me. Have a fabulous day!

Newton’s Nook – Never Judge a Book

Happy Wednesday friends! I’m happy to be over on the Newton’s Nook blog today with another dose of caffeinated inspiration to get you through the Coffee Loving Cardmakers hop week. I’ll be linking this card up for sure. I hope you’re playing along too. There are lots of fun prizes up for grabs, including one from Newton’s Nook!

I just adore the images and sentiments in the Sips & Stories stamp set so I pulled that out to play with today. I chose my favorite image and colored her up with copic markers. Then I used the coordinating die to cut the image out and set it aside.

After flipping through the Coffee House Stories paper pad, I chose two patterns – one for my focal panel and one for the card front. I cut the focal panel from the largest Frames & Flags die set, then also die cut a black banner while I had it out. I stamped and heat embossed my sentiment on that.

As I was finalizing my layout, I wanted something subtle behind the image so I added a scalloped vellum circle cut from one of the Circle Frames dies. My polka dot panel is adhered with liquid glue, then the cups are popped up on foam tape. The image and sentiment banner are glued together and popped up on the vellum circle with foam tape as well. I hid some liquid adhesive behind the image to add the vellum circle to the card front. For finishing touches I added Touch of Gloss to the pillows and kitty nose.

Products used:
Sips & Stories stamps and dies
Coffee House Stories paper pad
Circle Frames dies
Frames & Flags dies

Anti-static brush
Embossing & Watermark ink
Embossing powder – frosting
Touch of gloss
Foam tape

I appreciate you sharing your time with me. Have a fabulous day!

Waffle Flower – New Shader Brushes are Magic

Hey friends! Stopping by today to share a new crafting tool on the market. Waffle Flower has stepped up the blending brush game again. They’ve got new blending brushes in different styles and they make adding multiple colors to small areas a breeze. Low stress and fun to blend different colors in small spaces!

I made a few cards with this amazing die and stencil combo a few weeks ago but I couldn’t resist pulling out out again to play with these brushes. I mixed and matched pink, purple, orange and brown together for some beautiful leaves!

Then I trimmed the panel down and glued it to a kraft card base. I cut my sentiment three times and glued those together offset before adding them to my leaf panel. I popped up a sentiment strip that I thought went well and pulled the leaves up for added dimension.

Another amazing part to the Waffle Flower blending brushes is that they come in packs. We all like to have a color family for each brush and this makes it super simple to do.

Products used:
Pop Up Fall Leaves Panel die
Fall Leaves background stencil
Shader Brush PLUS sampler pack
Liquid glue
Foam strips

I appreciate you sharing your time with me. Have a fabulous day!

Doodlebugs – Holly Jolly Die Cutting Christmas

Hello everyone! I had a die cutting party for one in my craft room and it was a blast! I played with the new Pretty Pink Posh Build a Stocking die set and it was so fun! I even went a completely different color way than I’m used to for added fun. I hope you enjoy it!

This card actually started with me embossing a piece of white cardstock with the new Spellbinders Sparkling Snow 3D embossing folder. I had to test it out as soon as it came because it looks so pretty on the package. It’s even better in real life. After I embossed the panel I took my pink and purple blending brushes and just went over random snowflakes without adding and ink to them. It gave a sweet, soft glow on the paper and I loved it.

So naturally, I went digging in my paper stash and found pink and purple cardstock that coordinated and started die cutting parts of the stockings. I used liquid glue to adhere them together and played with arrangement on my card for a while before I liked it.

I carefully added liquid glue where the stockings overlapped and placed an acrylic block on them to dry so I didn’t lose my positioning. (That’s how long it took me to get it right.) While that was drying, I die cut sentiment strips and stamped the sweetest sentiment ever on the top layer. I was mindful to use gray ink because the card is so soft, I didn’t want a bold black sentiment stealing all the attention.

With the stockings dry, I added foam squares to everything and popped them in place on the embossed panel. Finally, I added the panel to a card base and my card is all finished.

I love thinking about different ways projects could be fun after I make them and this one screams a “build a stocking” party for kids. Die cut a bunch of pieces and let them loose to build stockings and create cards with them. I think it would be so much fun for everyone! Shoot, might be a fun way to convert a non-paper crafter to the dark side too. Lol.

Products used today:
Pretty Pink Posh Build a Stocking dies
Pretty Pink Posh Sentiment Strip dies
Pretty Pink Posh Sentiment Strips | Christmas stamps
Spellbinders Sparkling Snow 3D embossing folder
Liquid glue
Foam squares

I appreciate you sharing your time with me. Have a fabulous day!