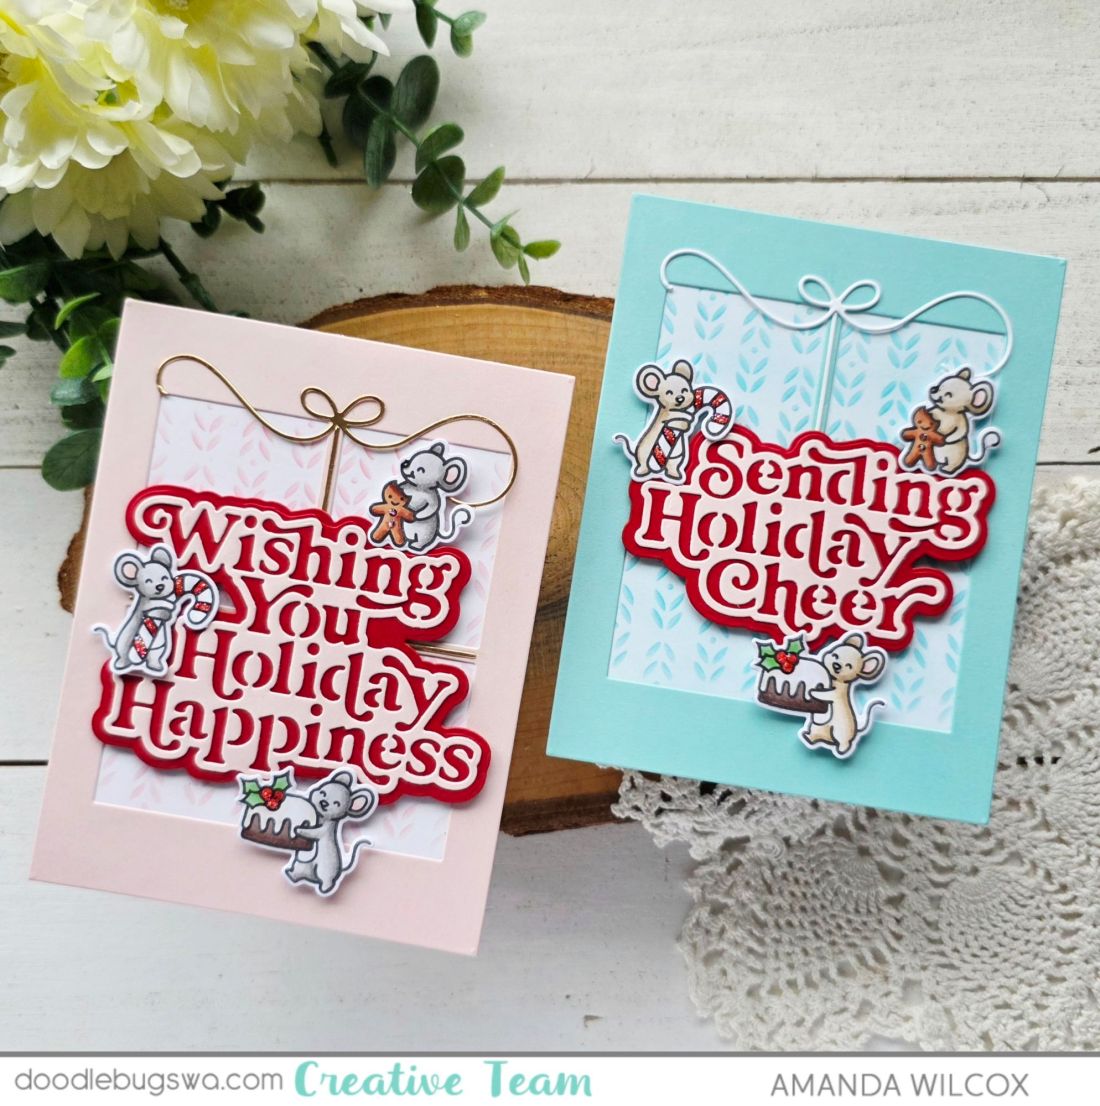
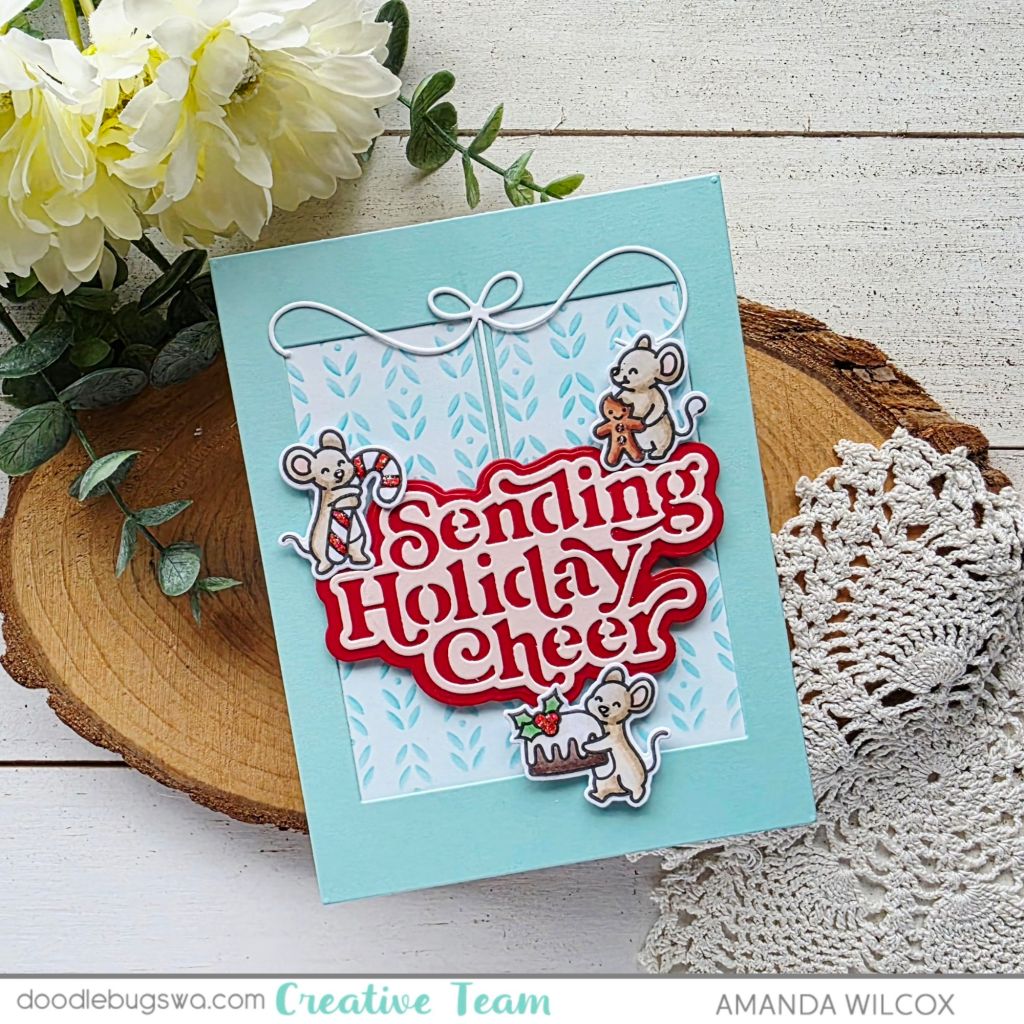
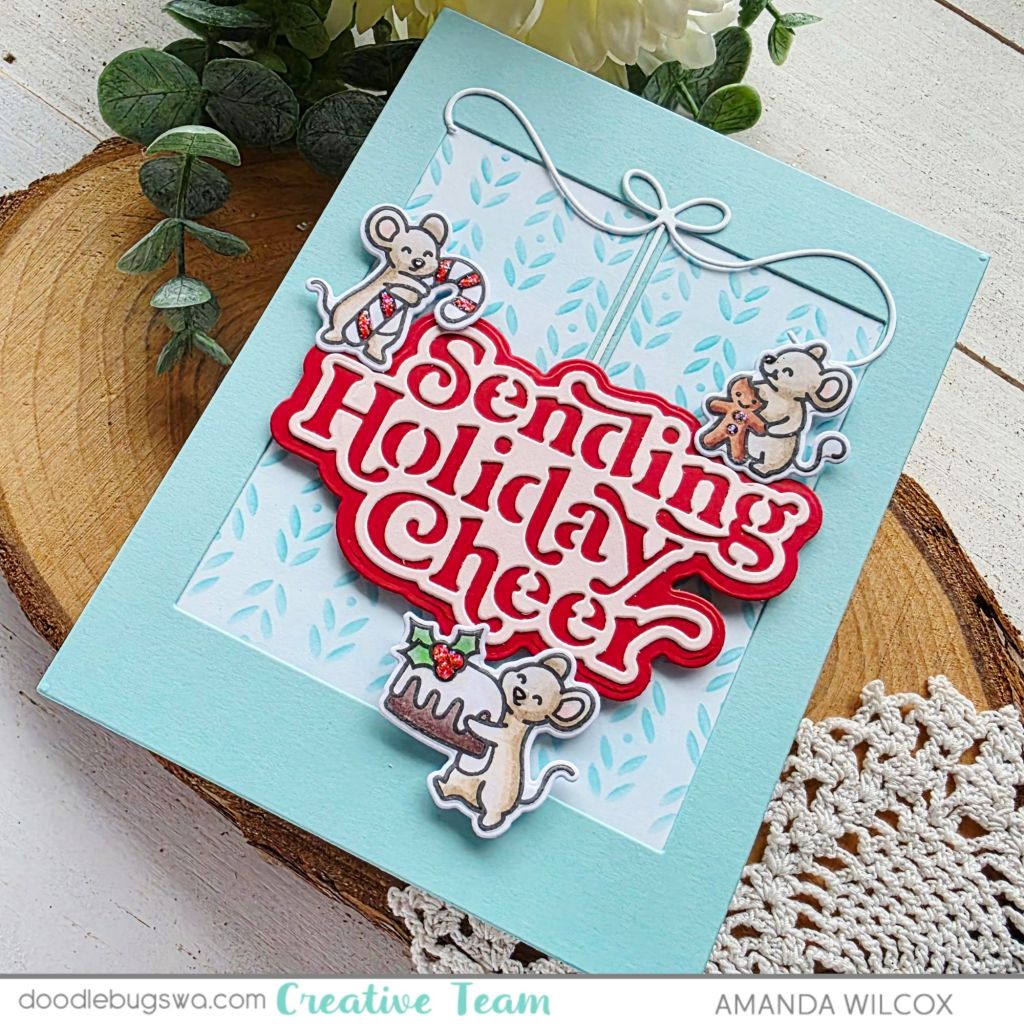
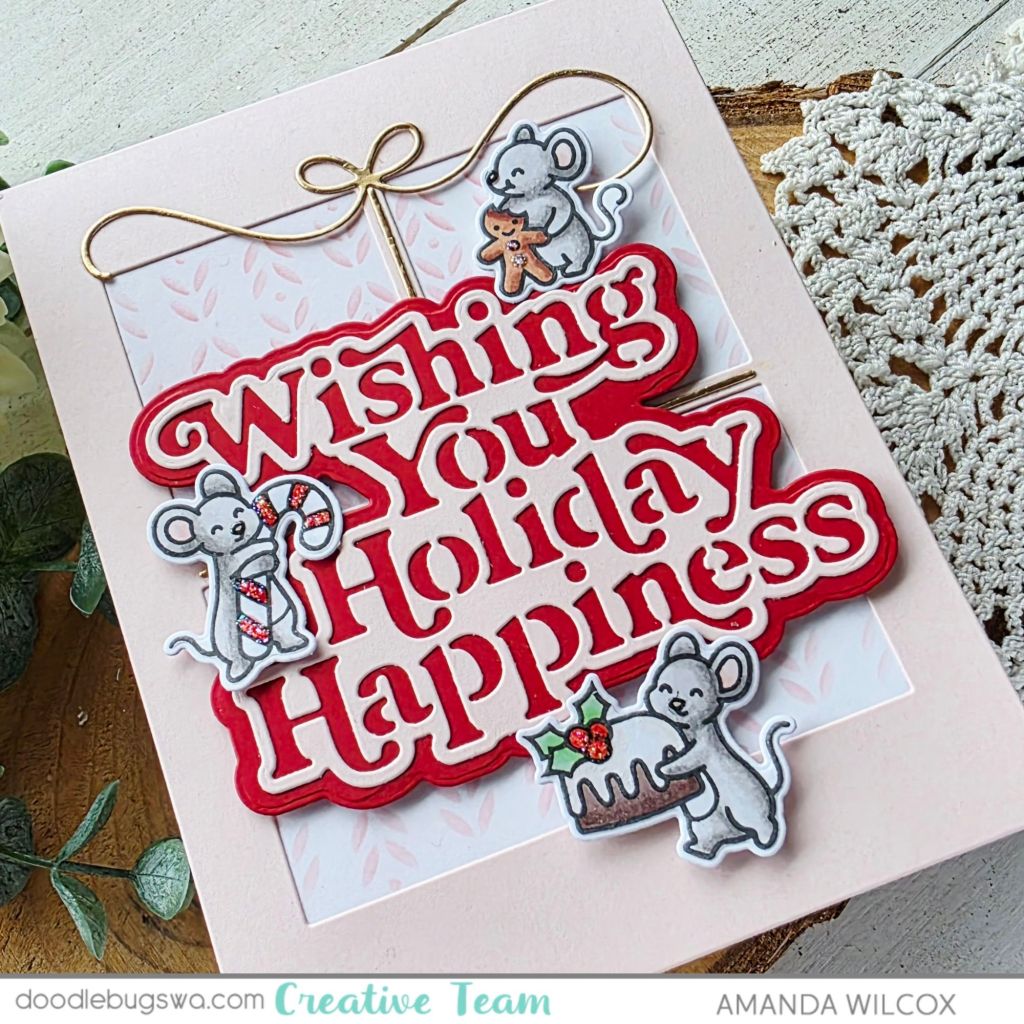
Happy Mix it up Monday everyone! I’m here today with a pair of cards featuring the same products in two colorways to help stock my stash for Christmas cards before it’s here.
I started by cutting the Mama Elephant All Tied Up cover from pink and teal cardstocks. Then I cut the string and bow from white and rose gold cardstocks to see how the different colors looked. They’re both good but I think I like the flashy better.
I cut white card bases next and inked up the front with the Pretty Pink Posh deco leaves stencil coordinating with both panels I had ready to go. I used Lawn Fawn peacock and ballet slippers inks here.
I pulled out the Mama Elephant Holiday Happiness dies and cut both sentiments from red and pink cardstock, using liquid glue to adhere the layers. I always have a hard time choosing which to use so I love making double cards for these to use one of each.
Next, I stamped two sets of the cute mice from the Lawn Fawn Sweet Christmas Mice and colored one set gray and the other brown. I used the coordinating dies to cut them out and now we can start assembling everything together.
The gift panels are glued directly to the card bases, along with the ribbons strings. Then I popped the sentiments and mice up with foam tape and squares. I finished the designs off with glossy accents on mouse noses and stardust Stickles on bits of each image.
It’s release day for Newton’s Nook and, therefore, Instagram Hop day as well! Before you head over and fill your carts up. Head to Instagram and hop with us for a chance to win and more inspiration too!
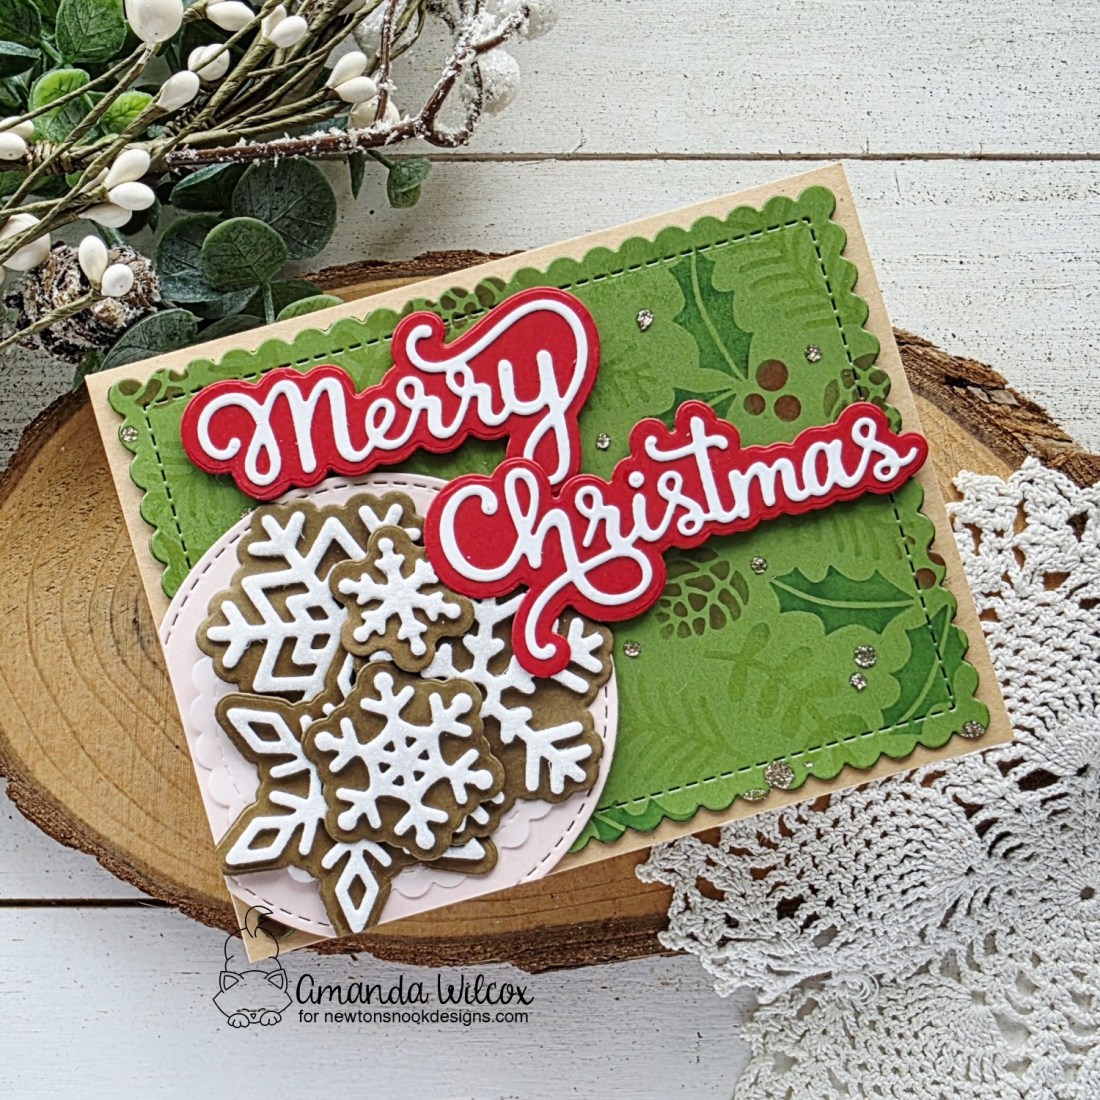
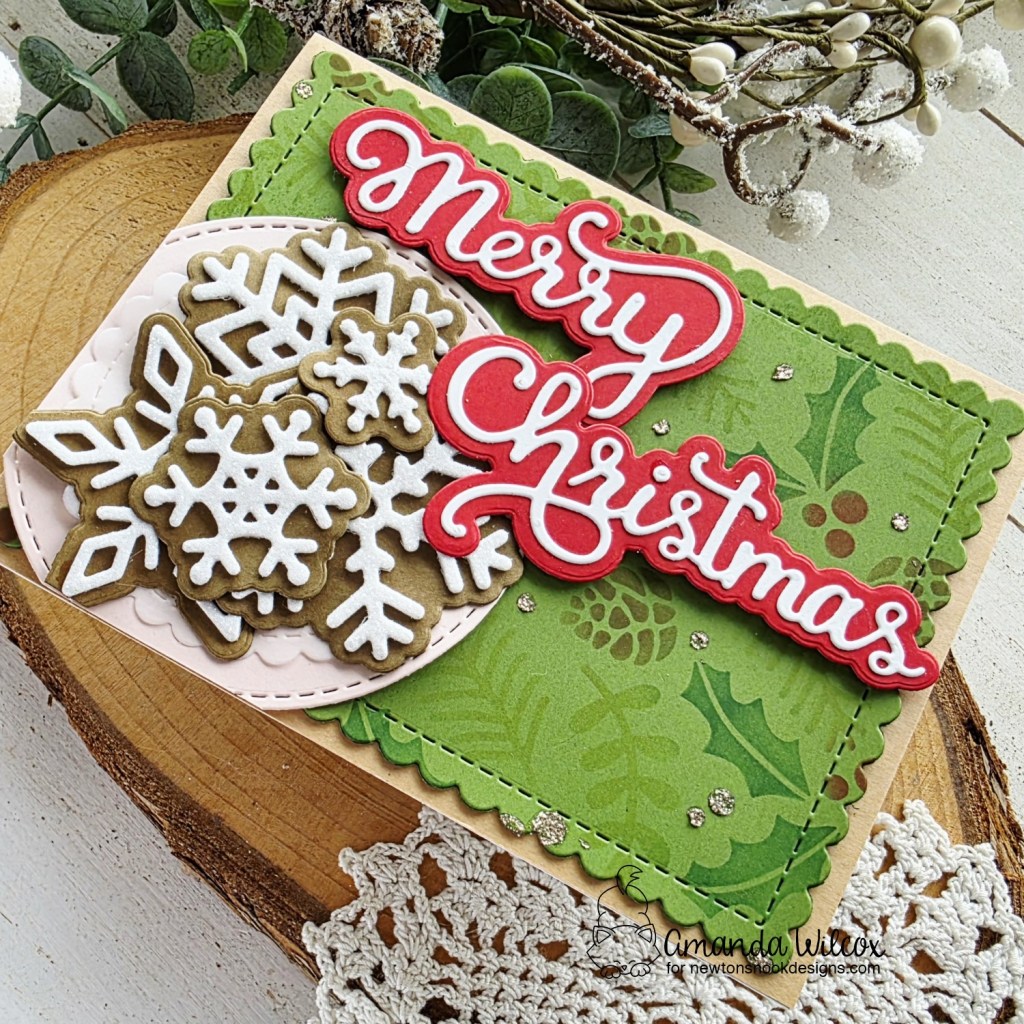
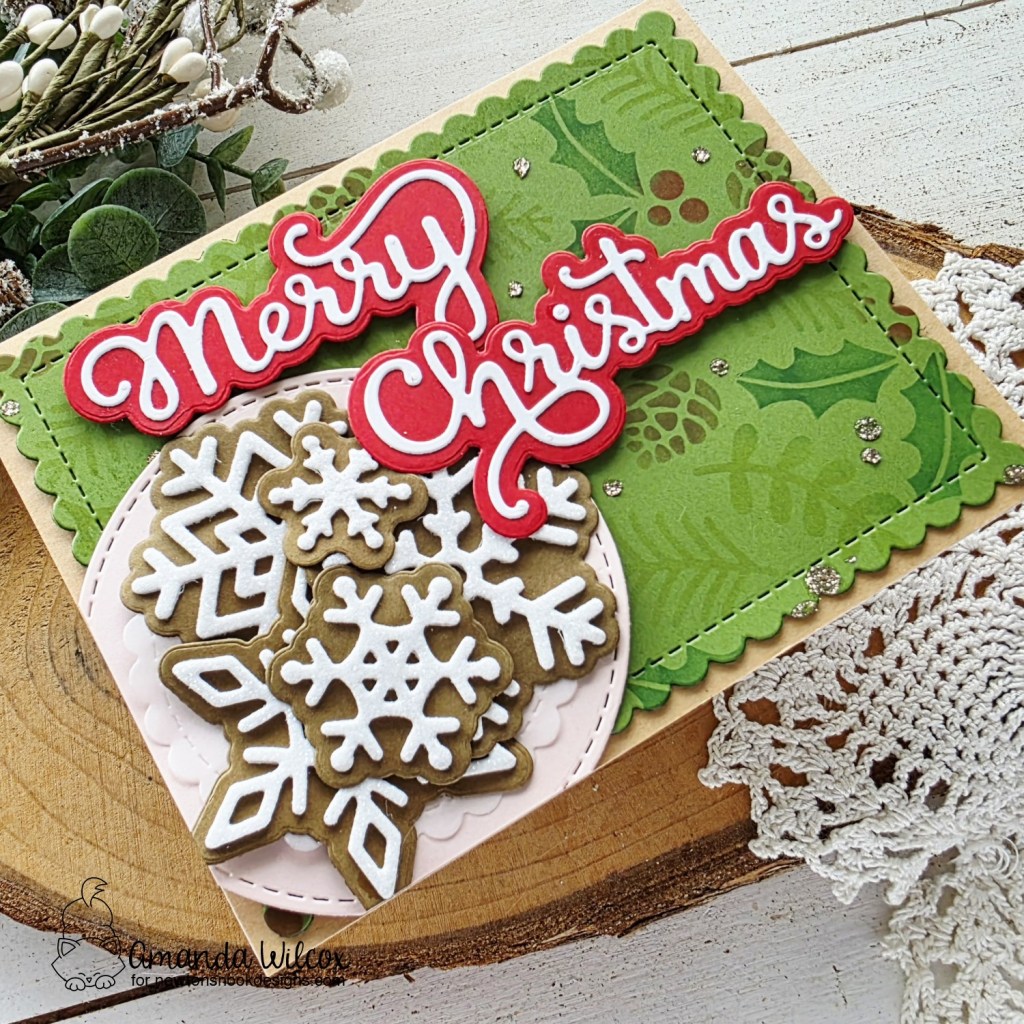
I created this card to share for the hop which uses the new Snowfall dies to make gingerbread cookies! I cut the shadow from brown cardstock and the snowflakes from white glitter foam! Perfect combo for almost edible looking cookies!
I inked up the Holiday Foliage stencil on green cardstock for my background and used the Circle Frames dies to create my cookie plate. I glued a piece of kraft cardstock to a card base and then added my foliage panel directly to that with liquid glue as well. The cookies are quite tall stacked up like that so I didn’t want to risk too much dimension.
I glued the cookie plate down and trimmed the excess off before adding my sentiment (from the October release) with foam squares to help it lay nicely with the cookies.
Like I said before, head to Instagram and comment on the hop for a chance to win plus so much fun inspiration! Then head to the Newton’s Nook shop to fill your carts and start crafting!
I appreciate you sharing your time with me. Have a fabulous day!
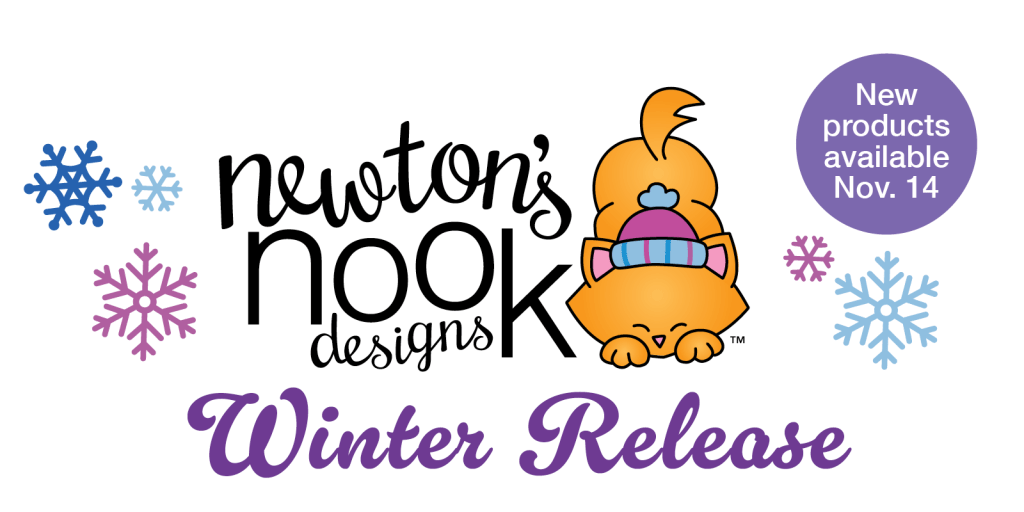
Welcome back everyone! For day 2 of the Newton’s Nook November release reveals, we’re completing your winter wonderland for crafting! Let’s check it out!
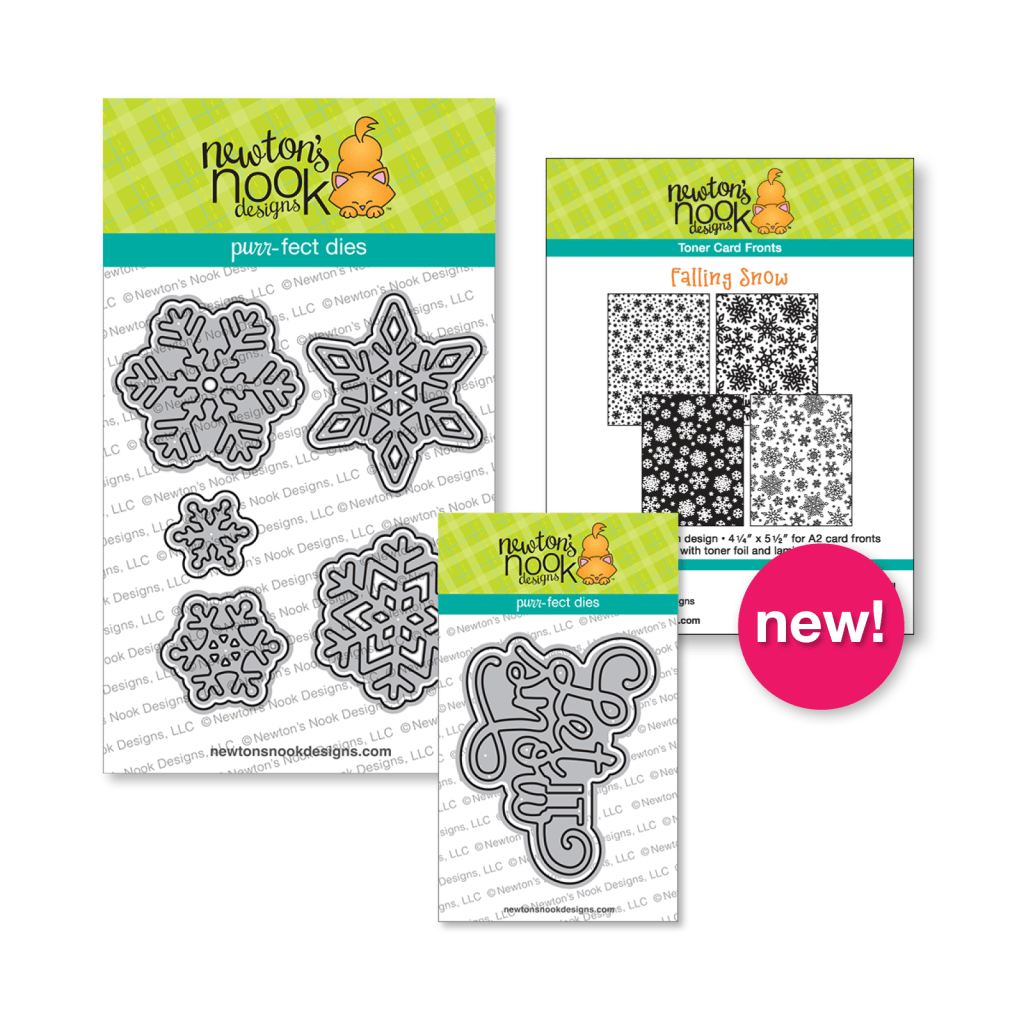
Snow Flurries toner card fronts, Snowfall dies and Let it Snow dies
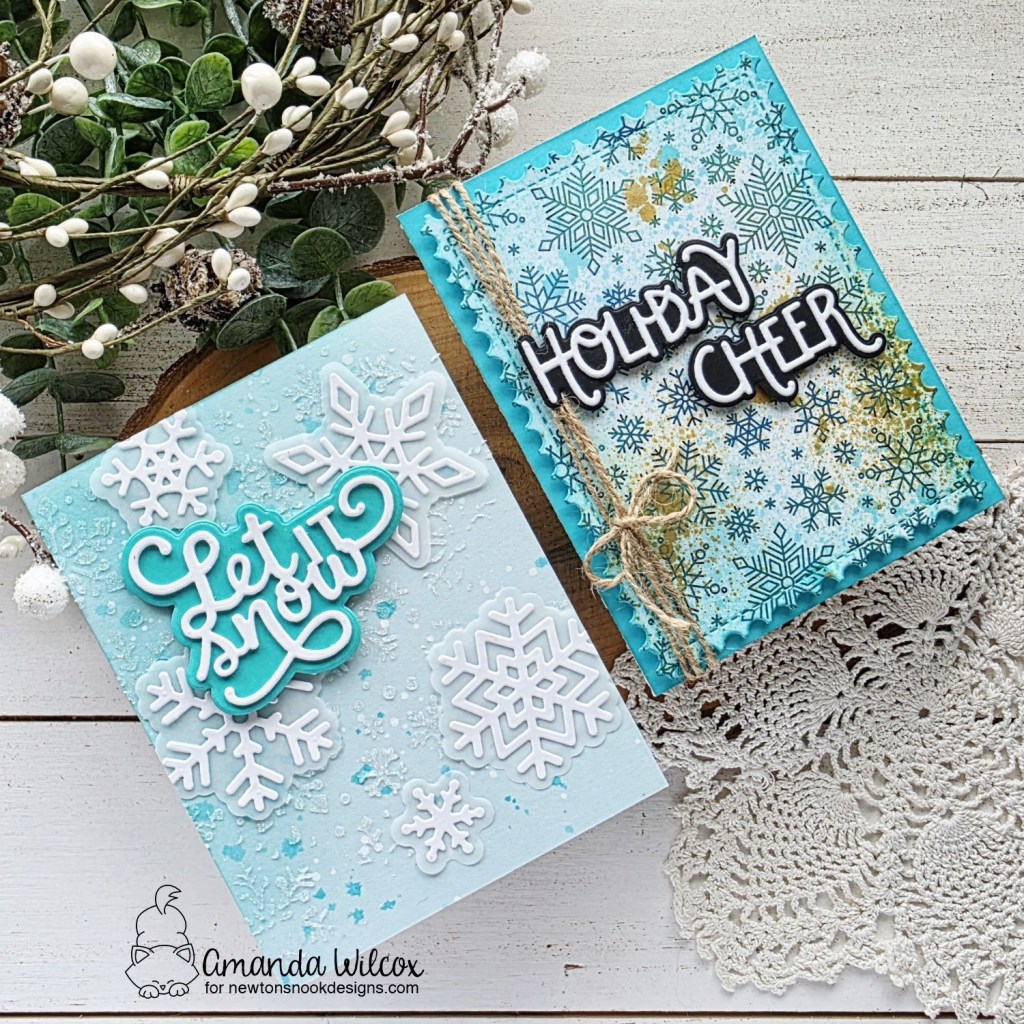
Isn’t this a fabulous start to a winter wonderland?!? I think so! Plus I have 2 cards to share with you for inspiration today.
I had so much fun playing with all of these goodies. I know you will too! Let’s have a look at the beautiful toner card fronts first.
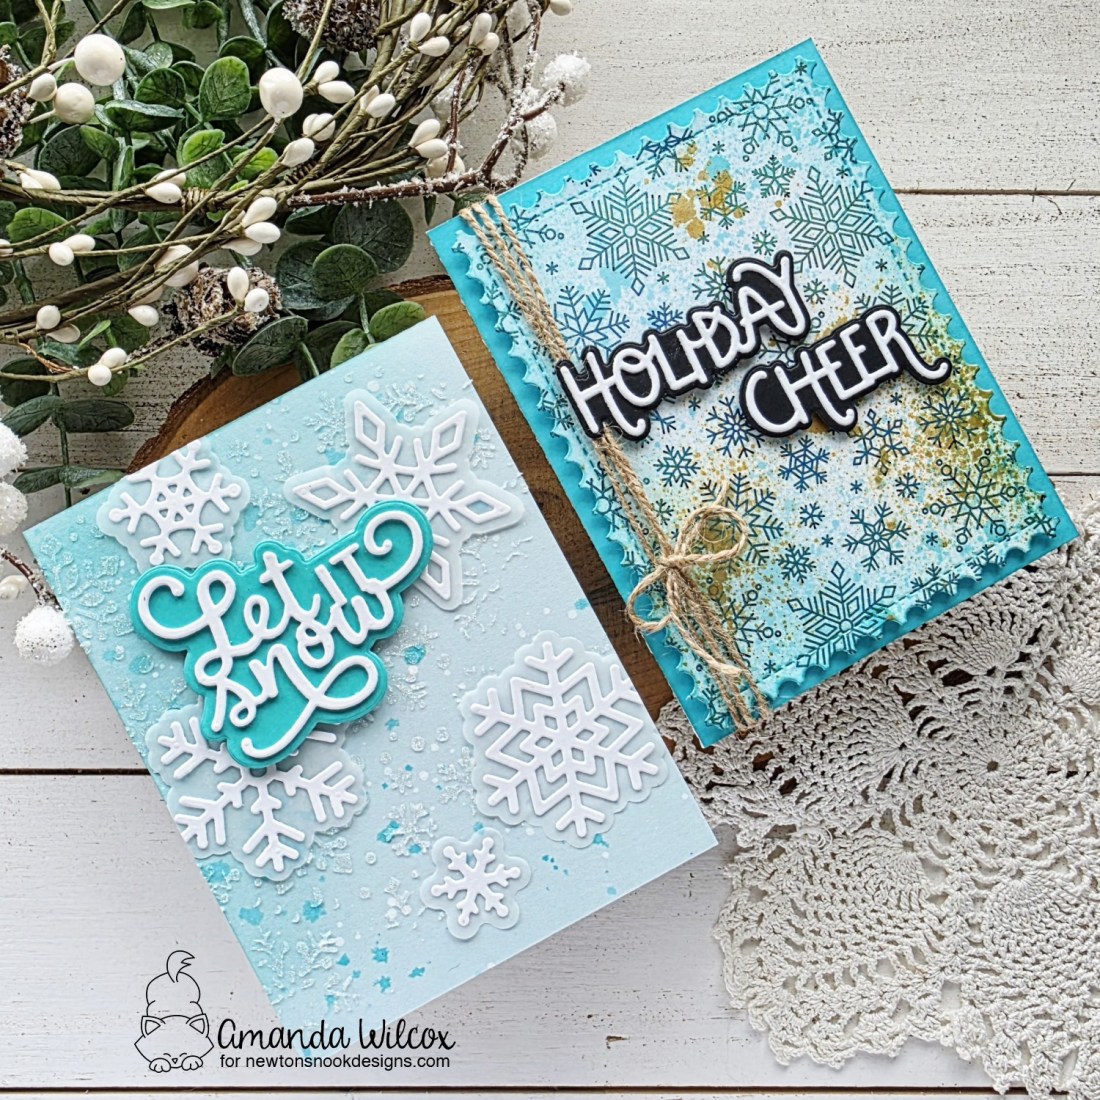
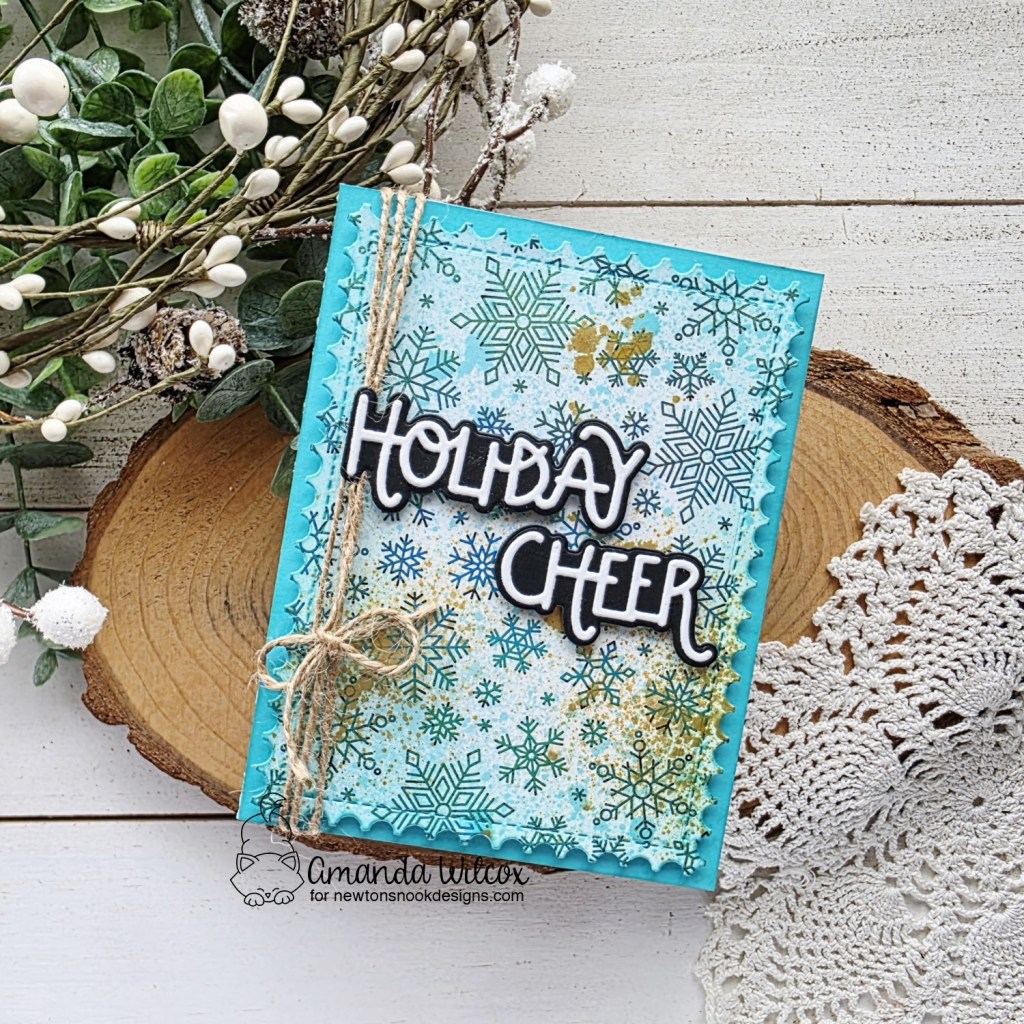
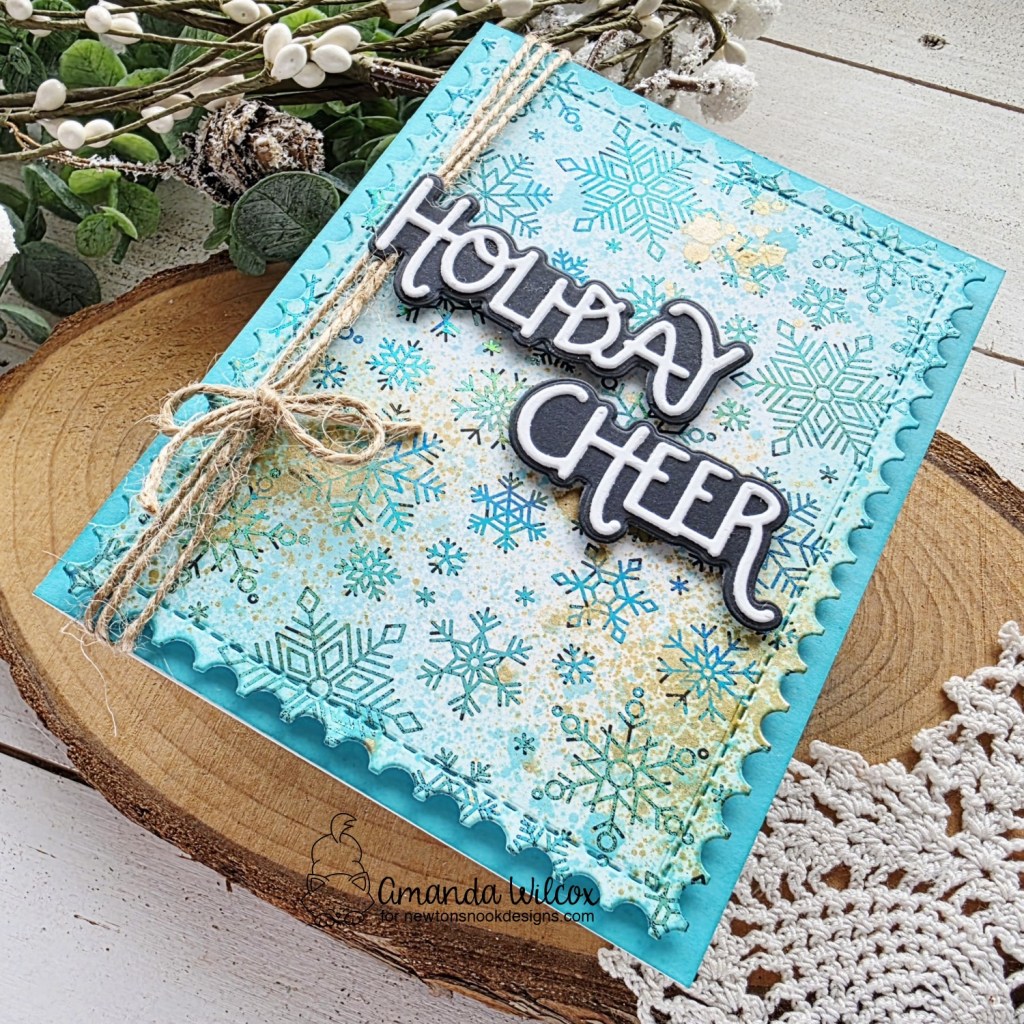
I foiled my panel with a teal deco foil from Thermoweb. Then splattered it with distress sprays in peacock and gold. Once those were dry, I cut the panel with the largest Framework die and inked the edges with teal ink for added interest.
I added a teal panel to a card base and popped the foiled panel up on that with foam tape. Next, I cut a holiday sentiment that released this time last year and popped it up too. Last, I finished the design off with some jute twine tied around the card front on the left side. A little rustic and a little shine – perfect combo!
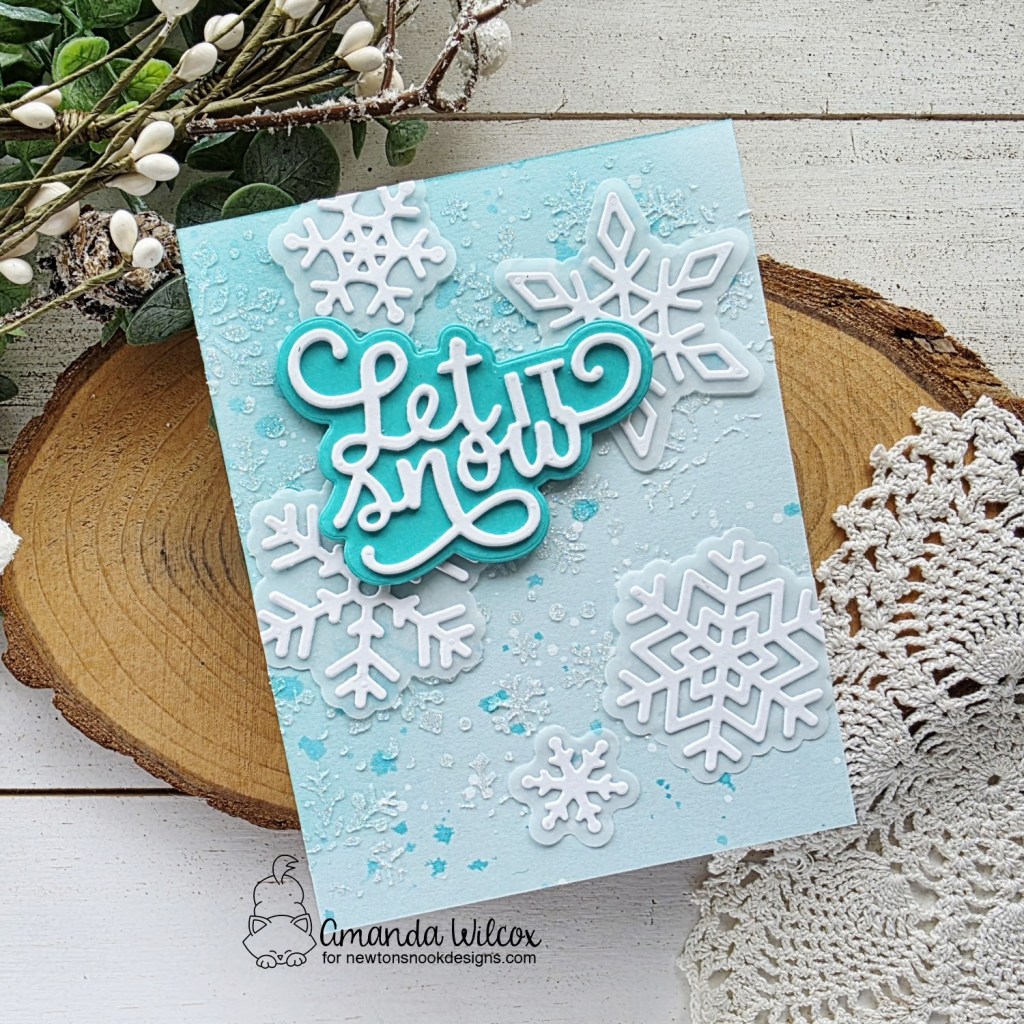
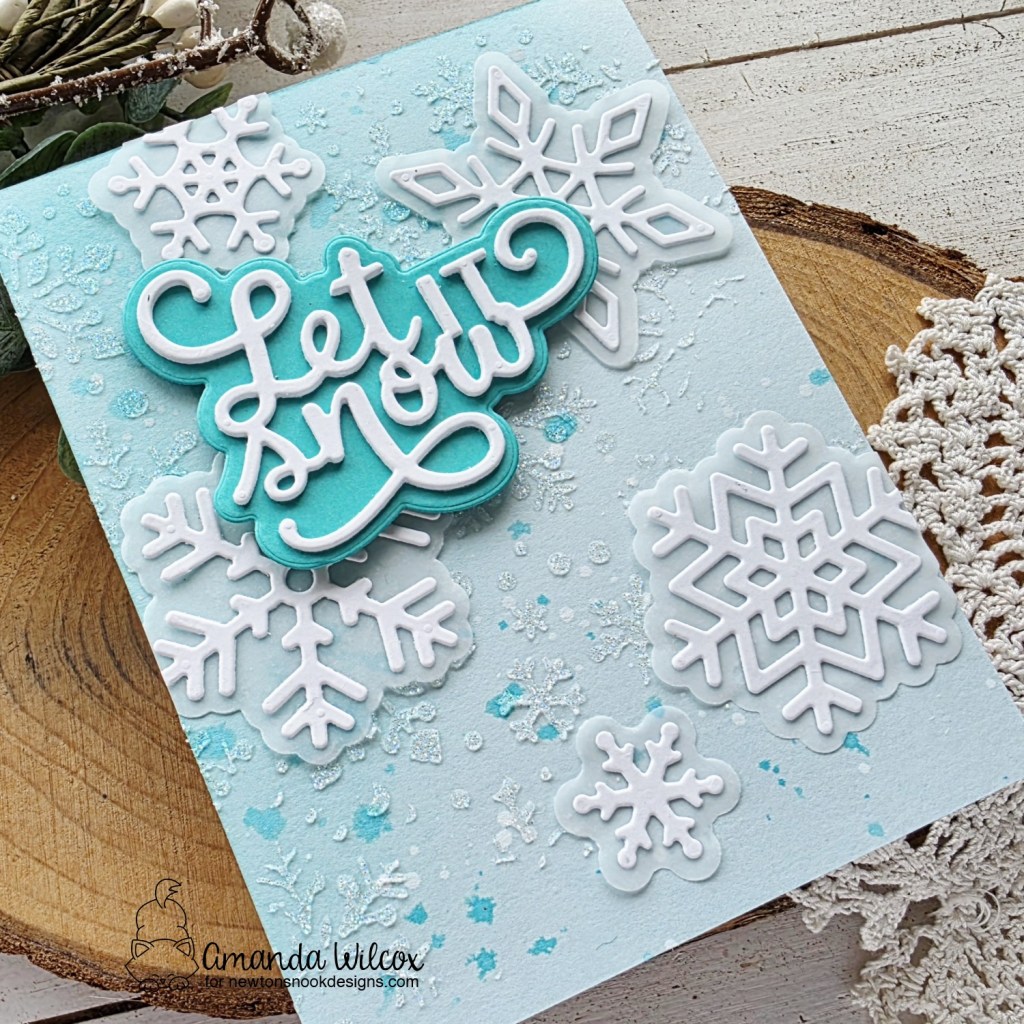
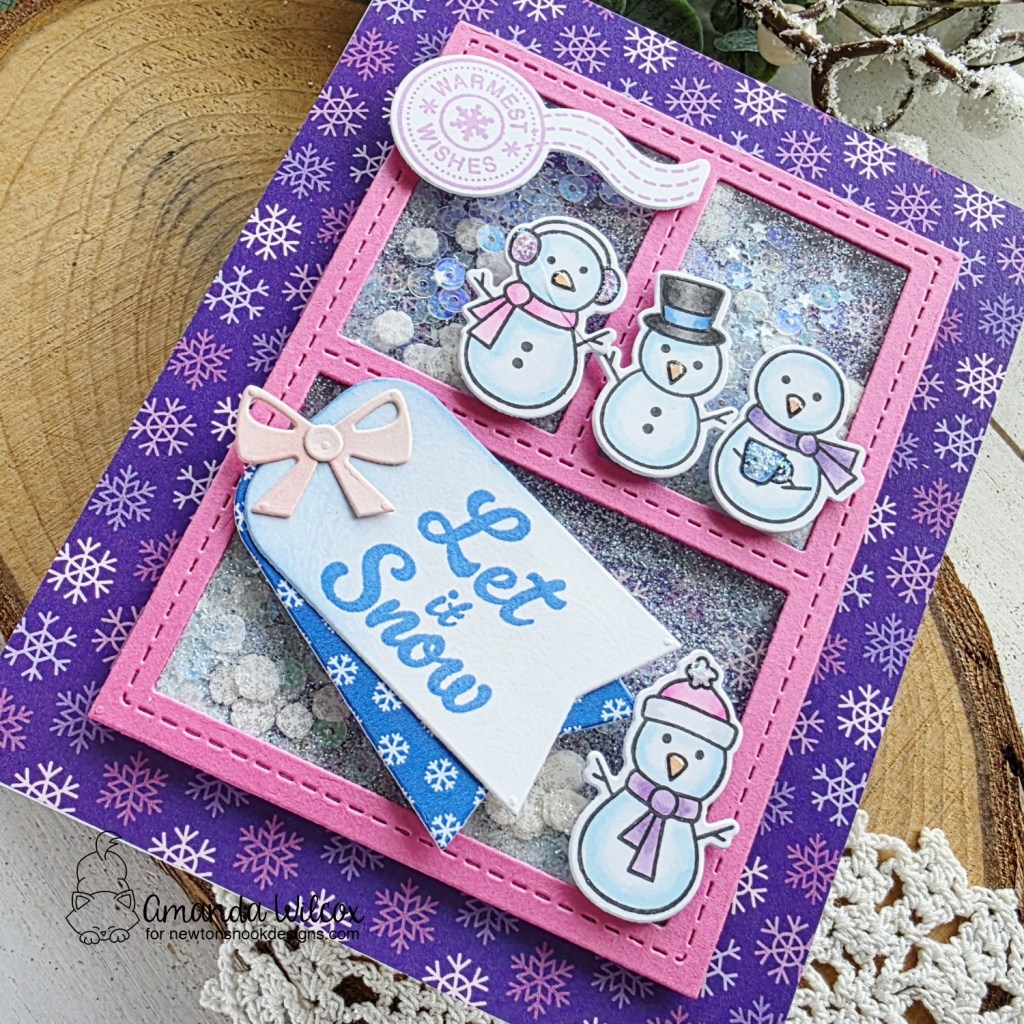
Next I paired the new sentiment dies and snowflake dies with an oldie but goodie stencil called Snowfall. I started by inking a light teal panel from the top left corner out, fading for an ombre effect. Then I splattered the panel with teal ink and let it dry. Next, I spread Astro Paste through the Snowfall stencil also, fading from the top left corner down.
I cut the new snowflakes from white cardstock and vellum, using liquid glue to adhere them together. Next I cut my sentiment dies from white cardstock and teal for the shadow. This time I cut the words 4 times from white cardstock so they have height. I glued the snowflakes to the panel with liquid glue and popped the sentiment up with foam squares.
Enter to Win a $25 Prize!
One lucky winner will receive a $25 prize to spend at Newton’s Nook Designs online shop! The winner will be chosen at random from the collective blog posts featuring our new products this week. For a chance to win, leave comments on the Design Team Member Blog Posts (see list below) from Wednesday November 12 through Thursday November 13th. You will not know which blog has been chosen so the more you comment on the better your chances are of winning! You have until Thursday, November 13th at 9 pm ET to comment — winners will be announced on the NND blog on Friday, November 14th.
Want another chance to win? We will be having an instagram hop on Friday with a second prize! Please join me on Instagram on Friday, November 14th for details!
Check out all the awesome Design Team Blogs below to enter:
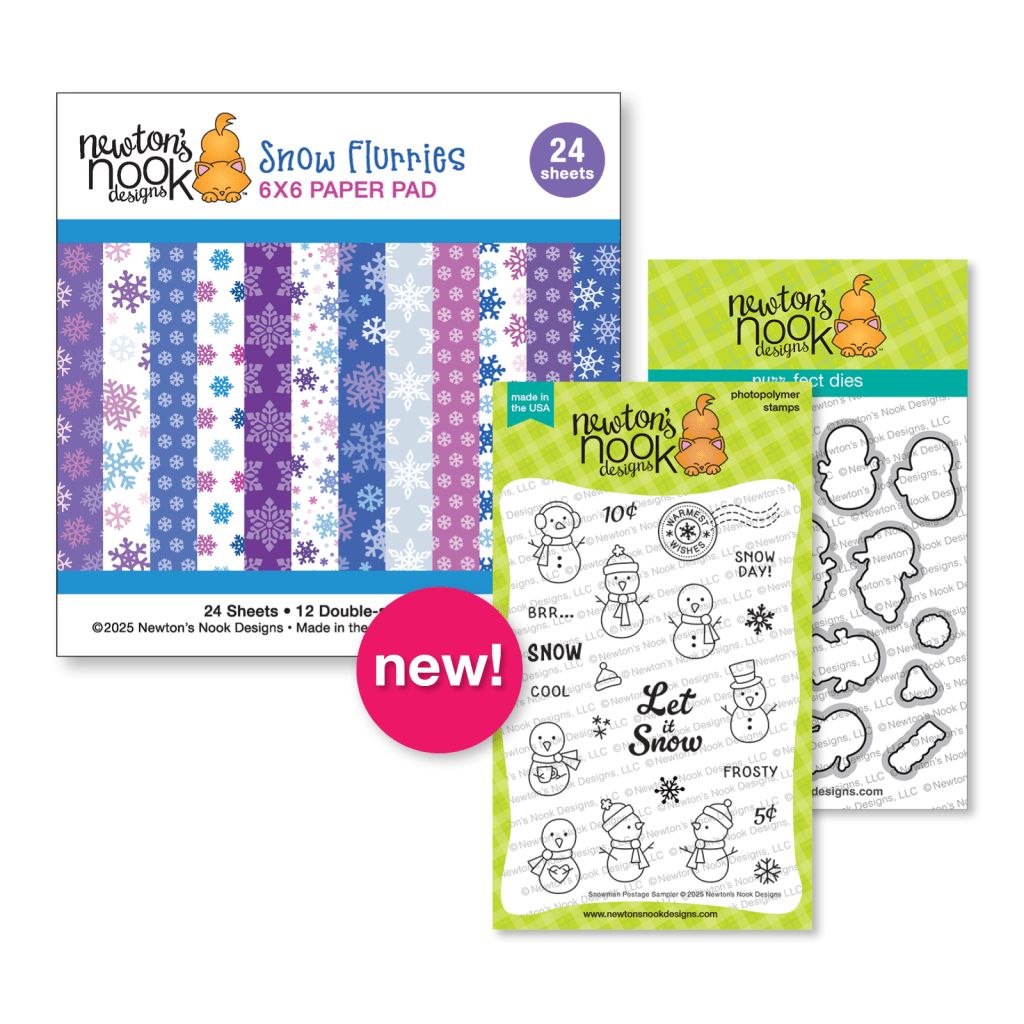
Hi everyone! We’re here with a reveals for the Newton’s Nook November mini release! It’s perfectly winter to balance your Christmas goodies and carry you right into the new year! Let’s look at today’s surprises!
Snowman Postage Sampler stamps and dies AND Snow Flurries paper pad
I am smitten with these adorable snowmen and just love the color palette of the new paper pad too! Mix them together?!? Crafting fun for days!
I have 2 cards to share with you today using both of these new goodies together in totally different ways.
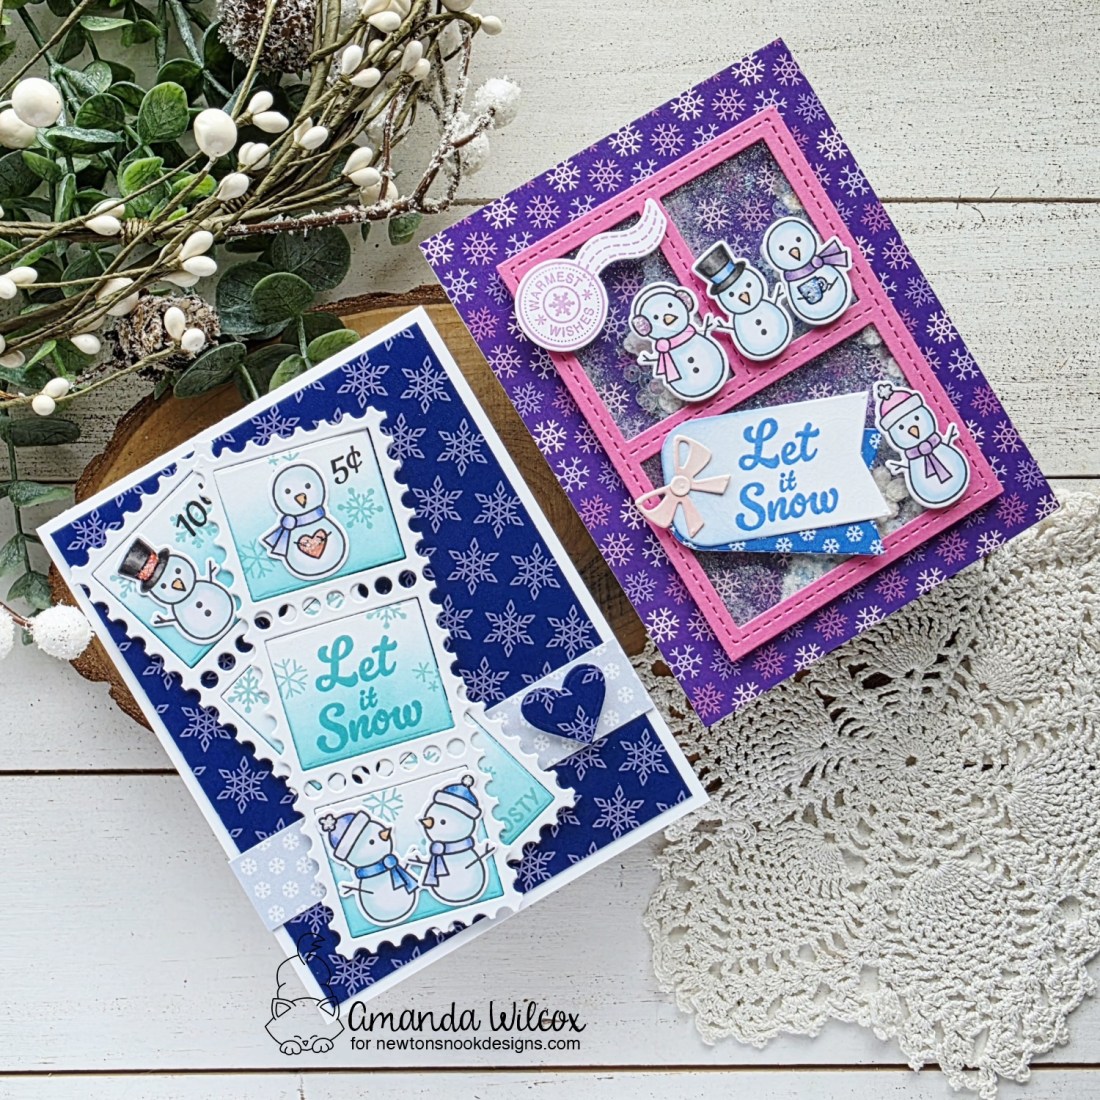
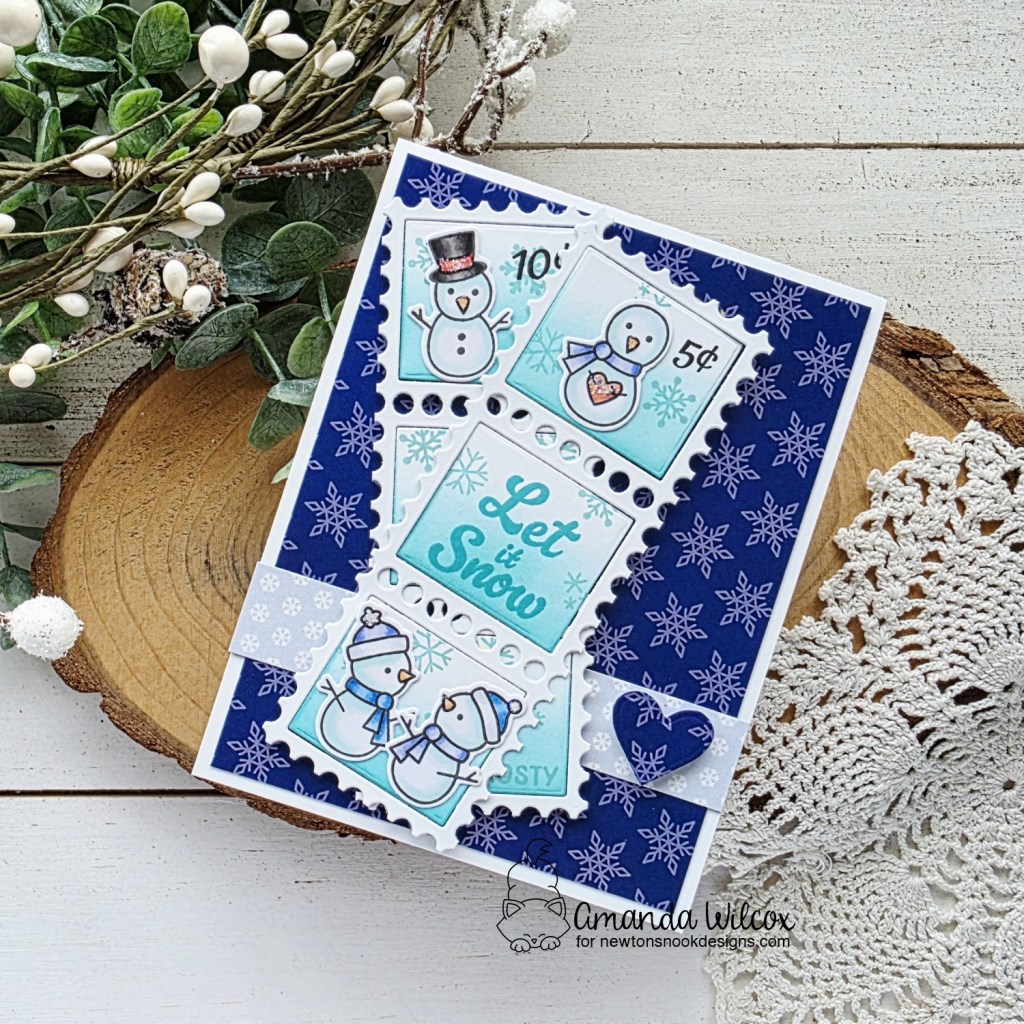
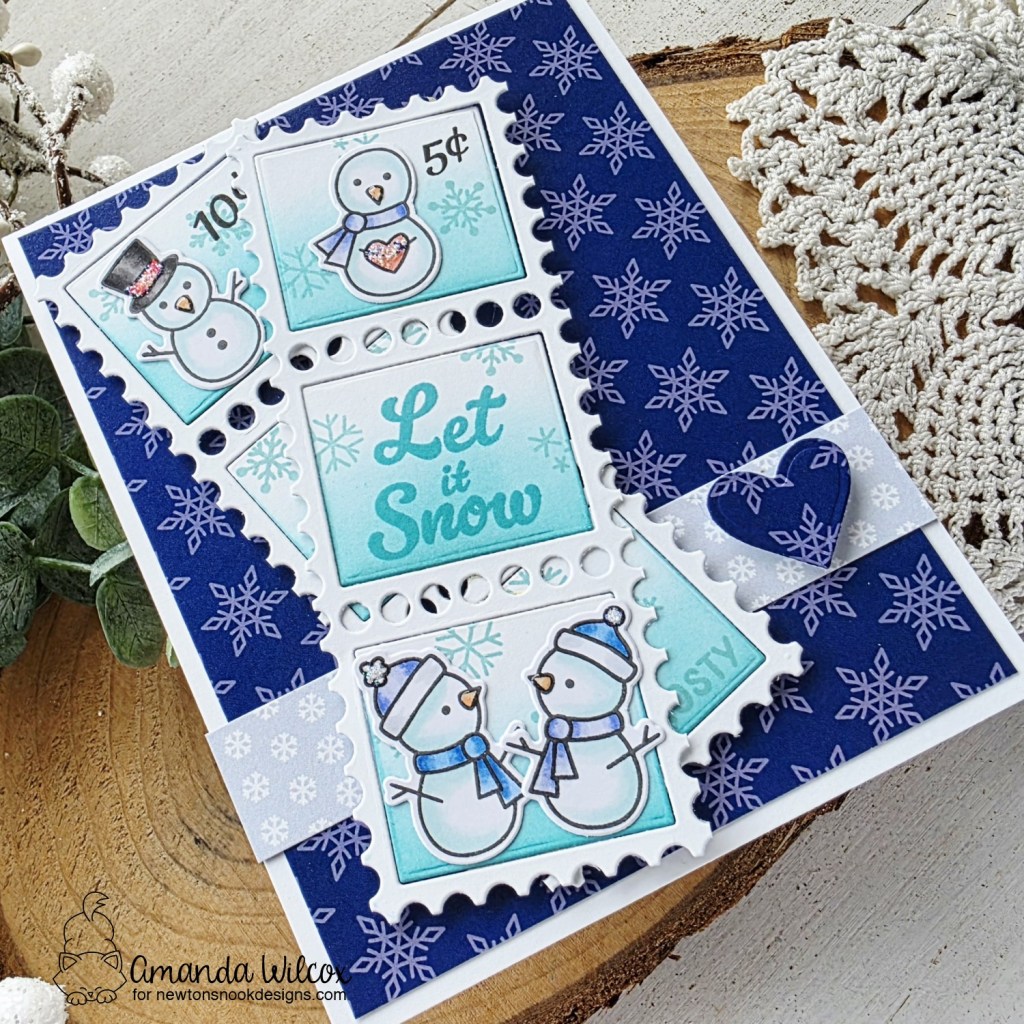
For this first card, I pulled out the Postage Frame dies and cut them apart into strips. I inked the inserts with teal ink and stamped some smaller images, plus a sentiment. Then I added my snowmen and glued the strips together.
I chose 2 patterns of paper from the pad and trimmed one to 5.25 x 4 inches and glued it to a white card base. Then I cut another strip about 1 x 4.25 inches and glued that down. Then I added my stamp strips with foam tape on the left. I cut the heart in the center of the Circle Frames die set from the background paper and popped it up next to those. This card was finished off with stardust Stickles on parts of the images and glossy accents on all carrot noses!
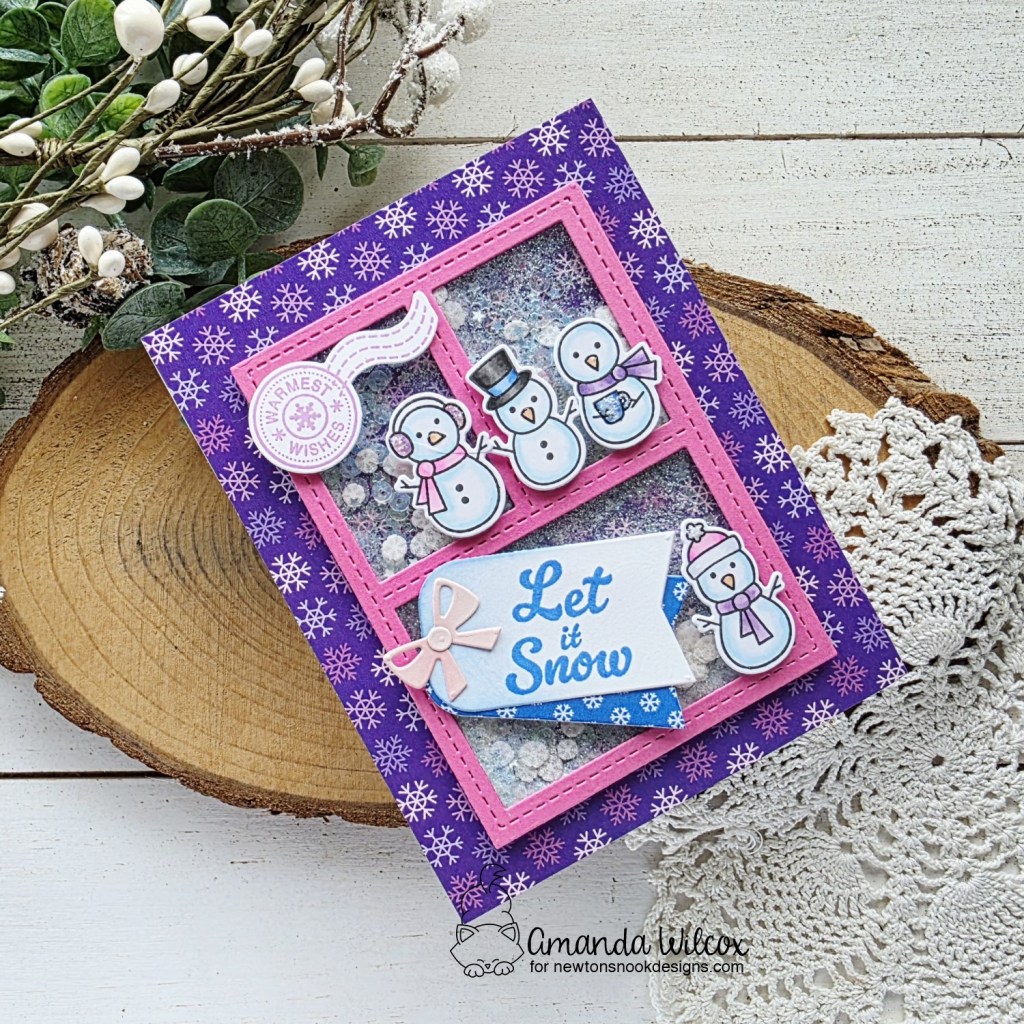
For my second card, I decided to create a fun shaker using one of the card layout dies. These are so perfect for this style of card! They make it fun and easy. I cut the frame from pink cardstock, plus trimmed acetate to the same size, adhering them together with double-sided tape. I added foam tape to the back of that and set it aside.
Next I trimmed a snowflake pattern to A2 size and glued it to a card base. I sprinkled some shaker bits onto the center, and adhered my shaker frame to that. Then I chose my snowmen to stamp and color – coordinating to the paper I chose. Last, I used one of the tag dies in the Card Layout die set to hold my sentiment.
This card is finished off the same as the first with stardust Stickles and glossy accents for all the snowmen images.
Enter to Win a $25 Prize!
One lucky winner will receive a $25 prize to spend at Newton’s Nook Designs online shop! The winner will be chosen at random from the collective blog posts featuring our new products this week. For a chance to win, leave comments on the Design Team Member Blog Posts (see list below) from Wednesday November 12 through Thursday November 13th. You will not know which blog has been chosen so the more you comment on the better your chances are of winning! You have until Thursday, November 13th at 9 pm ET to comment — winners will be announced on the NND blog on Friday, November 14th.
Want another chance to win? We will be having an instagram hop on Friday with a second prize! Please join me on Instagram on Friday, November 14th for details!
Check out all the awesome Design Team Blogs below to enter:
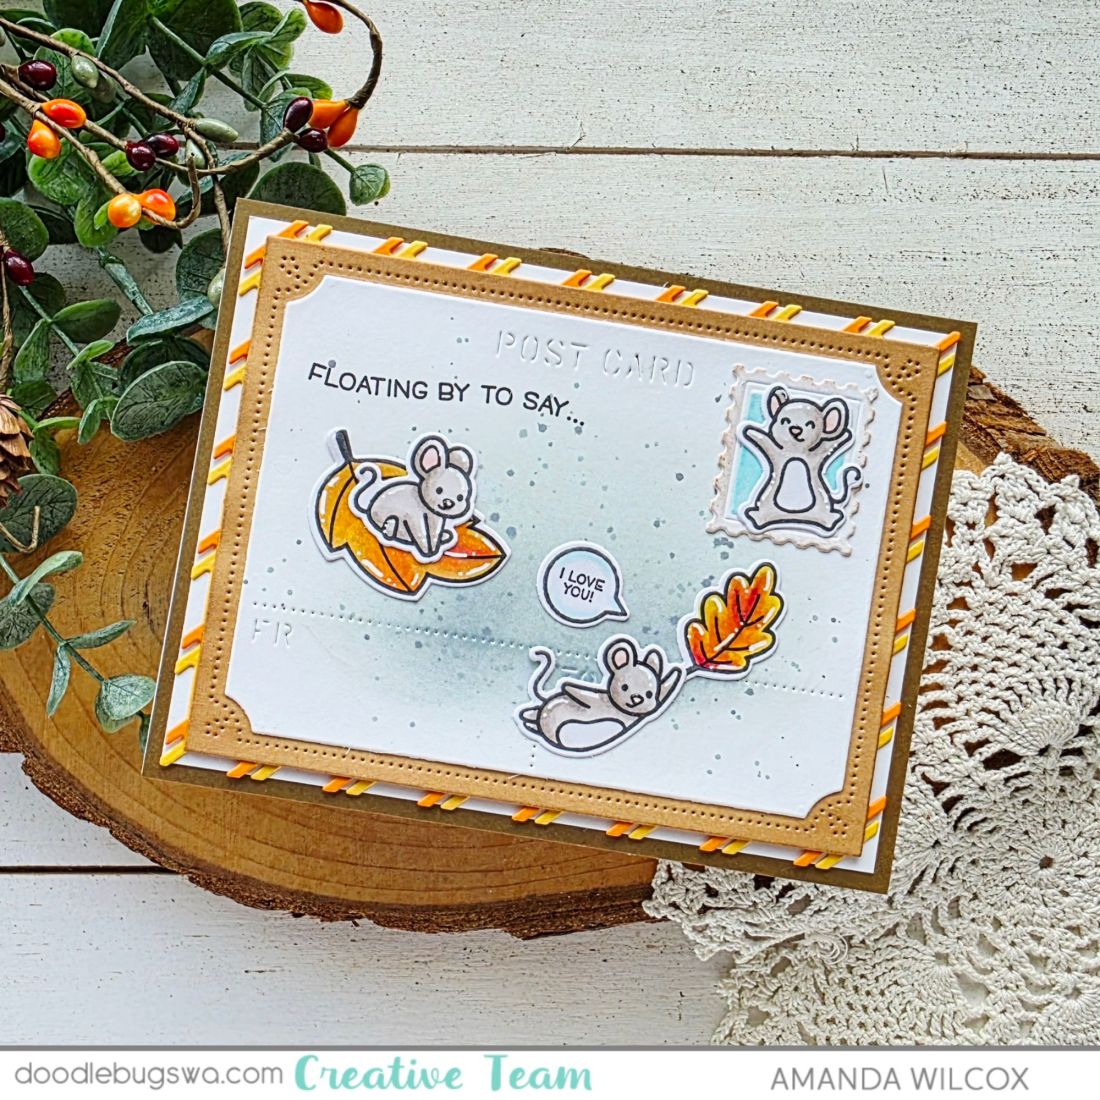
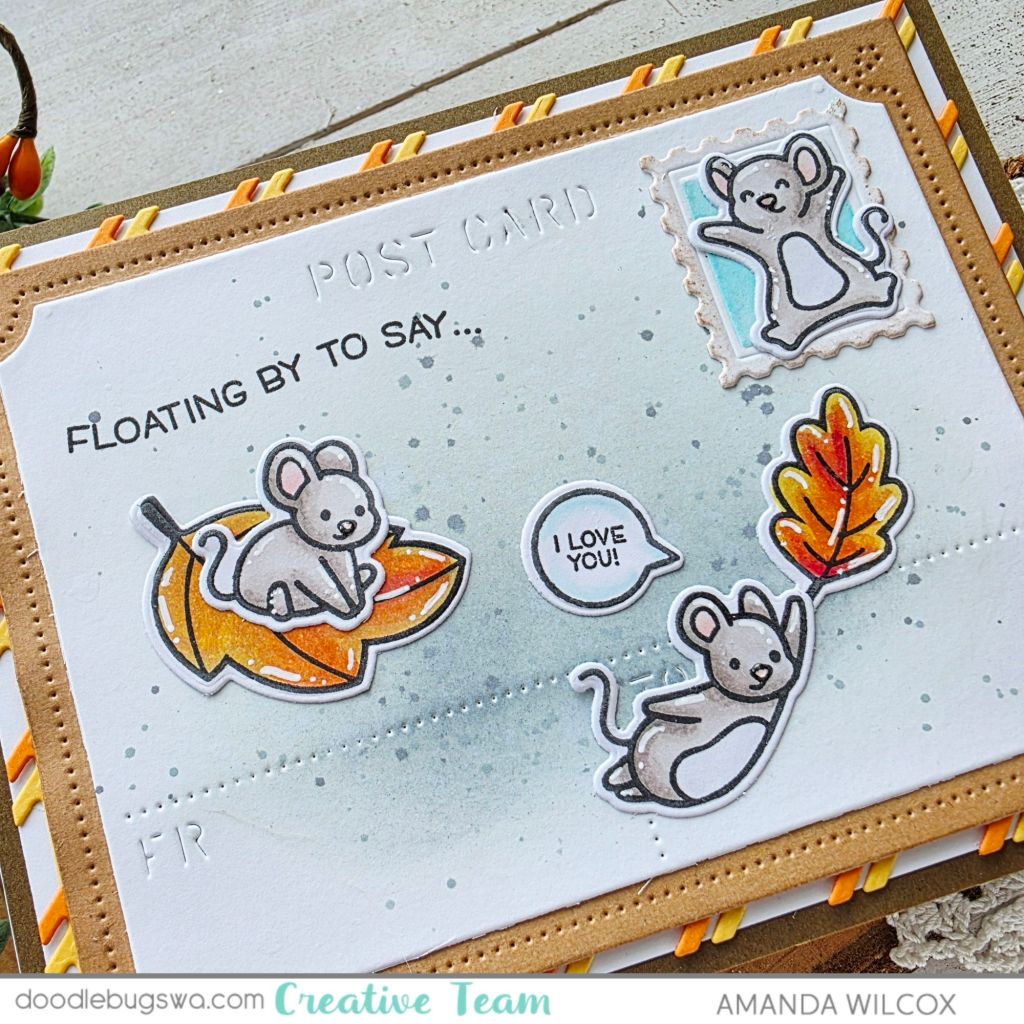
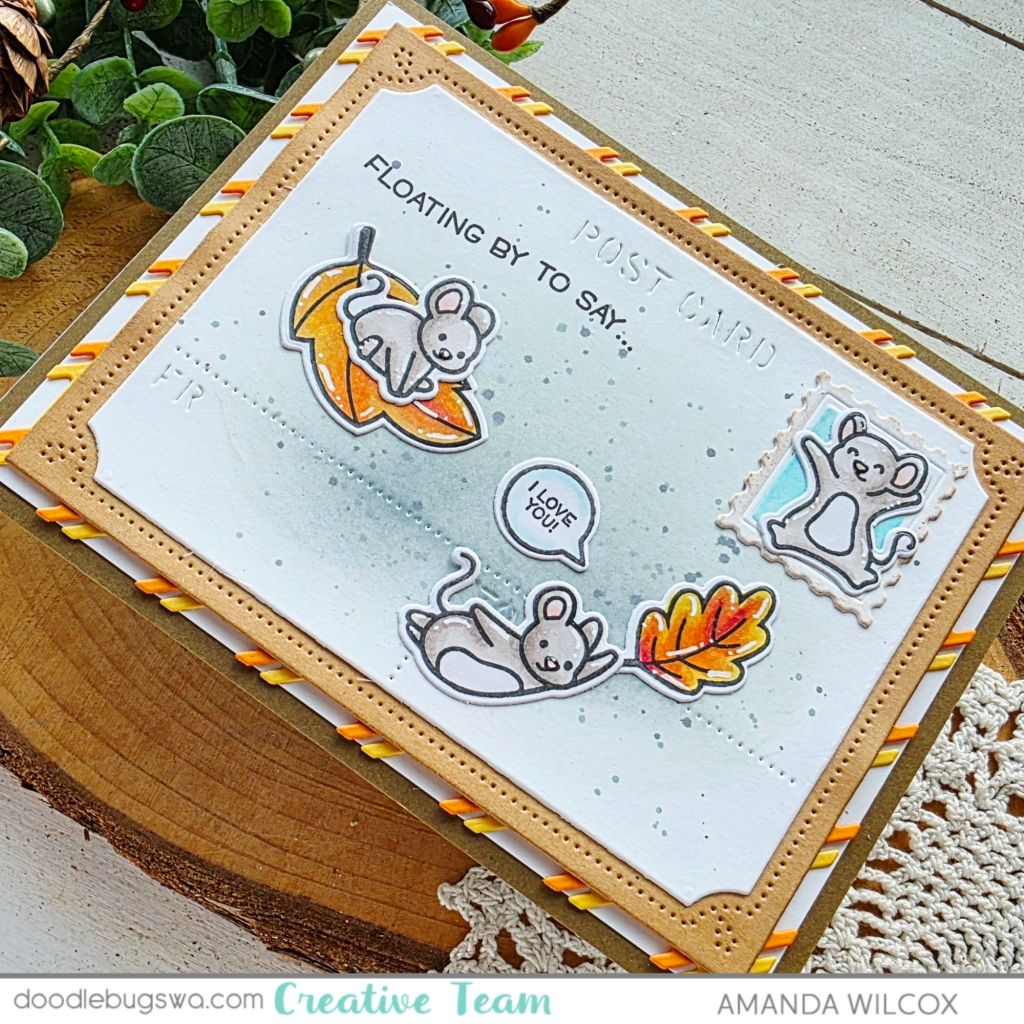
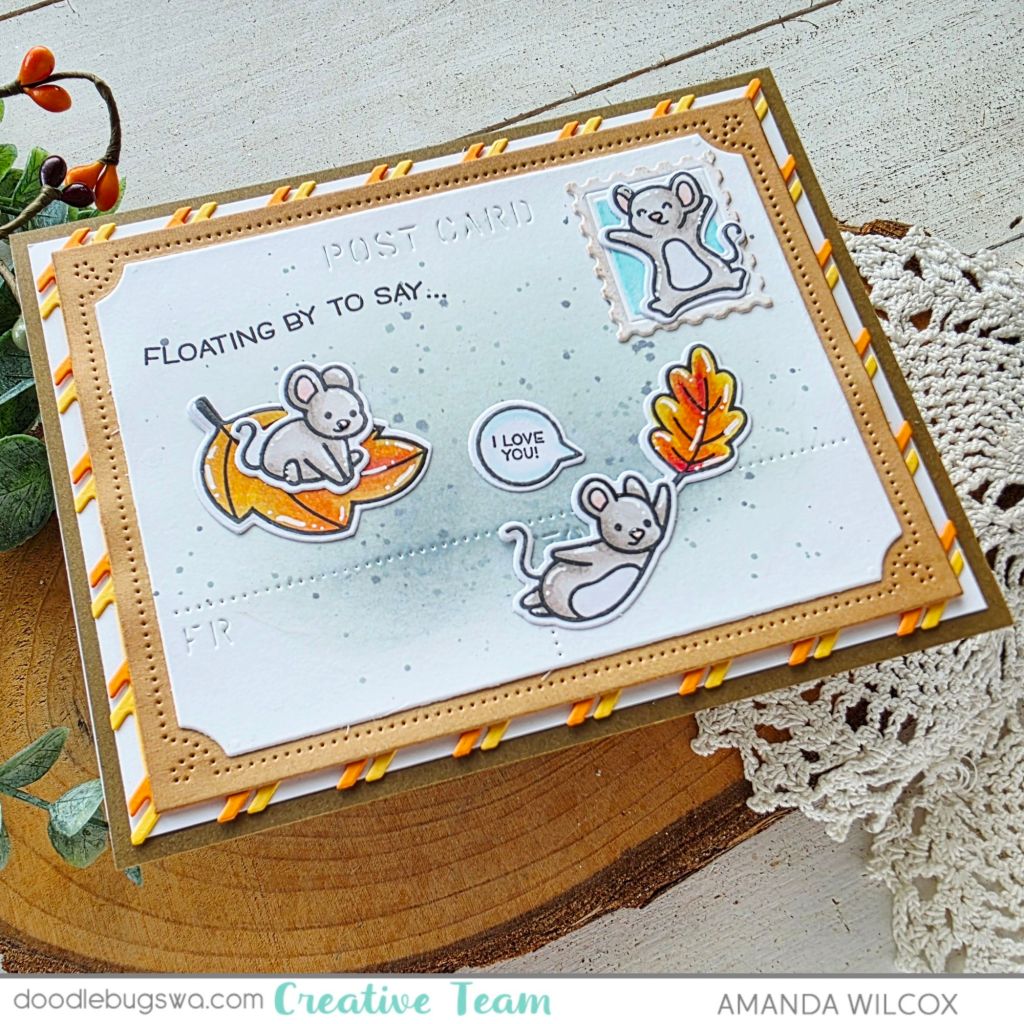
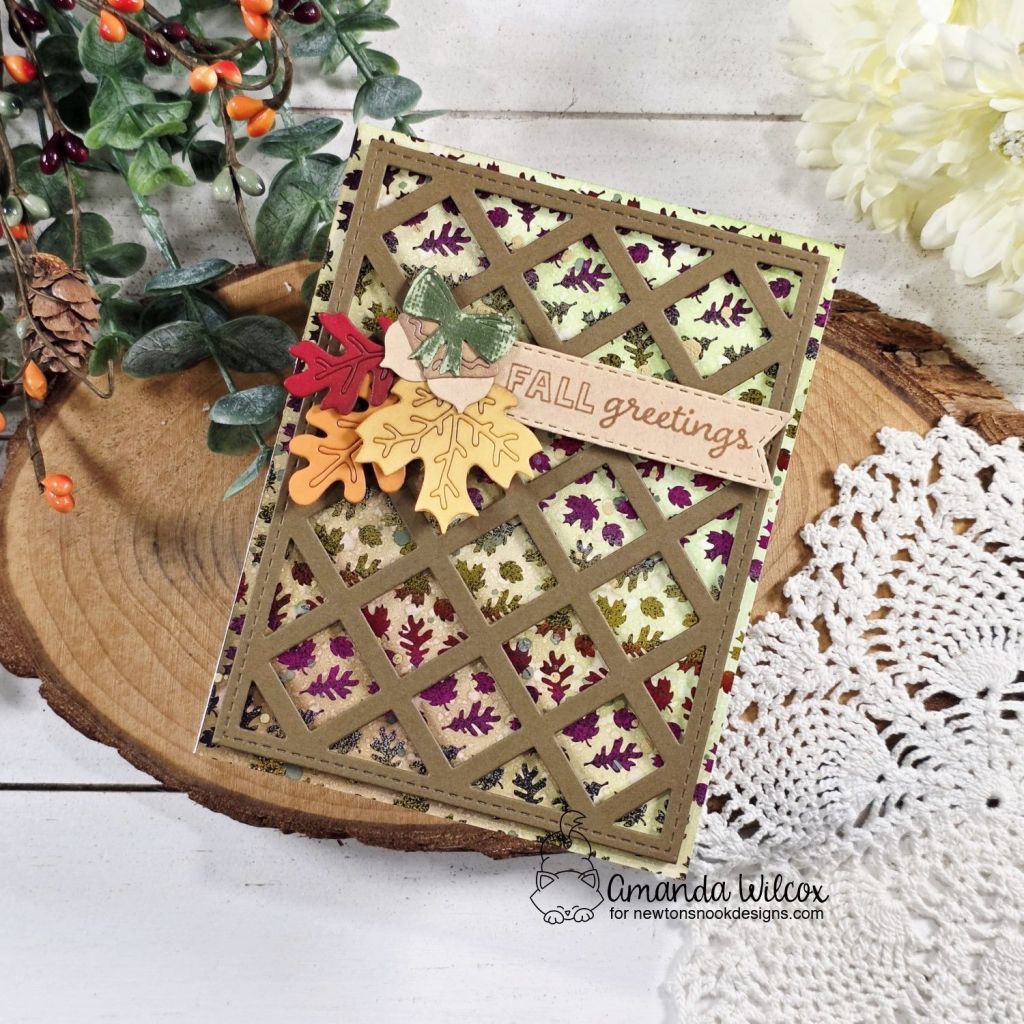
Welcome back to Mix it up Monday for Doodlebugs! Today I’m playing with the recently release Mama Elephant postcard dies, in a fall theme before fall gets away from us!
There are quite a few layers on the postcard die set so I didn’t use foam today at all, just liquid glue to adhere the layers together. My card front is dark brown, then I glued the striped pieces from the postcard to a piece of white cardstock so they popped more. Next, I glued the kraft layer to that.
With all of that decided, I cut the postcard panel and postage stamp from white cardstock and inked them up a bit. The edge of the stamp is lightly inked with brown ink. Then I masked off the edges to ink the center with light teal ink. Then I added speckled egg distress oxide ink to the center of the postcard panel, splattering more ink after for added texture.
Finally, I pulled out the Lawn Fawn You Autumn Know set to choose my images. I stamped and colored everything with copic markers, using the coordinating dies to cut it all out. I glued the images down with liquid glue and then placed the panel in my MISTI to stamp the first portion of the sentiment on the upper left area.
I finished this design off with glossy accents on all the mouse noses and white gel pen highlights on the mice and the leaves. This turned out so cute and the postcard die set is really fun to create with! It’s going to be great at valentine time!
Hi friends! Proud to be a super sponsor of the Coffee Loving Cardmakers Fall | Winter Hop once again. I’m here to share some great inspiration with you and a little intro to my shop. If you’re new here, welcome! And if you’re an old friend, I’m happy to have you with us!
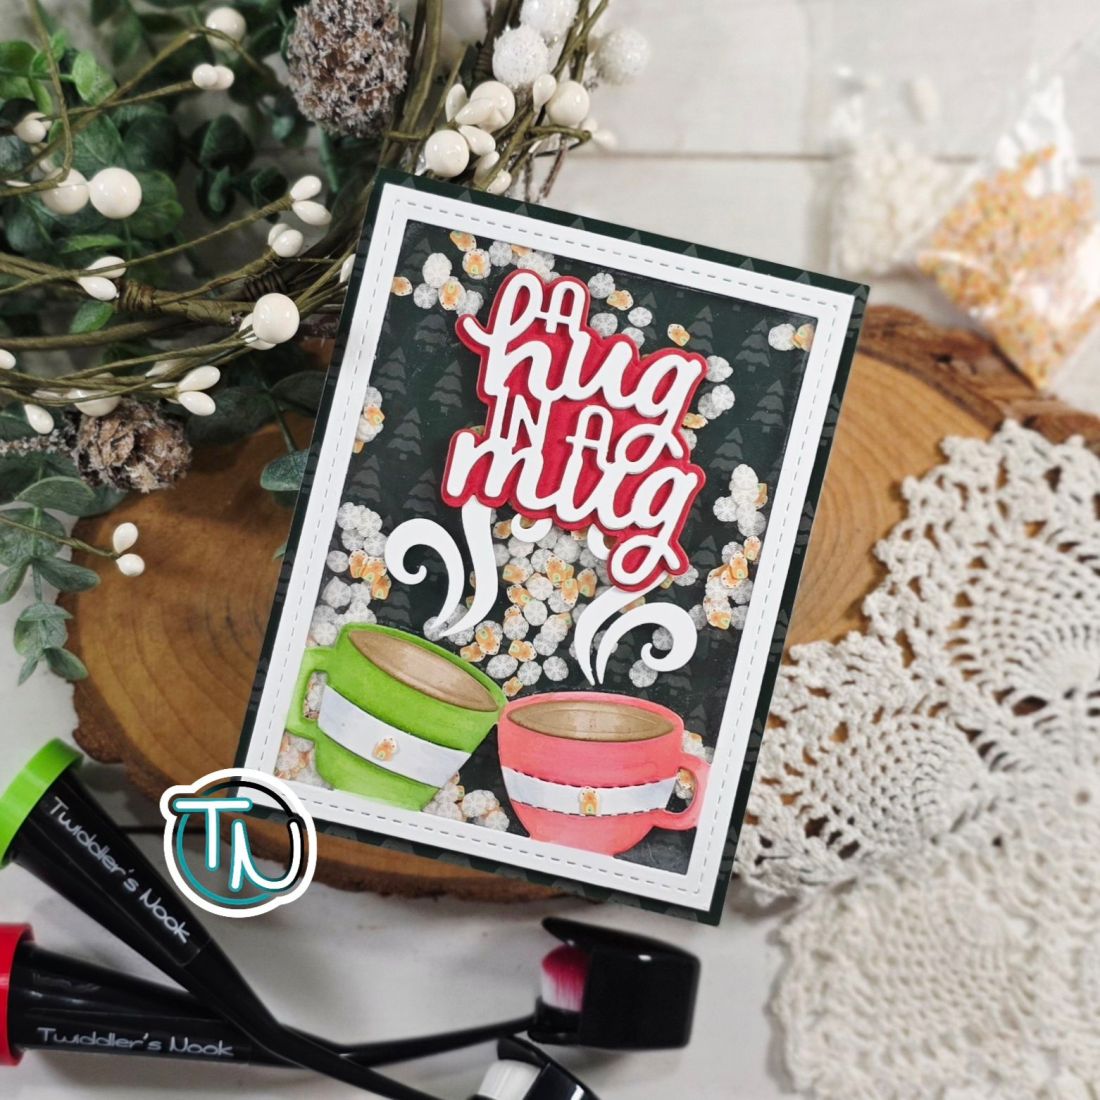
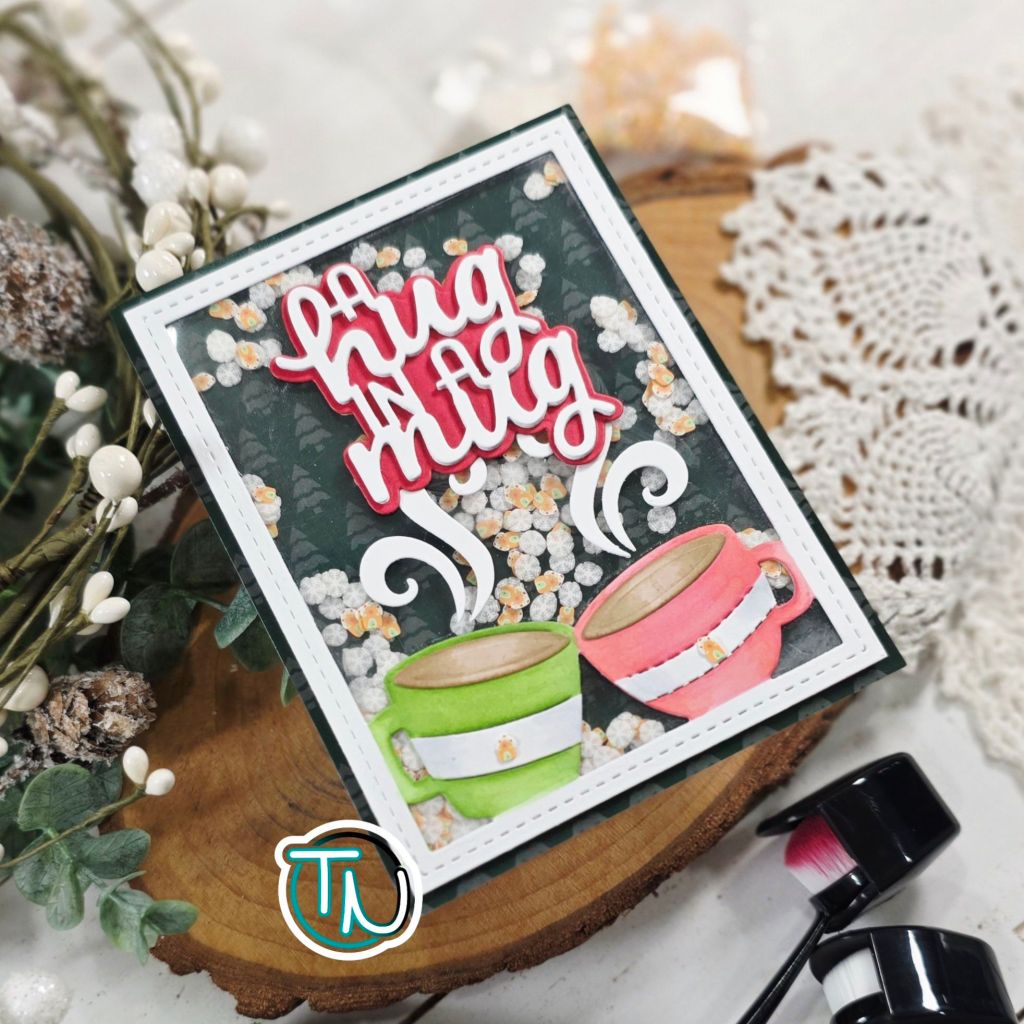
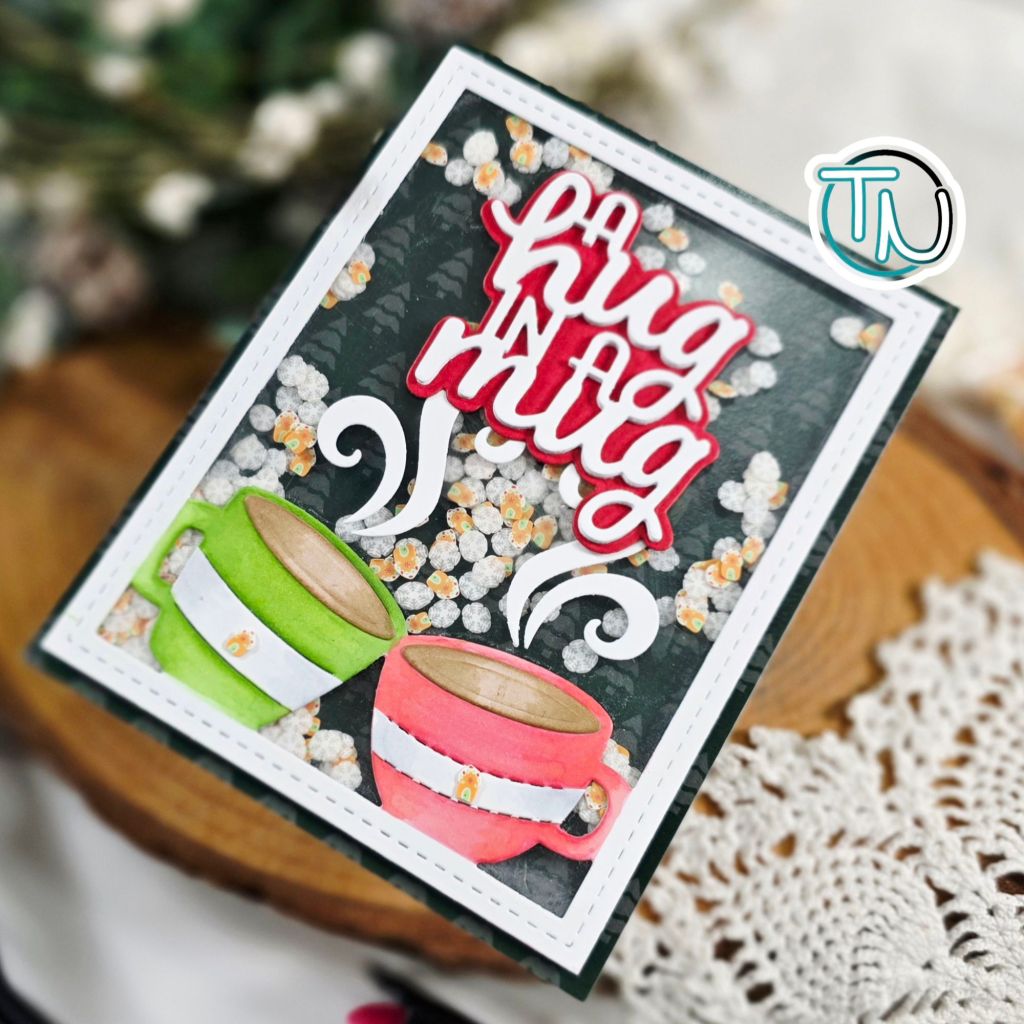
Today I’m pairing a few Twiddler’s Nook embellishments and crafty tools with Newton’s nook dies and patterned paper to create a holiday shaker card.
I cut the Newton’s Nook Coffee Frame from white cardstock, masked off the border and used Twiddler’s Nook blending brushes to add color to the mugs. I cut the mugs a second time from white cardstock, trimmed the center stripe out and added it with liquid glue over top of the ink blended mugs.
I added acetate and foam strips to the frame for my shaker window. Then sprinkled some Snowy Day and Gingerbread House clay embellishments to an A2 piece of patterned paper and adhered the frame over the top to seal the shaker up.
I glued the steam bits above the mugs on the acetate and then glued my Newton’s Nook Hug in a Mug sentiment over the top of that. Next, I added the whole panel to a card base.
If you’d like to check out the Twiddler’s Nook Shop to see what embellishments and crafty tools we have to offer, click HERE.
Next on the hop list is Your Paper Insider! If you need to get back to the beginning of the hop, click HERE!
I appreciate you sharing your time with me. Have a fabulous day!
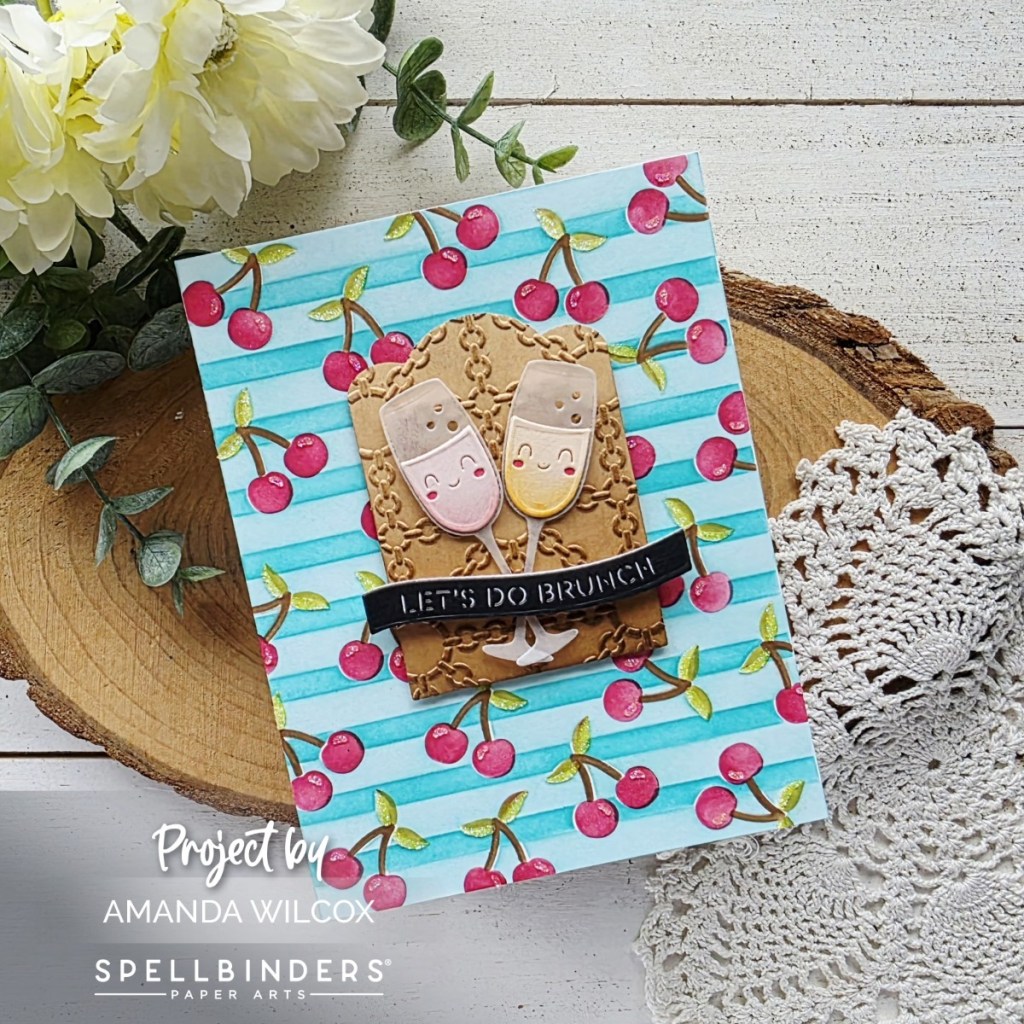
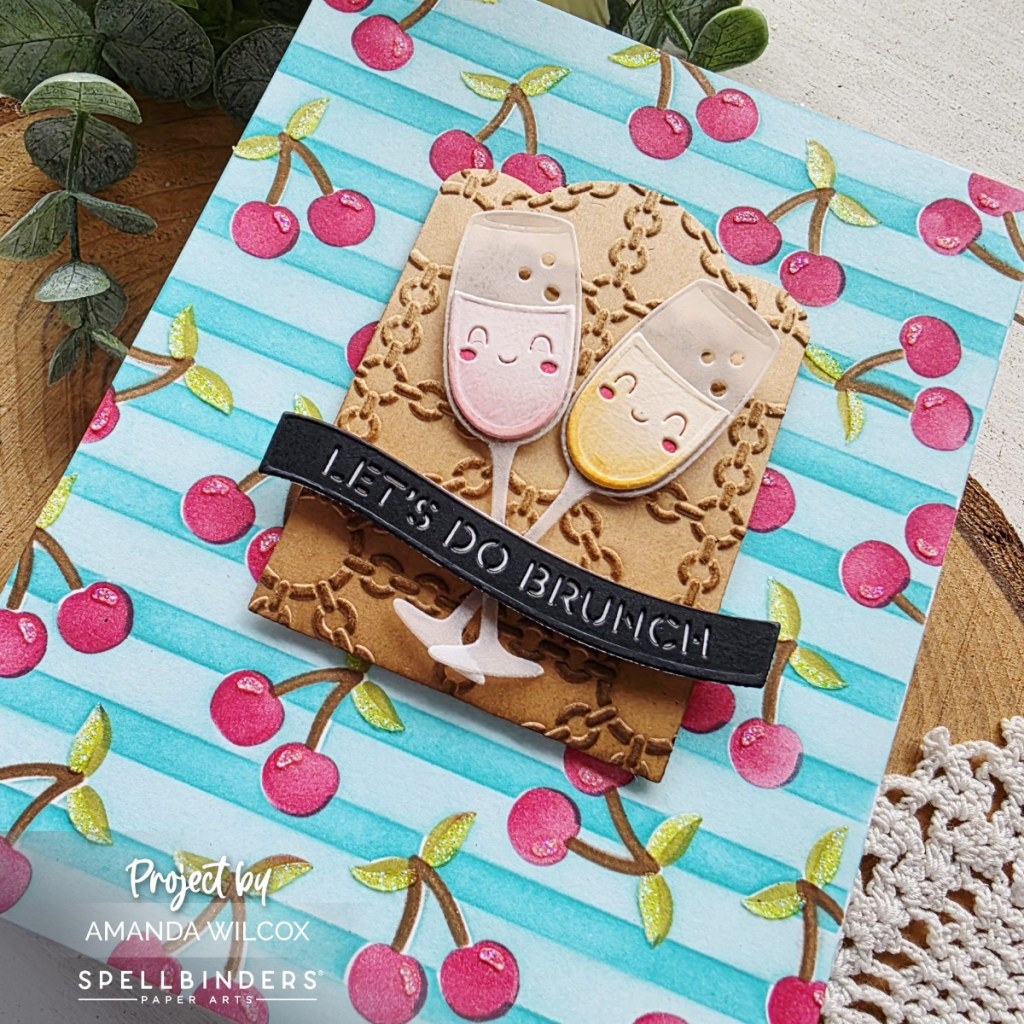
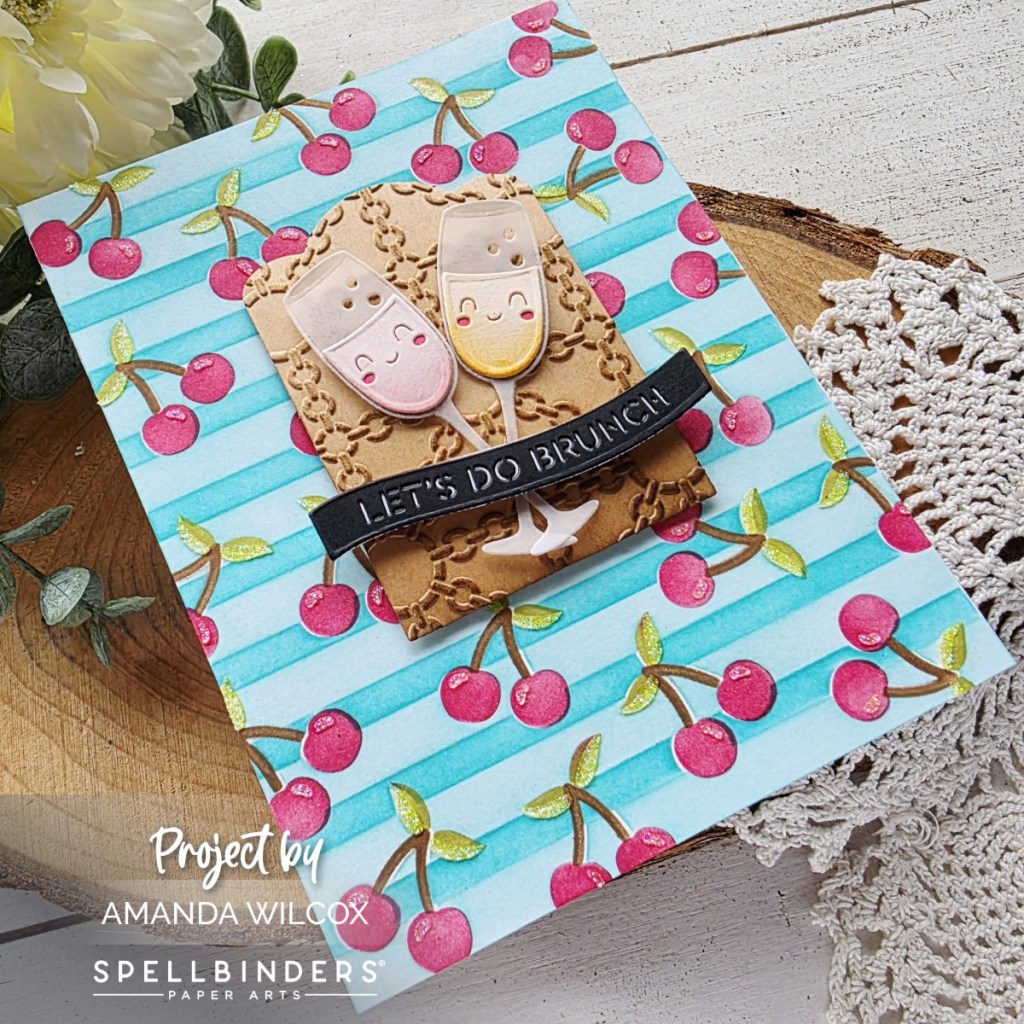
Hello again everyone! I’m back to share a card today highlighting a few of the Spellbinders November Clubs. This card uses the Die of the Month, Stencil of the Month and Embossing Folder of the Month; all together. So much cuteness, I couldn’t resist!
First off, I pulled this stencil out of the package and swooned! It’s amazing! Designed perfectly to make creating this amazing background a piece of cake! Everything is inked up with blending brushes and dye inks. On the last layer, there are highlights for the leaves and cherries, which I did ink up and then go back over with unicorn Astro Paste for a glittery finish.
While the background was drying, I cut a couple of these adorable drink (mimosa) glasses and assembled them. I love the vellum look for the glasses and inking the bottom of the drink portion for some depth turned out great too! I also cut the sentiment banner from the Die of the Month set too.
I cut one of the smaller Scallop Labels and embossed it with the Embossing Folder of the Month on kraft cardstock. Then I inked it up with brown ink to make the embossing pop a little more before adhering the drink glasses and sentiment with foam strips and squares. Next I added the stenciled panel to a card base and popped the embossed panel up with foam tape on that.
Hi friends! I’m over on the Newton’s Nook blog today sharing more inspiration using the new toner card fronts. They’re such a quick and easy way to pack a punch on your backgrounds! Plus they are a super affordable addition to your craft stash. Don’t sleep on these beauties…they’re fun!
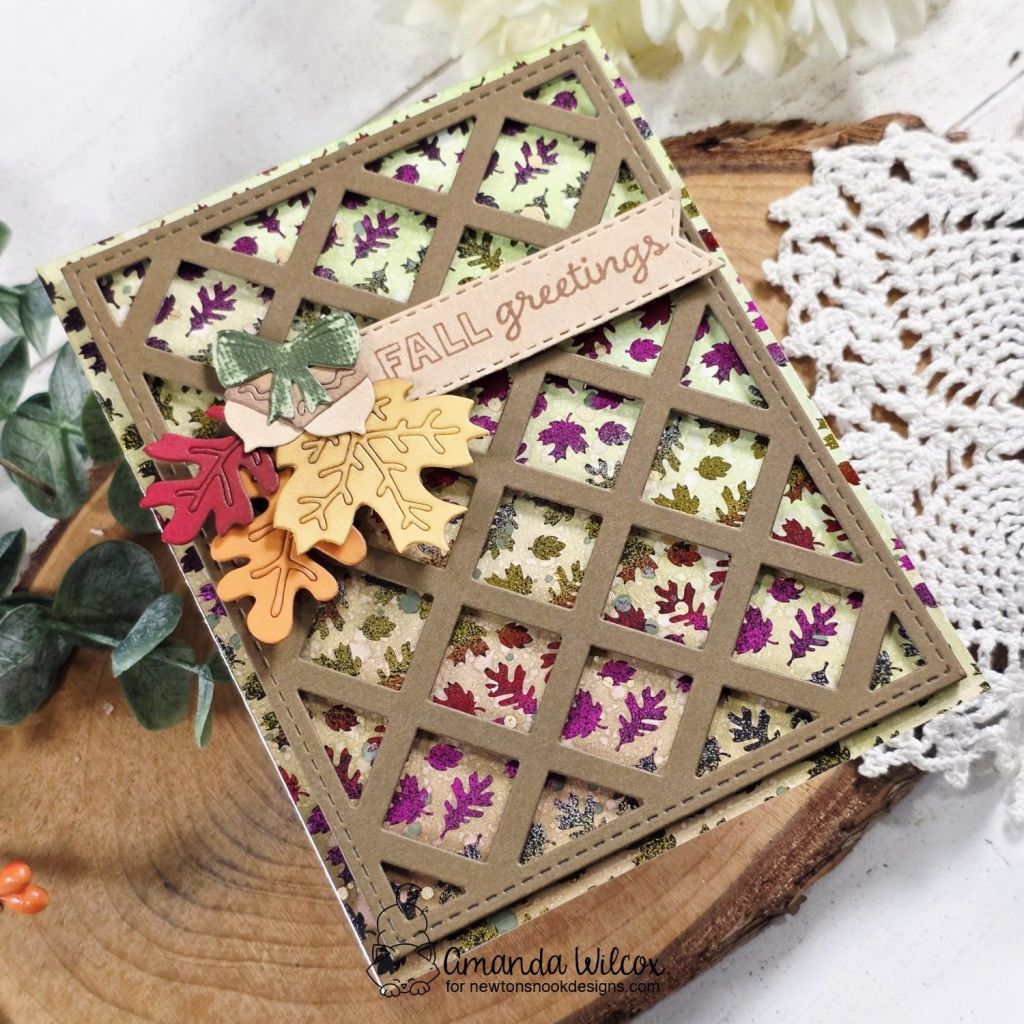
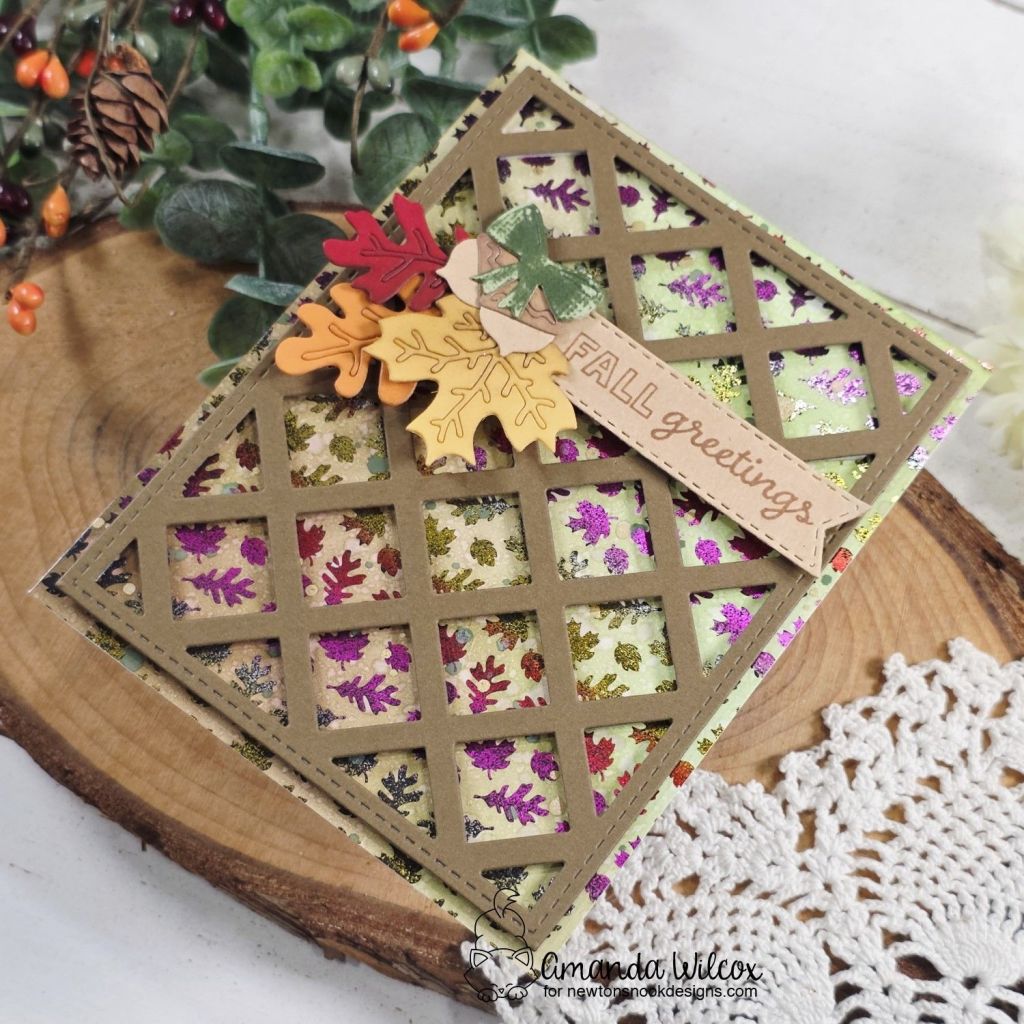
I started by foiling one of the Fabulous Fall toner card fronts with Thermoweb deco foil. This pattern is a gradient of warm tones which is as great for fall is it is summer! After I foiled the panel I ink blended brown to green at an angle across the whole thing. I splattered it with water and gold distress spray for texture.
Then I cut the Lattice cover die from dark brown cardstock. I added that to the foiled panel using foam strips on the whole lattice panel. Then I glued this to a white card base for stability. Toner card fronts are a thinner cardstock so it’s nice to have that backing.
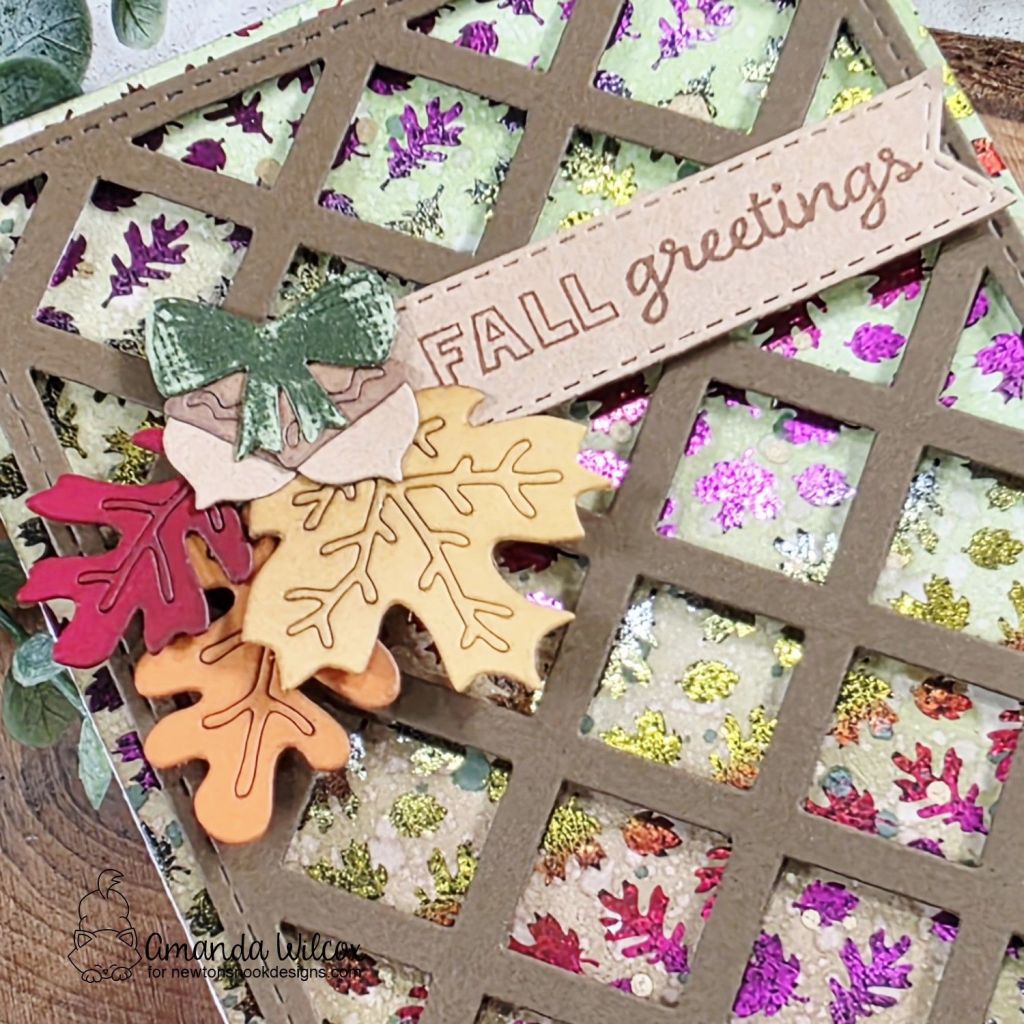
Then I cut the Fall Foliage dies from different colors of cardstock. The details can pop out of these images but this time I wanted them to stay so I added washi tape to the back of each keeping them in place. I adhered them all together using liquid glue.
I stamped a sentiment from Heartfelt Fall on a Banner Trio die cut, using brown ink to keep with the tone of the card. This and the leaf bundle are popped up on the card front using foam squares.
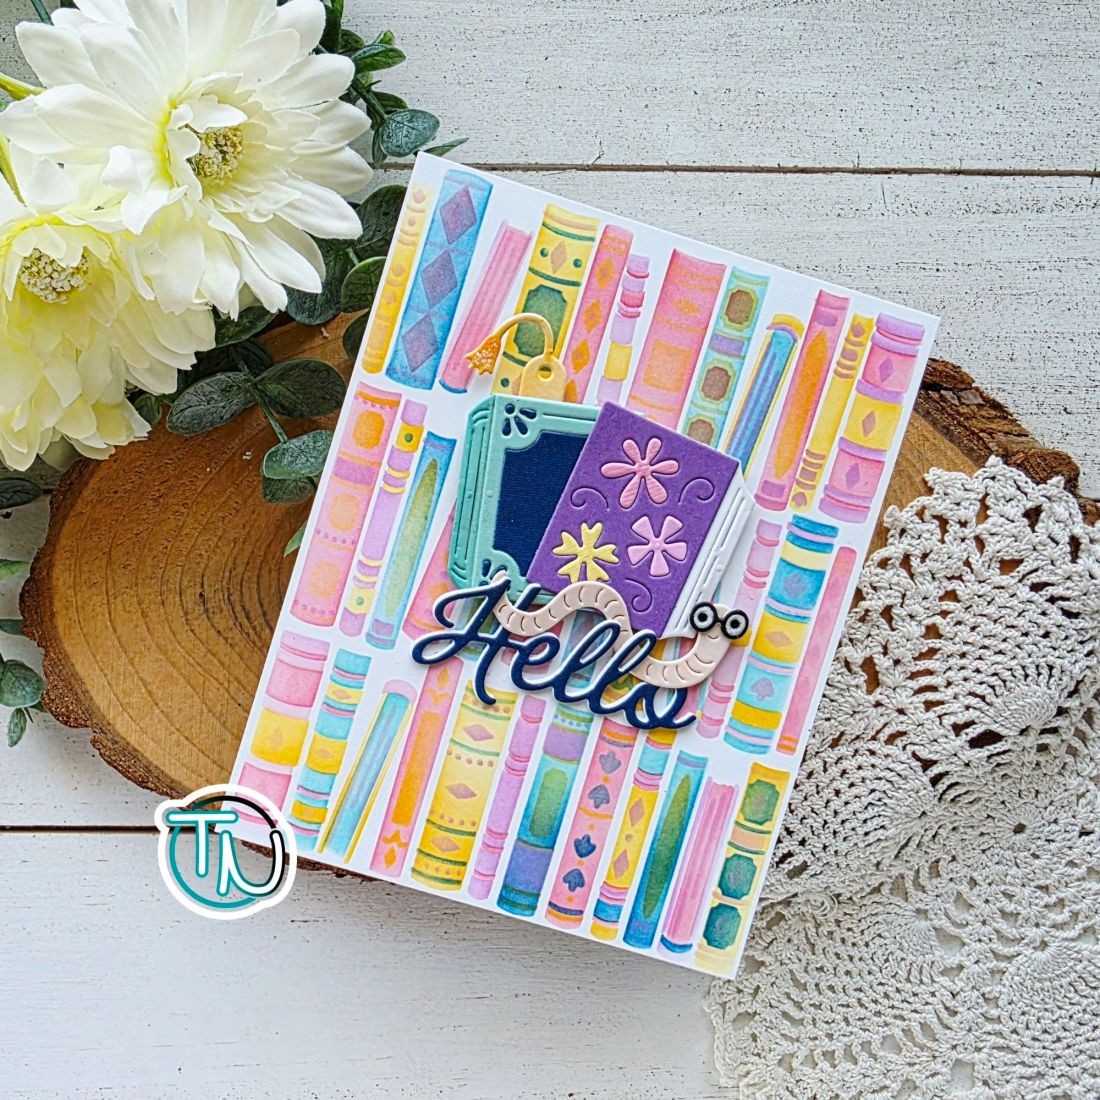
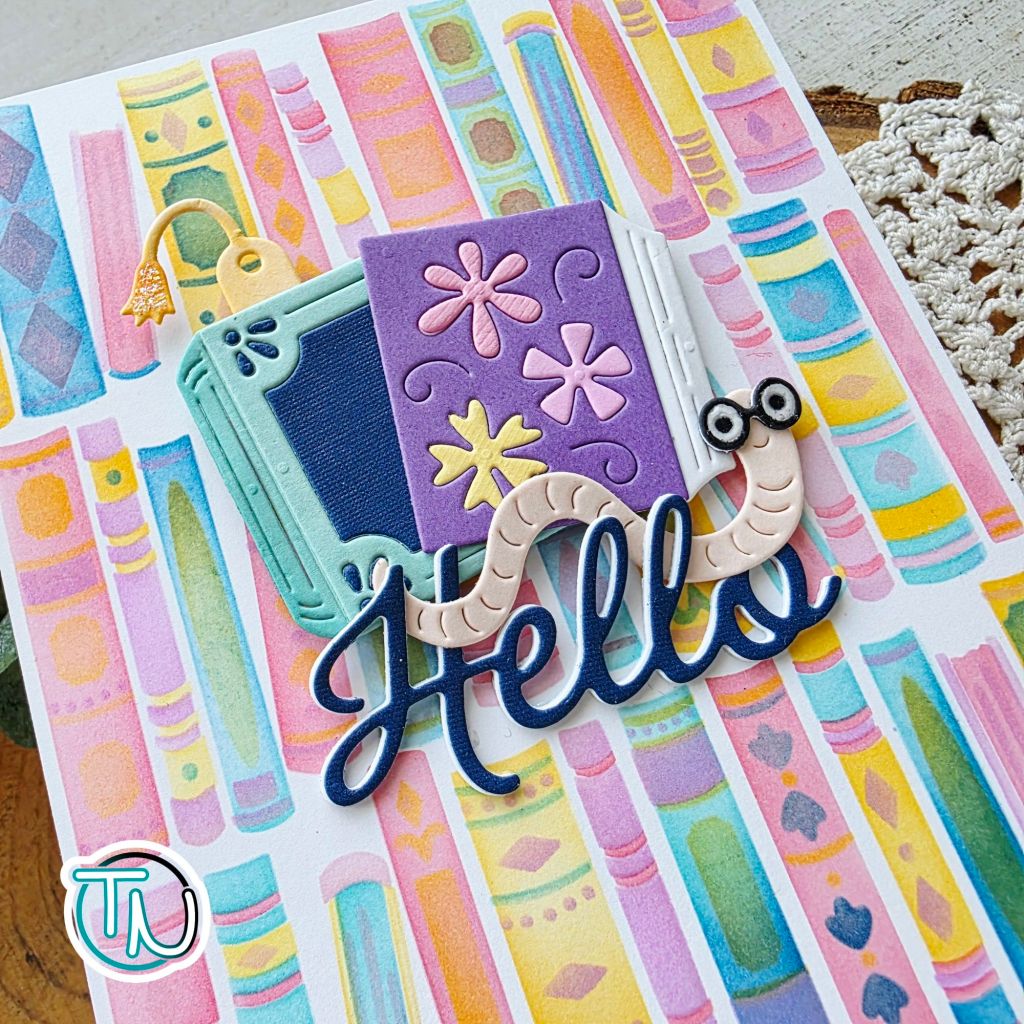
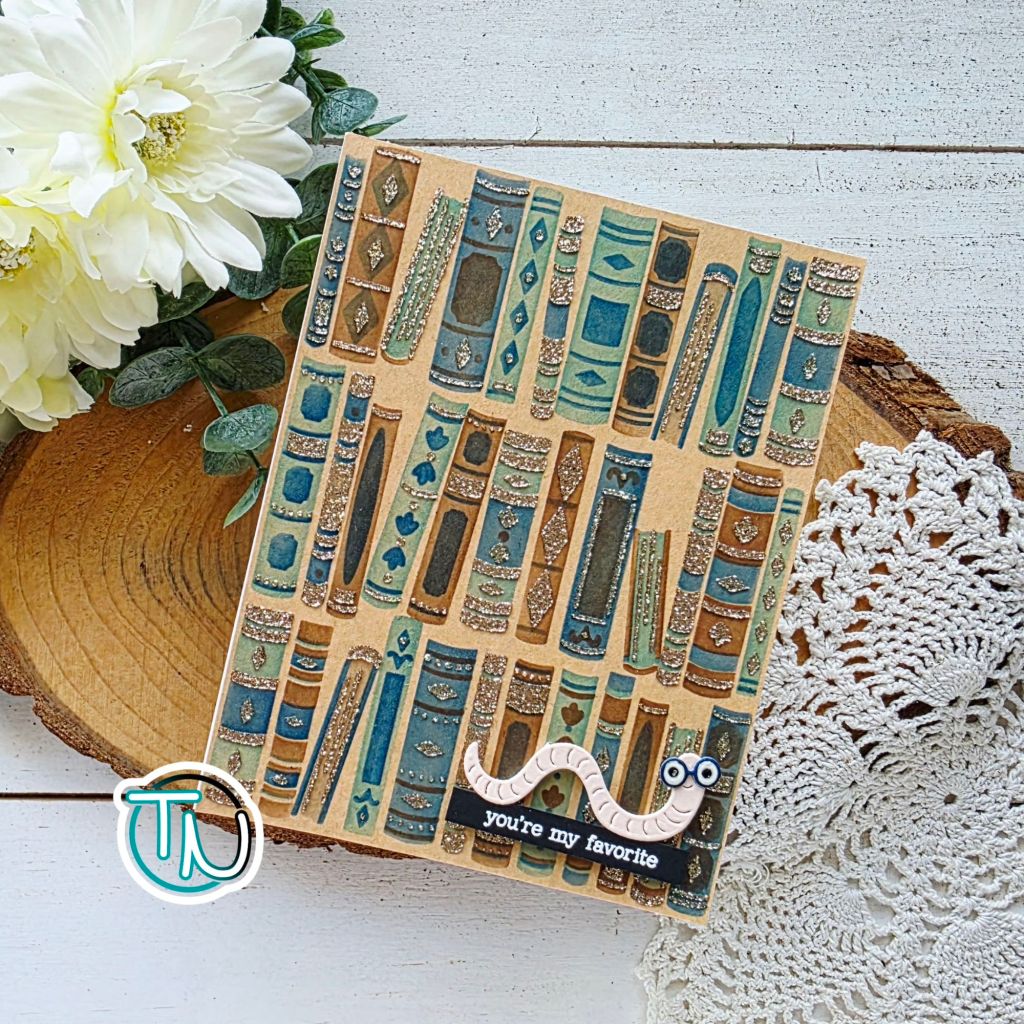
Welcome everyone! Today I’ve got a couple of cards to share for inspiration with the November Hero Arts Hero Studio subscription – specifically the layering stencil and die of the month. My second passion to cardmaking is reading so this month just grabbed me by the heart immediately!
My first try at the layering stencil, I went with a ton of bright, happy colors just to play with it. It was so fun and I love how it turned out! Then I grabbed the die of the month set and couldn’t wait to build the sweet book worm, along with both styles of books included.
After creating my images, I took one of the sentiments in the die set and cut it 3 times to layer together, plus a dark blue layer for the top. These are adhered by liquid glue. Then I wove my book worm through the letters, adhering him with liquid glue here and there as well.
I added the books with foam squares, then the worm and sentiment below it with liquid glue and a foam square where needed. I finished things off here with glossy accents on the worm’s glasses because, who can resist that?!? Not me.
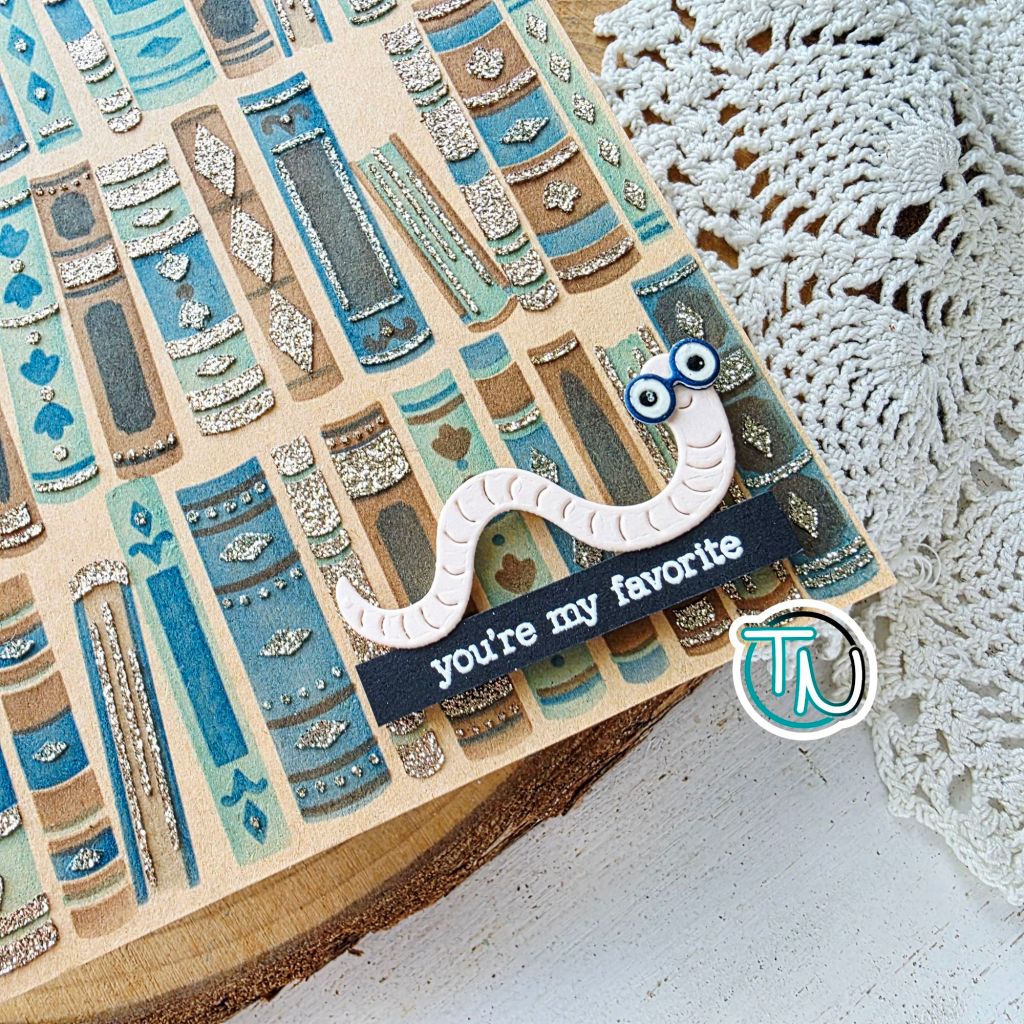
For my second card, I went darker on my color palette and finished things off with some Astro Paste for the beautiful gold glitter. This library belongs in a castle somewhere, I’m sure of it!
I went back and forth on what images to add but in reality, this little worm is too adorable not to add to everything for the foreseeable future. So he won and so did this simple little sentiment from the What’s Cookin’? stamp set. They are both popped up with foam strips and his glasses are also finished off with glossy accents.
If you haven’t thought about the Hero Studio subscriptions from Hero Arts, I highly recommend. The themes are so fun each month and you know it’s so fun to have something new to create with regularly! It’s also a steal of a deal compared to retail prices.
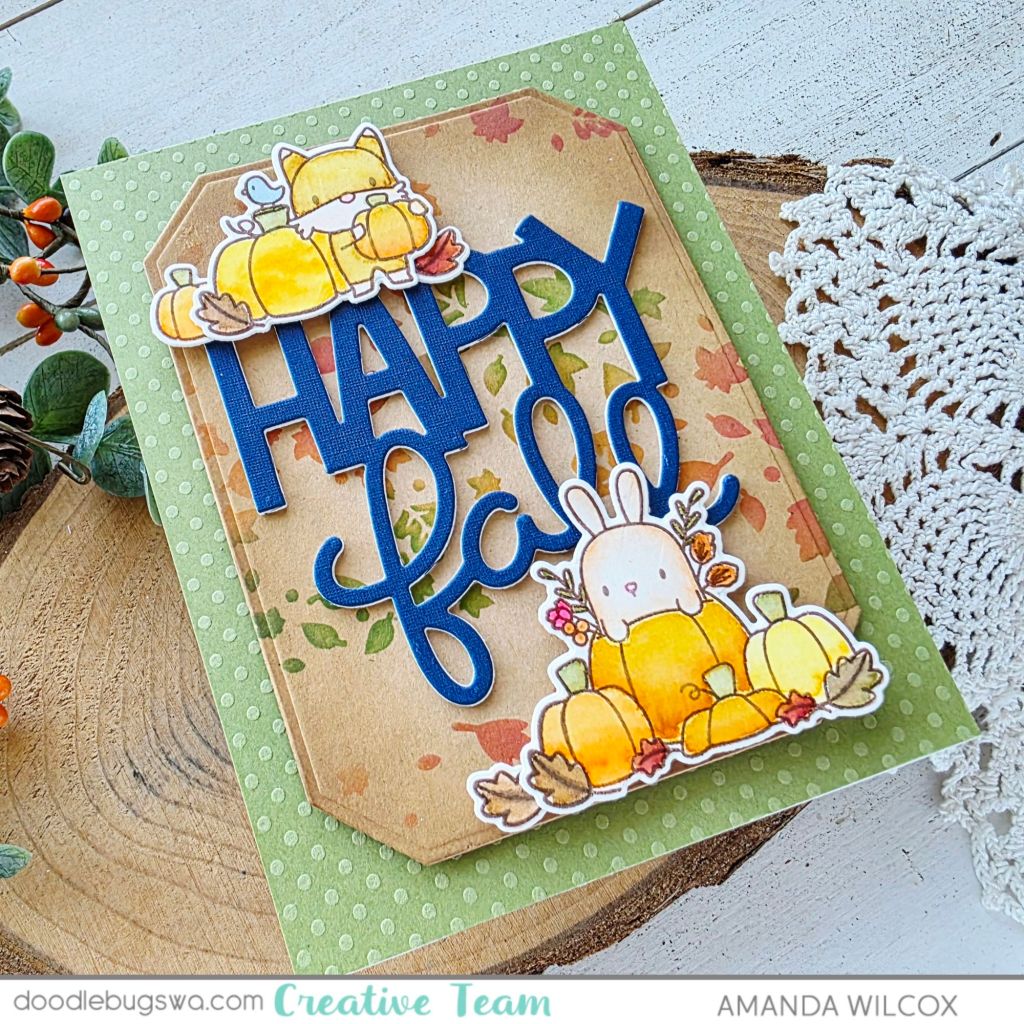
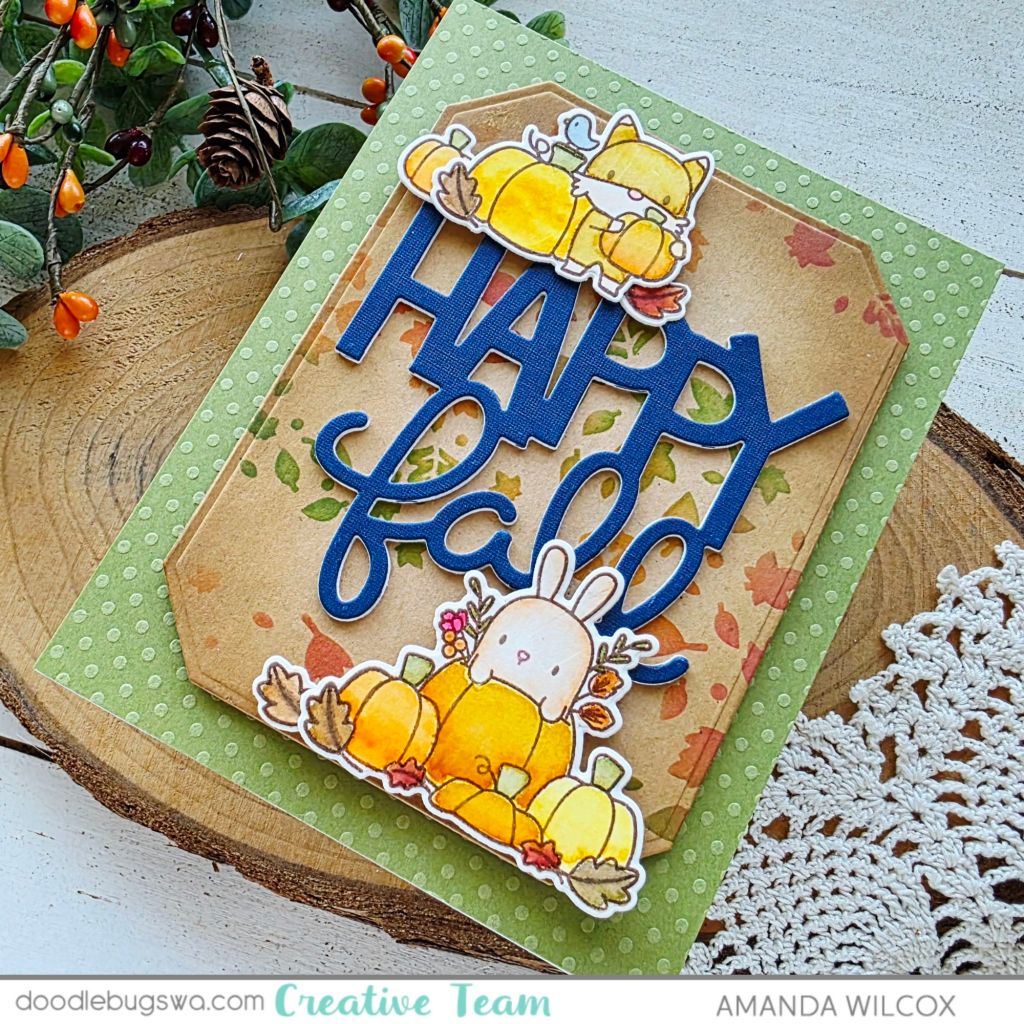
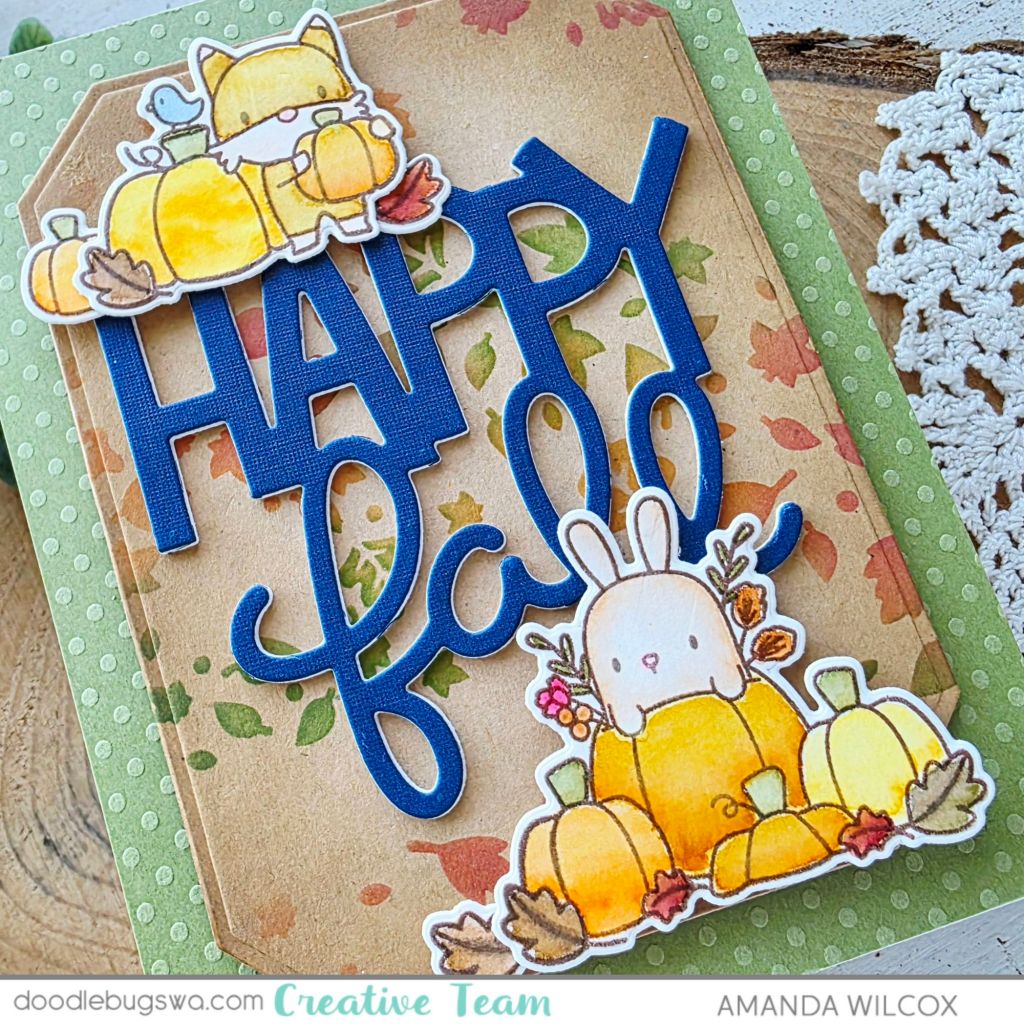
Welcome to this week’s Mix-it-Up Monday for Doodlebugs! We’re into full fall mode with Halloween behind us now so let’s celebrate that with a sweet fall-themed card today!
This card actually started with the sentiment which I created for another card but it didn’t end up fitting. I always save those items in case they can be used later on. So with that in mind, I inked up the Lawn Fawn Autumn Breeze stencil using a combo of fall colors on a kraft panel. I cut that panel with a Spellbinders Emerald Cut Labels and Tag die, then inked the edges with brown for depth.
I chose a few images from the Mama Elephant Hey Pumpkin stamp set to stamp and watercolor. I used the coordinating dies to cut them out and arranged everything with my sentiment on the kraft panel. The sentiment has 3 layers of white cardstock behind the blue so it stands up nicely. I added the images with foam squares so they’re on the same level.
Next, I found the green polka dotted cardstock in my stash but you could always stencil or emboss your own to match. That is glued to a card base with liquid glue and the sentiment/scene panel is popped up on that with foam tape.
Watercolor doesn’t say “shiny” or “sparkly” to me so I don’t typically add any finished touches like that to these cards. I like the muted tone and the soft way about them, so I leave them how they are. But if you’re in the mood, add whatever speaks to you!