Blog

Picket Fence Studios – Coffee Bar Scene Card

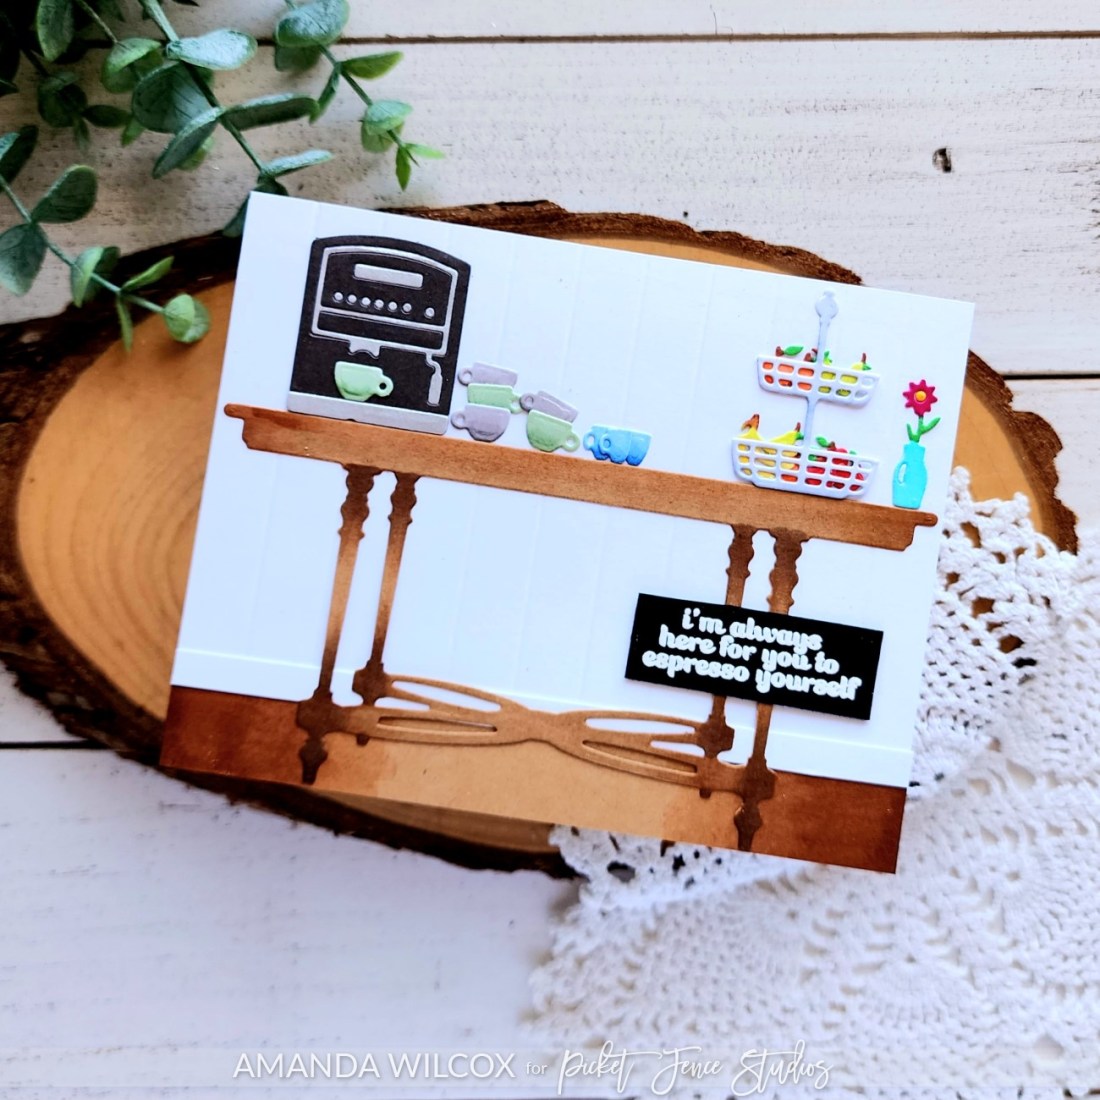
Hi there! I’m back with another card I created using the Picket Fence Studios June release. This time I created a fun scene card making a coffee bar that I’m jealous I can’t sample off of!

I had a vision in mind so I cut all the pieces for my table and coffee goodies. Some from colored cardstock, like the coffee maker, and others from white cardstock so I could color them with copic markers.

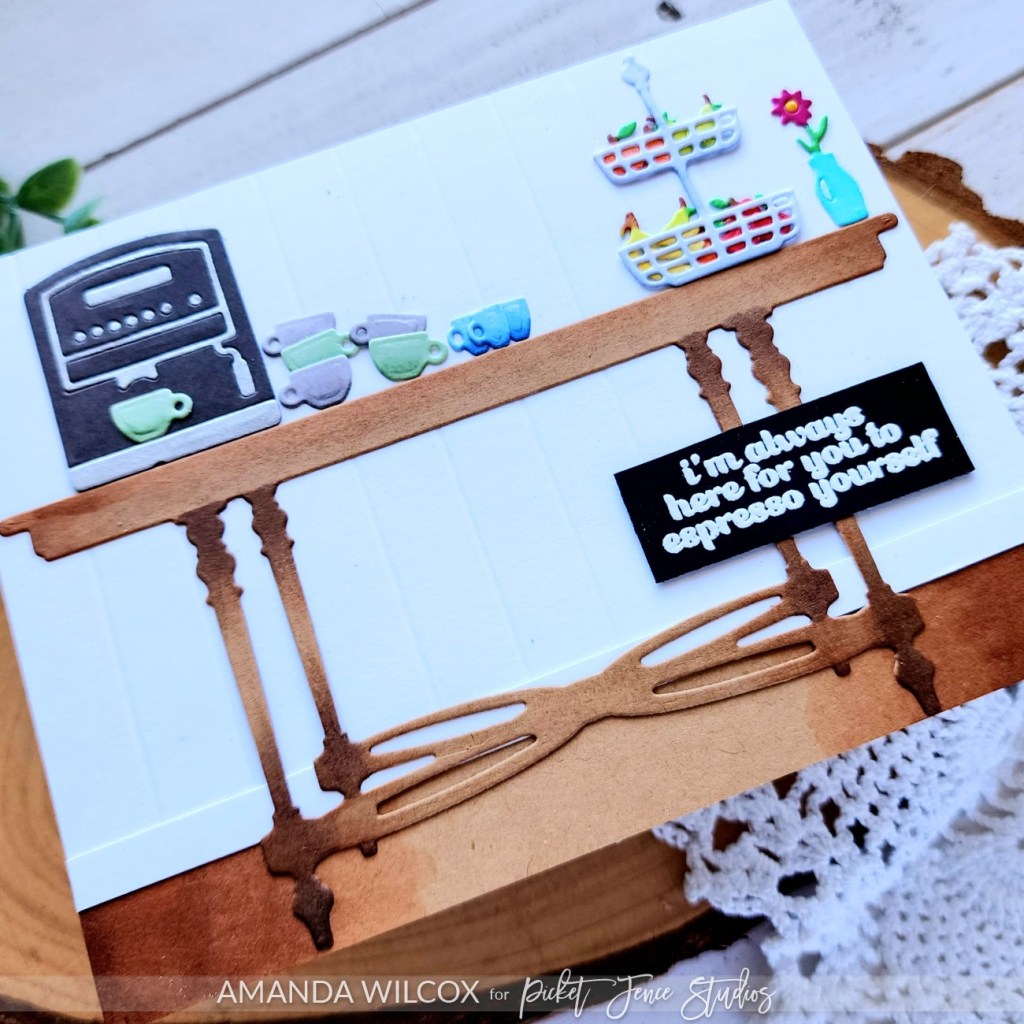
Next, I took an A2 white panel and scored it every half inch for texture. I cut a strip of kraft cardstock for the floor and colored it with copic markers for depth. I glued the floor to the scored panel and added a 1/4″ strip over the seam for a baseboard.

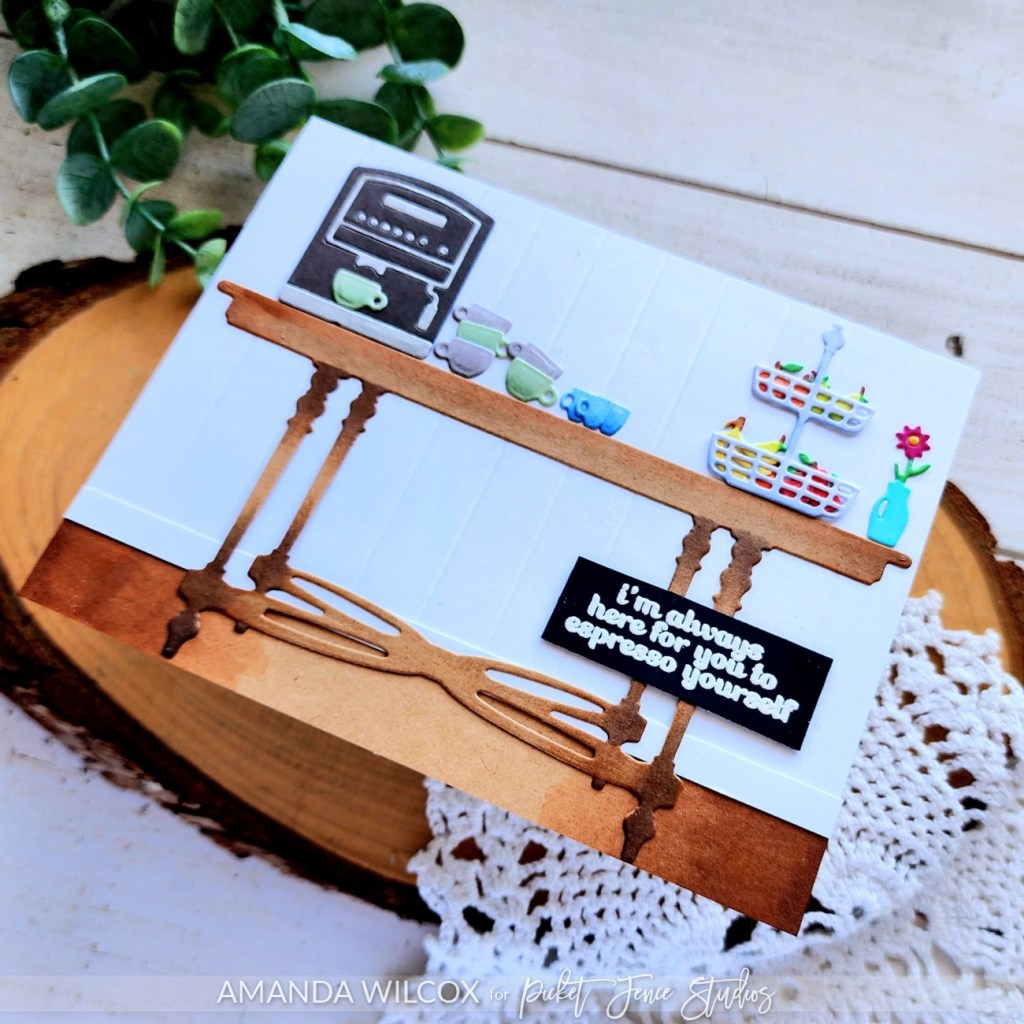
I adhered all of my coffee bar pieces with liquid glue. Then I stamped and heat embossed a sentiment on black cardstock, cut it into a rectangle and glued it in place as well.

I love being able to create in different ways. This card was out of my comfort zone but so fun to play with all the little elements, building a scene.

Products used:
Espresso Bar dies
Espresso Yourself stamps

Magic Anti-static Brush
Embossing & Watermark ink
Embossing powder – icicle

Bearly Art liquid glue

I appreciate you sharing your time with me. Have a fabulous day!

Pink & Main – Patriotic Reach for the Stars

Hi everyone! I’m on the Pink & Main blog today with a little inspiration using a new background die and the June Pup freebie stamps and dies! I’m having a blast with this collection and so happy to have a patriotic version to add to the mix.

I stamped my image and colored it with copic markers before using the coordinating die to cut it out. Then I switched to my background using the new Making Waves cover die and a Stop Sign cardstock panel behind it.

I used EZ Squeeze liquid glue to adhere the background layers together and then to a white card base. I wanted something to separate my pup from the background so I chose a zig zag circle just a smidge bigger than him and cut it out from vellum. I added the pup to the vellum with foam squares and hid tape runner behind that to adhere the vellum to the card front.

I chose my sentiment and heat embossed it with licorice embossing powder on white cardstock, using the coordinating die to cut it out too. I wanted more stars to add to the mix so I went digging and found these awesome size stars in the Flip Flops and Shades die set. I cut them from silver foil cardstock and added them with a combination of liquid glue and foam squares.

For finishing touches I just added Touch of Gloss to my puppy’s nose, eye and the stars on his hat. This way there is shine at all angles of the card – the pup, the stars and the heat embossed sentiment. It’s perfect!

Remember you can get June Pup free with purchase until June 23. You get the stamps with a $50 purchase and the coordinating die added if you spend $75!

Products used today:
June Pup stamps and dies
Making Waves cover die
Zig Zag Circles dies
Flip Flops and Shades dies
Stop Sign cardstock
EZ Squeeze liquid glue
Touch of Gloss
Magic Anti-static Brush
Embossing & Watermark Ink
Embossing Powder – licorice
Foam squares

I appreciate you sharing your time with me. Have a fabulous day!

Newton’s Nook – Ink Smooshing Seashell Roundabout Cards

Hello everyone! I’m happy to be back on the Newton’s Nook blog today. This time I needed some inky therapy and decided to play with ink smooshing a few panels, mixing colors and just having fun. This great trio of cards was the outcome of that and I absolutely LOVE them! I hope you do too!

I used watercolor paper and Tombow markers – the brights set – for all of my inky panels. The key to getting layered colors instead of smooth blends when ink smooshing is to completely dry your paper in between colors. I use a heat tool but if you don’t have one but have patience, you could just let it dry too.

After the ink smooshing was done, I took the Seashell Roundabout stamp and stamped it with VeraFine onyx black ink on each one. I prefer this ink for stamping on top of ink. It comes out crisper and really stamps fabulous, detail or not.

After that, I die cut each panel with the largest scallop circle in the Circle Frames die set. I stamped and heat embossed three sentiments from the same stamp set on one of the Banner Trio banners next. Finally, I chose patterned papers from the Summertime paper pad to coordinate/contrast with my ink smooshing circles.

I added each layer with foam tape to white, top-fold card bases and chose some light yellow organza ribbon to tie at the top of each card.

To finish them off for a bit of bold bling, I glued black baubles across each design.

These cards whipped up in one evening easily. They were therapeutic to create and will be equally as therapeutic to pop in the mail for some just because happy mail.

Products used:
Seashell Roundabout stamps
Circle Frames dies
Banner Trio dies
Frames & Flags dies
Summertime paper pad
Magic Anti-static brush
Embossing and Watermark ink
Embossing powder – icicle

Foam tape
Black baubles
Tombow Brights Dual Brush markers

I appreciate you sharing your time with me. Have a fabulous day!

Pixi Dust Designs – Follow Your Heart Bergenia Card with Ink Blending

Welcome everyone. Today I have another card using the Pixi Dust Designs June release. This time I tried one of the new floral die sets – Bergenia. It’s so pretty and almost too simple to create. I loved it!

I started by die cutting all of my floral elements from colored cardstock. Then I used blending brushes to add some shadows to the different parts of the flower petals and leaves. I used liquid glue to adhere all of the layers together except the most front layer of the flower petals which I added with a foam square.

Then I took an A2 white panel of cardstock and ink blended with distress oxide inks from the top left corner fading to nothing. I used peacock feathers and salvaged patina and then splattered water, peacock feathers ink and black paint across the design. Once the panel was dry I adhered it to a card base and then popped the flower up with foam squares.

Last, I die cut thanks from the Tag Accessories die set using black cardstock and glued it to the flower leaves with liquid glue. I left the ends free and it really gives a beautiful look in person. You just have to be mindful putting it in an envelope.

Products used:
Bergenia dies
Tag Accessories Add On dies

Distress Oxide Ink – peacock feathers and salvaged patina
Foam squares
Liquid glue

I appreciate you sharing your time with me. Have a fabulous day!

Spellbinders – Daisy Mouse Watercolor Card

Welcome to a fresh, new week everyone! Thanks for stopping by today. I’m keeping things very clean and simple to start a very busy week. I have loved House-Mouse Designs for decades and am very happy to see them working with Spellbinders. I have the Daisy Mouse stamp set and chose to have some mellow watercolor time to create with it first.

My version of watercolor is more faux watercolor than anything. I stamped my image and sentiment on a piece of watercolor paper cut to 4×5.25 inches. All of my color is laid down with Zig Clean Color Real Brush Markers and then I use a wet paintbrush to move the color around.

I love the feel of watercolor and how it doesn’t have to be perfect to look gorgeous. Also remember that if you dry your ink between applications, it’s easy and so pretty to layer colors on top of each other for different looks.

When my painting was done but the panel was drying, I created a white card base but wanted to add some color to the edge. I grabbed picked raspberry distress oxide and added a light layer around the edge that would show through but the pink was not working for me. So I went right over the top with ripe persimmon and LOVE the melon color that I ended up with. It’s so pretty!

Once the watercolor panel was dry I just popped it up on the card base with foam tape and my card is all finished.

Products used:
Daisy Mouse stamps
Zig Clean Color Real Brush Markers
Distress Oxide Ink – picked raspberry and ripe persimmon
Foam tape

I appreciate you sharing your time with me. Have a fabulous day!

Trinity Stamps | Carlijn Designs – Father’s Day Slimline Card and Gift in One

Hey friends! I’m excited to share a fun slimline card with you today that I made my dad for Father’s Day. It’s a card but also his gift which is fun!

I started by using the adorable Carlijn Designs Patootie dies to create that awesome bald eagle. My dad loves bald eagles so I was excited when this die set had it as an option. Then I used the Trinity Stamps That’s the Ticket slimline dies and Marshmallow Alphabet dies to create my card base and all the other elements for my card.

I cut two of the largest ticket shape – one blue and one white – then scored the white layer 1/2″ from the top for my card flap. I used the embroidery floss to stitch the layers together and kept it going all the way around, tying it in a bow at the end.

I cut my other elements from different cardstocks in my stash – glitter, metallic, etc. – and used liquid glue to adhere layers together. The word “dad” is cut from gray cardstock four times and black once, then glued together for dimension. I adhered the elements of my card with a combination of liquid glue and foam squares.

On the inside I wrote a nice message to my dad and told him that we’re going on a movie date! He picks the movie and the day, and I’m paying. We both love going to the movies so it’s going to be great! I’m excited and I hope he is too!

Products used today:
Carlijn Design Patootie dies
Trinity Stamps That’s the Ticket dies
Trinity Stamps Marshmallow Alphabet dies
Trinity Stamps black baubles (eagle eyes)
Liquid glue
Foam squares

I appreciate you sharing your time with me. Have a fabulous day!

Pixi Dust Designs – June Release | Just Keep Swimming Ink Smooshing

Yay friends! It’s release day for Pixi Dust Designs! This release has some beautiful florals and really fun ocean goodies. Of course I was totally drawn to the critters. They’re so cute, really easy to put together and, most of all, fun to create with!

For my first card with these cuties, I went lots of texture and made an inky fun mess! The technique I used is ink smooshing which is super simple, gives amazing results and is totally forgiving for us perfectionists.

I took a couple pieces of watercolor paper, Tombow brush markers, a clear block, spray bottle and heat gun to accomplish everything. I scribbled with the markers on the block, sprayed it with one or two spritzes from a small spray bottle and smooshed it on the paper. Then I used the heat gun to dry the area and repeated all over.

Sometimes I used the same color twice – this still gives layering and visual texture if you dry between applications. Then I also layer different colors on top of each other.

Next, you grab your dies and star cutting. Pick and choose as you move through the papers that you inked on. Don’t these look so cool!?! I love them!

Last, I cut the back layer that fills in the eyes from black cardstock and used liquid glue to adhere all the layers together.

I arranged the die cuts all over an A2 card front and then carefully glued everything in place with liquid glue. You can accomplish this a few ways. Lift each one, add glue and replace it or take a piece of press’n’seal to lift your arrangement up at once, add glue to the back and place it back down.

Then I trimmed anything hanging off the edge and filled in empty spots with large pieces of seaweed that were trimmed off.

I cut the sentiment from silver glitter and black cardstock and used liquid glue to adhere the layers together and then to the card front. For finishing touches I added Nuvo Crystal Drops like bubbles in all of the open white spaces.

Be sure to check out the whole release. There is definitely something fun for all tastes!

Products used:
Keep Swimming dies
Tombow Brush Markers
Bearly Arts liquid glue
Nuvo Crystal Drops – teal

I appreciate you sharing your time with me. Have a fabulous day!

Newton’s Nook – Beach Bound Birthday

Hello everyone! I’m over on the Newton’s Nook blog today with a fun summer themed birthday card to share. I had a blast pulling out some of these products and dusting them off from last summer. Bright and happy and full of sunshine!

I started my card with the Palm Tree Line stencil and a piece of white cardstock. I turned it at an angle and stacked rows of palm trees all the way up. Then I trimmed it to 4×5.5 inches so I could have a bright border on one side of my card.

Next, I stamped and colored the awesome Jeep in Beach Bound and used the coordinating die to cut it out. All of my banners use dies in the Frames & Flags die set and the patterned paper comes from the Summertime paper pad.

I trimmed a 1/4 inch strip of blue paper and glued it to a card base, then I added the stenciled panel to that. I adhered the banners together with liquid glue and popped them up with foam squares. Finally I added the Jeep with foam squares as well.

There was a bit too much white space for me so I splattered black paint and some glittery watercolor across the design after adding Tough of Gloss to accents on the Jeep.

We’re a Jeep family so I love this a little extra. The beachy, summer vibe is awesome and makes me super happy!

Products used today:
Beach Bound stamps and dies
Palm Tree Line stencil
Summertime paper pad
Frames & Flags dies
Foam squares
Liquid glue
Touch of Gloss

I appreciate you sharing your time with me. Have a fabulous day!

Miss Ink Stamps – Patriotic Bear and Bunny Card

Welcome everyone. Today I have a little patriotic inspiration to share with you as Independence Day approaches in the USA. I love all things Americana and couldn’t wait to color this sweet duo up!

I used the largest die in the Oh Happy Day set to cut a piece of white copic paper. I stamped my images and colored them with copic markers. Then I cut the frame from dark blue cardstock and the inner border from gold foil cardstock for some shine.

Next, I cut an A2 piece of red cardstock and glued it to a white card base. Then I popped up the colored panel with foam tape and did the same with the frames using foam strips. To add the skinny inner frame, I carefully added the foam strips hanging over the edge just a bit so it would stick to them on the same level.

For finishing touches I added black glaze pen to the critter eyes and Touch of Gloss to their noses and the stars.

Do you create patriotic cards? I know it’s not an overly popular theme to create with but I always have fun making home decor and cards with it.

Products used:
Patriotic Bear and Bunny stamps
Oh Happy Day dies
Foam tape and strips
Touch of Gloss

I appreciate you sharing your time with me. Have a fabulous day!

Pink & Main – June Sneak Peek

Welcome friends! I’m over on the Pink & Main blog today for sneak peek week sharing a sneak of a fantastic addition to my very favorite long-legged critters! This kitty is too cute for words and I couldn’t get him open fast enough to stamp. I love it!!!

Like I said, I stamped my images straight away and colored them with my copic markers. Then I used the coordinating dies to cut them out and set them aside. I had a few different ideas in mind but ended up really wanting to play with the upcoming paw print stencil too, so that’s what I stuck with.

I inked up a white panel that measures 4×5.5 inches with distress oxide inks. I started with spiced marmalade and went to mustard seed, then squeezed lemonade at the top. I like this blend for a dark orange/yellow combo. I spritzed the panel with water and blotted it dry. Then I layered the paw print stencil over top and went in with rusty hinge distress oxide ink.

I popped the panel up with foam tape on a white card base and added a strip of washi tape from my stash to the edge. Then I stamped a sentiment on a large sentiment strip and popped it, with the images up on foam squares.

For finishing touches I added black glaze pen to the critter eyes and white gel pen highlights around the images. Last, I added stardust Stickles to the kitty’s cheeks. I absolutely love doing this with these critters and couldn’t resist myself.

Be sure to stay tuned for more sneak peeks and then release day on Friday!!!

Products used:
Pawsome Friend stamps and dies
Paw Prints stencil

Large Sentiment Strips dies
Foam tape and squares
Distress Oxide Ink – rusty hinge, spiced marmalade, mustard seed, squeezed lemonade
Black glaze pen
White gel pen

I appreciate you sharing your time with me. Have a fabulous day!