Blog

Newton’s Nook – July Release Reveals Day 1

I can’t believe it but it’s Newton’s Nook’s 10th birthday of being an amazing company, supplying us with endless cuteness and fabulous products to create with! Today is day 1 of release reveals and we’re starting off with the man himself – Newton!

Newton’s Birthday Delights

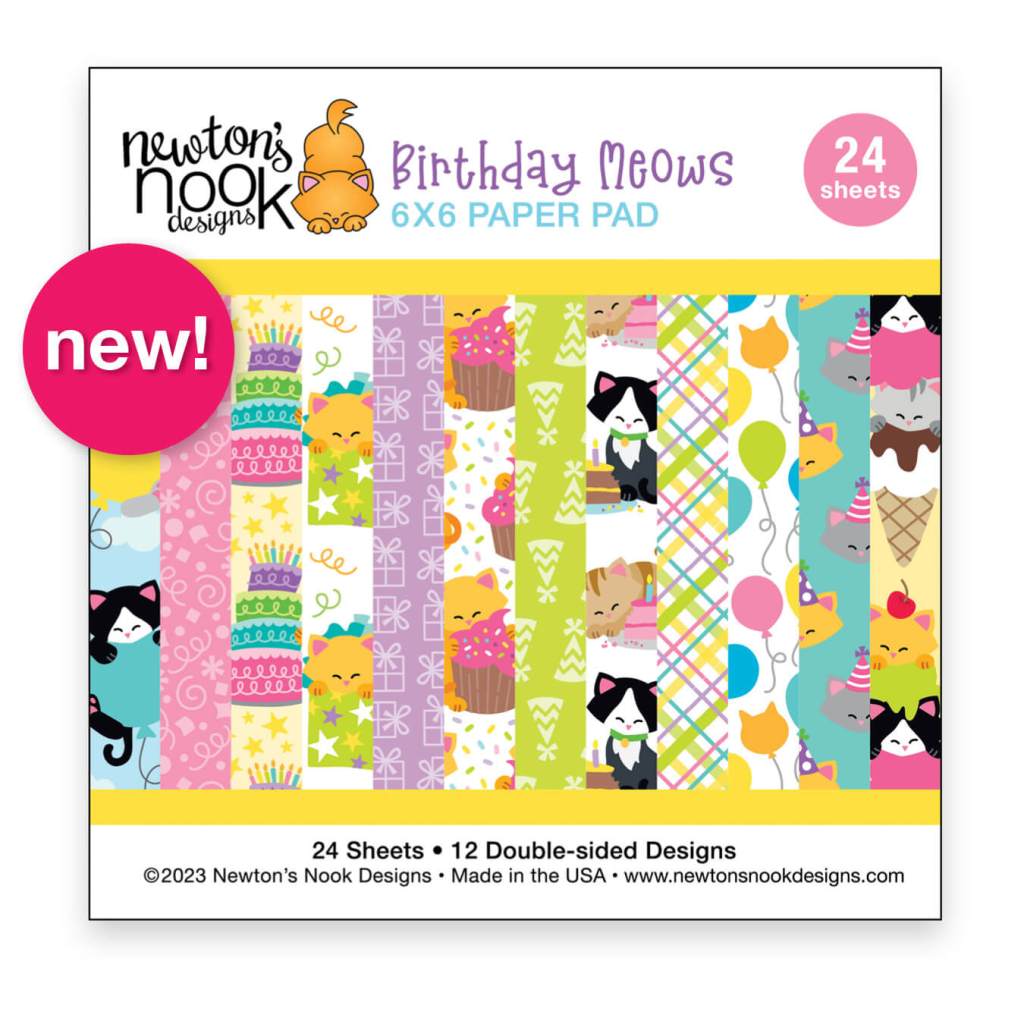
Birthday Meows Paper Pad

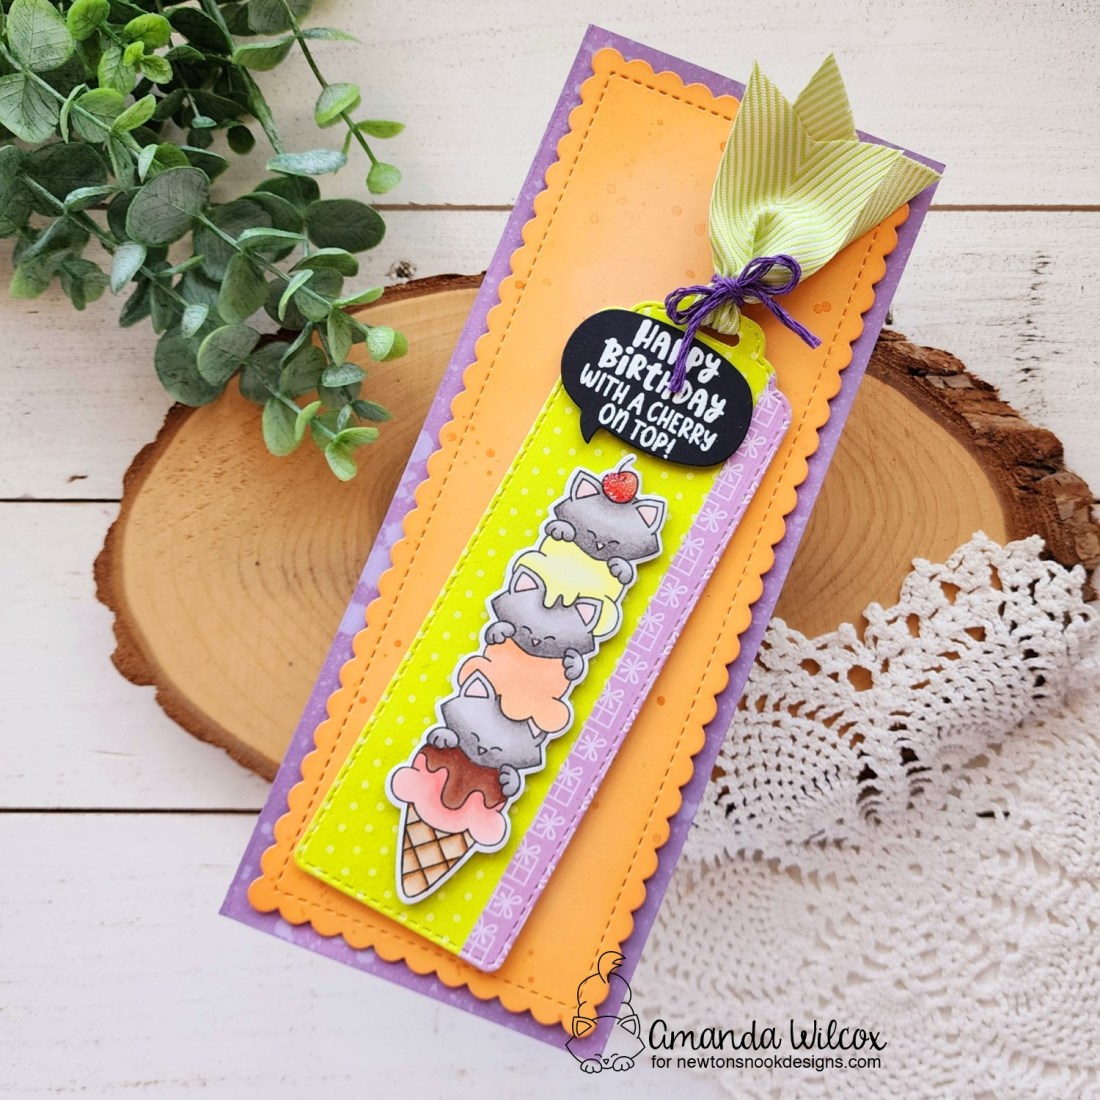
I have two cards to share with you today! First up, is Newton and his adorable stack of ice cream cones. Perfect for the Bookmark dies and a slimline card! I just had to do it.

I was really feeling the warm tones so I kept with gray kitties to contract with my pink, orange and yellow ice cream! I used the coordinating die to cut them out and heat embossed my sentiment on a Speech Bubble die cut before popping everything up on the Bookmark die cut.

Pulling from the colors on my bookmark, I cut a scalloped slimline panel from orange and splattered darker orange ink and watercolor on it for texture and shimmer. Then I inked up my slimline card base with wilted violet distress oxide ink and splattered it with water.

Everything is adhered together with foam strips because I love that dimension! For finishing touches I added Touch of Gloss to the kitty noses and stardust Stickles to the cherry on top!

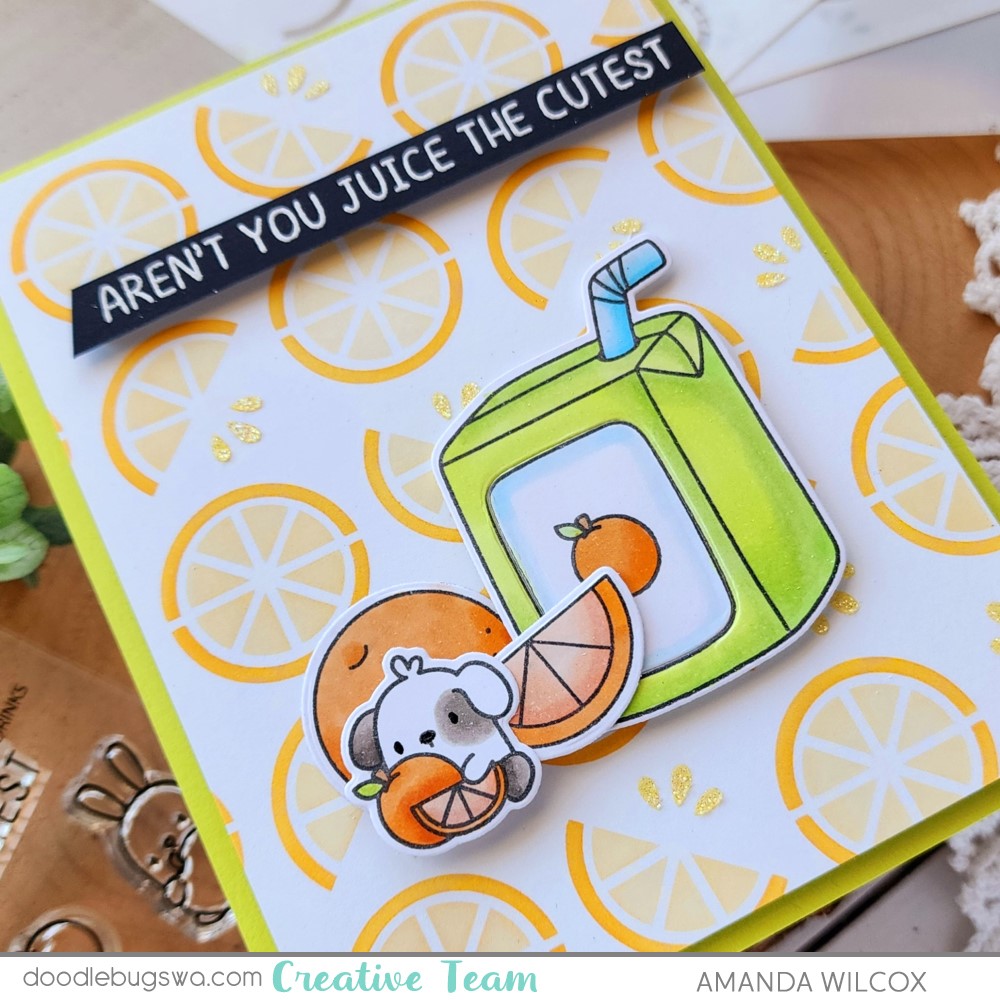
Next, I just had to create a card focusing on the new fabulous Birthday Meows paper pad too! The double-sided decorations go perfectly together and the color palette is incredible!

Another slimline for you but it was too perfect that this paper cut into strips and met up seamlessly! Then I added some plaid on the edges and popped it up on a slimline card base that I had inked with distress oxide squeezed lemonade. I also splattered it with green metallic watercolor for shimmer.

I used the Circle Frames dies to create a medallion to go over my paper seams and stamped it with a sentiment from Newton’s Cupcake. Isn’t it just perfect?!?

Would you like to win the “Newton’s Birthday Delights” Stamp Set? This stamp set will be given away to ONE lucky winner!

Here’s how to win: Comment on the NND blog and Design Team blogs (see list below)! Thewinner will be chosen at random from the collective reveal posts. Make sure to check out each of their blogs and comment for your chance to win. You will not know which blog has been chosen so the more you comment on the better your chances are of winning! You have until Wednesday July 19th at 9pm ET to comment  — winners will be announced on the blog post on Thursday, July 18th. 

Check out all the awesome Design Team Blogs below to enter:

Newton’s Nook Designs
Donna Idlet
Ellen Haxelmans
Tina Herbeck
Larissa Heskett
Samantha Mann
Diane Morales
Maria Russell
Farhana Sarker
Tatiana Trafimovich
Amanda Wilcox

Doodlebugs – Juice the Cutest with Stenciled Background

Welcome friends! I’m so glad you stopped by today. I’m on the Doodlebugs blog sharing an adorable card featuring new products from Mama Elephant and Pretty Pink Posh. They work so perfect together, I just couldn’t resist!

I started by card by stamping images from Mama Elephant Boxed Drinks and Pretty Pink Posh Citrus. I colored everything with my copic markers and used the coordinating dies to cut them out. The juice box die automatically cuts the center for a shaker but I didn’t want to do that today so I just used washi tape to hold it back in place until I added my foam squares to the back later on.

For my background, I inked up a white panel with the Pretty Pink Posh Citrus layering stencil. I used Lawn Fawn carrot and peach fuzz dye inks with blending brushes. Then I added a layer of iridescent glitz gel over the layer with juice drops for some sparkle. Once that was dry I trimmed the panel to 4×5.25 inches and popped it up on a green note card that matched my juice box.

I added the images with a combination of liquid glue and foam squares to the lower portion of my card. Next, I stamped and heat embossed my sentiment, trimmed it in to as trip and popped it up with foam strips as well. Last, I added black glaze pen to the puppy’s eyes and nose so they shine and stand out.

Isn’t this so stinking adorable!?! I love how these sets work so fun together!

Products used:
Mama Elephant Boxed Drinks stamps and dies
Pretty Pink Post Citrus stamps and dies
Pretty Pink Post Citrus stencils
Lawn Fawn Ink – carrot and peach fuzz

Blending brushes
Glitz Gel – iridescent
Foam tape and squares
Sakura Glaze Pen – black

Stop by the Doodlebugs shop and pick up any of these awesome products!

I appreciate you sharing your time with me. Have a fabulous day!

Miss Ink Stamps – I Love You More Than Socks

Hey friends! I’m popping in today to let you know the new release from Miss Ink Stamps is live and available for purchase. It’s another fantastic one with so many fun things, be sure to check it all out!

We have a fur baby living in our house who inspired this fun card. I can’t help but picture her every time I see this sentiment. She’s a sock stealer for sure…from the laundry basket or fresh out of the dryer, she’s not too terribly picky. Lol!

I created a mini scene on one of the Tag dies using the Perspective Floors stencil with the Splatter stencil over the top adding glitz gel for some sparkly magic feelings. Then I cut my sentiment short and finished it off with die cut letters instead of a long banner.

My house elf and the banner are popped up on the tag with foam squares, then the frame and tag are popped up with foam strips on a white card base.

Remember to head to Miss Ink Stamps and check out the whole release!

Products used today:
Elf stamps and dies
Perspective Floors stencil
Splatter stencil
Tags dies
Modern Typeset Frame dies
EIEIO Frame dies
Foam squares and strips
Glitz gel – red
Stencil pal
Liquid glue
Blending brushes

I appreciate you sharing your time with me. Have a fabulous day!

Newton’s Nook – Patterned Paper Play

Happy Friday again friends! I’m over on the Newton’s Nook blog today with a simple trio of cards using patterned paper to create beautiful and easy cards. Following sketches like this with multiple designs in one card make it simple to create a batch of cards at once too.

I saw the general idea for these cards on a reel on Instagram and just had to try it out. I chose three patterns from the A Cat’s Life paper pad and cut each down to 4.25×5.5 inches. Then I stacked them together, holding them tightly so they didn’t shift and cut them into three sections. I didn’t measure a single thing, just lined them up and chopped.

Then I mixed and matched each set so there was one from each pattern for each card. I used liquid glue and adhered them to card bases. Now my card fronts are all done. First I was going to do identical sentiments and shapes but I wanted to share more ideas for you instead.

The sentiments did all come from the Cat-itude stamp set. I chose three that I liked in the moment and went digging for die shapes that coordinated with them. This one uses and oval from the Oval Frames die set. I ink blended the edge with a lime green that coordinates with the color scheme and popped it up on foam squares.

This one was too perfect in the Paw Shaker die shape so I totally ran with it. Inking the edge the same as the other and also popping it up with foam squares.

Last, but not least is a simple stitched circle from the Circle Frames die set, also with inked edges. You’ll also notice that each card has a kitty silhouette somewhere on the design and orange ribbon tied around the top. These were just little additions I made at the end to bring simple cards a step up.

Little things like this make them feel more special and unique. They don’t take much and add a lot of impact for the recipient.

Products used today:
A Cat’s Life paper pad
Cat-itude stamps
Pawprint Shaker dies
Circle Frames dies
Oval Frames dies
Blending brush
Lawn Fawn jalapeno ink
Foam squares
Liquid glue

I appreciate you sharing your time with me. Have a fabulous day!

Pixi Dust Designs – Christmas in July Release Day

Welcome and happy Friday everyone! Pixi Dust Designs has a new release today and it’s all about getting a jump on Christmas crafting. They are re-releasing the holiday mugs die series and adding some other new products in as well! Be sure to check it out. Today I have a fun treat box for you using the Snowman Mug and Mug Add-on dies.

I started by cutting all of my pieces from different colors of cardstock. Then I inked some of the edges for a little depth and added rosy cheeks to my snowman face too. Using liquid glue, I assembled the front mug.

I cut another solid mug piece from white cardstock and also cut the mug add on piece at the same time. I folded and creased the mug add on piece at all the score lines and added tear tape to all the flaps. I removed the release paper from one side and adhered it to the blank mug back. Then did the same thing on the other side, adhering the front decorated mug on top.

Since I used glitter paper for my spoon and sentiment, I didn’t thing it needed much extra. I simply finished things off with white gel pen highlights on his eyes and Touch of Gloss on his nose.

Now, this cute box is ready for treats when the holidays roll around. And with this much lead time, I think this cutie might multiply enough for my whole office! How fun would that be?!?

Products used:
Snowman Mug dies
Mug Add On dies
EZ Tear Tape
EZ Squeeze Liquid Glue
Touch of Gloss

I appreciate you sharing your time with me. Have a fabulous day!

Pink & Main – Hello Friend Hammies with Inked Embossing Folder

Hello everyone! Thanks for stopping by. Today I’m sharing a fun card on the Pink & Main blog featuring these sweet Hammies and my sentiment choices are still making me giggle.

It’s easy for me to overlook but some stamp sets might have less or smaller images and those are the most perfect ones to repeat on your card like a pattern. For instance these cuties with their messages and the one I relate to most with his snack in hand!

I started by stamping and coloring my hammies. Once they were colored, I put them back in my MISTI and stamped the sentiments in the signs. After that, I used the coordinating dies to cut them all out.

Next, I pulled out my chevron embossing folder and a piece of white cardstock. I inked up one side of the embossing folder with The Park ink using a brayer roller. I carefully closed it up and ran it through my die cutter to emboss and ink the panel at the same time. It’s a little blotchy but looks so cool and just adds interest to the background.

Finally, I inked up a strip of white cardstock with Barbershop ink and a blending brush fading into white. Then I spritzed it with water and blotted it dry. I used EZ tear tape to add a strip of kraft cardstock to the top and popped it up with foam tape on the embossed panel. I glued that to a white card base with EZ squeeze liquid glue and added my hamsters with foam squares.

For finishing touches I just added some Touch of Gloss to the hamsters eyes so they were shiny in the light.

Also, still giggling about the sentiments on their signs. I really love this card and can’t wait to mail it! I know just the perfect person for it!

Products used:
Hammies stamps and dies
Chevron embossing folder
Dye Inks – The Park and Barbershop
Foam tape
EZ tear tape – 1/4″
EZ squeeze liquid glue

Ergonomic blending brushes
Touch of gloss

I appreciate you sharing your time with me. Have a fabulous day!

Doodlebugs – Mini Note Card with Pretty Pink Posh, Mama Elephant and Spellbinders

Hi everyone! Today I’m sharing a mini note card featuring dies from Pretty Pink Posh, stamps from Mama Elephant and embossing folder and stamps from Spellbinders. This little card was so fun to create and I think they’re going to be a little addictive. They will be so fun to pop in lunch boxes or leave places for my family.

I really wanted to color this adorable image from Mama Elephant Storytime stamps, so that’s where I started…with no other plan in place. Sometimes this is the most therapeutic craft sessions. No pressure, just do something you want and if it turns into a completed project, cool. If not, you got to relax and color.

However, after I die cut this adorable image, it struck me that it might fit the Pretty Pink Posh Sweet Note card. And it did, perfectly! So I cut the base from white cardstock and the stitched square from teal. Then I added some texture to the square using the Spellbinders Tiny Dots embossing folder. The embossed panel is glued to the card with liquid glue and the image is popped up with foam squares.

Then I found this perfect sentiment in the Spellbinders I’ve Got You Covered stamp set. After I stamped it, I just trimmed it into a strip and added it with a foam strip. For finishing touches I added some white gel pen highlights, black glaze pen to open eyes and stardust Stickles to the clouds and sun. Last, I did put little dots of glossy accents on noses and the frog’s crown.

Do you give little notes to your family members? I can’t be the only one. Lol!

Products used:
Mama Elephant Storytime stamps and dies
Pretty Pink Posh Sweet Note dies
Spellbinders Tiny Dots embossing folder
Spellbinders I’ve Got You Covered stamps
Liquid glue
Foam squares and strips
Glossy accents
Stickles – stardust
Sakura Glaze pen – black

I appreciate you sharing your time with me. Have a fabulous day!

Miss Ink Stamps – Hi Swirl Frame Card

Hello again! Today I’m popping in with a fun card featuring Miss Ink Stamps Hi Swirl Frame dies. This die set is so packed and it’s the only thing I needed to create this card. How often can we say that anymore? It seems that something is in one set and other piece that you just have to have is in another. I’m always feeling that way.

For this card, I cut a rainbow of 1/4″ strips and glued them to a 4×5.25 inch panel of white cardstock. I trimmed off the excess with my paper trimmer. Then I cut the frame from black cardstock and glued it down on top.

I cut the shadow for “hi” from black cardstock and the letters with Spellbinders Die Cutting sparkle foam. This stuff really is magical. It pops right back up when it comes out of the die cutter. I love it! I used liquid glue to adhere everything again.

I popped my panel up with foam tape on a white card base but something was missing. It felt boring and uninteresting. So I went back to that same die set and cut some florals using the same cardstock that’s in my rainbow stripes. I used liquid glue to adhere all of those parts and my card is finished.

Products used:
Miss Ink Stamps Hi Swirl Frame dies
Spellbinders Die Cutting Foam
Foam tape
Bearly Art liquid glue

I appreciate you sharing your time with me. Have a fabulous day!

Pink & Main – A Cheerful Hello with Negative Foiling

Welcome back everyone! I’m over on the Pink & Main blog today playing with CheerFoils again but this time, I’ve used the negative foil from last week’s card. Remember you can do that to extend the use of your supplies, have little or no waste and Pink & Main has FABULOUS colored toner sheets so your negative isn’t just black.

Last week I foiled the Making Waves Foilable card front with gold CheerFoil but I saved that negative because it came out so perfect. Sometimes I might foil the negative right away and other times, like this one, I’m non-committal on the color I want the background so I just hold onto the foil. This time I chose blue for a watery, tropical vibe. Then I die cut the panel with a Concave Rectangle and splattered the panel with black acrylic paint. This adds cool texture and pulls your eye away from any imperfections too.

I stamped and colored the sweet hula girl from Tiki Time and colored her with copic markers. Then I stamped and heat embossed a sentiment on a Large Sentiment Strip. I added foam tape to all of my pieces and switched gears to choosing a color for my card front.

After trying multiple colors I landed on cracking campfire distress oxide that goes with the details on the hula girl. After inking the card front up, I splattered it with water and blotted it dry. Then I adhered all the elements and came in with some Touch of Gloss details on the girl.

Sometimes this much foil can be overwhelming for me but I really can’t express how awesome this card is in person and how cool the shine is to play with in the light. I love it!

Products used:
Tiki Time stamps and dies
Large Sentiment Strip dies
Concave Rectangle dies
Making Waves Foilables
CheerFoil – gold

Rainbow Toner Sheets
Mini Minc Machine
Touch of Gloss
Foam tape
Magic Anti-static Brush
Watermark & Embossing Ink
Embossing Powder – icicle
Distress Oxide Ink – crackling campfire

I appreciate you sharing your time with me. Have a fabulous day!

Pixi Dust Designs – Floral Bergenia with Negative Die Cut Sentiments

Welcome back everyone! I’m happy to be sharing another card featuring the Bergenia dies from the June Pixi Dust Designs release. I am finding it so fun to cut and assemble these gorgeous layered blooms. Today I have a simple card with a fun twist to try.

I started, once again, by die cutting all the pieces to my flower and ink blended some shadows on the layers with a blending brush and dye inks. Then I used liquid glue to assemble all the pieces, except a foam square for the top layer of the flower.

Then, for my sentiment, I cut a piece of white cardstock to 4×5.25 inches and arranged my dies, using the flower for help with placement. I used pixie tape to hold the dies in place and ran the panel through my die cut machine. I was careful to keep all the little pieces of the letters too. I glued the white panel to a piece of purple cardstock and then inserted all the letter centers with liquid glue.

I added the flower with foam squares and finished the design off with a scattering of gemstones for some pretty bling. I love adding sparkle to things!

Products used:
Bergenia dies
Foam squares
Liquid glue
Rainbow Reflection Rhinestone embellishments

I appreciate you sharing your time with me. Have a fabulous day!