Blog

Doodlebugs – Hip Hip Hooray Tropical Bird Hot Foil

Woohoo!!! I’m so happy to be joining the Doodlebugs team! I’ll be bringing you fantastic inspiration with your favorite brands mixed and matched together. Sometimes we get in a rut of using only one brand of products per project but remember that it’s fun to combine your favorites together.

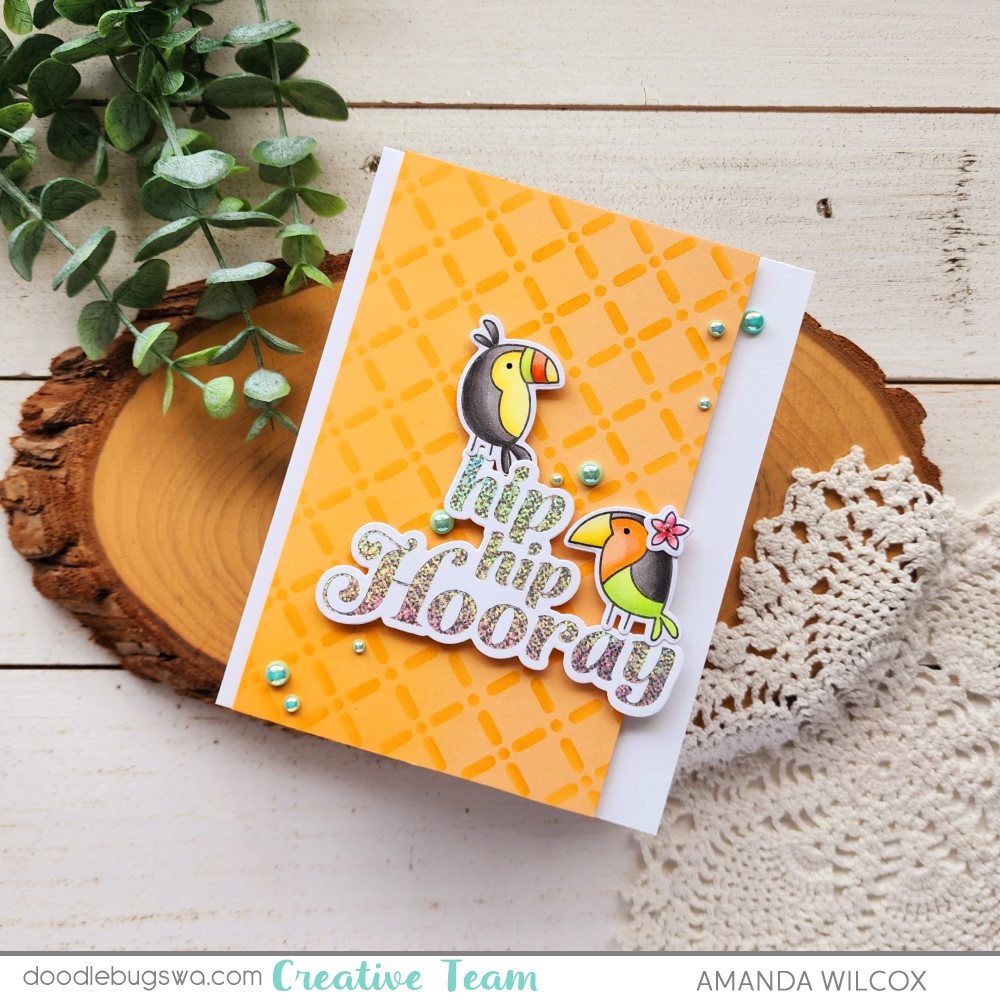
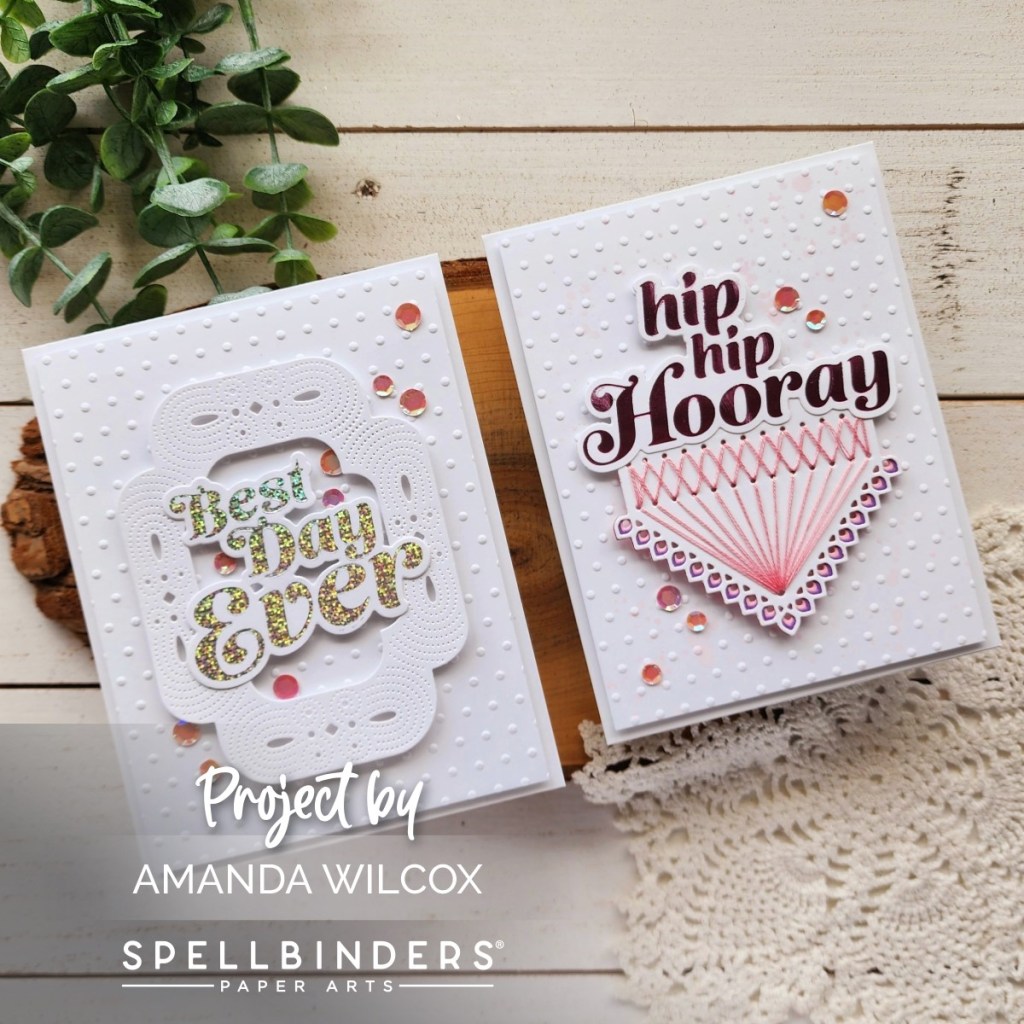
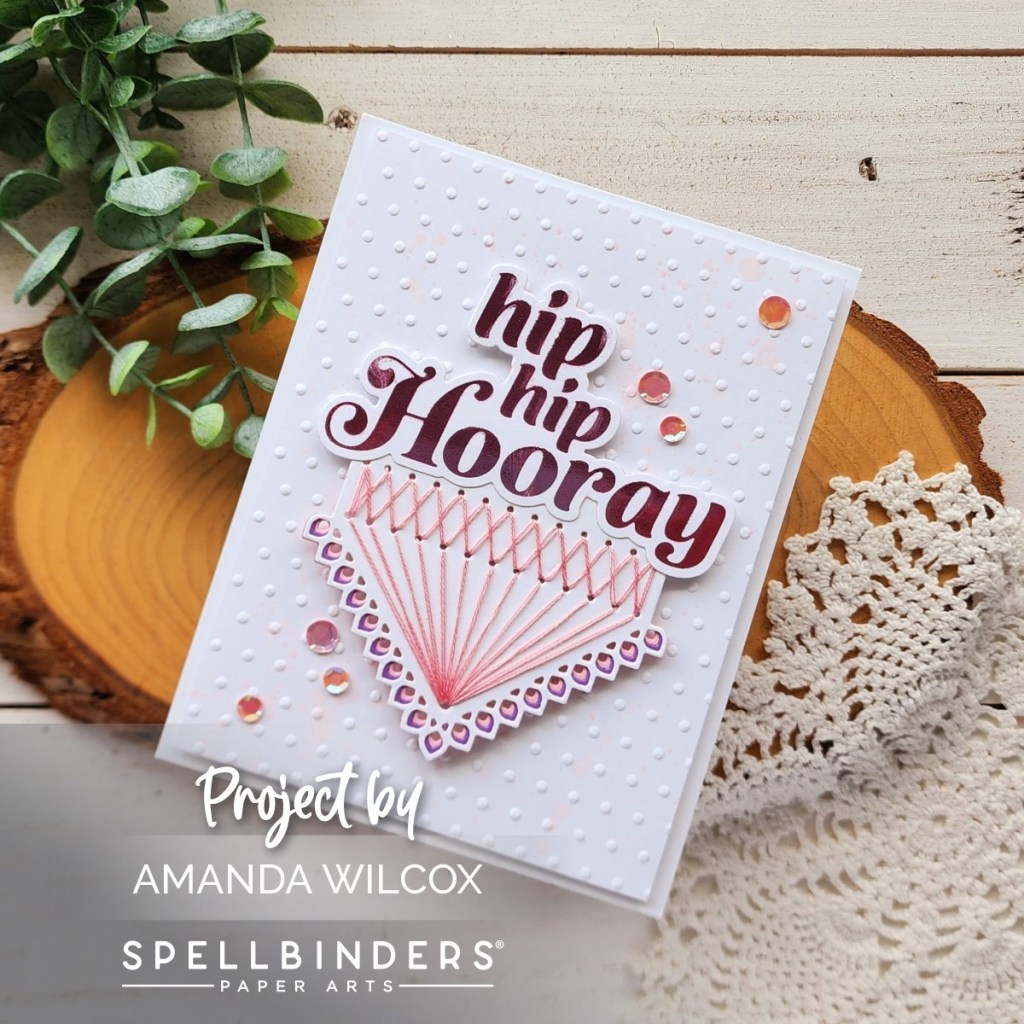
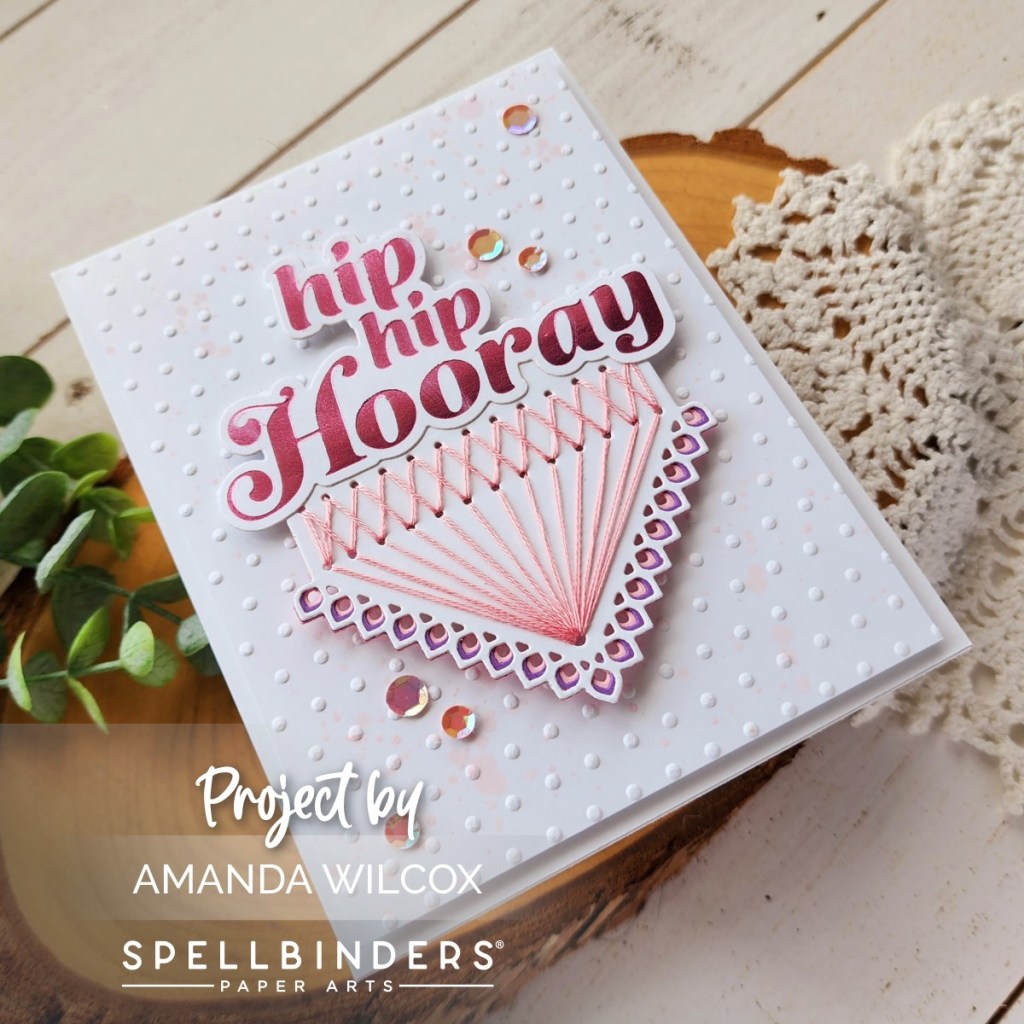
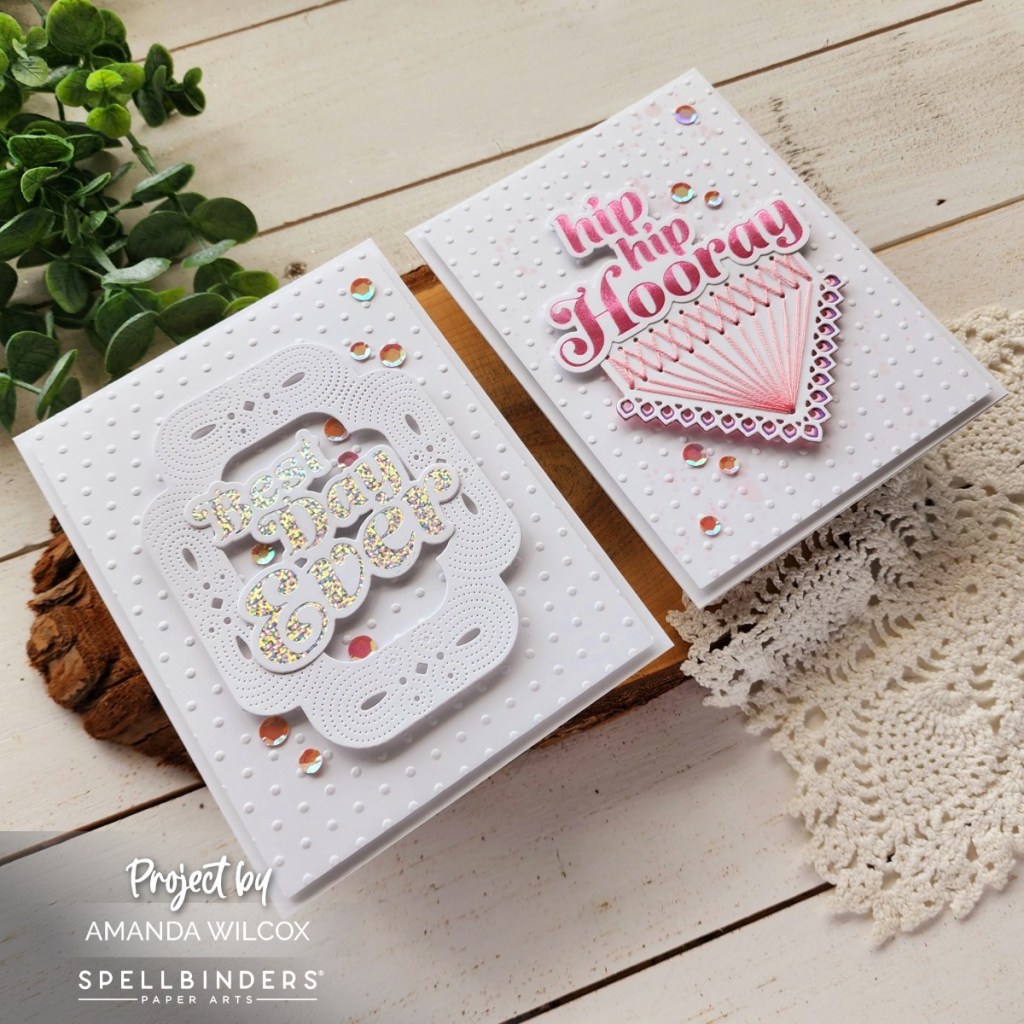
Today I had some fun hot foiling with the new Spellbinders Hooray hot foil and die set. Isn’t that speckled prism hot foil eye catching! I love it! Once that was done, I pulled out the Pretty Pink Posh Tropical Toucans and Trellis stencil to play around.

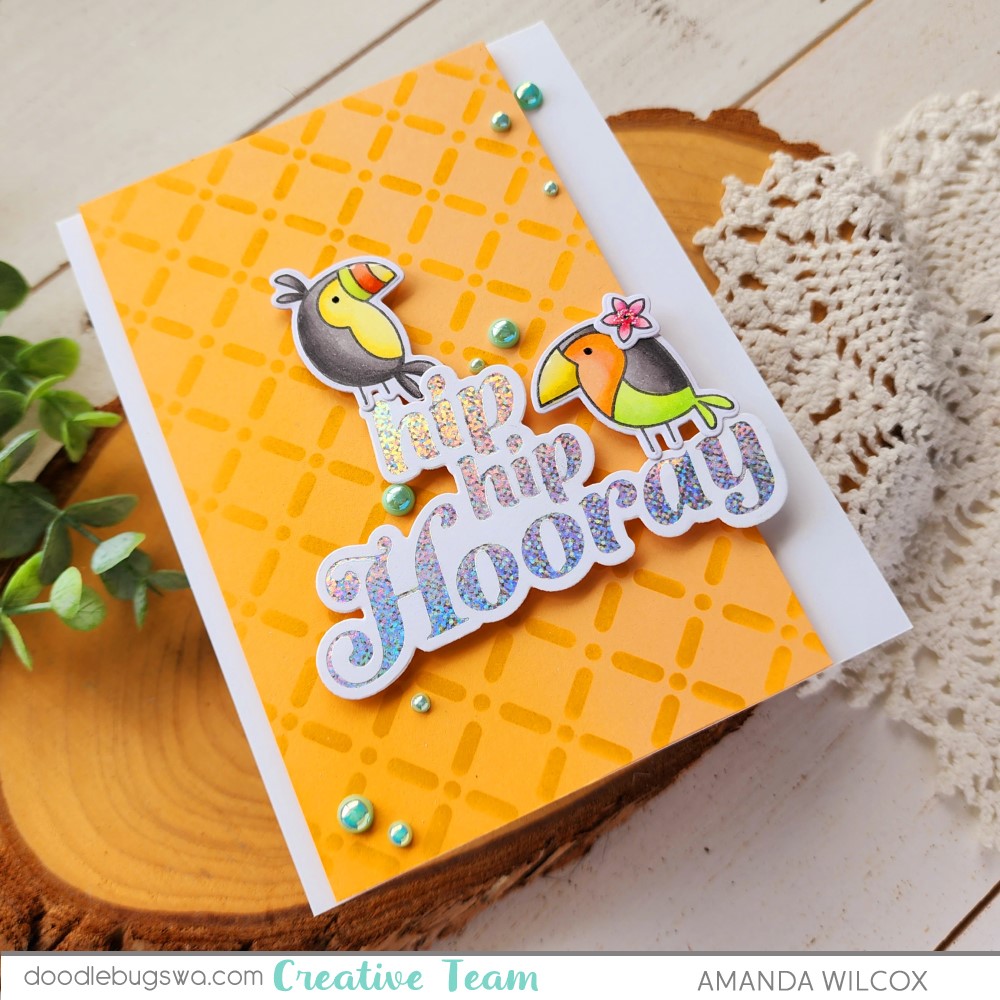
My orange panel measures 3×5.5 inches and is inked up with Lawn Fawn carrot ink for a tone-on-tone background. I popped the panel up with foam tape before adding my birds and sentiment with foam squares.

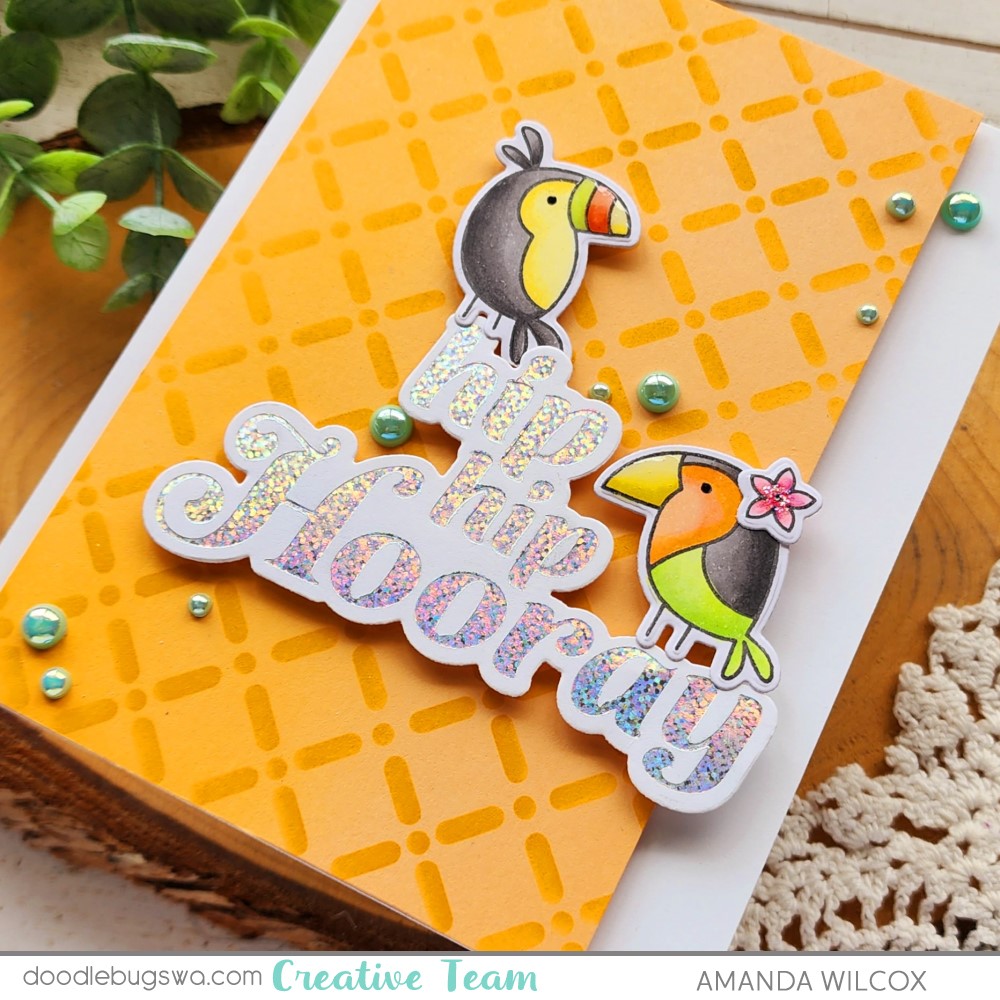
For finishing touches I added black glaze pen to the toucan’s eyes and glossy accents to their beaks. Next I put a bit of stardust Stickles on the the flower and finished the design off with a scattering of Pretty Pink Posh sea foam pearls using liquid glue.

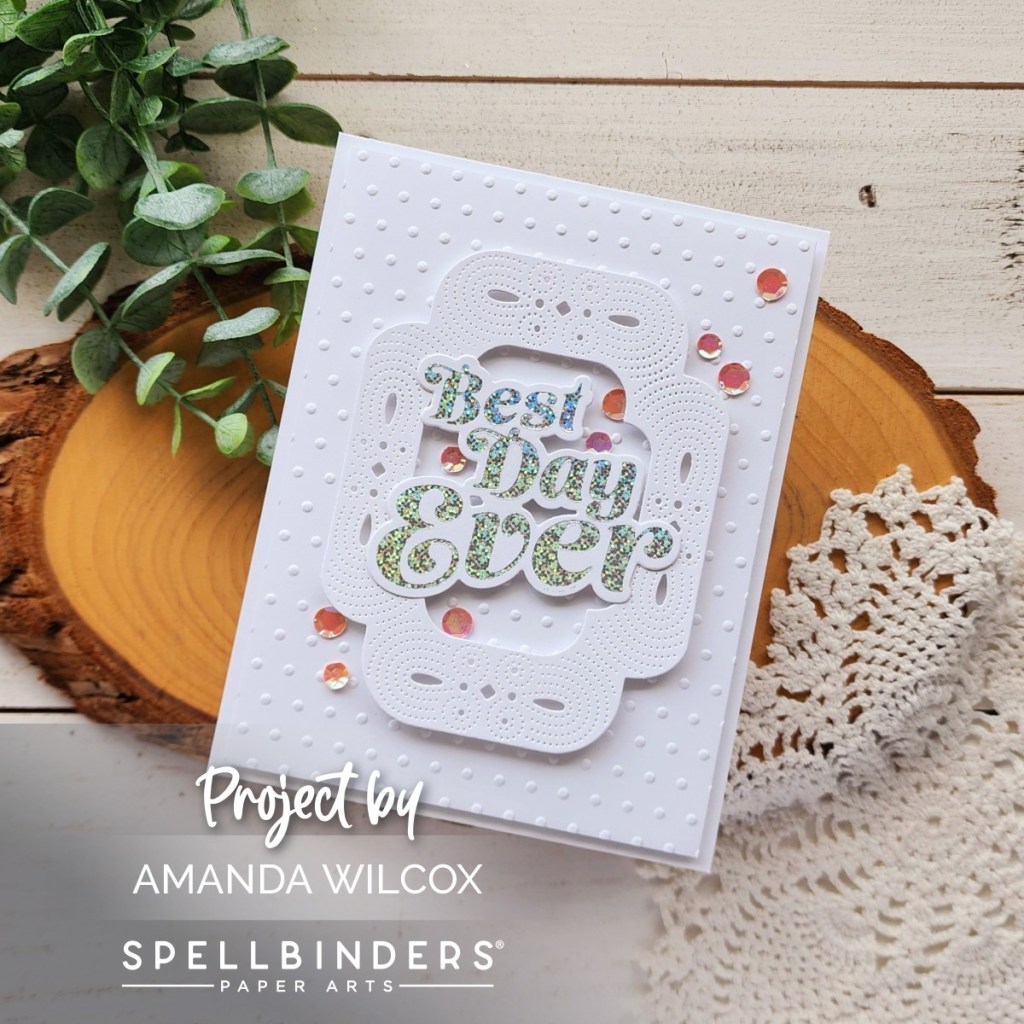
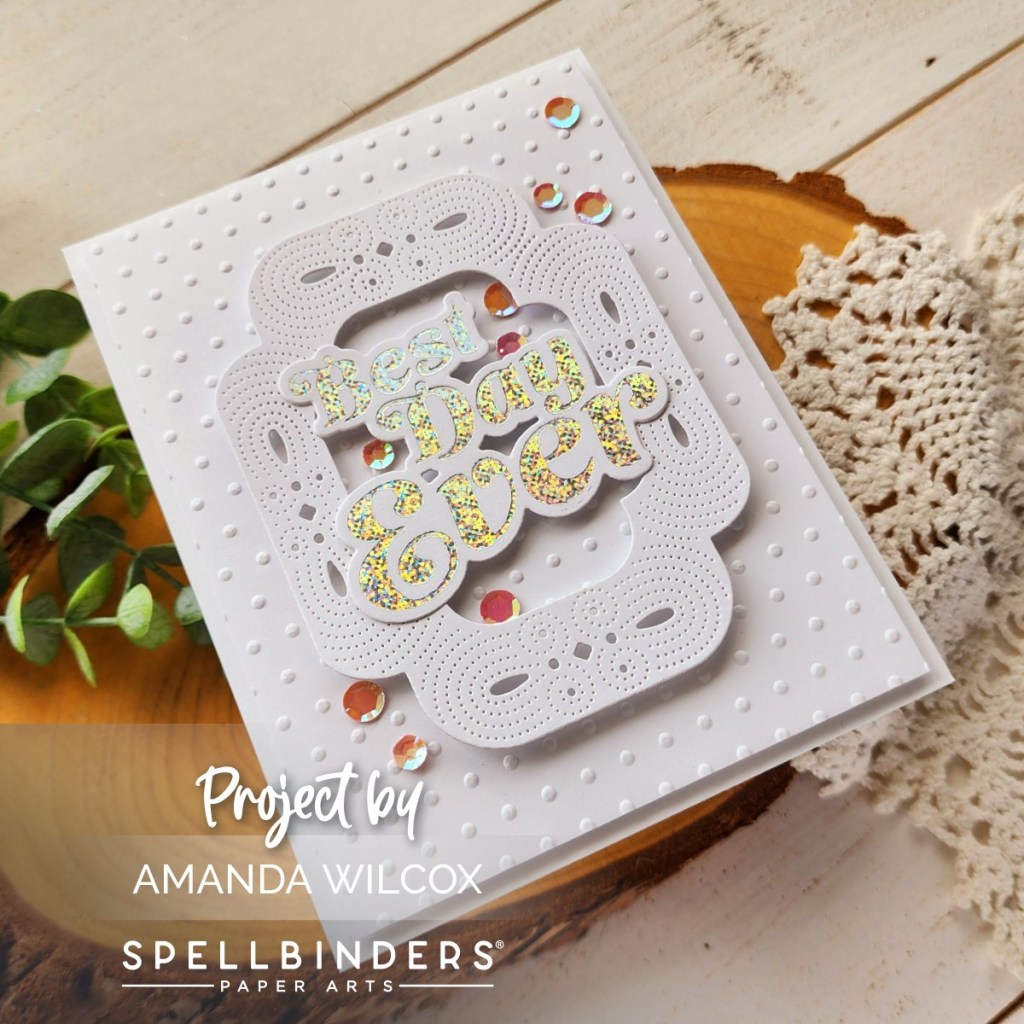
I love how fun and happy this bright card is! It’s perfect for a variety of occasions and great to have in your stash.

Products used:
Spellbinders Hooray Hot Foil Plate and Die
Spellbinders Speckled Prism Hot Foil
Pretty Pink Posh Tropical Toucans stamps and dies
Pretty Pink Posh Trellis stencil
Pretty Pink Posh sea foam pearls
Glossy accents
Sakura Glaze Pen – black
Stickles – stardust
Bearly Art liquid glue
Foam tape and squares

I appreciate you sharing your time with me. Have a fabulous day!

Pink & Main – Just Fur You Fun with Foiling

Welcome crafty friends! I’m on the Pink & Main blog today sharing a sweet pet themed just because card using some of the new amazing foiling products. Pairing these awesome foilable card fronts and gorgeous foils with the new Minc machine from Pink & Main, you can’t go wrong! They foil beautifully, quickly and it’s so fun to create with!

When I looked at the new Just Fur You and Top Dog stamp sets, I had to put these sweeties holding flowers together! It was just too perfect. So I stamped and colored them with copic markers before using the coordinating dies to cut them out.

I love the visual texture of the new Making Waves foilable background so I decided to run that through my Minc with gold foil. Pulling from the green grass in the puppy image, I inked the edges of my card base with The Park dye ink and also stamped my sentiment in the same color. I used a sentiment banner from Sunny Greetings dies to cut it out and started arranging my card.

Something was definitely missing so I went back to the drawing board. That’s when I remembered this AWESOME new giant paw in the Paw Prints die set. It’s perfect! So I cut it from black cardstock and popped the pieces up with foam squares. I added my images and sentiment the same way and popped the foiled panel up with foam tape on the inked card base.

For finishing touches I just added a little touch of gloss to the puppy and kitty noses and black glaze pen to their eyes.

It turned out so cute and fun with all the foiled shiny texture and sweet images! I love it!

Products used:
Just Fur You stamps and dies
Top Dog stamps and dies
Paw Prints dies
Sunny Greetings dies
Making Waves foilables
CheerFoil – gold
Mini Minc Machine
Foam tape and squares
The Park ink
Ergonomic blending brush
Touch of gloss
Glaze pen – black

I appreciate you sharing your time with me. Have a fabulous day!

Pixi Dust Designs – Just Keep Swimming Slimline with Soft Ink Blended Backgrounds

Hello everyone! I’m so glad you stopped by. Today I’m sharing a slimline card featuring the new Keep Swimming die set from Pixi Dust Designs. I went a completely different direction from my last card with this set and it was really fun!

I started by die cutting the slimline cover plate in the Keep Swimming die set from white cardstock. I tossed the little bubbles that cut out but I saved the larger opening pieces to ink blend on. I chose blue, teal and purple dye inks and randomly blended them on each piece with blending brushes. Then I splattered them with some pearl watercolor and set them aside to dry.

Then I chose some characters and scene setting dies from the set and cut them all from colored cardstock. I ink blended some shading on each one and used liquid glue to adhere the different layers together.

you might notice that I sort of followed a certain Disney movie’s character colors because I love that movie so much and totally couldn’t resist myself. After everything was glued together I started deciding what was going to go in which panel.

When that was figured out, I cut a piece of teal cardstock and glued it to a white slimline card base before gluing the die cut frame over it. This colored in all the bubble holes. Next, I added foam tape to the back of the three scene panels and popped them up in their respective spaces.

Finally, I added the images to my mini scenes with a combination of liquid glue and foam squares. Last, I die cut my sentiment using dies in the Birthday Sentiments set. I cut skinny foam pieces to pop it up and make it the same level as the background panels.

Aren’t these ocean critters just the cutest thing ever??? I’m totally smitten with this die set and can see so many more projects coming in the future!

Products used:
Keep Swimming dies
Birthday Sentiments dies

Twiddler’s Nook blending brushes
LH Colors pearl watercolor
Foam squares
Liquid glue
Lawn Fawn dye inks – mermaid, forget me not and juice box

I appreciate you sharing your time with me. Have a fabulous day!

Picket Fence Studios – Animal Crackers Rooting For You

Hello again! I wanted to share another card I created for the Picket Fence Studios June release featuring their adorable Animal Crackers line. This group of critters are rooting for a speedy recovery and I love it!

I started by stamping the image and taking my time coloring all of these cuties with my copic markers. Then I cut it out and set it aside.

For my background panel, I cut a piece of white cardstock to 4×5.25 inches and used my scoring board to emboss lines 1/4″ in and 1/8″ apart all the way around. This gives a subtle frame and great detail to your focal panel. Then I placed the panel in my MISTI and stamped the sentiment, making sure I had room for my image because it’s so big.

I popped the panel up with foam tape and then did the same thing with the image. For finishing touches I added black glaze pen to critter eyes and noses. Then I glued down a scattering of sequins from the new Lake Tahoe embellishment mix.

Products used today:
Animal Crackers: Kind Messages stamps and dies
Lake Tahoe embellishment mix

Foam tape
Liquid glue

I appreciate you sharing your time with me. Have a fabulous day!

Spellbinders – It’s My Party Too with Hot Foiling

Happy Friday everyone!!! I’m popping in today with a pair of cards featuring the Spellbinders It’s My Party Too collection. It’s a fabulous add on to Carissa Wiley’s It’s My Party so be prepared you’re going to want it all! Super versatile, brilliantly designed and amazing to create with!

To start off, I just pulled out some hot foil and played with that for a minute so I had extra sentiments when I was done. I used two from the Metallic & Holographic Variety Pack today.

I’m going to start with this Best Day Ever card because I’m a little obsessed with it and how totally cool the holographic foil is on the sentiment! I paired the sentiment with the new Tiny Dots embossing folder and the middle section you get using the Scrolled Punch & Pierce Plate.

You know I love dimension so the embossed panel is trimmed to 4×5.25 inches and popped up with foam tape, then the scroll frame and sentiment are popped up with foam squares too. To finish off the design I added some pink opalescent sequins across the design.

Next, I went a different route and added some stitching fun to my card.

I loved how the Hooray sentiment perfectly covered the length of the Stitched Kaleidoscope Hexi-Gem die cut so I paired them together for a different look. I stitched in pink and added pink and purple layers behind the border. Then glued the hot foiled sentiment to the top edge.

Next, I embossed another 4×5.25 inch panel with the Tiny Dots embossing folder. This time I added a little ink splatter to the embossed panel using watered down spun sugar distress oxide ink too. Everything is popped up with foam tape the same way as the first card and I finished things off with the same scattering of sequins too.

Here’s one more look at the pair of cards together. They’re so shiny and pretty! I’m so happy with how they turned out and seriously love playing with that holographic foil in the light. It’s addicting.

Products used today:
Glimmering Best Day hot foil plate and die
Glimmering Hooray hot foil plate and die
Tiny Dots embossing folder

Scrolled Punch & Pierce Plate die
Stitched Kaleidoscope Hexi-Gem dies
Metallic & Holographic Variety Pack hot foil rolls
Pink Opalescent sequins
Liquid glue
Foam tape and squares
Distress Oxide Ink – spun sugar

I appreciate you sharing your time with me. Have a fabulous day!

Picket Fence Studios – Coffee Bar Scene Card

Hi there! I’m back with another card I created using the Picket Fence Studios June release. This time I created a fun scene card making a coffee bar that I’m jealous I can’t sample off of!

I had a vision in mind so I cut all the pieces for my table and coffee goodies. Some from colored cardstock, like the coffee maker, and others from white cardstock so I could color them with copic markers.

Next, I took an A2 white panel and scored it every half inch for texture. I cut a strip of kraft cardstock for the floor and colored it with copic markers for depth. I glued the floor to the scored panel and added a 1/4″ strip over the seam for a baseboard.

I adhered all of my coffee bar pieces with liquid glue. Then I stamped and heat embossed a sentiment on black cardstock, cut it into a rectangle and glued it in place as well.

I love being able to create in different ways. This card was out of my comfort zone but so fun to play with all the little elements, building a scene.

Products used:
Espresso Bar dies
Espresso Yourself stamps

Magic Anti-static Brush
Embossing & Watermark ink
Embossing powder – icicle

Bearly Art liquid glue

I appreciate you sharing your time with me. Have a fabulous day!

Pink & Main – Patriotic Reach for the Stars

Hi everyone! I’m on the Pink & Main blog today with a little inspiration using a new background die and the June Pup freebie stamps and dies! I’m having a blast with this collection and so happy to have a patriotic version to add to the mix.

I stamped my image and colored it with copic markers before using the coordinating die to cut it out. Then I switched to my background using the new Making Waves cover die and a Stop Sign cardstock panel behind it.

I used EZ Squeeze liquid glue to adhere the background layers together and then to a white card base. I wanted something to separate my pup from the background so I chose a zig zag circle just a smidge bigger than him and cut it out from vellum. I added the pup to the vellum with foam squares and hid tape runner behind that to adhere the vellum to the card front.

I chose my sentiment and heat embossed it with licorice embossing powder on white cardstock, using the coordinating die to cut it out too. I wanted more stars to add to the mix so I went digging and found these awesome size stars in the Flip Flops and Shades die set. I cut them from silver foil cardstock and added them with a combination of liquid glue and foam squares.

For finishing touches I just added Touch of Gloss to my puppy’s nose, eye and the stars on his hat. This way there is shine at all angles of the card – the pup, the stars and the heat embossed sentiment. It’s perfect!

Remember you can get June Pup free with purchase until June 23. You get the stamps with a $50 purchase and the coordinating die added if you spend $75!

Products used today:
June Pup stamps and dies
Making Waves cover die
Zig Zag Circles dies
Flip Flops and Shades dies
Stop Sign cardstock
EZ Squeeze liquid glue
Touch of Gloss
Magic Anti-static Brush
Embossing & Watermark Ink
Embossing Powder – licorice
Foam squares

I appreciate you sharing your time with me. Have a fabulous day!

Newton’s Nook – Ink Smooshing Seashell Roundabout Cards

Hello everyone! I’m happy to be back on the Newton’s Nook blog today. This time I needed some inky therapy and decided to play with ink smooshing a few panels, mixing colors and just having fun. This great trio of cards was the outcome of that and I absolutely LOVE them! I hope you do too!

I used watercolor paper and Tombow markers – the brights set – for all of my inky panels. The key to getting layered colors instead of smooth blends when ink smooshing is to completely dry your paper in between colors. I use a heat tool but if you don’t have one but have patience, you could just let it dry too.

After the ink smooshing was done, I took the Seashell Roundabout stamp and stamped it with VeraFine onyx black ink on each one. I prefer this ink for stamping on top of ink. It comes out crisper and really stamps fabulous, detail or not.

After that, I die cut each panel with the largest scallop circle in the Circle Frames die set. I stamped and heat embossed three sentiments from the same stamp set on one of the Banner Trio banners next. Finally, I chose patterned papers from the Summertime paper pad to coordinate/contrast with my ink smooshing circles.

I added each layer with foam tape to white, top-fold card bases and chose some light yellow organza ribbon to tie at the top of each card.

To finish them off for a bit of bold bling, I glued black baubles across each design.

These cards whipped up in one evening easily. They were therapeutic to create and will be equally as therapeutic to pop in the mail for some just because happy mail.

Products used:
Seashell Roundabout stamps
Circle Frames dies
Banner Trio dies
Frames & Flags dies
Summertime paper pad
Magic Anti-static brush
Embossing and Watermark ink
Embossing powder – icicle

Foam tape
Black baubles
Tombow Brights Dual Brush markers

I appreciate you sharing your time with me. Have a fabulous day!

Pixi Dust Designs – Follow Your Heart Bergenia Card with Ink Blending

Welcome everyone. Today I have another card using the Pixi Dust Designs June release. This time I tried one of the new floral die sets – Bergenia. It’s so pretty and almost too simple to create. I loved it!

I started by die cutting all of my floral elements from colored cardstock. Then I used blending brushes to add some shadows to the different parts of the flower petals and leaves. I used liquid glue to adhere all of the layers together except the most front layer of the flower petals which I added with a foam square.

Then I took an A2 white panel of cardstock and ink blended with distress oxide inks from the top left corner fading to nothing. I used peacock feathers and salvaged patina and then splattered water, peacock feathers ink and black paint across the design. Once the panel was dry I adhered it to a card base and then popped the flower up with foam squares.

Last, I die cut thanks from the Tag Accessories die set using black cardstock and glued it to the flower leaves with liquid glue. I left the ends free and it really gives a beautiful look in person. You just have to be mindful putting it in an envelope.

Products used:
Bergenia dies
Tag Accessories Add On dies

Distress Oxide Ink – peacock feathers and salvaged patina
Foam squares
Liquid glue

I appreciate you sharing your time with me. Have a fabulous day!

Spellbinders – Daisy Mouse Watercolor Card

Welcome to a fresh, new week everyone! Thanks for stopping by today. I’m keeping things very clean and simple to start a very busy week. I have loved House-Mouse Designs for decades and am very happy to see them working with Spellbinders. I have the Daisy Mouse stamp set and chose to have some mellow watercolor time to create with it first.

My version of watercolor is more faux watercolor than anything. I stamped my image and sentiment on a piece of watercolor paper cut to 4×5.25 inches. All of my color is laid down with Zig Clean Color Real Brush Markers and then I use a wet paintbrush to move the color around.

I love the feel of watercolor and how it doesn’t have to be perfect to look gorgeous. Also remember that if you dry your ink between applications, it’s easy and so pretty to layer colors on top of each other for different looks.

When my painting was done but the panel was drying, I created a white card base but wanted to add some color to the edge. I grabbed picked raspberry distress oxide and added a light layer around the edge that would show through but the pink was not working for me. So I went right over the top with ripe persimmon and LOVE the melon color that I ended up with. It’s so pretty!

Once the watercolor panel was dry I just popped it up on the card base with foam tape and my card is all finished.

Products used:
Daisy Mouse stamps
Zig Clean Color Real Brush Markers
Distress Oxide Ink – picked raspberry and ripe persimmon
Foam tape

I appreciate you sharing your time with me. Have a fabulous day!