Blog

Trinity Stamps | Carlijn Designs – Father’s Day Slimline Card and Gift in One

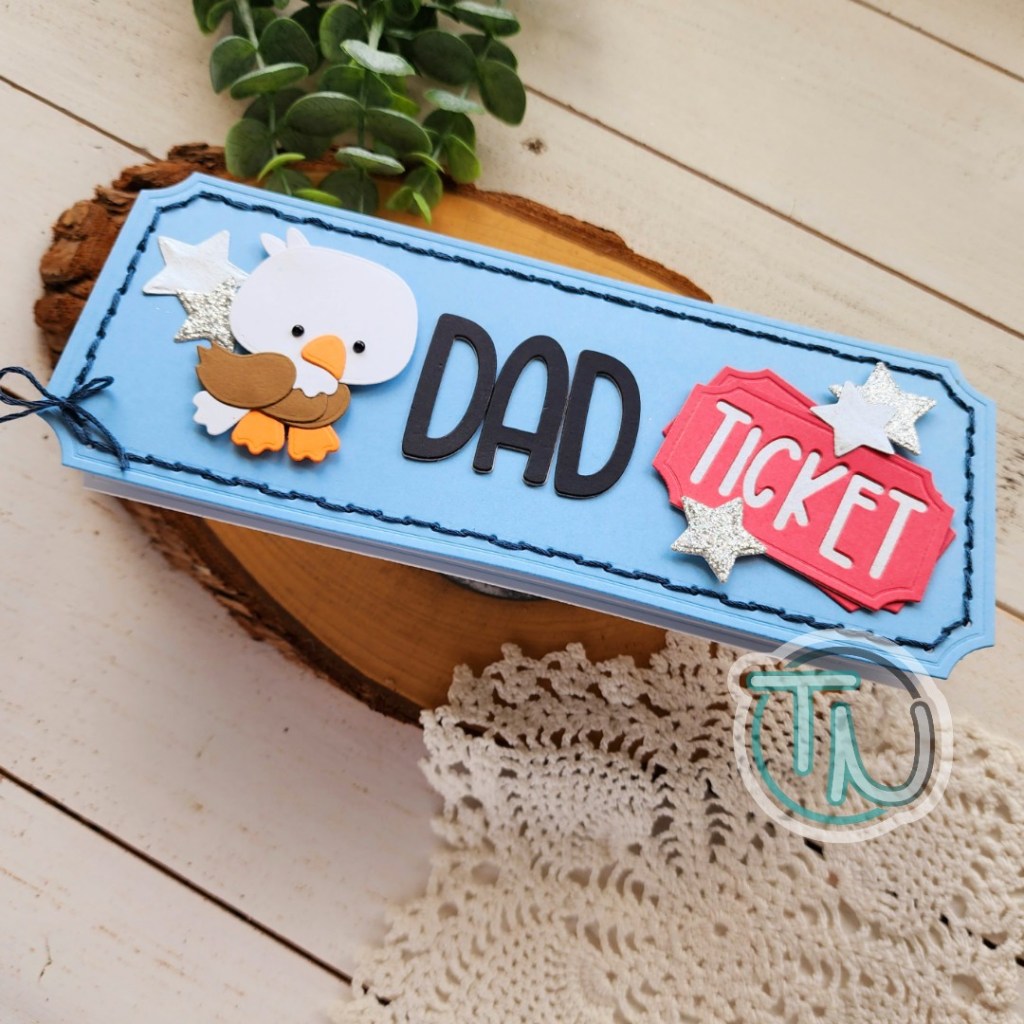
Hey friends! I’m excited to share a fun slimline card with you today that I made my dad for Father’s Day. It’s a card but also his gift which is fun!

I started by using the adorable Carlijn Designs Patootie dies to create that awesome bald eagle. My dad loves bald eagles so I was excited when this die set had it as an option. Then I used the Trinity Stamps That’s the Ticket slimline dies and Marshmallow Alphabet dies to create my card base and all the other elements for my card.

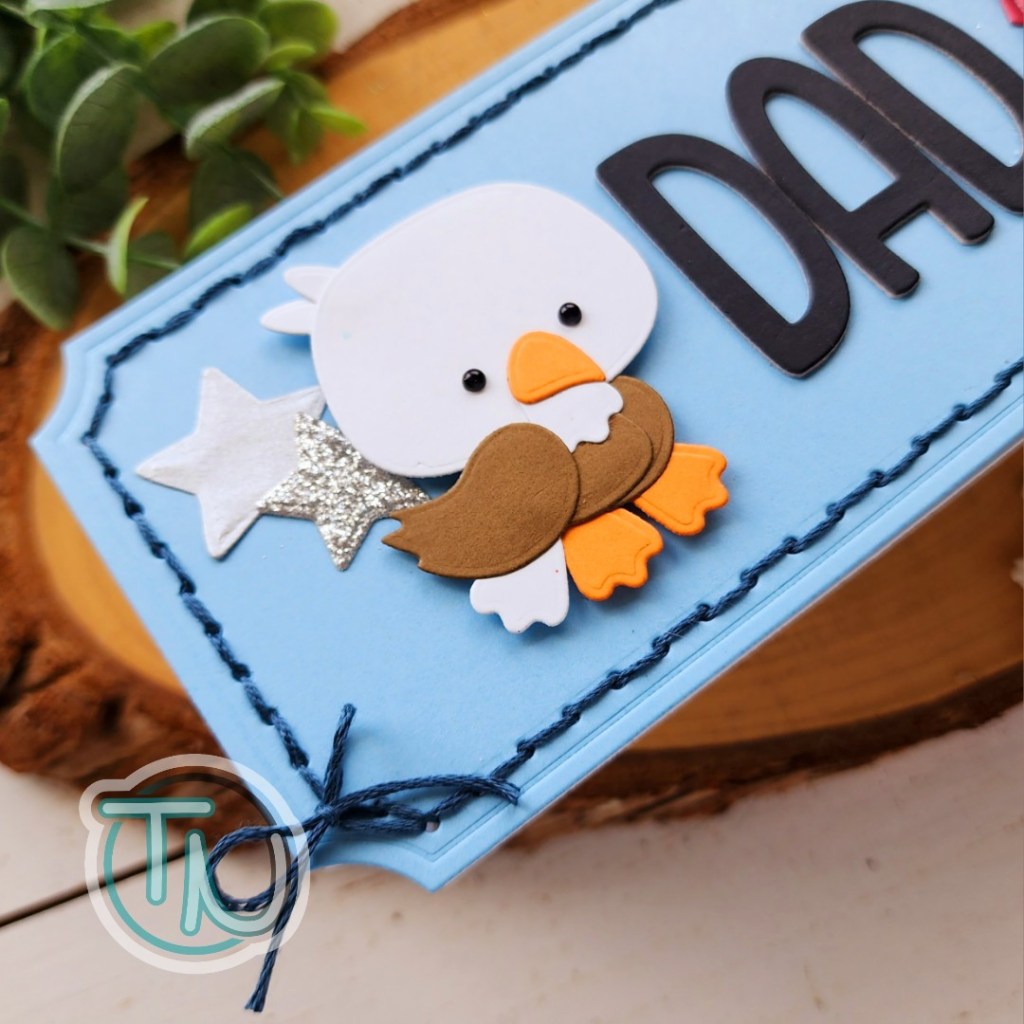
I cut two of the largest ticket shape – one blue and one white – then scored the white layer 1/2″ from the top for my card flap. I used the embroidery floss to stitch the layers together and kept it going all the way around, tying it in a bow at the end.

I cut my other elements from different cardstocks in my stash – glitter, metallic, etc. – and used liquid glue to adhere layers together. The word “dad” is cut from gray cardstock four times and black once, then glued together for dimension. I adhered the elements of my card with a combination of liquid glue and foam squares.

On the inside I wrote a nice message to my dad and told him that we’re going on a movie date! He picks the movie and the day, and I’m paying. We both love going to the movies so it’s going to be great! I’m excited and I hope he is too!

Products used today:
Carlijn Design Patootie dies
Trinity Stamps That’s the Ticket dies
Trinity Stamps Marshmallow Alphabet dies
Trinity Stamps black baubles (eagle eyes)
Liquid glue
Foam squares

I appreciate you sharing your time with me. Have a fabulous day!

Pixi Dust Designs – June Release | Just Keep Swimming Ink Smooshing

Yay friends! It’s release day for Pixi Dust Designs! This release has some beautiful florals and really fun ocean goodies. Of course I was totally drawn to the critters. They’re so cute, really easy to put together and, most of all, fun to create with!

For my first card with these cuties, I went lots of texture and made an inky fun mess! The technique I used is ink smooshing which is super simple, gives amazing results and is totally forgiving for us perfectionists.

I took a couple pieces of watercolor paper, Tombow brush markers, a clear block, spray bottle and heat gun to accomplish everything. I scribbled with the markers on the block, sprayed it with one or two spritzes from a small spray bottle and smooshed it on the paper. Then I used the heat gun to dry the area and repeated all over.

Sometimes I used the same color twice – this still gives layering and visual texture if you dry between applications. Then I also layer different colors on top of each other.

Next, you grab your dies and star cutting. Pick and choose as you move through the papers that you inked on. Don’t these look so cool!?! I love them!

Last, I cut the back layer that fills in the eyes from black cardstock and used liquid glue to adhere all the layers together.

I arranged the die cuts all over an A2 card front and then carefully glued everything in place with liquid glue. You can accomplish this a few ways. Lift each one, add glue and replace it or take a piece of press’n’seal to lift your arrangement up at once, add glue to the back and place it back down.

Then I trimmed anything hanging off the edge and filled in empty spots with large pieces of seaweed that were trimmed off.

I cut the sentiment from silver glitter and black cardstock and used liquid glue to adhere the layers together and then to the card front. For finishing touches I added Nuvo Crystal Drops like bubbles in all of the open white spaces.

Be sure to check out the whole release. There is definitely something fun for all tastes!

Products used:
Keep Swimming dies
Tombow Brush Markers
Bearly Arts liquid glue
Nuvo Crystal Drops – teal

I appreciate you sharing your time with me. Have a fabulous day!

Newton’s Nook – Beach Bound Birthday

Hello everyone! I’m over on the Newton’s Nook blog today with a fun summer themed birthday card to share. I had a blast pulling out some of these products and dusting them off from last summer. Bright and happy and full of sunshine!

I started my card with the Palm Tree Line stencil and a piece of white cardstock. I turned it at an angle and stacked rows of palm trees all the way up. Then I trimmed it to 4×5.5 inches so I could have a bright border on one side of my card.

Next, I stamped and colored the awesome Jeep in Beach Bound and used the coordinating die to cut it out. All of my banners use dies in the Frames & Flags die set and the patterned paper comes from the Summertime paper pad.

I trimmed a 1/4 inch strip of blue paper and glued it to a card base, then I added the stenciled panel to that. I adhered the banners together with liquid glue and popped them up with foam squares. Finally I added the Jeep with foam squares as well.

There was a bit too much white space for me so I splattered black paint and some glittery watercolor across the design after adding Tough of Gloss to accents on the Jeep.

We’re a Jeep family so I love this a little extra. The beachy, summer vibe is awesome and makes me super happy!

Products used today:
Beach Bound stamps and dies
Palm Tree Line stencil
Summertime paper pad
Frames & Flags dies
Foam squares
Liquid glue
Touch of Gloss

I appreciate you sharing your time with me. Have a fabulous day!

Miss Ink Stamps – Patriotic Bear and Bunny Card

Welcome everyone. Today I have a little patriotic inspiration to share with you as Independence Day approaches in the USA. I love all things Americana and couldn’t wait to color this sweet duo up!

I used the largest die in the Oh Happy Day set to cut a piece of white copic paper. I stamped my images and colored them with copic markers. Then I cut the frame from dark blue cardstock and the inner border from gold foil cardstock for some shine.

Next, I cut an A2 piece of red cardstock and glued it to a white card base. Then I popped up the colored panel with foam tape and did the same with the frames using foam strips. To add the skinny inner frame, I carefully added the foam strips hanging over the edge just a bit so it would stick to them on the same level.

For finishing touches I added black glaze pen to the critter eyes and Touch of Gloss to their noses and the stars.

Do you create patriotic cards? I know it’s not an overly popular theme to create with but I always have fun making home decor and cards with it.

Products used:
Patriotic Bear and Bunny stamps
Oh Happy Day dies
Foam tape and strips
Touch of Gloss

I appreciate you sharing your time with me. Have a fabulous day!

Pink & Main – June Sneak Peek

Welcome friends! I’m over on the Pink & Main blog today for sneak peek week sharing a sneak of a fantastic addition to my very favorite long-legged critters! This kitty is too cute for words and I couldn’t get him open fast enough to stamp. I love it!!!

Like I said, I stamped my images straight away and colored them with my copic markers. Then I used the coordinating dies to cut them out and set them aside. I had a few different ideas in mind but ended up really wanting to play with the upcoming paw print stencil too, so that’s what I stuck with.

I inked up a white panel that measures 4×5.5 inches with distress oxide inks. I started with spiced marmalade and went to mustard seed, then squeezed lemonade at the top. I like this blend for a dark orange/yellow combo. I spritzed the panel with water and blotted it dry. Then I layered the paw print stencil over top and went in with rusty hinge distress oxide ink.

I popped the panel up with foam tape on a white card base and added a strip of washi tape from my stash to the edge. Then I stamped a sentiment on a large sentiment strip and popped it, with the images up on foam squares.

For finishing touches I added black glaze pen to the critter eyes and white gel pen highlights around the images. Last, I added stardust Stickles to the kitty’s cheeks. I absolutely love doing this with these critters and couldn’t resist myself.

Be sure to stay tuned for more sneak peeks and then release day on Friday!!!

Products used:
Pawsome Friend stamps and dies
Paw Prints stencil

Large Sentiment Strips dies
Foam tape and squares
Distress Oxide Ink – rusty hinge, spiced marmalade, mustard seed, squeezed lemonade
Black glaze pen
White gel pen

I appreciate you sharing your time with me. Have a fabulous day!

Picket Fence Studios – Release IG Hop

Hey friends! I’m so happy to be joining Picket Fence Studios for their June release! Today we’re having an Instagram hop where there’s a $75 gift certificate to their shop up for grabs! So be sure to head there and hop along to increase your chances of winning.

I’m sharing two sweet rainbow cards for the hop today. A fabulous shaker card and a bonus I created with what I cut to create my shaker window.

I started my card by ink blending an A2 size panel with a rainbow of dye inks randomly all over. Then I spritzed it with water and blotted it dry. I love shine and shimmer so next I flicked pearl watercolor on the panel too.

I die cut the rainbow from the panel, saving those pieces for later, and then stamped my sentiment along the bottom. Next, I die cut the elephants from white cardstock and popped them up under the center of the rainbow with foam tape.

To turn this into a shaker card, I just added acetate to the back of the panel and lined it with foam tape. I sprinkled shaker bits inside and sealed it up with a piece of white cardstock. Then I glued the panel to a card base and it’s all finished.

To create my bonus card, I cut the rainbow shadow from white cardstock twice. I scored the top of one about 1/2 inch down and glued the two together at that flap only. This created my card base. Then I glued to rainbow pieces from my die to cut in place with liquid glue.

While that was drying with an acrylic block on top, I cut a banner and heat embossed my sentiment on it. I glued that across the center and finished things off with some pretty iridescent sequins.

Products used today:
Another Rainbow for All Seasons dies
Animal Crackers Kind Sentiments stamps
Glamorous Shaker bits
Liquid glue
Foam tape

Remember to head to Instagram and hop long for a chance to win!

I appreciate you sharing your time with me. Have a fabulous day!

Spellbinders – Stampendous Bear Hugs Release Day

Hello everyone! I’m popping in today to share a couple of cards featuring some of the new dies release by Spellbinders, the Stampendous Bear Hugs Collection. There are actually a bear, dog and cat to choose from and they are all fluffy cute and fun to play with!

I have the sweet bear and made a couple of cards to share with you today using him and the add on die sets too.

I cut my first bear and all his pieces from white cardstock so that I could ink blend and color with copic markers. It gives a whole different look than cutting from colored cardstock. Both are great, it just depends if you have the color cardstock you want or if you want to add more texture here and there.

After cutting and coloring my pieces, I used liquid glue to assemble the bear and his banner. Then I cut the deckled rectangles from orange cardstock and ink blended the bottom for a gradient depth. I cut a piece of teal cardstock and ink blended the edges of that before splattering it with teal ink as well.

I glued the panel to a card base and added the orange rectangles with liquid glue. Then I popped up my bear and the hearts with foam squares.

For my second card, I cut all the pieces from colored cardstock and used liquid glue to assemble everything. I found reverse tweezers to be my friend when assembling the envelope because it wanted to pop open.

For this background, I cut a piece of white cardstock to 4×5.25 inches and ink blended mustard seed distress oxide fading out toward the right. I splattered the panel with black paint and added the package with liquid glue and the bear with foam squares. After that I added the panel to a white card base with foam tape for added dimension.

Aren’t these just so sweet!?! They’re so cute and happy. Can’t help but smile.

Products used:
Stampendous Bear Hugs dies
Stampendous Hugs Accessories dies
Stampendous Fran’s Frames dies

Foam tape and squares
Distress Oxide Ink – mustard seed, peacock feathers, spiced marmalade
Bearly Art liquid glue

I appreciate you sharing your time with me. Have a fabulous day!

Pink & Main – Sweet Summer Greetings

Happy Wednesday everyone! This week is chugging along and I’m happy to be on the Pink & Main website with some mid-week inspiration to share. I am dreaming of summer vacation and playing on the beach so these sweet penguins were perfect to fit my mood.

They were the stamp of the month in May but don’t worry, you can still snag them in the shop and sign up for this months stamp of the month so you don’t miss out anymore. I’ll share links at the bottom of this post.

I chose these two sandy cuties to create a mini scene with today. I stamped and colored them with copic markers before using the coordinating dies to cut them out.

Then I cut out a wide stitched arch from white cardstock and inked it up lightly with distress oxide inks for sand and sky. I started with tea dye for the sand and added a little gathered twigs at the bottom. Then I added mermaid lagoon to the top for a pretty sky and spritzed the whole panel with water. Then I flicked ground espresso ink on the sandy part of the panel and more mermaid lagoon on the top.

This die set can cut your sentiments out if you’d like but I chose to stamp mine on the scene panel today. Once that was done, I added my images with foam squares and then added foam tape to the back of the arch panel.

I cut down a piece of yellow gingham paper from the Warm Basics paper pad and added it to a white card base before adding the scene panel to that.

For finishing touches I added some white gel pen highlights to the images. Then black glaze pen to the penguin’s eyes that are open and finally some Touch of Gloss to the sun and penguin beaks.

We’re spending a week camping at the beach for 4th of July and it can’t come quick enough! I’m so excited and start daydreaming every time I create with these fun beachy stamps.

Products used today:
Summer Penguins stamps and dies
Stamp of the Month Subscription
Wide Stitched Arches dies
Warm Basics paper pad
Foam tape and squares
Touch of Gloss
Ergonomic blending brushes
Distress Oxide Ink – gathered twigs, tea dye, ground espresso, mermaid lagoon

I appreciate you sharing your time with me. Have a fabulous day!

Mama Elephant – Feel Better Soon

Welcome crafty friends! Today I have a get well card to share featuring Mama Elephant stamps and dies. These stamps and dies are so fun to create with and make all kinds of “get well” cards really easy to create.

Mine is more of a feel better from being sick card but there are images in the stamp set for injuries and things too. It’s great!

I stamped and colored my images with Zig Clean Color Real Brush Markers and a water brush pen which made it easier for me to keep the colors soft and light which is what I wanted. It’s also fun to color with different mediums from time to time. Kind of refreshing. Once everything was colored and dried, I used the coordinating dies to cut everything out and liquid glue to assemble my mini scene together.

I had some of the diamond stripes left over from another card I shared a couple weeks ago and thought they were perfect for the background here. So I chose my pieces and used liquid glue to adhere them down to a card base. Then I die cut “Feel better soon” from the Wellness Wishes die set 4 times from white cardstock. I used liquid glue to adhere the layers and then went over it with orange ink and a blending brush.

I glued that down with liquid glue and popped my images up with foam squares. Then, for finishing touches, I added Touch of Gloss to the rabbit’s glasses and nose.

One tidbit about this Feel Better stamp and die set – it has dies to cut the hands for the bunnies so they can hold anything you want and the bed cuts a slit so that the bunny can get in bed too! It’s perfect and totally fool proof!

Products used today:
Feel Better stamps and dies
Diamond Stripes dies
Wellness Wishes dies
Foam squares
Liquid glue
Zig Clean Color Real Brush Markers
Blending brushes
Lawn Fawn Ink – carrot

I get all of my Zig markers and Mama Elephant supplies from Doodlebugs. If you’d would like 15% off your first purchase, click HERE to shop with my affiliate link.

I appreciate you sharing your time with me. Have a fabulous day!

Miss Ink Stamps – Release Day Enjoy the Ride Card and Tags

Hello everyone! I’m really excited to share a new card and coordinating tags featuring some of the new products being release by Miss Ink Stamps today! I’m using new stamps, dies and stencil from the release!

I started by just stamping and coloring a bunch of sweet images from Enjoy the Ride. It’s a packed full stamp set that has coordinating dies available. After everything was colored, I cut it all out and started arranging it. My card was over full so I switched gears and created some fun coordinating tags.

I used a new stencil for texture on my ink blended background and the Oh Happy Day frame dies to ground my scene. I cut the frame from kraft cardstock and used a W7 copic marker to color the inner frame so it stood out a little. I glued it to the stenciled panel and popped it all up on a white card base. Then I added my images and sentiment with a combination of liquid glue and foam squares.

Next, I started filling my tags with the leftover images. Once the tags were die cut I thought it would be nice to coordinate them with the same background so I inked them up using the same stencil. I added all the images and sentiments with liquid glue and foam squares here as well.

I threaded ribbon from my stash through the holes and tied them with twine for the rustic vibe. For finishing touches on everything I added black glaze pen to eyes with white gel pen highlights after the black was dry. Then I added glossy accents to noses, beaks and flower centers, with stardust Stickles to the butterfly wings.

Be sure to head over to Miss Ink Stamps and check out the whole release. It’s huge and so amazing!!!

Products used:
Enjoy the Ride stamps and dies
Oh Happy Day dies
Stencil

Foam tape and squares
Blending brushes
Lawn Fawn Inks – mermaid and jalapeno
Touch of Gloss
Stickles – stardust

I appreciate you sharing your time with me. Have a fabulous day!