Blog

Newton’s Nook – Reindeer Roll Call Z-Fold Mini Slimline

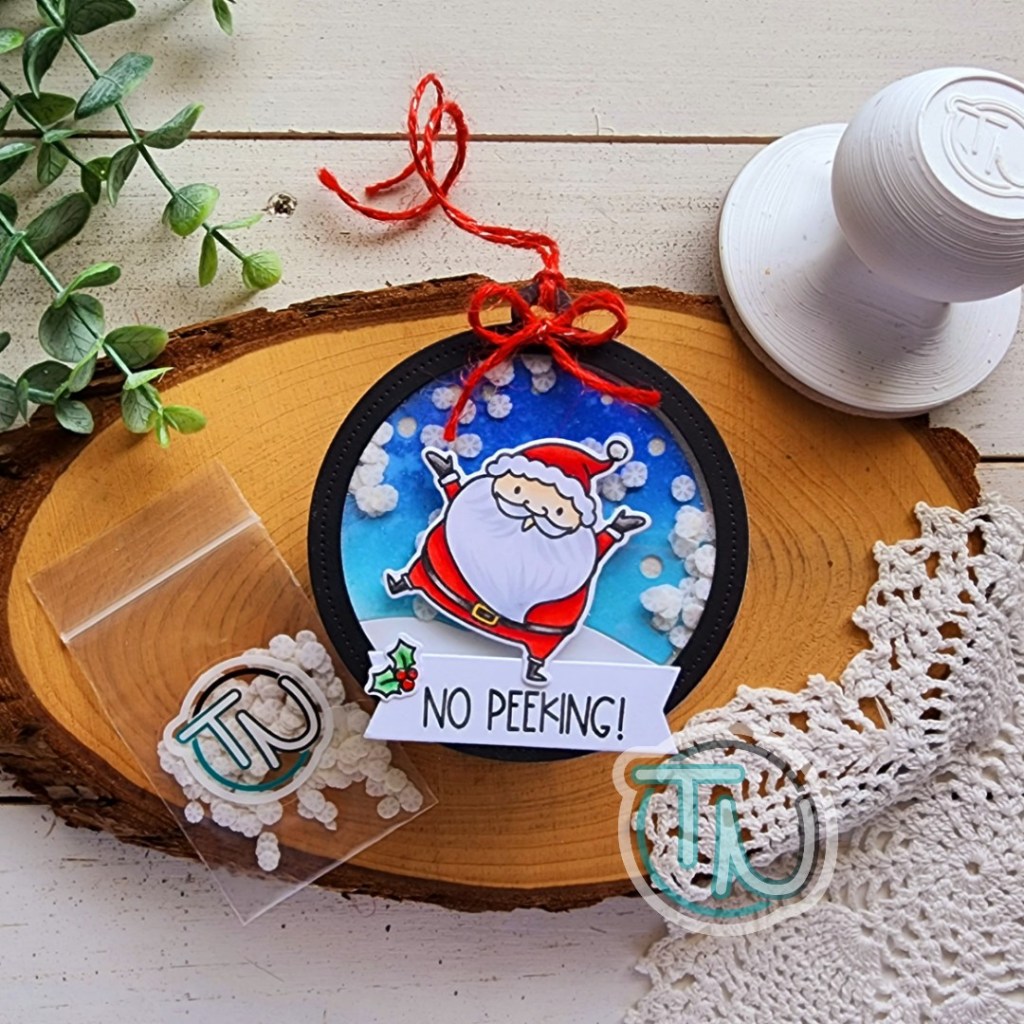
Hello everyone! I’m stopping by today to share a really fun take on the mini slimline size. It’s a Z-fold card which gives lots of room to write a message and also a great way to be able to stand the card up for display after the recipient opens it. I feel like Christmas cards are the top occasion people do this with so I pulled out some fun Christmas Newton’s Nook goodies and started crafting.

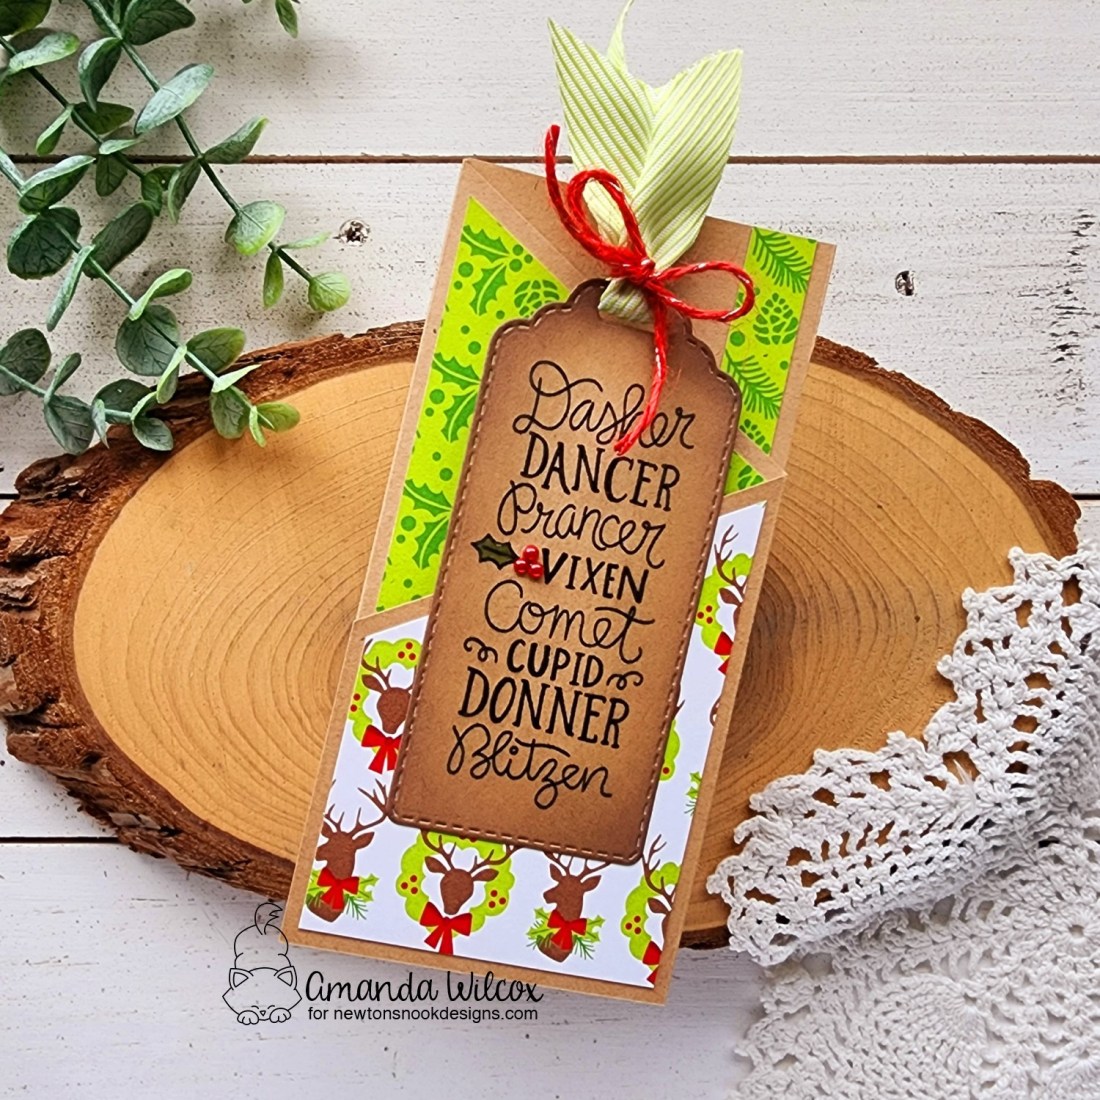
Here’s what the card looks like when it’s all folded up, coming out of the envelope. Isn’t that Reindeer Roll Call stamp just super fun!?! I love it! And found out that it fits perfectly on the new Bookmark dies! BONUS! After I stamped and die cut the bookmark into a shorter tag, I colored the holly and inked up the edges with brown ink and a blending brush. I threaded some ribbon through the slot and tied a bow to secure it.

Next, I switched gears to creating the card base. I cut a piece of kraft cardstock to 6×9 inches and scored it at 3 and 6 inches. Then you just alternate your fold directions to create the main card base. Next, I measured 2 inches up from the base on the left side and positioned it in my paper trimmer to cut that angle off from the 2 inch mark to the top of the second fold line. This gives you a peek into the different levels.

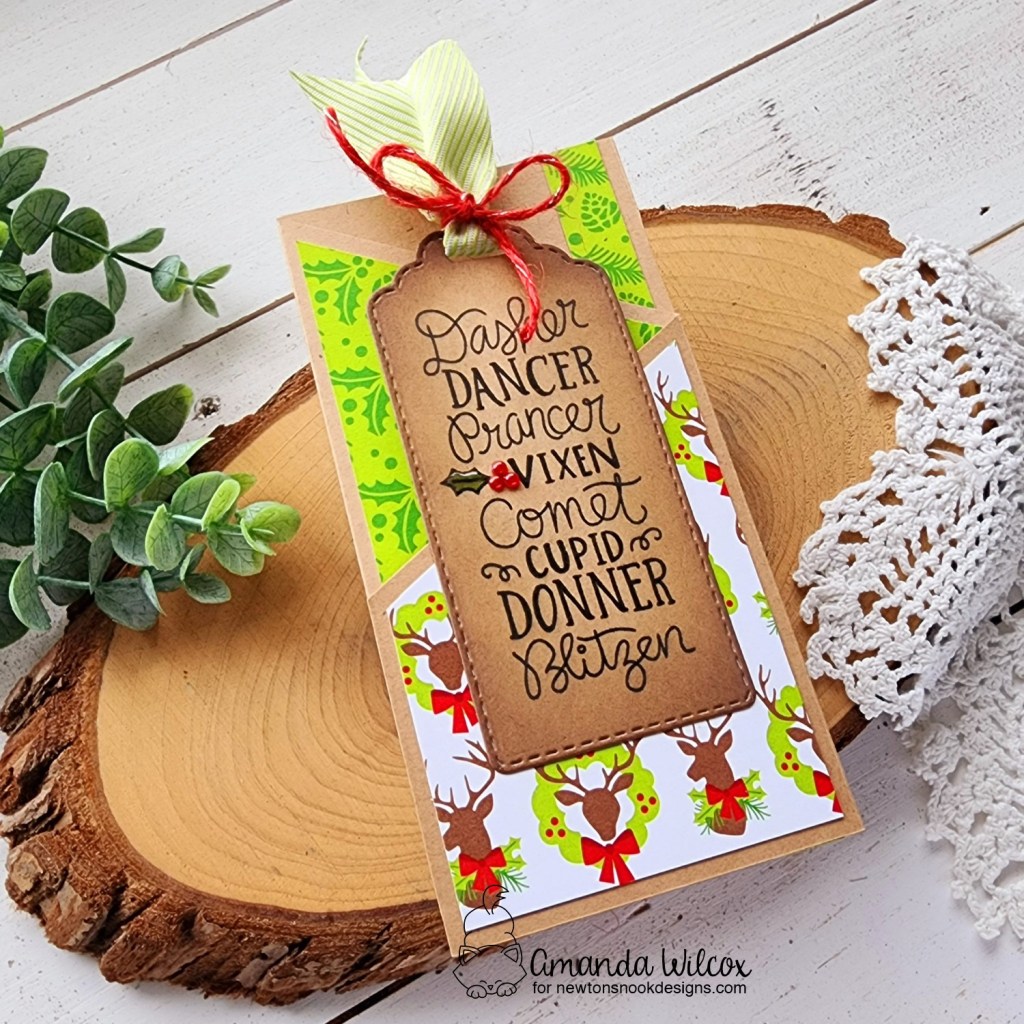
I chose a piece of patterned paper matching the images in Reindeer Roll Call from the new Christmas Time paper pad and trimmed it down to fit each of the panels on my card. At the end I was left with a 1/2 inch strip that I adhered to the inside most panel for a little decoration. Then I stamped Merry Christmas from the Holiday Heights stamp set in black and a reindeer from Reindeer Roll Call in brown under it for extra fun.

For finishing touches, I glued 3 red pearls on the holly and added glossy accents to the holly leaf. Isn’t this card so fun!?! You could easily step this up or down depending on your likes and how many you’re making.

Products used today:
Reindeer Roll Call stamps
Holiday Heights stamps
Bookmark dies
Christmas Time paper pad
Bearly Art liquid glue
Pretty Pink Posh red pearls
Glossy accents

I appreciate you sharing your time with me. Have a fabulous day!

Coffee Loving Cardmakers – Fall | Winter Hop

Hello everyone! Very happy to be a super sponsor for another Coffee Loving Cardmakers hop! I actually think I’m a little extra excited this time because we’re also having a new release of super fun products today too!!!

We’re releasing a handful of new embellishments along with two new other products too! We have Twiddler’s Nook Stand Up Blending Brushes available! I’m so excited about this and hope you love them too! We also have mesh zipper pouches to hold your embellishments or project pieces! I know, so many exclamations points. Sorry not sorry. I’m really excited, friends!

Okay, so we’ve got our own blending brushes now. They have bright white bristles, come with a cap and stand up on their own. However! They coordinate with our magnetic color coding caps which also coordinate with all of our platforms so they have a place to be. The magnets in the color caps stick to the metal in our platforms so you can have your brushes at your fingertips and they don’t fall over if you bump your desk. Click HERE to check it all out!

Our new mesh zipper pouches measure 6×9 inches and have a gorgeous blue zipper. They work great to keep embellishment bags under control or pieces to your projects that are in process. These are also amazing if you’re a traveling crafter to pack things in manageable amounts. Click HERE to check them out!

Pro Tip: I love cleaning the outside with rubbing alcohol and decorating them with my waterproof stickers!

We also have 5 new embellishment mixes to share with you today! So much fun and so much great color! I hope you enjoy creating with them.

I would love it if you headed to the shop to check out all the great things we have to offer! If you see something you like, use the code COFFEE10 to save 10% on your order from today through November 18.

I appreciate you sharing your time with me. Have a fabulous day!

Pink & Main – Happy Harvest

Welcome everyone! I’m over on the Pink & Main blog today sharing some harvesty fall inspiration for you. Most everyone has switched to Christmas crafting but I really enjoy holding on to fall themes as long as I can. I love these colors and pumpkins are one of my favorite things!

I started by stamping and coloring the image in Happy Harvest with my copic markers. I used the coordinating die to cut it out. Then, I used the image as a guide to choose which size Wide Stitched Arch to use. Once I decided, I cut it from kraft cardstock and embossed it with the Sun Ray embossing folder.

I trimmed a piece of The Park cardstock down to A2 size and used the Leafy stencil to ink it up. I used green, brown and orange on the stencil, then came in with green around the edges. Next, I used what brown was still in my blending brush to ink up the kraft arch too.

For assembly, I glued the background panel to a white card base and popped the arch up with foam tape. Then I added the pumpkin image with foam squares. I stamped and heat embossed a sentiment from Happy Harvest and used the coordinating die to cut it out before popping it up too.

For finishing touches, I added A Touch of Gloss to all of the acorns and then wrapped jute twine around the top, tying it in a knot. I added white gel pen highlights to all the other parts of the image and my card is finished.

I hope you enjoyed a bit more fall inspiration before Thanksgiving and here and gone.

Products used:
Happy Harvest stamps and dies
Wide Stitched Arches dies
Sun Ray embossing folder
Leafy stencil
Ergonomic Blending Brushes
EZ Squeeze liquid glue
Embossing and Watermark Ink
Magic Anti-Static Brush
Embossing powder – frosting
Foam tape and squares
A Touch of Gloss

I appreciate you sharing your time with me. Have a fabulous day!

Newton’s Nook – Santa-Saurus Gate Fold Card

Hey crafty friends! I’m over on the Newton’s Nook blog today with an adorable gate fold card featuring some of the new Christmas Time patterned paper and my favorite Christmas dinos from last year!

To create my card base, I took a regular 8 1/2 x 5 1/2 inch sheet of white cardstock and, instead of scoring at 4 1/4 inches, I scored at 2 1/8, flipped it around and scored it again in the same measurement. Then, when you fold on the score lines toward each other, you get a card the opens from the center. Really simple but just makes it different and fun!

I trimmed down the fabulous plaid paper from the Christmas Time pad to 2 x 5 1/4 inches twice and glued them to the flaps on the front of my card. Then I pulled out the green tree pattern and cut 2 strips of that at 1 1/2 inches wide and scored them about 2 1/2 inches in. I folded them and wrapped them around the card to adhere them together but giving enough room for the band to slide up and down the card to remove it.

Next, I stamped and colored images from Prehistoric Christmas and used the coordinating dies to cut them out. I stamped a sentiment from the set and cut it with the smallest circle in the Frames Squared die set. Next, I used the circle frames set to cut a white scallop and another pattern from the paper pad to cut a circle background for my mini scene. I adhered everything together and then added it to the band I made earlier.

For finishing touches I just added black glaze pen to the dinosaur’s eye and glossy accents to his spots, the gift bows and the holly berries. This card is just sooo much fun! I hope you enjoyed it too!

Products used today:
Prehistoric Christmas stamps and dies
Christmas Time paper pad
Frames Squared dies
Circle Frames dies
Pink & Main Layered Circles dies
Glossy accents
Foam squares
Bearly Art liquid glue

I appreciate you sharing your time with me. Have a fabulous day!

Pink & Main – In Your Future, I See…

Welcome everyone! Today I’m over on the Pink & Main blog with another way to use those new fantastic scratch off stickers! This time, I have used the pre-cut circles on the new, AMAZING fortune teller! She’s stunning!

I started by stamping and coloring her with my copics. Then I chose a mystery sentiment from the set to stamp in the crystal ball and die cut everything with the coordinating dies. Then I adhered one of the holographic scratch off stickers over the top.

To create the setting for my fortune teller, I chose a piece of patterned paper from Inked Oasis paper pad and cut it with a Stacked Oval die. Then I cut the next largest oval from white cardstock and finally a scalloped oval just a smidge bigger from black cardstock. Then I adhered everything together. Pulling from the colors of my fortune teller, I cut a card front from purple cardstock and stamped some stars around the outside edge. Now we can put everything together.

I adhered the purple to a white card base, then added the ovals next with liquid glue. I placed the card in my MISTI and used the images as a guide for where to stamp the “scratch to reveal” instructions. I stamped it down and then added all the images with liquid glue too.

I chose to keep things flat and not use foam like I always do so that there was nothing impairing the ability to scratch the circle off. It might not make it difficult but I wasn’t sure since these are so new. Better safe than sorry until I test things out a bit.

Products used today:
In Your Future stamps and dies
Scallop Oval dies
Layered Oval dies
Scratch Off Circles – glitter
Scratchers

Inked Oasis paper pad
EZ Squeeze liquid glue
Touch of Gloss

I appreciate you sharing your time with me. Have a fabulous day!

Newton’s Nook – Hope Your Fall is Extra Mice

Happy Halloween friends!!! I hope you have an excellent holiday, however you do or don’t celebrate it! I absolutely love Halloween for a billion and one reasons! This year we’re not a home celebrating but it’s going to be a blast anyway.

Today I’m over on the Newton’s Nook blog with a fall-themed card featuring my absolute FAVORITE sweet mice. Aren’t they just too cute for words?!?

I stamped and colored them with my copic markers, plus some extra leaves. Then used the coordinating dies to cut them out.

Next, I used the Falling Leaves stencil on a piece of kraft cardstock with distress oxide inks. I randomly grabbed a red, orange and green blending tool and pounced all over the stencil without even reinking them. I love the subtle mixed colors you get. So pretty!

I die cut the panel with the largest Framework die and placed it in my MISTI. Using the images as guides, I stamped my sentiment on the kraft panel. Then I added foam tape and popped it up on a white card base and did the same with my images.

For finishing touches, I added glossy accents to mouse noses and various parts of each image like the berries in the wind, parts of the wheat and the acorn hat. Then I added black glaze pen to all of the mice eyes.

Products used today:
Autumn Mice stamps and dies
Falling Leaves stencil
Framework dies
Foam tape

I appreciate you sharing your time with me. Have a fabulous day!

Miss Ink Stamps – Merry Christmas Woodland Critters

Happy Thursday everyone. I hope your week is going splendid! I’m here today with a bit of Christmas inspiration using a few Miss Ink Stamps products. Layering stencils together for a magical touch and an array of the cutest woodland critters for a sweet scene! I hope you like it.

I started with my stencils and stamps laid out on my card front to figure out how far the stenciled trees needed to go and how many critters I could fit. Once that was decided I inked up the Scene Builder Treeline stencil with dark blue ink, just applying with a lighter hand as I went up. Then I layered the Sparkles stencil over top and spread iridescent Glitz Glitter Gel through that. I set the panel aside to dry and cleaned my area so I could stamp critters!

I stamped the critters and scene elements from Woodland Hearth and colored them with my copic markers. Then I fussy cut everything out, including the inside of the scene area between the trees and under the stockings and such. Then I used liquid glue to adhere the scene portion to the stenciled panel and popped my bunnies up with foam squares.

I stamped and die cut the sentiment with a banner die and inked the top with leftover blue ink from my blending brush to tie it in and help it stand out from the white space in the sky. I popped it up with foam squares too.

Aren’t these critters just the sweetest?!? I think they are adorable and make a very calm and serene Christmas card.

Products used:
Woodland Hearth stamps
Scene Builder Treeline stencil
Sparkles stencil
Foam squares
Liquid glue
Pink & Main Extra Large Sentiment Strip dies

I appreciate you sharing your time with me. Have a fabulous day!

Pink & Main – Stack o’ S’mores

Hey crafty friends! So glad you’re here today. I’m sharing a fun way to use the Stamp and Die of the Month from Pink & Main today. This subscription is such an amazing deal and I have been over the moon in love with literally every single one since it started. It’s SO GOOD! This month we have s’mores characters doing different antics that are amazing to create with all year long. They’re so cute!

I decided to take the stacked s’mores and stack them even higher! I stamped three and colored them with copics before using the coordinating die to cut them out. I used a little EZ Squeeze liquid glue to adhere them together and lined the back with foam tape. To add a splash of color, I stamped the sentiment on teal cardstock and die cut it as well.

For my background, I cut a kraft panel 8.5×3.5 inches for a slimline card. I inked the edges with ground espresso distress oxide and spritzed it with water. Then I flicked watered down ink on it and set it aside to dry while I die cut the Slimline Plaid cover plate from white cardstock. I used liquid glue to adhere them together and then to a white card base.

Next, I die cut the smaller mod rectangle from the Beautiful Slim Line die set out of vellum and adhered the s’mores and sentiment to that. I hid tape runner behind those to adhere it to the card front.

For finishing touches I added some clear enamel dots around the images and black glaze pen to the s’mores eyes and hands. Then I added Touch of Gloss to their cheeks for some shine.

Aren’t they just adorable?!? I love them!

Products used today:
S’more Fun stamps and dies (Stamp and Die of the Month)
Beautiful Slim Line dies
Plaid Slim Line die
Crystal Clear enamel dots
EZ Squeeze liquid glue
Touch of Gloss
Distress Oxide – ground espresso
Foam tape

I appreciate you sharing your time with me. Have a fabulous day!

BYSHC – Falling for the Holidays Hop

Hey friends! So excited to be sponsoring another BYSHC Hop! Today I have a super simple and fun shaker tag to share with you using one of our embellishments and, of course, I use our crafty tools whenever I craft!

To create my tag, I stamped Santa and the holly from Avery Elle’s Ho Ho Holidays using my pressure pal and colored them with my copic markers. Then I used the coordinating dies to cut them out and set that part aside.

For the tag I used the new Avery Elle Snowy Tag dies. I cut multiple layers to create the different elements.

Whole tag – 1 acetate, 1 white glitter cardstock and 1 white cardstock
Frame – 1 black
Snowy elements – sky portion from ink blended cardstock using blueprint sketch and salvaged patina distress oxide, hill from white cardstock

I used liquid glue to adhere the glitter tag to the white. This give the back of the tag a pretty side to write on. Then I added the frame to the acetate and finally the background scene pieces over the glitter. I added foam strips to the frame, sprinkled in some Snowy Day clay embellishments and sealed it up.

Next, I die cut the banner from the Avery Elle Easy Layer Tag and stamped a sentiment on it from Ho Ho Holidays. I adhered the images and banner to the tag front with liquid glue. Next, I threaded red sparkle twine through the hole. Cut another piece to tie in a bow and adhered it down.

Then, for finishing touches I added glossy accents to the holly berries and a bit of stardust Stickles to the ball on Santa’s hat.

Products used today:
Pressure Pal
Paw Print Magnetic Die Stand
Paw Print Embellishment Tray
Snowy Day clay embellishments
Avery Elle Ho Ho Holidays stamps and dies
Avery Elle Easy Layers Tag dies
Avery Elle Snowy Tag dies
Distress Oxide – blueprint sketch, salvaged patina
Bearly Art liquid glue
Scrapbook Adhesives foam strips
Glossy accents
Stickles – stardust

I appreciate you sharing your time with me!

Click HERE to head to the BYSHC main blog post for the hop listing.

SALE
We’re having a sale in the shop Friday through Sunday – 15% all crafty tools and embellishments. Mention the BYSHC Hop in your notes to the seller and I just might add an extra something in your package too. 🙂

GIVEAWAY
We’re sponsoring a $20 gift card to the Twiddler’s Nook shop! Happy crafting!

Miss Ink Stamps – Wish You a Holly Jolly Christmas

Hey friends! I’m popping in today with inspiration and a reminder! Miss Ink Stamps is the sponsor of this month’s Caffeinated Christmas Challenge. This challenge is so fun! Every month you create Christmas cards with caffeination and a twist! This month the twist is gnomes. How fun is that?!? Here’s what I created this time.

I started with that fun girl from Coffee Gnomes and colored her with my copics. I fussy cut her out and then die cut a circle for the focal scene. I stamped Holly Jolly on it and did very loose copic coloring on that. I wanted a little color but nothing bold to distract from my sweet gnome.

Next, I die cut a blue rectangle and inked up Frosty Flakes stencil with dark blue ink fading from top left to bottom right. Then I stamped and heat embossed the sentiment from Holly Jolly on black cardstock and die cut it with a banner.

To adhere everything, I used foam tape and foam squares. If you know me, you know how I dimension and elevation on my cards. The different layers do a lot for me. Then I moved on to finishing touches. I added glossy accents to the holly berries in the background and the stripes on the coffee carafe and mug. Then I pulled out some bright gold Nuvo Crystal Drops to try and make my gnome’s pjs a little more festive by adding it to all of the flower centers. I’m pretending these are poinsettias. Even if it’s a stretch, it’s cute!

I hope you’ll link up to the challenge for a chance to win a gift certificate from Miss Ink Stamps! Click HERE to head to the challenge blog.

Products used today:
Coffee Gnomes stamps
Holly Jolly stamps
Frosty Flakes stencil
Trinity Stamps Embossed Edge Circle dies
Trinity Stamps Embossed Edge Rectangle dies
Foam tape
Glossy accents
Nuvo Crystal Drops – bright gold

I appreciate you sharing your time with me. Have a fabulous day!