Blog

Newton’s Nook – Frankly, You’re the Best!

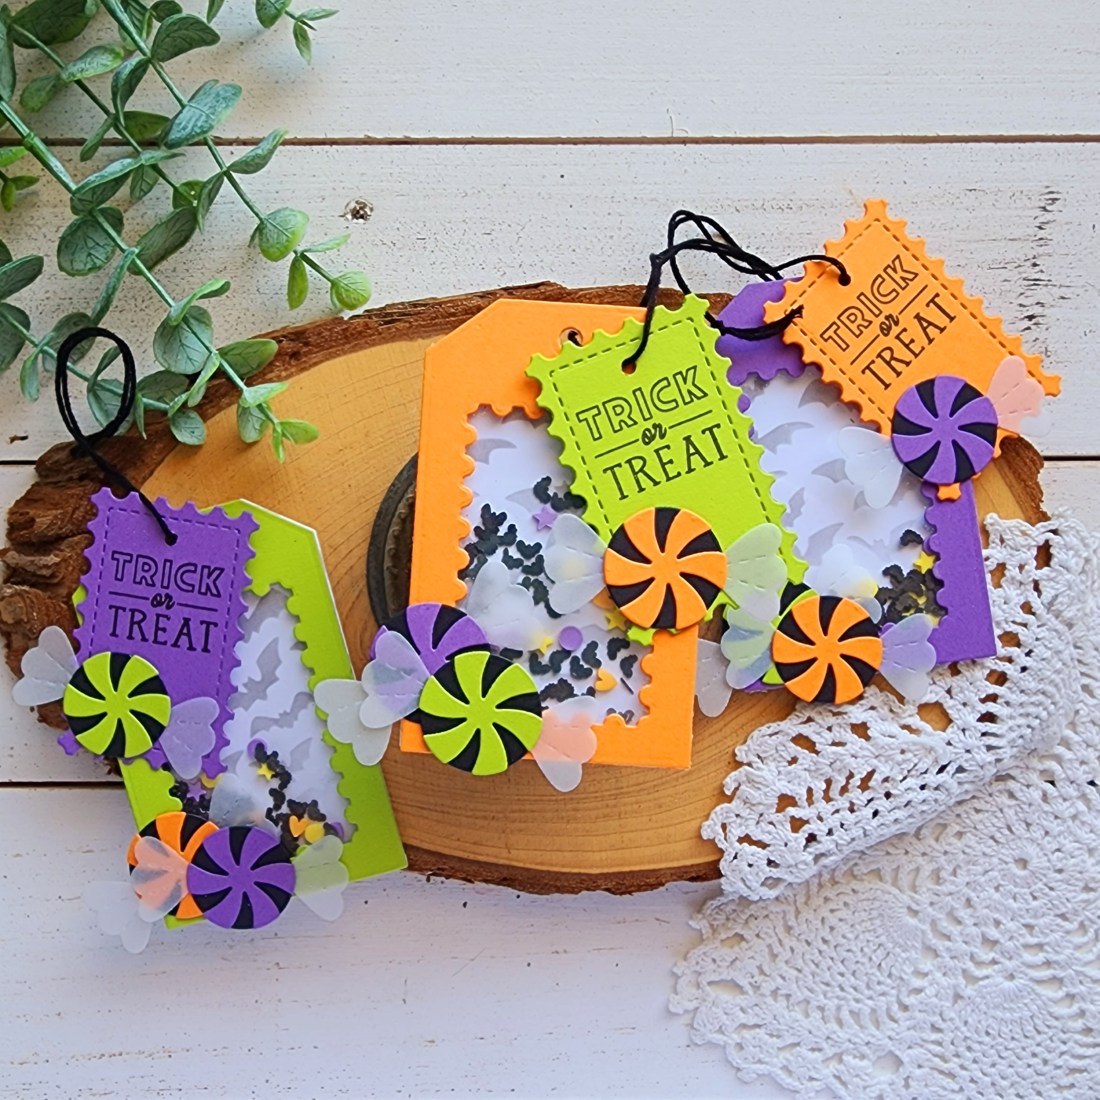
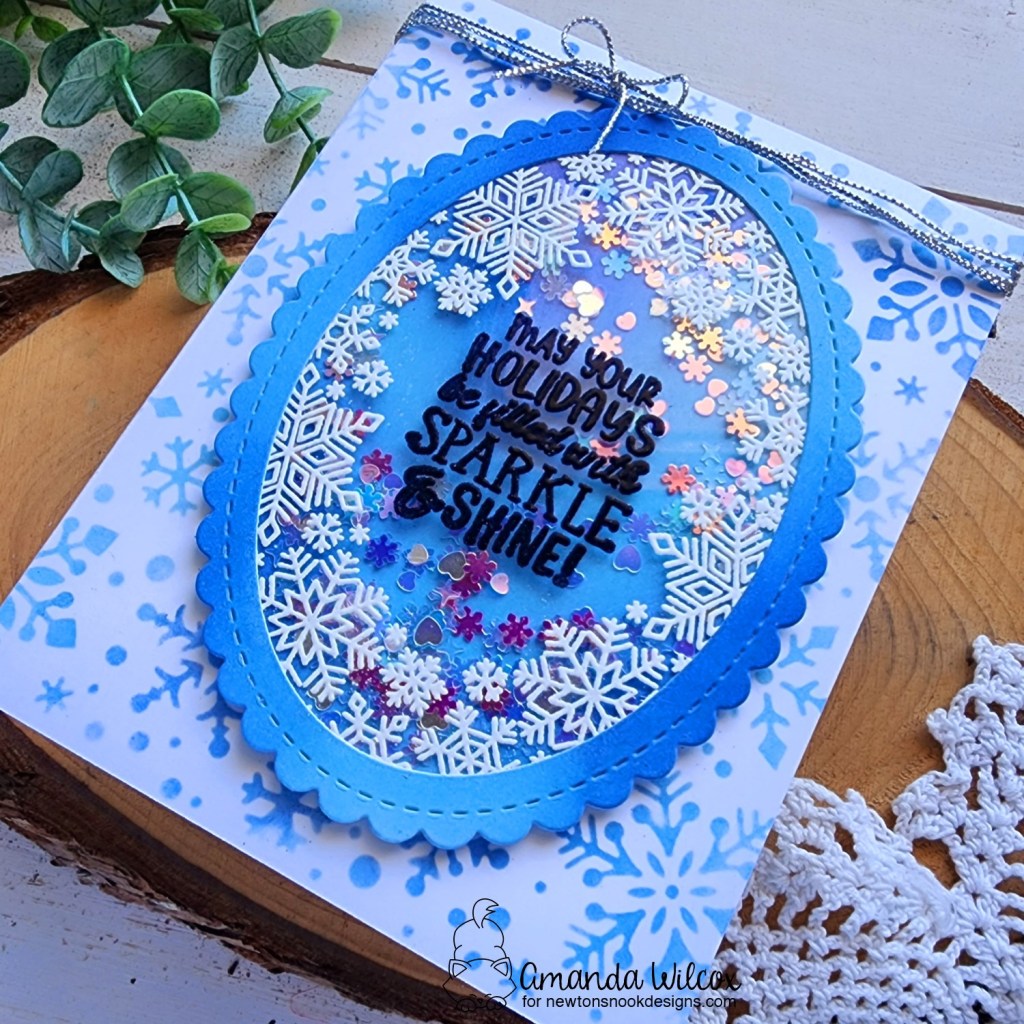
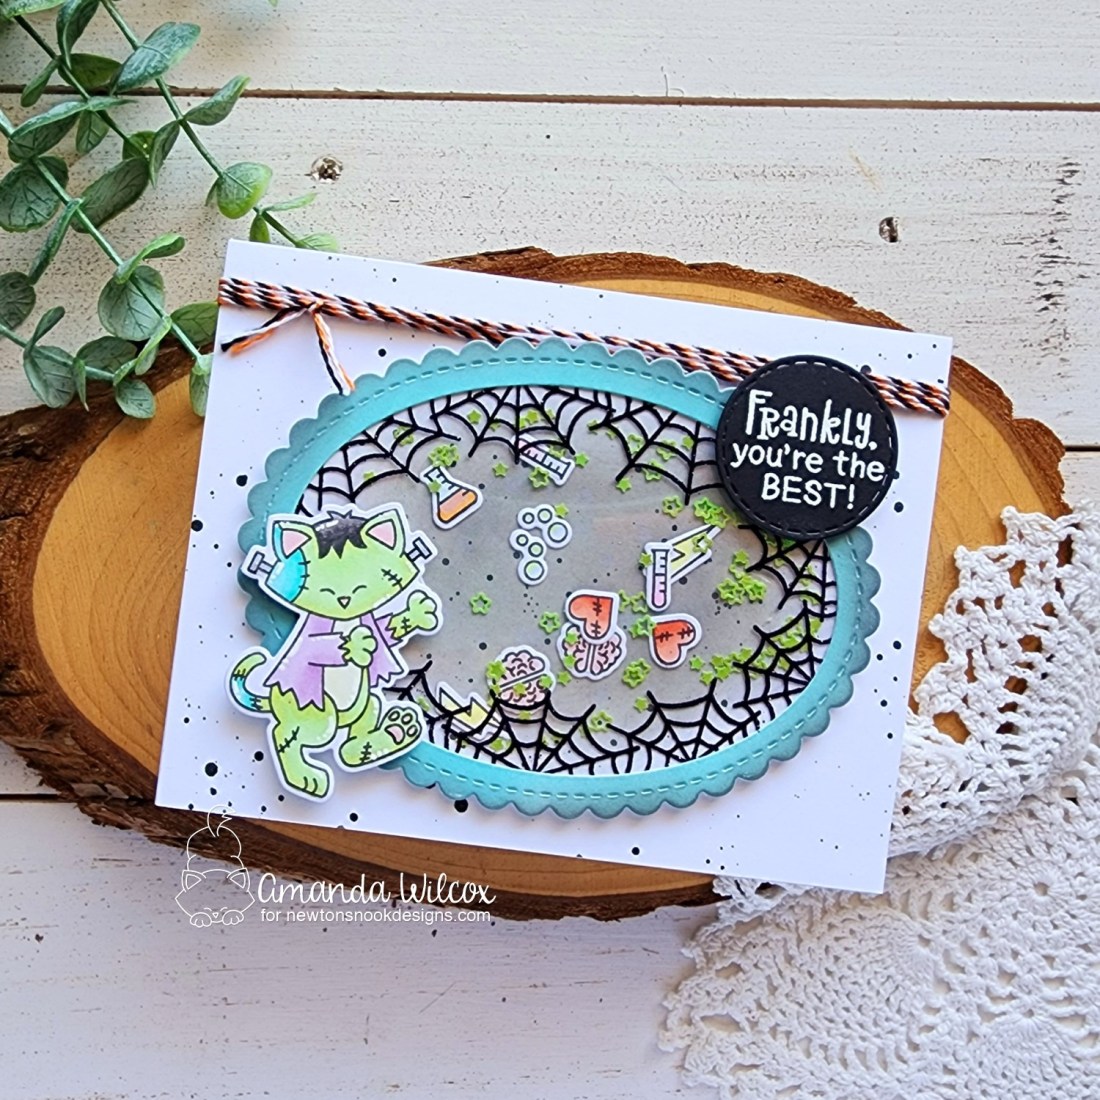
Hey friends! Super excited to be on the Newton’s Nook blog today with an adorable flat shaker card to share! I used the Halloween release goodies – Franken-Newton and Spiderweb Oval stamps and had a blast creating with it!

I started by creating my shaker mechanism layers using the Oval Frames dies. I inked a panel with salvaged patina distress oxide ink and cut it with the largest scalloped oval with it. I inked up just the edge with black soot distress oxide ink and used the next size down oval to cut a window in it. Then I cut another full scalloped oval from acetate and white cardstock. I heat embossed the Spiderweb Oval on the acetate and inked the center of the white one with hickory smoke distress oxide ink.

Next, I took an A2 piece of white cardstock and the back layer of the shaker and splattered them both with black paint. I set them aside to dry while I stamped and colored all of my images from Franken-Newton. I stamped all of the small images in the set twice to be my shaker pieces. I used the coordinating dies to cut everything out and started assembling the layers.

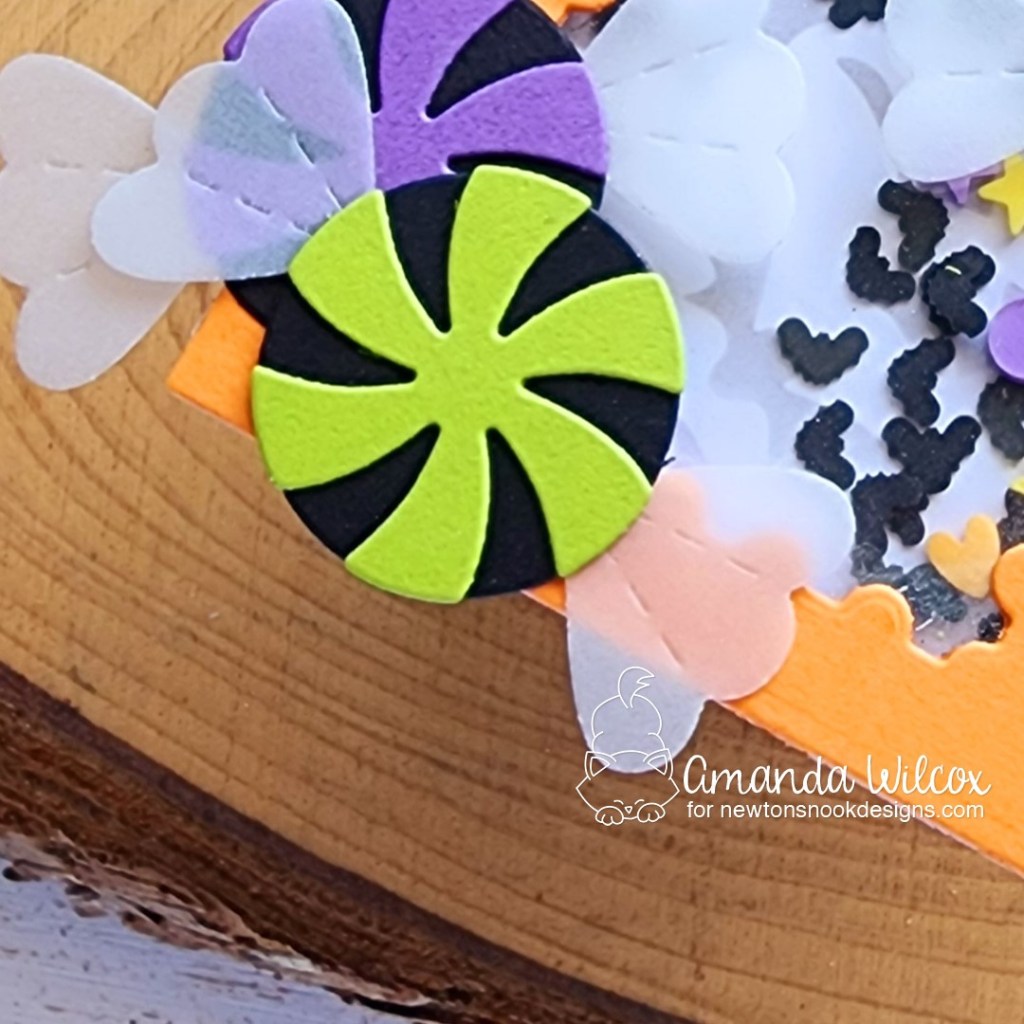
I used 1/8″ scrappy tape to adhere the frame to the spiderweb, added my images and luscious lime star confetti to the back oval before sealing the shaker up the same way. I used a small circle from the Circle Frames dies to stamp and heat emboss my sentiment on and layered my card together.

First, the splattered panel was added to a card base with liquid glue. Then the shaker was added with foam tape and the sentiment with Franken-Newton were also added with foam squares. For finishing touches I added twine to the top of the card, white gel pen highlights and just a bit of glossy accents to Newton in various places.

Products used today:
Franken-Newton stamps and dies
Spiderweb Oval stamps
Oval Frames dies
Circle Frames dies
Twiddler’s Nook Luscious Lime confetti stars
Foam tape
Scrappy tape – 1/8″
Distress Oxide – salvaged patina, black soot, hickory smoke
Glossy accents
Heat embossing powder, ink and anti-static brush

I appreciate you sharing your time with me. Have a fabulous day!

Pink & Main – October Sneak Peek Scratching Fun

Hey friends!!! It’s sneak week for the Pink & Main October release and it’s got SOOOOOOOO many new products in it and that ridiculous fun! I can’t wait to share everything with you! Today I have a little sneak of Jackpot and some new accessories that are going to make your cards extra fun to send out!

Check out this super fun slot machine we’ve got this month! And guess what?!?!?!? Scratch off stickers!!!! These are so fun! There will be circles and also sheets you can die cut any shape you want! So for my card today, I die cut two so the majority of the image is a surprise for the recipient. Then I stamped sentiments over the top of the scratch stickers too!

I embossed my background with the new Dotted Triangles embossing folder for texture and interest. How cool is that new design!?! Then I glammed the image up with Touch of Gloss and enamel dots too!

You guys, this release is so much fun and it’s so different! I hope you love it and have an amazing time crafting with it!

Products used:
Jackpot stamps and dies
Dotted Triangles embossing folder
Touch of Gloss

Enamel dots
Scratch Off Sticker sheets
Street Light cardstock

I appreciate you sharing your time with me. Have a fabulous day!

Newton’s Nook – Designer’s Nook Sneak Peek

Hey crafty friends! It’s been a while so I’m here to remind you and let new readers know that the Newton’s Nook Designer’s Nook Newsletter that comes out every Tuesday has some shaking good fun in it tomorrow!

If you’re not subscribed to this fun weekly newsletter, click HERE today so you don’t miss tomorrow’s project.

Thanks for stopping by today! Have a fabulous day!

Miss Ink Stamps – Ghostly Greetings

Happy Thursday everyone! I have another adorable card featuring the super fun ghosts from Miss Ink Stamps – Boo Sheet! I love this set so much! These ghosts are fun to create with in a million different ways. Today I used them to create a patterned paper background on my card. So easy and really fun!

I just used the different ghost images all over an A2 panel, stamping in light gray ink, masking the ones with hands and giving each one something different to hold just for fun. Then I stamped and heat embossed the large BOO from Halloween Sentiments in orange. It practically glows, it’s so bright!

Next, I used the frame die in Trinity Stamps’ 4-Bar Card die set to cut out of the center of the panel. Then I cut that same frame 4 more times from white, black, green and orange cardstocks. Now, we layer everything together on a white card base.

I started with the outside frame, using liquid glue to adhere it down. Then I added the plain white frame and finally the center ghost panel. Then I started stacking the other frame die cuts on top of the white one. Next, I added orange, then black, green and finally the original stamped and heat embossed one. It’s a fun way to add a little color and also step up an otherwise simple card design.

To finish this card off, I stamped and heat embossed a smaller sentiment from Halloween Sentiments and cut it with a banner in the same 4-Bar Card die set, popping it up with a foam strip. Then I glued Champagne Stardust glitter in all of the openings between the ghosts. This is one of my favorite glitter packs ever! I love it!

Products used today:
Boo Sheet stamps
Halloween Sentiments stamps
Champagne Stardust glitter
Trinity Stamps 4-Bar Card dies
Pink & Main magic anti-static brush, embossing ink and orange embossing powder
Bearly Art liquid glue
Foam strips

I appreciate you sharing your time with me. Have a fabulous day!

Newton’s Nook – October Release Day 4

Sad but exciting…today is the final day of reveals for the Newton’s Nook October Release! I hope you have loved it all, have your shopping list ready and are going to create amazing things with all of these new goodies!

Today we cap the week with another addition to the Oval card front series and I love it! It’s perfect for Christmas and winter which makes it twice as good!

Snowflake Oval stamps (coordinates with Oval Frames dies)

I couldn’t resist creating a fun shaker card with this beautiful image! Keeping things simple with some ink blending and heat embossing.

To start, I die cut the scalloped oval from heat resistant acetate and heat embossed the Snowflake Oval image in white. Then I used a sentiment from the set and heat embossed it in black for contrast.

Then I inked blended two panels in similar ways with blueprint sketch and tumbled glass distress oxide inks. I cut the same oval from both but then used the next size down to cut the center from one.

Because I was using flat glitter for this shaker, I just adhered all the layers together with liquid glue and placed acrylic blocks on top for a bit while they dried.

For my background, I used the Snowfall stencil with the same distress oxide inks and glued the panel to a white card base. When the shaker was dry, I adhered it with foam tape and wrapped some silver cord from my stash around the top.

Would you like to win the “Snowflake Oval” Stamp Set? This stamp set will be given away to ONE lucky winner!

Here’s how to win: Comment on the NND blog and Design Team blogs (see list below)! The winner will be chosen at random from the collective reveal posts. Make sure to check out each of their blogs and comment for your chance to win. You will not know which blog has been chosen so the more you comment on the better your chances are of winning! You have until Thursday October 13th at 9pm ET to comment  — winners will be announced on the blog post on Friday October 14th. 

Check out all the awesome Design Team Blogs below to enter:

Newton’s Nook Designs
Donna Idlet
Ellen Haxelmans
Tina Herbeck
Larissa Heskett
Samantha Mann
Zsofia Molnar
Maria Russell
Farhana Sarker
Tatiana Trafimovich
Amanda Wilcox

Pink & Main – May Your Holidays Be Sweet

Happy Wednesday everyone! I’m over on the Pink & Main blog today with some Christmas inspiration featuring these hilariously adorable gingerbread men from Gingerbread Kisses. I also pulled out the fabulous Peppermint Cover die from last year to set the scene.

First, I blended distress oxide ink in candied apple and aged mahogany on a piece of white cardstock. I kept the darker to the center, fading out to the edges. I splattered the panel with water and blotted it dry. Then I cut the Peppermint Cover die from white cardstock and glued them together with EZ Squeeze liquid glue. I added these to a white card base and started stamping next!

These two gingerbread men in a frosting fight just cracked me up so I had to color them immediately! I used my copics to color and the coordinating dies to cut everything out. Then I stamped and heat embossed my sentiment, also using the coordinating die to cut it out. Everything is popped up on foam squares for added interest and dimension.

For finishing touches I added glossy accents to all three peppermint candies and stardust Stickles to the frosting everywhere. Last, I snagged some fun red enamel dots from the Musical pack and scattered those about the design.

Products used today:
Gingerbread Kisses stamps and dies
Peppermint Cover die
EZ Squeeze liquid glue
Enamel Dots – musical
Magic Anti-static brush
Embossing & Watermark Ink
Frosting embossing powder
Glossy accents
Foam squares
Distress Oxide Ink – candied apple, aged mahogany

I appreciate you sharing your time with me. Have a fabulous day!

Newton’s Nook – October Release Day 3

Alright friends, we’re over the hump and on to day 3 of release reveals for the October Newton’s Nook release! There are two more amazing stamp and dies sets to reveal and super fun projects to share!

Newton’s Gift stamps and dies

Christmas Nap stamps and dies

These sets are super sweet! Great for the holidays but also, Newton’s Gift is great for all occasions!

I couldn’t resist creating a fun winter themed birthday card with Newton’s Gift right away. It’s so sweet and great in any color combo you want to try it in.

I stamped and colored the image using that great snowflake paper from the new paper pad as a guide. To reduce the risk of smearing, I stamped on the gift tag after I was done coloring. Then I used the coordinating die to cut it out.

Next, I die cut a scalloped circle from Circle Frames and heat embossed Birthday Roundabout in white. I die cut a banner from Banner Trio and stamped a sentiment from the same birthday set on it. I used copics to give it some shading to coordinate with the gift tag.

Next, I ink blended scattered straw distress oxide on an A2 panel and splattered it with water, then I popped up the patterned paper with foam tape. I added foam squares to the banner and image and adhered them to the vellum circle. I used these places to hide adhesive to adhere the vellum to the card front.

For finishing touches, I added white clay snowflakes from Twiddler’s Nook Happy Feet embellishment mix around the design, glossy accents to Newton’s nose and stardust Stickles to the gift ribbon.

For my Christmas Nap card, I stamped and colored the image in some warm colors fit for winter. I used the coordinating die to cut it out and set it aside. This die set also has the word dies Peace & Joy in it so I cut them from white cardstock 4 times and adhered them together with liquid glue.

For my background, I inked up a panel with scattered straw and evergreen bough distress oxide, fading to nothing. Then I layered the Christmas Foliage stencil over top and inked through that with blending brushes and dye inks from my stash. I die cut the panel with the largest Framework die and popped it up on a black A2 size panel. I adhered that to a white card base and added the image and sentiment next.

For finishing touches I used a silver Wink of Stella glitter brush pen on the sentiment, which I LOVE! Then glossy accents on the ornaments and critter noses. Last I added stardust Stickles to the gift bow and star on the tree.

Would you like to win the “Christmas Nap” or the “Newton’s Gift” Stamp Set? We will choose ONE lucky winner for each stamp set!

Here’s how to win: Comment on the NND blog and Design Team blogs (see list below)! The winner will be chosen at random from the collective reveal posts. Make sure to check out each of their blogs and comment for your chance to win. You will not know which blog has been chosen so the more you comment on the better your chances are of winning! You have until Thursday October 13th at 9pm ET to comment  — winners will be announced on the blog post on Friday October 14th. 

Check out all the awesome Design Team Blogs below to enter:

Newton’s Nook Designs
Donna Idlet
Ellen Haxelmans
Tina Herbeck
Larissa Heskett
Samantha Mann
Zsofia Molnar
Maria Russell
Farhana Sarker
Tatiana Trafimovich
Amanda Wilcox

Miss Ink Stamps – You Are Magical

Hello crafty friends! I’m over on the Miss Ink Stamps blog today sharing a magically wonderful card using the newest release of stamps and dies.

Sometimes I get overwhelmed at the thought of coloring in those big full-background stamps but today I wanted to show you that you don’t always need to. It brings the focus more on your images and sentiment if you don’t.

Today, I stamped the Ups and Downs image on a 4×5.25 inch piece of white cardstock and splattered it with black acrylic paint. I set it aside to dry and stamped a few images from Magical Graduation. I colored those with copic markers and used the coordinating dies to cut them out before gluing the wand in the wizard’s hand.

Next, I stamped an image from Heart’s Desire and fussy cut it out. Then, for my sentiment I used the “magical” in those dies and cut them from white cardstock 4 times, using liquid glue to adhere them together. To complete my sentiment, I stamped a few words from a sentiment in Heart’s Desire and heat embossed them in white. I trimmed that out with my scissors and started adhering all the pieces together.

First, I added the wizard and the wand flourish with foam squares. Then I added the background panel to a white card base with foam tape. I played around a bit with the sentiment pieces and finally decided I like the whimsical feel of the letters not being lined up. Once I had my final placement decided, I used liquid glue to adhere them and popped the heat embossed portion up with foam too.

Up until now, “magical” was white because I couldn’t decide what color to make it. Finally, I landed on red so it would really show and coordinate with the tie on the image. For this, I just used copic markers and carefully colored the top layer of letters.

For finishing touches, I added black glaze pen the the wizard’s eyes, let it dry and added the white highlight back in. Then I used Wink of Stella glitter brush pen on the magical flourish so it shimmers in the light.

Super fun card, that’s great for a bunch of occasions! I love how it turned out!

Products used today:
Magical Graduation stamps and dies
Heart’s Desire stamps and dies
Ups and Downs stamps
Foam squares and tape
Wink of Stella glitter brush pen
Liquid glue

I appreciate you sharing your time with me. Have a fabulous day!

Newton’s Nook – October Release Day 2

Hello again! We’re back for day 2 of release reveals for Newton’s Nook and today we’ve got two stamp and die sets to share with you!

Wreath Pups stamps and dies

Holiday Haul stamps and dies

Aren’t these new sets just so much fun!?! I had a blast creating with both of them. I hope you enjoy these cards.

The moment I saw Wreath Pups, I thought of a circle shaped card so that was a no-brainer! I used the Circle Frames dies to cut patterned paper from the new pads and layered them together. The red and white are glued together and popped up with foam tape on the green stripes.

I stamped and colored the image with my copic markers and used the coordinating die to cut it out. Then I also die cut a banner from the Banner Trio die set and heat embossed the sentiment on it. I adhered both with foam squares and moved on to finishing touches.

Keeping those simple, I just added glossy accents to the pup noses and wreath berries. Then I added black glaze pen to their eyes and a little bit of shimmer with Wink of Stella glitter brush pen on the wreath ribbon.

For my Holiday Haul card, I stamped and colored the image with my copics using the Christmas Time paper pad as a color choice guide. I used the coordinating die to cut it out and added foam tape to the back. Then I cut down two patterns of paper and adhered them to a white card base. I also glued down a strip of white cardstock over the seam before adhering the image down.

Next, I die cut a banner from Frames & Flags and heat embossed the sentiment on it. Then, for finishing touches, I added glossy accents to the truck lights and wreath bow, then stardust Stickles to the wreath berries and gift ribbons.

Would you like to win the “Holiday Haul” or the “Wreath Pups” Stamp Set? We will choose ONE lucky winner for each stamp set!

Here’s how to win: Comment on the NND blog and Design Team blogs (see list below)! The winner will be chosen at random from the collective reveal posts. Make sure to check out each of their blogs and comment for your chance to win. You will not know which blog has been chosen so the more you comment on the better your chances are of winning! You have until Thursday October 13th at 9pm ET to comment  — winners will be announced on the blog post on Friday October 14th. 

Check out all the awesome Design Team Blogs below to enter:

Newton’s Nook Designs
Donna Idlet
Ellen Haxelmans
Tina Herbeck
Larissa Heskett
Samantha Mann
Zsofia Molnar
Maria Russell
Farhana Sarker
Tatiana Trafimovich
Amanda Wilcox

Newton’s Nook – October Release Day 1

Hey friends! It’s time for the Newton’s Nook October Release reveals! And that means…Holiday goodies!!!!! Yay!!! We’ve got a few things to share today so let’s jump in.

Christmas Time and Canine Christmas paper pads

Christmas Tree Line stencil

Holiday Heights stamps and dies

Isn’t that an amazing start to release week?!? I think so! Today I have a few cards to share with you. Let’s start with the new Holiday Heights set where I made a slimline card and a gift tag.

I stamped and colored both images with my copic markers and used the coordinating dies to cut them out. Then I came in with the super fun new paper pads and die cut the Bookmark die set for backgrounds of both images.

For the card, I cut a snowbank using the sky borders dies and some trees from the Tree Scene Builder die set to create a little s cene. Then heat embossed my sentiment and added the image with foam tape.

I ink blended distress oxides in tumbled glass and stormy sky on a slimline panel and spritzed it with water. Then I flicked white paint on it and let it dry before die cutting it with the largest Slimline Frames & Portholes die. I popped the panel up on a white card base with foam tape and did the same with my bookmark scene.

For finishing touches, I added glossy accents to the snowman’s buttons, nose and hat band, also the dog’s nose. Then I added black glaze pen to his eyes and white gel pen to the dog’s scarf. I also threaded some ribbon through the bookmark hole and tied a bow too.

For the tag, I die cut the banner in the bookmark set and heat embossed the sentiment on it. Then I lined it up in the main bookmark die again and cut the top to match. I used liquid glue to adhere them together and popped the kitties up with foam tape.

Next, I die cut another bookmark from white cardstock and used the snowflakes in the set to decorate it lightly so you can still write on it and see the writing. I tied the two together with ribbon and just added some glossy accents to the ornaments and kitty noses and toe beans to finish it off.

These super fun line stencils are getting me every time. They are so fun to play with and today I created a perfect mini slimline card with the new Christmas Tree Line stencil. I went with a non-traditional color palette of green, pink and teal, trimmed the panel down and adhered borders on the top and bottom of black and glitter cardstock.

I stamped and heat embossed a sentiment coming later in the week in the center before popping it up on a 3×6 piece of paper from the new Christmas Time paper pad. I adhered that to a white card base with liquid glue and finished the design off with some stardust Stickles on various parts of each tree.

Would you like to win the “Holiday Heights” Stamp Set?This stamp set will be given away to ONE lucky winner!

Here’s how to win: Comment on the NND blog and Design Team blogs (see list below)! The winner will be chosen at random from the collective reveal posts. Make sure to check out each of their blogs and comment for your chance to win. You will not know which blog has been chosen so the more you comment on the better your chances are of winning! You have until Thursday October 13th at 9pm ET to comment  — winners will be announced on the blog post on Friday October 14th. 

Check out all the awesome Design Team Blogs below to enter:

Newton’s Nook Designs
Donna Idlet
Ellen Haxelmans
Tina Herbeck
Larissa Heskett
Samantha Mann
Zsofia Molnar
Maria Russell
Farhana Sarker
Tatiana Trafimovich
Amanda Wilcox