Blog

MFT Stamps – Wishing You Sunnier Days Ahead Shadow Box Card

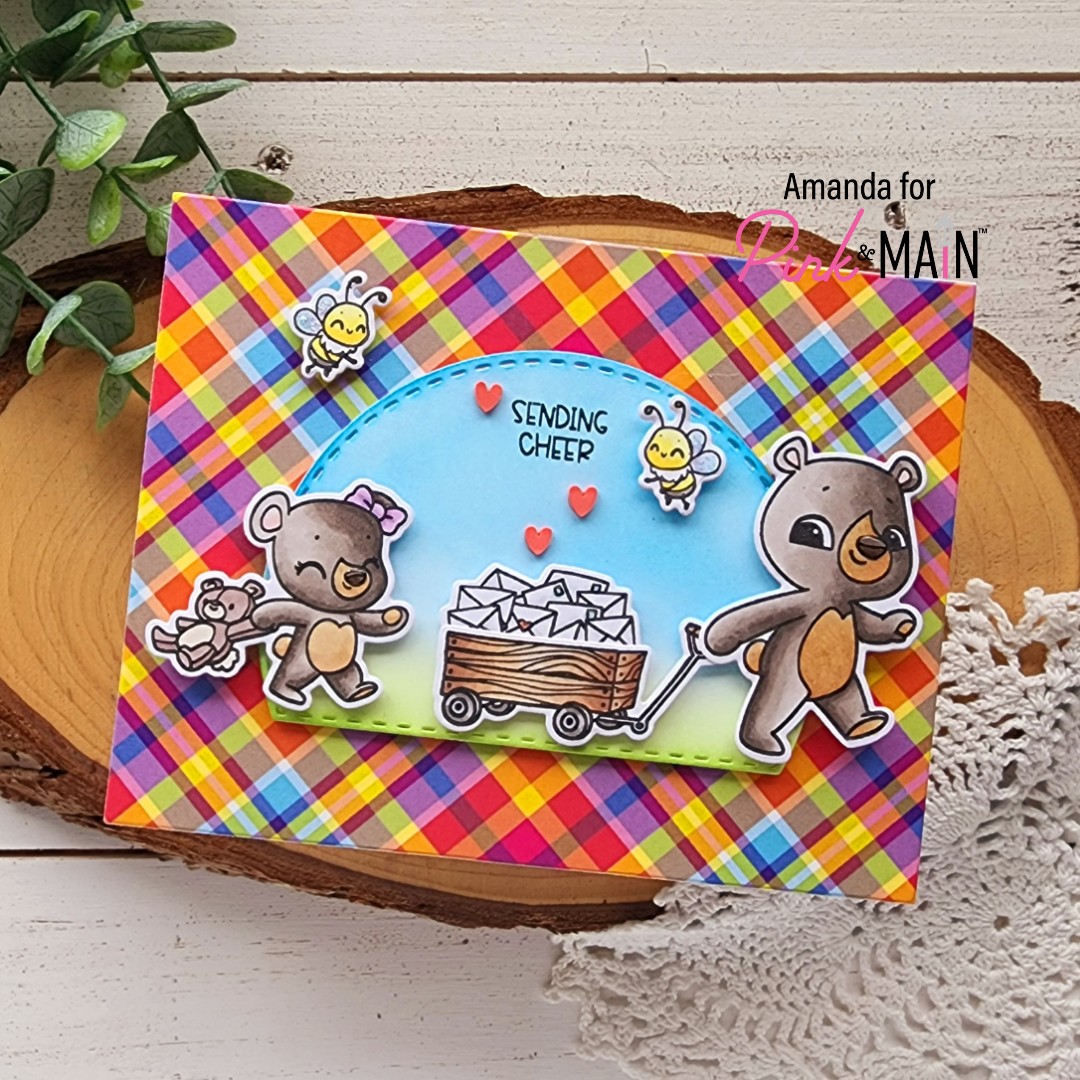
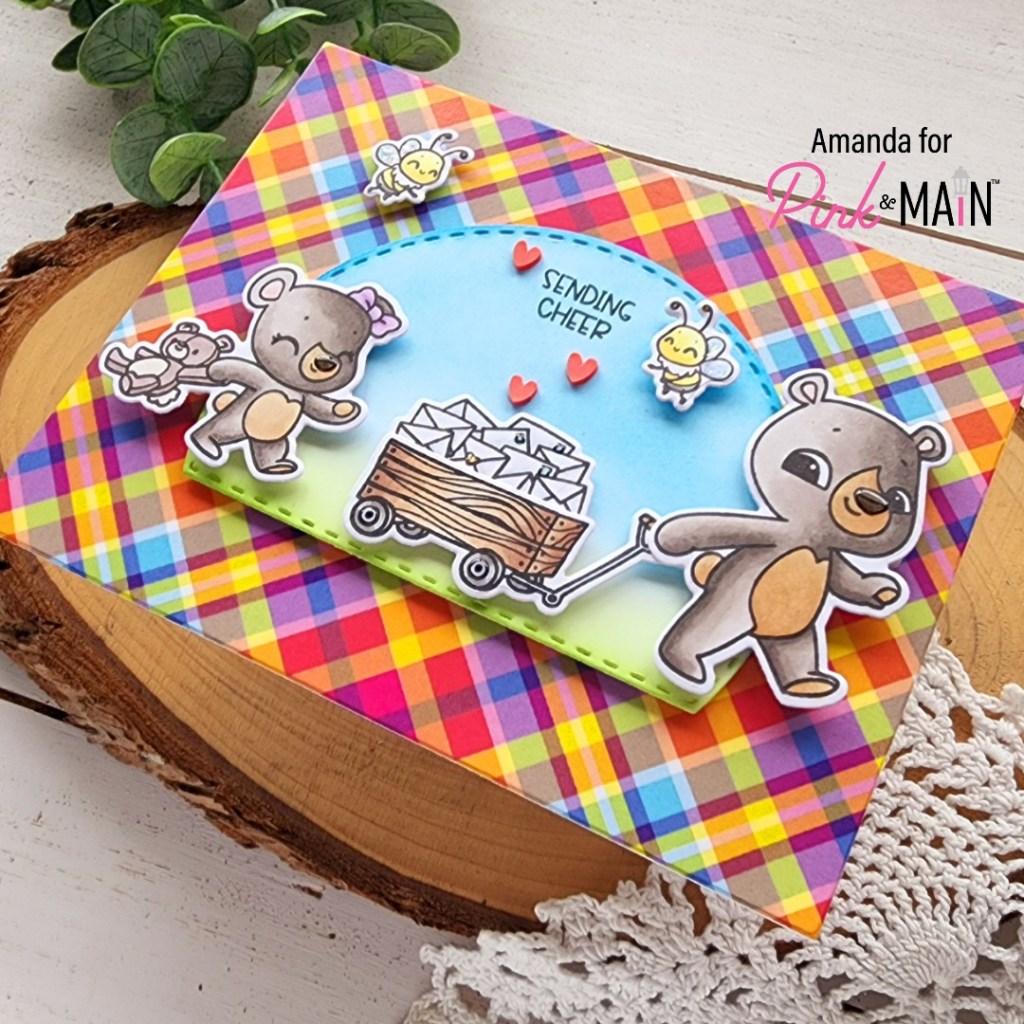
Happy Saturday crafty friends! I have been wanting to create more shadow box cards lately. I keep searching them on Pinterest and watching videos for inspiration and I finally set a night aside to just create one. It was so fun! I totally fussed with it for hours and kept coming back and changing my mind, but I love how it turned out!

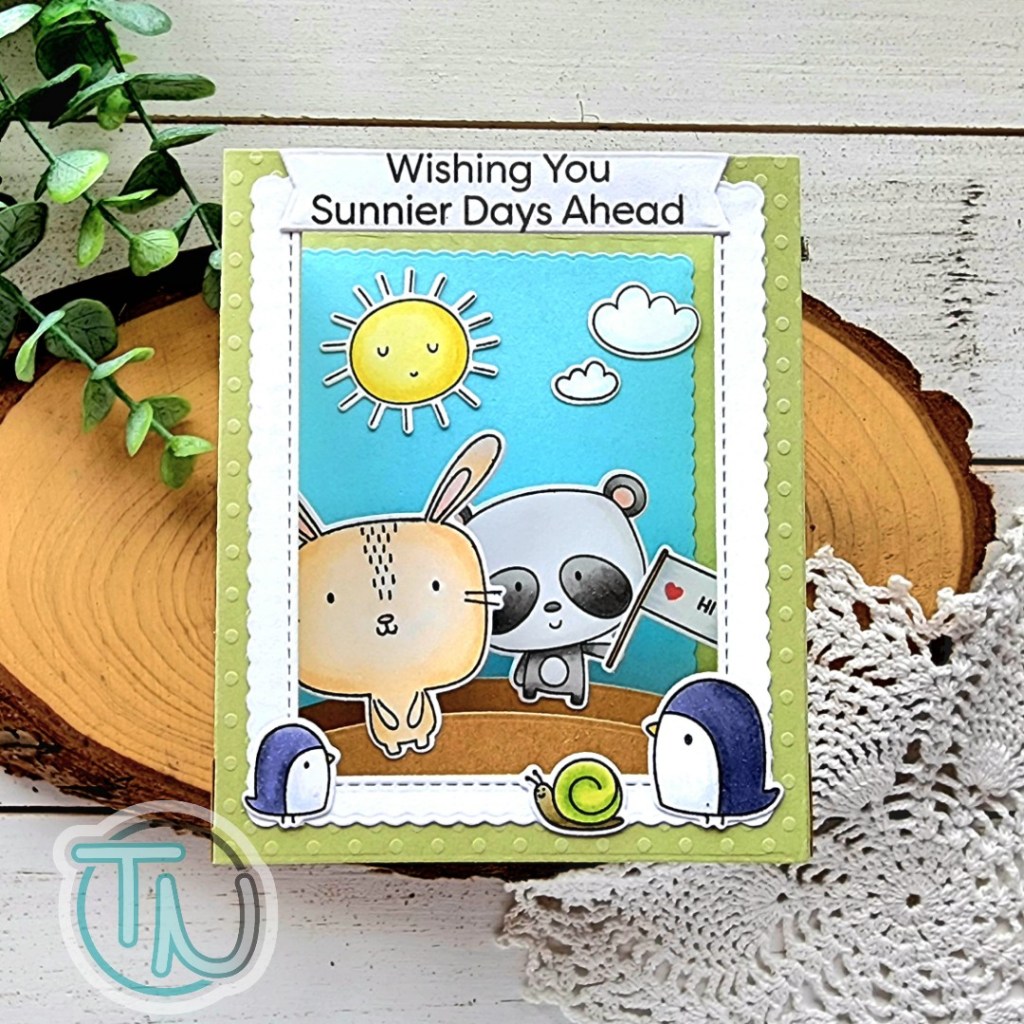
I used the Heffy Doodle Big Shadow Box Card die set for my card base and hills. Then I pulled out the Weather With You and Sprinkling You With Love stamp sets from MFT Stamps to decorate it all. I feel like these sets have similar artwork so even though the critters are different, they play well together.

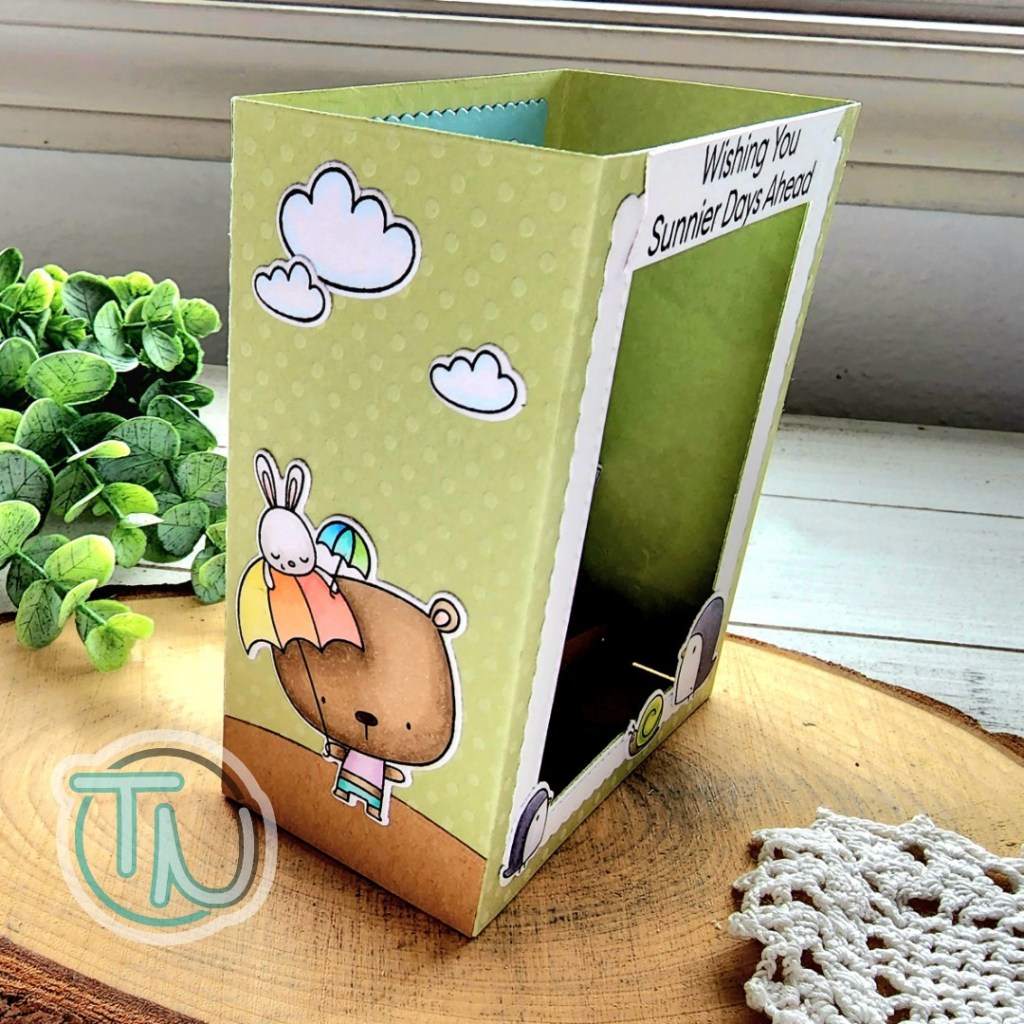
Once I created the box card itself, I started by filling in the inside and front with all of my critters. Then I knew I wanted to decorate the sides so I had colored extra images so I started filling those in too.

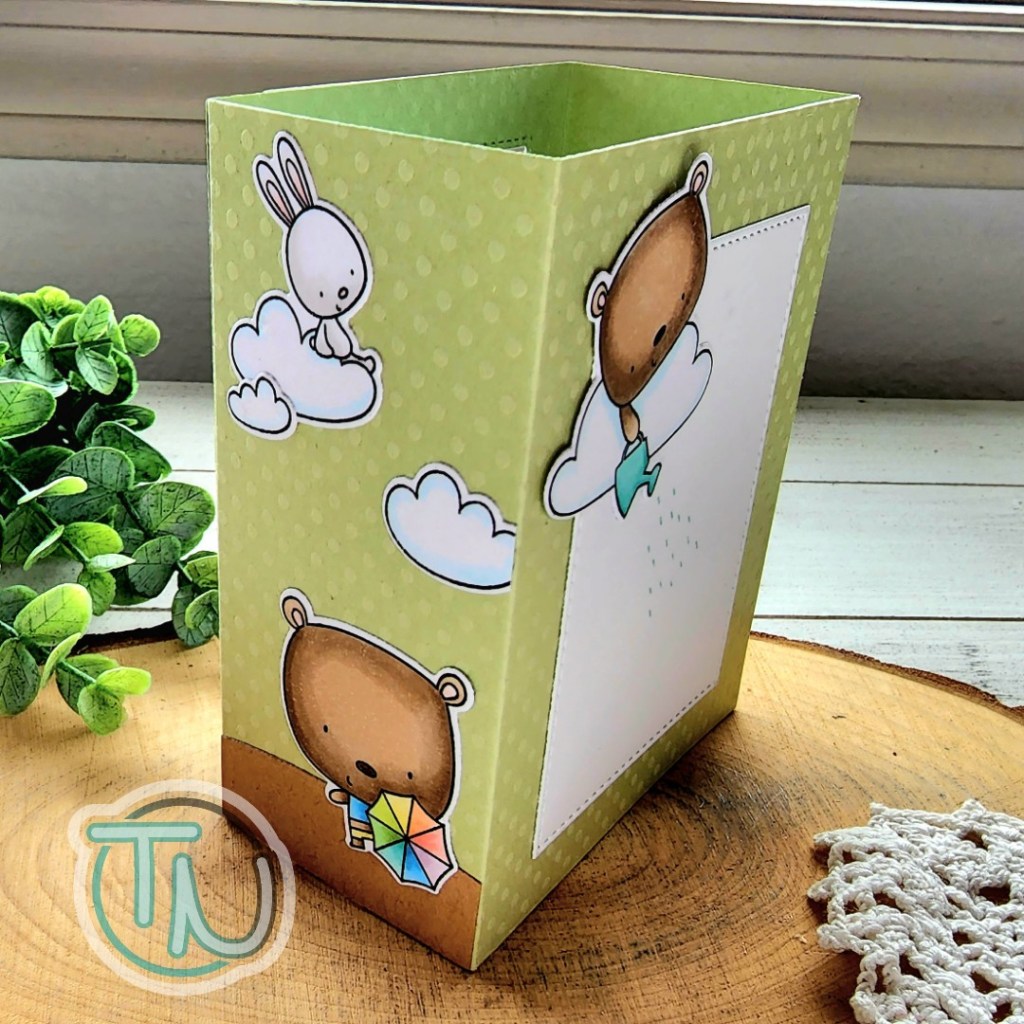
After the inside and sides were finished, I didn’t like something about the inside, so I kept fussing and then it hit me that the bear sprinkling water was not working well. So I carefully removed him and added the sunshine instead. Then, I didn’t want to waste this cute bear so I added him to the back panel where I will write my little message. Isn’t that so cute?!?

I almost forgot, the sentiment on the top front is from Weather With You and it’s cut from a Pink & Main Large Sentiment Strip die.

Products used today:
Heffy Doodle Big Shadow Box Card dies
MFT Stamps Weather With You stamps and dies
MFT Stamps Sprinkling You With Love stamps and dies
Pink & Main Large Sentiment Strip dies
Scrappy Tape – 1/8″ and 1/4″
Bearly Art liquid glue

I appreciate you sharing your time with me. Have a fabulous day!

Pink & Main – Release Day | Sending Cheer

Happy Friday everyone! It’s release day for Pink & Main and, once again, it’s packed full of cuteness! Much to my happiness are more of the sweet bears, which I absolutely had to create with right away!

***CORRECTION*** We had a little mix up and release day is next week. So here’s a fun sneak peek of one of the new sets coming your way. Sorry about that.

I immediately wanted to create a sweet little scene with these bears pulling a wagon full of happy mail. There are a bundle of options in the set but I was very drawn to the envelopes. So I stamped and colored the images with copic markers and used the coordinating dies to cut everything out. I glued the wagon handle to the bear’s hand and figured out how my spacing was going to work – landscape or portrait.

I decided on landscape because it filled the space so perfectly. Then I grabbed the double stitched dome dies and cut the middle size from white cardstock. I used my ergonomic blending brushes to add blue sky and green grass to it before stamping my sentiment in the top center.

I used the largest layered A2 rectangle die to cut a piece of Year Round Plaid paper and adhered it to a white card base with EZ Squeeze liquid glue. I popped the dome up with foam tape and then added my images with foam squares too.

My scene was a little empty so I pulled out some clay hearts from my stash and also added the two bees from Spring Snow Globe Scenes to fill things in. For finishing touches I added Stickles to the bee’s wings and the heart on the letter. Then I came in with glossy accents for the bear’s noses and stamps on the envelopes.

Be sure to head to the Pink & Main shop to check out the entire release that’s available now!

Products used today:
Bear with Wagon stamps and dies
Spring Snow Globe Scenes stamps and dies
Double Stitched Dome dies
Layered A2 Rectangles dies
Year Round Plaid paper pad
EZ Squeeze liquid glue
Ergonomic Blending Brushes
Foam tape and squares
Glossy accents
Stickles – unicorn
Twiddler’s Nook Sweethearts embellishments

I appreciate you sharing your time with me. Have a fabulous day!

Miss Ink Stamps – Artsy Abstracts Thank You Card

Happy Thursday everyone! Thanks for stopping by today. I have a card featuring a new stencil set from Miss Ink Stamps called Artsy Abstracts. I just love the idea behind these stencils and have had so much fun playing with them in different ways. Today I went bright and bold for a little toucan fun.

For this card, I started with an A2 size panel of white cardstock. I chose the smaller “blob” stencil in the set and the smaller accent stencil as well. I was very random and unintentional with my placements today. I simply chose a color, inked up a blob, chose a detail accent and inked it up somewhere around it and moved on to the next.

Once my panel was decorated to my liking I played with different images and sentiments to see what I wanted to add. First, I chose the simple thank you sentiment from Fall Bouquet and heat embossed it in black on a strip of vellum. That seems a bit plain so I trimmed down the inked panel to 3 3/4×5 inches, wrapped the vellum around and mounted it on a piece of black cardstock measuring 4×5 1/4 inches. I added foam tape to that and added it to a white card base.

I actually walked away from my card for the night and came back the next day. Still unhappy with it, it was just too plain for me. I went through my stamps again and this time the Pretty Birds caught my eye so I gave them a go and totally love how wild and fun this looks with them on it.

For finishing touches, I added glossy accents to both of the bird beaks but that’s all today.

Products used:
Artsy Abstracts stencils
Fall Bouquet stamps
Pretty Bird stamps
Blending Brushes
Lawn Fawn dye inks
Thermoweb 3D foam tape and squares
Glossy accents

I appreciate you sharing your time with me. Have a fabulous day!

Newton’s Nook – Let’s Be Mermaids!

Hello again everyone! I’m over on the Newton’s Nook blog again this week with a second bit of inspiration and today we’re going down deep in the ocean with my Purr-maid friend Newton. I hope you love it as much as I do!

This card all started with the idea to create that fun wavy color block pattern in the background. I chose a selection of cardstock colors and cut them all with one of the Sea Borders dies. I nested them together and secured them with washi tape on the back before die cutting them with the rounded rectangle in the Frames & Flags die set.

Next, I chose images from Purr-maid Newton and Scuba Newton, stamped and colored them with my copic markers, before cutting them out with the coordinating dies. Then I arranged them on the panel, deciding on final placement and where to put my sentiment. I eventually thought the speech bubble would be fun so I cut one and stamped the sentiment on that and then adhered the images with a combination of liquid glue and foam squares.

Next, I took a white A2 size panel and lightly inked up the Waves stencil with teal ink and a blending brush before popping the focal panel up with foam tape on it. Then I used liquid glue to add the whole thing to a card base and moved on to finishing touches.

For those I added black glaze pen to the fish eyes and glossy accents to the stripes or fins on each fish and Newton’s nose. Then I came in with unicorn Stickles on Newton’s tail and the bubbles above the sentiment.

I had so much fun creating this card and just love how the wavy panel turned out! I think it’s so cool!

Products used:
Purr-maid Newton stamps and dies
Scuba Newton stamps and dies
Sea Borders dies
Frames & Flags dies
Speech Bubbles dies
Waves stencil
Foam squares and tape
Stickles – unicorn
Glossy accents
Blending brush
Lawn Fawn mermaid dye ink

I appreciate you sharing your time with me. Have a fabulous day!

Miss Ink Stamps – Coffee Stencil Trio

Hey friends! I’m on the Miss Ink Stamps blog today highlighting the super fun coffee themed gift with purchase stencil that is available! I have two cards and a bonus gift tag to share.

I started today by taking a 6×6 piece of white cardstock and inked it up very messy and random with distress oxide inks in tea dye, gathered twigs and ground espresso. Once I liked the look of the panel and spritzed it with water and then flicked black acrylic paint on the whole thing. After it was dry I spread Thermoweb transfer gel blanco through the coffee stencil. I removed the stencil, cleaned up and set the panel aside to dry.

Once the panel was dry, I heated up my laminator and ran the whole panel through with copper deco foil in a craft & carrier sheet. Then I trimmed the text blocks and rainbow apart using my paper trimmer. I adhered the text blocks to black panels giving them a small border and popped that up with foam tape on white panels.

For this card, I inked up a teal A2 panel with the new Latte Love stencil and white pigment ink before adding the foiled layers to the center.

For the second card, I did the same thing with the foiled panel, adding the white and black mat layers before inking up the teal panel with the Lava Lamp stencil and darker teal ink for a tone-on-tone contrast.

Bonus! This stencil has a third image that is a cup ring/coffee bean rainbow! It’s so fun and different! This time I decided to add it to a tag that I could tie to a box of K-cups to share with a friend.

I cut the large tag from textured teal cardstock and the stitched layer from white. I attached the Perfectly Plaid stencil with Pixie Spray and inked it up with Dusty Concord distress oxide ink. Since I pounced my sponge dobber instead of using a brush I got this cool distressed looking texture. I splattered the panel with watered down Cracked Pistachio distress oxide ink to tie in the teal color and adhered the tag layers together.

Using my MISTI I stamped the sentiment from Brewtiful on the lower center and popped the rainbow up with foam squares. To finish it off I threaded some ribbon through the hole and tied it with twine.

Don’t miss your chance to get this super fun gift with purchase stencil! Click HERE for all the details.

Products used today:
Free with Purchase Coffee Stencil
Perfectly Plaid stencil
Latte Love stencil
Lava Lamp stencil
Brewtiful stamps
Thermoweb Transfer Gel Blanco
Thermoweb Deco Foil – copper
Thermoweb stencil pal
Thermoweb 3D foam tape
Thermoweb Pixie Spray
Avery Elle Easy Layer Tag dies
Distress Oxide Ink – tea dye, ground espresso, gathered twigs, dusty concord, cracked pistachio

I appreciate you sharing your time with me. Have a fabulous day!

Coffee Loving Cardmakers – Thermoweb Spotlight

Hey friends! Thermoweb is a super sponsor of the Coffee Lovers Spring | Summer Hop and on the blog today they are giving away an extra prize to a lucky commenter! Since they were so generous to offer this prize, I wanted to highlight their fabulous products with a project to share with you.

For my card, I pulled out a gorgeous toner card front and the mystic rainbow Deco Foil transfer sheets. I heated up my laminator and ran it through. It was totally gorgeous but there is a lot of white space on the design I chose, so I took the negative foil that was left over and ran that through with a toner sheet giving me this deep, gorgeous design to work with! Bonus! I still have the foiled toner card front to make another card with later on!

The left is what I started with and the right is the negative on a toner sheet. Isn’t that the coolest! And that left zero waste for my beautiful foil too!

Then to keep my card moving along, I cut the panel down with a Trinity Stamps embossed edge rectangle and then cut the Cafe Cup Cutout from the upper center of that. I decided to add white steam bits instead of the foiled pieces so I used a scrap to cut those pieces and set them aside.

I took an A2 panel and used the window as a guide where to ink up a light teal shadow in the opening. Once that was set I glued down the steam bits with Ultra Bond liquid glue pen and added Thermoweb foam tape to the back of the foiled panel. I removed the release paper and adhered the two together. For my sentiment I used the Trinity Stamps Cut and Foil Coffee die set to cut the word coffee from tuscan gold Deco Foil Flock transfer sheet. I stamped and heat embossed “you make me smile” and cut it out with a stitched banner. The flock coffee sentiment is added with liquid glue and the banner is popped up with foam squares.

I added the panel to a white card base with liquid glue and my card is all finished for today. Here’s a look at it tilted in the light so you can really see how that gorgeous foil stands out. It’s so striking!

Products used:
Thermoweb Toner Card Front by Unity – Wild Garden
Thermoweb Toner Sheet
Thermoweb Ultra Bond glue pen
Thermoweb Foam tape and squares
Thermoweb Deco Foil – mystic rainbow
Thermoweb Deco Foil Flock – tuscan gold
Thermoweb Craft & Carrier Sheets
Trinity Stamps Cafe Cup Cutout die
Trinity Stamps Slimline Scalloped Panels and Banners
Trinity Stamps Cut and Foil Coffee dies
Trinity Stamps Embossed Edge Rectangle dies
Trinity Stamps Supporting Script Sentiments stamps
Pink & Main Embossing Ink
Pink & Main Embossing Powder
Pink & Main Powder Tool

Remember to head to the Coffee Loving Cardmakers blog and comment there for a chance to win a gift certificate to the Thermoweb shop!

I appreciate you sharing your time with me. Have a fabulous day!

Newton’s Nook – Big Cup of Thanks

Hello everyone! Today I’m over on the Newton’s Nook blog sharing a big cup of thanks and an adorable Newton colored to resemble our kitty, Oreo. It’s so fun to customize these cute kitties to look like pets in our lives.

I started by stamping the main image from Newton’s Mug and the pair of cups from Love Cafe and colored them with my copic markers. I used the coordinating dies to cut them out and then kept going back and forth between adding the sentiment to my large mug or decorating it with lines and dots. Obviously, I landed on the sentiment but either way would have been awesome!

Next, I cut a gray panel and inked it up with the mugs stencil for a tone-on-tone look. I die cut the panel with the largest Framework die. I just love that postage stamp edge and the stitching detail. It’s so fun! Next, I cut a rounded rectangle out of vellum using a die from the Frames & Flags die set.

To adhere all these layers, I glued the mugs together with a little liquid glue and added foam squares to the back of them. I adhered them to the vellum rectangle and hid tape runner behind those to add my vellum to the stenciled panel. I wrapped twine around that and then added foam tape to the back before popping the whole thing on a white card base.

Doing things in this order gives us lots of help in different ways. First, we hid the adhesive on the vellum in areas you can’t see it. Then, wrapping the twine before adding foam tape lets us avoid that area so it’s not bulky and lays nice and flat.

For finishing touches I simply added glossy accents to Newton’s nose and the hearts and both mugs. I intentionally kept it minimal and not super glittery because this card was giving me masculine vibes, even with the heart mugs, and I wanted to keep it that way. I always need more like this in my stash but I have to make an effort to stop with the glitter. Haha.

Products used today:
Newton’s Mug stamps and dies
Love Cafe stamps and dies
Mugs stencil
Framework dies
Frames & Flags dies
Foam tape
Foam squares
Glossy accents

I appreciate you sharing your time with me. Have a fabulous day!

Pink & Main – You Party Animal with Flock and Glitter

Welcome everyone! Thanks for stopping by. Today I’m over on the Pink & Main blog with a fun birthday card featuring the super fine glitter, flock and sparkling flock too! It’s definitely got bling and texture everywhere!

I started my card wanting to play with that really fun stack of gifts die cut from a few releases ago. I hadn’t gotten a chance and today a fun idea struck me. So I cut the stack from white cardstock 3 times and glued them together with EZ Squeeze liquid glue.

Next, I took a white panel cut down to 4×5.25 inches and the EZ Tear Tape that is 1/2 inch wide. I added strips of the tape at an angle across a few inches of the panel. I used my bone folder to really burnish the adhesive tape down and then removed the release paper one strip at a time starting with the center and working my way out. First, I added ocean wave super fine glitter, then I switched to sparkling fuzzy monster flock with glitter and finished the outside strips with fuzzy monster flock.

Next, I took another white panel and embossed it with the confetti embossing folder. I cut it in half at an angle and adhered it on either side of the flocked strips with liquid glue. After the glue was dry, I trimmed off anything hanging over the edge. This panel was so cool on it’s own, I was tempted not to cover it with anything! Haha.

However, there was the matter of that fun stack of gifts. So I started playing with placement and digging in my stash to see what I wanted to pair with it. That was so much fun! I ended up landing on this sweet duck from Party Animal. I stamped and colored him with copic markers, then used the coordinating die to cut him out. Next, I stamped and heat embossed a sentiment from the same set and used the cool sentiment strip dies in the Sunny Greetings die set to cut it out.

When I started laying out my design I thought the white stack of gifts was lacking. So I went digging again and found this awesome green glitter paper from the Spring Glitter paper pad, cut it out and added it to the top. Perfection! I added the gifts to the panel with liquid glue and put a giant acrylic block on top while it dried because of all the texture underneath.

Then I added the sentiment strip with foam and the duck with a combo of foam and liquid glue. Finally, I popped the whole thing up on a white card base with foam strips and added a little touch of glossy accents to the image for some shine.

Products used today:
Party Animal stamps and dies
Sunny Greetings dies
Confetti embossing folder
Stack of Gifts die
Super Fine Glitter – ocean wave
Flock – fuzzy monster
Flock with Glitter – fuzzy monster

Spring Glitter Paper Pad
EZ Squeeze liquid glue
EZ Tear Tape – 1/2 inch
Foam tape and squares
Glossy accents

I appreciate you sharing your time with me. Have a fabulous day!

Newton’s Nook – National Scrapbook Day

Happy National Scrapbook Day! Today Newton’s Nook Designs is celebrating with NEW dog and cat themed papers and dies! These new products are available NOW in their shop! Plus, there is a FLASH SALE TODAY! Save 20% off today only with code SCRAP22 at newtonsnookdesigns.com.

About a month ago now, we lost our beloved pup, Bailey. It was quite unexpected and I’ve been devastated to say the least. Having this event come up gave me a great time to sit on my own and go through pictures of him, remembering to awesome adventures we had. I am not a scrapbooker at all but I was able to create a fun 12×12 page using the new A Dog’s Life paper and the new dies too. I hope you like it.

These photos are from a little evening trip to the park across the street from our house last summer. He was so happy to be anywhere as long as his humans were with him. We were taking turns playing volleyball and laying in the grass with him. It was a fun night.

For my design I used the fancy edges tags to create some visual texture to go with the silhouette images on the left. Then I cut a couple strips of kraft cardstock and inked them up with the petite paws stencil for a tone-on-tone texture there. I also used the grass die in the land borders die set to cut a strip of grass which seemed fitting.

I framed the photos with some of the paper from the pad and couldn’t resist using the speech bubble sheet as a background panel too! It’s so much fun!

I pulled out the paw shaker die set and used it for a few elements – the large paw here, those fun little bones and the woof die cut too. I used the essential alphabet dies to cut his name from black cardstock and added it to the grass border.

After everything was assembled, the page looked too flat for my general taste so I took a blending brush and shaded the edge of the whole page with gray ink.

I’m really happy with how this turned out and hope to be ready to display it somewhere soon.

Products used today:
A Dog’s Life paper pad
Dog Silhouette dies
Pawprint Shaker dies
Essential Alphabet dies
Land Border dies
Petite Paw Prints stencil
Fancy Edges Tag dies
Bearly Art liquid glue
Blending Brush
Lawn Fawn narwhal ink

Remember there is a flash sale going on today only. Don’t miss out!

Check out the blogs of these Design Team Members for more inspiration:

Newton’s Nook Designs
Donna Idlet
Ellen Haxelmans
Farhana Sarker
Larissa Heskett
Samantha Mann
Zsofia Molnar
Tatiana Trafimovich
Amanda Wilcox

I appreciate you sharing your time with me. Have a fabulous day!