Hey friends! We are very excited to be a super sponsor of the Coffee Loving Cardmakers Spring | Summer Hop! Here’s a little overview of some of the crafty products that we sell. Be sure to check out the shop to see everything available and check out the sale we have going on as well!
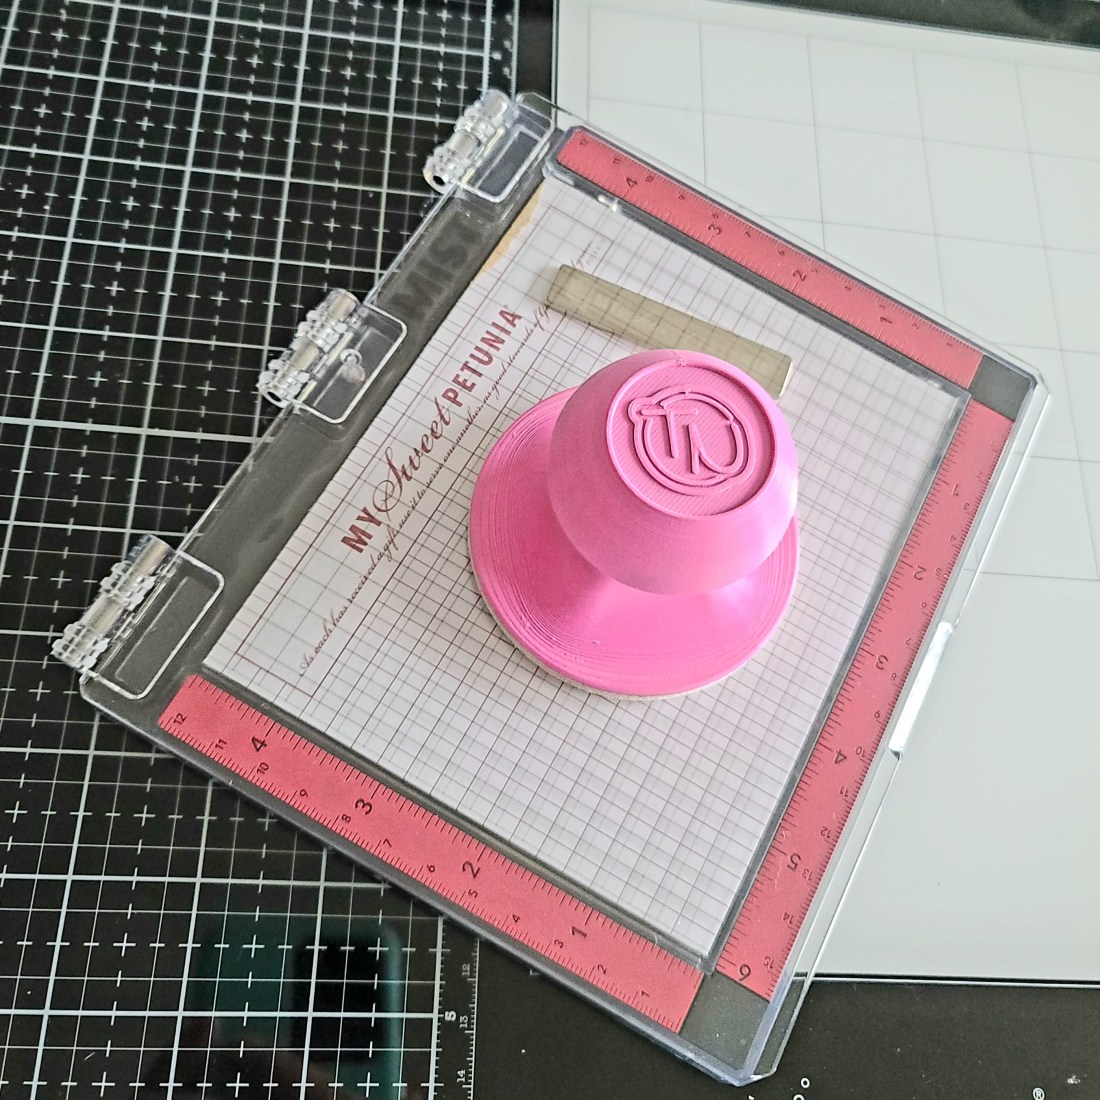
Pressure Pal
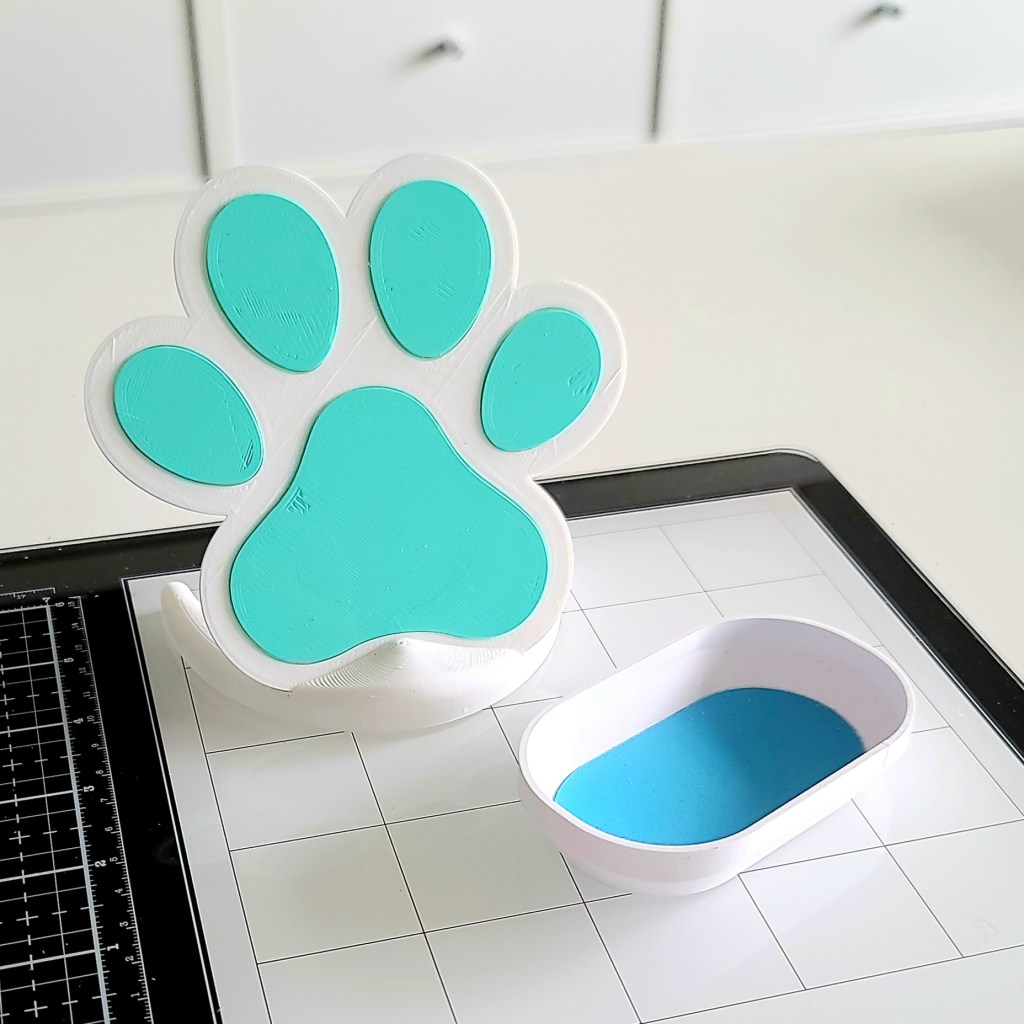
Magnetic Die Stands and Trays
Embellishment Trays
Embellishments
And lots, lots more too! We also have a few new products in the works that we hope to release this year. Be sure to subscribe to the blog and follow us on social media – Instagram and Facebook.
For today’s giveaway, you have multiple entry possibilities.
Leave us a comment. Anything you want.
Follow us on Instagram and leave a comment that you do.
Follow us on Facebook and leave a comment that you do that too.
Share an idea for a craft tool that we could create or embellishments that you would like to see us carry.
Don’t forget we’re having a sale during the hop too!
Commenting is closed for the giveaway.
Next in the hop line up is InkOn3! Click HERE to head to their hop post! If you get lost, click HERE to head to the CLC page and reorient yourself.
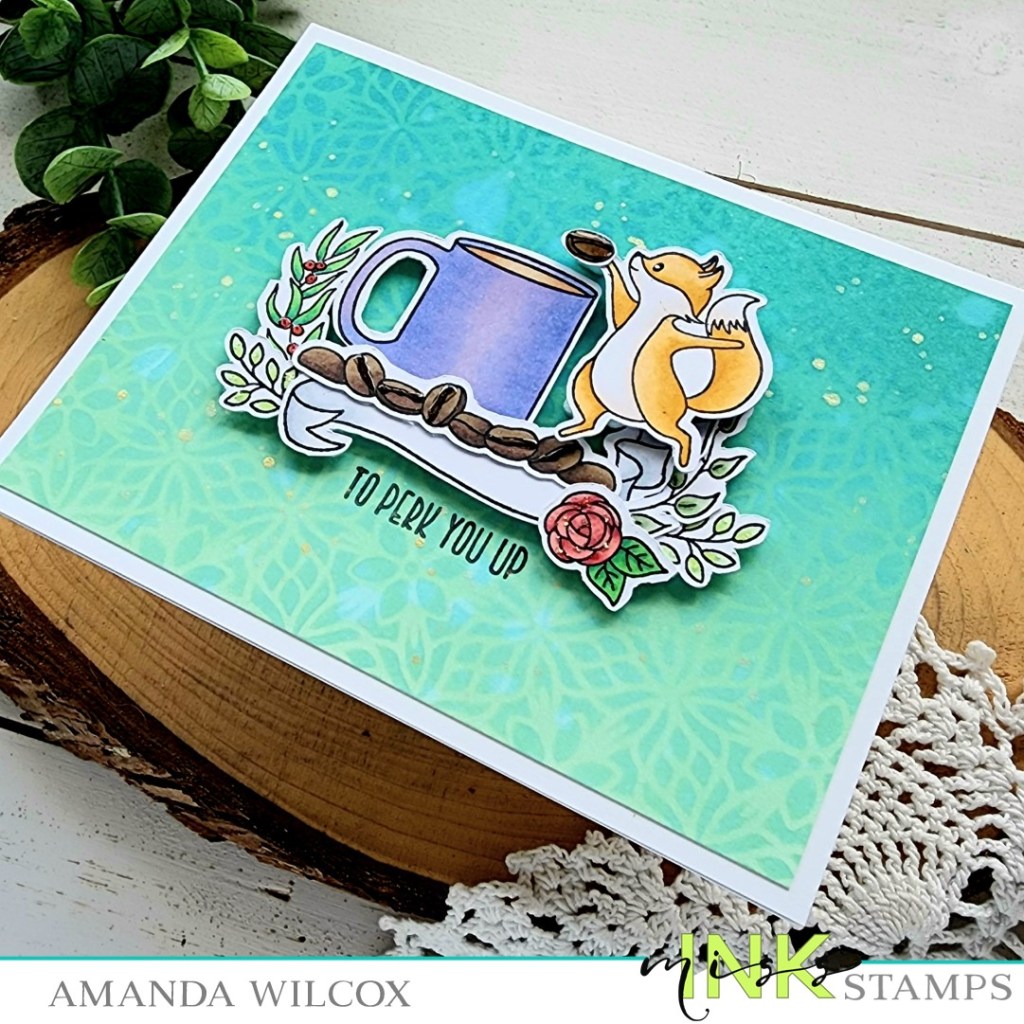
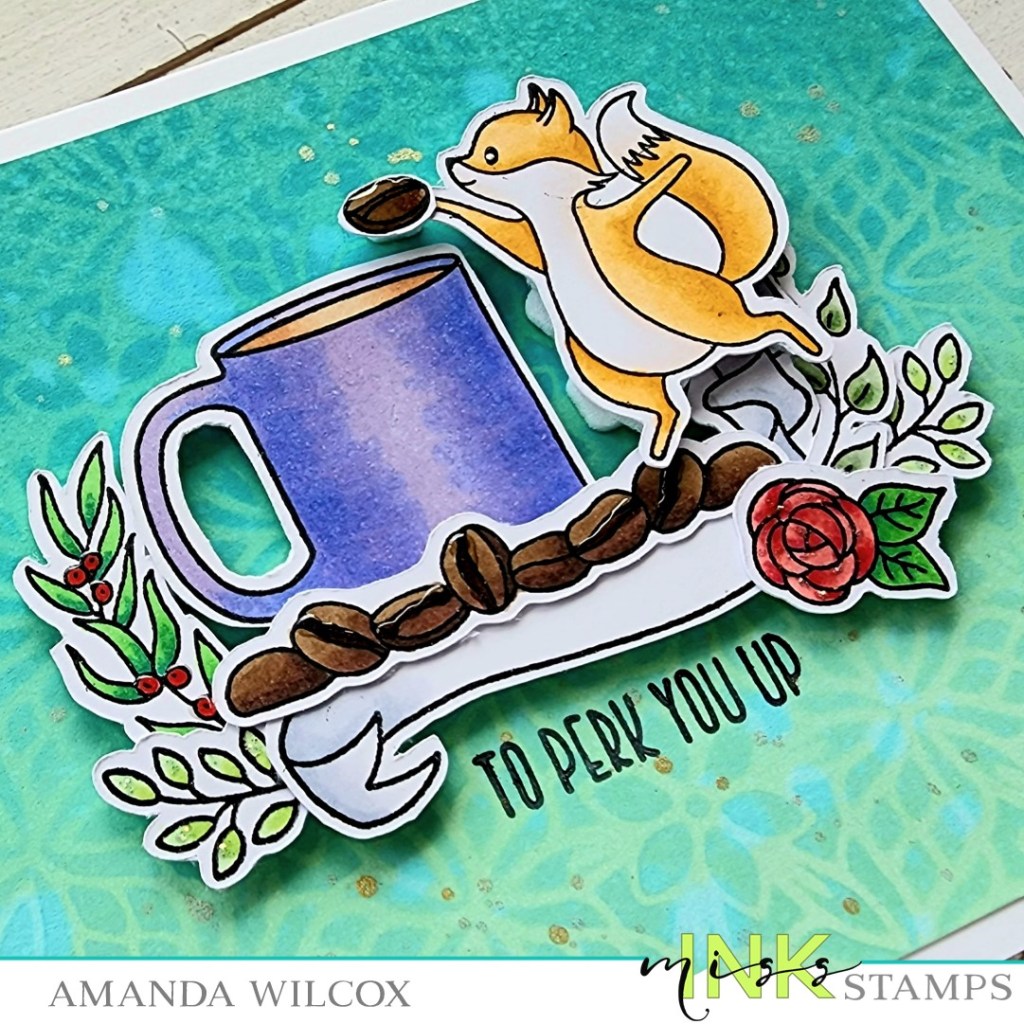
Welcome friends! Today I have a bit of caffeinated inspiration featuring stamps and stencils from Miss Ink Stamps. Tomorrow is the start of the Coffee Loving Cardmakers Spring | Summer Hop and I wanted to get you warmed up today!
To start this card, I had an idea in my head, so I pulled out my stamps and laid them on a card from to see if things would fit the way I was hoping. It seemed to work out so I stamped everything and colored the images with my copic markers. I used the scan-n-cut to cut them all out and arranged them in layers, using liquid glue to adhere small bits together at a time.
Once I had the general shape of my images together I pulled out an A2 panel and inked it up with cracked pistachio and mermaid lagoon distress oxide inks. Then I layered the Springtime Lace stencil over the top and added another layer of the same colors over the top. I spritzed the panel with water and then gold watercolor and set it aside to dry.
Once the panle was dry, I trimmed it down to 4×5.25 inches and added it to a white card base with liquid glue. I added the images with a combo of liquid glue and foam squares next. Finally, I put the whole card in my MISTI and carefully stamped my sentiment nestled in beneath the banner.
For finishing touches I added some glossy accents to parts of the coffee beans and berries on the branch. Then I added unicorn Stickles to the flowers and leaves.
Be sure to start at the Coffee Loving Cardmakers blog tomorrow and hop along for chances to win prizes at lost of stops, including Miss Ink Stamps and back here too!
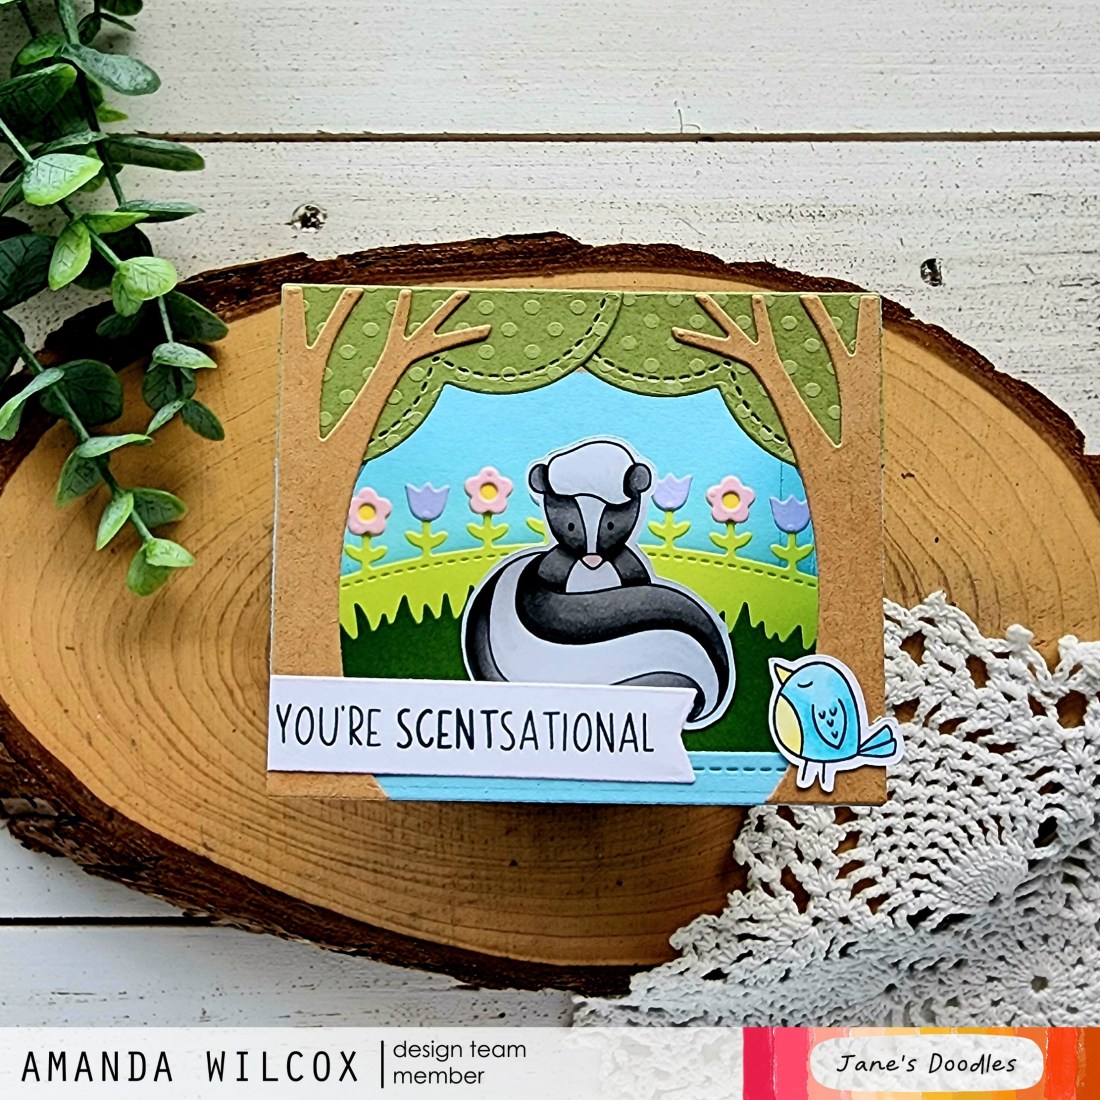
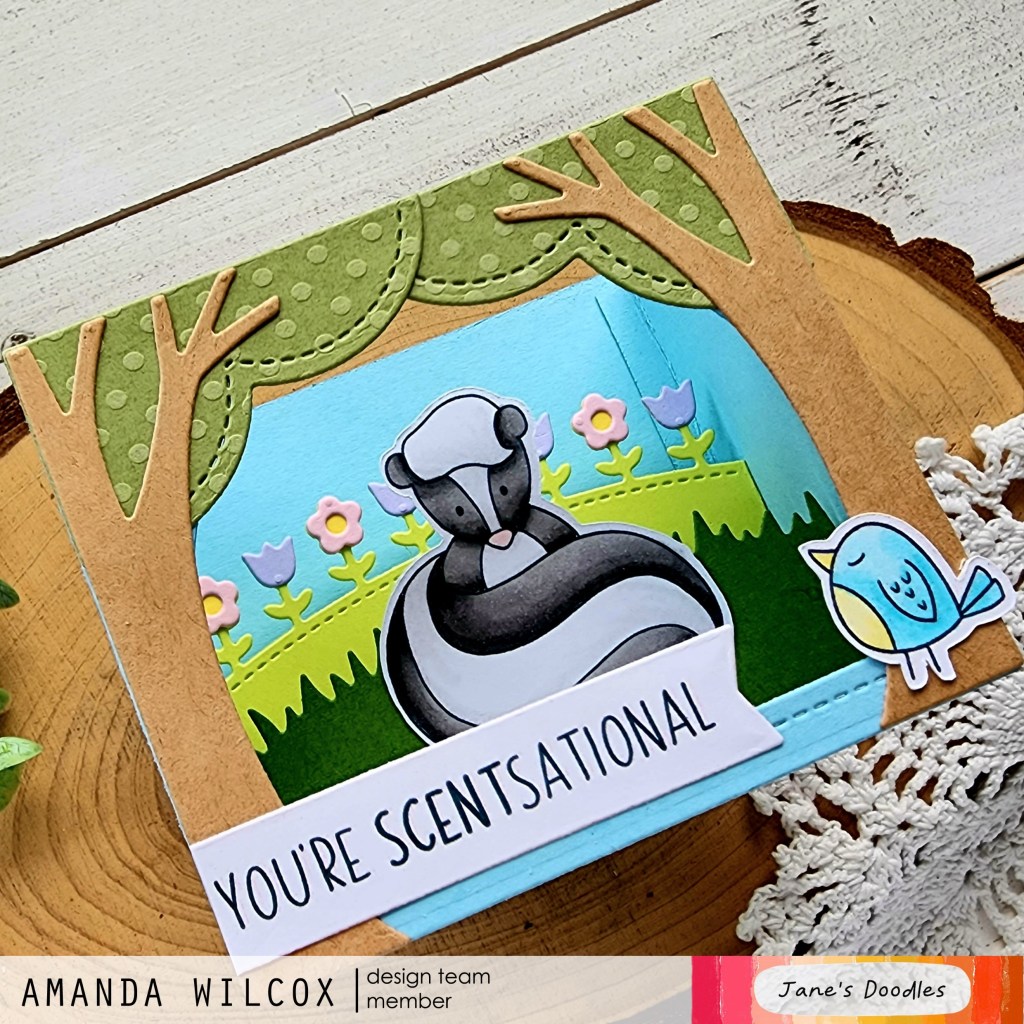
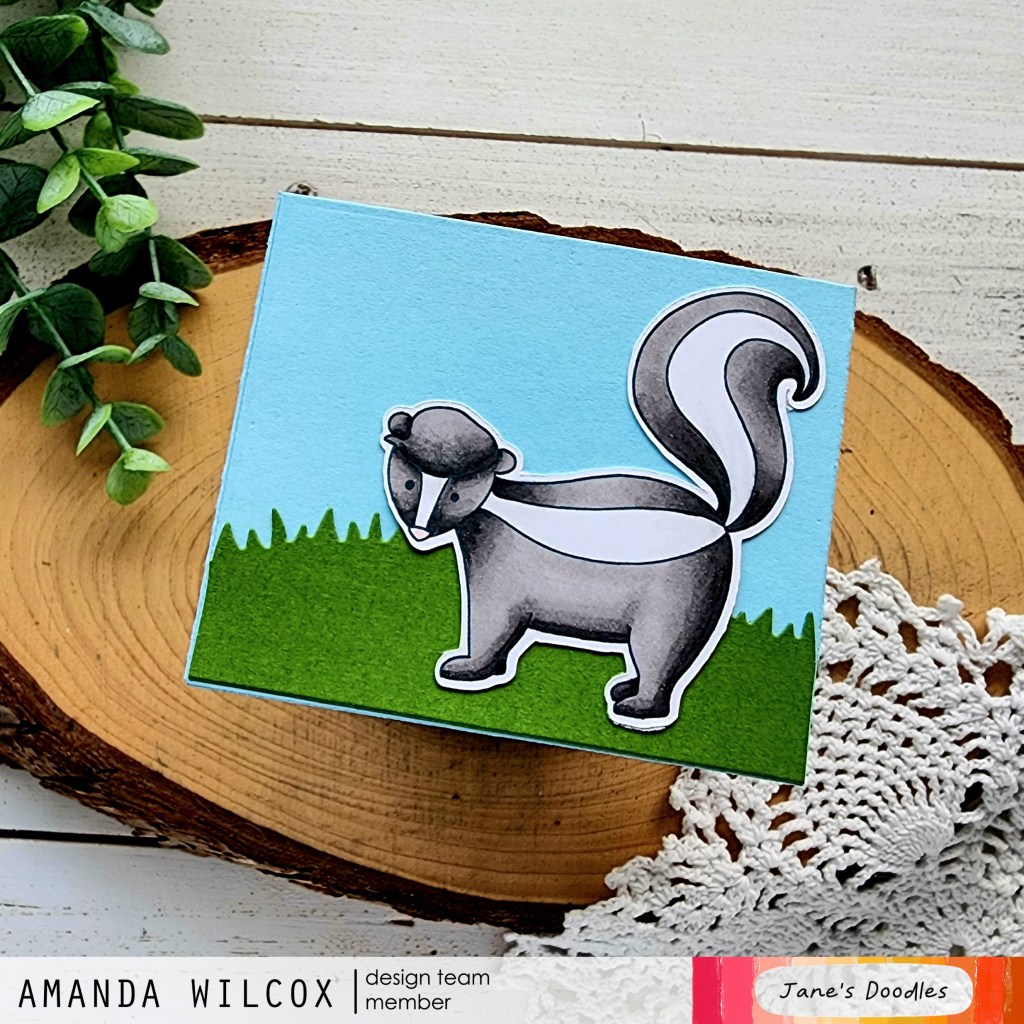
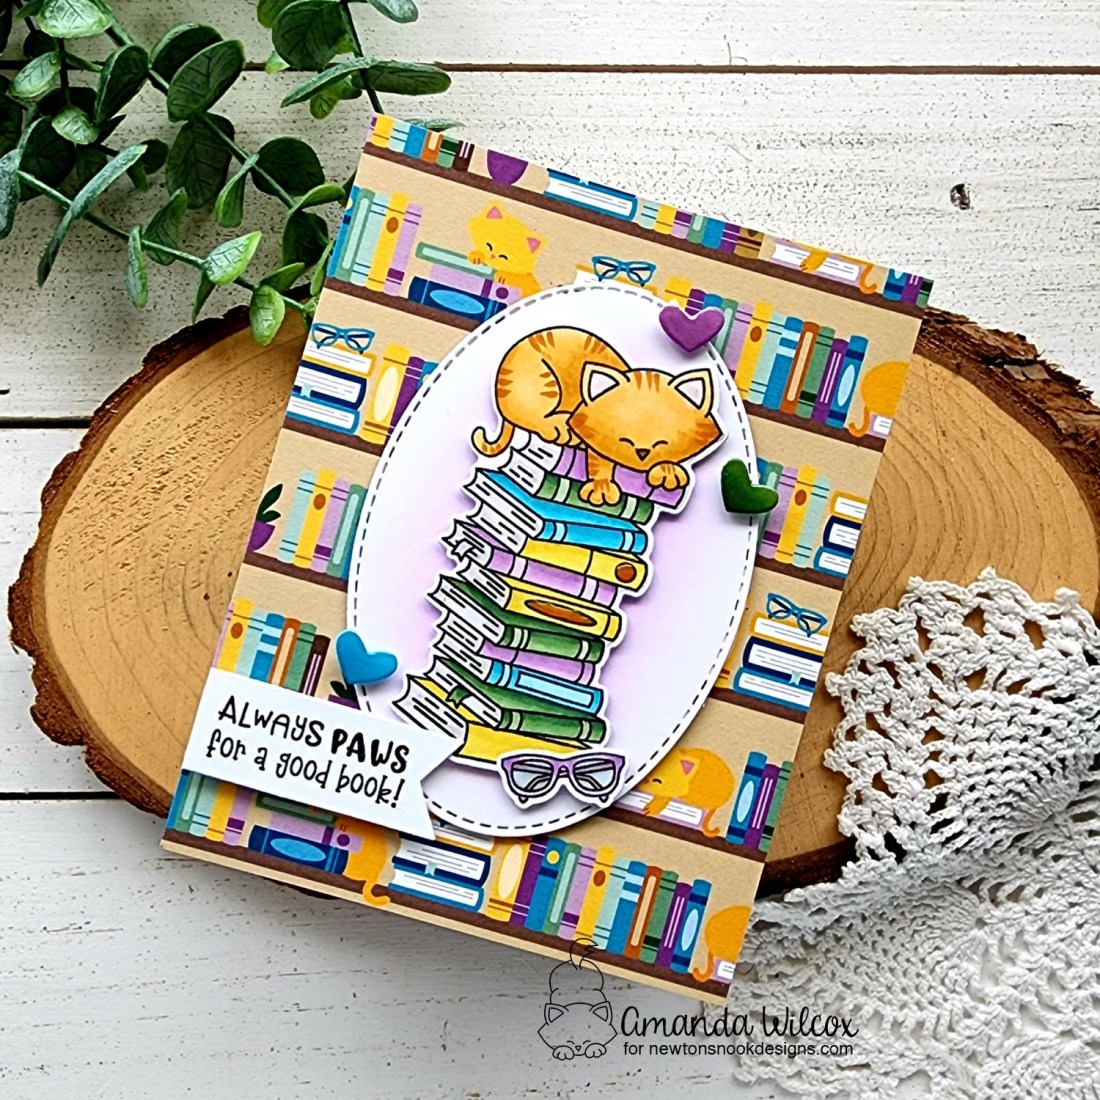
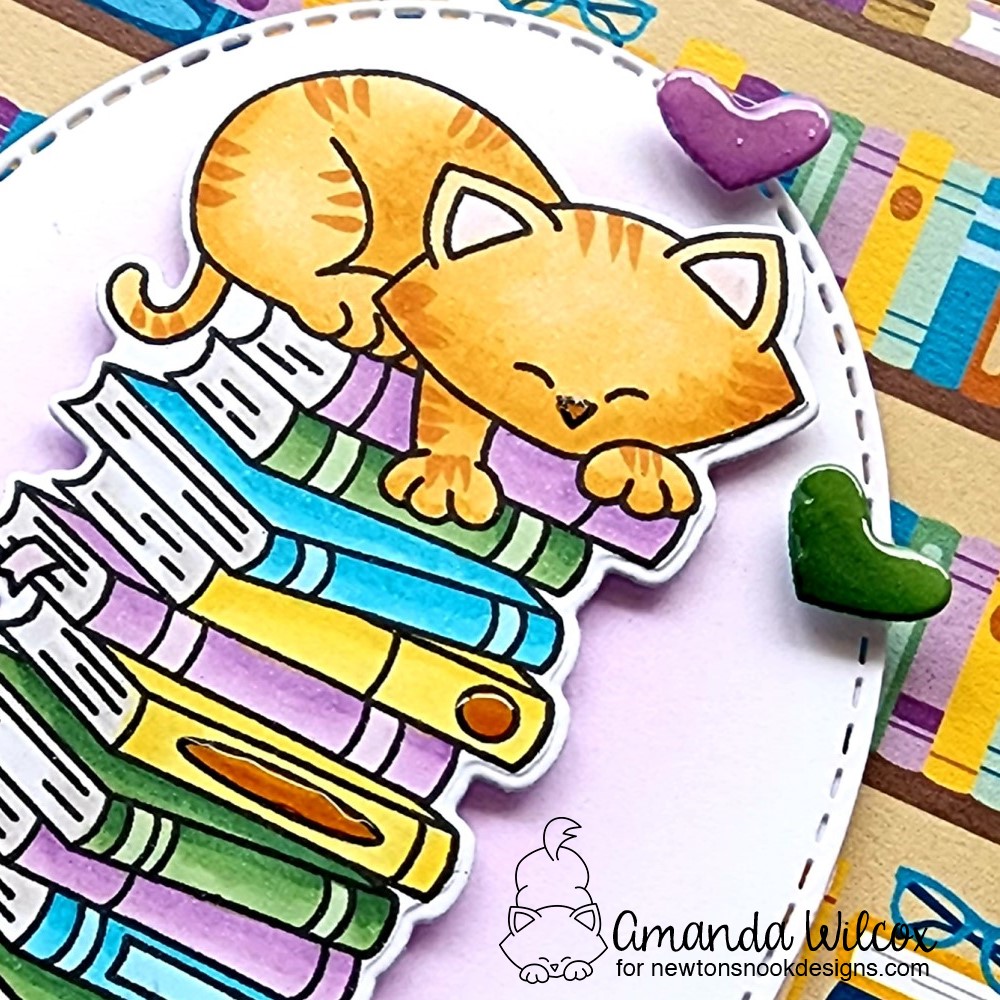
Hello everyone! Thanks for stopping by. Today I have a fun little shadow box featuring the Jane’s Doodles Stinks digital stamp set. These skunks are some of my favorites from Jane and I was all too happy to color them up for a spring themed card to share.
I printed my images and sentiment on white cardstock and colored them with my copic markers. I used a Pink & Main large sentiment banner die to cut out the sentiment and the scan-n-cut the cut out my images.
Then I used the Lawn Fawn shadow box die set along with the spring add on for the flower row in the back and park add on for the grass border and trees on the front. I used 1/8″ scrappy tape to adhere the box pieces and liquid glue for the images and details.
I always write my message on the back of these cards and thought it would be fun to continue the scene on the back this time too. I added another grass border by trimming off the tabs and that cute skunk!
I’m excited to share this card with someone for a fun, unexpected smile!
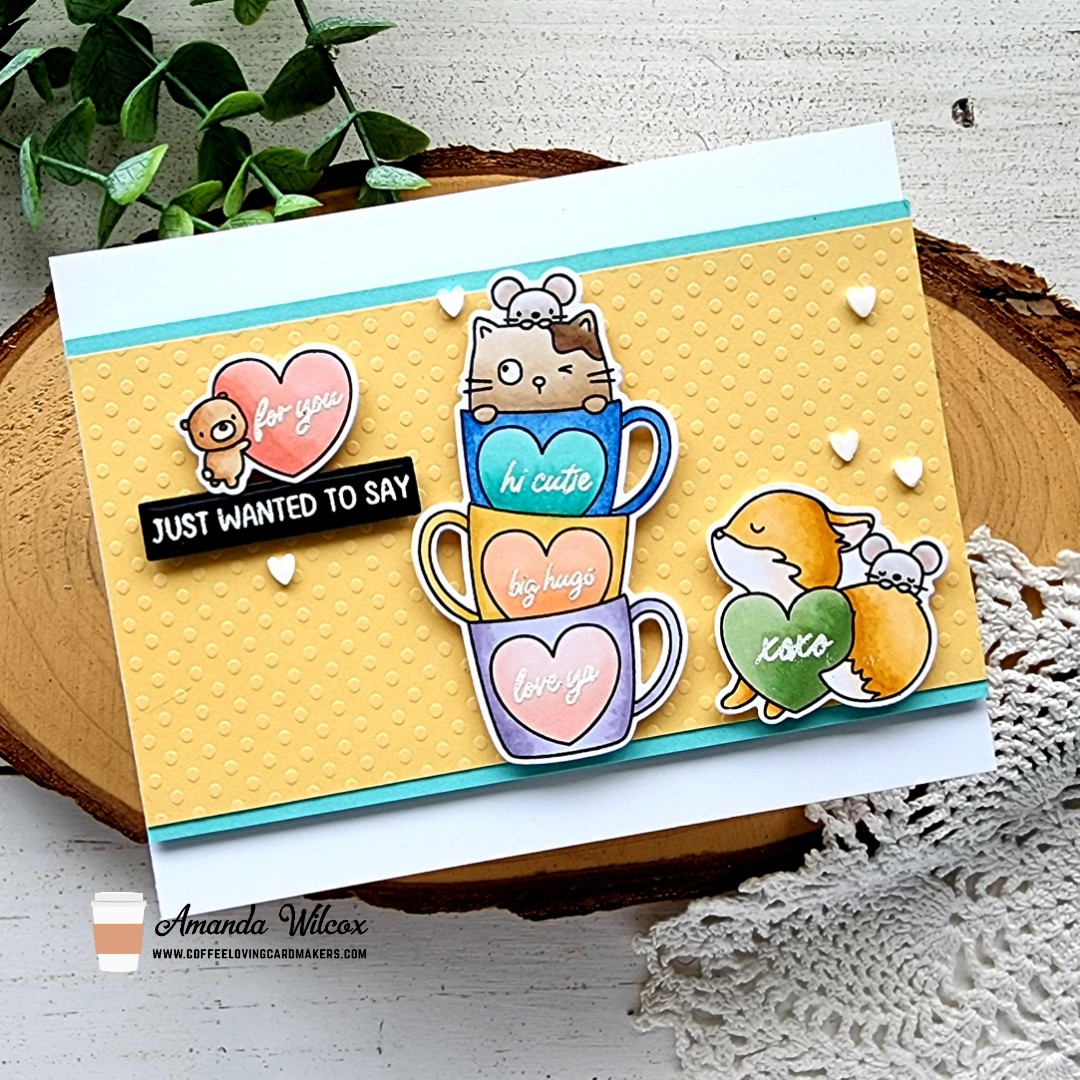
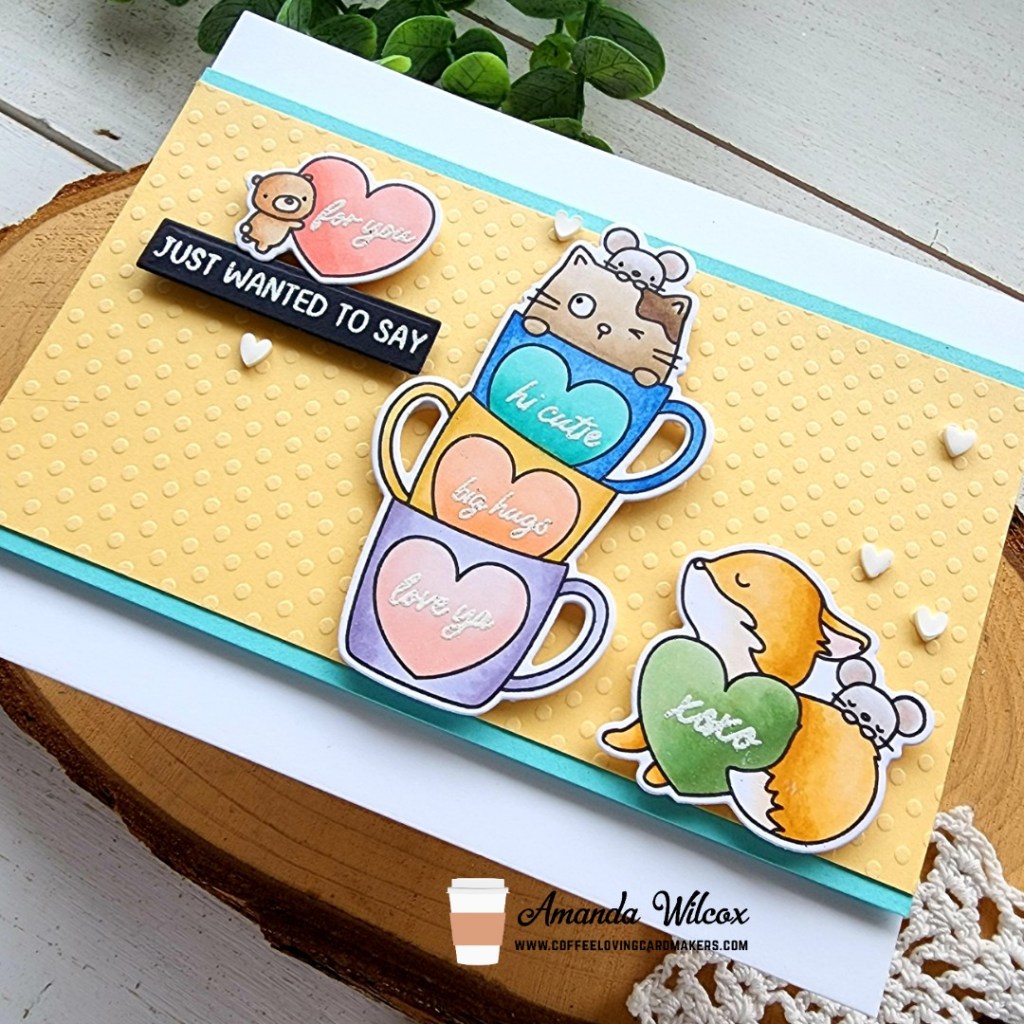
Happy Tuesday everyone! It’s time for tea over on the Coffee Loving Cardmakers blog today! I finally took a moment to ink up the adorable My Favorite Person stamp set from the last Mama Elephant release and it did not disappoint! SOOOOO CUTE!
I colored my critters first and then went in to the mugs and hearts with a bit of a muted rainbow palette just for something different. Then I chose a variety of the small sentiments in the set and heat embossed each heart with a different one.
Next, I stamped and heat embossed one of the regular strip sentiment on black cardstock and die cut it with a sentiment strip from my stash.
When it came to arranging my images, I kind of wanted the sentiments to read left and down to the right…so that’s what I did. I added that cute bear to the sentiment strip with a little liquid glue on his feet and popped them up with foam squares. Then I added the stack of mugs to the center and finished things off with the sweet fox and mouse on the right.
I added some teal strips to the top and bottom of my yellow dotted background and popped them up on a white card base. Then to finish things off and tie in the white card base I added some white clay hearts from the Twiddler’s Nook Sweethearts embellishment mix.
This is a subscriber only project that is sent directly to your inbox every Tuesday from the Newton’s Nook design team. Tomorrow is my turn and I’m super excited to share tips and ideas with you!
It’s really fun and even more adorable! So click HERE to subscribe if you haven’t already and I’ll see you tomorrow!
I appreciate you sharing your time with me. Have a fabulous day!
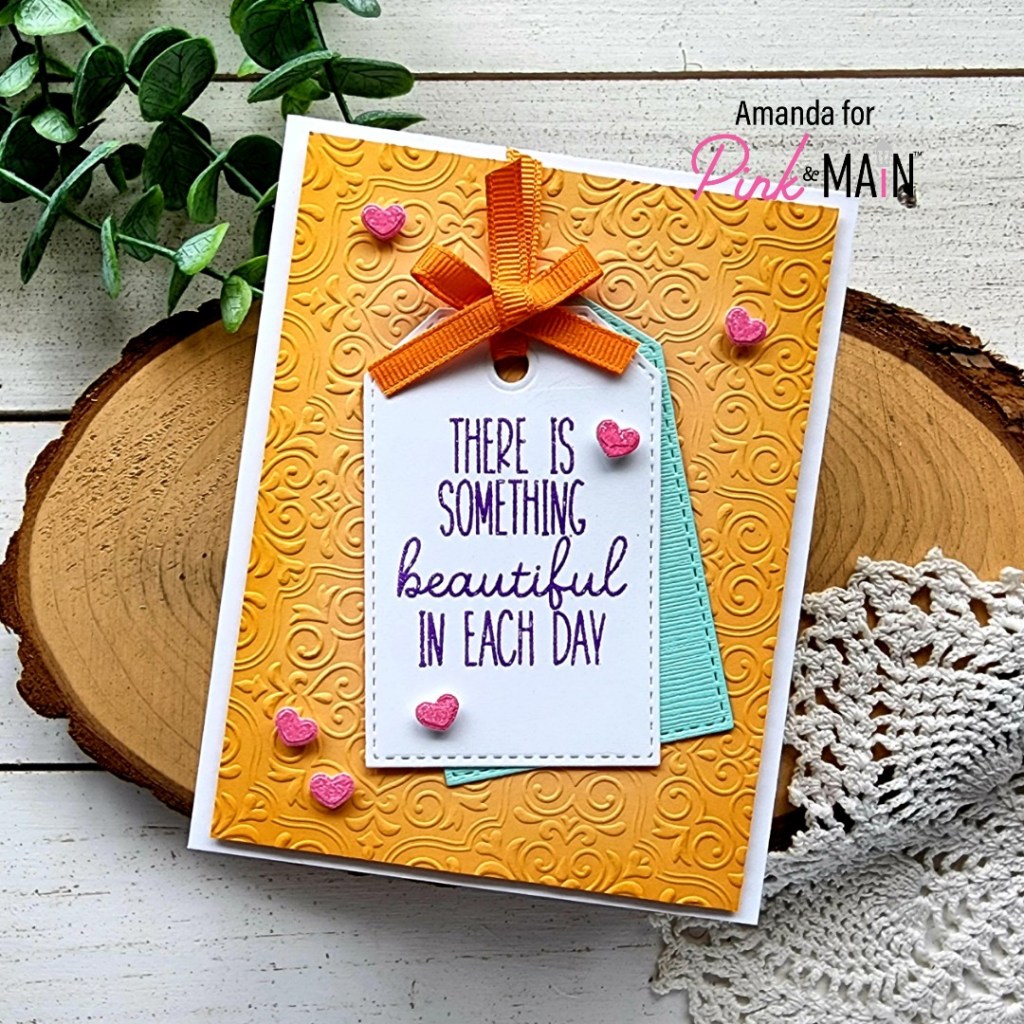
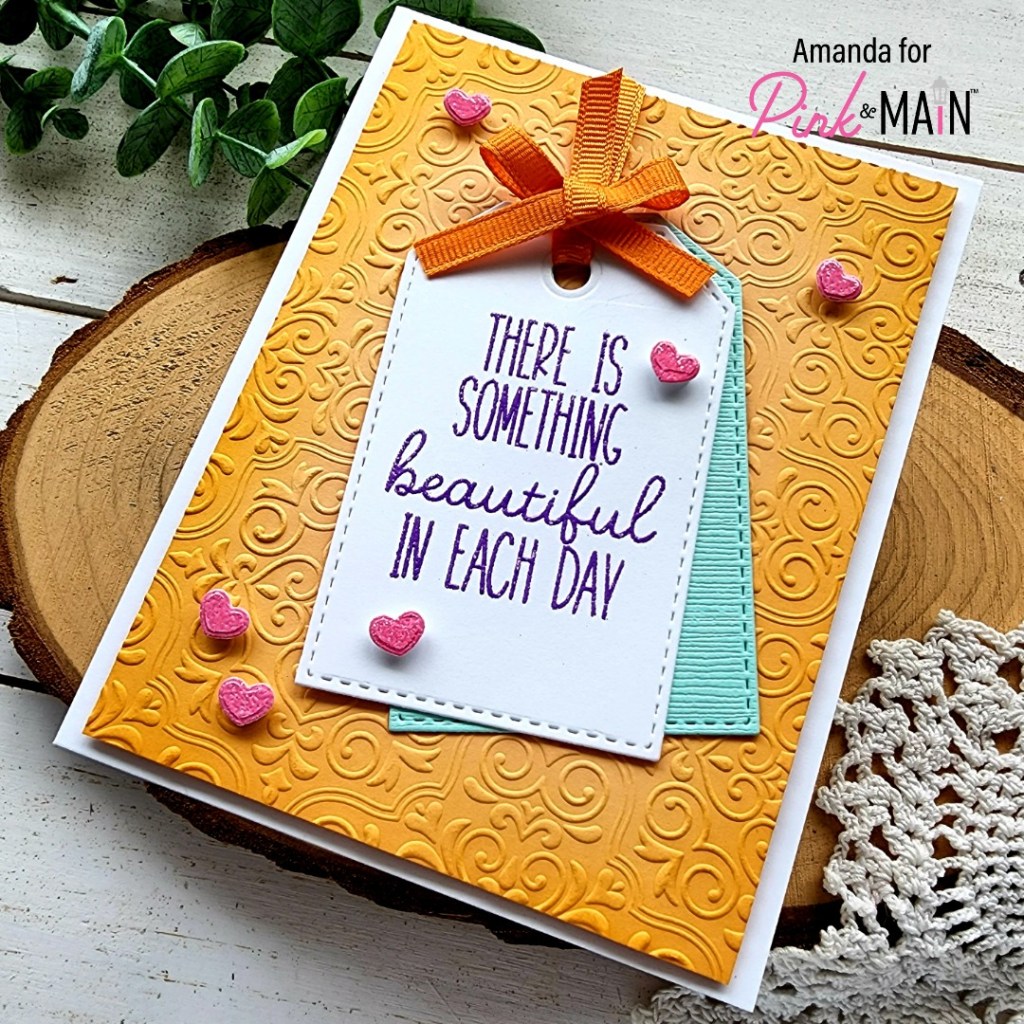
Welcome, welcome everyone! Thanks so much for stopping by today. I’m over on the Pink & Main blog playing with the latest release – mostly the new gorgeous heat embossing powders because these colors are everything!!! Oh my word, I love them!
Today I chose a sentiment from the new Here For You stamp set and heat embossed it in Grape Soda embossing powder on a tag. I cut a second tag from teal textured cardstock and tied them together with orange ribbon. I tied a bow and added to the top of the tag for a little decoration with EZ Squeeze liquid glue.
For my background, I just had to play with the new Ornate Tile embossing folder! It’s beautiful too! I embossed orange cardstock and used my blending brush to deepen the edge of the embossing with orange ink. I popped the panel up on a white card base and glued my tags in place next.
Wanting to add more color to my card and play with the embossing powders more, I smeared the embossing ink pad across a scrap of white cardstock and sprinkled the Bubblegum color of powder on it. I heated it up for a gorgeous swatch of the color. Then I used the small heart in the tag die set to create my own shiny embellishments for my card!
I added all of them with foam squares for some dimension and now my card is all finished. Isn’t it so pretty?!? I just love all these bright colors!
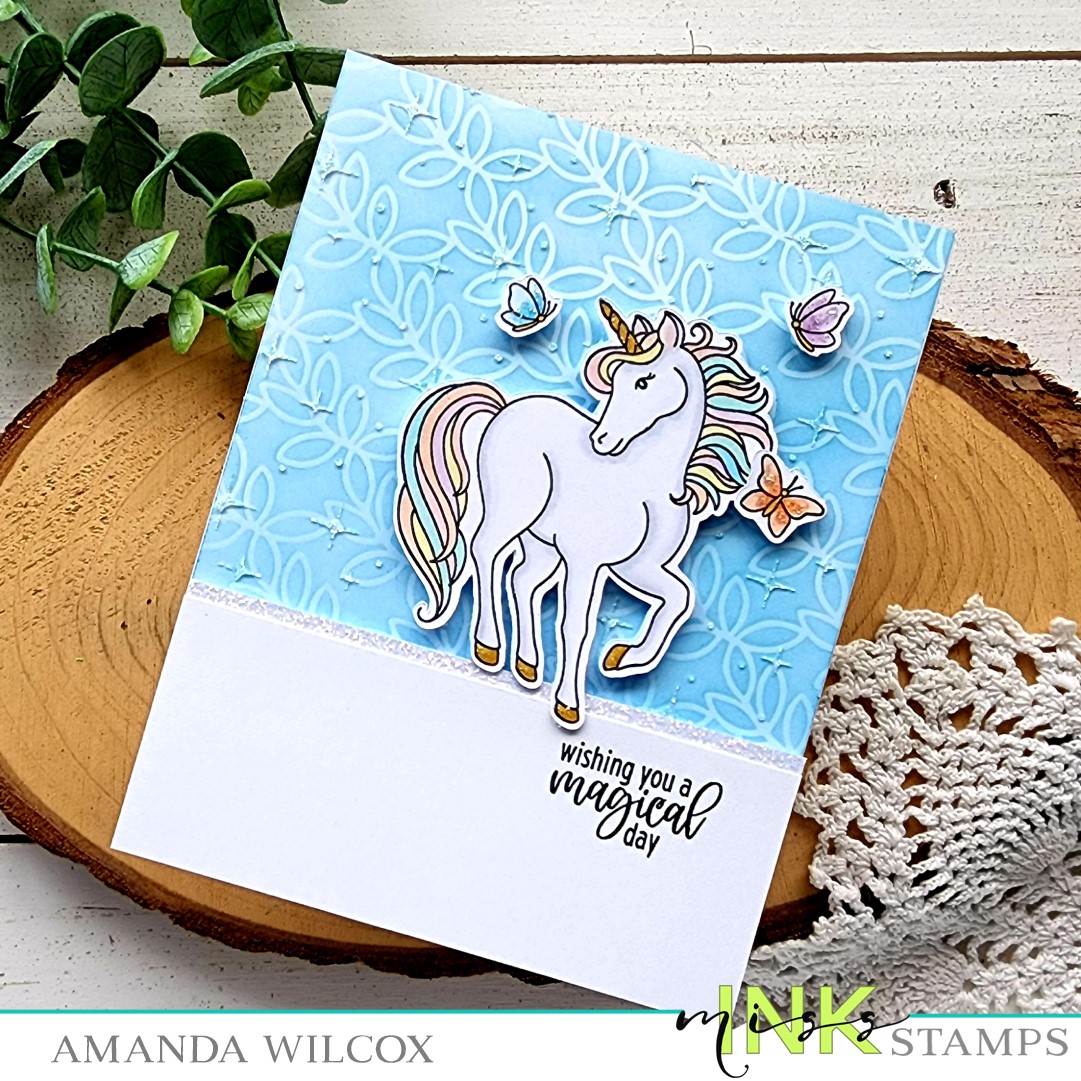
Hello there! Thanks so much for stopping by. Today I have a little inspiration featuring some magical products from Miss Ink Stamps. I pulled out the Lovely Unicorns because it had been a minute since I colored these beauties up and decided to pair some beautiful stencils together too!
I started by stamping my images out and coloring them with my lightest copic markers. I wanted to keep things soft and sweet for this card. Then I used the scan-n-cut to cut them all out.
Knowing the general design direction I was going, I trimmed a piece of white cardstock down to 2×4.25 inches and stamped my sentiment on the upper right side. I added 1/8″ scrappy tape to the edge and adhere a strip of silver cardstock to it. Then, I set this aside with my images while I worked on the stencil panel.
I have really been itching to try out the new On the Vine stencil to see how it was in person and I can’t even tell you how much I love it. It’s beautiful and is going to be so versatile with any images you try it with! Today I inked up a white piece of cardstock with light blue ink. Then I sprayed the stencil with Pixie Spray and stuck it down before adding another layer of the same color blue ink over the top. The moment I peeled the stencil away I was in love!
But thanks to my friend Lynnea, I just can’t leave these alone without trying to layer a little something over the top. Today for that added magical feel, I used the Sparkles stencil with iridescent Glitz Glitter Gel from Thermoweb for the perfect amount of magic!
Once the glitz gel was dry, I lined everything up to figure out final spacing and decided to trim the sentiment panel down to 1.5 inches and pop it up with foam tape. Then I added foam squares to the images and added them next.
For finishing touches I added unicorn Stickles to the unicorn horn and hooves and also the butterfly wings. Then I took my Wink of Stella glitter brush pen and added a little shimmer to the unicorn mane and tail too. You can’t have too much sparkle on a card like this, ever!
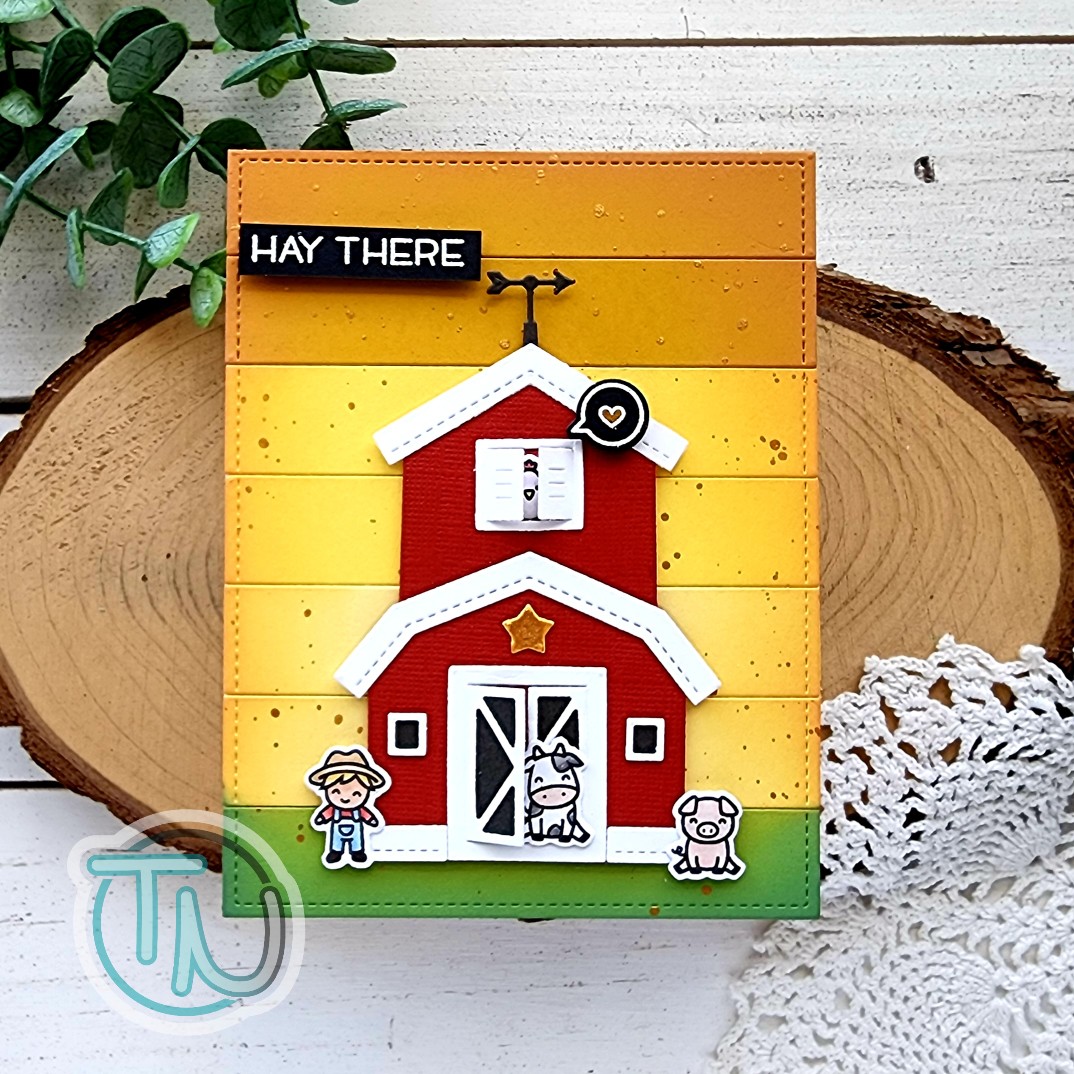
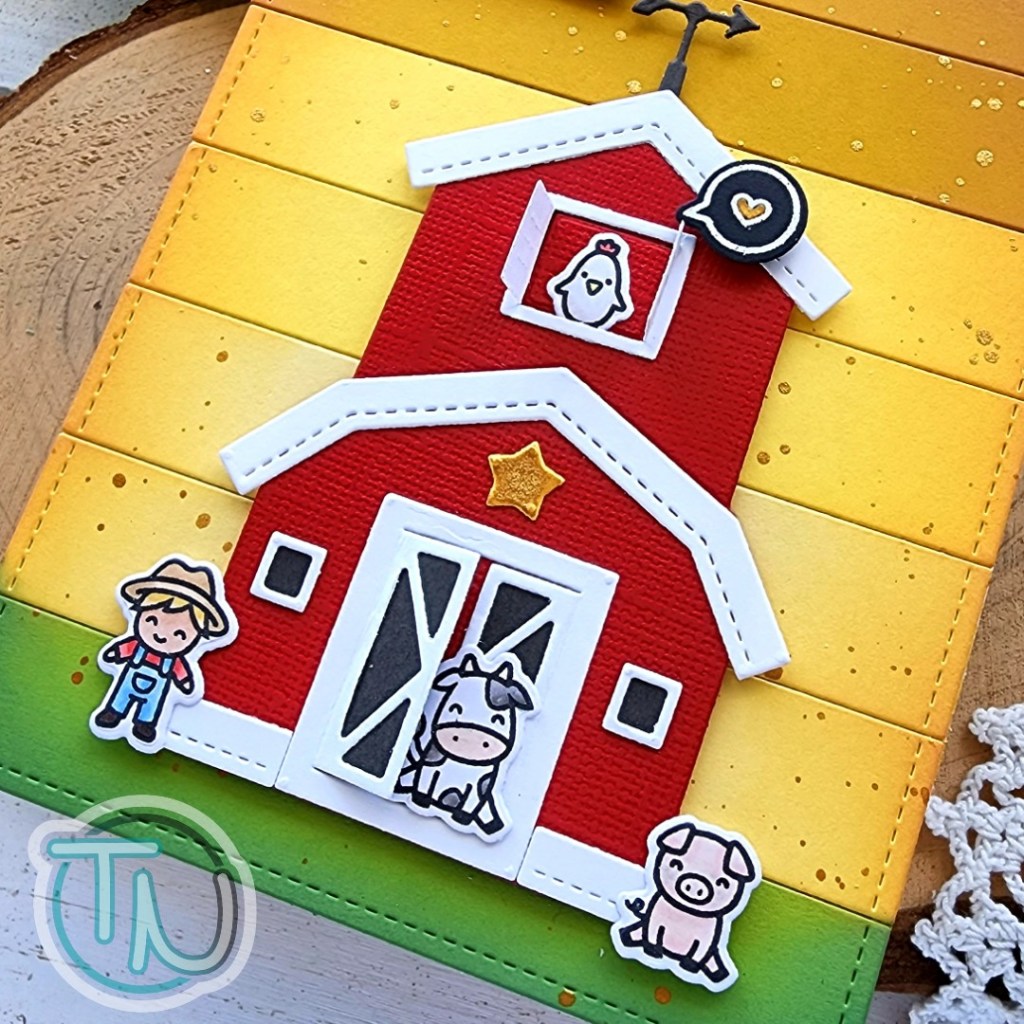
Hi there! I’m popping in this afternoon to share a card I created last night with the Lawn Fawn Tiny Farm cuties and the Build-a-Barn dies. I just added these to my stash and had so much fun playing with them! I can’t wait to make a reveal wheel card with them next.
I stamped and colored all 4 characters from the Tiny Farm set with my copic markers. Then I used the coordinating dies to cut them all out. Next, I cut the pieces for the Build-a-barn and used liquid glue to put it all together.
I wanted to try something different for the background of my card so I chose 3 different scraps of yellow cardstock and one green and cut the strips for the Simple Stripes Portrait die. I adhered them to a panel with liquid glue two strips of each yellow and ending with the green on the bottom for my ground. I wasn’t a huge fan of how flat it all looked so I took my distress oxide blender for spiced marmalade and lightly inked up the edges of the yellow with just the ink left on it from last time I used it. Then I did the same for the green area with rustic wilderness. Then I splattered gold watercolor all over the panel.
I added the chicken to the window opening in the top and replaced the red cardstock that cut out of it behind him to help secure him in place. Then I added the cow with liquid glue, added foam tape to the back of the barn and popped it in place. I added foam squares behind the farmer and pig and added them next.
I wanted a larger sentiment than the one in the Tiny Farm set so I pulled out Hay There and used the same one from that set to stamp and heat emboss on black cardstock. I trimmed it into a strip and added it to the top left with foam squares.
For finishing touches I came in with the same gold watercolor as the splatters and painted the star decoration on the barn. Then I thought it would be fun to add a little speech bubble by the chicken in the top to make sure the recipient’s eye is drawn that direction to see the hiding critter.
I stamped and heat embossed that and the heart inside from Hay There and cut it out with the coordinating die. After popping it up with a foam square I also painted that heart with the gold watercolor to tie everything together.
Isn’t this adorable?!? I’m so tickled with the way it turned out. I just makes me smile!
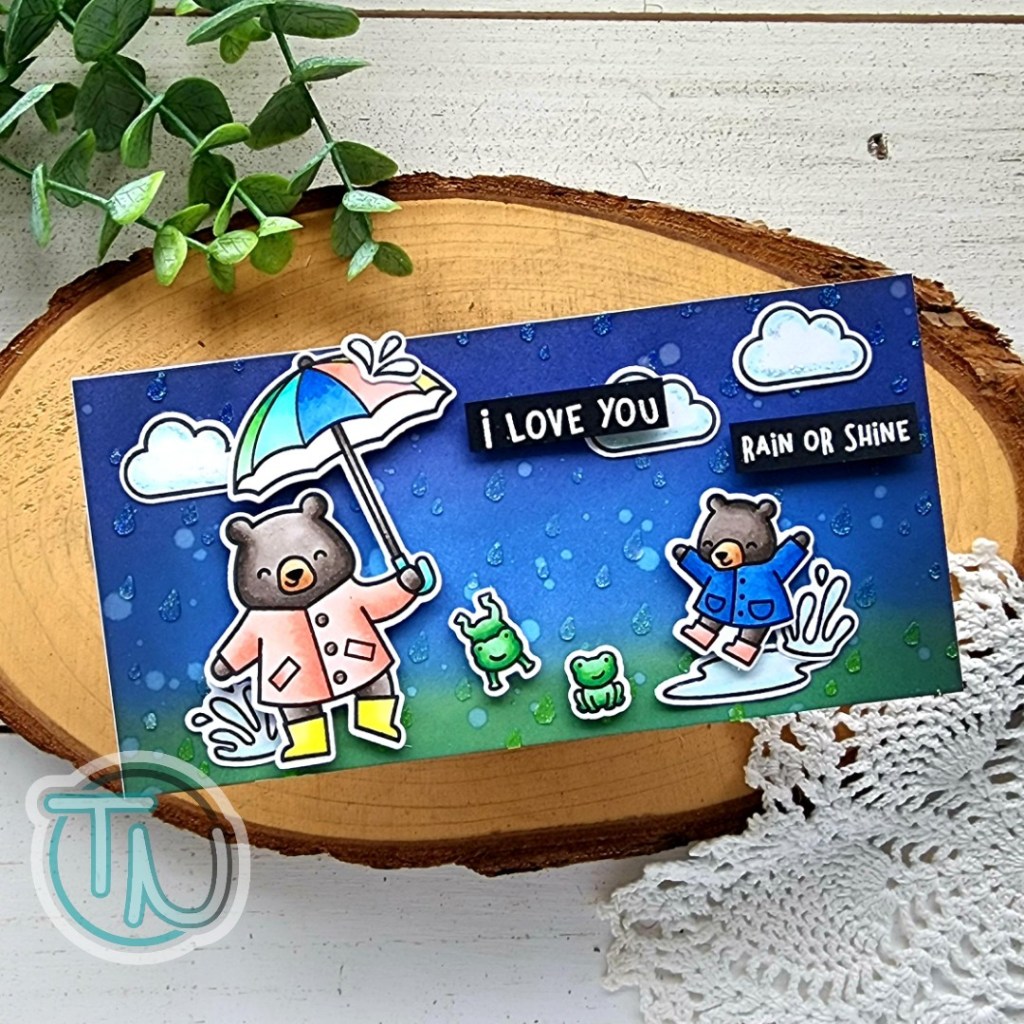
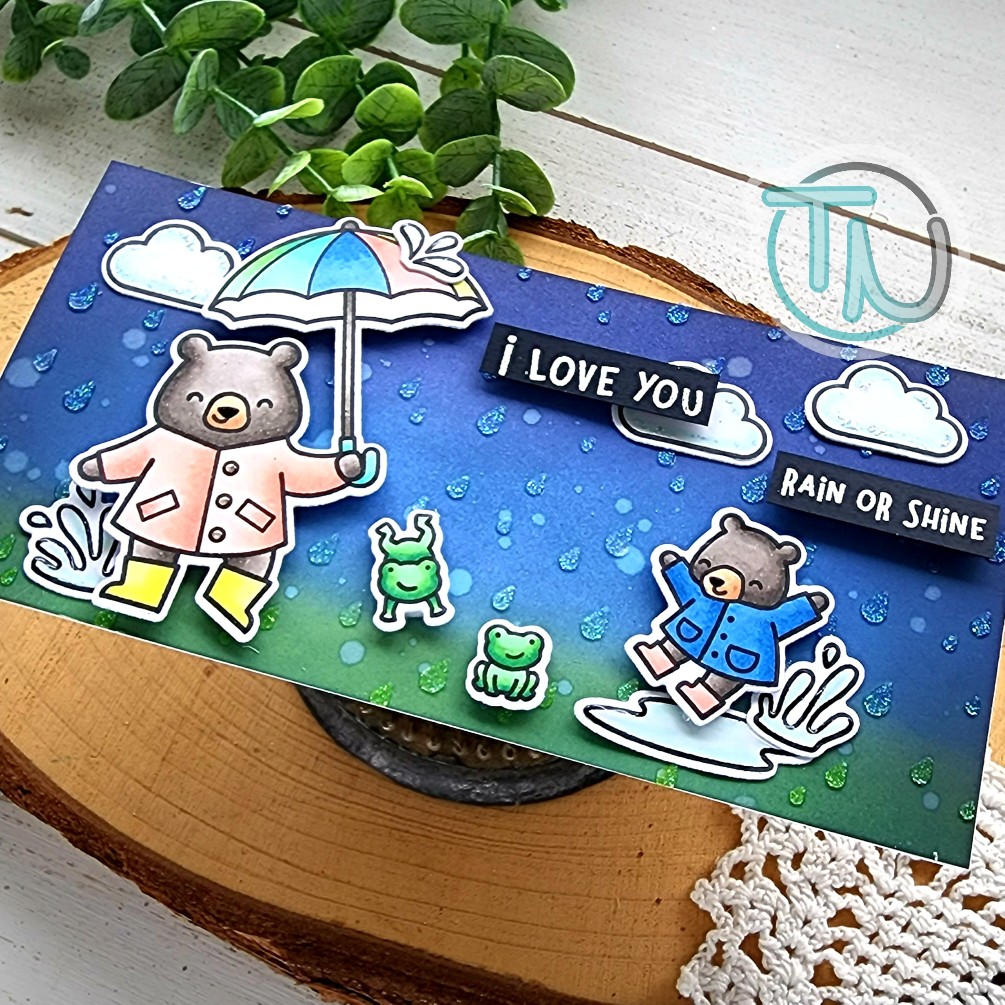
Hey friends! I’m popping in today with a fun, mini slimline card to enter into the Lawn Fawnatics challenge. I didn’t get a chance to play along with the last one and really loved the vision board so I pulled my color palette from there but created a scene to go with this challenge too.
I chose images from Beary Rainy Day and colored them with my copic markers using the vision board as a reference to my color palette. I had a blast doing this and trying to match the colors with theirs.
Next, I cut a mini slimline panel at 3×6 inches and inked it up with distress oxide inks – rustic wilderness is my ground and faded jeans, chipped sapphire and black soot are my sky colors. I splattered water on the panel and let it dry. Then I taped down my Rainy Sky stencil and spread fairy dust stencil paste through it.
While that was drying I added foam squares to my images and then stamped and heat embossed sentiments to trim into strips. Once the panel was dry I added it to a card base and started adding everything to my scene. Some of the images are added with liquid glue directly to the card front but all the critters and sentiment strips are popped up.
Then I finished the design off with some glossy accents on the water and buttons on the jacket, unicorn stickles on the clouds and black glaze pen on the bears’ noses.
It’s a little out of my typical comfort zone to create a darker sky background but I love how it helps the images pop so much and show that they are really enjoying this rainy day.
Happy Friday my friends! I don’t know about you but it’s been a long week and I’m really looking forward to this weekend to relax and recoup.
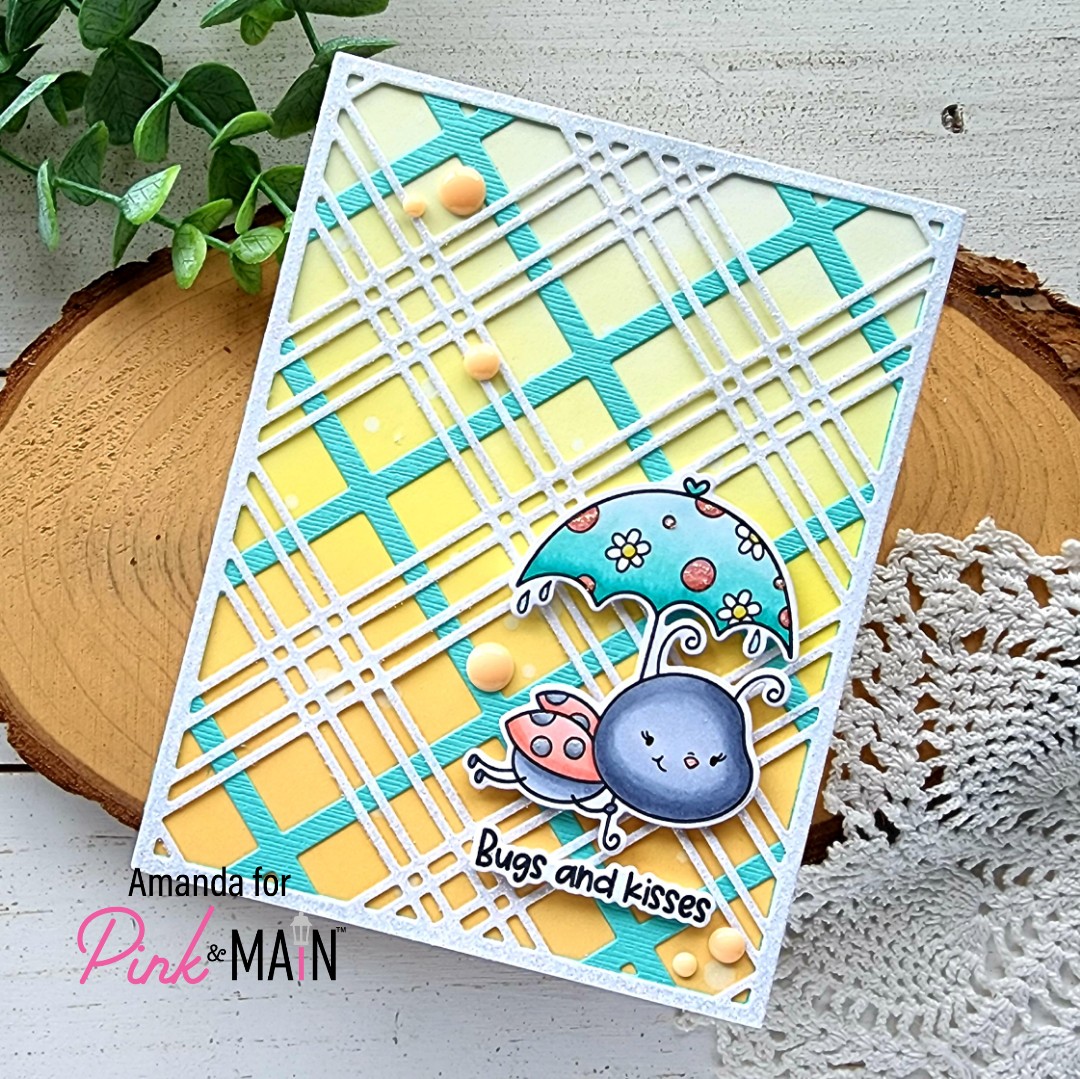
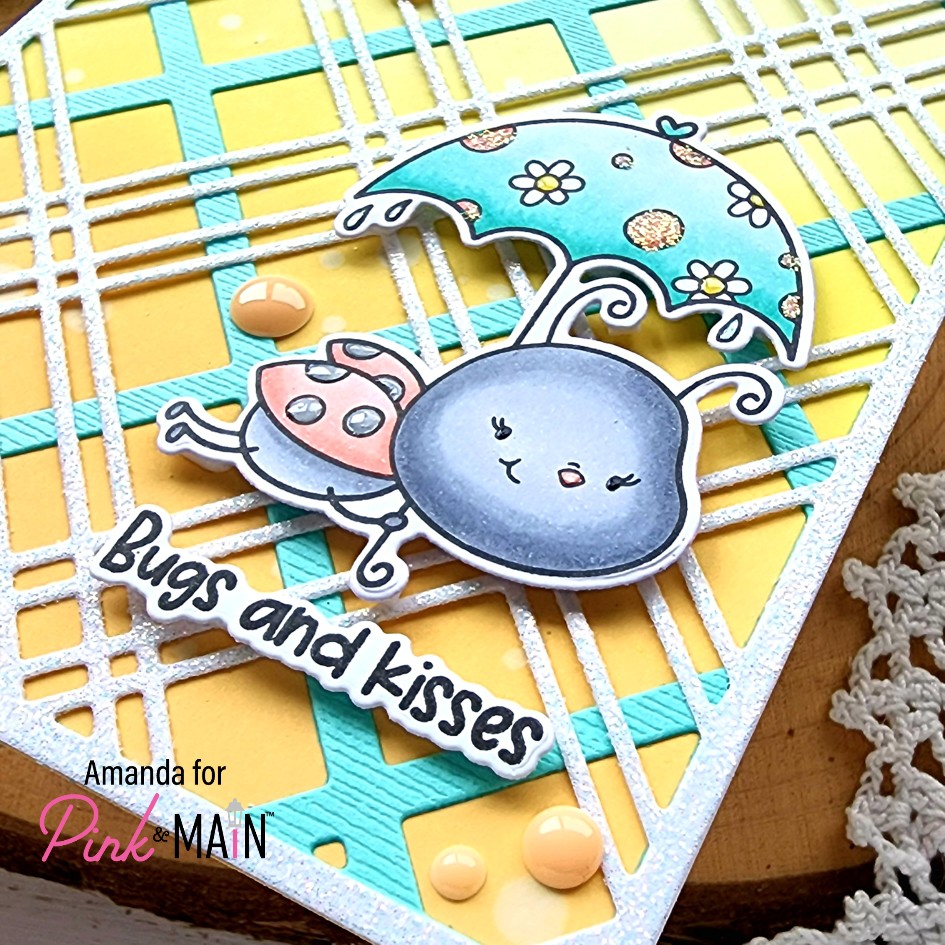
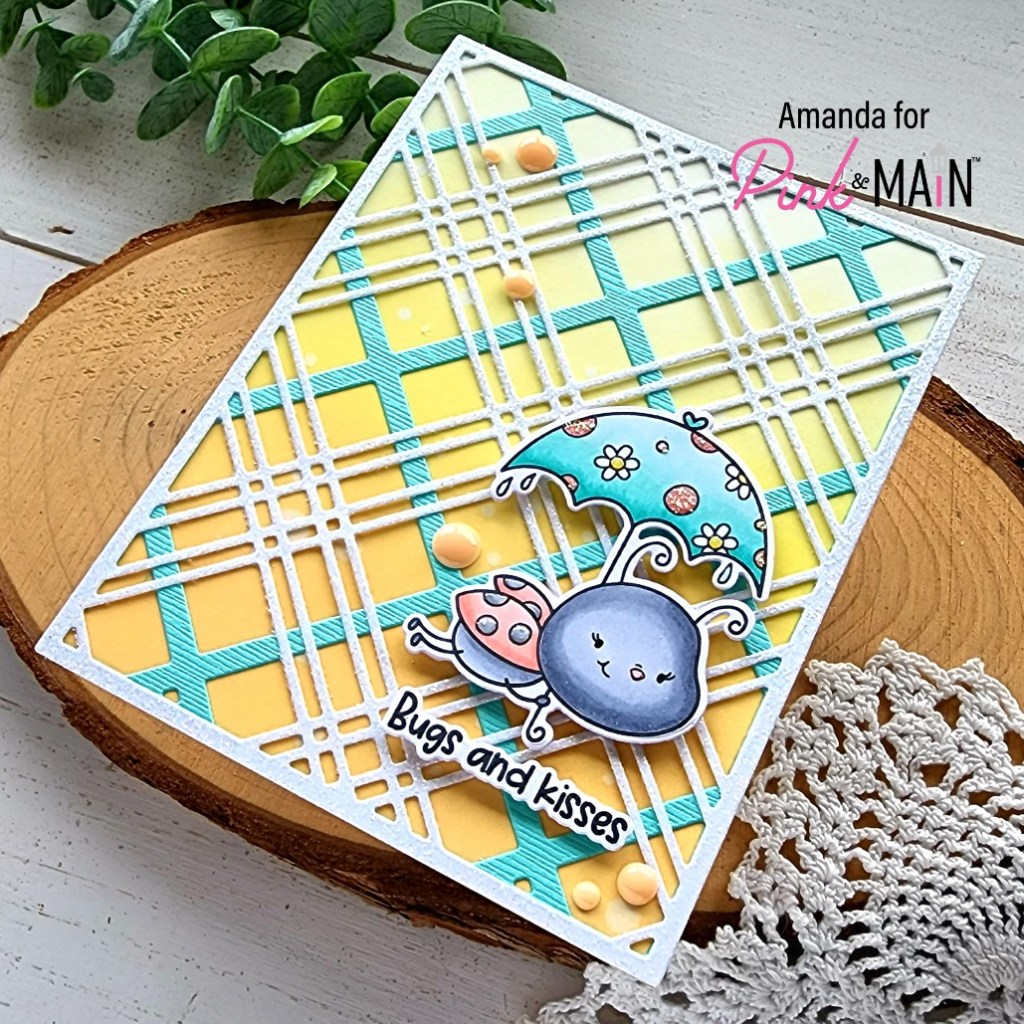
Today I’m on the Pink & Main blog with a little inspiration featuring the Stamp of the Month for April – Lady Luck. I adore these sweet images and can’t actually believe just how much I love the color palette that came together on today’s card.
I started today by choosing and image from Lady Luck, stamping it and coloring it with my copic markers. I used the coordinating die to cut it out and went digging in my stash to see if any of my background dies inspired me.
The moment I pulled out the Plaid Cover dies I knew this was it! I cut one layer from teal cardstock matching the colors in the umbrella and the other layer from the white glitter cardstock in the Metallics Glitter paper pack. Next, I took an A2 white cardstock panel and inked it up with scattered straw fading into squeezed lemonade distress oxide inks. I flicked water on the panel and let it air dry before adhering the plaid layers over the top.
Next, I chose a sentiment from the set and used the coordinating die to cut it out as well. I love it when sets do this. It’s such an awesome option to have when creating. Then I added foam squares and strips to the image and sentiment and popped them up on the card front.
For finishing touches I added unicorn Stickles to the dots on the umbrella and glossy accents to the flower centers, ladybug nose and her spots. Then I used a black glaze pen on her eyes to help them shine and pop. Last, I pulled out the Dragonfly Dreams enamel dots and added a scattering of them across the design.
This card just screams spring to me and I’m over the moon with how it turned out. I love these soft colors and the ladybug image is just the sweetest! I hope you enjoyed it too.