Blog

Miss Ink Stamps – It’s a Jungle Out There

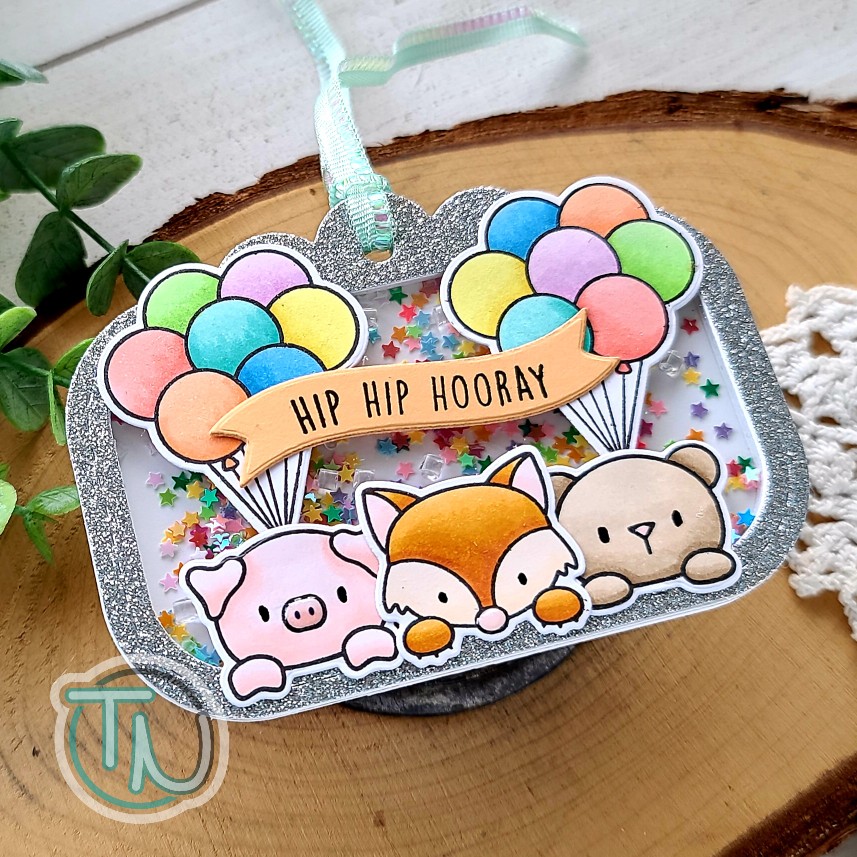
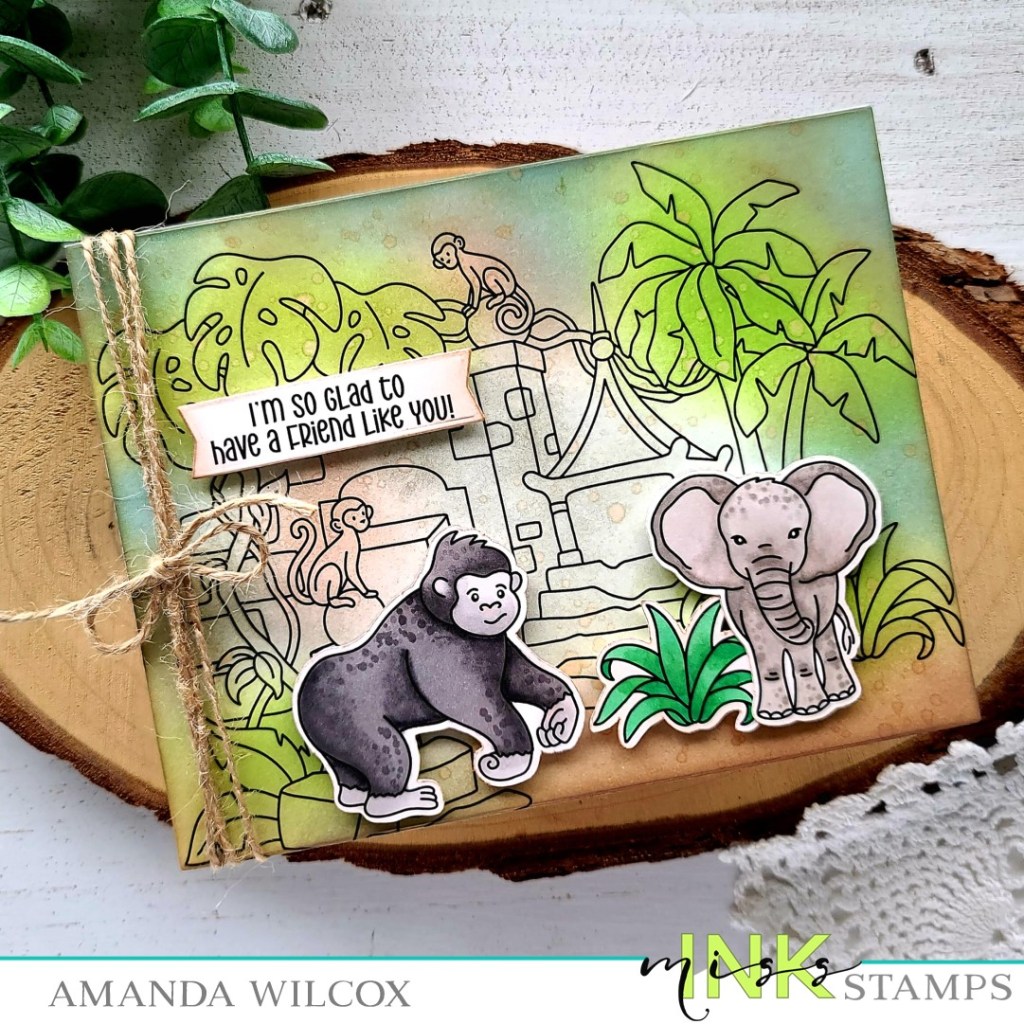
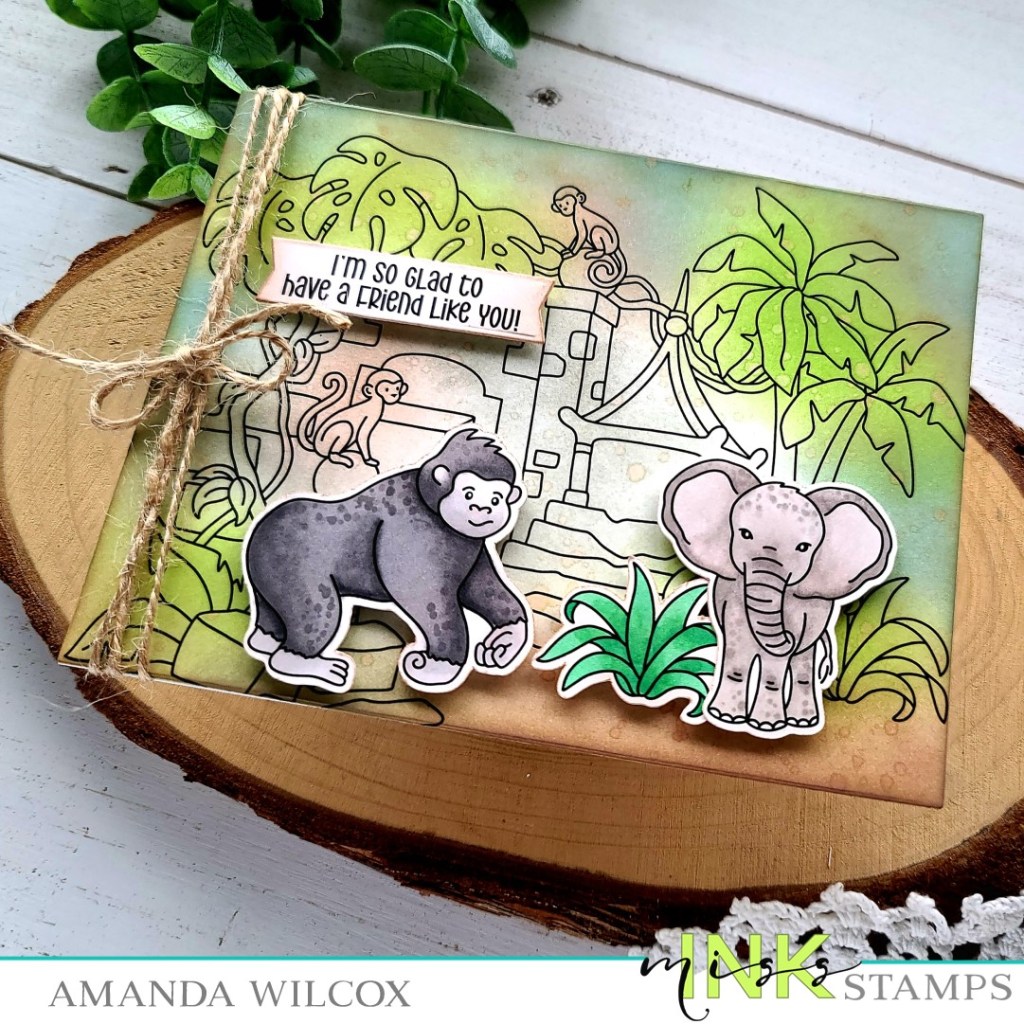
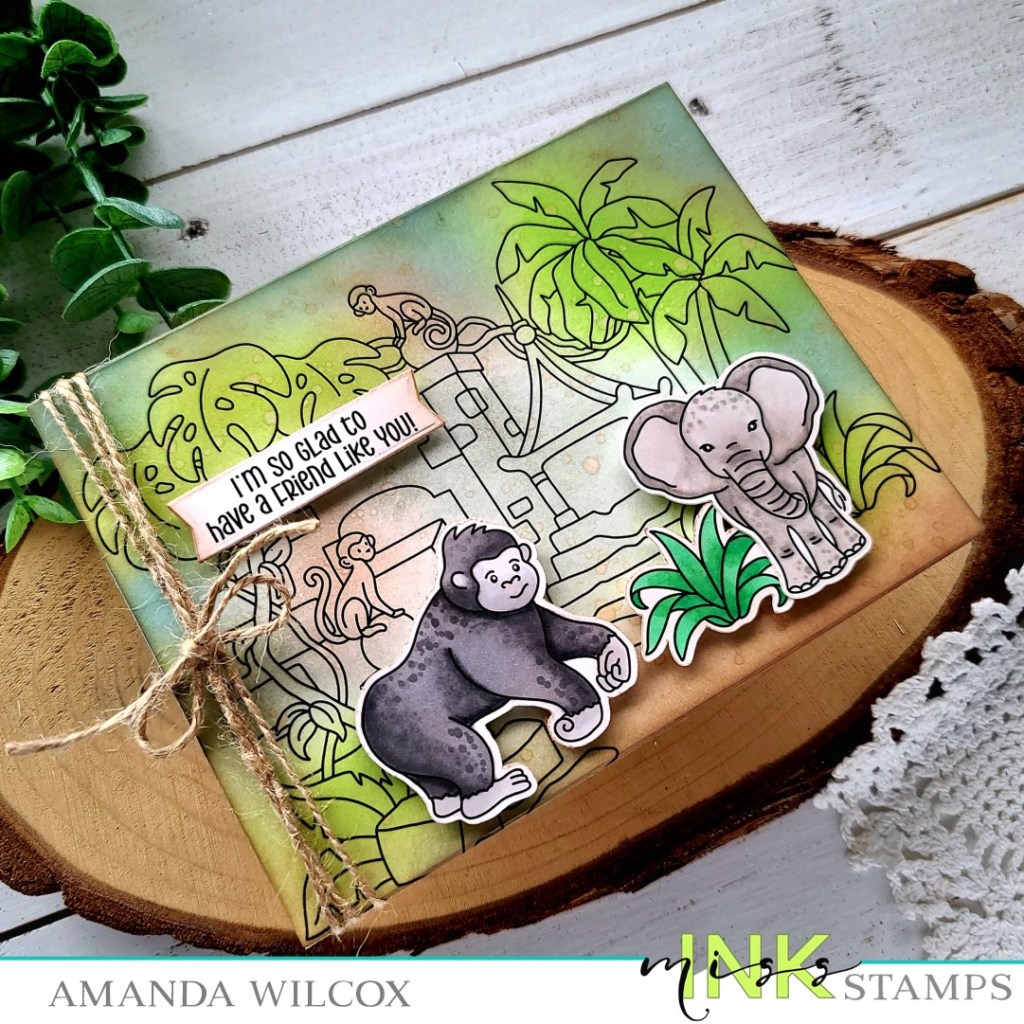
Welcome everyone! Today I have an atypical style card to share with you featuring more from the newest Miss Ink Stamps release. These critters and all the fun supporting images just don’t get old and I haven’t been able to create with everything yet so I’m not even close to done!

Last weekend I was out of town for my daughter’s State Championship competition for dance. Thinking ahead and knowing I would have lots of down time while the team prepared I stamped some images and packed my Zig Clean Color Real Brush Markers with me. Typically I reach for copics but they don’t travel as well as my Zig collection. I had some wonderfully relaxing time watercoloring and created my card once I was home.

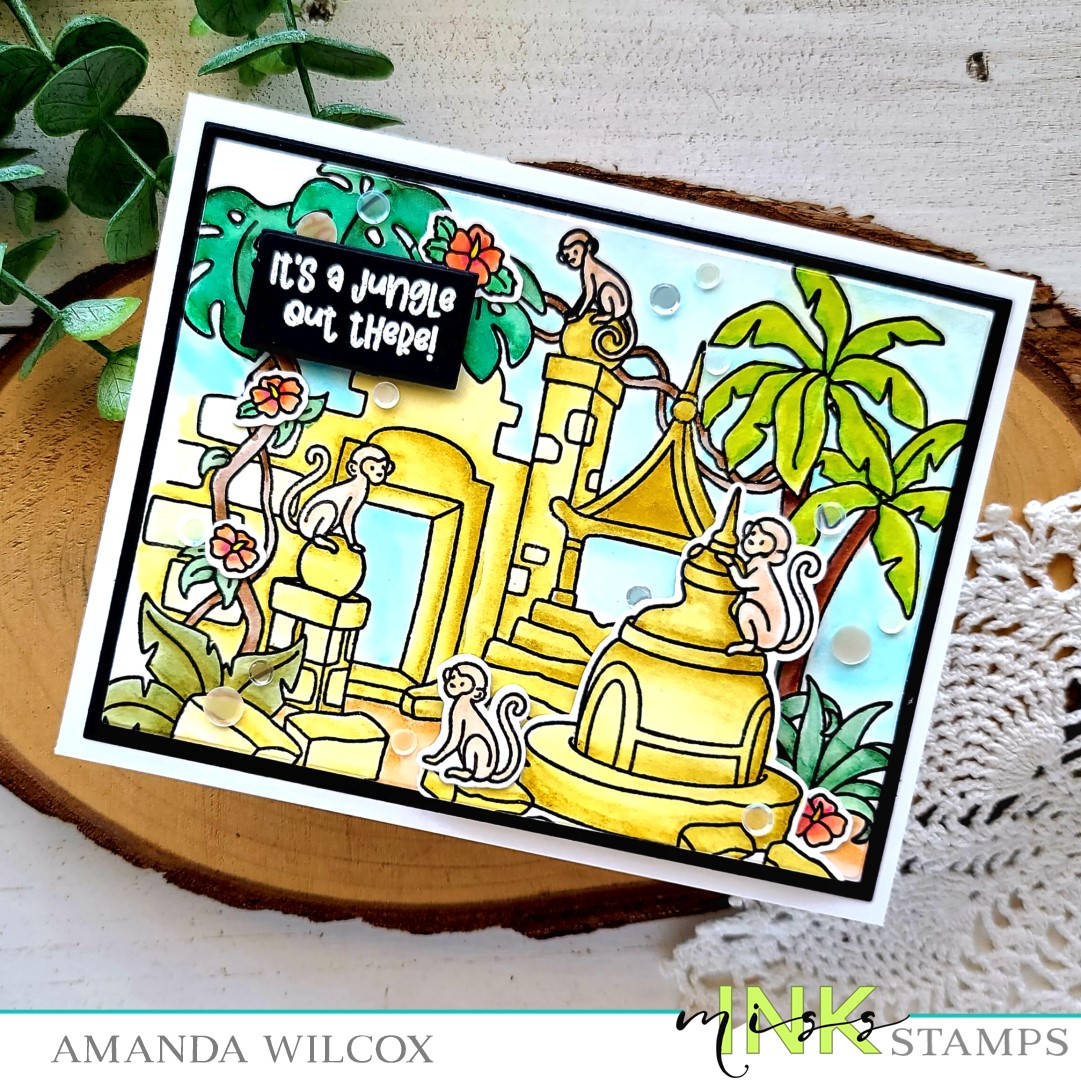
I chose images from Jungle Ruins, Go Bananas and Pretty Bird. Not everything made it on today’s card but now I have a little tray full of images ready to create with this weekend when I hit the craft room again!

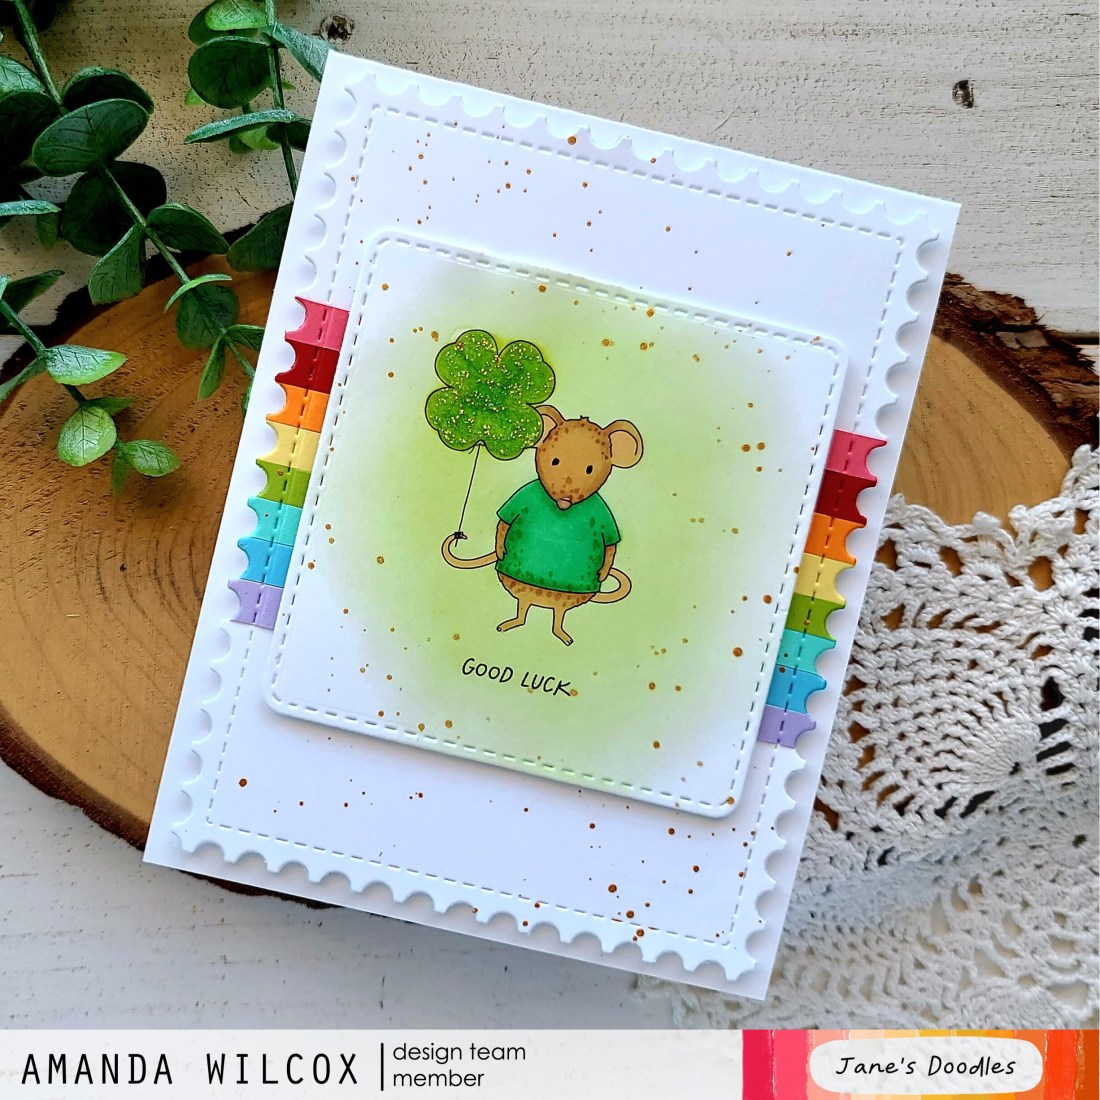
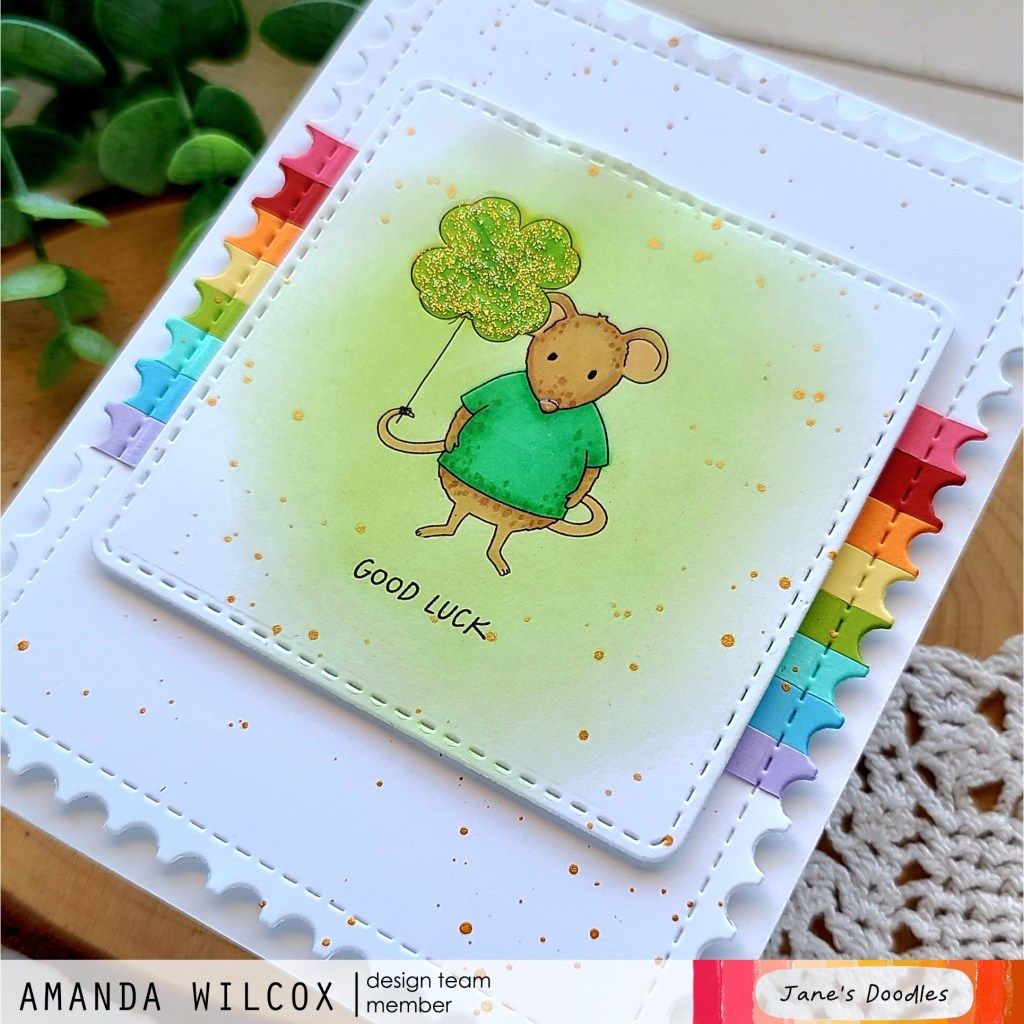
To create this card, I cut the background image down with a Pink & Main Layered Rectangle die and cut a black panel one size larger. I adhered the black panel to a white card base and popped the image panel up with foam tape. Then I used the same rectangle die to cut the edge of the ruins image off so they matched and popped it up with foam squares. I also added one extra monkey with foam squares too.

I stamped and heat embossed a sentiment on black cardstock and used the same rectangle dies to cut it out. I adhered it with foam squares to help it stand out. Then, for finishing touches I glued down a scattering of confetti embellishments from Trinity Stamps across the design.

Once that was all finished I thought it was lacking so I went back to my pre-colored images and found the flowers from Pretty Bird and thought that bright red/orange pop of color was perfect! So I used liquid glue and adhered those in various places around the scene too.

I hope you’re enjoying inspiration from this fantastic release!

Products used today:
Jungle Ruins stamps
Pretty Bird stamps
Pink & Main Layered Rectangle dies
Trinity Stamps Glass Slipper confetti mix
Foam tape and squares
Liquid glue

I appreciate you sharing your time with me. Have a fabulous day!

Newton’s Nook – Hoppy Greetings

Hello friends! Today I’m over on the Newton’s Nook blog sharing this adorable Easter card I created with a fun new background idea that popped into my head.

The whole card started with those fun circles. They are the negative piece that comes from the Slimline Frames & Portholes die. Every time I used that set, I keep the circles in a sleeve if I’m not using them on the current card. I happened to have a stash of them and though this would be a fun way to use them.

I stamped each one with the Spring Roundabout stamp set in different areas so each one is a little different. Using the same ink I stamped the image I inked up the edges with a blending brush so they weren’t stark white. Then I arranged them on the patterned paper with foam squares and trimmed off the excess.

Next, I stamped and colored images from Hoppy Greetings with my copic markers and cut them out with the coordinating dies. I added the images with foam squares so the dimension would help the bunny scene stand out from the background a little and moved on to finishing touches.

I kept those pretty simple too. Just adding glossy accents the the bunny’s nose and toe beans, flower center and parts of the Easter eggs.

This was a very fun card to create and it was also really cool to use up something that I’ve been saving to for a while too.

Products used:
Hoppy Greetings stamps and dies
Slimline Frames & Portholes dies
Spring Roundabout stamps
Springtime paper pad
Foam squares
Glossy accents

I appreciate you sharing your time with me. Have a fabulous day!

Trinity Stamps – With Sympathy

Hello everyone. Today I have a quick and easy way to create cards that you need in a flash. I was asked to create a sympathy card and didn’t have a lot of time last night. I pulled out this fabulous Trinity Stamps set called With Sympathy. It’s got a great floral image and wonderful supporting sentiments for a variety of situations.

For this card, I started with an oversized piece of watercolor paper. I scribbled some Tombow markers on a clear block, spritzed it with water and smooshed my paper into the block. After every time I smooshed the paper into the water, I used my heat gun to dry it. That’s how you get all of the different splotches and layers. If you leave it wet and keep smooshing, it all mixes together and you get one color.

Once the panel was dry and my laminator was heated up, I ran the panel through there to help flatten it back out. Then I used the largest Embossed Edge Rectangle Stack die to cut the panel down to A2 size. Next, I chose 2 smaller rectangles and used them to cut a dark gray frame. Then, using the frame as a guide, I stamped and heat embossed the floral image with black embossing powder. I used liquid glue to adhere my frame and placed acrylic blocks on top while I stamped my sentiment to help it all dry flat.

The dies for this set also cut the large sentiment out perfectly. I love this! I used liquid glue to adhere that down and also added a scattering of confetti sequins across the design.

Products used today:
With Sympathy stamps and dies
Embossed Edge Rectangle Stack dies
Confetti Mix embellishments
Bearly Art liquid glue

I appreciate you sharing your time with me. Have a fabulous day!

MFT Stamps – Smile Card Duo

Hi there! I hope your weekend is off to a great start! Today I have a pair of cards to share with you that were inspired by one of the MFT Stamps designers last week. I couldn’t get the design out of my head and when I started creating I immediately had 2 ideas that I wanted to try.

The card on the left is the one that was inspired by Carly. Click HERE to see her card. Mine is a tad different but I’m not much for directly copying designs. Things just morph on their own as I start creating.

As soon as I die cut the word from the white panel for the first card, I had the idea to use it on another card so I had no waste. I love how they both turned out.

On this first card, I cut a white panel down to 4×5.25 inches and die cut the word using the Big Smile die. This has since sold out but you could do the same thing with any alphabet dies you may have, or even change it up completely for a different word.

Using the die cut panel as a guide I taped off the edge of my card base and used blending brushes to ink up a light rainbow where it will show through. Then I added foam tape to the back of the panel and popped it in place.

I stamped and heat embossed a small sentiment on black cardstock and cut it out with a banner die from the Trinity Stamps 4-Bar Card die set. I stamped and colored the koala from Weather With You and cut it out with the coordinating dies too. The banner and koala are adhered with liquid glue directly to the card front.

I finished things off with black glaze pen the the eyes, glossy accents to the nose and a scattering of pink clay hearts from the Twiddler’s Nook Sweethearts embellishment mix.

I think this is such a sweet card! It would be great to add a birthday message to the inside or maybe a congratulations too. It’s so versatile.

After making that first card, I had the letters from cutting the window and I thought it would be fun to do the idea in reverse by stacking the letters for dimension here instead of creating a window. So, I pulled out white scraps and cut the word 4 more times and adhered the layers together with liquid glue.

I cut another panel down to 4×5.25 inches and stamped it in a light gray ink with the All Lined Up Diagonally background stamp. I changed out the critter for the bunny in the same Weather With You stamp set. Popping it up with foam squares before adding another heat embossed sentiment across “smile.” I forgot to mention earlier, the small heat embossed sentiments are from a Pretty Pink Posh set called Let’s Party. I thought they fit perfectly.

This panel is popped up on a white card base with foam tape and the finishing touches are the same. This time I chose red hearts from the same embellishment mix for a little pop of bright on a neutral colored card and I think that is so fun and eye catching.

I love these critters so much and any excuse to ink them up is a good one to me!

Products used today:
Weather With You stamps and dies
Big Smile die
All Lined Up Diagonally background stamp
Trinity Stamps 4-Bar Card dies
Pretty Pink Posh Let’s Party stamps
Twiddler’s Nook Sweethearts embellishments
Glossy accents
Bearly Art liquid glue
Foam squares
Foam tape

I appreciate you sharing your time with me. Have a fabulous day!

Heffy Doodle – Hip Hip Hooray Shaker Tag

Well, hello again! Today I’m back with a super fun and snazzy shaker tag to share with you. I’ve been creating a fun, usually punny, tag for my daughter for each dance team competition she’s performed at. Today is State Championships and the last tag for this season.

For this one, I chose images from Bed Heads and Popping By from Heffy Doodle, along with their Tag Along die set. My sentiment is from the Wavy Banner Sentiments and coordinating dies.

To create my tag, I started by laying the images on the tag frame die to see what I could get to fit. I decided that the three cute critters and a couple of balloon bundles would be just perfect. So, I stamped everything out and colored them with my copic markers. Then, I used the coordinating dies to cut everything out and used liquid glue to adhere them together.

Next, I created my shaker tag using the solid die to cut 2 backing pieces from white cardstock and one more from acetate for my window. Then I cut the frame from silver glitter cardstock once and white cardstock six times. I added the silver frame to the acetate and the other white frames to one of the white solid backing pieces. I filled the shaker well with embellishments from my shop called Wishing on Rainbow Stars and sealed it up.

I added my images to the front of the tag with liquid glue. Then stamped and die cut a sentiment and banner from the Wavy Banner Sentiments set. I also added this with liquid glue.

For finishing touches I added black glaze pen to all of their eyes and glossy accents to all of their noses. Then I added a little sparkle to the balloons with Wink of Stella glitter brush pen, tied a ribbon through the hole and it’s ready for our message on the back and to be delivered to her with a small gift.

Products used today:
Popping By stamps and dies
Bed Heads stamps and dies
Wavy Banner Sentiments stamps and dies
Tag Along dies
Wishing on Rainbow Stars embellishments
Bearly Art liquid glue
Wink of Stella glitter brush pen

I appreciate you sharing your time with me. Have a fabulous day!

Pink & Main – Make a Wish

Happy Friday everyone!!! I’m over on the Pink & Main blog today sharing a SUPER fun and TOTALLY adorable card featuring the new release that is available in the shop now! This release has me squealing with delight every time I look at it. You’re absolutely going to love every piece of it. It’s amazing!!! Click HERE if you want to just go shop now. Or keep scrolling for today’s card fun! No judging. LOL!

I started my card by choosing two of the images from Party Animal that complimented each other, stamped them and got to coloring with my copics. I used the coordinating dies to cut them out. Then I chose 2 of the striped papers from the Year Round Dots and Stripes paper pad, cut one for my card background and another with the Double Stitched Dome die.

For a little added texture, I used the Grid embossing folder on a white panel and then trimmed it down until I liked the amount of stiped paper showing on the size. I added the green stripes to a card base, popped the embossed panel up with foam tape, then glued the arch to that with EZ Squeeze liquid glue. I popped my images up with foam squares next.

I chose a sentiment from Party Animal, stamped it and cut it out with a Large Sentiment Strip die. This is also popped up with foam squares. For finishing touches I started with a scattering of enamel dots across the design.

But this is a birthday card, so I couldn’t leave these cute images alone! I added glossy accents to the turtle’s shell and panda’s nose. Then I went nuts with the unicorn stickles on the hats, cake and gifts! I think it adds so much and makes this such a happy and fun card!

Products used today:
Party Animal stamps and dies
Grid embossing folder
Large Sentiment Strip dies
Double Stitched Dome dies
Year Round Dots and Stripes paper pad
Enamel Dots
EZ Squeeze liquid glue
Foam tape and squares
Glossy accents
Stickles – unicorn

Thanks for stopping by! Be sure to check out the new release! I appreciate you sharing your time with me. Have a fabulous day!

Jane’s Doodles – Good Luck

Happy St. Patrick’s Day everyone! I’m like some minuscule amount of Irish and my husband is a bit more but, let’s be real, today we’re all Irish! Haha. We are a firm believer in wearing green, rainbows, pots of gold and all the luck today! So I really wanted to pop in a share a card from me to all of you to celebrate today!

I’ve used the Jane’s Doodles Good Luck digital stamp set and colored him with my copic markers. Then I took a blending brush and some light green ink and inked up a shadow all around him. I splattered the panel with gold watercolor and set it aside to dry.

I cut a rainbow of strips from cardstock and glued them to an A2 panel of white cardstock. I die cut the whole thing with the largest Newton’s Nook Framework die and decided to continue the gold watercolor so I splattered this too.

Once it was all dry, I added foam tape to both panels and adhered them to a white card base. For finishing touches I added unicorn Stickles to the entire balloon because I was all about the sparkly on this card today! Then I added black glaze pen to the mouse’s eyes and glossy accents to his nose.

Products used today:
Jane’s Doodles Good Luck digital stamps
Newton’s Nook Framework dies
Newton’s Nook Frames Squared dies
Glossy accents
Stickles – unicorn

Thanks so much for stopping by. I appreciate you sharing your time with me. Have a fabulous day!

Miss Ink Stamps – Jungle Kids Scene Card

Welcome everyone! Thanks for stopping by. Today I have a scene card featuring a couple of newly release sets from Miss Ink Stamps. These new sets are just so fun to create with. I love sitting and coloring all the images and just playing out little stories in my head.

Today I stamped a couple of images from Jungle Kids and colored them with my copic markers. I used the scan-n-cut to cut them out and set them aside. I stamped the main scene image from Jungle Ruins and used blending brushes and dye ink to fill in the scene.

Once I had the main color laid down I went over the whole thing with some tea dye distress ink to give it a dirty, rustic feel…more jungle-like to me. I spritzed the panel with water and flicked watered down tea dye ink on it too. However, how my images have a stark white edge that looks funny so I took the blending tool and just inked them up too. It’s perfect and makes them fit the scene so well!

I chose a sentiment from Jungle Friends, stamped it and cut it out with a banner die before inking it up to match. Then I added foam squares to my images and sentiment and popped them all in place. I created a side folding card base and adhered my panel to the front. Then I tied twine around the left side and tied it in a bow. I seriously love how this finishes today’s card off! So perfect!

Products used today:
Jungle Kids stamps
Jungle Friends stamps
Jungle Ruins stamps

Blending brushes
Distress Ink – tea dye
Foam squares
Pink & Main Large Sentiment Strip dies

I appreciate you sharing your time with me. Have a fabulous day!

Newton’s Nook – March Release Day 3

This month’s release is a little smaller than some so today is the final day of release reveals for the Newton’s Nook March Release! Today we have 2 more adorable stamp an die sets to share with you.

Newton’s Blooms stamps and dies

Tulips stamps and dies

I have one card featuring both of these new sets to share with you. Let’s start with the Newton’s Blooms cuteness, shall we?

For this card, I stamped the images plus an extra butterfly and colored them with my copic markers. I used the coordinating dies to cut them out and set them aside to get inky on my background.

For that panel, I blended tumbled glass and salty ocean distress oxide inks on a white A2 size panel. I splattered it with water and flicked pearl watercolor all over it for some fun shimmer in the light. After it was dry, I added it to a white card base.

Next, I trimmed a couple pieces of patterned paper from the new Springtime paper pad and added them to the card base with foam tape. Finally, I added my images with a combination of foam squares and liquid glue. I placed the whole card in my MISTI and stamped the sentiment above those cute kitties and switched over to finishing touches.

I added glossy accents to all the flower centers, kitty noses and ladybug dots. Then I added unicorn Stickles to the butterfly and bee wings and this adorable card is all finished!

Sticking to my usual MO of getting inky and messy, I followed the same trend with my background for the beautiful new Tulips stamp set too.

This time I inked peacock feathers and cracked pistachio at an angle fading out to nothing. Then I flicked watered down peacock feathers ink and gold watercolor on the whole panel and let it dry. After that, I taped down the Raindrops stencil and spread white glitz glitter gel through it fading that to nothing the same way I did the ink.

I stamped and colored both images from the set with my copic markers and cut them out with the coordinating dies. Next, I die cut the ticket shape from the Framework die set and heat embossed a sentiment in white. I added foam squares to everything and adhered it in place.

For finishing touches on this card, I added a pink clay heart by the sentiment and a little glossy accents on the butterfly wings.

Would you like to win the “Tulips” or the “Newton’s Blooms” Stamp Set? We will choose ONE lucky winner for each stamp set!

Here’s how to win: Comment on the NND blog and Design Team blogs (see list below)! The winner will be chosen at random from the collective reveal posts. Make sure to check out each of their blogs and comment for your chance to win. You will not know which blog has been chosen so the more you comment on the better your chances are of winning! You have until Wednesday March 16th at 9pm ET to comment  — winners will be announced on the blog post on Thursday March 17th. 

Check out all the awesome Design Team Blogs below to enter:

Newton’s Nook Designs
Donna Idlet
Ellen Haxelmans
Tina Herbeck
Larissa Heskett
Samantha Mann
Zsofia Molnar
Farhana Sarker
Tatiana Trafimovich
Amanda Wilcox

Newton’s Nook – March Release Day 2

Chugging along with the wonderful Newton’s Nook release reveals. Day 2 brings us two new stamp and die sets plus a stencil! They are SO PERFECT together too!!! I had a blast creating today’s cards.

Welcome New Cat stamps and dies

Welcome New Dog stamps and dies

Petite Paw Prints stencil

These new sets are going to come in handy and be so fun to create with! First let’s have a look at the card I created using the Welcome New Cat stamp set.

I had a layout in mind so I stamped out my images, making sure to stamp a couple extra mice, and colored them all with my copic markers. I used the coordinating dies to cut them out and set them aside to get a little inky.

I pulled out the Slimline Frames & Portholes die set, cut the scalloped rectangle from yellow cardstock and the porthole panel from white. I inked up the white panel with the new petite paw prints stencil in a diagonal rainbow using my blending brushes and some dye inks from my stash. Then I inked up the edges of the yellow panel with yellow dye ink and splattered some of the same watered down ink all over for added texture.

To assemble my card, I added the yellow panel to a white slimline card base with foam tape and the rainbow panel to that the same way. This is when I placed the card in my MISTI and stamped the sentiment before adding the images with foam squares and liquid glue.

For finishing touches I added black glaze pen to the kitten and mouse eyes and glossy accents all around the images. For a little extra interest I add white gel pen highlights to some of the images too.

For the Welcome New Dog set, I just had to create a full scene with these images. They are just too cute and I thought it would be extra fun to do it using the new Oval Frames dies.

I stamped my images and colored them with copics, using the coordinating dies to cut them all out. Then I cut a couple of stitched ovals using the new die set and inked them up for sky and grass before cutting the grass edge using the Land Borders dies. I also cut a cute little picket fence and adhered my layers to create my scene. I added the images with a combo of liquid glue and foam squares.

For the background, I inked up a white panel with distress oxide ink in ripe persimmon, carved pumpkin and spiced marmalade. I spritzed it with water and splattered it with white acrylic paint. Once that was dry I spread Thermoweb transfer gel blanco through the new petite paw print stencil and let it dry. While it was drying I heated up my laminator and ran it through with the new midnight blue deco foil flock transfer sheets. Finally, I cut the whole panel with the largest Framework die and moved on to adhering all my layers.

I glued a brown panel to a white card base and popped the paw print panel up with foam tape. Then I added the oval scene with foam tape and die cut a banner from the banner trio die set to stamp my sentiment. This sentiment is a little short so I thought it would be fun to add the paw image along with it instead of the white space or shortening the banner. I colored it with dark blue copics to tie in the flocking and added this with foam squares and liquid glue.

For finishing touches I added white gel pen highlights to the images, black glaze pen to the puppy’s eyes and some glossy accents to the paw print, bone on the bowl and the puppy’s nose too!

Would you like to win the “Welcome New Cat” or the “Welcome New Dog” Stamp Set?
We will choose ONE lucky winner for each stamp set!

Here’s how to win: Comment on the NND blog and Design Team blogs (see list below)! The winner will be chosen at random from the collective reveal posts. Make sure to check out each of their blogs and comment for your chance to win. You will not know which blog has been chosen so the more you comment on the better your chances are of winning! You have until Wednesday March 16th at 9pm ET to comment  — winners will be announced on the blog post on Thursday March 17th. 

Check out all the awesome Design Team Blogs below to enter:

Newton’s Nook Designs
Donna Idlet
Ellen Haxelmans
Tina Herbeck
Larissa Heskett
Samantha Mann
Zsofia Molnar
Farhana Sarker
Tatiana Trafimovich
Amanda Wilcox