Blog

Coffee Loving Cardmakers – Double Pocket Card

Hey everyone! Today is Tuesday Tea over on the Coffee Loving Cardmakers. Today I’m bringing back an oldie but goodie folding technique called a double pocket card. I have made these in the past and filled the pockets with a variety of items – from double notes to the recipient to flower seed packets, Starbucks Via packets, gift cards, cash – lots of options! If you have other ideas, I would absolutely love for you to leave them in the comments below. Giving little gifts like this is a favorite of mine and I’m always looking to add things to the list.

To create my card base, I followed this tutorial from Splitcoast Stampers through step 7. Instead of folding the second layer over on the bottom pocket, I folded it back and actually created a regular card to go with my pockets.

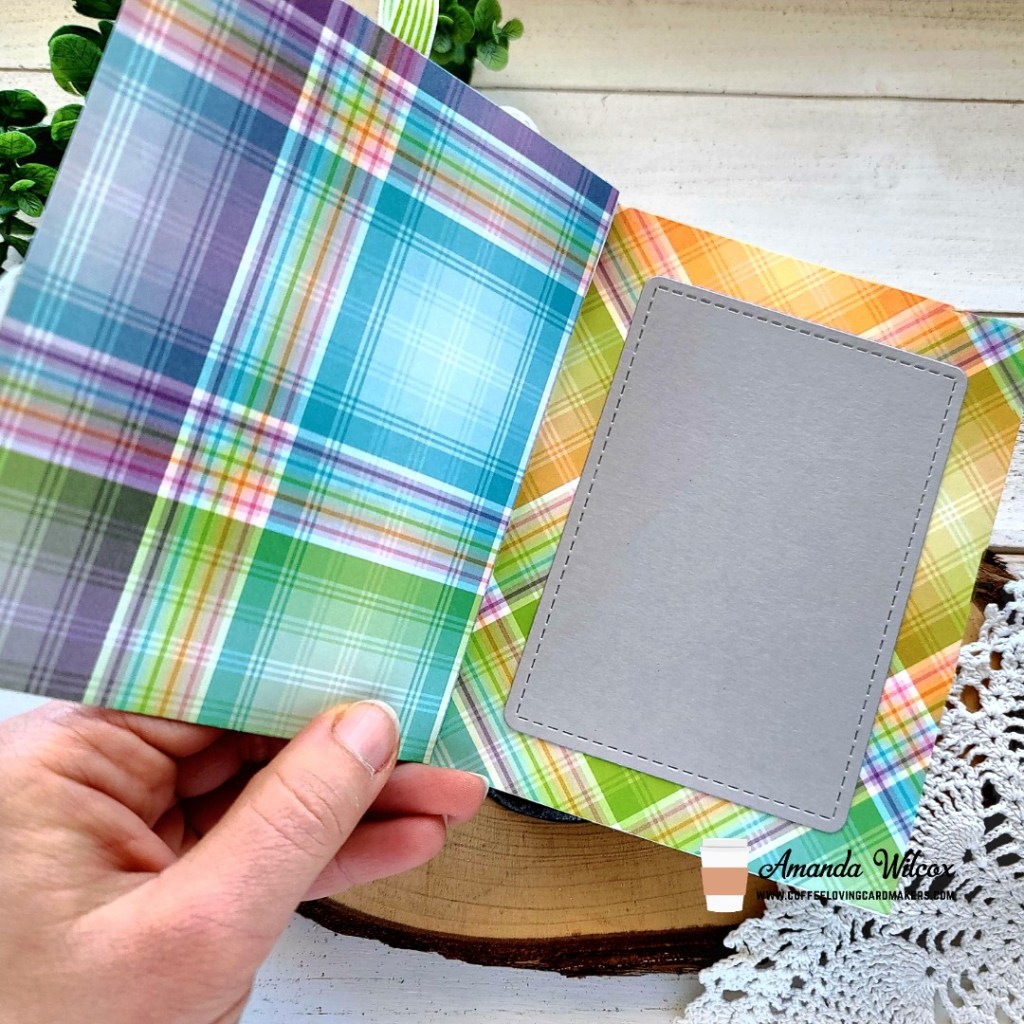
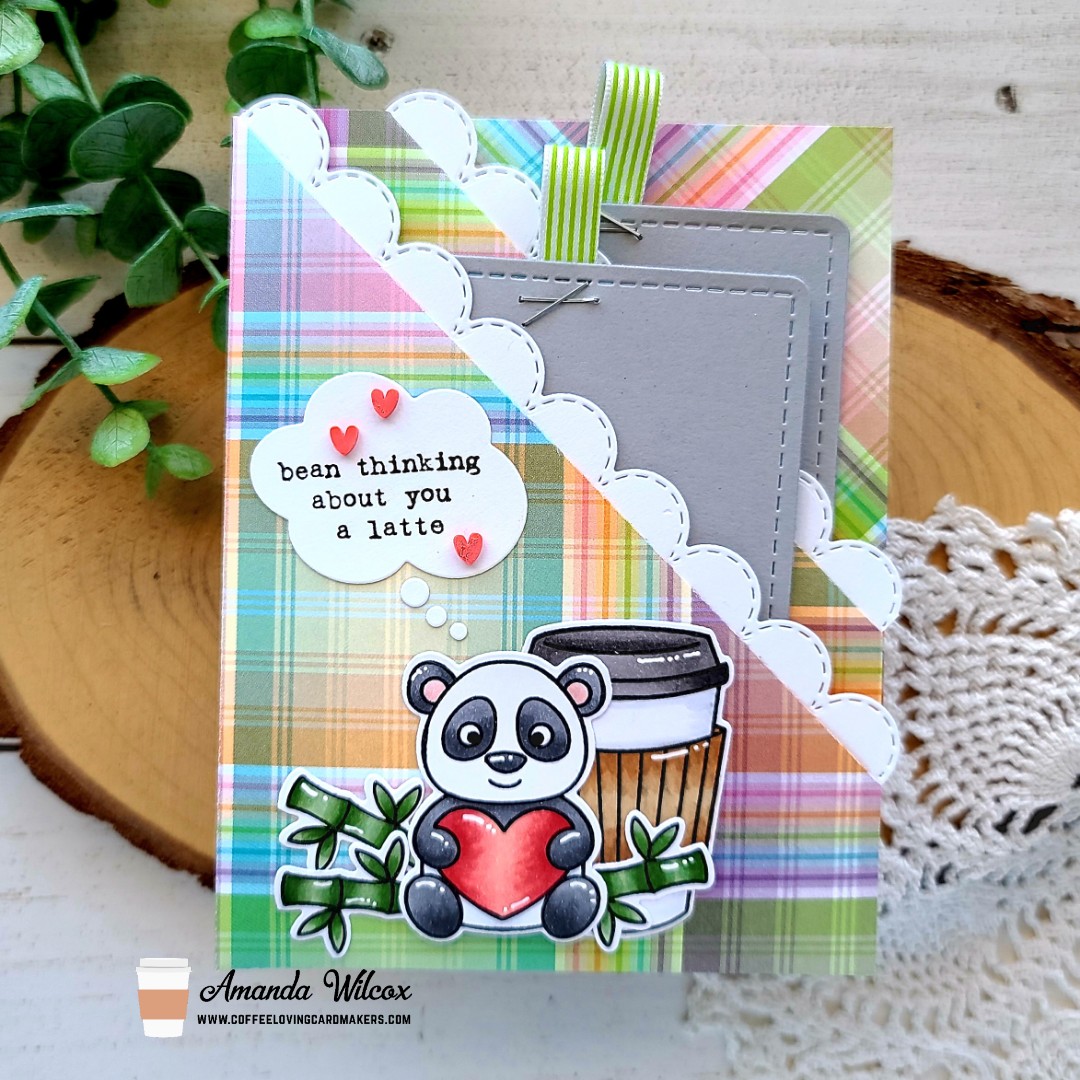
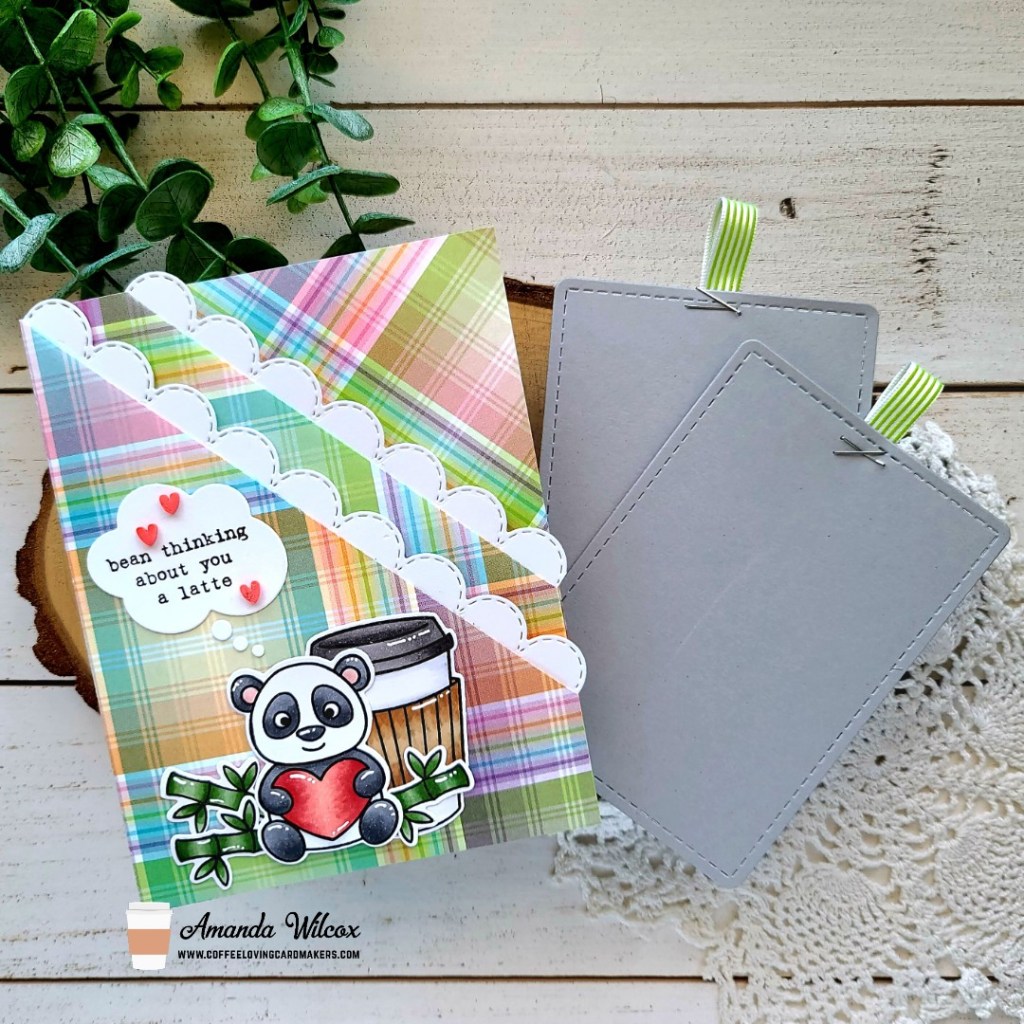
Here’s a look at the inside. I used a 12×12 rainbow plaid paper from Lawn Fawn for a fun and bright card base and my Newton’s Nook Frames & Flags dies for the stitched rounded rectangles for my inserts. The front inserts have ribbon stapled to the top which adds a little whimsy and makes them easy to pull out. This is where I will add either gift cards or probably Starbucks Via packets taped with cute washi tape.

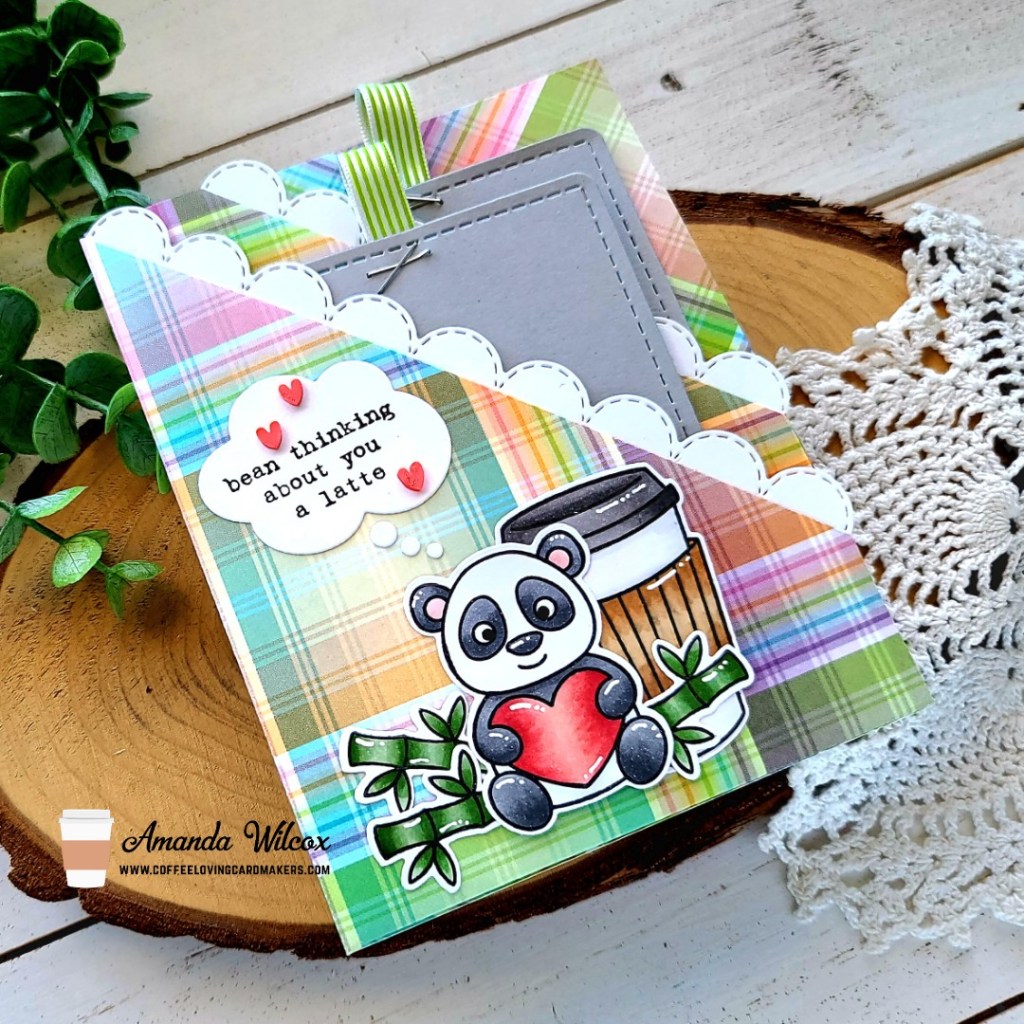
To decorate the front of my card, I used images from Pawsome Stamps Coffee Besties and Playful Pandas. They are colored with copic markers and cut out using the coordinating dies. My thought bubble is from Newton’s Nook and the sentiment today is a mini set from Impress Crafts. The scalloped edging on the pockets is a border die from Newton’s Nook too.

With all the folds and layers this card is a little thick on it’s own so my images are all adhered with liquid glue directly to the card front. Shocker, I know. I am quite addicted to my foam squares, we all know.

For finishing touches I added black glaze pen to the panda’s eyes and white gel pen highlights to all of the images. Then I glued a couple of clay hearts from Twiddler’s Nook Sweethearts embellishment mix and my card is all finished and ready for treats!

Products used today:
Pawsome Stamps Coffee Besties stamps and dies
Pawsome Stamps Playful Pandas stamps and dies
Newton’s Nook Speech Bubbles dies
Newton’s Nook Frames & Flags dies
Newton’s Nook Sky Borders dies
Twiddler’s Nook Sweethearts embellishments

I appreciate you sharing your time with me. Have a fabulous day!

Newton’s Nook – March Release Day 1

YIPPEE!!!! It’s the start of the Newton’s Nook March Release reveals and I’m so excited to share everything that I’ve created with you! Today we have a few new products to reveal so let’s not waste any time.

Best Mom Oval stamps and Oval Frames dies

Springtime Paper Pad

Isn’t this such an awesome start to the release?!? I just love all the possibilities with all of these products! I have one card to share with you today featuring all 3 products.

To start my card, I pulled out the plaid paper from the paper pad and used it as inspiration to color my Best Mom Oval image with my copic markers. Once that was finished, I used the new Oval Frames dies to cut it out.

I trimmed the plaid paper to A2 size and adhered it to a white card base. Then I cut a strip of the fun cloud paper and edged it with the teal polka dot print before adhering it next. Then I popped the oval up with foam tape. To round out the design I thought it would be fun to add the “MOM” to a banner and pop it up too. This banner came from the Frames & Flags die set.

For finishing touches I added some opal droplet embellishments from my stash around the design. Then I added unicorn Stickles to the word “best” and the little dots floating around the red flowers. I added glossy accents the centers of all the flowers and my card is finished.

Would you like to win the “Best Mom Oval” Stamp Set? This stamp set will be given away to ONE lucky winner!

Here’s how to win: Comment on the NND blog and Design Team blogs (see list below)! The winner will be chosen at random from the collective reveal posts. Make sure to check out each of their blogs and comment for your chance to win. You will not know which blog has been chosen so the more you comment on the better your chances are of winning! You have until Wednesday March 16th at 9pm ET to comment  — winners will be announced on the blog post on Thursday March 17th. 

Check out all the awesome Design Team Blogs below to enter:

Newton’s Nook Designs
Donna Idlet
Ellen Haxelmans
Tina Herbeck
Larissa Heskett
Samantha Mann
Zsofia Molnar
Farhana Sarker
Tatiana Trafimovich
Amanda Wilcox

Jane’s Doodles – Butterfly Shadow Box Card

Hello again everyone! I’m back with a bright, springy shadow box card featuring the Doodle Butterflies digital stamps from Jane’s Doodles. I have been on a huge interactive card kick lately so I knew I wanted to put these sweet butterflies in a shadow box card for sure. I love how they look flying around in there.

First, I printed my butterflies and chose a color palette from my copic markers. I randomly colored them all in and cut them out with the scan-n-cut. Then I attached each butterfly to an acetate pick (about 1/4″ wide) and set them aside while I created my shadow box.

Today’s shadow box is created using the Heffy Doodle Big Shadow Box die set. I cut all the elements from heavy white cardstock. Then I used my Newton’s Nook Clouds stencil and a blending brush to ink some clouds on all sides of my box, inside and out. Then I used the ink left in my brush to add a little texture to the inserts that the butterflies will be adhered to. I used scrappy tape to adhere the box together and zots glue dots to add my butterflies in place with the exception of 2 that I glued to the back of the box with liquid glue.

I cut the sentiment with a stitched banner from Newton’s Nook and adhered it to the front of the box and this card is all finished! Isn’t it just so bright and make you ready for spring? I personally am ready for summer and warm weather but I’ll take some spring sunshine when I can get it for now. Haha.

Products used:
Jane’s Doodles – Doodle Butterflies digital stamps
Heffy Doodle Big Shadow Box dies
Newton’s Nook Frames & Flags dies
Newton’s Nook Clouds stencil
Blending brush
Zots glue dots
Scrappy tape – 1/4 inch and 1/8 inch

I appreciate you sharing your time with me. Have a fabulous day!

Pink & Main – Happy Easter

Hello friends! It’s time for your Friday installment of Pink & Main inspiration and today I’m sharing a super fun Easter card with you! The last release was packed full of spring and Easter goodies and I’m still having so much fun creating with it all!

I started by stamping images from Easter Greetings and colored them with my copic markers. I used the coordinating dies to cut them out and arranged everything on my card front to make sure that the big Happy Easter word dies would fit like I wanted. Once I decided it would work, I cut the words from white cardstock 4 times and adhered them together with EZ Squeeze liquid glue. I cut the shadow from vellum and used tape runner to adhere it because I find that liquid glue warps the vellum.

For my background, I chose some teal cardstock and cut it out with the largest Layered A2 Rectangle die, then I splattered it with watered down dark teal ink for a little texture. I cut the Basket cover die from purple cardstock and adhered the two together. I added them to a white card base and started adding the other elements.

The word dies are added with tape runner and the images are all added with foam squares. I did use a little liquid glue to add the small items to my Easter basket before the foam squares. I feel like it helps things stay put.

Moving on to finishing touches, I added glossy accents to parts of the eggs, critters eyes, noses and beaks. I’m ready to switch gears to these super fun and happy spring colors. Aren’t you?

Products used today:
Easter Greetings stamps and dies
Happy Easter word dies
Basket cover die
EZ Squeeze liquid glue
Glossy accents
Foam squares
Tape runner

I appreciate you sharing your time with me. Have a fabulous day!

Miss Ink Stamps – You’re Mesmerizing!

Hello again everyone! I’m back with another bit of inspiration featuring the new Miss Ink Stamps release. Today I had fun with some layered stenciling and that fantastic snake from Jungle Friends!

I stamped and colored the snake with my copic markers. Then I used the scan-n-cut to cut him out. I stamped my sentiment which was totally the driving force behind today’s card. I just love it! Then I cut it out with a sentiment banner. I set those aside and moved on to my background.

I really wanted the snake to pop so I started with a back cardstock panel measuring 4×5.25 inches and taped the Ins & Outs Quatrefoil stencil in place. I inked it up with shabby shutters distress oxide ink and then taped the Lava Lamp stencil over the top and inked that layer up with forest moss distress oxide. I removed those stencils and clean them up. Then I switched to the frame from the quatrefoil set and spread Thermoweb grass green glitz glitter gel through that. I cleaned everything up and set the panel aside to dry.

Once it was dry, I added foam tape to the back and popped it on a white card base. Then I added foam squares and strips to my image and sentiment banner before adhering them in place too. For finishing touches I just added glossy accents to the snake’s eyes.

Isn’t this so fun and cool! These new sets are totally amazing and are making it really easy and fun to create masculine feeling cards. I have a hard time with that so I’m really excited!

Products used:
Jungle Friends stamps
Ins & Outs Quatrefoil stencils
Lava Lamp stencil
Distress Oxide Ink – forest moss, shabby shutters
Glitz Glitter Gel – grass green
Stencil pal
Foam squares and strips
Glossy accents
Trinity Stamps 4-Bar Card dies

I appreciate you sharing your time with me. Have a fabulous day!

Miss Ink Stamps – Release Day | Jungle Kids Interactive Card

Hello crafty friends! Today is release day for Miss Ink Stamps and I’m super excited to have a really fun interactive card to share with you. I am over the moon for this whole release and can’t wait to see what everyone creates with it!

To start my card, I stamped the images from Jungle Kids and colored them with my copic markers. Then I used the scan-n-cut to cut them all out. Next, I stamped my sentiment in two parts and cut them out with stitched banners.

To decorate my background, I die cut a scalloped mini slimline panel from Trinity Stamps and taped off the edge. I inked the center with tumbled glass distress oxide ink, then taped the Mouse Flower stencil over the top and inked it up with some blue dye inks and a blending brush. I faded it as I went down for added interest too.

To put my card together, I cut a hole in the top center to make room for my moving mechanism. I added foam tape to the back of the main panel and popped it on a kraft card base and added doubled-up foam circles to the hole I created. Next, I found a die that is essentially an “o” larger than my foam circles and cut it from white cardstock. I glued the vine to the bottom and slid the “o” over the foam circles. I removed the release paper from the foam circles and added the leaves over it and all around to hide the swinging mechanism. Before you add your leaves and such to the top, test out your foam square placement because this will also act as a stopper for your swinging from side-to-side.

Finally, I trimmed the sentiment banners and added them with foam squares too. I created a coordinating kraft mini slimline envelope and my card is all finished! Here’s a little GIF to show you the card in action. It’s super fun and easy to make!

Remember, it’s release day so head over to the Miss Ink Stamps shop and check it all out!

Products used today:
Jungle Kids stamps
Mouse Flower stencil
Trinity Stamps Mini Slimline Card and Envelope dies
Foam circles and squares

I appreciate you sharing your time with me. Have a fabulous day!

Miss Ink Stamps – New Release Sneak Peek | Jungle Friends

Hello again everyone! I’m popping in with a quick sneak peek of the upcoming Miss Ink Stamps release! OMG is it PACKED with so many amazing things! I can’t begin to tell you how excited I am to share it all with you.

Today I’ve got a card featuring the upcoming Jungle Friends and Jungle Ruins stamp sets. Isn’t this so amazing!?! I had so much fun creating this card! The images are so fun to color and I loved doing some simple ink blending on that awesome background image.

I used some Pink & Main dies to cut a frame and sentiment banner before adhering all the layers together. The images and banner are popped up on foam squares and I couldn’t resist a little glossy accents on those critter noses!

Head to Instagram and comment on each post on the Miss Ink Stamps page from Friday until Tuesday, when the release goes live, for a chance to win stamps from the new release!

I’ll be back Tuesday, release day, with a super amazing interactive card using another set from the release. You won’t want to miss it!

I appreciate you sharing your time with me. Have a fabulous day!

Ellen Hutson – May the Fork Be With You

Hello everyone! I’m so glad you stopped by. Today I’m sharing a second card that I created with the new Essentials by Ellen release. It’s so fun and totally cracks me up every time I see it. I love the sentiments in this new set. They are punny to the max and I just adore it all!

Once again you can see that I got nice and inky and boy did I have a blast doing it! The background sun panel is carved pumpkin to squeezed lemonade, the next hill is mowed lawn and lucky clover, the dirt field is gathered twigs and tea dye and the final grassy field is twisted citron and mowed lawn. Phew! That’s a lot of inking but they just look so awesome all layered up and I love it! I spritzed each panel with water and blotted them dry before die cutting the layers with different Lawn Fawn border dies. I’ll list them all in the products below.

I was so excited to create a farm scene that I jumped right in to stamping images from All Inside, Bear Ware and Bear Ware Dress Up. I colored them all with my copic markers and used coordinating dies to cut it all out. I dressed my bear using liquid glue to adhere the elements to him. TOO CUTE!!!

I added all of my elements to the scene with liquid glue with the exception of my sweet bear, the buzzing bee at the top and my sentiment banner.

For finishing touches I added glossy accents to various parts of the images like the bear’s nose, watering can stripe and pitchfork handle. I added black glaze pen to bear’s eyes and unicorn Stickles to the bee’s wings and flowers in the grass.

I can hardly stand the cuteness! It’s like having super adorable bear paper dolls to play with and dress up however you feel like. Haha. It’s so fun!

Products used today:
All Inside stamps and dies
Bear Ware stamps and dies
Bear Ware Dress Up stamps and dies
Bear Ware Dress Up Sentiments stamps
Lawn Fawn Grassy Border die
Lawn Fawn Stitched Hillside Border dies
Lawn Fawn Simple Stitched Hillside Border dies
Pink & Main Sentiment Strip dies
Distress Oxide Ink – squeeze lemonade, carved pumpkin, lucky clover, mowed lawn, twisted citron, tea dye, gathered twigs
Foam squares
Stickles – unicorn
Glossy accents
Liquid glue

I appreciate you sharing your time with me. Have a fabulous day!

Essentials By Ellen – New Release Bear Ware Fun

Hooray!!! It’s release day for Ellen Hutson’s Essentials by Ellen line and they are adding to my favorite line – Bear Ware! I’m obsessed with this bear in all his cute forms and could not wait to play with these new accessories!

I pulled bears from Bear Ware Grand Tour and Sweet surprises and colored them with my copic markers. I used the coordinating dies to cut them out and decided on all the accessories from the new set I was going to use. After playing around a bit I landed on the flight captain’s hat, necktie and airplane. Then I went fishing in Grand Tour for the fun suitcase to finish my little scene off. I colored all of those images the same way and die cut them out as well.

Knowing that I wanted to use the super fun Planet Surface die set, I got out my distress oxide inks and inked up a couple scrap strips of white cardstock. I used mowed lawn and twisted citron for my land pieces and salty ocean and broken china for the water. I left these un-distressed so they really stood apart from my sky. For that panel I inked up blueprint sketch and tumbled glass for a vibrant gradient. I spritzed that panel with water and flicked watered down blueprint sketch ink on it too.

I used liquid glue to adhere my planet and lined the back with foam tape. I adhered it to the sky panel and then popped that up on a white card base. I added foam squares to my images and added them to my scene next.

Then I stamped and heat embossed a sentiment from Bear Ware Dress Up Sentiments, trimmed it into as trip with my scissors and added it with a foam strip too.

For finishing touches, I added white gel pen highlights to the images, black glaze pen to the eyes and pops of glossy accents all around too.

I hope you enjoyed today’s card and will stop by to check out the new release from Essentials by Ellen.

Products used today:
Bear Ware Dress Up 1 stamps and dies
Bear Ware Dress Up 2 stamps and dies
Bear Ware Dress Up Sentiments stamps
Bear Ware Grand Tour stamps and dies
Sweet Surprises stamps and dies
Planet Surface dies
Glossy accents
Distress Oxide Ink – twisted citron, mowed lawn, blueprint sketch, tumbled glass, salty ocean, broken china
Foam tape and squares
Copic markers

I appreciate you sharing your time with me. Have a fabulous day!

Pink & Main – You’re the Gold

Happy Friday friends! Today I’m over on the Pink & Main blog with a fun and festive card perfect for a friend at St. Patrick’s Day. I just adore this Lucky Leprechaun set. It’s super cute and I’ve never had a St. Patty’s Day stamp set to play with before so I was definitely inking this up before it gets here and I miss my chance.

For this card, I die cut the main image from Rainbow Friend and then used my blending brushes and dye inks to ink up the various pieces. Then I used the Layered Circles dies to cut a circle just smaller than the scallop edge so I could adhere all the pieces together. Once that was complete I decided on this cute leprechaun and his pot of gold from Lucky Leprechaun. I stamped and colored him with copic markers before using the coordinating dies to cut him out.

Next, I chose 2 patterned papers from the Butterfly Kisses pad. I cut the stripes to A2 size and adhered it to a white card base. Then I cut the bokeh green piece with a Stitched Arches die. Using the rainbow and leprechaun as guides, I stamped my sentiment on the arch and then popped it up with foam tape on the stripes.

Then I popped the rainbow up with foam tape next and finally used a combo of liquid glue and foam tape to add the leprechaun. Then I moved on to finishing touches.

I actually kept those pretty simple today by just adding glossy accents to the band on the hat, unicorn Stickles to the clover in his hat and the rays of the sun. Then I switched to pale gold Nuvo Crystal Drops for the gold in the pot for a change of pace.

Isn’t this card so much fun! I absolutely loved putting it together and can’t wait to send it out.

Products used:
Lucky Leprechaun stamps and dies
Rainbow Friend dies
Stitched Arches dies
Layered Circles dies
Butterfly Kisses paper pad
EZ Squeeze liquid glue
Ergonomic Blending Brushes
Foam tape
Glossy accents
Nuvo Crystal Drops – pale gold
Stickles- unicorn

I appreciate you sharing your time with me. Have a fabulous day!