Blog

Pink & Main – Heart Spotlight Cover Die Cards

Happy Friday everyone!!! I’m over on the Pink & Main blog today celebrating release day!!! Today I have a bundle of cards for you featuring the new heart burst cover plate and images from lots of the new stamp sets too!

The night that I got my release package I started cutting this cover plate out of every color of cardstock I could get my hands on. I had so many ideas and it was so much fun! So today I’ve narrowed it down to 4 cards to share with you. Let’s dive in!

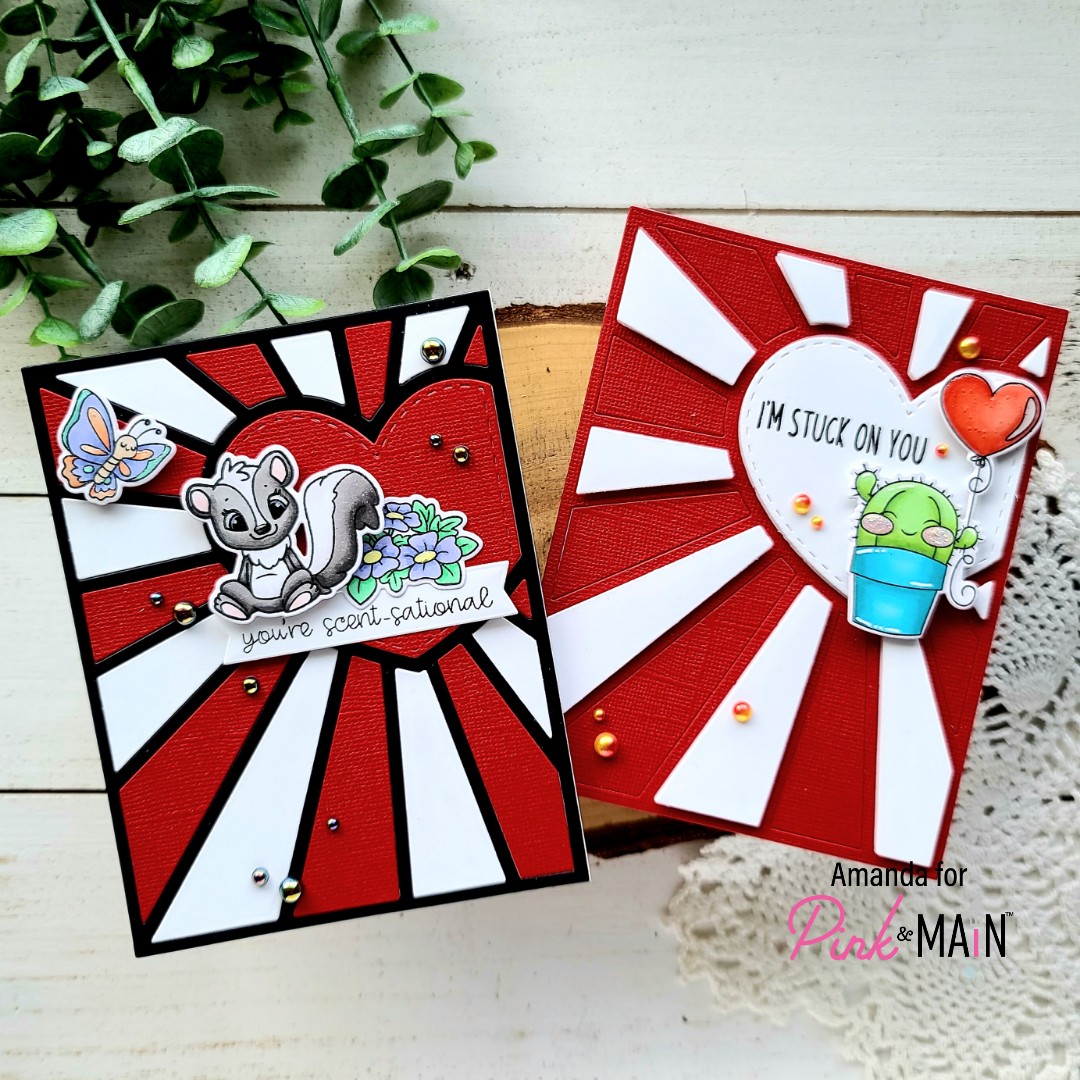
First I cut the background from white, black and red cardstocks. I glued the black frame to a card base and inlayed the white and red bursts with EZ squeeze liquid glue. Then I popped the heart up with foam tape. For the second card, I adhered the red frame to a card base and inlayed the red bursts while popping the white ones up with foam tape, along with the heart as well.

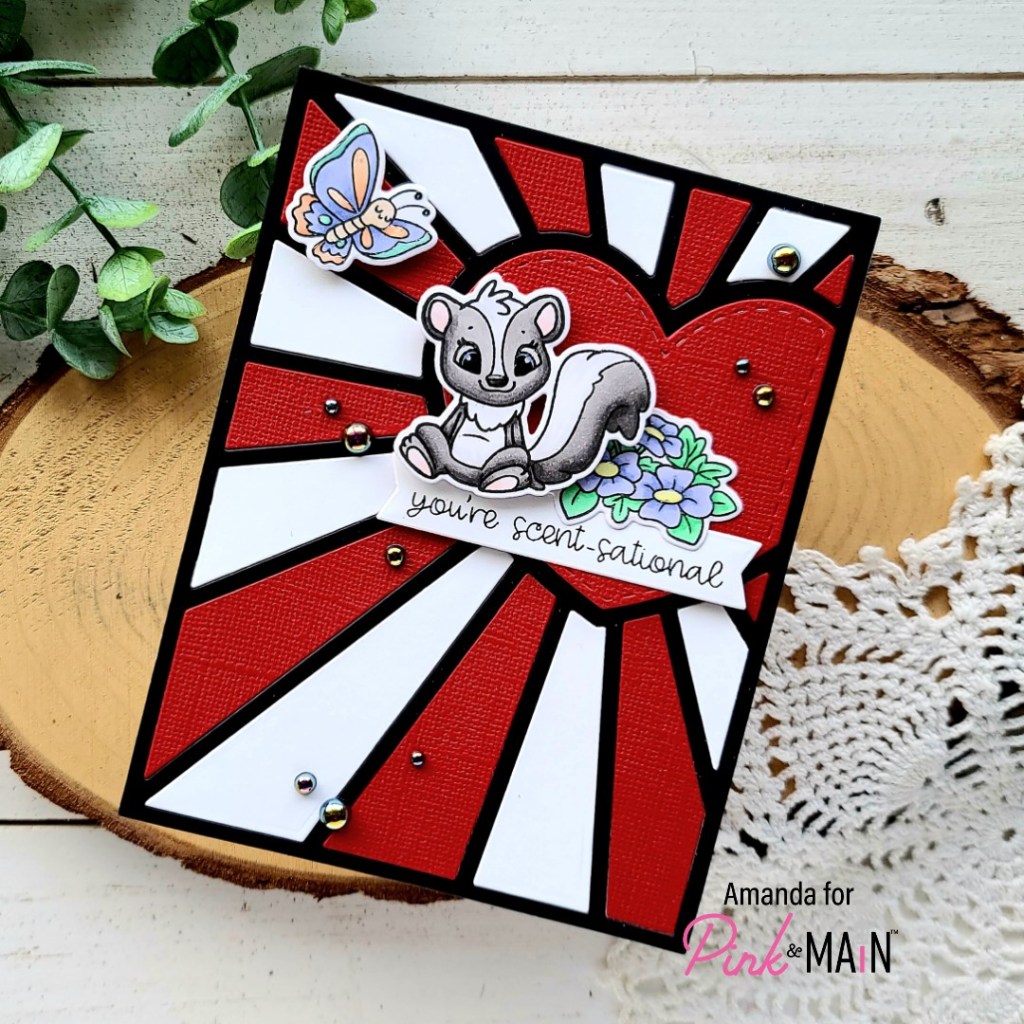
Then for this card, I stamped and colored images from Stinkin’ Sweet with my copic markers. I used the coordinating dies to cut them out and added them with a combination of foam squares and EZ Squeeze liquid glue. I stamped a sentiment from the set and cut it out with a large sentiment strip die and tucked it underneath the images to ground my mini scene.

For finishing touches I added glossy accents to the skunk’s eyes and nose, the flower centers and parts of the butterfly. Then I glued a scattering of pearls from Essential Pearls pack across the whole design.

Isn’t it so bold and still adorable?!? I love it! Now for the second card…

I place my card in my MISTI and stamped a sentiment from Prickly Hugs on the heart. Then I stamped an image from the same set and colored it with my copic markers. I used the coordinating dies to cut it out and added foam adhesive to the back. After removing the release paper, I popped it in place, tucking it right around the sentiment perfectly.

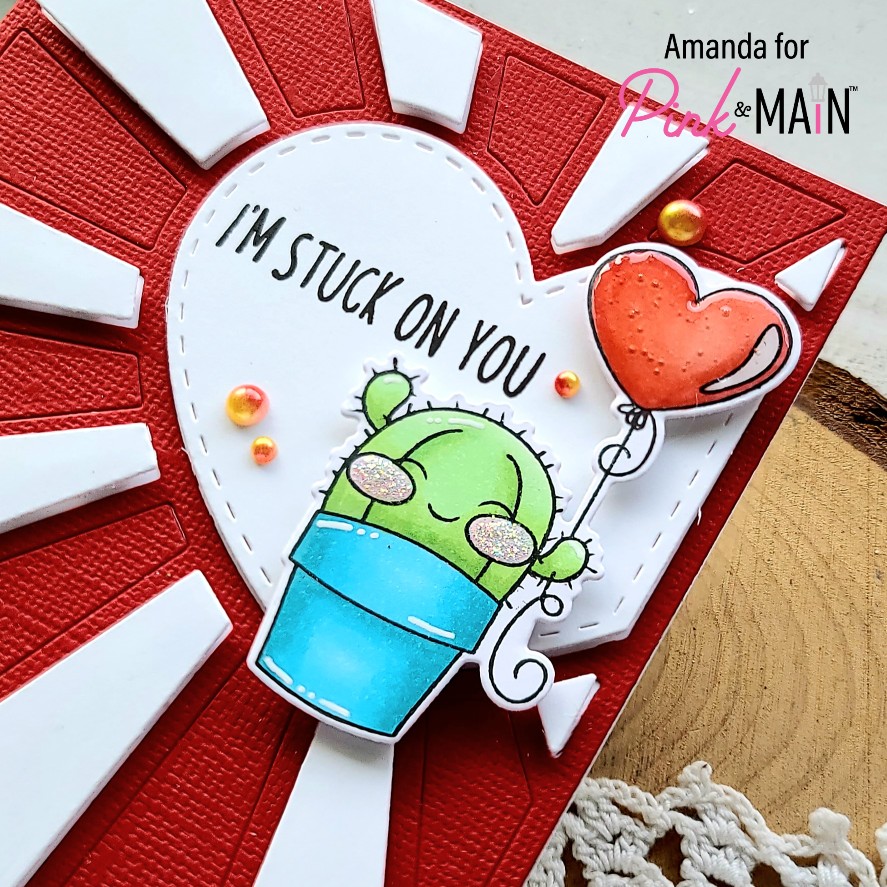
For finishing touches on this fun card, I added some white gel pen highlights and glossy accents to the balloon. Then I just had to add unicorn Stickles to the cacti cheeks. Last I glued a scattering of Unicorn Pearls across the design.

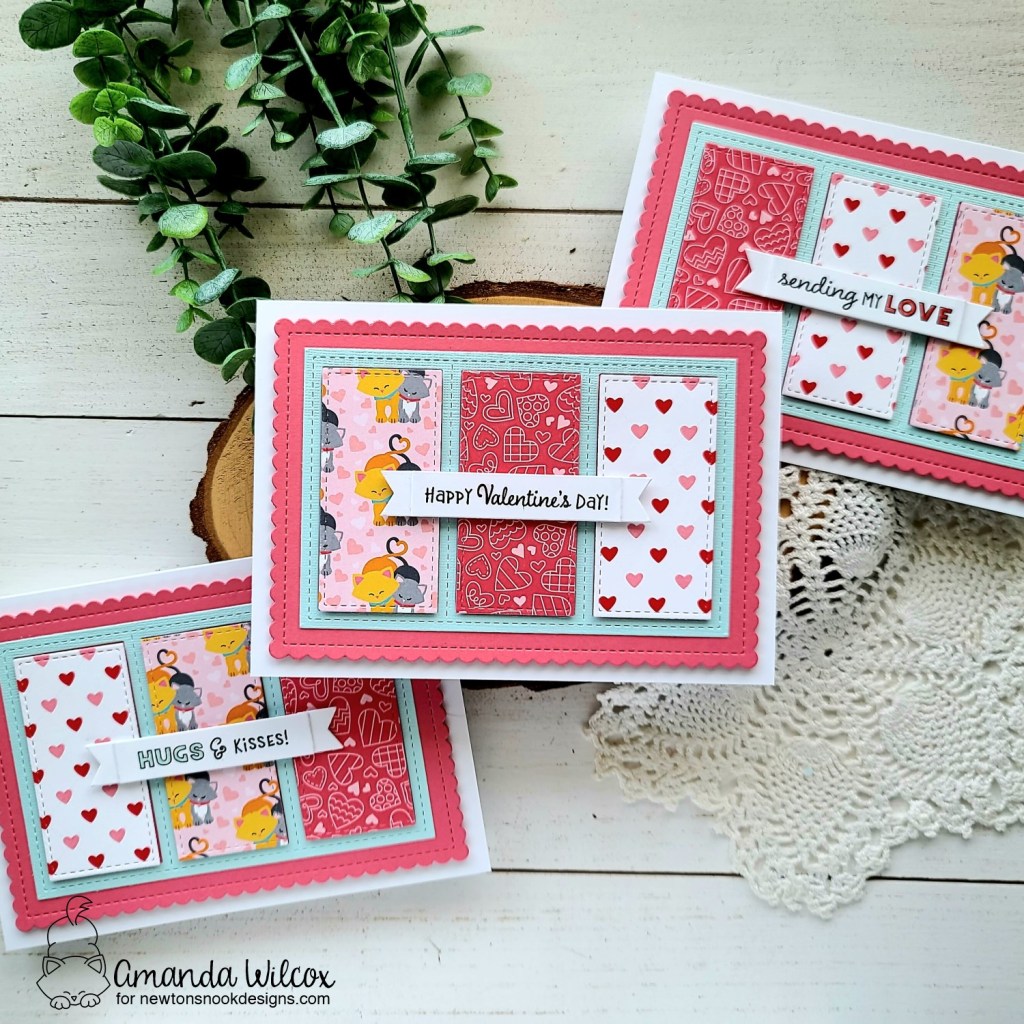
Now, I have a pair of quick and easy but absolutely adorable Valentine cards that you could mass product if you needed.

I cut the heart burst frame from melon and pink cardstocks and still had my white frame from the cards above. For the card on the left I glued the frame and bursts directly to the card base with EZ Squeeze liquid glue. Then, before popping up my heart, I stamped and heat embossed a sentiment from the new My Heart Smile set. Once that was finished I added a little Wink of Stella glitter brush pen to the hearts in the sentiment and glued a scattering of Pastel Pearls across the design.

For the card on the right, I doubled up the frame gluing the light pink one beneath the melon one for a little dimension. Then I inlayed the bursts and popped up the heart with foam squares again. This time for the sentiment, I stamped and heat embossed it on vellum and used the coordinating dies to cut it out. I used R35 and R39 copic markers to color the back size of the vellum for a little interest before using tape runner to adhere it down. I finished this card off with a scattering of the same pearls. Voila!

Aren’t all of these cards just too much fun!!! I can’t wait to play more! I hope you enjoyed today’s projects and have fun shopping the new release!

Products used today:
Heart Burst Cover Plate die
Prickly Hugs stamps and dies
Stinkin’ Sweet stamps and dies
My Heart Smile stamps and dies
Large Sentiment Strip dies
Essentials Pearls
Pastel Pearls
Unicorn Pearls
EZ Squeeze liquid glue
Foam squares
Glossy accents
Stickles – unicorn

I appreciate you sharing your time with me. Have a fabulous day!

Miss Ink Stamps – I Drink Coffee So I Don’t…

Welcome again everyone! I have a fun mini slimline card to share with you featuring stamps and stencils from Miss Ink Stamps. Today I pulled out the super fun Slim’s Whims stamp set and paired it with a new fabulous stencil called Sweater Weather. I love the texture of this stencil! I can’t wait to get really messy with it! It’s going to be great!

I started today by stamping images from Slim’s Whims and colored them with my copic markers. Then I used the scan-n-cut to cut them all out. I used a tape runner to adhere the bow tie and cup to slim and then thought it was too perfect not to decorate his mug with that sentiment. So I popped it in my MISTI and stamped it right away.

For my background, I die cut the largest mini slimline stitched panel from Trinity Stamps from kraft cardstock. Then I cut the next size down from dark blue. I blended white pigment ink through the Sweater Weather stencil over the blue panel and popped it up on the kraft with foam tape. Then, using Slim as a guide, I stamped and heat embossed another sentiment at the top of the panel. Once that cooled I added it to a white mini slimline card base.

Before I popped Slim in place I decided to give the background just a little texture and shimmer by splattering gold watercolor all over it. It’s not big but in person it gives just a little something that I love!

Then I popped Slim up with foam tape and came in with a white gel pen to give highlights all over the images. Last, I used the coordinating Trinity Stamps die set to create an envelope and stamped the glasses image on the outside of it in brown ink.

This set always makes me smile and this time was no different. It’s super fun to dress Slim up and color him in different color ways too. I actually don’t think I’ve colored him the same way twice yet. It’s great!

Products used today:
Slim’s Whims stamps
Sweater Weather stencil
Trinity Stamps Mini Slimline Card and Envelope dies
Trinity Stamps Mini Slimline Stitched Layers dies
Foam tape
Copic markers

I appreciate you sharing your time with me. Have a fabulous day!

Newton’s Nook – January Release Day 4

Hooray!!! We made it all the way through to the final day of release reveals! I hope you’re super excited for today’s reveal and release day tomorrow! Make your list and check it twice because there is a ton to choose from! Let’s get on with the show for today’s fun reveal!

Love Bots stamps and dies

I have so many ideas to create with this new set that it was difficult for me to choose which one to try first. Ultimately this fun slimline design allowed me to play with almost all of the images so I landed on it but be on the look out for more to come with this super fun set!

I chose my general design and started with the messy part first so it had time to dry. I cut 3 medium stitched hearts from the Heart Frame die set and spread white glitz glitter gel through the Petite Hearts stencil. I removed the stencil, set my hearts aside to dry and cleaned up.

Next, I cut the scalloped rectangle in the Slimline Frames & Portholes die set from teal cardstock and inked up the Bokeh Hearts stencil – one layer with teal ink and the other with white pigment ink. Then I stamped and colored the images from Love Bots with my copic markers and cut them out with the coordinating dies.

I stamped 3 sentiments from Love Bots and cut them out with a banner from the A7 Frames & Banners set and added foam squares to the back of everything before starting to assemble my card.

I created a white slimline card base and popped the teal panel up with foam tape. Then I added the glitzy hearts with foam tape as well. Finally I added the images and sentiment strips with a combination of foam squares, strips and liquid glue.

Once everything was assembled I trimmed off the hearts and banners that were hanging over the edge. Then, for finishing touches, I added glossy accents and unicorn Stickles to various parts of the images throughout the design.

I hope you’ve enjoyed today’s projects and the reveal of the wonderful new products coming.

Would you like to win the “Love Bots” Stamp Set? This stamp set will be given away to ONE lucky winner!

Here’s how to win: Comment on the NND blog and Design Team blogs (see list below)! The winner will be chosen at random from the collective reveal posts. Make sure to check out each of their blogs and comment for your chance to win. You will not know which blog has been chosen so the more you comment on the better your chances are of winning! You have until Thursday January 20th at 9pm ET to comment  — winners will be announced on the blog post on Friday, January 21st. 

Check out all the awesome Design Team Blogs below to enter:

Newton’s Nook Designs
Donna Idlet
Ellen Haxelmans
Tina Herbeck
Larissa Heskett
Samantha Mann
Zsofia Molnar
Maria Russell
Farhana Sarker
Tatiana Trafimovich
Amanda Wilcox

Newton’s Nook – January Release Day 3

Hi again! It’s day 3 of release reveals for the Newton’s Nook January release. Today is full of more additions to the ever amazing Heartfelt series that coordinates with the Heart Frames and Banner Trio dies.

Heartfelt Meows and Heartfelt Woofs

I tried to create 2 very different cards for you today that would work great with any of the heartfelt collection, even if you’re not specifically a dog or cat person. I hope you enjoy them both.

First up, let’s have a look at the super adorable Heartfelt Meows shaped card that I created with the Heart Frames dies and Banner Trio dies.

I started by die cutting the scalloped heart from Bristol Smooth cardstock and then stamped and heat embossed the Heartfelt Meows image on it. I used Zig Clean Color Real Brush markers and a water brush pen to watercolor all the images before cutting a larger melon heart to pop it up on.

Next, I stamped a sentiment from the set on a Banner Trio banner and colored the open letters with markers to match the melon heart. I popped it up with foam squares.

To turn this into a card, I die cut another heart the same size as the melon one and scored the top about a 1/2 inch down. Before adhering it to my front panel I stamped another sentiment and colored it with markers too. Then I added tape runner to that small portion above the score lines, adhered the hearts together and creased the fold.

Now, for the Heartfelt Woofs card I took a totally different approach and I think it would be so much fun to try this with different color combos and lots of the Heartfelt series.

I simply chose a bunch of blue cardstock scraps and cut them into 1/4 inch strips. I adhered them to a piece of copy paper to avoid extra bulk and die cut it with the scalloped heart from the Heart Frames die set. I stamped my pups in VersaMark black ink and heat embossed it with clear embossing powder.

Next, I die cut 2 red banners from the Banner Trio dies and heat embossed sentiments in white. Digging through my stash of amazing puppy images I chose these from the Puppy Playtime set. I stamped and colored them with copic markers, cut them out with the coordinating dies and glued the pieces together.

To assemble my card, I splattered black paint on a 4×5.25 inch white panel and popped it up on a white card base with foam tape. Then I popped the heart up the same way and added foam squares to the back of the banners, tucking them under the heart edges.

Last, I added the puppy and his bones with a combo of liquid glue and foam squares. For finishing touches I added glossy accents to his nose and one stripe on the hat, unicorn Stickles to the top of the hat and black glaze pen with white gel pen accents to his eyes.

I hope you’ve enjoyed today’s projects and the reveal of the wonderful new products coming.

Would you like to win the “Heartfelt Meows” or the “Heartfelt Woofs” Stamp Set? We will choose ONE lucky winner for each stamp set!

Here’s how to win: Comment on the NND blog and Design Team blogs (see list below)! The winner will be chosen at random from the collective reveal posts. Make sure to check out each of their blogs and comment for your chance to win. You will not know which blog has been chosen so the more you comment on the better your chances are of winning! You have until Thursday January 20th at 9pm ET to comment  — winners will be announced on the blog post on Friday, January 21st. 

Check out all the awesome Design Team Blogs below to enter:

Newton’s Nook Designs
Donna Idlet
Ellen Haxelmans
Tina Herbeck
Larissa Heskett
Samantha Mann
Zsofia Molnar
Maria Russell
Farhana Sarker
Tatiana Trafimovich
Amanda Wilcox

Jane’s Doodles – You Don’t Have to be Perfect

Hello everyone! It’s a busy day on the blog today. I’m also sharing this beautiful card using the Jane’s Doodles Plumeria digi stamp set and You Got This sentiment stamps. I love these type of floral cards with bright berry purple backgrounds. I’m just always drawn to it.

So, today after I printed and colored all the plumeria images and cut them out. I cut a whitepanel down to 4×5.25 inches and inked it up with distress oxides – seedless preserves around the edge blended into shaded lilac in the center.

I spritzed the panel with water and flicked pearl watercolor all over it and the images for beautiful shimmer and sparkle in the light. Once it was dry, I used the images as a guide to center and stamp my sentiment.

Next, I glued the images down with liquid glue and trimmed off anything hanging over the edge. There is one large image in the set so I took what was left, repositioned it and glued it down to extend the flower cluster and also not waste the gorgeous flowers.

I added foam tape to the back of the panel and popped it up on a white card base. Then I added a scattering of pearl embellishments across the design.

I’ve been to Hawaii once, when I was a teenager, and the plumeria flowers were the ones I was most drawn to throughout the whole trip. They are gorgeous in person and I love this stamp set!

Products used today:
Plumeria digital stamps
You Got This stamps
Distress Oxide – seedless preserves and shaded lilac
Foam tape
Pearl embellishments

I appreciate you sharing your time with me. Have a fabulous day!

Coffee Loving Cardmakers – Peppermint Spice and Everything Nice

Hello again crafty friends! It’s Tuesday Tea with Twiddler’s Nook over on the Coffee Loving Cardmakers blog today and I had an absolute blast creating today’s card. I don’t think I’ve ever been so free thinking with combining products from different companies. It was so fun!

To start my card, I cut the Boo Brew mug and stitching detail from Trinity Stamps from pink cardstock. Then I cut a nested heart to go with it. That’s as far as my planning went. Lol. So I grabbed my blending brushes, Lawn Fawn ballet slippers and guava inks and inked the edges of my die cuts. Then I wanted texture on the background heart so I went looking for a stencil or something. I instantly landed on this Pink & Main woodgrain embossing folder.

I got into my Newton’s Nook stash for my framework dies to cut a background panel and remembered the awesome peppermint candy dies and everything just came together from this point on. I cut the background from white cardstock and then used the petite hearts stencil that was just revealed yesterday (It will be available to purchase on Friday.) I didn’t want everything to be stark white so I used Lawn Fawn pizza crust ink on the edges of the background panel and my card base. To dress up my mug a little I cut the smallest heart from the Heart Frames set from the same cardstock as the large heart and glued it down.

I popped the background panel up with foam tape, then popped the large heart up too. I used a combination of liquid glue and foam squares for my mug and peppermint candies. Then I die cut a stitched banner from Newton’s Nook banner trio die set and stamped a sentiment from the Cup of Cocoa stamp set in ballet slippers ink. I dusted the edges with the same pizza crust ink and popped it up with foam squares too.

I used my scissors to trim off the excess hanging over the edge and moved on to finishing touches. For that I just glue three Trinity Stamps jelly drop hearts down – one to the mug and two by the sentiment banner.

I hope you enjoyed today’s project as much as I did creating it.

Products used today:
Trinity Stamps Nested Heart dies
Trinity Stamps Boo Brew dies
Trinity Stamps Jelly Drop Hearts embellishments
Pink & Main Woodgrain embossing folder
Newton’s Nook Petit Hearts stencil
Newton’s Nook Banner Trio dies
Newton’s Nook Framework dies
Newton’s Nook Cup of Cocoa stamps
Newton’s Nook Peppermint dies
Foam tape

I appreciate you sharing your time with me. Have a fabulous day!

Newton’s Nook – January Release Day 2

Welcome back everyone! We’re on to day 2 of reveals for the Newton’s Nook January release. Today we have another addition to the incredible floral line.

Orchids

I had a simple but fun card design in mind for this set as soon as I saw the products for this release. But once I started creating, I immediately had to make a second card to share with you today.

I started by creating the card on the left and just had to use the stitched rectangles from the frame which led to the card on the right. So let’s walk through them in that order.

I chose 3 colors of cardstock to start with, then stamped and heat embossed the orchids image on each one in white. I used the coordinating dies to cut them out and set them aside. Then I die cut the other elements from the A7 Frames & Banners die set, heat embossing my sentiment in black on a vellum banner.

Once everything was ready I laid it all out to make sure I liked the placement and color order of the flowers. The white card base seemed stark so I splatters some black paint on it before popping the teal scalloped rectangle up.

next, I popped up the frame and flower images and then hid a smidge of tape runner behind the text on the banner and added it last.

I love the look of this card and could see myself making a few in an assembly line fashion to share with a bunch of people at a time.

Remember the stitched black rectangles we were left with from the frame on the last card…I just had to see if they would stack on an A2 card base and look how fabulous they work!

So I stamped another orchid and colored it with my copic markers this time before cutting out out. Then I cut a banner from the A7 Frames & Banners set and stamped a different sentiment on it, trimmed the top off for this design.

To assemble, I cut a piece of green cardstock and popped the black rectangles up with foam tape, then I adhered the orchids and sentiment banner with foam squares before popping this whole panel up with foam tape on a white card base.

For finishing touches I added some washi tape to the right side to break up the white edge and added some clear crystals from my stash. Then the last thing I did was add a little glossy accents to the center of the flowers.

I hope you’ve enjoyed today’s projects and the reveal of the wonderful new products coming.

Would you like to win the “Orchids” Stamp Set? This stamp set will be given away to ONE lucky winner!

Here’s how to win: Comment on the NND blog and Design Team blogs (see list below)! The winner will be chosen at random from the collective reveal posts. Make sure to check out each of their blogs and comment for your chance to win. You will not know which blog has been chosen so the more you comment on the better your chances are of winning! You have until Thursday January 20th at 9pm ET to comment  — winners will be announced on the blog post on Friday, January 21st. 

Check out all the awesome Design Team Blogs below to enter:

Newton’s Nook Designs
Donna Idlet
Ellen Haxelmans
Tina Herbeck
Larissa Heskett
Samantha Mann
Zsofia Molnar
Maria Russell
Farhana Sarker
Tatiana Trafimovich
Amanda Wilcox

Newton’s Nook – January Release Day 1

Hello friends! It’s time for another fantastic release reveal week from Newton’s Nook! It’s day 1 and we’re revealing a bundle of goodies that will be used today and all through the week! Let’s take a peek!

Love & Meows paper pad

Petite Hearts stencil

A7 Frames & Banners dies

Knead Kittens stamps and dies

Holy moly! Isn’t that a ton if awesomeness to begin our week with?!? It’s all fantastic! Today I have a card to share with you featuring Knead Kittens stamps and coordinating dies and then a bonus set of cards at the end of this post with the A7 Frames & Banners plus the Love & Meows paper pad too.

I just adore this set and absolutely had to use this funny kitty in the bread! It just made me smile too much! I stamped my images and colored them all with copic markers before using the coordinating dies to cut them out.

Then I took a white panel and inked up the ray portion of the Sunscape stencil with light teal ink. Next, I cut a strip of melon cardstock just wider than the small bread slice image and added a black border to the edge. I adhered this to the stenciled panel and added foam squares to my images.

After popping everything up I place my card in my MISTI and stamped a sentiment on the top right corner of the design.

Moving on to finishing touches, I added black glaze pen to the kitten’s eyes and glossy accents to his nose and toe beans. Too cute for words! Don’t you love this new set!?!

Next, I have a super fun and quick to make set of Valentine cards featuring the new A7 Frames & Banners and the Love & Meows paper pad.

I created 3 white card bases and cut the main scalloped rectangle from melon cardstock 3 times. I cut the frame from mint cardstock 3 times, saving the stitched rectangles that pop out for another card later on. Then I chose 3 patterns of paper from the paper pad and cut them with the frame die as well.

To assemble my cards, I popped up the scalloped rectangle, glued the frame directly to that and then popped my patterned panels up with foam tape. To finish them off I cut 3 banners from the Banner Trio die set and stamped sentiments from Heartfelt Love before added foam squares and placing them in the center of each design.

I hope you’ve enjoyed today’s projects and the reveal of the wonderful new products coming.

Would you like to win the “Knead Kitten” Stamp Set?This stamp set will be given away to ONE lucky winner!

Here’s how to win: Comment on the NND blog and Design Team blogs (see list below)! Thewinner will be chosen at random from the collective reveal posts. Make sure to check out each of their blogs and comment for your chance to win. You will not know which blog has been chosen so the more you comment on the better your chances are of winning! You have until Thursday January 20th at 9pm ET to comment  — winners will be announced on the blog post on Friday, January 21st. 

Check out all the awesome Design Team Blogs below to enter:

Newton’s Nook Designs
Donna Idlet
Ellen Haxelmans
Tina Herbeck
Larissa Heskett
Samantha Mann
Zsofia Molnar
Maria Russell
Farhana Sarker
Tatiana Trafimovich
Amanda Wilcox

Pink & Main – Thank You

Happy Friday everyone! You’ve made it through another awesome week! I hope you have fun plans for the weekend. My daughter has a dance competition so we’ll be busy and it will be so fun!

Today I’m over on the Pink & Main blog still trying to catch up on thank you cards. It seems as soon as I make a batch and send them, I find reasons to need more.

Today I started by stamping the bunny from Love Ewe and colored it with my copic markers. Then I used the coordinating die to cut it out. Next, I pulled out the Best Friends paper pad and cut the plaid with the largest layered rectangle die. I wanted a little contrast for my bunny so I chose the light blue polka dot paper in the pad and cut it out with the next-to-largest stitched arches die.

I pulled out the big thank you dies and cut the words from white cardstock 4 times, using EZ Squeeze liquid adhesive to glue them together. Then I cut a small circle from another paper in the same pack and stamped sending big hugs from the spotlight sayings stamp set on it.

I adhered the plaid paper to a white card base and popped the stitched arch up with foam tape. Then I popped the bunny up with foam squares, doubling the squares on his feet and tips of the ears so it lays flat. I carefully added some foam strips to the back of the “thank you” dies and added them over those awesome long legs. Last, I added the big hugs circle and trimmed off anything hanging over the edge.

For finishing touches, I added glossy accents to the bunny’s nose and eyes and then a scattering of glitter enamel dots across the whole design.

Isn’t this just the cutest!?! And it’s super fun to pull out sets for other times of the year and extend your use of them too!

Products used today:
Love Ewe stamps and dies
Spotlight Sayings stamps
Big Thank You dies
Stitched Arches dies
Layered A2 Rectangles dies
Layered Circles dies
EZ Squeeze liquid adhesive
Best Friends paper pad
Glitter enamel dots

I appreciate you sharing your time with me. Have a fabulous day!

Miss Ink Stamps – Pamper Yourself

Hello everyone! I’m popping in this afternoon with a fun “it’ll be okay” type card featuring stamps and stencils from Miss Ink Stamps.

You know I love my critters and these Rub-a-dub Doggies are pretty high on that list! I love that they are distinctly different breeds of dogs sudsing up and shaking off! They are super cute!

To create my card, I stamped a few of the pups and some accessories and colored them with my copic markers. I used the scan-n-cut to cut them out and set them aside. Then I took a blue panel and the Between the Lines stencil and inked it up with a green dye ink and a blending brush. Next, I pulled out my set of circle dies, chose 3 sizes that fit the dogs and cut holes in my panel. I thought the panel was a little stark so, without adding more ink to my brush, I inked up the edges of the cardstock. Then I flicked watered down ink all over the panel for extra texture.

Then I cut a very light blue piece of cardstock to go behind the window panel. I used the pups as a guide to ink up a little blue shadow behind each one for some added interest. Then I put foam tape on the stenciled panel and popped it up on the blue panel.

I added foam squares to the back of all the images and filled in each window with its coordinating dog and accessories.

I chose 3 sentiments from the set, stamped and heat embossed them and die cut them with banner dies before popping them up with foam squares too.

For finishing touches I added glossy accents to pup noses, black glaze pen to their eyes and unicorn Stickles to random bubbles.

Isn’t this a fun card to share with someone needing a pick-me-up?!? I think it will be perfect for it!

Products used today:
Rub-a-dub Doggies stamps
Between the Lines stencil
Pink & Main Layered Circle dies
Pink & Main Large Sentiment Strip dies
Blending Buddy brush
Lawn Fawn Cilantro ink
Foam tape and squares
Glossy accents
Stickles – unicorn

I appreciate you sharing your time with me. Have a fabulous day!