Blog

Newton’s Nook – Tides of Love Slimline

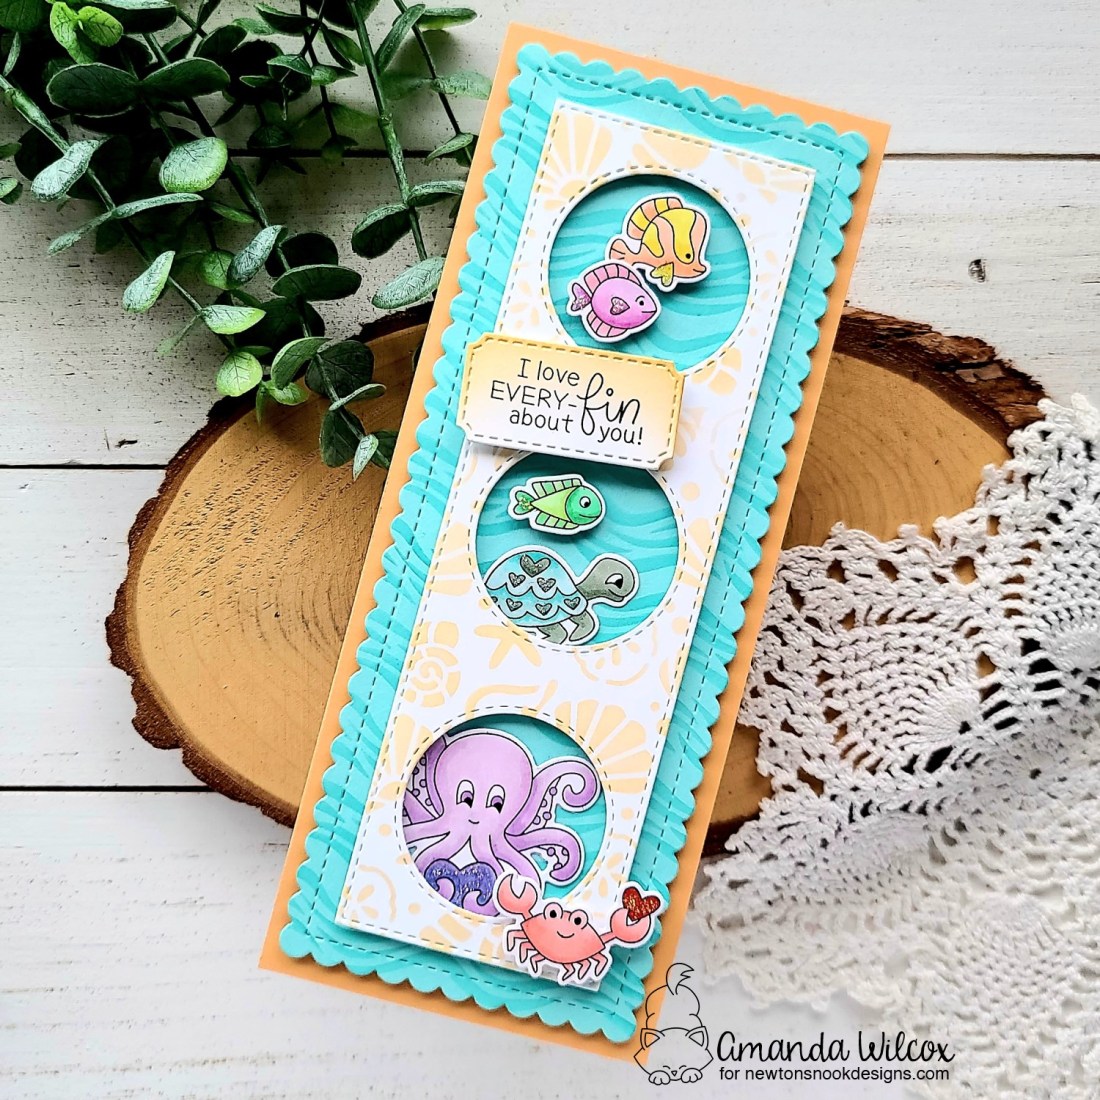
Hello everyone! I’m over on the Newton’s Nook blog today sharing a fun love themed card that would be great for Valentine’s Day or just because. I specifically didn’t use stereotypical lovey colors but I think it would work great with any color palette you chose!

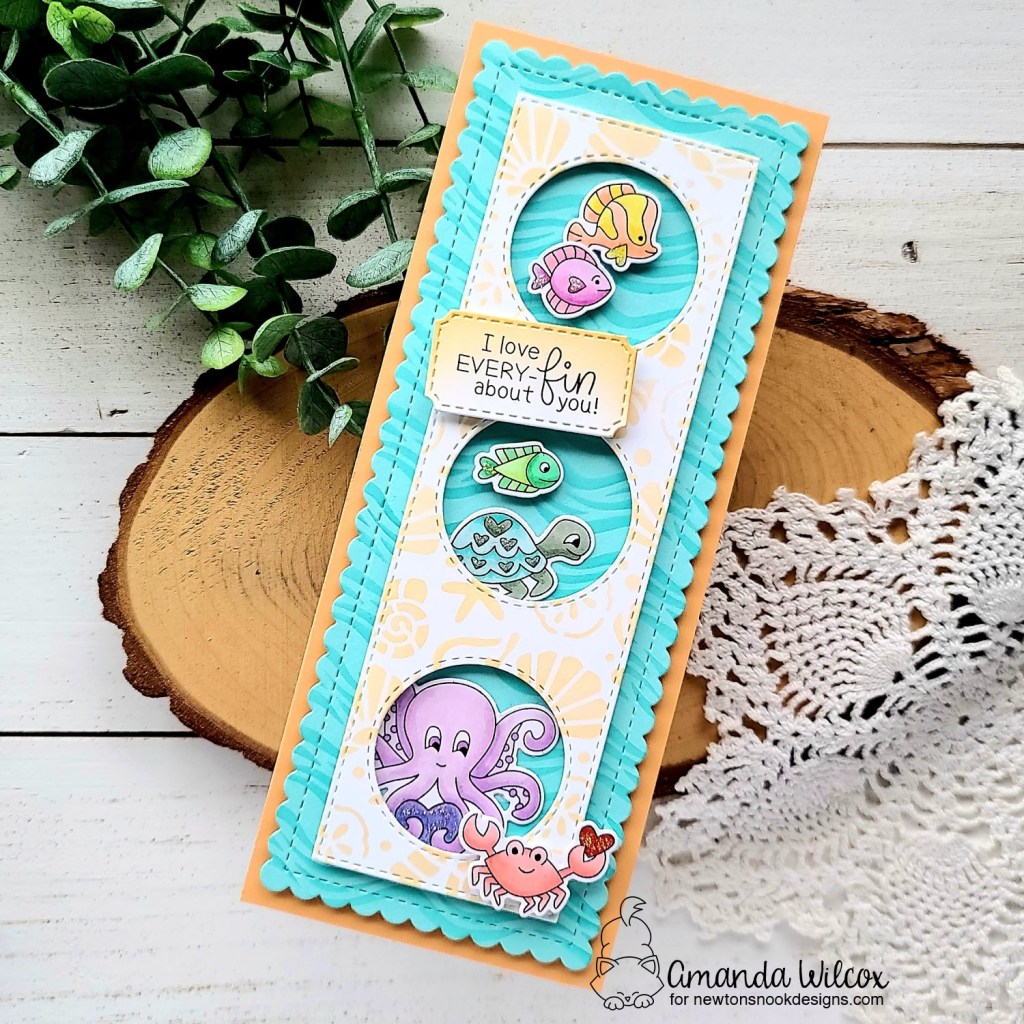
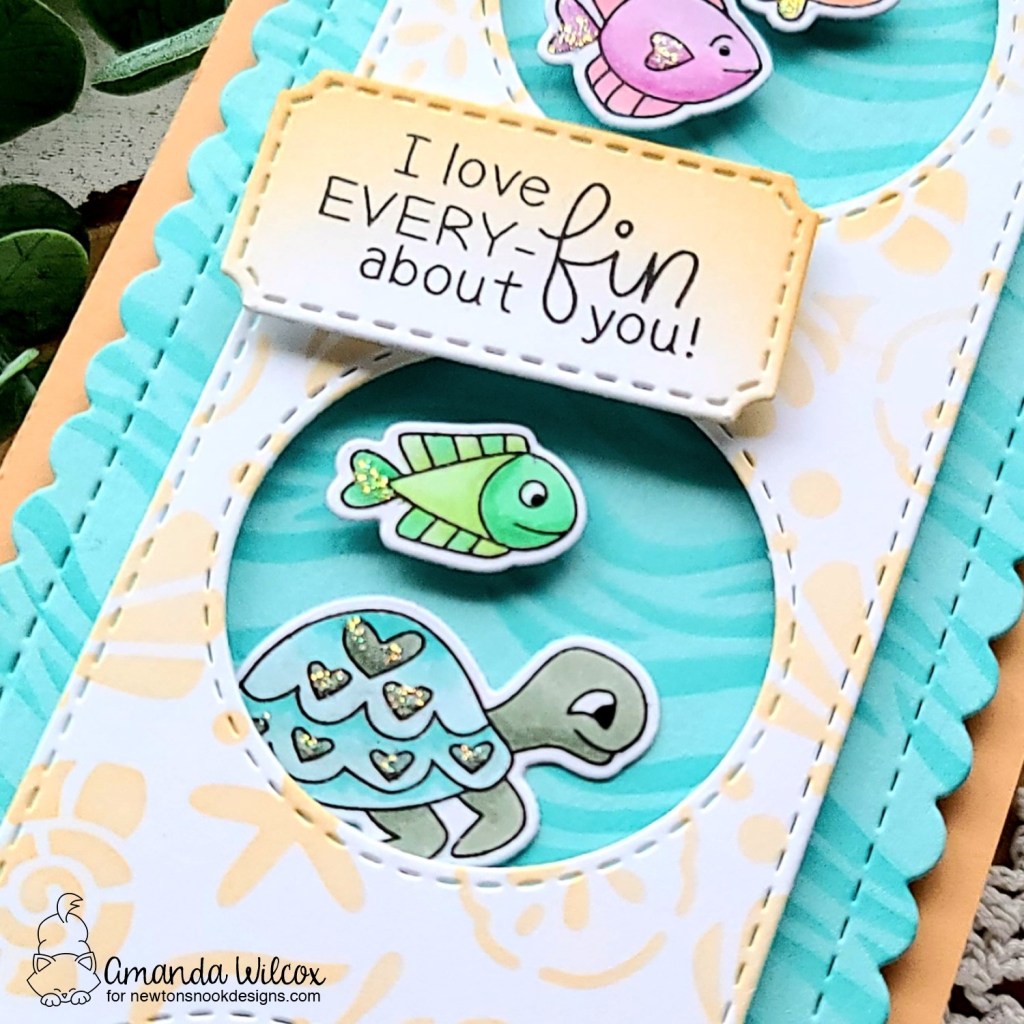
I designed my card by taking the porthole die from the Slimline Frames & Portholes die set and laying my stamps out on it to see what I could get to fit in the windows. Once that was decided I stamped everything and colored them with my copic markers. I went for the rainbow in all my critters just for fun. Then I used the coordinating dies to cut them out.

Next, I die cut a teal panel with the scalloped rectangle from the same slimline die set and inked it up with the waves stencil. Then I cut a white panel with the porthole die and inked the seashells stencil up with orange ink. And finally, for my sentiment I die cut the smallest shape from the Framework set and stamped my sentiment on that before using the same orange ink the give it a little ombre effect.

I didn’t want a white border so I cut a piece of orange cardstock close to the ink color of the seashells and adhered it to a white slimline card base. I popped the waves panel up with foam tape and then popped the seashell panel up on that. I added the images with a combination of foam squares and liquid glue for dimension and interest, finishing things off with the sentiment in between the top and middle portholes.

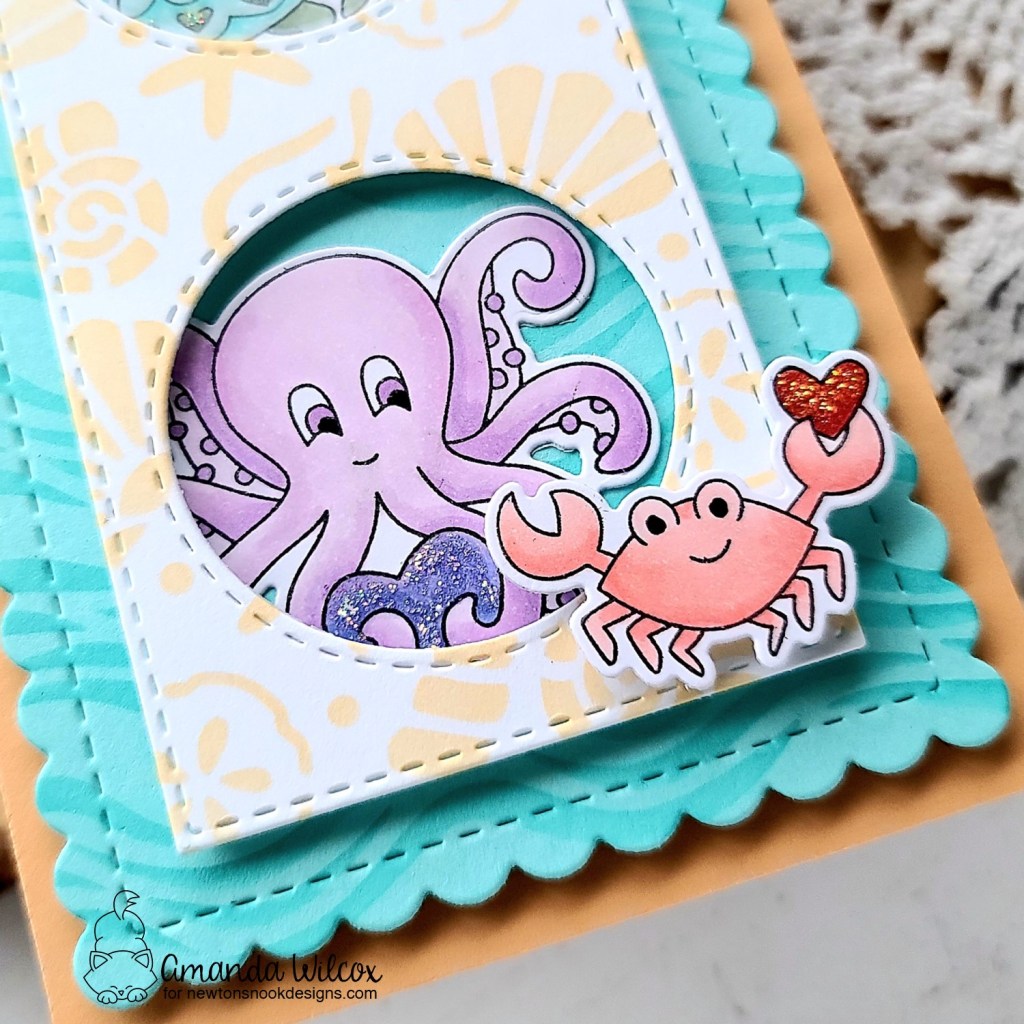
For finishing touches on this card I added black glaze pen to the eyes of all the critters which really helps them stand out. Full disclosure, I would have added glossy accents all over this fun card but my tip died and the replacements haven’t arrived yet so I pulled out my trusty unicorn Stickles and added some shimmer to the heart images on each critter.

That’s one thing I love about this set. Each critter, obvious or hidden, has hearts on it somewhere. Isn’t that so fun!?!

I hope you enjoyed today’s card. I really had a lot of fun creating it!

Products used today:
Tides of Love stamps and dies
Slimline Frames & Portholes dies
Waves stencil
Seashells stencil
Stickles – unicorn
Foam strips and squares
Liquid glue

I appreciate you sharing your time with me. Have a fabulous day!

Miss Ink Stamps – You Are My Rainbow

Hello again! I’m over on the Miss Ink Stamps blog today with another way to use the rainbow builder stencil set. It was an idea that came to me and I’m so happy it turned out!

I started with my rainbow today by cutting a piece of vellum to 4×5.25 inches. Then I chose one of the 4 rainbows you can build with the stencil set and inked up the first layer which just has the middle color of the rainbow. I used distress oxide inks today which I had hoped would work but I wasn’t sure. I used wild honey, picked raspberry and twisted citron. I carefully dried each layer with my heat gun for just a minute before adding silver glitz glitter gel to the last layer and then set the whole panel aside to dry.

Next, I die cut a cloudy background panel from white and light teal cardstocks. I added foam tape to the back of the teal panel replacing the teal clouds with white ones but keeping some aside to put on top of the vellum. I added the vellum panel and then the white frame to the top.

I stamped a sentiment on one of the larger clouds and added the remaining ones with foam squares for added dimension and interest.

I finished the design off with a scattering of sweethearts sequins all over the sky. There are a couple of sizes and lots of colors in this mix which makes it that much more fun with the rainbow theme.

Isn’t this so cool! It gives me a whole new round of ideas to try with other stencils on vellum now too!

Products used today:
Rainbow Builder stencils
Sunshine and Rainbows stamps
Sweethearts sequins
Avery Elle Cloud Mat die
Distress Oxide Ink – wild honey, picked raspberry, twisted citron
Glitz Glitter Gel – silver
Stencil Pal
Foam tape
Liquid glue

I appreciate you sharing your time with me. Have a fabulous day!

Pink & Main – Valentine Treat Holders

Happy Friday friends! Thanks so much for stopping by. Today I’m over on the Pink & Main blog sharing a super fun way to create treat holders. Mine are for Valentine’s Day but these are easily customizable for birthdays or any other holiday too!

These treat holders are so fun and easy to create. They are great for mass producing and completely customizable using products you probably already have! I wanted to share different versions today so you can see that fun dies you might already have could work!

The two die sets I used today were the notched corner dies (top) and concave rectangles dies (bottom). Specifically, I die cut the third largest notched corner die and scored it at 1 5/8″ and 2 5/8″. This gives you an inch wide strip in the middle to adhere your treats. Specifically Hershey Kisses and Rolos work perfectly! Just add a strip of tape runner or glue dots and you can get 3 treats in each one.

For my treat holders today, I cut one of each of the shapes I showed above from pink cardstock and inked it up with the scattered hearts stencil and white pigment ink using my ergonomic blending brush. Then I scored them both and folded them up. I stamped and colored this fun image from Rawr with my copic markers twice before cutting it out with the coordinating dies.

I used the image as a guide where to stamp my sentiment on the bottom between the dinos and then punched a hole in the top center of each one so I could tie it shut with a little twine. I popped my images up with foam squares for a bit of dimension and interest but if you’re making these for kiddos or tons of them you could easily skip that step.

Aren’t they so fun!?! Valentine’s Day is my very favorite holiday to create treat type gifts for and I wanted to share this idea early enough that you might have time to plan and create without the rush and stress.

Products used today:
Notched Corners dies
Concave Rectangles dies
Scattered Hearts stencil
Rawr stamps and dies
Ergonomic blending brush
Foam squares

I appreciate you sharing your time with me. Have a fabulous day!

Miss Ink Stamps – The Hurrier I Go…

Happy Thursday everyone! Thanks for stopping in today. I pulled out the Miss Ink Stamps Alice collection again and created a card fitting for myself these days…

I stamped images from Alice and colored them with my copic markers. I used the scan-n-cut to cut them both out and set them aside.

Next, I inked up a white panel with distress oxide inks – gathered twigs, rustic wilderness and salty ocean – and spritzed it with water, blotting it dry with a dry cloth. Then I stamped the large image from Forest Path with VersaFine ink. I find that this ink sits nicely on top of the oxide, although it takes a bit for it to dry completely so be careful.

I sat my images in place to decide on sentiment placement and thought it looked a little lacking. So I pulled out the Trinity Stamps embossed edge rectangle stack and created a gray frame for the scene. I used liquid glue to adhere it and then stamped my sentiment in the sky area on the upper right.

Finally, I added my two images with foam squares. Alas, still no glossy accents to adorn my projects these days so I opted for Wink of Stella glitter brush pen. I added this to the leaves in the tree on the left, the rabbit’s coat buttons and watch, and Alice’s headband, bow and shoes.

I tried to capture the glitter in the light but the camera was not cooperating with me. It really is quite awesome in person. If you haven’t used one of the glitter pens, I encourage you to. They aren’t too expensive and add a ton of glimmer to your projects.

Products used today:
Alice stamps
Forest Path stamps
Wonderland Wisdom stamps
Trinity Stamps Embossed Edge Rectangle dies
Distress Oxide Ink – rustic wilderness, gathered twigs, salty ocean
Distress Sprayer
Wink of Stella glitter brush pen
Liquid glue
Foam squares

I appreciate you sharing your time with me. Have a fabulous day!

Jane’s Doodles – Stinks

Welcome everyone! Today I’m over on the Jane’s Doodles blog with a super sweet card featuring the new digital stamp set – Stinks. I absolutely adore these skunks and had so much fun creating this card.

I printed the whole set on copic xpress paper and colored them all with my copic markers. Then I used the scan-n-cut to cut them out. I chose these two sitting together and set the others aside for another project later on.

I cut a piece of white cardstock and used the new Lawn Fawn Lots of Hearts background stencil. I inked the first layer up half and half green and blue and the second layer half and half purple and pink. The colors blend together in the middle. Then I took a piece of green cardstock and cut some grass. I adhered it to the stenciled panel with foam tape and inked the bottom edge for a little dimension.

I added the skunks with foam squares, die cut a sentiment with a Pink & Main sentiment strip and popped it up as well. Then I added foam tape to the back of the panel and popped it up on a white card base.

This is silly and a bit sad but you all know how I love my glossy accents…especially on critter noses and beaks. Well, I went to add it and my nozzle clogged…it happens. But when I tried to clear the blog I ruined my pin and couldn’t find anything in my whole house narrow enough to get in there. So I regained my composure and decided it would be fun to add unicorn Stickles to the noses and beaks instead. I also added a little dot in the center of the flower. Last, I went ahead and added black glaze pen on the eyes to help them stand out too.

Needless to say, I popped on and ordered a new fine tip for my glossy accents and I’m anxiously awaiting its arrival. But on a good note, this card is super cute and the sparkly stickles give a little extra whimsy effect which I love!

Products used today:
Jane’s Doodles Stinks digital stamps
Lawn Fawn Lots of Hearts stencil
Lawn Fawn Grassy Border die
Lawn Fawn dye inks
Thermoweb foam tape and squares
Blending Buddy Brushes
Unicorn Stickles

I appreciate you sharing your time with me. Have a fabulous day!

Coffee Loving Cardmakers – Java Junkie Shaker

Hello there! Today I’m over on the Coffee Loving Cardmakers for the first Tuesday Tea of 2022!!! Can you even believe it?!? Time just flies by too fast. I hope you all had a wonderful New Year holiday and are ready to jump into fun crafting! I’ve got a shaker card today featuring so many companies and highlighting embellishments from the Twiddler’s Nook shop. We just had our mini Valentine release yesterday and I couldn’t wait to start creating with it!

I recently picked up these adorable unicorns from Heffy Doodle that I’ve been eyeing for an eternity and I’m so happy to color them up in Valentine colors! Aren’t they adorable!?! Then I used the Lawn Fawn stitched mug die sets to create a shaker and filled it with three embellishments from Twiddler’s Nook – sweethearts clay hearts, holographic hearts confetti and rosetta pixie dust micro beads. The whipped cream on my mug is from the Lawn Fawn cupcake die set.

To create the background for my card, I cut a white panel to 4×5.25 inches and inked the top and side edges with Lawn Fawn mermaid ink and a blending brush. Then I cut two layers of clouds used the Lawn Fawn cloudy border dies and inked the tops of those with the same color before adhering all the layers with liquid glue.

Next, I used my images as guides before stamping my sentiment in the top left sky area. Then I started adding everything with either foam squares or liquid glue, or a combo.

For finishing touches today, I added Wink of Stella glitter brush pen to the unicorn horns, sweetheart clay embellishments to the whipped cream and heart on the mug and a scattering of holographic hearts around the sky.

I probably had way too much fun creating this card but I’m just so happy with how it turned out and think it would make anyone smile when they opened it! Don’t you?!?

Products used today:
Heffy Doodle Fluffy Puffy Unicorn stamps and dies
Lawn Fawn Outside In Stitched Mug dies
Lawn Fawn Stitched Mug Frame dies
Lawn Fawn Puffy Cloud Border dies
Lawn Fawn mermaid ink
Trinity Stamps blending buddy brushes
Hero Arts 2018 My Monthly Hero Kit stamp set
Twiddler’s Nook Pixie Dust Micro Beads – rosetta
Twiddler’s Nook Sweethearts Clay Heart embellishments
Twiddler’s Nook Holographic Hearts embellishments
Wink of Stella glitter brush pen
Foam squares
Liquid glue

I appreciate you sharing your time with me. Have a fabulous day!

Spellbinders – Happy Birthday Lion

Hey friends! Happy New Year! I took a bit of time off for the holidays and only did the crafting that I had to for my teams. It was really nice and we did some fun things. Today I’m back with a birthday card that I made for my dad last week. I didn’t want to share it here until he had opened it.

I started by cutting the elements from the Spellbinders Lion, Oh My! set and used liquid glue to adhere them all together. Isn’t he just the most studious party lion ever?!? I love him! Then I pulled out some dies from Pink & Main to create my background.

I cut a white card base and folded it. Then I cut the two layers of the Pink & Main Plaid Cover dies from white and light blue and adhered them together. Next, I cut a Reverse Scallop Frame from Pink & Main out of black cardstock and popped it up with foam strips.

I dug through my stash for a good happy birthday sentiment and ultimately landed on a simple one from Lawn Fawn cut out with a Pink & Main Large Sentiment Strip die. I added foam squares to the banner and lion and popped them in place next. Then I finished everything off with a scattering of glitter enamel dots from Pink & Main.

I am so happy with how this card turned out and my dad liked it too! Success!

Products used:
Spellbinders Lion, Oh My! dies
Pink & Main Plaid Cover dies
Pink & Main Reverse Scallop Rectangles dies
Pink & Main Large Sentiment Strip dies
Pink & Main Glitter Enamel Dots
Foam squares and strips

I appreciate you sharing your time with me. Have a fabulous day!

Miss Ink Stamps – Happy New Year Bottle Tag

Hello everyone! I’m back with a quick New Year project featuring Miss Ink Stamps Punny Farm Pigs and Happy New Year sets and a couple of dies from Trinity Stamps.

My daughter loves having sparkling cider at the holidays so I thought it would be fun to make a bottle tag to decorate it while it sits on the counter tomorrow.

I stamped images from Punny Farm Pigs and colored them with my copic markers before using the coordinating dies to cut them all out. I used liquid glue to adhere all of the accessories on and set them aside to dry.

Next, I die cut a bottle tag from Trinity Stamps and stamped images from Happy New Year all over it in VersaMark ink. I heat embossed them in gold for that classic New Year decor vibe. Next, I die cut cheers from the bottle tag die set from white cardstock 4 times and black once. Then I cut the shadow from gold glitter cardstock and used liquid glue to adhere all the layers together. Last, I stamped and heat embossed Happy New Year in gold and trimmed it into as trip. For a little dimension and to help it stand out I inked the edges with white pigment ink. Then I added foam squares to my images and sentiment strip.

I adhered the cheers die with liquid glue, removed the release paper from the foam squares and popped everything in place.

For finishing touches I added black glaze pen to the pig’s eyes and white gel pen highlights to all the images. Once the eyes were dry, I came back in with a little white gel pen highlight on those too.

Here’s a look at the tag hanging on the sparkling cider bottle. Isn’t it just the cutest!?! I think so and I’m excited to surprise my daughter with it tomorrow. She’ll love it too!

Products used today:
Miss Ink Stamps Punny Farm Pigs stamps and dies
Miss Ink Stamps Happy New Year stamps
Trinity Stamps Bottle Tag die set
Foam squares

I appreciate you sharing your time with me. Have a fabulous day!

Pink & Main – Woofing You a Great Day

Hello everyone! I’m over on the Pink & Main blog today with an adorable card featuring the stamp and die of the month for December. It is the CUTEST puppy set! I absolutely love all of the images in the set and the sentiments are too cute too!!!

I started my card with a layout in mind so I stamped the images from the set and colored them with my copic markers. Then I used the coordinating dies to cut them out. Then I pulled out the awesome rainbow die from the Rainbow Friend die set and cut it from white cardstock. I pulled all the pieces apart and used my copics to color those as well. I seriously love adding color to dies like this with markers instead of colored cardstock. Then I cut a white circle just a smidge smaller than the scalloped outline and adhered everything to that. This makes it tons easier to add to my card, especially since it’s popped up with foam tape.

I chose a gray patterned paper from the Hooray paper pad and cut it out with the largest Layered Rectangle A2 die. I adhered it to a white card base with EZ Squeeze liquid glue and popped my rainbow panel up. Then I added foam squares to my images and popped them up as well.

I chose a sentiment from the set, stamped it and cut it out with a Large Sentiment Banner die and popped it up as well. The parts of the puppy and sentiment that hang over the rainbow circle have double layer foam squares so it lays flat. I love the depth the extra layer gives everything.

For finishing touches I added black glaze pen to the puppy’s eyes and glossy accents to the nose, bow and shine mark on the balloon. Then I finished the design off with a scattering of gray glitter enamel dots from the Rainbow pack.

It’s almost weird to switch gears from holiday cards to this but also a little refreshing. If you’re interested in subscribing to the stamp and die of the month, click HERE. It’s a steal of a deal and guarantees you super fun happy mail each month to create with!

Products used today:
Puppy Love stamps and dies – Stamp of the Month
Rainbow Friend dies
Layered Rectangle A2 dies
Large Sentiment Strip dies
Hooray paper pad
Rainbow glitter enamel dots
EZ Squeeze liquid glue
Glossy accents
Foam squares and tape

I appreciate you sharing your time with me. Have a fabulous day!

Trinity Stamps – Happy New Year Snowman

Hello everyone! The year is coming to a close and I can’t even believe it! It flew by but oddly drug on at the same time. This year was much harder for me than 2020 so I’m happy to see it go and ready to move forward with happy positive vibes!

Today I’m popping in with a super fun slimline card featuring all Trinity Stamps dies, stencils and stamps! So much cuteness!

I started by cutting all the elements for the Slimline Happy Snowman die and assembled them with liquid glue. I cut the scarf and hat band from light blue cardstock and inked them up with blue dye ink and my blending brush before adhering them in place.

Next, I inked up a white panel with distress oxide inks in chipped sapphire, blueprint sketch and wilted violet. I spritzed the panel with water and blotted it dry. Then I used the Slimline Snowfall stencil – layer 1 is white pigment ink with my blending brush and layer 2 is iridescent glitz glitter gel and a stencil pal.

Once the panel was dry I die cut it with the largest Slimline Stitched Panel die. Then I cut 2 more scraps of white with the same stitched panel to create snow hills. I trimmed the top of each white scrap with the cloud border from the Slimline Scenic Borders die set. I like the bumpy look of snow drifts.

I inked the edges of the snow drifts with my blending brush and light teal ink. Then I stamped Happy New Year from the Holiday Tag Helper stamp set on the front one. Now it’s time to assemble everything!

I adhered the inked panel to a white slimline card base with liquid glue. Then I added the back snow drift the same way. I added foam tape to the snowman and used the front snow drift as a guide where to pop him in place. Then I carefully added foam tape to the front snow drift so that it didn’t interfere with the snowman and added it last.

Isn’t this just the cutest scene!?! I love it! I don’t normally send new year cards out but I ran out of Christmas cards and time to send them so I’m going to send a few out and have had fun creating them!

Products used today:
Slimline Happy Snowman dies
Slimline Stitched Card Panel dies
Slimline Snowfall stencils
Slimline Scenic Border dies
Holiday Tag Helper stamps
Blending Buddy Brushes
Distress Oxide Ink – chipped sapphire, blueprint sketch, wilted violet
Thermoweb Glitz Glitter Gel – iridescent
Thermoweb Stencil Pal
Thermoweb 3D foam tape
Thermoweb liquid glue

I appreciate you sharing your time with me. Have a fabulous day!