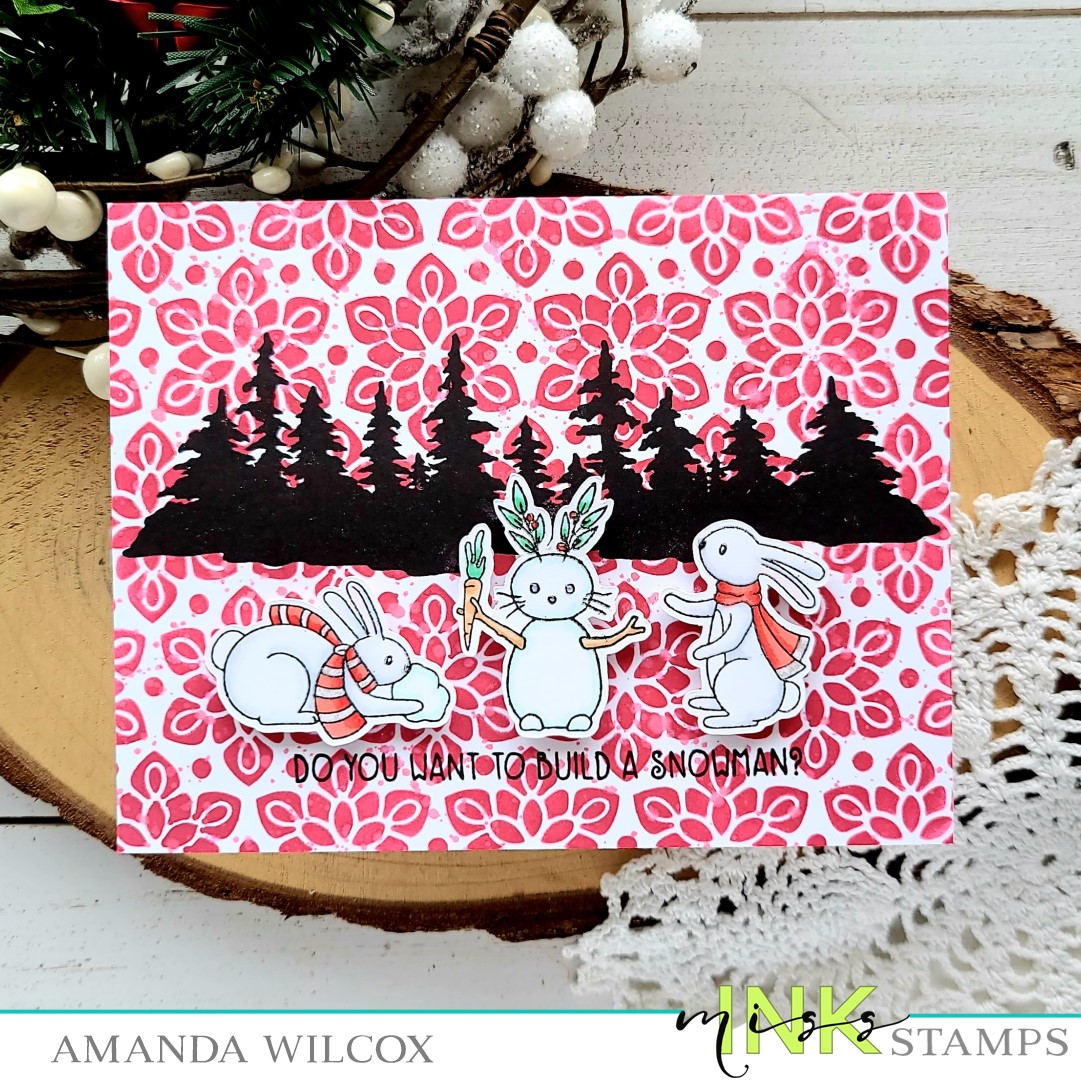
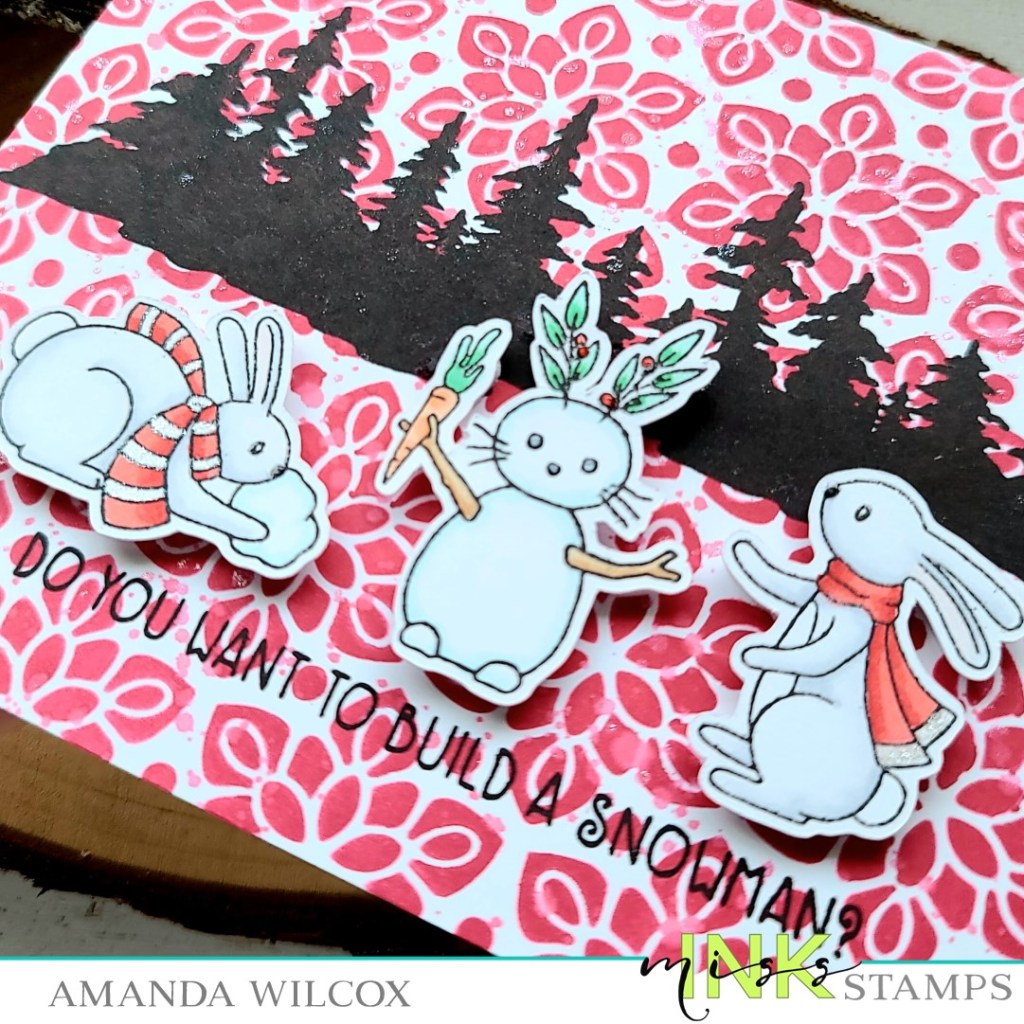
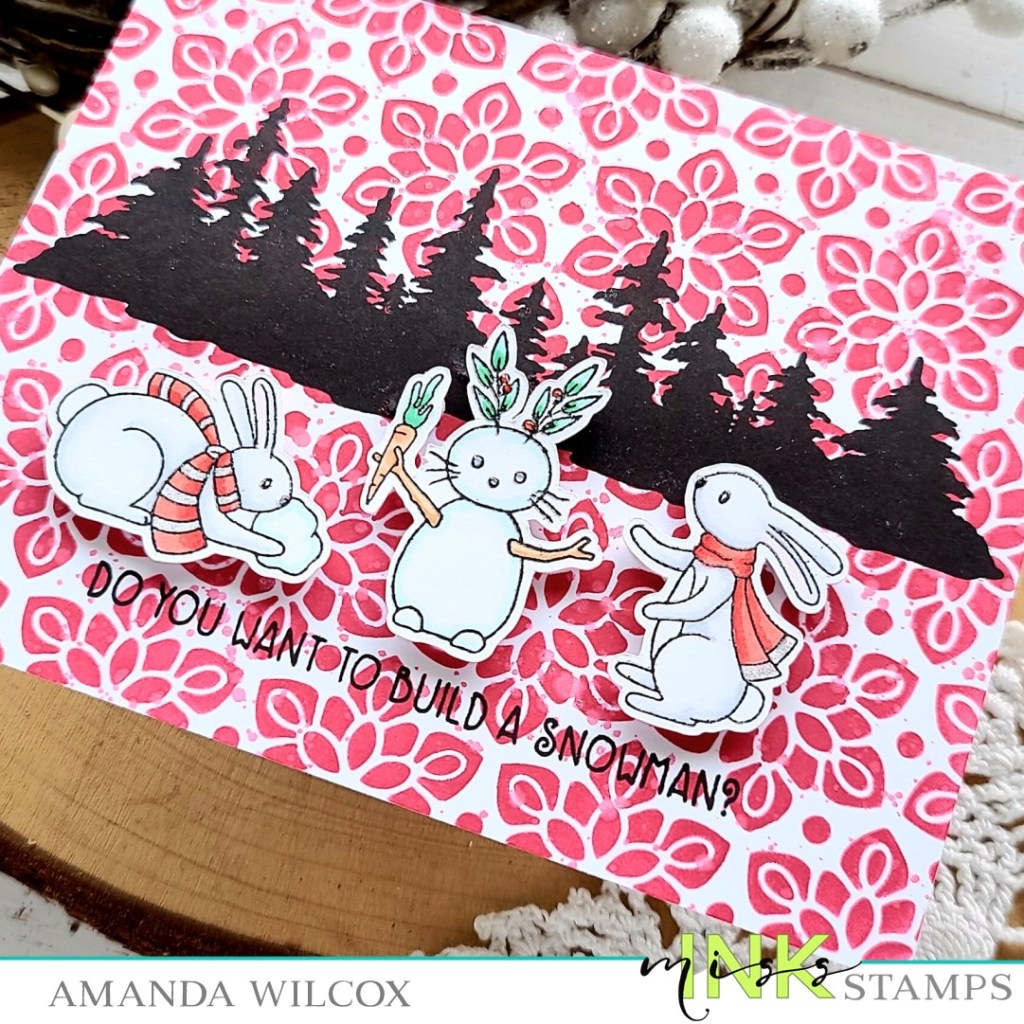
Happy Friday everyone! I’m popping in with a quick peek at the card I made for the Miss Ink Stamps | InkOn3 collaboration hop that’s happening on Instagram right now. Both companies have prizes up for grabs so be sure to hop and comment along on Instagram.
For my card, I used stamps and stencils from Miss Ink Stamps and ink and liquid pixie dust from InkOn3.
I inked up the Frosty Flakes stencil with Atelier Marilyn Red ink. I smooshed the ink pad on my glass mat and sprayed it with water, then splattered it on the stenciled panel. Next, I added a drop of liquid pixie dust to the watered down ink and flicked that all over for some shimmer. Isn’t it such a fun background?!?
Then I stamped the pine forest over the top and added a sentiment at the bottom using blackout detail ink. I stamped images from Snow Buddies with the blackout detail ink and colored them with my copic markers. I used the scan-n-cut to cut them out and popped them up with foam squares.
For finishing touches I added some glossy accents to bunny noses, the carrot stem and berries. Then I painted liquid pixie dust on the bunny’s scarves and my card is finished!
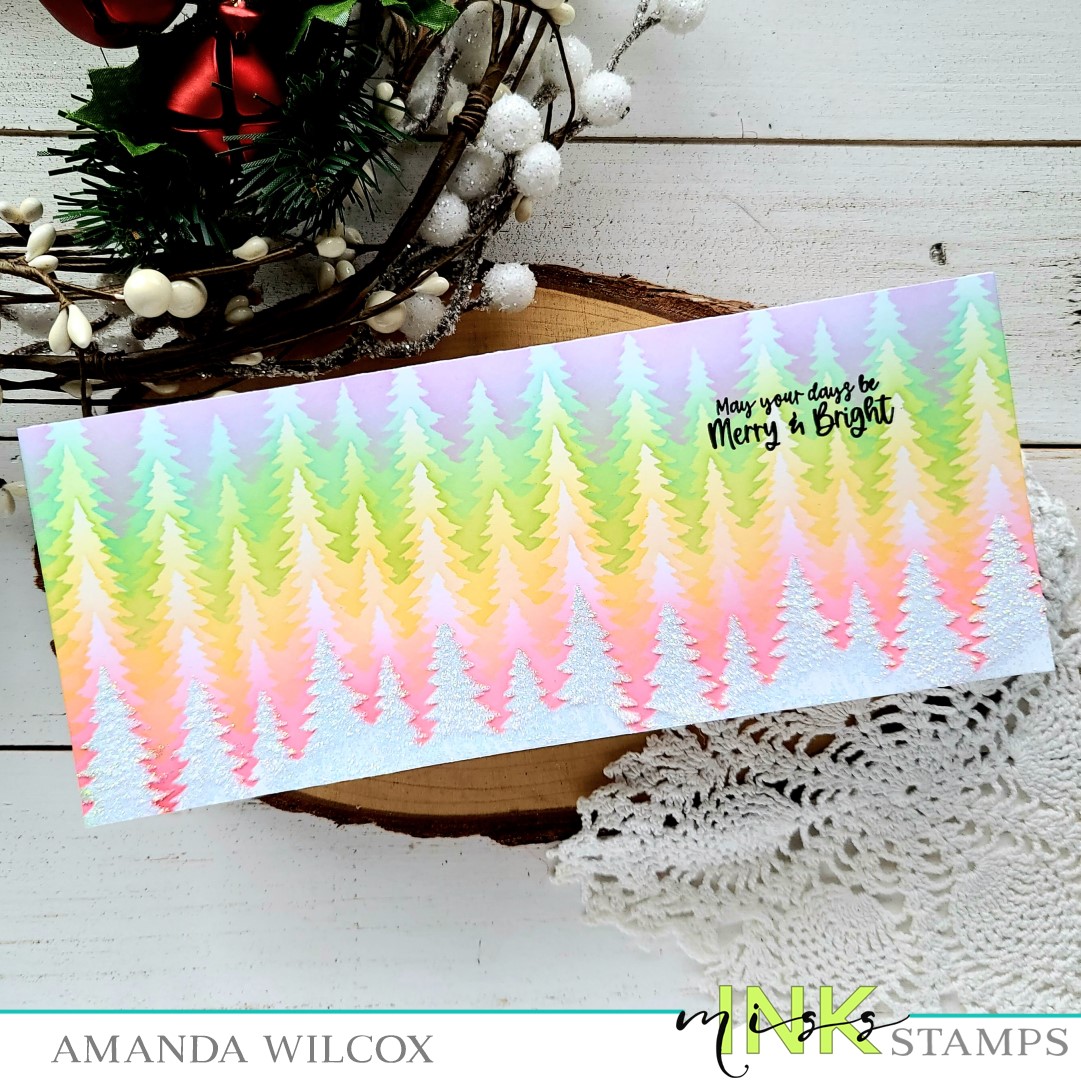
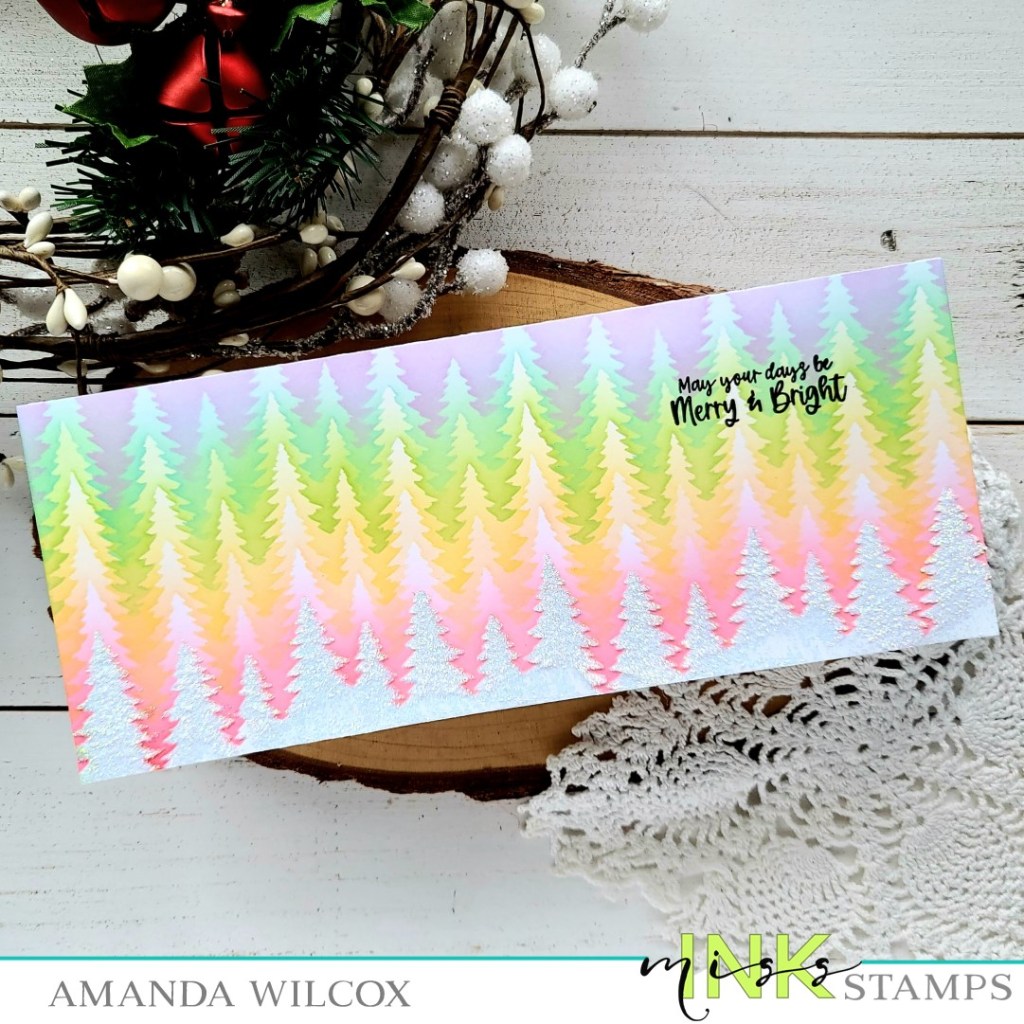
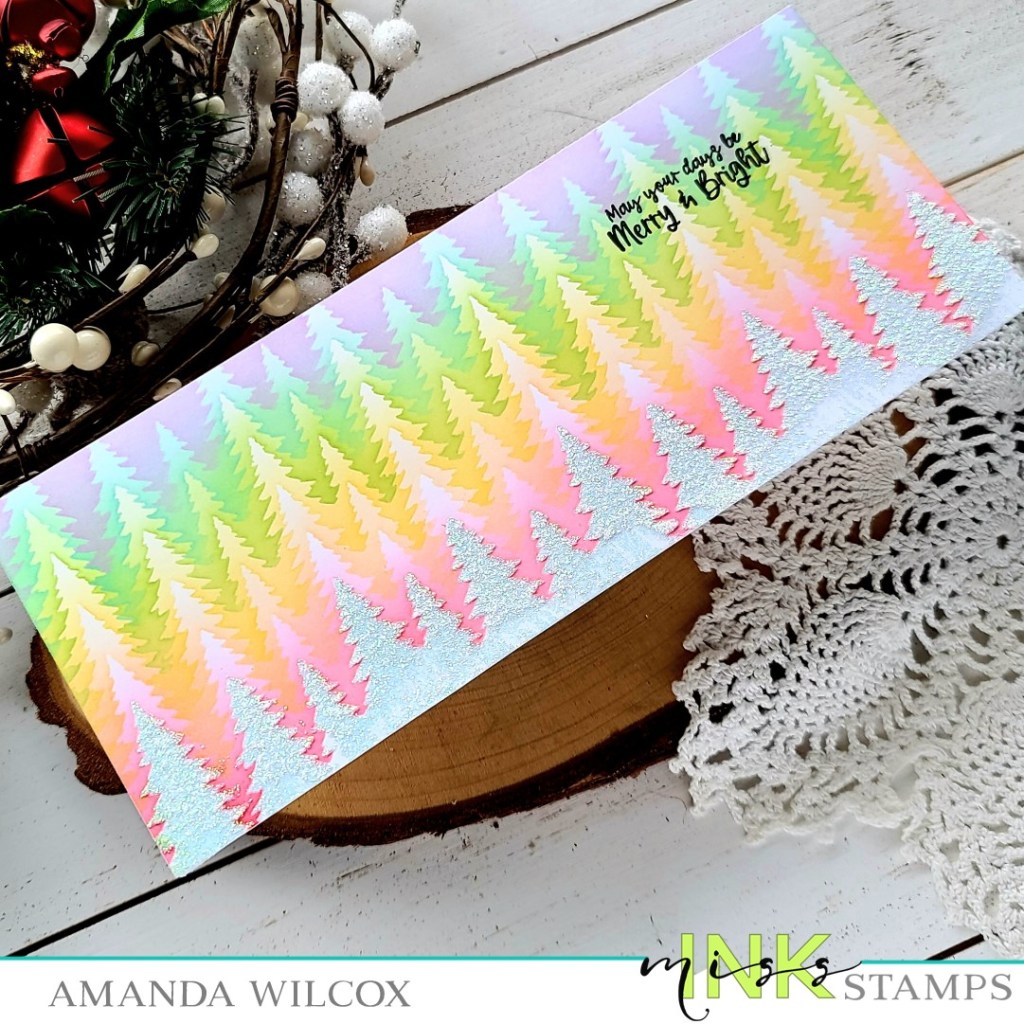
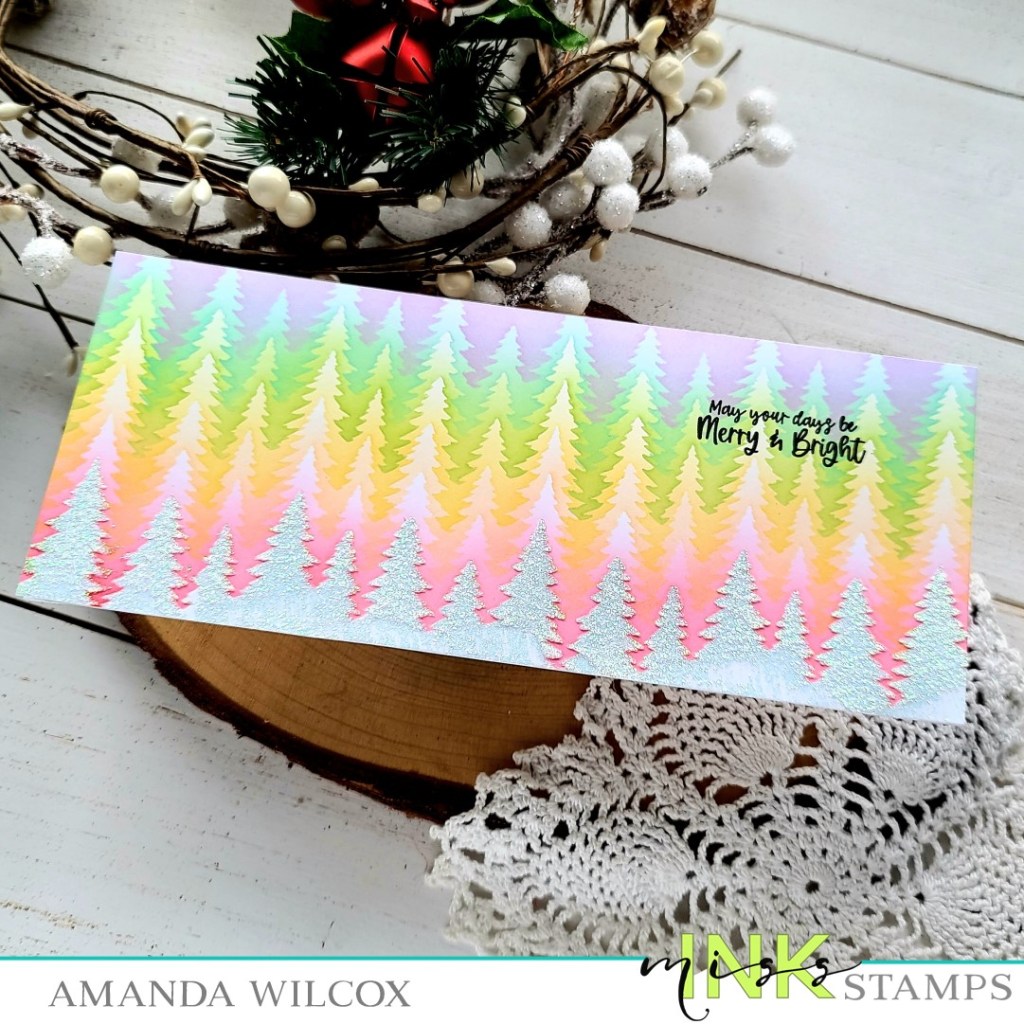
Hey friends! Today I have a really fun Miss Ink Stamps card to share with you that is literally one layer! I actually don’t think I’ve ever successfully accomplished this before and I couldn’t be more happy with the result!
To create my card, I took a white panel and secured it to my glass mat. Then I taped down the new Treeline stencil toward the bottom. I used Lawn Fawn dye inks and just inked the edge around the trees one layer at a time, shifting the stencil up 1/4 inch each color.
The rainbow I chose for today was, from top to bottom, fresh lavender, mermaid, celery stick, sunflower, peachy keen and guava.
Once I got to the top, I shifted the stencil to use the negative on the bottom half to protect my inking and smeared Thermoweb iridescent glitz glitter gel on the white space. I left it to dry and then trimmed my panel down to 8.5×3.5 inches and adhered it to a slimline card base.
Last, but not least, I popped the whole thing in my MISTI and stamped a sentiment from Deck the Halls in the upper right and this card is finished!
I have been very into rainbow Christmas cards this year for some reason. They are just happy and make me smile! I hope you are enjoying them too!
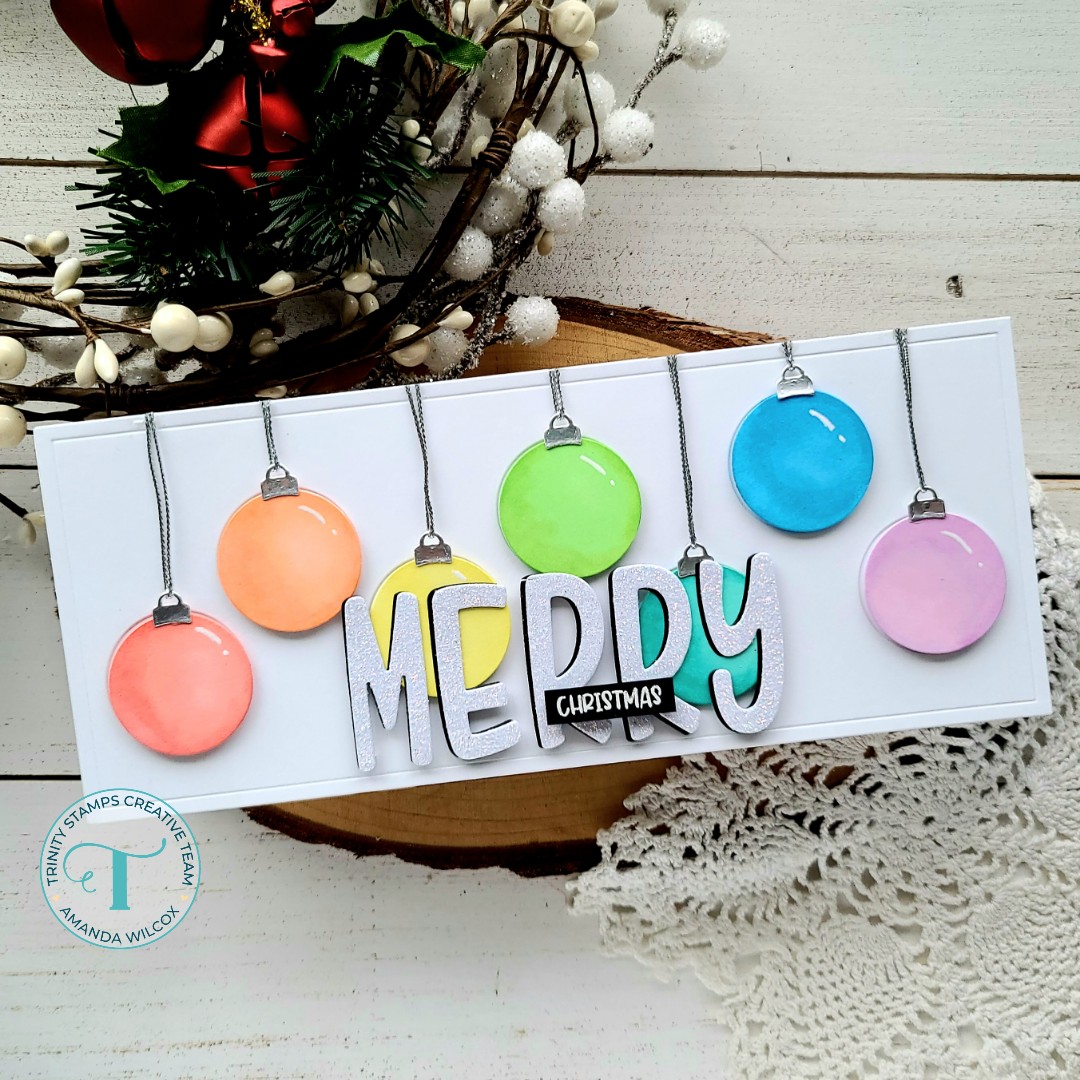
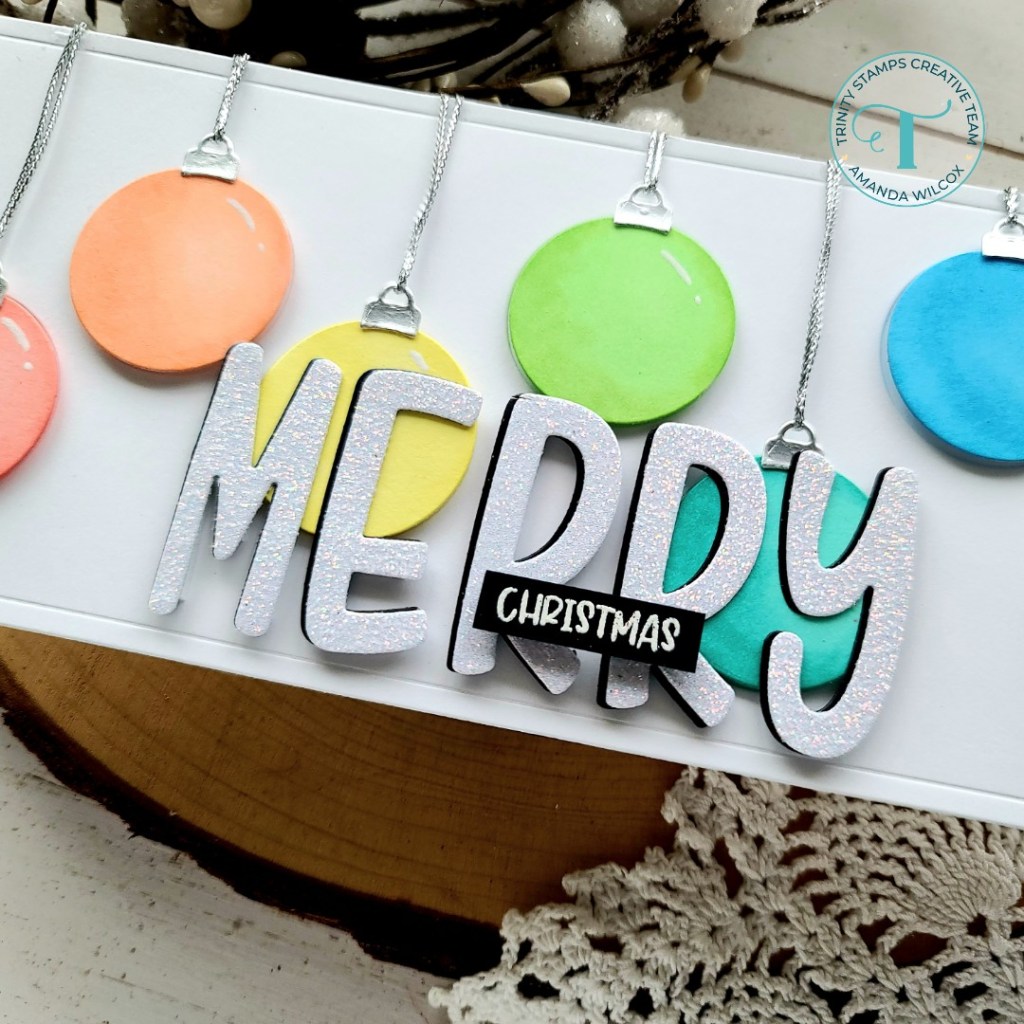
Happy Wednesday everyone! Thanks for stopping by. Today I’m over on the Trinity Stamps blog sharing a slimline card featuring a new cover plate and my favorite alphabet dies of all time!
To create my card, I just die cut the Slimline Hanging Ornament Panel die from white cardstock. I kept all the pieces so that I could color the ornaments with my copic markers. Then I cut the hanger piece of the ornaments from silver foil cardstock and started coloring.
Here’s a look at all the pieces and the copic colors I used on the ornaments. After they were colored I added foam squares to the back of each one and used liquid glue to adhere the silver toppers to them too. Then I adhered the main panel to a white slimline card base and popped each ornament in its place.
I threaded some silver cord from my stash through each one and glued the ends to the edge of the card. After the glue was dry I trimmed off any excess and added white gel pen highlights to each ornament.
For my sentiment I die cut MERRY from the marshmallow alphabet die set in white glitter and black cardstock. I glued the layers together and adhered them to the card front with a combination of foam strips and liquid glue. Then I went digging in my stash for a “Christmas” stamp and found this perfect one in the Tree Rex stamp set. I stamped and heat embossed it, cut it into a strip and popped it up with a foam strip.
Isn’t this card just so much fun!?! I’m so happy with how it turned out and had a blast creating it. I hope you enjoyed it too!
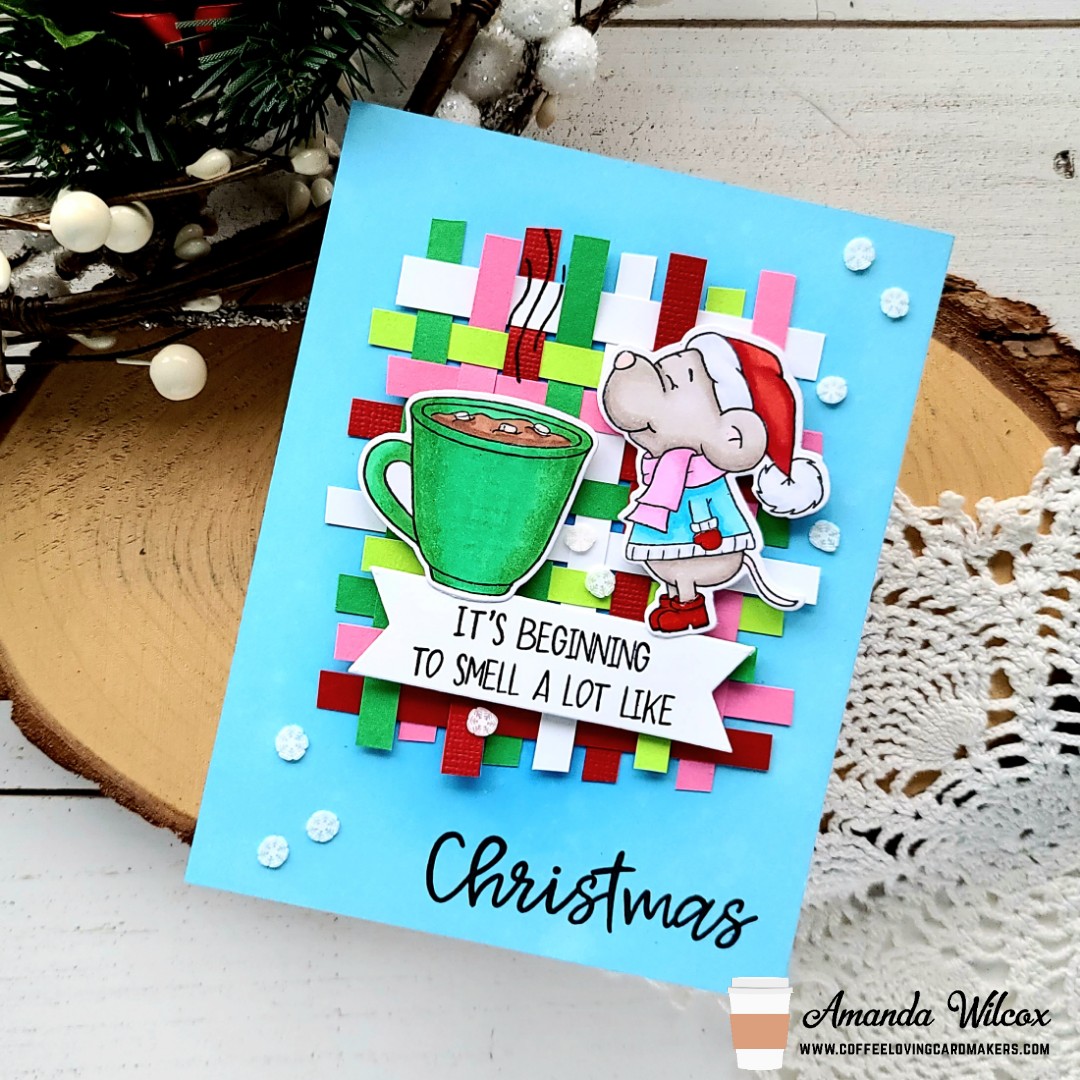
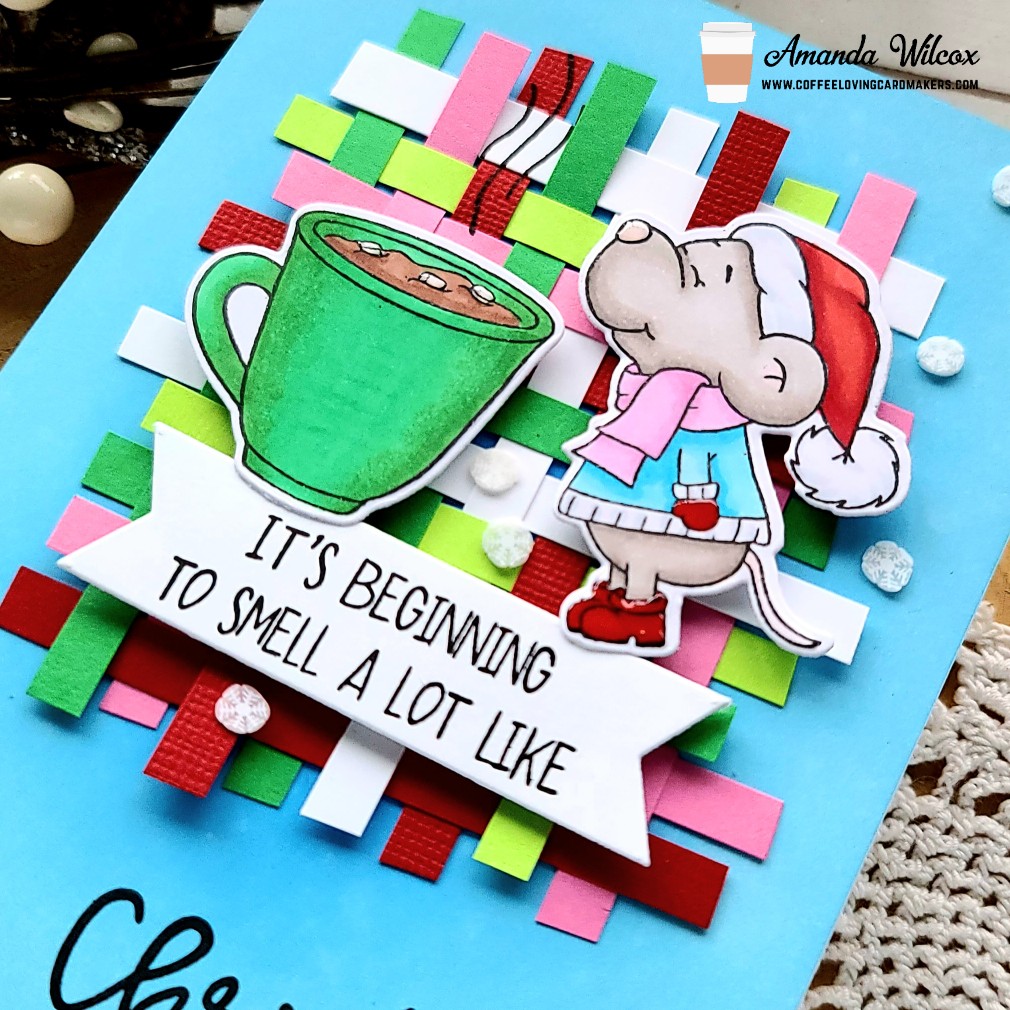
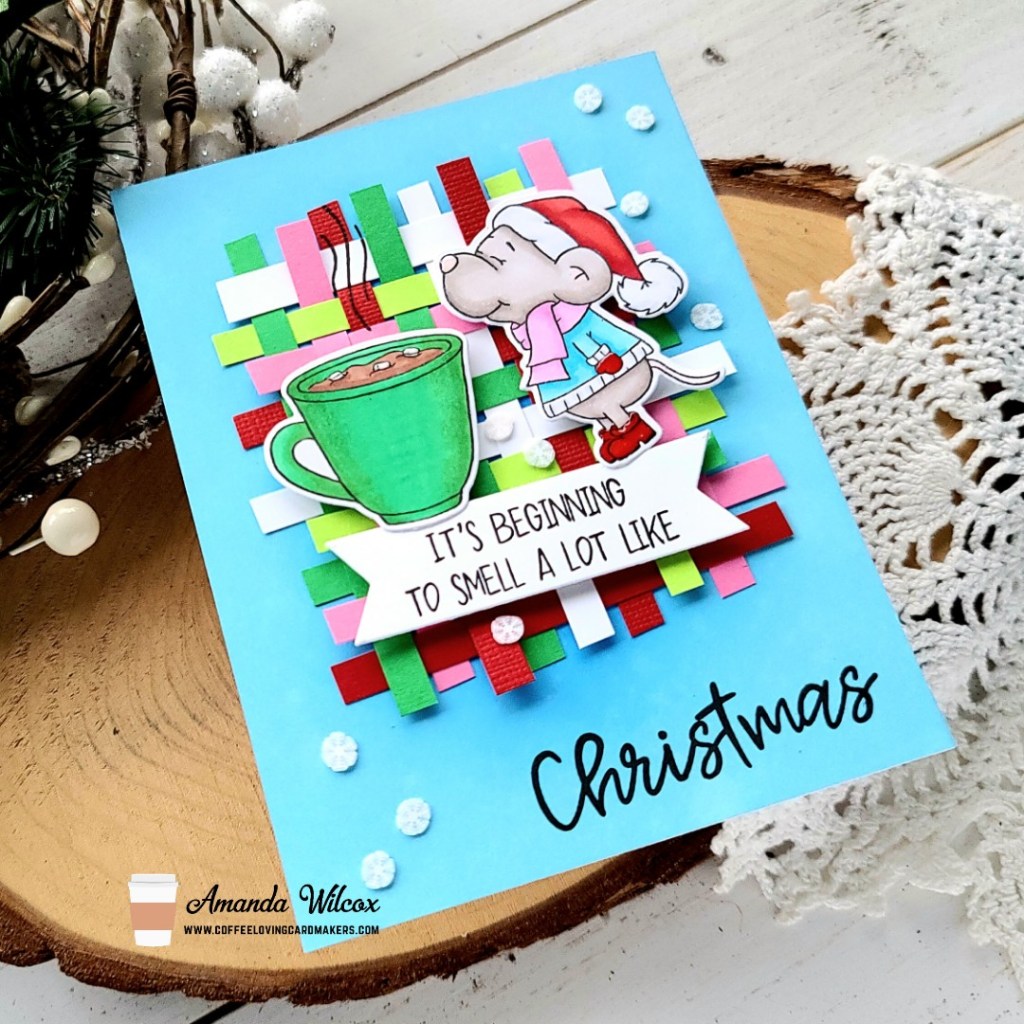
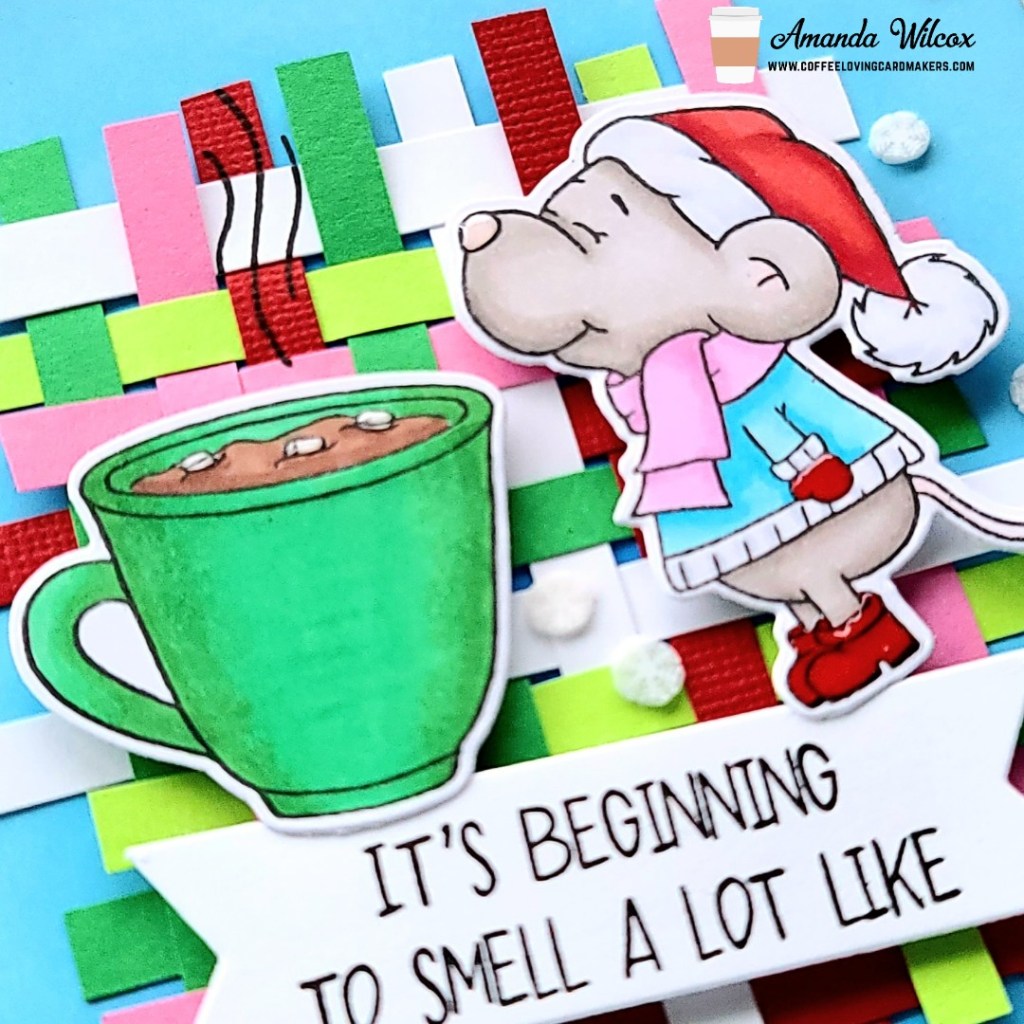
Happy Tuesday crafty friends! It’s time for another Tuesday Tea over on the Coffee Loving Cardmakers blog today. I’m sharing an adorable Christmas card featuring a new-to-me stamp set from Gerda Steiner Designs that a friend gifted to me.
I knew I wanted to use this cute mouse and the cup of hot cocoa from the set so I stamped them out but didn’t get any farther than that for a bit. Later on I was scrolling through reels on Instagram and one popped up with someone weaving strips of clay and it hit me! So I headed up to the craft room, chose a fun color palette and cut 1/4 inch strips of the colors and started weaving them together.
Then I colored my images in the same palette that I used for the paper weaving and used the coordinating dies to cut them out. I die cut a banner from Newton’s Nook and stamped a sentiment on it before adding foam squares to the back of everything.
Next, I ink blended a white panel with tumbled glass and salty ocean distress oxide inks and spritzed it with water. I stamped the last word for my sentiment in the bottom right corner before adhering the panel to a white card base. Then I added the paper weaving and popped my images and banner in place last.
For finishing touches, I added glossy accents to the mouse’s nose, mittens and boots and the marshmallows in the cup. Then I glued a scattering of snowy day clay embellishments from the Twiddler’s Nook shop around the whole card.
Isn’t this card so happy and fun!?! I just love how it turned out!
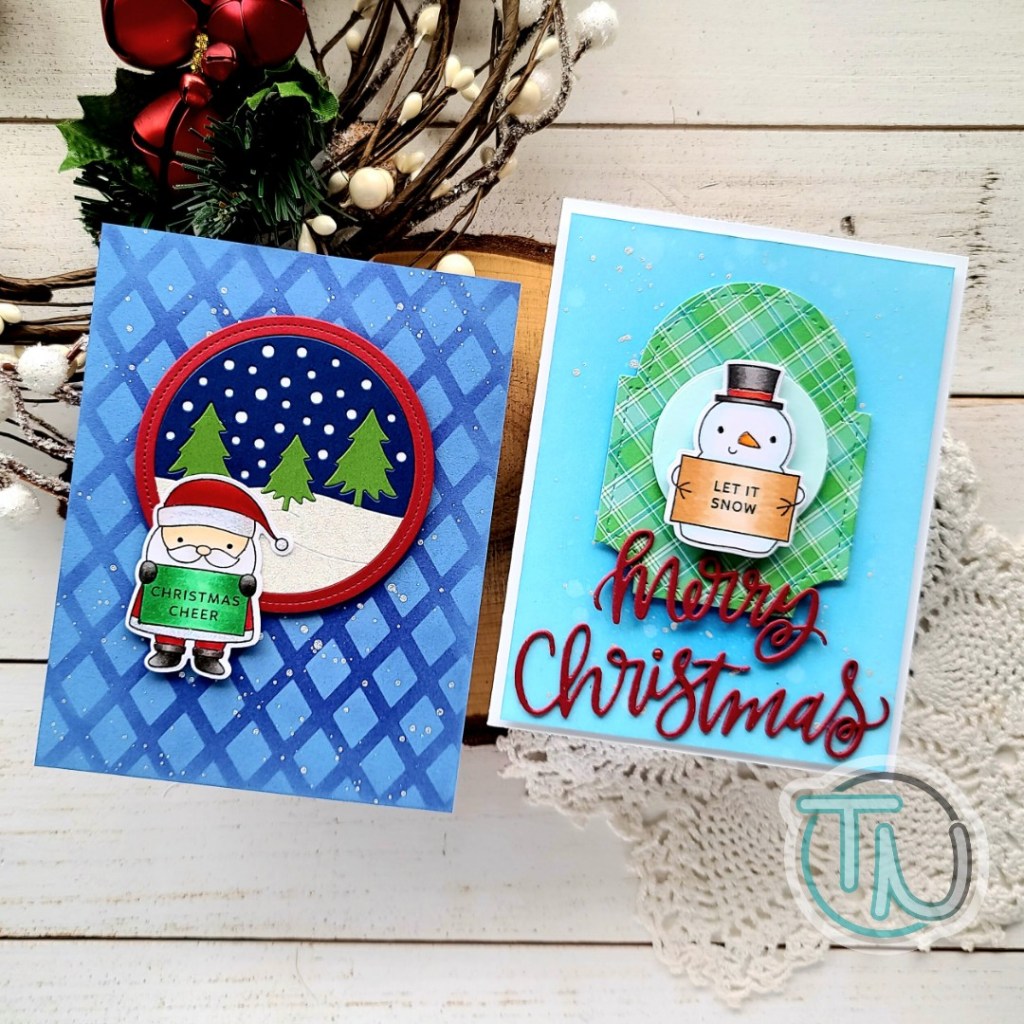
Happy weekend everyone! I’m popping in with a couple of fun Christmas cards featuring some Pretty Pink Posh goodies I had ordered a while ago but had yet to ink up. Shame, shame! Haha! Anyway, they are having a sale on the Christmas section of the store so I’ll have affiliate links below if you’re feeling inspired at all.
Any of the stamp sets out there where a critter is holding a sign and I get to put a sentiment in it…I’m a huge fan of! Totally drawn to them and want them all. Soooo, I had to get this adorable Christmas set – Holiday Signs. Today I stamped a couple of them and colored them with my copic markers. Then I used the coordinating dies to cut them out.
I had a couple of cards sketched out already so I just set to work with more die cutting and ink blending. Let’s look at the Santa one first.
Pretty Pink Posh has a line of dies that cut out scenes like the winter scene on this card, and I just love them! Today I cut the pieces from colored and glitter cardstock and adhered them to a plain white circle for stability.
Next, I took a dark blue panel and cut to A2 size before using the lattice stencil with a blending brush and white pigment ink. I splattered the panel with pearl watercolor and started assembling everything. The stenciled panel went on a card base, then the winter scene was popped up with foam tape and the Santa was adhered with a combo of liquid glue and a foam square to keep him flat.
So sweet, right!?! I just love how this one turned out! Next up, the super fun snowman!
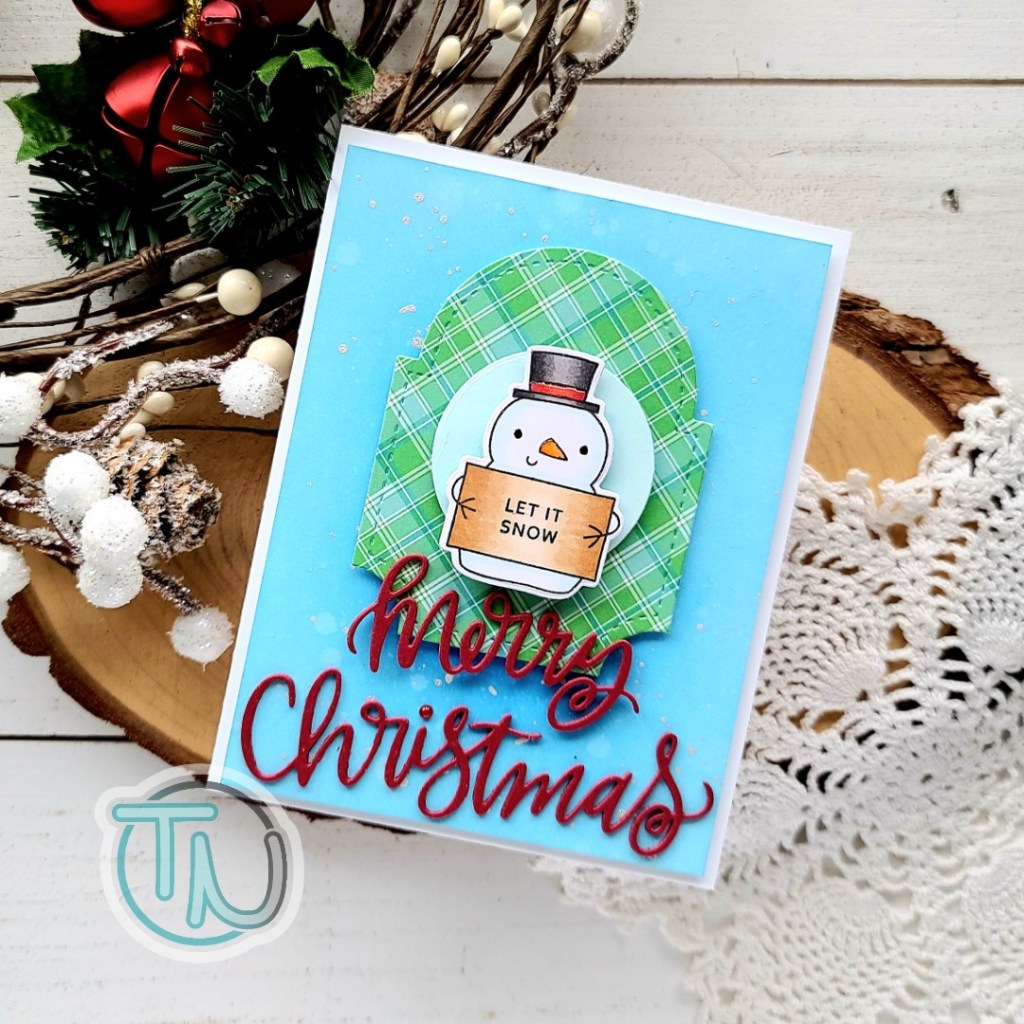
For this card, I die cut the Merry Christmas Script form red cardstock, lost the dot on the “i” and freaked out for a minute. I set it aside and proceeded with my card. Next, I used the coordinating dies for the Spring Circles set (I love this shape!) from plaid cardstock and light blue.
Moving on to the background before assembling every, I inked up a white panel with distress oxide ink in tumbled glass around the outside and salty ocean in the center so it gets a bit darker. I spritzed the panel with water and flicked pearl watercolor on it too.
For assembly, I added foam tape to the back of the blue panel and popped it up on a white card base, then I popped up the other elements with foam squares. I used liquid glue to adhere the Merry Christmas Script die cuts and then contemplated die cutting another dot when I remembered that I have the beautiful Pretty Pink Posh pearl collection! I pulled out the red pearls and glued one on instead!
For finishing touches on both of these cards, I used glossy accents, on parts like Santa’s boots and gloves, the snowman’s nose and hat. Then I added unicorn Stickles to Santa’s hat and finished things off with black glaze pen on both of their eyes.
The links above are affiliate links. This helps fund my crafty adventures at no additional cost to you. Remember Pretty Pink Posh is having a sale on all things Christmas, so grab some new goodies and get holiday crafting!
I appreciate you sharing your time with me. Have a fabulous day!
Hello everyone! I’m over on the Pink & Main blog today sharing a sweet little snow globe shaker card featuring some of my favorite Christmas mice from last year’s holiday release. I simply couldn’t go without inking them up again.
To create my card, I started with the snow globe elements. I stamped the Empty Snow Globe image and one of the Christmouse images and colored them with my copic markers. Then I curved a sentiment from Christmouse onto the base of the snow globe. I used the coordinating dies to cut everything out, making sure to cut 2 extra snow globe frames and a solid white cardstock snow glob plus an acetate one as well.
I used EZ squeeze liquid glue to adhere all the layers together and filled my shaker with a little sparkling in the clouds flock with glitter and a sprinkle of ice rink glitter too. I added foam tape to the back of the snow globe and set it aside for later.
I flipped through the paper pad included in the Homespun Christmas card kit and found 2 sheets that I liked together. I cut them both with an layered rectangle A2 die. I trimmed them down to 2 inches and 3.5 inches and adhered them to a white card base. Next, I cut a strip of white glitter cardstock .25 inches wide and adhered it with a strip of EZ tear tape.
I removed the release paper on my snow globe and popped it up in the center of the card and finished things off with a small scattering of red pearls from the rainbow pearls pack.
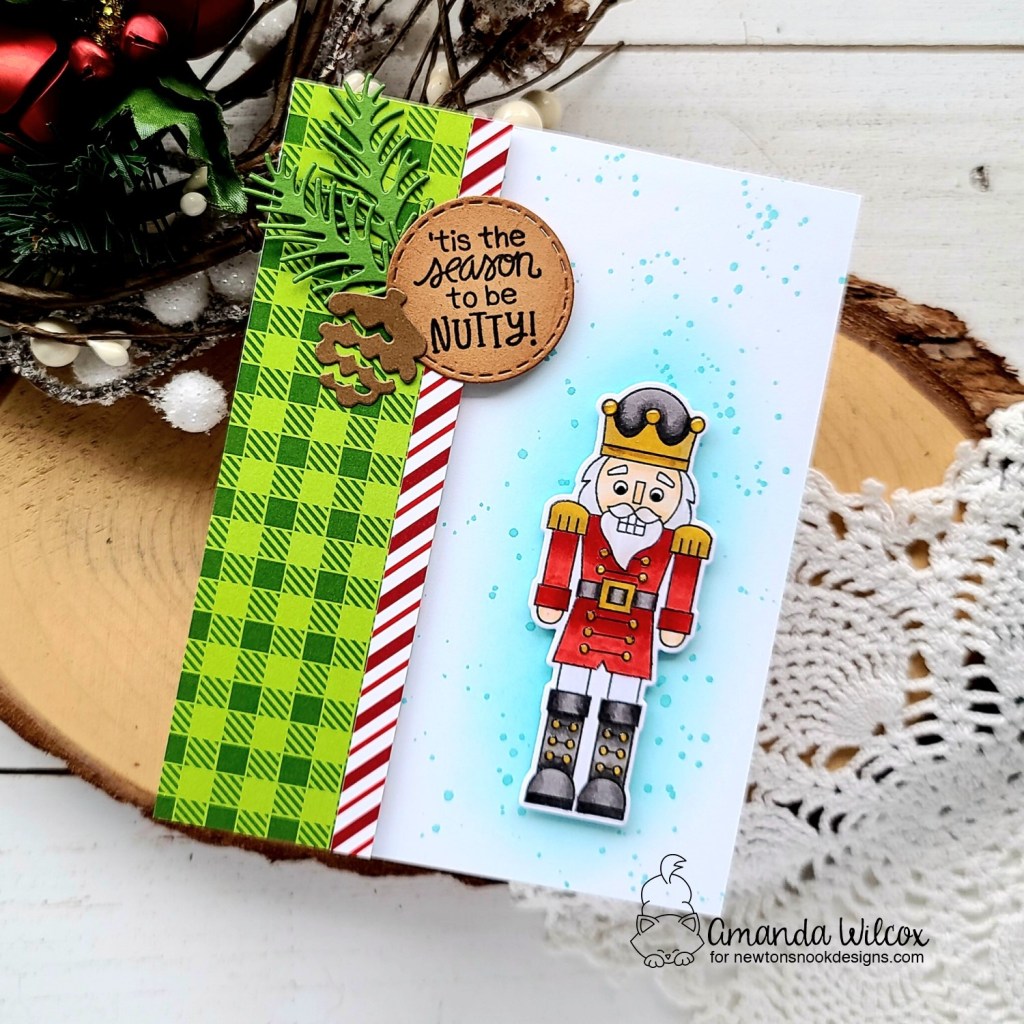
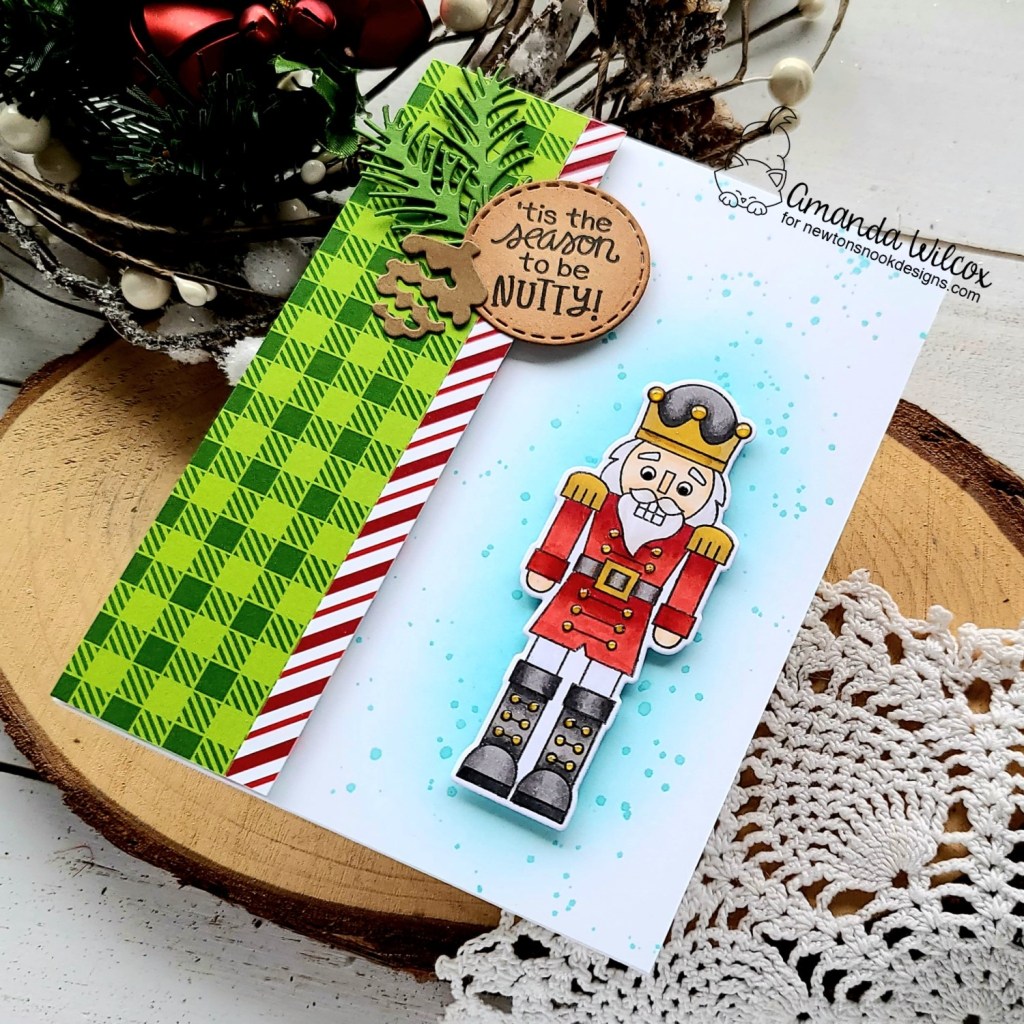
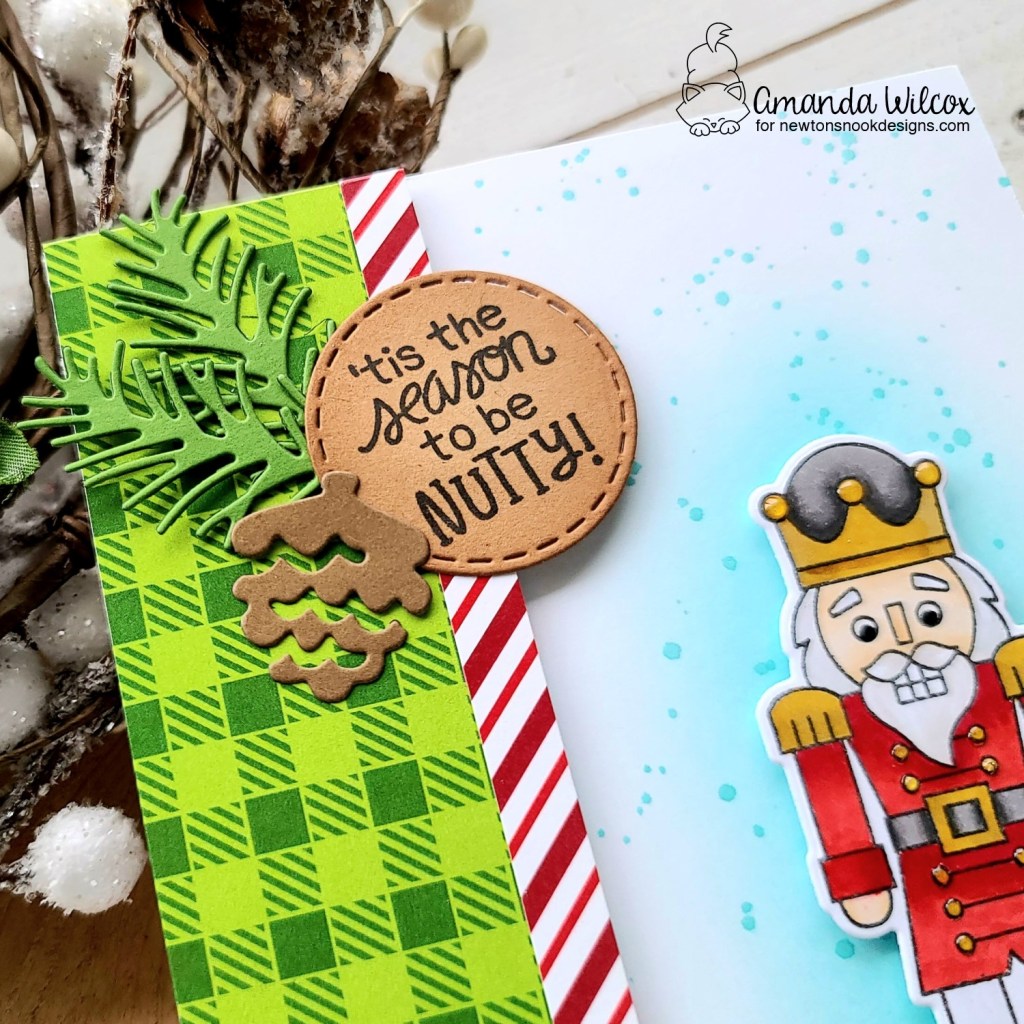
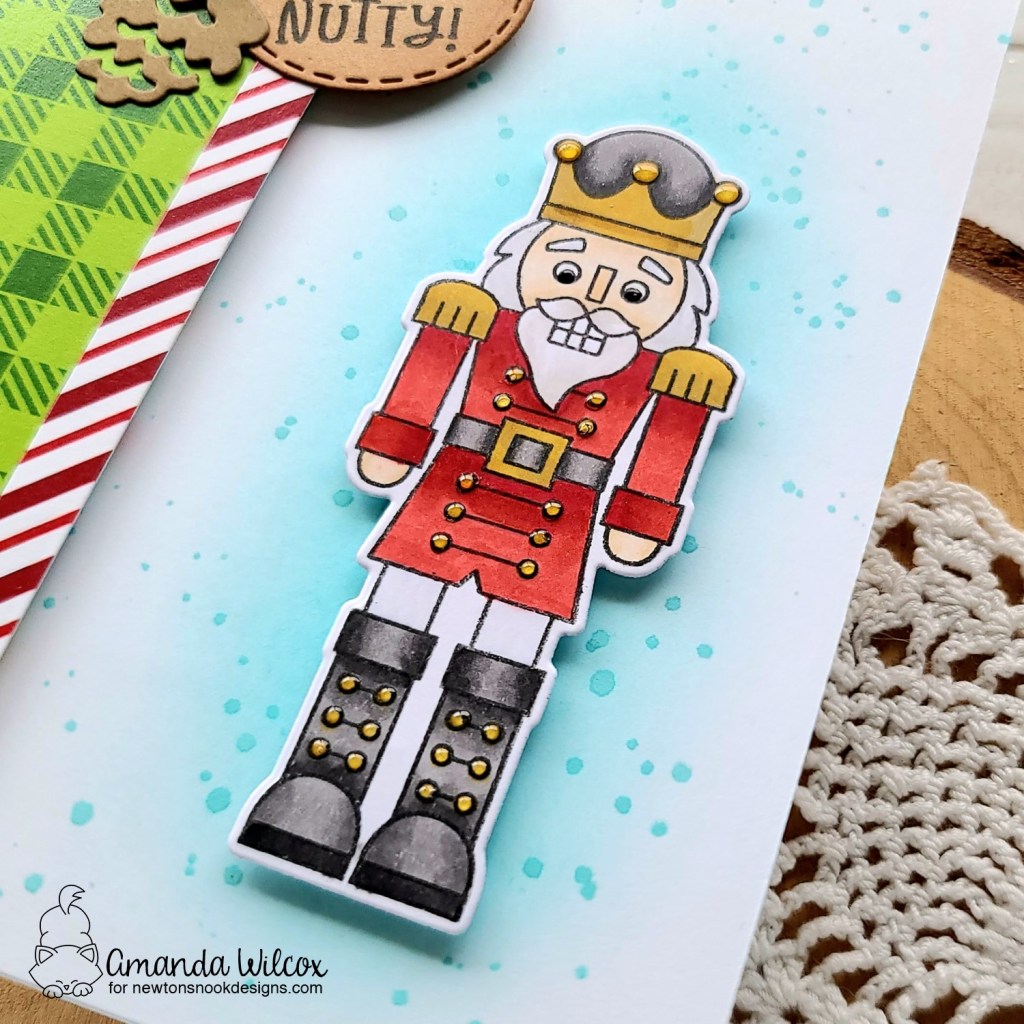
Hello everyone! Thanks for stopping by! I’m excited to be apart of another Newton’s Nook Deck the Halls with Inky Paws Blog Hop! These are so fun and there is so much great holiday inspiration to be had!
I don’t know when it started but I have a thing for nutcrackers at Christmas. So naturally I’m totally drawn to this super fun Nutcrackers stamp set and chose it for today’s card share. I started by stamping one of the images and coloring it with my copic markers. Then I used the coordinating die to cut it out.
I chose 2 patterns from the Meowy Christmas paper pad, cut one at 2×5.5 inches and the other at .25 inches. I adhered them together with scrappy tape and added foam tape to the back.
Next, I cut a white panel to A2 size and inked a light blue shadow behind where my nutcracker is going to go. For a little added interest I flicked some watered down ink on the whole panel as well. Then I adhered the patterned paper to the left side and also popped my nutcracker up with foam squares.
I die cut the smallest circle from the Circle Frames die set out of kraft cardstock and inked the edges with some brown dye ink. I stamped a sentiment from the Nutcracker stamp set on it. Die cut a pinecone and some tree sprigs from the Pine & Holly die set and adhered everything with liquid glue and foam squares.
For finishing touches I added glossy accents to all of the buttons on the nutcracker and the tips of his crown as well. Then I came in with black glaze pen on his eyes for a little shine there too.
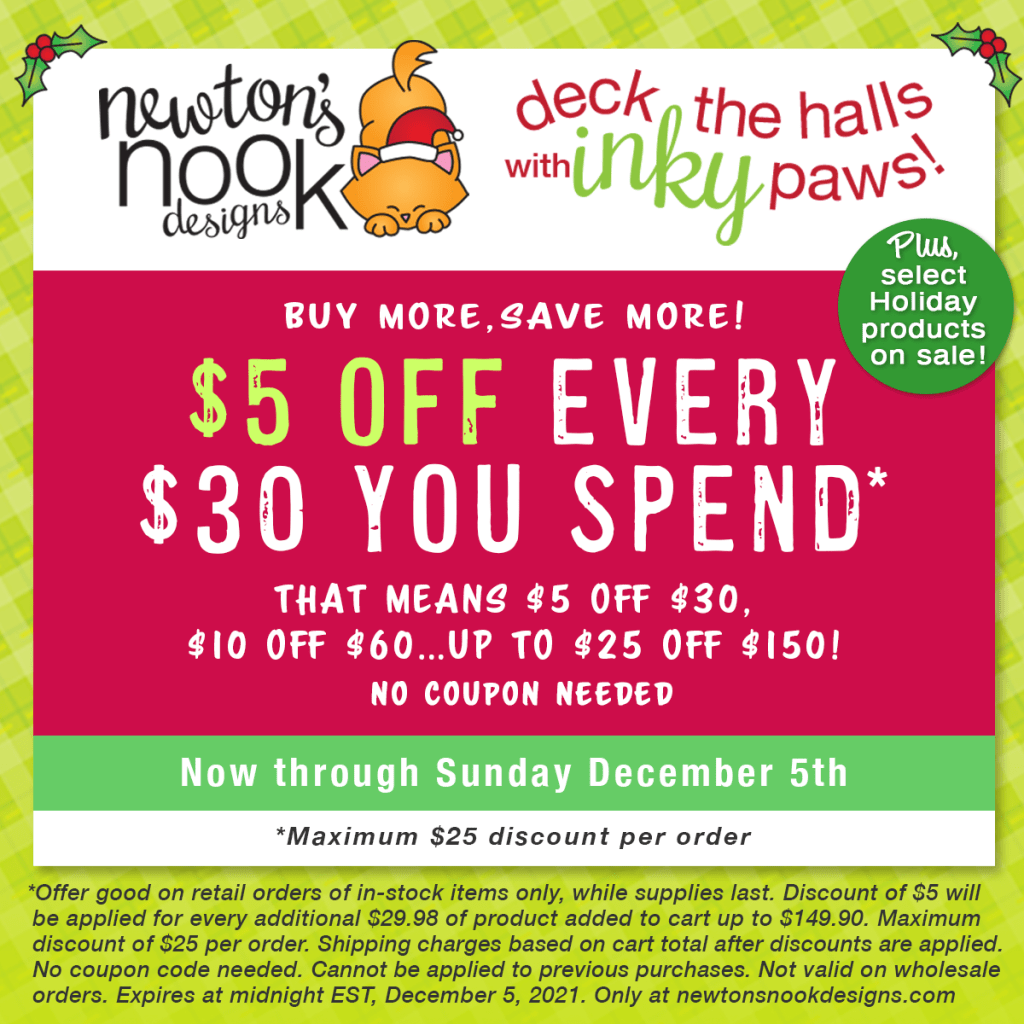
Enter to Win! Deck the Halls with Inky Paws Hop Prizes! We will be choosing two lucky winners to win a $25 store credit for Newton’s Nook Designs online shop! To enter, just leave comments on the Design Team Member and Guest blogs (see list below)! Two winners will be chosen at random from the collective blogs in the blog hop. Make sure to check out each of their blogs and comment for your chance to win. You will not know which blog has been chosen so the more you comment on the better your chances are of winning! You have until Sunday, December 5th at 9 pm EST to comment — winners will be announced on the NND blog on Monday, December 6th.
Deck the Halls with Inky Paws SALE! $5 off every $30 You Spend! That means $5 off $30, $10 off $60…up to $25 off $150!* No Coupon Needed Now through Sunday, December 6th! *Maximum $25 discount per order.
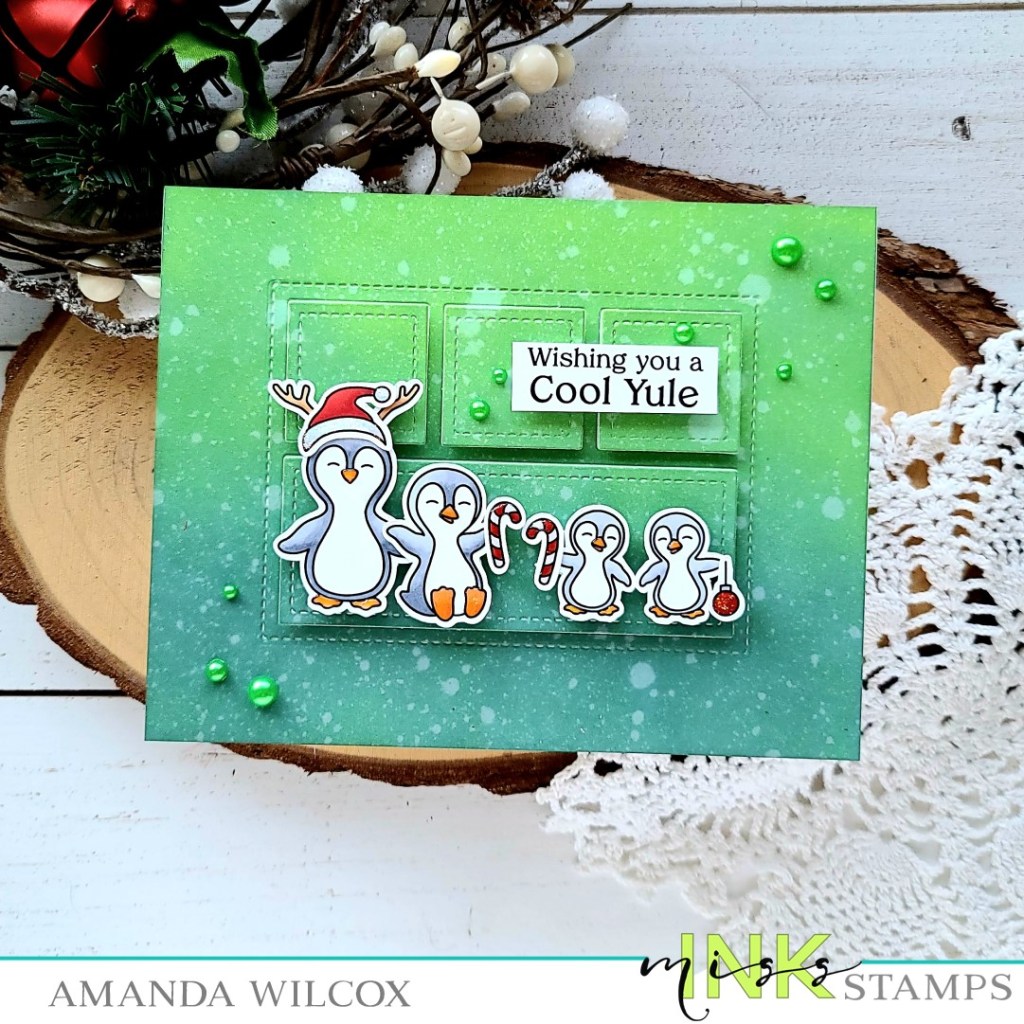
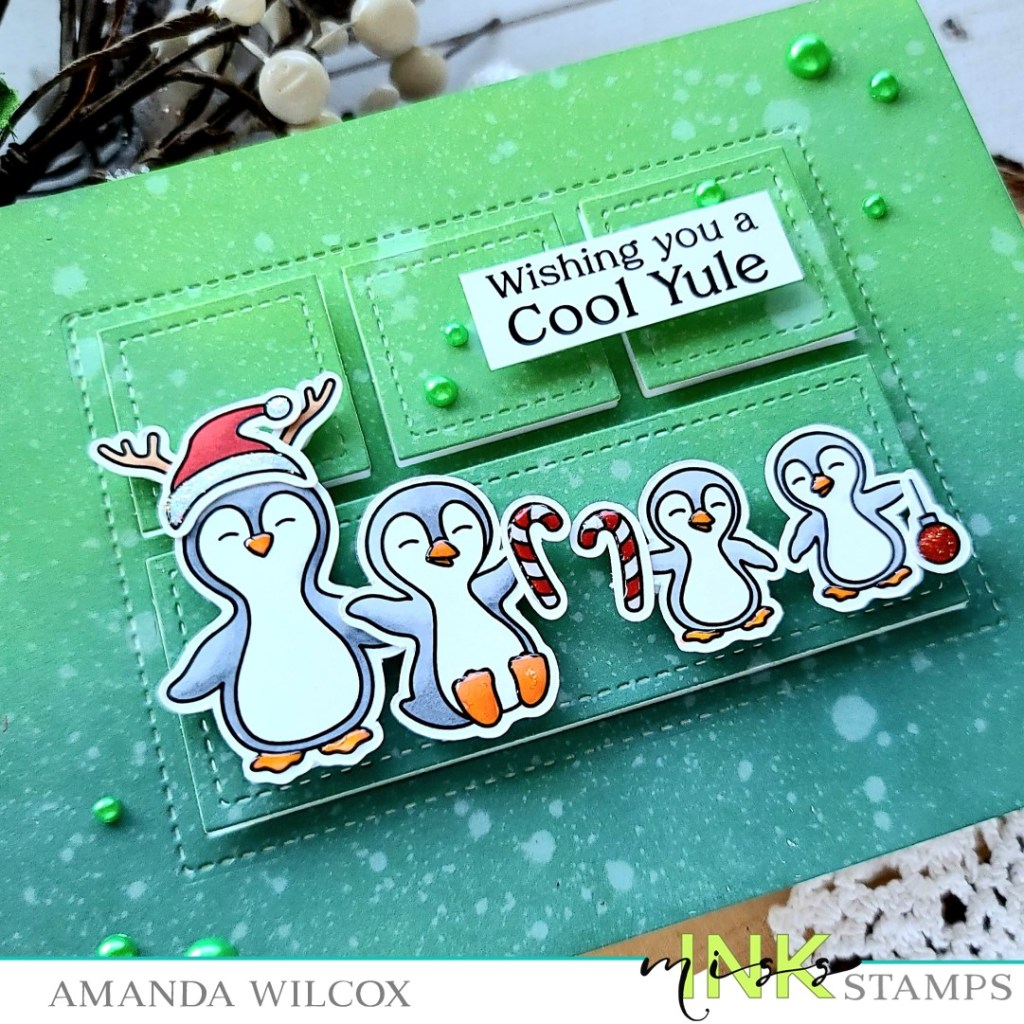
Hello again! I hope your week is going fantastic! I’m having a blast doing all things Christmas – decorating, crafting, baking – all of it! And today I have an adorable Miss Ink Stamps Christmas card featuring the newly release Have an Ice Day penguins! They are too cute and I just love coloring them!
I started by stamping images from Have an Ice Day and colored them all with my copic markers. Then I used the scan-n-cut to cut them out and used liquid glue to adhere all the bits and pieces to my sweet penguins.
Next, I blended distress oxide ink in rustic wilderness and mowed lawn on an A2 panel and spritzed it with water. I blotted it dry and ran it through my die cutter with the Pretty Pink Posh Storybook 2 die. I love these dies and how they give you something to ground your images. They also make fun shaker cards if you feel like doing that.
I adhered the main part of the inked panel to my white card base with liquid glue and then popped the windows back in place with foam squares for a little dimension and interest.
Then I added all of my images and sentiment strip with foam squares as well. For finishing touches I added a scattering of PPP Shamrock pearls across the design. Last I couldn’t resist a little unicorn Stickles and glossy accents on the penguins and their accessories.
Isn’t this little penguin family just the sweetest!?! I can’t get over how cute the hat is with the reindeer antlers coming out of it. It makes me giggle every time.
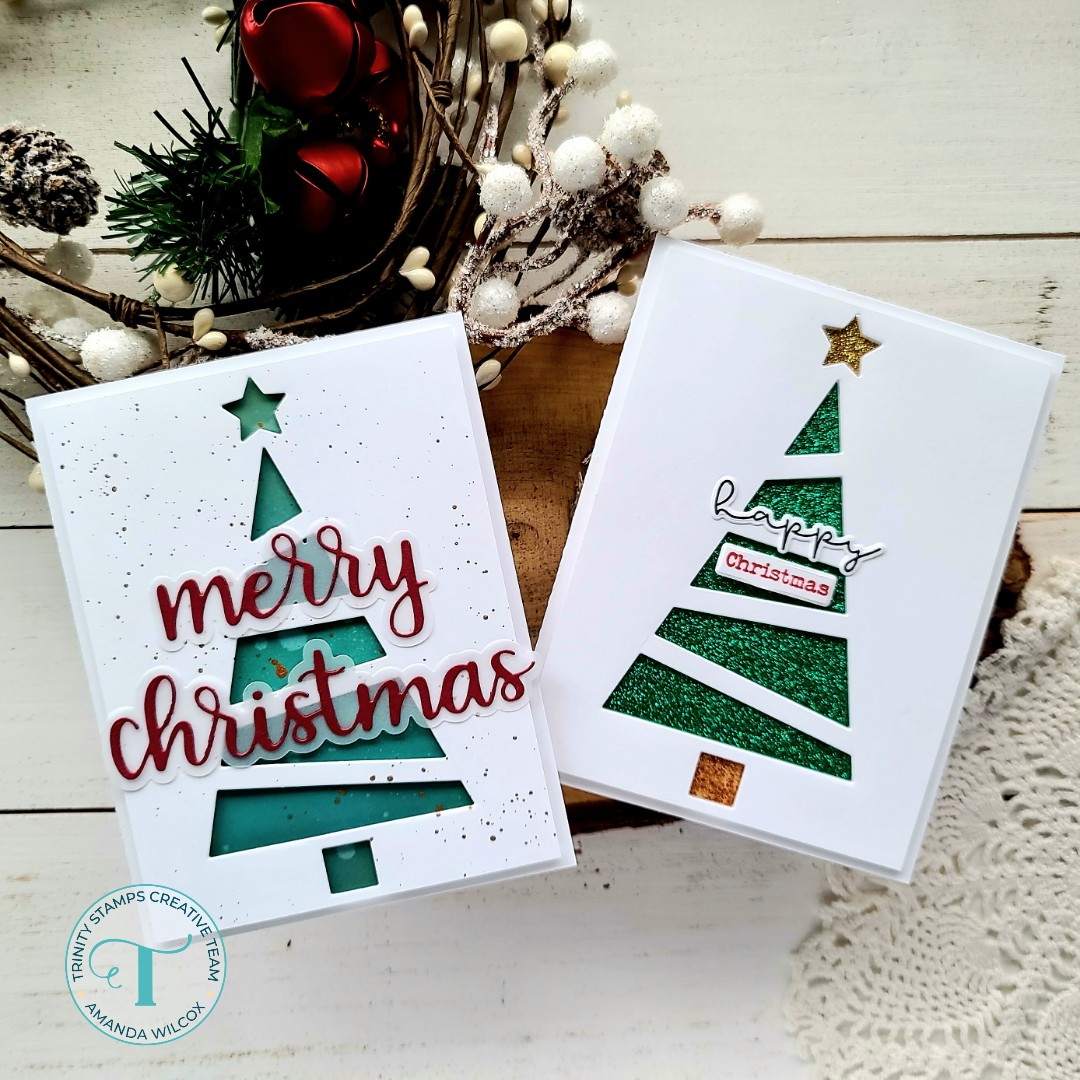
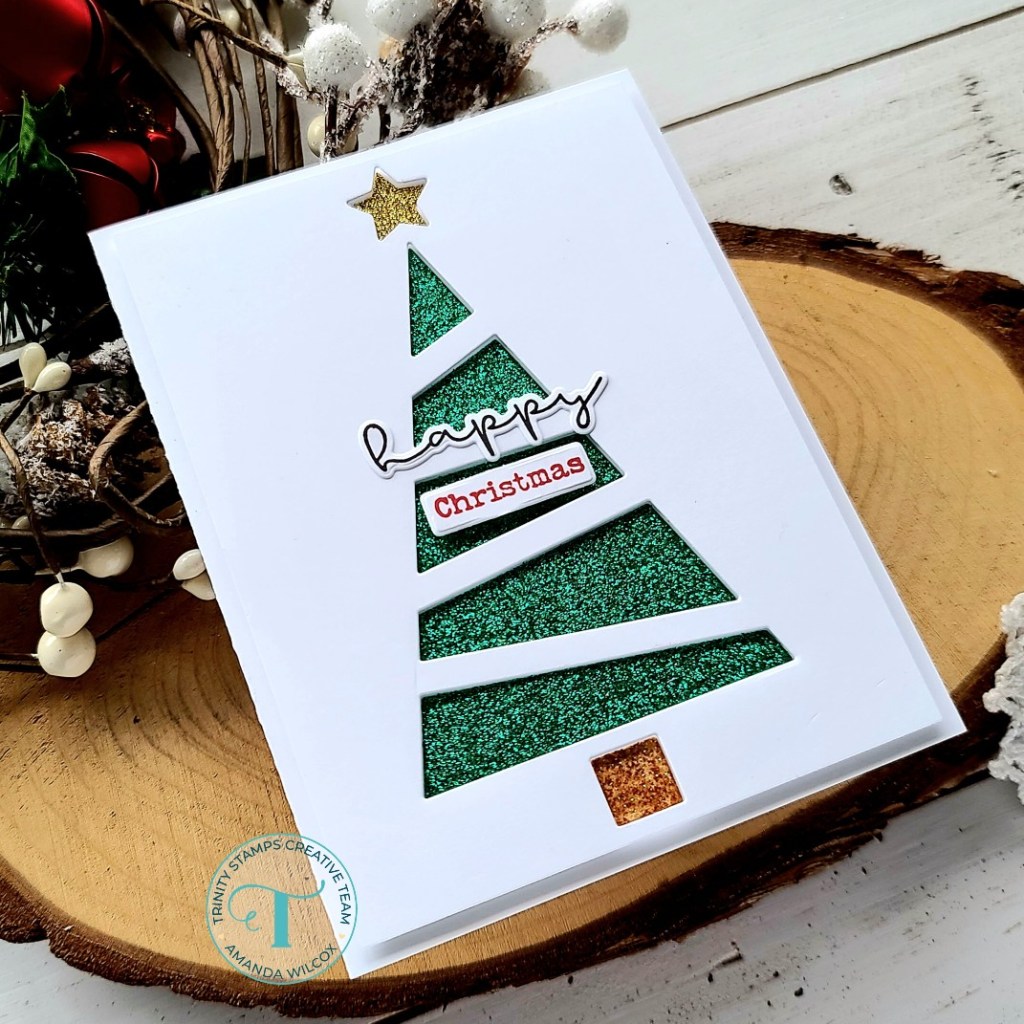
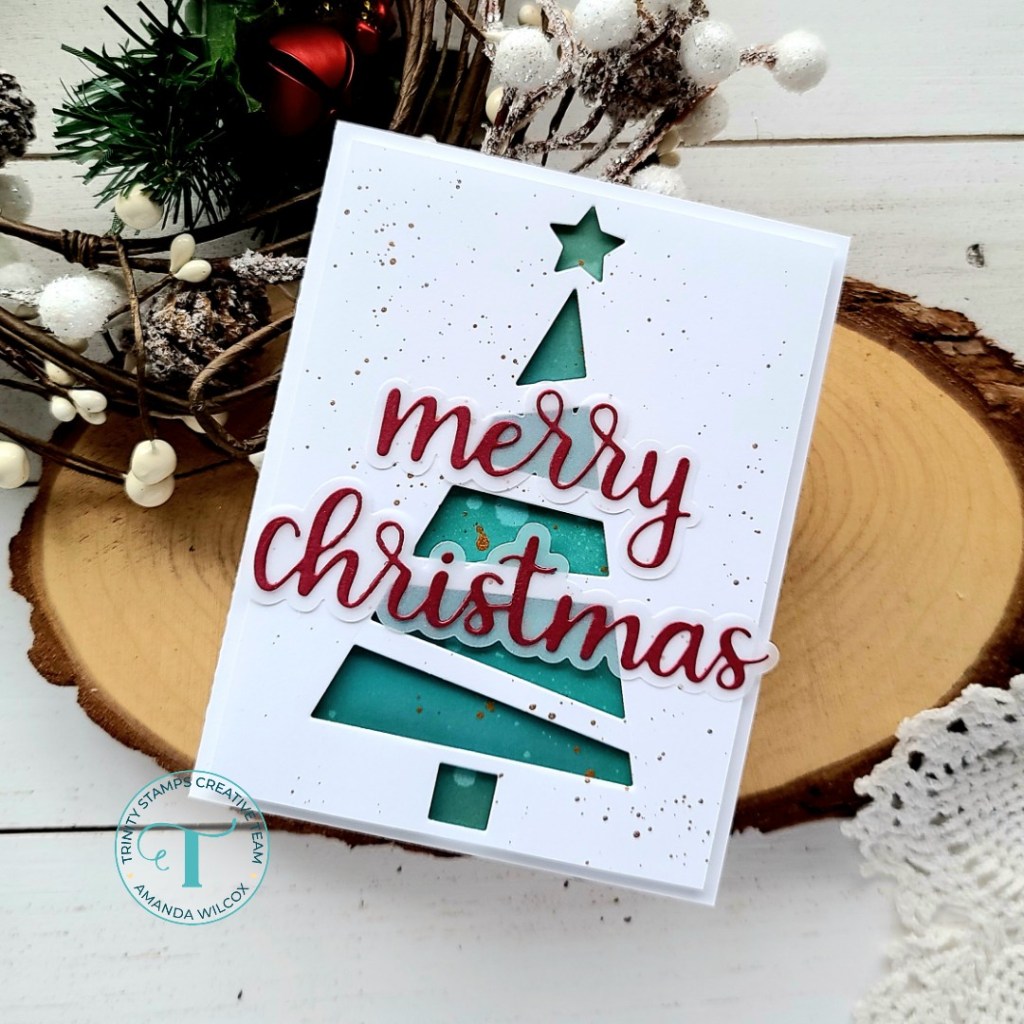
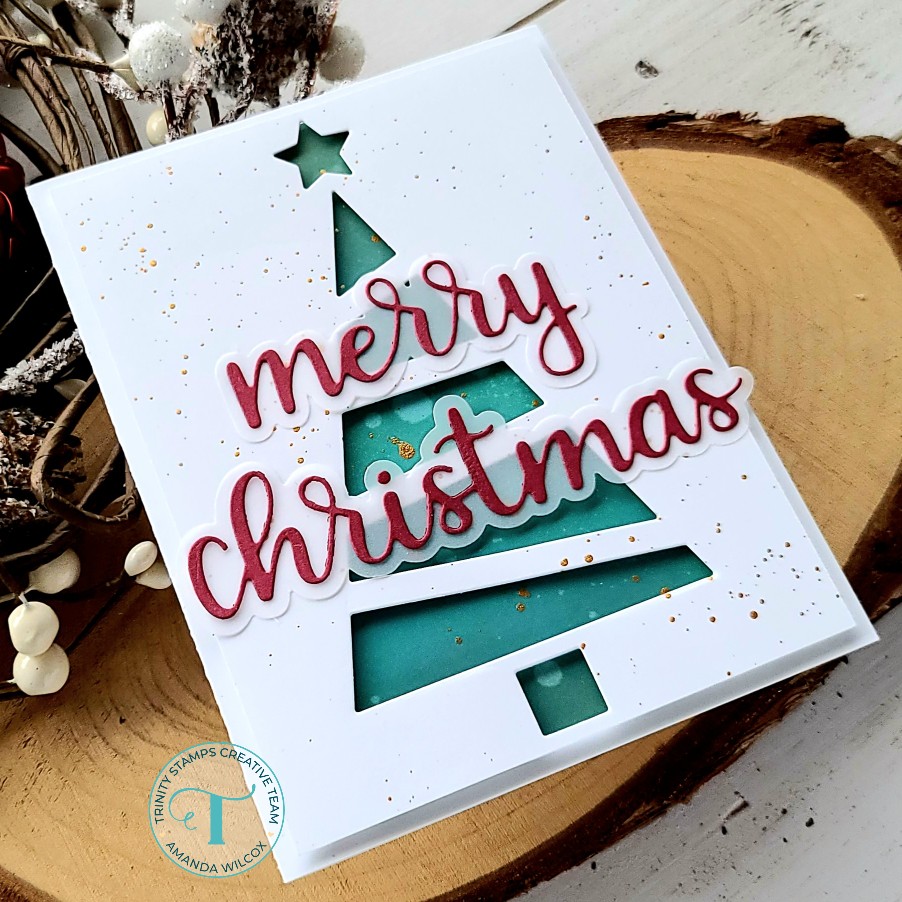
Hello everyone. Today I’m sharing a couple of cards featuring the Christmas Tree Cut Out die from Trinity Stamps. This is such a fun die cut and has endless possibilities for different looks. Today I’ve got two to share with you.
Today I took 2 white cardstock panels measuring 4×5.25 inches and cut the tree from the center of them. I discarded the pieces it cut out but you could totally save them for another set of cards too! Bonus!
For my first card, I cut 3 pieces of glitter cardstock to fit behind the openings. (Tip: When you don’t have the right color glitter cardstock but you have white glitter, just use a copic marker to color it. I used E35 for the trunk.) I added foam tape to the back of my Christmas tree cutout panel and positioned the glitter cardstock so the right colors were only showing in their respective openings. Then I glued the whole thing to a white card base.
I pulled out the new Simply Sentimental Happy stamps and dies to make my sentiment and glued it in place with liquid glue.
Totally clean and simple but so visually fabulous with all that glitter! Don’t you think!?!
For my second card I went monotone behind the cutout with distress oxide ink blended on a white panel. I blended evergreen bough and lucky clover today. I spritzed the panel with water and flicked gold watercolor on it too. Then I decided to also splatter the gold watercolor on my Christmas Tree cutout panel too.
I adhered these panels together the same way I did the others – with foam tape and then liquid glue to a white card base. Last, I die cut the Scripty Christmas shadow from vellum and words from red cardstock and adhered them together. Then I adhered them to the front of the tree cutout.
Like I said before, there are tons of ways to use this single die to get different looks. You could even make it a really cool shaker or inlay patterned paper on a single layer card! That would be gorgeous! See, I’m getting extra ideas just writing this blog post!
Hello crafty friends! Today might be a little bit of a longer post because I have 2 cards and a tag to share with you.
I have been in love with the Ellen Hutson bear by Julie Ebersole since it first came out. I immediately splurged on the stitching dies and have made a billion of those cuties but I recently started adding the stamps to my collection – starting with the World Card Making Day release and I’ve just kept going since then.
Here’s a look at all the projects I have to share with you today. I hope you like them. They were so fun to create!
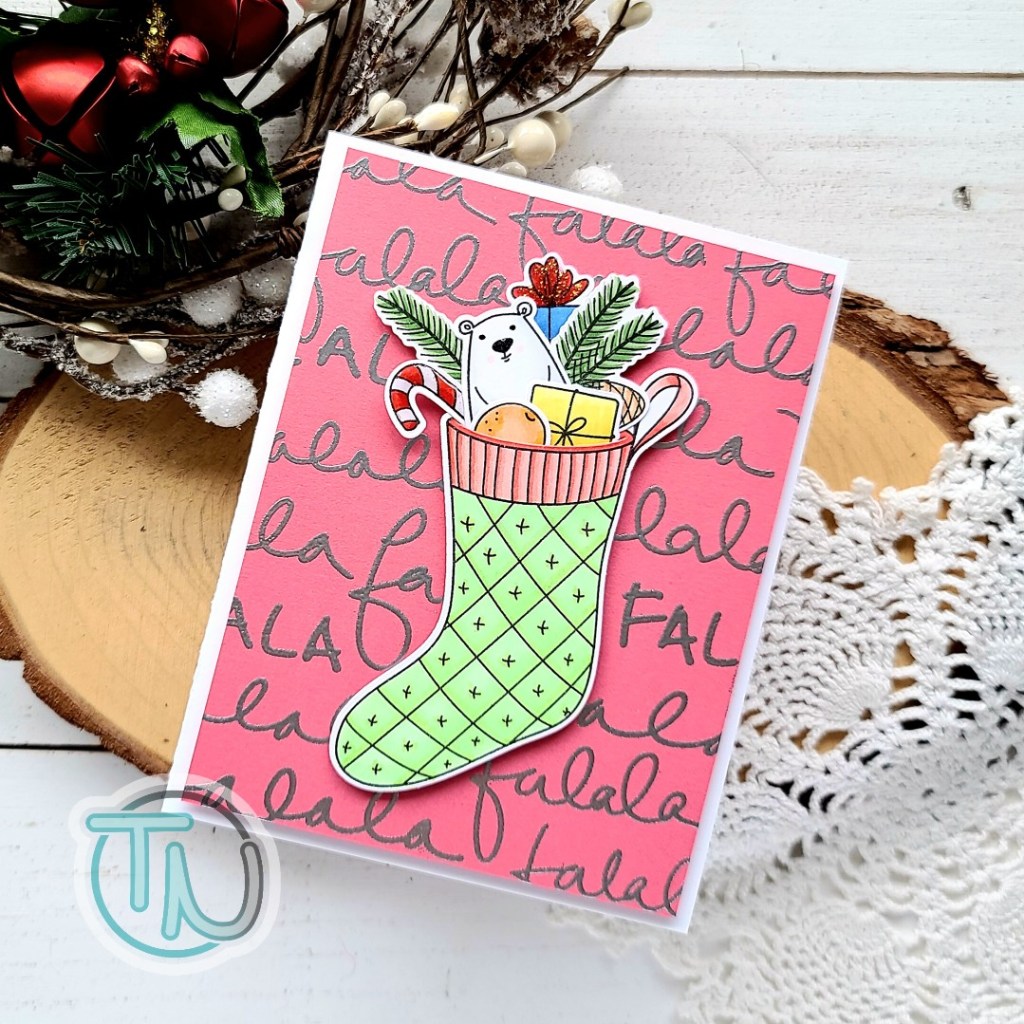
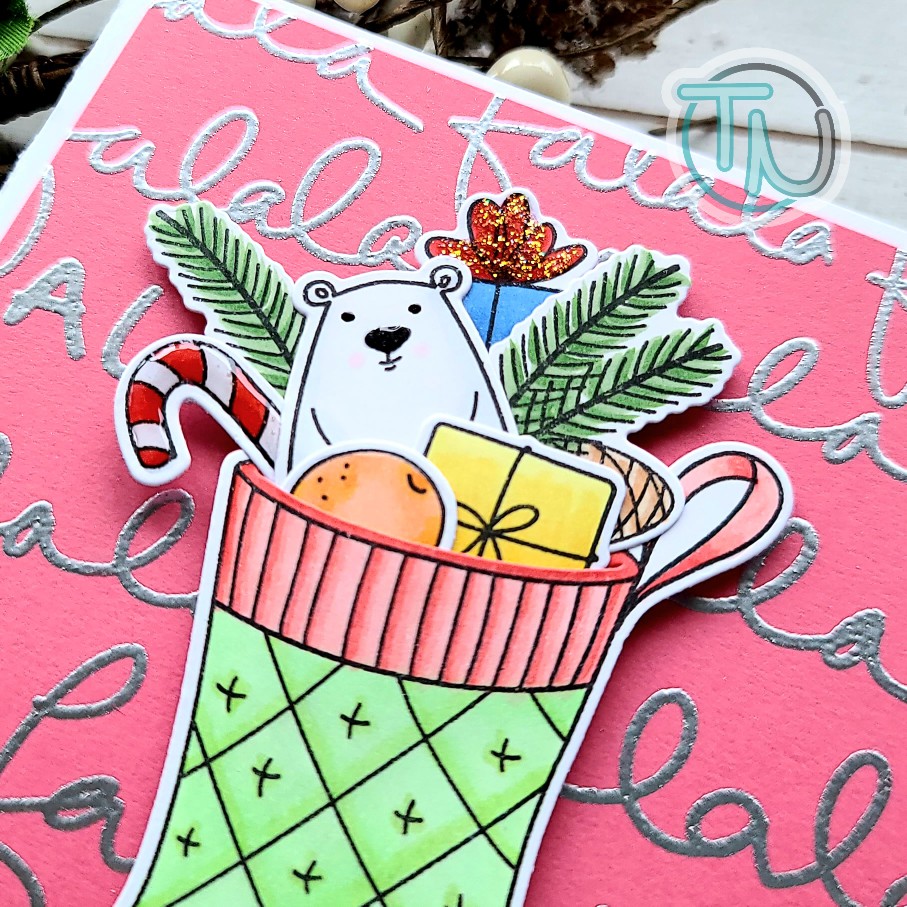
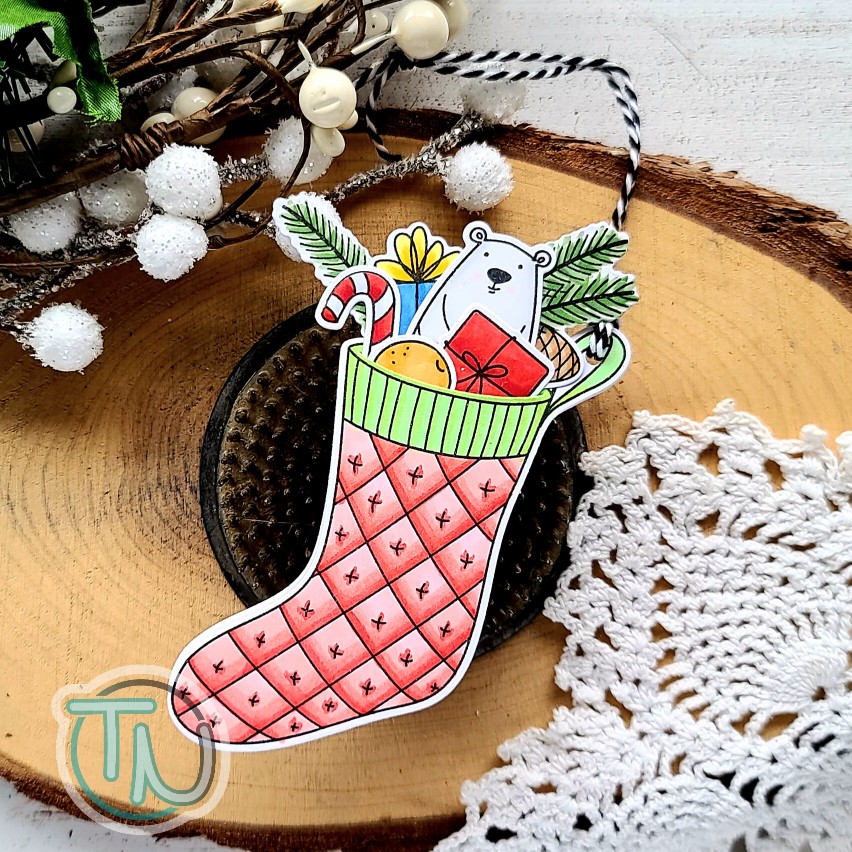
I’m going to start with the card and tag duo because that’s actually where this whole project started. I couldn’t wait to color that fun stocking and fill it up. I love how the dies cut a slit so you can without any extra work!
Aren’t these just so fun together!?! I started by stamping a bunch of images from the Sweet Surprises stamp set on white cardstock. I use my MISTI to stamp so once the images were stamped, I actually flipped my paper around and stamped a second set on the same piece of copic paper. I used my copic markers to color the images and then cut them out with the coordinating dies. Pretty much everything is colored the same in both sets except the stockings are colored the opposite with the same markers.
I took both stockings and filled them up with their goodies. I used some washi tape on the back side to hold things in place and then liquid glue in between them so things were really secure. I held everything together with my Pink & Main reverse tweezers for a bit to make doubly sure it was all good!
When I first received my order with the Fa La La background stamp, I created a bunch of backgrounds and set the extras aside for another time. Well, this card was just the perfect time for that melon/silver heat embossed background! So I popped it up on a white card base with foam tape. Then I added foam tape to the back of my stocking and popped it up in the center.
For finishing touches, I actually stamped a sentiment and stars from the Holly Jolly Christmas stamp set on the inside (forgot to take a photo, doh!) and then added unicorn Stickles to the package bow and glossy accents to the bear’s nose and the candy cane. I also added black glaze pen to the bear’s eyes to make them stand out more too.
For the tag, I went ahead and die cut a plain white second stocking and used my score board to score a line right around the bottom of the cuff. Then I used liquid glue to adhere everything above the score line. I punched a hole in the stocking hanger area and threaded it with baker’s twine. Voila, tag finished! So cute!
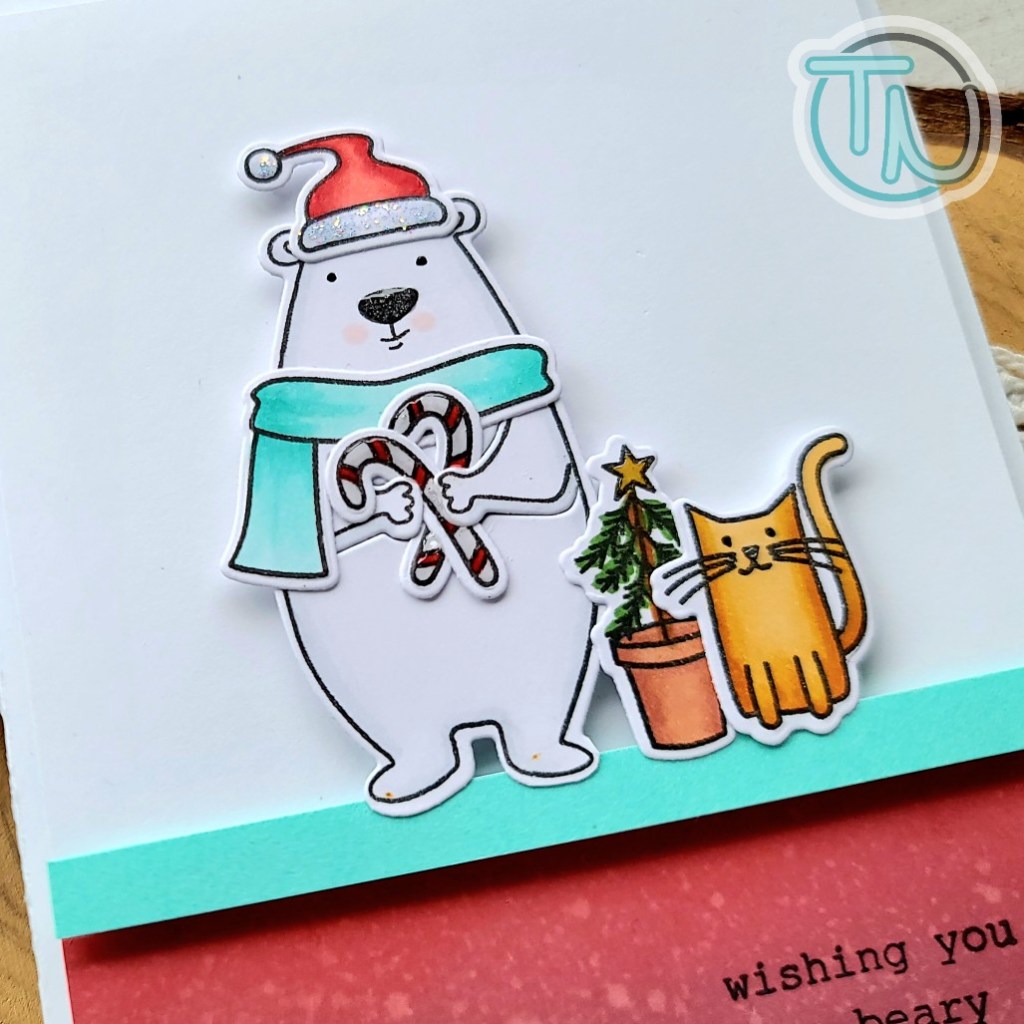
Now, let’s switch gears to the second card for today using All Inside (the original bear stamp set) and Bear Ware 2, which happens to have all my favorite add-ons in it!
I pulled this set out to play with after my other projects were finished and my daughter immediately got excited about the cat of all things. So funny. So I stamped images from both stamp sets and colored them with my copic markers. I used the coordinating dies to cut them out and used liquid glue to adhere all the things in place.
I inked up a strip of cardstock with distress oxide ink in aged mahogany and festive berries and spritzed it with water. I trimmed it down to 4×2 1/4 inches and stamped my sentiment on the bottom right corner. Next, I adhered the panel to a white piece of cardstock that measures 4×5.25 inches and popped up a 1/4 inch strip of light teal cardstock over the seam. Then I added foam squares to my images and popped them up in the center of the card front.
For finishing touches I added glossy accents to the candy canes, bear and cat’s noses and the star on the tree. Last of all I added unicorn Stickles to the bear’s Santa hat and black glaze pen to both critter’s eyes.
Thank you so much for sticking with me today. I hope you found some inspiration to create something wonderful and share it with someone.