Blog

Coffee Loving Cardmakers – Fall | Winter Hop Inspiration

Hey friends! I’m back again kicking off some great card inspiration for you as part of the Coffee Loving Cardmakers Design Team. I’m starting the hop off with Super Sponsor Pawesome Stamps! Their artwork is beyond words adorable and so fun to create with!

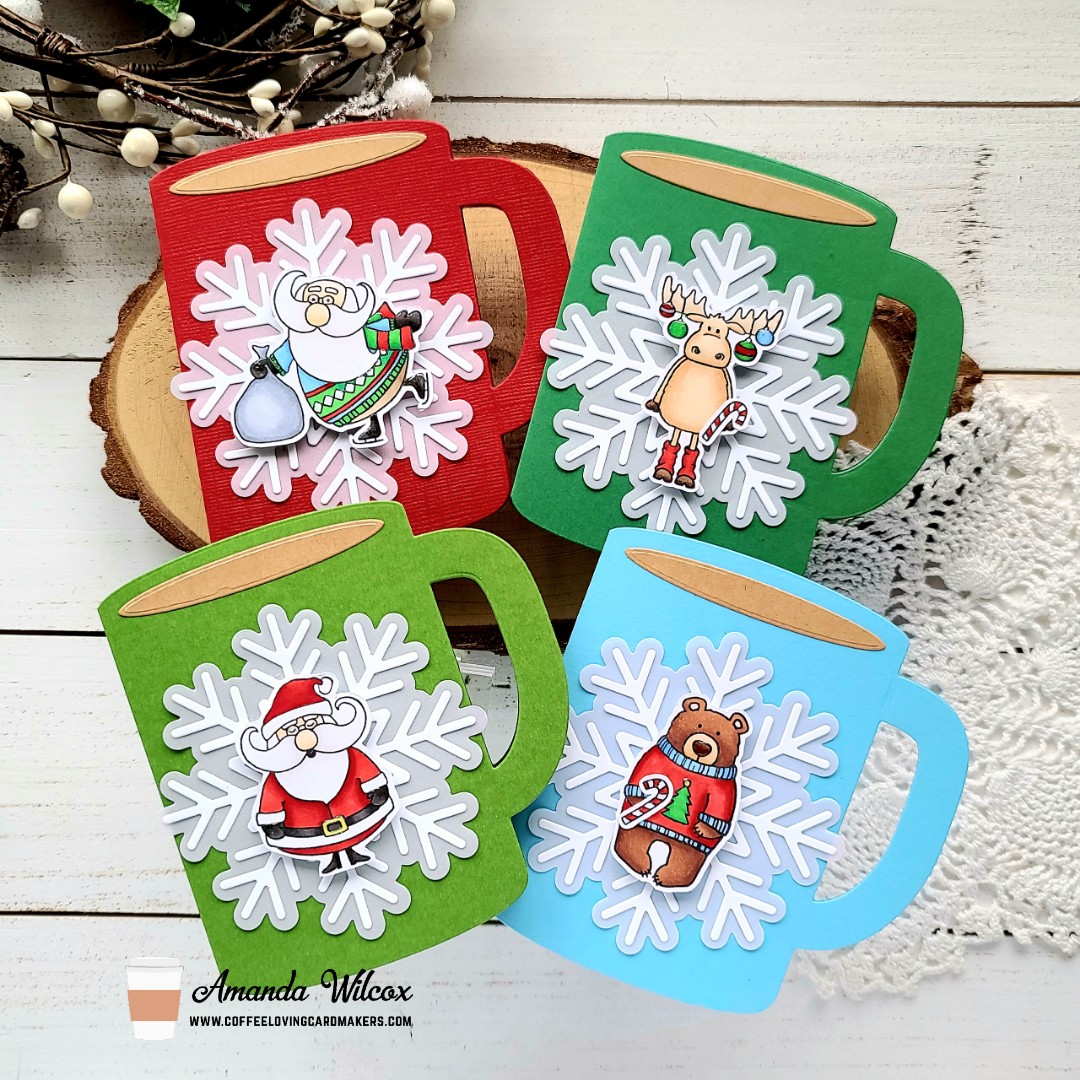
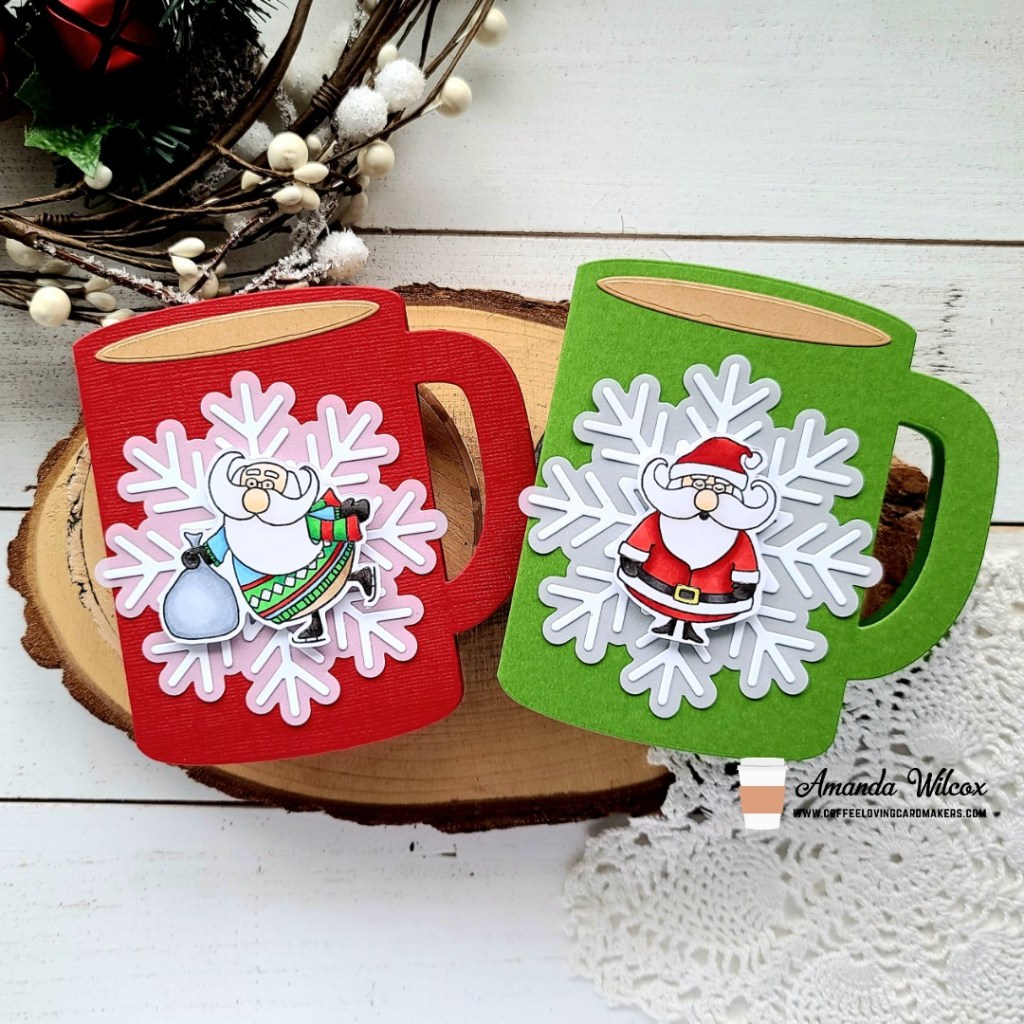
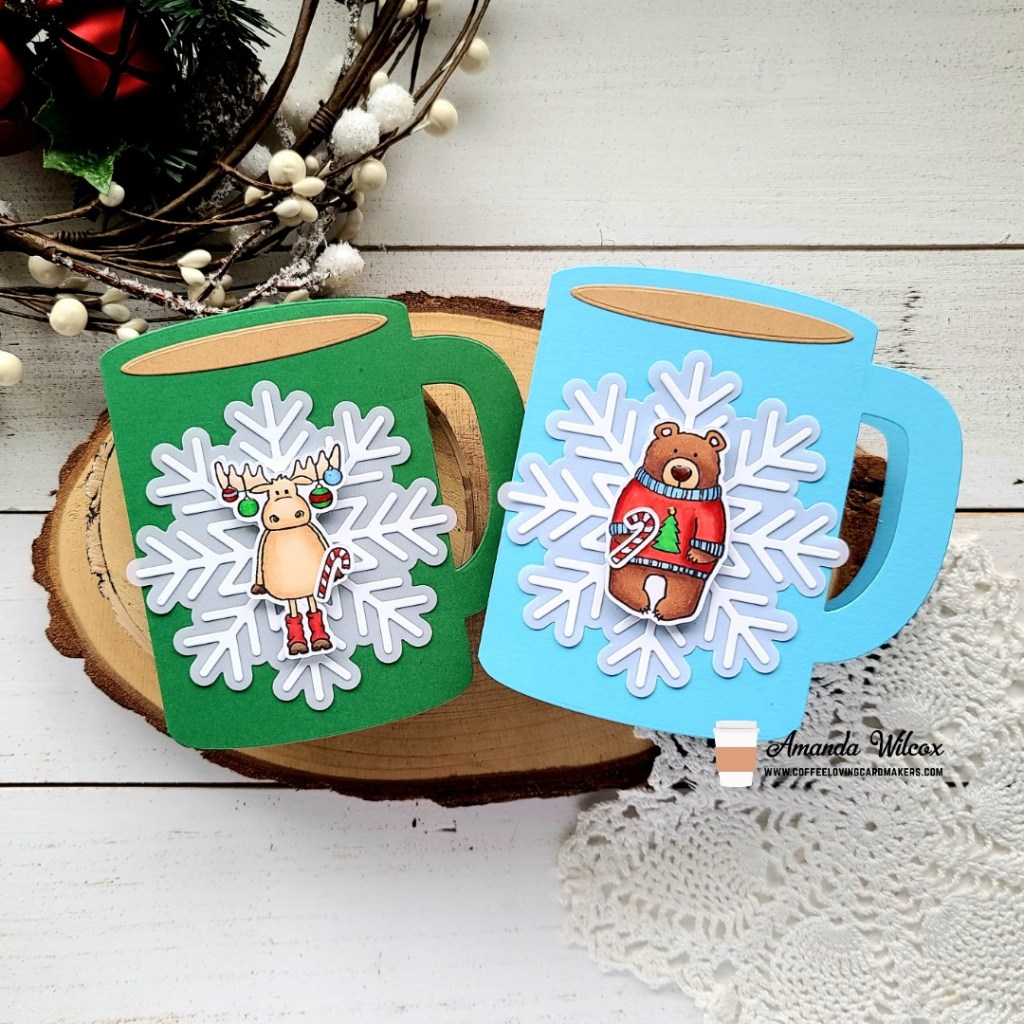
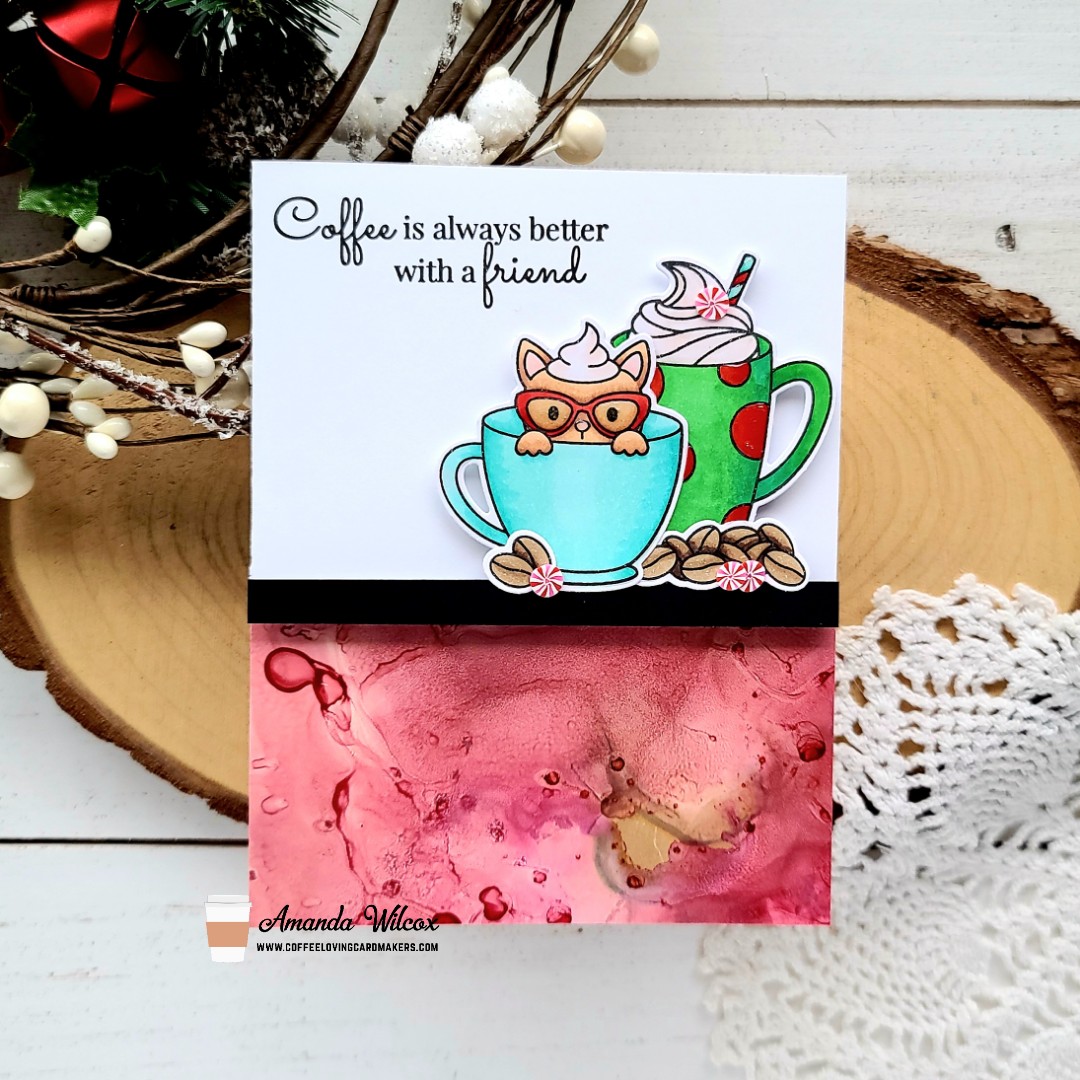
Today I chose some images from Coffee Besties, inked them up and colored them with my copic markers. I used the coordinating dies to cut them out and switched gears to my background.

It’s been a minute since I played with alcohol inks so I did a little panel with deception and mineral alcohol pearl inks on yupo paper. After it was dry, I trimmed my panel down and adhered it to a white card base. I popped up a black strip of cardstock with a foam strip and then added my images with foam squares too.

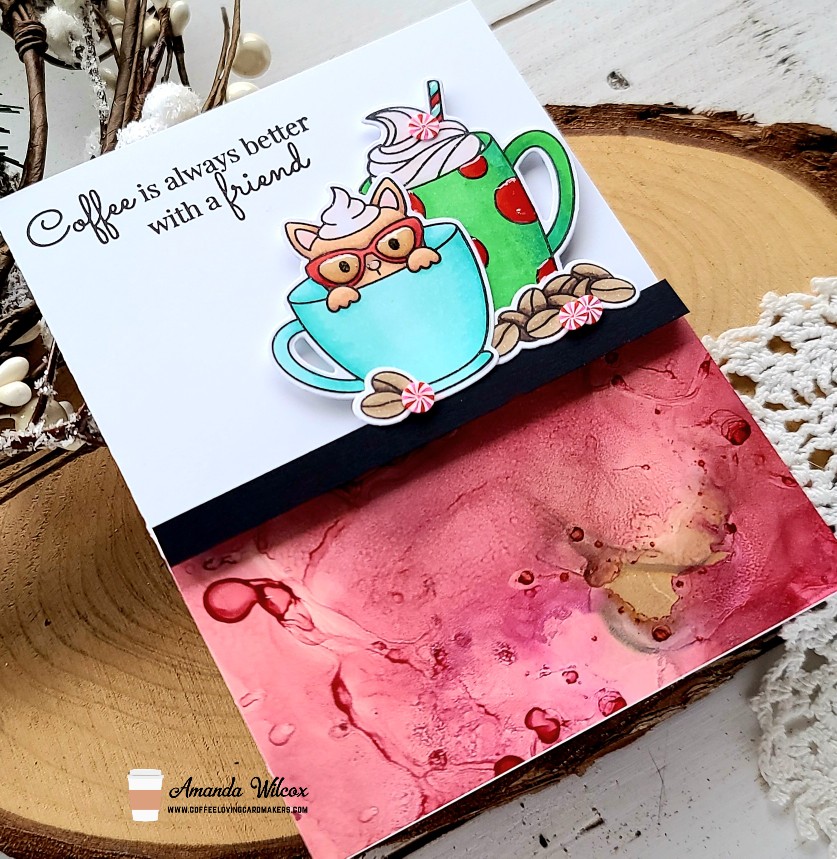
Finally, I put the whole thing in my MISTI and stamped a sentiment in the top left white space. For finishing touches I added peppermint clay embellishments around the coffee beans and in the whipped cream. Then I added glossy accents to the kitty’s glasses, nose, dots on the cup and stripes on the straw.

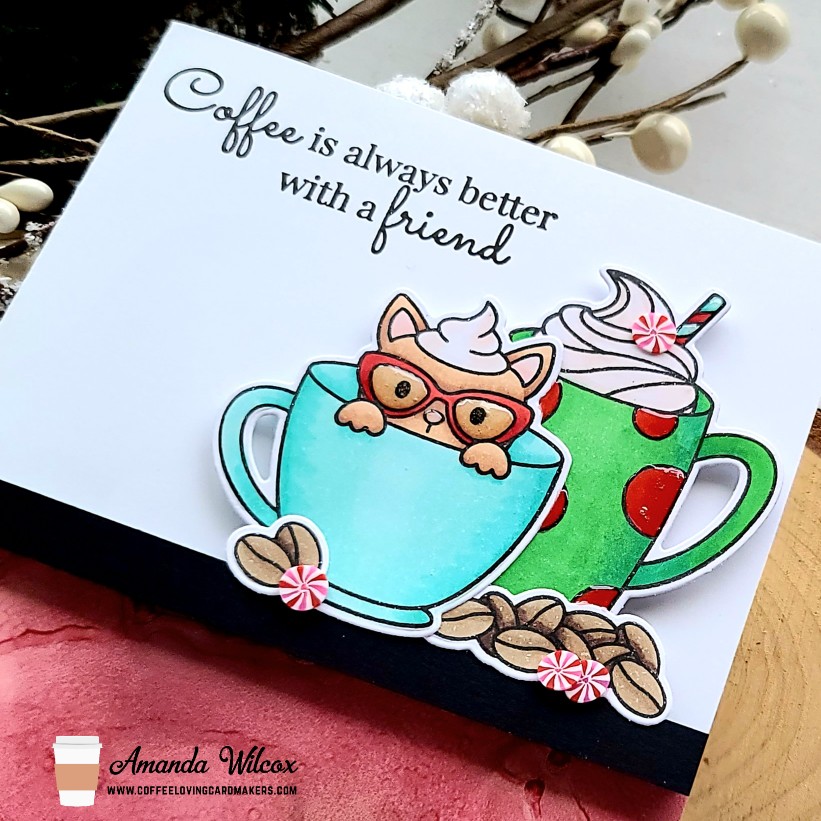
I love how versatile stamps can be when you think outside the box. Nothing about this card says Christmas except the colors I chose for the mugs and the peppermint candies. I’m hoping to add a little coffee gift card to the inside of this and mail it to a friend for Christmas.

Products used today:
Pawesome Stamps Coffee Besties stamps and dies
Twiddler’s Nook Peppermint Candy clay embellishments
Alcohol Pearl Ink – deception and mineral
Foam strips and squares
Glossy accents

I appreciate you sharing your time with me. Have a fabulous day!

Coffee Loving Cardmakers – Fall | Winter Hop Sponsor

Hey friends! Twiddler’s Nook is super excited to be a sponsor of the Coffee Loving Cardmakers Fall | Winter Hop! We just love these hops and seeing everyone’s creations!

In case you’re new to us, let me show you just a few products that we offer and you can move along to hopping the rest of the fabulous sponsors! But I warn you…be sure to make it to the end of this post for the most fun part!

Our biggest seller is the wonderful Pressure Pal. It helps get even pressure when stamping with a stamp platform. Pictured here with the mini MISTI, but it works with all stamp platforms the same. It can give relief to your hands and wrists and keeps from getting smooshy spots in your impressions from pressing with fingertips.

Some other favorites are our magnetic products. Show here is the Paw Print Magnetic Die Stand and Magnetic Tray. These are both fabulous for holding your die cuts in between uses so that you don’t lose them. I’ve also been told that they work great for needlework accessories too! The die stands come in a variety of shapes such as a coffee mug, flower and skull. All of the colored parts of our products are customizable too. We offer a variety of colors!

Another fun product we offer are our Embellishment Trays. They are super fun to create so we just keep coming out with designs and it seems that I love the next one more and more each time. Here you see our cute cloud, original circle with the heart and the fabulous donut tray! We also offer honeycomb, skulls, stars and paws! Once again…so many color options too!

Now for my most favorite part of today’s post!!! We have a brand new embellishment release today!!!!!!!!! Twelve new embellishments have been added to the shop AND…WE’RE HAVING A SALE!!! Starting today through next Friday, Nov. 19 the entire shop is 15% off!

Happy shopping and happy crafting my friends!!! Click HERE if you’d like to take a look at what’s available.

Miss Ink Stamps – Frosty Hellos

Hello again! This wee sure is chugging along quickly! I have another fun Miss Ink Stamps card to share with you but today I’m going for more of a winter feel with one of my favorite sets – Say Cheese! These mice and their sidekicks are too cute for words and so fun to create with!

Today I inked up the penguin and the mouse with the coordinating penguin hat and colored them with copic markers. I used the scan-n-cut to cut them out and adhered them together. Then I took a dark blue cardstock panel and spread Thermoweb iridescent glitz glitter gel through the frosty flakes stencil.

While that was drying, I went digging for a different sentiment and found just the perfect one in the snow buddies set. I stamped it in dark blue and cut it out with a Pink & Main large sentiment strip die. Next, I decided it would be fun to put a snowflake behind my images instead of a simple circle or something. I cut the Trinity Stamps big snowflake cut and foil dies from light blue cardstock and iridescent vellum and adhered the layers together with liquid glue. Next, I popped the mouse and penguin up with foam squares and also added some to the back of the sentiment strip too.

Once the stenciled panel was dry, I popped it up on a white card base with foam tape. Next, I added the snowflake with liquid glue and added the sentiment strip below that.

For finishing touches I went over all the eyes with black glaze pen, let it dry and added white gel pen highlights back in. Then I finished things off with glossy accents on the hat pompoms, mouse nose and penguin beak.

Products used today:
Say Cheese! stamps
Snow Buddies stamps
Frosty Flakes stencil
Thermoweb Glitz Glitter Gel – iridescent
Stencil pal
3D foam tape
foam squares
glossy accents

I appreciate you sharing your time with me. Have a fabulous day!

Trinity Stamps – Ribbon Twirl Tree Stencil

Welcome again crafty friends! Today I’m over on the Trinity Stamps blog sharing another version of the ribbon twirl tree stencil. These new layering stencils from Trinity are fabulous, so easy to use and come out stunning in a million different combinations!

I started today by inking up the ribbon twirl tree stencil with green dye ink and my blending buddy brush. Then I used my scissors and cut it out. I really wanted a fun star for my tree so I used the star die from We Wish You a Merry Christmas die set and cut it from gold glitter cardstock. I used liquid glue to adhere it.

For the background, I cut a piece of teal cardstock and inked the edges with peacock feathers distress oxide ink. Then I flicked some watered down ink across the design and also black acrylic paint. After it was dry I adhered it to a white card base and popped my tree up with foam tape. Next, I glued some peppermint candy clay embellishments on the tree with liquid glue.

To finish my card off, I die cut the Scripty Christmas layers from vellum and red cardstock and used liquid glue to adhere them together and to my card front.

Isn’t this card just so festive?!? I love it!

Products used today:
Ribbon Twirl Tree stencil
We Wish You a Merry Christmas dies
Scripty Christmas dies
Peppermint Candy clay embellishments
Foam tape
Blending buddy brush

I appreciate you sharing your time with me. Have a fabulous day!

Newton’s Nook – Llama Delivery

Oh my goodness friends! I’m super excited for my card share today featuring Newton’s Nook Llama Delivery stamps and dies. It is TOO CUTE for words!

I had a design idea in my head when I stamped the images out so I made sure to stamp a couple extra packages, some music notes and both sentiments. I colored the images with my copic markers, keeping the color palette close to the Meowy Christmas paper pad because I knew I wanted to use it. Then I used the coordinating dies to cut everything out.

I cut the large sentiment out with a Frames & Flags banner and trimmed the other into strips. Then I cut a circle from the Circle Frames set and inked a light blue shadow behind where the llama would be. I flipped through the paper pad and landed on that fabulous plaid, trimmed it down to A2 size and glued it to a white card base. I tied twine around the sentiment banner and popped it up with foam tape along with the circle. I trimmed anything hanging over the edge with my scissors. Then I added glued the gifts directly to the circle and added foam squares toe everything else before popping them all in place.

For finishing touches I came in with glossy accents on various parts of the llama and packages on his back…things like polka dots and stripes, along with his nose because it’s me. 🙂 Then I added a little Wink of Stella glitter brush pen to the background package bows and the music notes at to top.

I seriously had so much fun putting this card together! It was super fun to color and I’m just in love with that paper pad so to see it all come together was awesome!

Products used today:
Llama Delivery stamps and dies
Frames & Flags dies
Circle Frames dies
Meowy Christmas paper pad

I appreciate you sharing your time with me. Have a fabulous day!

Miss Ink Stamps – It’s Always Tea Time

Hey friends! I’m over on the Miss Ink Stamps blog today sharing a Mad Hatter tea card. I just love the Alice series of stamps and it had been a while since I pulled them out so obviously it was past time to do so!

To create my card, I started with stamping images from Tea Party and colored them with my copic markers. I used the scan-n-cut to cut them all out and adhered the pieces to the table that I wanted sitting on top. Next, I inked up a kraft cardstock panel with the lava lam stencil and some brown dye ink. Then I layered the Ins & Outs Marquis window stencil and inked it up first with green and then dark gray. I like layering colors of ink blending for subtle shadows and hints of color.

Next I layered the Marquid frame over the panel and spread Thermoweb transfer gel blanco through it. I set it aside to dry for a bit and then heated up my laminator. Once it was ready, I ran it through with emerald watercolor deco foil. I removed it and began placing my images.

After much deliberation I sliced the table in half and adhered it to the card front with liquid glue. Then I popped the Hatter up with foam squares and placed the panel in my MISTI. I chose a sentiment from Tea Party and stamped it with brown ink.

I absolutely couldn’t waste the other half of the table or the March Hare that I had originally colored either…so let’s take a peek inside my card!

Sometimes it’s fun to bring the scene into your card too! I decided I wanted another sentiment inside this time so I chose one from wonderland wisdom and stamped it in the same brown ink.

After that I moved back to the front of the card for some simple glossy accents in various places for finishing touches.

Products used on today’s card:
Tea Party
Wonderland Wisdom
Ins & Outs Marquis stencil
Lava Lamp stencil
Thermoweb transfer gel blanco
Deco Foil – emerald watercolor
Stencil pal
Blending buddy brushes

I appreciate you sharing your time with me. Have a fabulous day!

Coffee Loving Cardmakers – Christmas Coffee Mug Cards

Hey there! It’s Tuesday Tea over on the Coffee Loving Cardmakers blog today and I’ve got a whole set of absolutely adorable cards to share with you!

I was really itching to color these cuties from Jane’s Doodles so I pulled them out and did just that. They are from Warm and Cozy and St. Nick. I colored the images with my copic markers and use the scan-n-cut to cut them out. Then I pulled out the every amazing Trinity Stamps Coffee Mug Card die and cut some mugs and the little oval that looks like coffee in the cup.

For a little something I decided to add the Trinity Stamps Cut and Foil Snowflake behind each image. I cut the shadow from iridescent vellum and the snowflake from white cardstock. I adhered them with liquid glue and then adhered them to the mug. I popped eahc image up on their mug and moved on to finishing touches.

For those I just added bits of glossy accents to each image somewhere. Things like critter noses, St. Nick’s glasses, candy cane strips and ornaments.

I actually plan to stick hot cocoa packets in each of these and tie the handles with ribbon but they would be adorable cards or gift card holders for the holidays too!

Products used today:
Jane’s Doodles St. Nick stamps
Jane’s Doodles Warm and Cozy stamps
Trinity Stamps Coffee Mug Card dies
Trinity Stamps Big Snowflake Cut and Foil dies
UltraBond liquid adhesive
Foam squares

I appreciate you sharing your time with me. Have a fabulous day!

Pink & Main – Season’s Greetings Snowmen

Happy Sunday everyone! Today I’m part of a super fun Pink & Main hop over on Instagram featuring the design team and special guests! So much inspiration to be had! We wanted to kick start the holiday crafting season and share some fun ideas.

I’ve got an adorable slimline card featuring the Stamp of the Month – Snow Sweet! I started by stamping all the images in the set and colored them with my copic markers. Then I used the coordinating dies to cut them out. Next, I die cut the Season’s Greetings sentiment dies from white cardstock 3 times and the shadow from vellum. Then I used my EZ Squeeze liquid glue to adhered the layers together.

Next, I blended distress oxide inks on speckled egg, peacock feathers and chipped sapphire at an angle down a slimline panel. I spritzed it with water and flicked pearl watercolor all over it. While it was drying I die cut the slimline plaid die from white cardstock and created a card base. Then I glued all the layers together.

I popped the snowmen up with foam squares and adhered my sentiment with liquid glue. I didn’t like how stark the white was so I cut the words from dark blue cardstock and adhered them to the top. I like this much better!

Finally, I came in for some finishing touches of glossy accents and unicorn Stickles on various parts of each snowman. They are just too cute and I love how sweet this card turned out!

Don’t forget to head to Instagram and hop along, commenting the whole way. There are 4 $25 gift certificates to the Pink & Main store up for grabs!

Products used today:
Stamp and Die of the Month – Snow Sweet
Plaid Slimline die
Christmas Greetings dies
EZ Squeeze liquid glue
Foam squares
Distress Oxide – speckled egg, peacock feathers, chipped sapphire

I appreciate you sharing your time with me. Have a fabulous day!

Miss Ink Stamps – Peace and Joy

Welcome back friends! Today I’m sharing a sweet Christmas card featuring a couple of sets from Miss Ink Stamps. I love the variety of background scene setting images Miss Ink carries and her critters and characters are amazing to go with them!

Today I chose the Mountainside stamp for my background. I inked it up on a white panel and then used my blending buddy brushes and some Lawn Fawn dye inks to color in the scene. I stamped a sentiment from Little Angel in the top right corner and switched over to my images.

I chose a few images from Little Angel which I stamped and colored with my copic markers. Then I used the scan-n-cut to cut them out and added foam tape to the back. I thought the background was a little lacking so I splattered pearl watercolor over the scene before adhering it to a white card base. This panel is 5.5×4 inches so there was room for a white glitter cardstock strip at the bottom. Then I added a dark gray strip over the meeting of the two with foam strips.

Finally, I added my images and moved on to finishing touches. For that, I just added a little glossy accents to the deer and squirrel noses, carrot stems and the wreath on the angel’s head. Then I finished things off with some unicorn Stickles on her wings.

I just love how serene this scene feels and think it will be a wonderful addition to my Christmas card stash to mail out. Have you started making Christmas cards yet? It’s going to sneak up on us super quick, I just know it!

Products used today:
Little Angel stamps
Mountainside stamps
Blending Buddy brush
Lawn Fawn ink – cilantro, mermaid, kiddie pool, blue jay
Foam strips
UltraBond liquid adhesive

I appreciate you sharing your time with me. Have a fabulous day!

Trinity Stamps – Warm Heart

Hey everyone! Thanks for stopping by. Today I have a Trinity Stamps card to share with you featuring the Warm Heart stamps and dies that are designed by Love Dani Studio. Her word art is always beautiful and so fun to color! Today I combined the stamp with the paper piecing portion of the dies and threw in a little Thermoweb amazingness for some pizazz!

I started by stamping the image on Bristol Smooth cardstock with versamark ink and heat embossed it in black. Then I used my Zig Clean Color Real Brush markers to watercolor the words. I cut the panel out with a stitched rectangle from the 4-Bar Card die set. Next, I chose some cardstock colors close to the words and cut the pieces for the heart. I used liquid glue to adhere them together and popped them up on the watercolored panel with foam squares.

I cut another panel of the teal cardstock I used for the scarf and hat and taped the first layer of the Catching Some Rays stencil to it. I inked it up with a teal dye ink, then switched to the second layer. For this I spread Thermoweb transfer gel blanco through it, removed the stencil and set the panel aside to dry while I cleaned up. Once it was dry, I heated up my laminator and ran it through with glass slipper deco foil. I trimmed the panel down to 4×5.25 and adhered it to a white card base. Then I popped the sentiment panel up with foam tape over the stenciling.

Here’s a look at the amazing foil in the light. It plays so perfectly with all the teal and looks amazing when you move the card around. I just love how this turned out! It’s just warm and fuzzy looking at it!

I hope you enjoyed today’s card and found some inspiration to create something wonderful to share with someone!

Products used today:
Warm Heart stamps and dies
4-Bar Card dies
Catching Some Rays stencils
Blending Buddy brush
Thermoweb Transfer Gel Blanco
Deco Foil – glass slipper
Stencil Pal
3D Foam Tape
Foam squares

I appreciate you sharing your time with me. Have a fabulous day!