Blog

Pink & Main – Let’s Get Stuffed!

Hey friends! I’m over on the Pink & Main blog today with a fun Thanksgiving card to share with you featuring the October stamp of the month. Don’t worry, if you haven’t signed up yet, you can still purchase the stamps and die set in the shop!

I started my card today by stamping and coloring images from Turkey Time. Then I cut them out with the coordinating dies. For the background, I cut a piece of kraft cardstock to A2 size and ran it through my die cutter with the woodgrain embossing folder. Then I used an ergonomic blending brush and brown ink to enhance the grain texture.

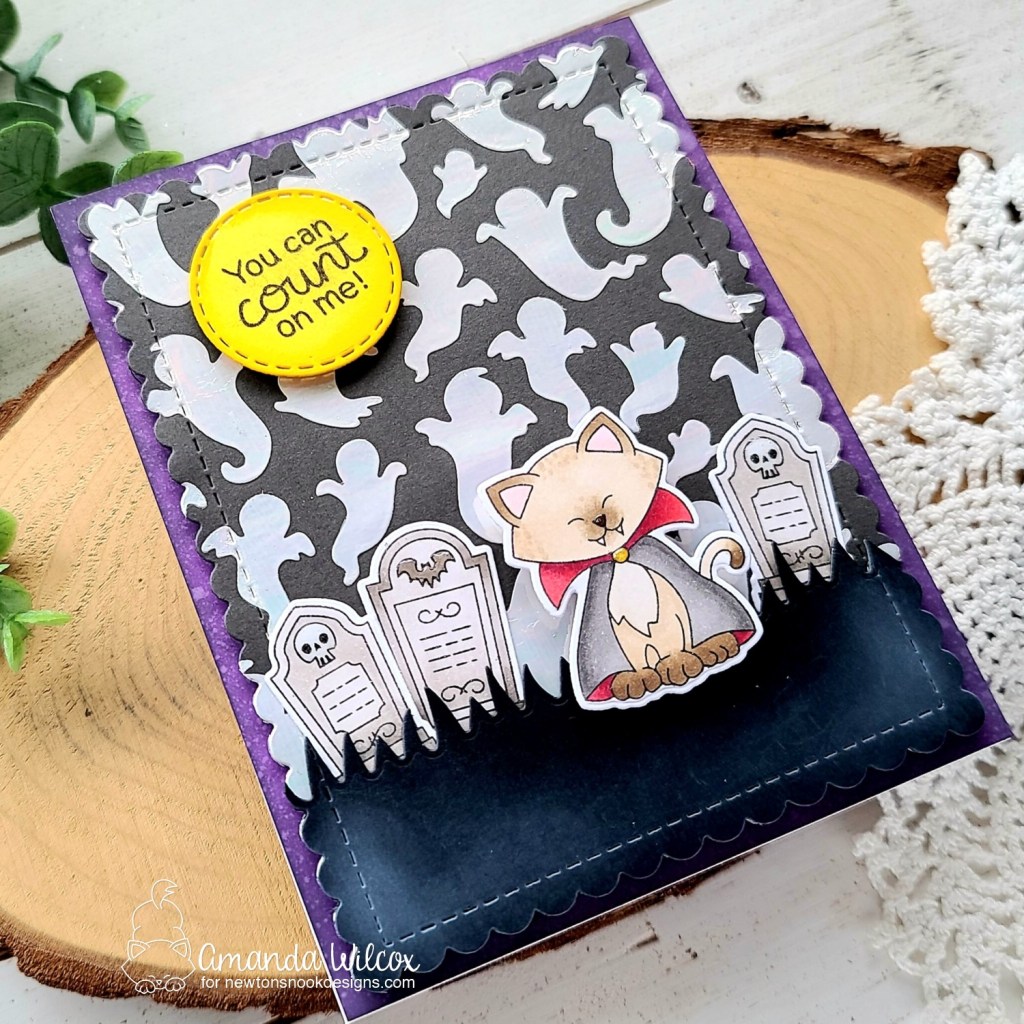
I adhered it to a white card base and cut a piece of black cardstock with a stitched arch die. I taped the arch to the sunshine layers stencil and inked it up with some white pigment ink. I went over the rest of the panel with the ink left on my brush to soften the lines. I stamped and heat embossed two sentiments from the set at the top of the arch and popped it on the card front with foam tape.

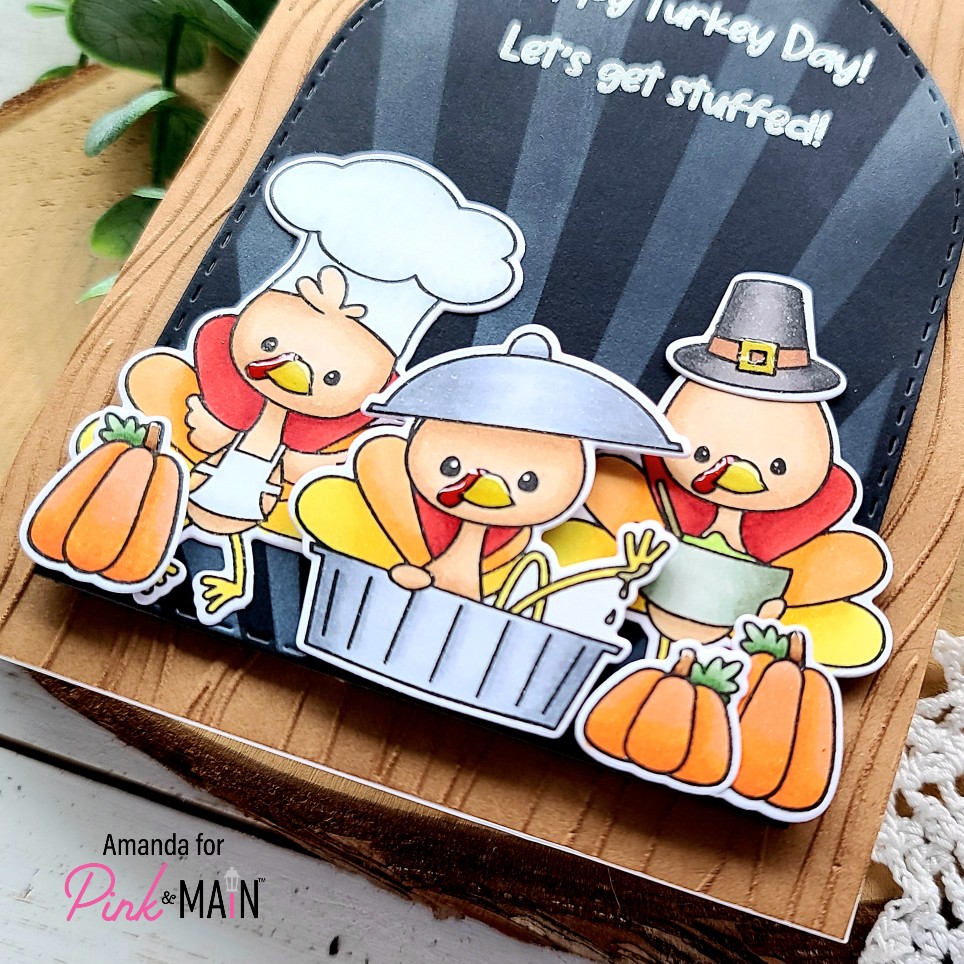
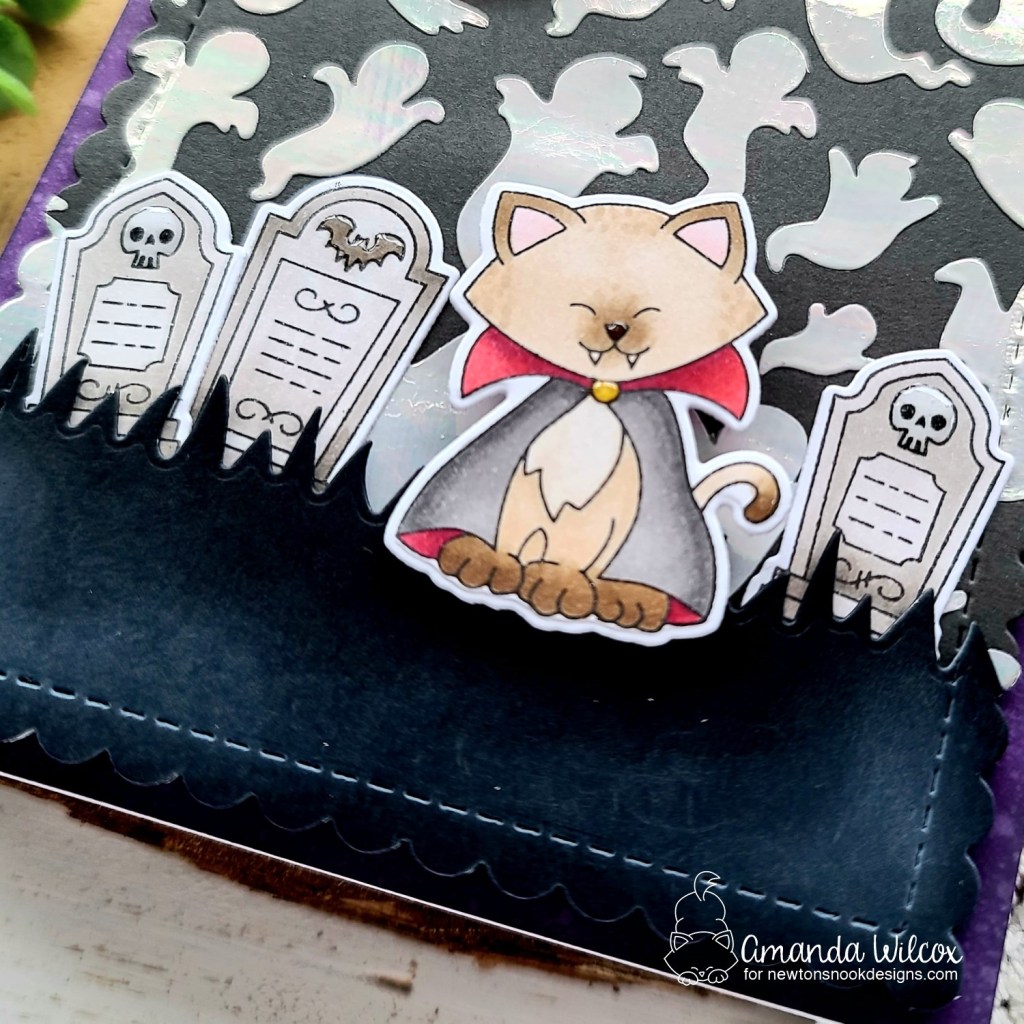
Next, I adhered two of the turkeys with EZ Squeeze liquid adhesive and popped the last one up, plus the pumpkins, with foam squares. I finished things off with some glossy accents on parts like turkey beaks, pumpkin stems and the buckle on the hat.

Now that Halloween is over, I always get another burst of energy for fall crafting and this card was just the start of it! Wouldn’t these cuties be fabulous on place cards for all of your Thanksgiving guests?!? I have an idea up my sleeve!

Products used today:
Turkey Time stamps and dies
Stitched Arch dies
Woodgrain embossing folder
Sunshine Layers stencil
Ergonomic Blending Brushes
EZ Squeeze liquid adhesive
3D foam tape and squares

I appreciate you sharing your time with me. Have a fabulous day!

Pink & Main – Homespun Christmas Card Kit

Happy Friday everyone! I’m over on the Pink & Main blog today sharing a card using the Homespun Christmas Card Kit that’s available! This kit is packed full of amazing products that are super fun to create with! I’ll be sure to link it below but let’s take a look at the card I created first!

I was really in love with the idea of this jar full of poinsettias being my focal point. It’s such a pretty image and I have always had a thing for Mason jars for some weird reason. Anyway, I stamped and colored the image with my copic markers. I used the coordinating dies to cut it out and then pulled the paper pad out of the kit to choose my backgrounds. I cut the pink paper to A2 size and adhered it to a card base included in the kit. Then I die cut the green panel with a zig zag circle and popped it up with foam tape. I also popped the jar up for extra dimension.

I stamped and heat embossed a sentiment on black cardstock and found that the second to smallest die in the slimline layers was perfect so I cut it out with that. Then I took a piece of the new adhesive sheets and adhered it to a white cardstock scrap. I die cut the scrap with the next largest slimline layer, removed the release paper and smothered it with sparkling fuzzy monster flock! This stuff is SO FUN!!! I used foam squares to pop the layers up and placed it on the card below the circle.

Because I love texture and dimension I also came in with glossy accents for the flower centers and berries on my image. Then for a little extra extra, I added some of the glitter enamel dots from the kit across the design too!

I am loving these non-traditional, bright colors for a Christmas card! They are happy and vibrant and sure to make the recipient smile!

Products used today:
Homespun Christmas Card Kit
Sparkling Fuzzy Monster Flock
Layered Slim Line dies
EZ Squeeze liquid adhesive
3D foam tape
Glossy accents

I appreciate you sharing your time with me. Have a fabulous day!

Miss Ink Stamps – Snow One Like You

Hello friends! Today I have a festive, wintery card for you featuring stamps and stencils from Miss Ink Stamps. I paired an older stencil, Starry Night, with one of the new releases, Perfectly Plaid. Layering stencils is seriously addicting. I just love mixing and matching them in different cominations.

I actually started my card today by playing with the background first. I inked up the perfectly plaid stencil on kraft cardstock with a brown ink. Then I went over that with the starry night stencil and Thermoweb transfer gel blanco. I set it aside while I decided what images I was going to color up today.

Feeling that Christmas vibe, I stamped and colored the images from Snow One Like You with my copic markers. Then I cut them out with my scan-n-cut. I stamped the sentiment on white cardstock and cut it out with a stitched banner. I heated up my laminator and pulled out some gold decofoil to use on the stenciled panel. Once the laminator was all heated up I ran it through. Then I die cut the panel with a notched corner die from Pink & Main and added foam tape to everything.

I adhered some red cardstock to a white card base and then removed the release paper from the foam squares and tape and popped everything in place, one layer at a time.

Because we all know I can’t leave well enough alone, I added some fun finishing touches next. Glossy accents were in order for the snowman’s eyes and buttons, while the snow was just calling for some glittery Stickles.

I love the rustic feel this card has with the combination of plaid, the color palette and the feel of the images too. It’s perfect!

Products used today:
Snow One Like You stamps
Starry Night stencil
Perfectly Plaid stencil
Newton’s Nook Frames & Flags dies
Pink & Main Notched Corners dies
Thermoweb transfer gel blanco
Thermoweb stencil pal
Thermoweb decofoil – gold

I appreciate you sharing your time with me. Have a fabulous day!

Trinity Stamps – Glory in the Highest Slimlines

Hello everyone! Today I’m over on the Trinity Stamps blog sharing this trio of slimline cards I created using the new Glory in the Highest dies. As soon as I saw this set I knew that I wanted to try this design in multiple colors. I love how they all turned out.

I started this process by die cutting the angels and sentiments from white cardstock 3 times for each card and once from gold, then I glued the layers all together. I tried to keep the small letters inset for one layer so they were easier to manipulate, like you see in the picture below.

Next, I cut 3 panels and chose my colors of distress oxide inks for blending. I blended a trio of colors for each card, spritzed the panels with water and flicked gold watercolor on them as well. Here’s a color map in case you’d like to replicate any of the blends.

Once the panels were dry, I die cut them with the dainty scallop edge panel die and adhered the angel and sentiments with liquid glue. I lined the back with foam tape and was getting ready to mount them on white card bases but I didn’t like how stark it looked.

So instead I cut 3 pieces of kraft cardstock, adhered those to the white card bases and inked up the edges with gathered twigs distress oxide ink. I spritzed them with water and flicked gold watercolor on there as well so everything ties together.

Then I removed the release paper and adhered each panel to a card base. Voila, 3 gorgeous Christmas cards to add to my stash.

I hope you found some inspiration from today’s project to create something wonderful and share it with someone!

Products used today:
Glory in the Highest dies
Dainty Scallop Edge dies
Distress Oxide inks
Liquid glue
Foam tape

I appreciate you sharing your time with me. Have a fabulous day!

Coffee Loving Cardmakers – Jane’s Doodles | Holiday Wishes Mini Slimline

Hello everyone! It’s that time again, Tuesday Tea with Twiddler’s Nook over on the Coffee Loving Cardmakers blog today. I’m sharing a super fun and silly mini slimline card featuring a mash-up of Jane’s Doodles sets and Trinity Stamps slimline dies.

To start my card, I pulled out a few Jane’s Doodles sets and played around with different images. Once I figured out how I wanted to layer everything I started stamping and cutting masks and then stamping the layers. The car, tree, trailer and gift are all from Driving Home. The penguin and trees in the scene are from Hot Cocoa while the coffee cup came from Warm Hugs and the sentiment from Warm and Cozy. I wasn’t kidding when I said this was a mash-up. Lol! It’s so fun to get use from so many sets on one card though!

Anyway, once everything was stamped out I colored everything with copic markers and used the scan-n-cut to cut it out. Next, I switched gears to ink blending my background scene layers with distress oxide inks. The sky is stormy sky and victorian velvet with a little chipped sapphire on the edge and splattered on the panel. The dirt is gathered twigs and tea dye with some ground espresso splatters. Then I cut a black layer for the road and inked it up with the leftovers of white pigment ink on my blending brush just so it wasn’t flat in comparison to the rest of the card.

I cut the layers with the largest Trinity Stamps Stitched Mini Slimline die and then cut the ground layers with Slimline Scenic Borders die. I stamped the trees in the background with VersaFine ink and started assembling my layers. The background is mounted on a white card base measuring 3×6 inches and then the dirt layer is popped up with foam tape. The road is adhered with liquid adhesive and the image is mounted with a combination of liquid adhesive and foam squares. For my sentiment, I stamped and heat embossed it on black cardstock and used the banner die from the Trinity Stamps Mini Slimline Card and Envelope die set. Then I popped it up with foam strips.

I finished things off with black glaze pen on the critter eyes and the dog’s nose. Then glossy accents on the penguin beak, coffee cup lid, lights and wheel hubs on the card and trailer and also the rope around the tree. For a little shimmer fun I added unicorn Stickles to the penguin’s earmuffs, the bow on the gift and the dog’s pompom.

I created an envelope to coordinate using the Trinity Stamps die set. I love doing this from time-to-time. It gives the card a little extra something. Sometimes I even stamp an image from the card on the front to give a hint what’s inside.

Products used on today’s card:
Jane’s Doodles Driving Home
Jane’s Doodles Hot Cocoa
Jane’s Doodles Warm Hugs
Jane’s Doodles Warm and Cozy
Trinity Stamps Mini Slimline Card and Envelope dies
Trinity Stamps Mini Slimline Stitched Layers dies
Trinity Stamps Slimline Scenic Border dies
Thermoweb 3D Foam Tape
Thermoweb Ultra Bond Liquid Adhesive
Glossy accents
Copic markers
Distress Oxide ink – victorian velvet, stormy sky, tea dye, gathered twigs, chipped sapphire, ground espresso
Stickles – unicorn

I appreciate you sharing your time with me. Have a fabulous day!

Newton’s Nook – You Can Count On Me

Hello friends! Today I have a super festive and adorable Newton’s Nook card to share with you in celebration of them sponsoring the Cat Lovers Hop!

For this card, I had an idea that I wanted to try so I didn’t waste any time adhering the Ghosts stencil to a dark gray panel and spreading Thermoweb transfer gel blanco through it. I set it aside while I stamped and colored images from Count Newton with my copic markers. Then I used the coordinating dies to cut them all out.

I actually did this card in two stages. So the next morning I turned my laminator on to heat up while I decided on background colors and sentiment details. I landed on wilted violet distress oxide on a white panel, spritzed with water and adhered to a card base. Then I stamped my sentiment on a yellow circle from the Circle Frames die set. I inked up the edges with mustard seed distress oxide for a little depth. Finally, I cut a scrap of black cardstock with the scalloped rectangle in Frames & Flags and trimmed the top with the grass die in Land Borders.

With my laminator heated up I ran the stenciled panel through with opal decofoil and it LOOKS SO COOL!!! After foiling I die cut the panel with the same scalloped rectangle in Frames & Flags. For assembly, I added foam tape or squares to everything with the exception of the headstones which were adhered with liquid glue.

Then, for finishing touches I added glossy accents to parts of the gravestones, Newton’s nose and the clasp on his cloak. The black grass looked stark so I used a blending brush and white pigment ink to give it a little ghostly dimension. Just the perfect touch!

Products used today:
Count Newton stamps and dies
Frames & Flags dies
Circle Frames dies
Ghosts stencil
Land Borders dies
Thermoweb Pixie Spray
Thermoweb DecoFoil – opal
Thermoweb Transfer Gel Blanco
Thermoweb Stencil Pal

I appreciate you sharing your time with me. Have a fabulous day!

Pink & Main – Sending Cheer

Hi everyone! I’m over on the Pink & Main blog today with a very special card to share with you. Given that it’s National Breast Cancer Awareness day and Pink & Main is a sponsor of the INK! Pink Hop, I used goodies from the brand new release to create another thinking of you card for the occasion.

To create my card, I die cut the smallest size in the notched corners die set from white cardstock and placed it in my MISTI, then I stamped each layer of the Sending Cheer rainbow with a different color of pink dye ink. Next, I stamped and heat embossed the sending cheer sentiment in black.

I chose light pink and melon colored cardstock and cut one from the next size up notched corner die and then trimmed the other to fit on my card base. I used the EZ Squeeze liquid adhesive to adhere the largest to the card base, then foam tape to adhere the other layers down.

To finish things off I glued down a scattering of pink pearls from the new Rainbow Pearls Set 2 collection.

My favorite thing about rainbows is their cheerfulness and versatility in crafting. You can make a rainbow any color scheme, in any order and it’s just happy. All the time.

Products used today:
Notched Corners dies
Sending Cheer stamps
Rainbow Pearls Set 2
EZ Squeeze liquid adhesive
Foam tape

Head over to Instagram and hop along with us for the INK! Pink Hop. There are tons of prizes and some wonderful and inspiring cards to see.

I appreciate you sharing your time with me. Have a fabulous day!

INK! Pink Hop | Newton’s Nook – Stay Strong

Hello everyone and Happy National Breast Cancer Awareness Day! There are a bunch of us bringing cheer and inspiration over on Instagram with a fun hop!

There’s a great line up of artists and a fabulous array of sponsors for this great hop. Head over to Instagram and comment as you hop along for chances to win prizes from each sponsor.

Today I have a card featuring Newton’s Nook and Thermoweb who are both generous sponsors of today’s hop.

I started by coloring the main image from Newton’s Support with my copic markers. Then I used my scan-n-cut to cut him out. I also die cut a vellum heart from the Heart Frames die set and heat embossed a sentiment on it.

Next, I moved on to my background. I just love this Bokeh Hearts stencil. I inked up one layer with pink dye ink and then spread bubblegum glitz gel from Thermoweb through the second layer. I left it to dry over night and then die cut it with the scalloped rectangle from the Frames & Flags die set.

I cut a pink panel to cover my white card base and popped the stenciled panel up with Thermoweb foam tape. Then I adhered Newton to the vellum heart with Thermoweb foam squares and hid my tape runner for the vellum heart behind Newton.

I finished the front of my card off with some glossy accents on Newton’s nose. But I didn’t want to stop there.

So on the inside of my card I stamped a ribbon in the same ink I used on the stenciling and then another sentiment over the top of that.

Most of the time my cards are blank on the inside for lots of room to write, but this time it was too perfect not to keep that feeling going all the way.

Products used today:
Newton’s Nook Newton’s Support stamps
Newton’s Nook Bokeh Hearts stencils
Newton’s Nook Frames & Flags dies
Newton’s Nook Heart Frames dies
Thermoweb Glitz Glitter Gel – bubblegum
Thermoweb Foam Tape and Foam Squares
Thermoweb XL Tape Runner
Thermoweb Stencil Pal

Now, don’t forget to head to Instagram and comment on the hop stops for chances to win!!!

I appreciate you sharing your time with me. Have a fabulous day!

Miss Ink Stamps – Stencil Week | Autumn Greetings

Hello everyone! It’s time for a super fun stencil release for Miss Ink Stamps! There’s a giveaway over on the Miss Ink Stamps Instagram page but before you head there let me share some fun inspiration with the new Fall Mandala stencil and my favorite little squirrels!

To create my background, I inked up an oversized white panel with gathered twigs and tea dye distress oxide inks. Then I sprayed my fall mandala stencil with pixie spray and stuck it to my panel off center a bit. I inked the stencil up with brown dye ink and then removed it. I splattered the panel with gold watercolor and set it aside to dry.

Next, I stamped and colored one of the squirrels from Oh, Nuts! with my copic markers. I used the scan-n-cut to cut it out and added foam squares to the back. Now that my panel is dry, I used an A2 rectangle to cut it down and adhered it to a white card base. I popped it in my MISTI and stamped a sentiment from Autumn Thanks in the top left corner.

Finally, I added my squirrel and his leaves. Then for finishing touches I added black glaze pen to his eyes and nose. After the black was dry I came in with a white gel pen accent on the eyes.

My main focus on today’s card was to add to the stencil and let it shine. I think everything turned out pretty great! Don’t you?!?

Products used today:
Oh, Nuts! stamps
Fall Mandala stencil
Autumn Thanks stamps
Pink & Main Layered Rectangle dies
Thermoweb Pixie Spray
Thermoweb foam squares

Thanks for hanging around this long. Now, head over to the Miss Ink Stamps Instagram and enter to win!

I appreciate you sharing your time with me. Have a fabulous day!

Trinity Stamps – Tree Rex

Hello everyone! Today I also have a super fun dinosaur Christmas card featuring the Tree Rex stamps and dies from the new Trinity Stamps release! This set is too cute for words and so fun to color up any way you like!

I chose a variety of greens for my dinosaurs using copic markers. After the image was colored, I used the coordinating dies to cut it out. I stamped and heat embossed a sentiment on black cardstock and used a banner from the 4-Bar Card die set to cut it out.

Moving on to the background, I cut a white panel using one of the stitched rectangles in the 4-Bar Card die set and inked it from the center out with my blending buddy brush and a red dye ink. Then I splattered it with gold watercolor.

Once the panel was dry I added foam tape to the back and popped it on a white card base. Then I used foam squares and strips to pop the image and sentiment strip up on that.

I finished things off with glossy accents on all of the Christmas lights and unicorn Stickles on the star. Last, I went over the dinosaur eyes with black glaze pen so they shine.

Next time I think I’ll try heat embossing and watercoloring the whole image. That extra texture on the dinosaurs will look really cool I think!

Products used today:
Tree Rex stamps and dies
4-Bar Card die set
Blending Buddy
Glossy accents
Stickles – unicorn
Foam tape, squares and strips

I appreciate you sharing your time with me. Have a fabulous day!