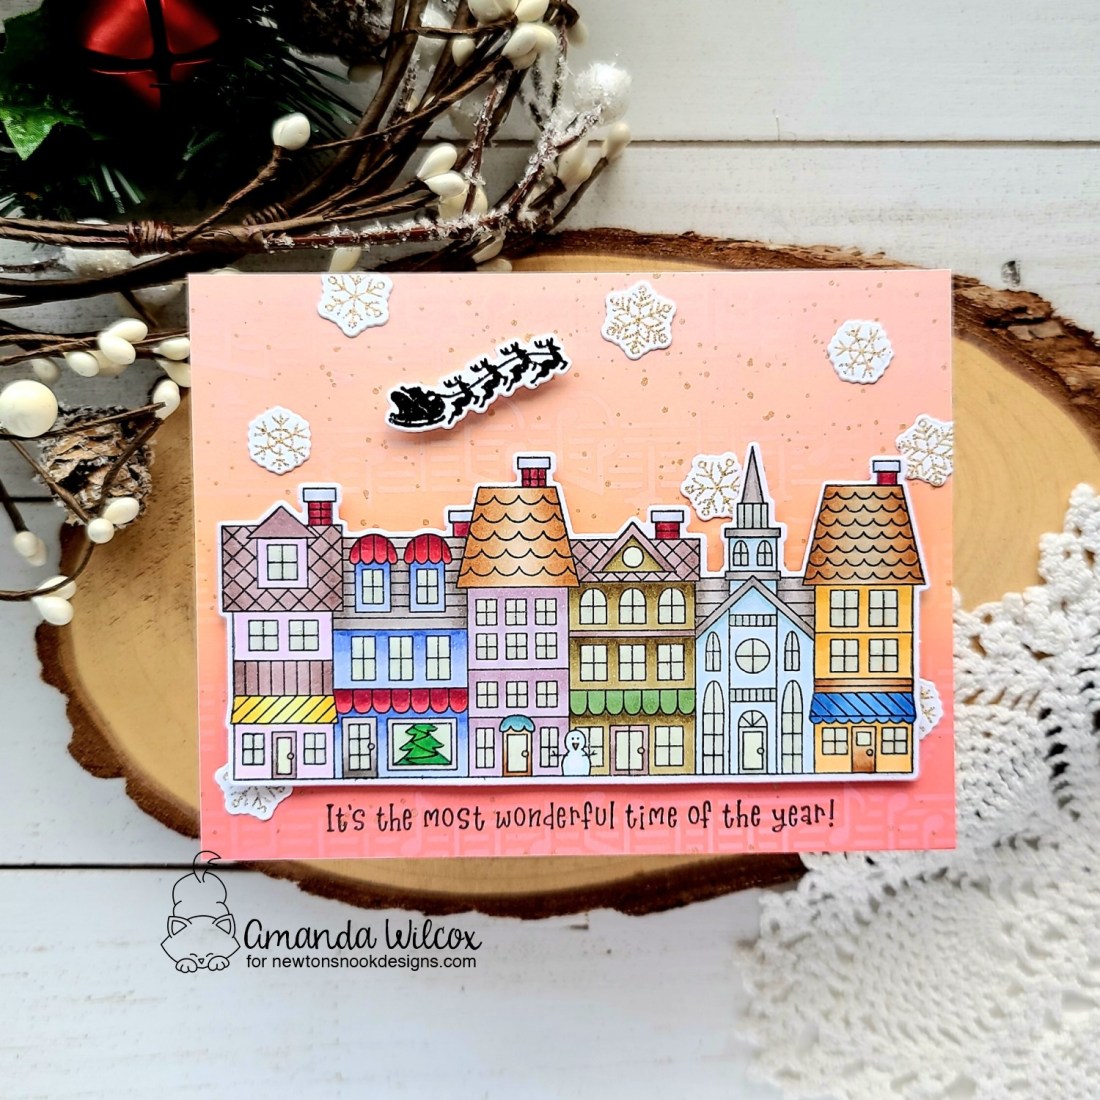
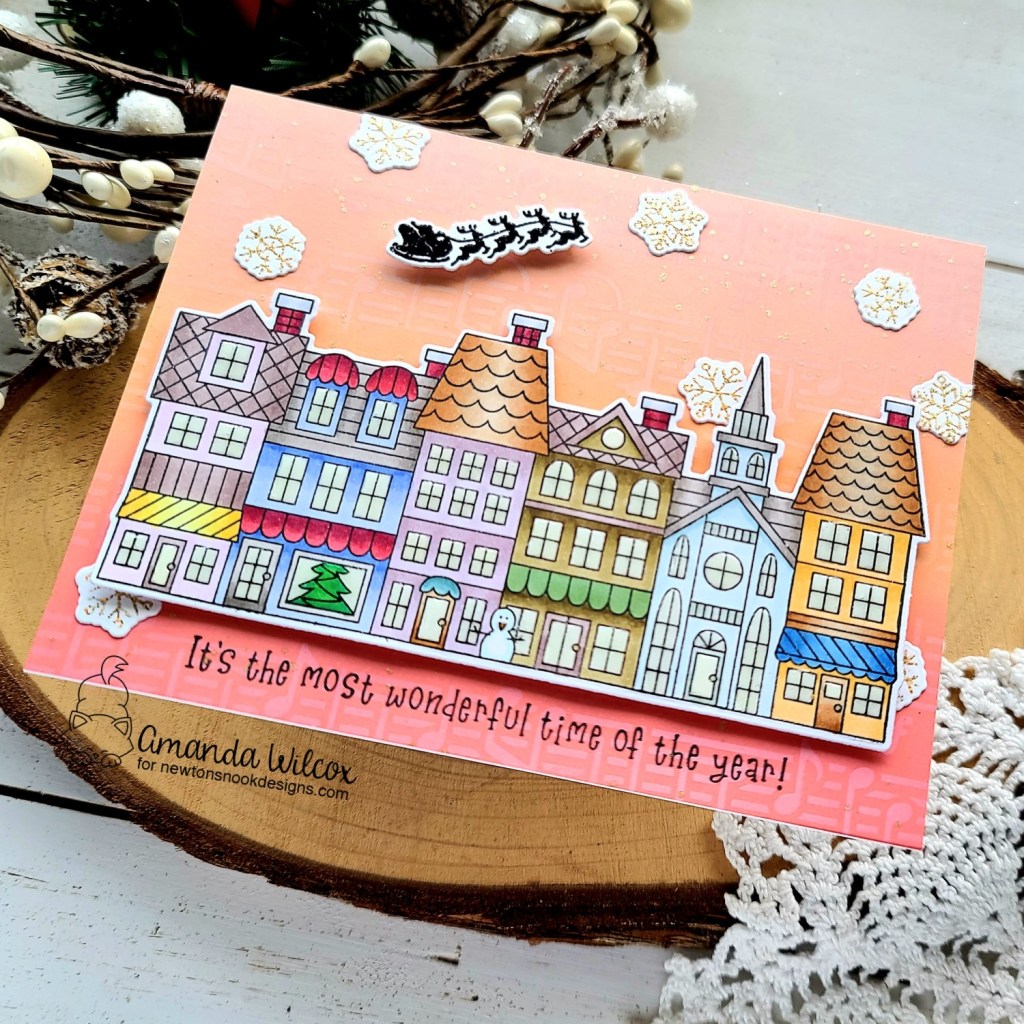
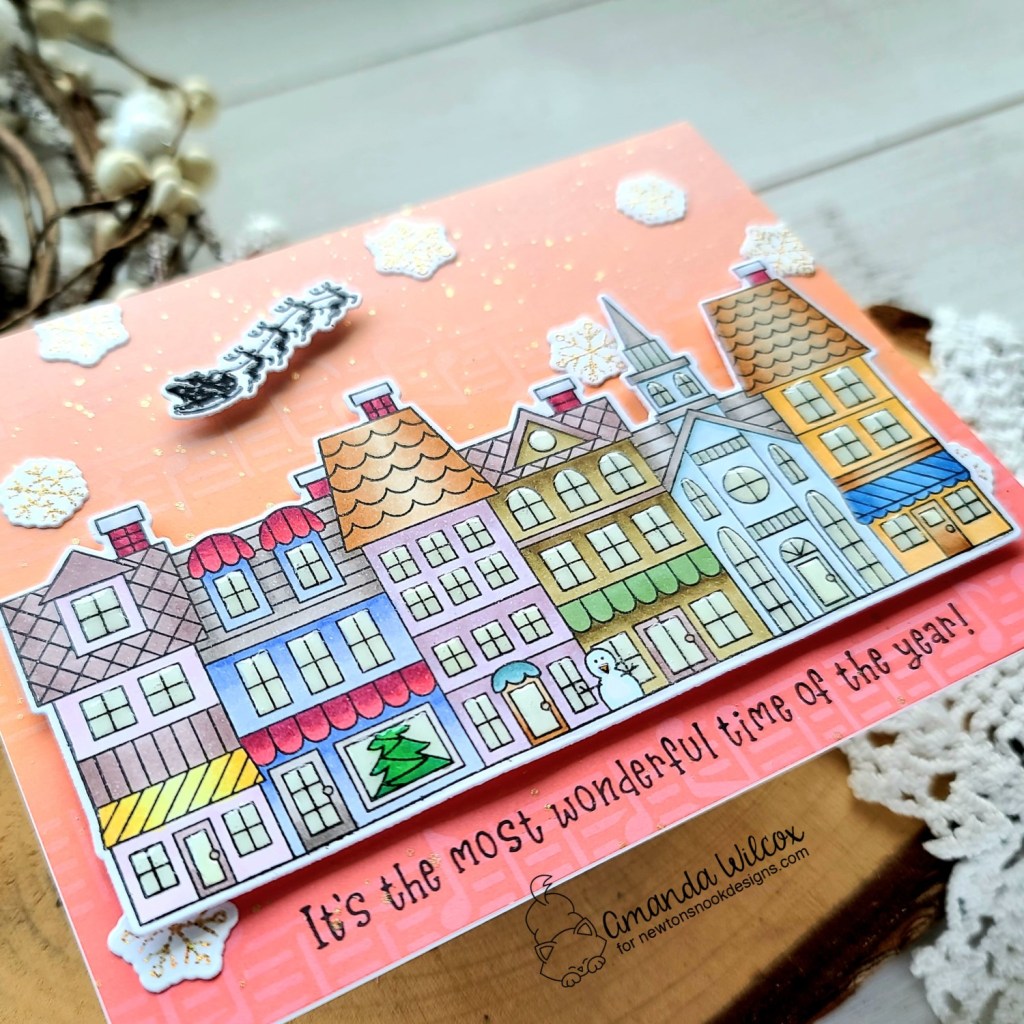
Hello everyone! Today I’m over on the Newton’s Nook blog with some fun holiday card inspiration to share with you!
I pulled out one of my very favorite holiday stamp sets and did some therapeutic coloring the other day. This Main Street Christmas set is super cute and so fun to color in a million different combinations! So that’s what I did. I stamped and colored it with my copics, then cut it out with the coordinating dies.
Next, I stamped and heat embossed Santa in black and some snowflakes in gold glitter and die cut those too.
I inked up a panel with distress oxide inks in abandoned coral, dried marigold and tattered rose. Next, I taped my Music stencil to it and blended white pigment ink through the stencil. It’s subtle but I knew which sentiment I wanted to use and it seemed perfect. Then I flicked some light gold watercolor all over the panel and let it dry.
Once that was dry, I adhered it to a white card base and popped my Main Street image up with foam strips. I used my MISTI to stamp the sentiment below the street and adhered the snowflakes down with liquid glue. Finally I popped Santa up with some foam squares so he didn’t get lost at all.
Then I finished the whole card off with glossy accents on EVERY. SINGLE. WINDOW. Can anyone say hand cramps??? Oh my word, yes! But sooooooooo worth it!!!
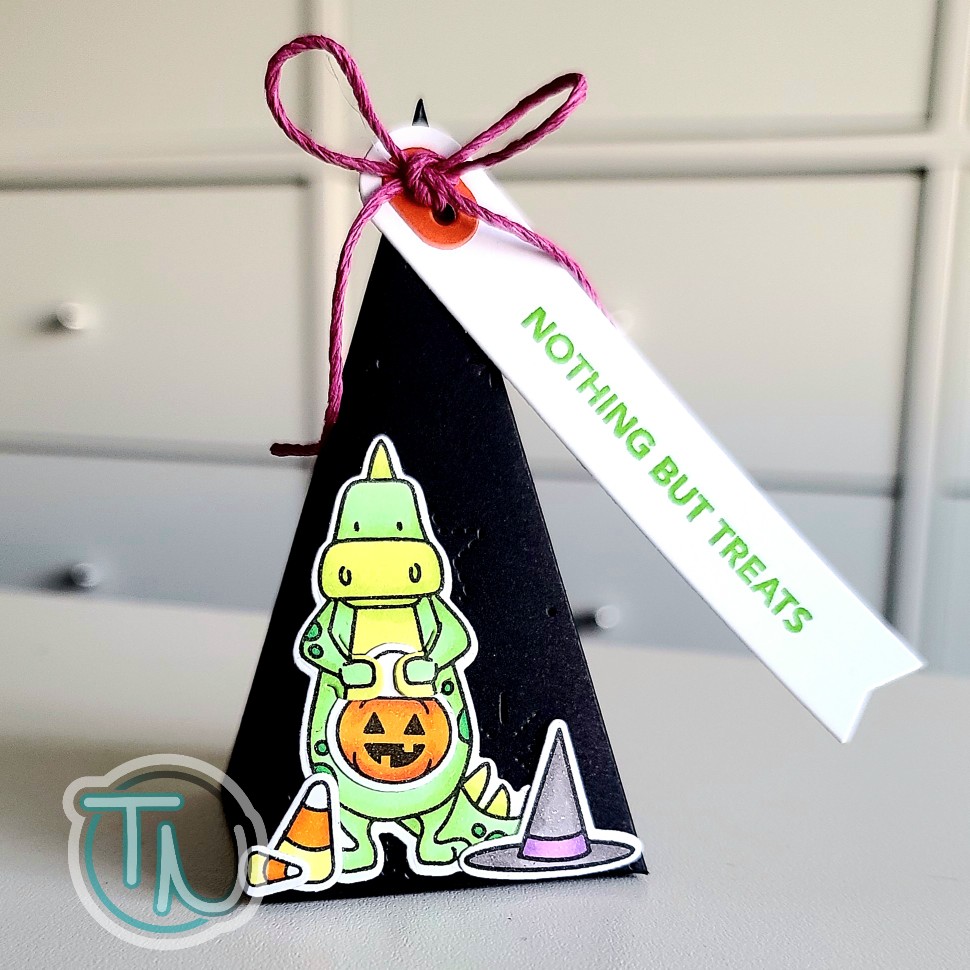
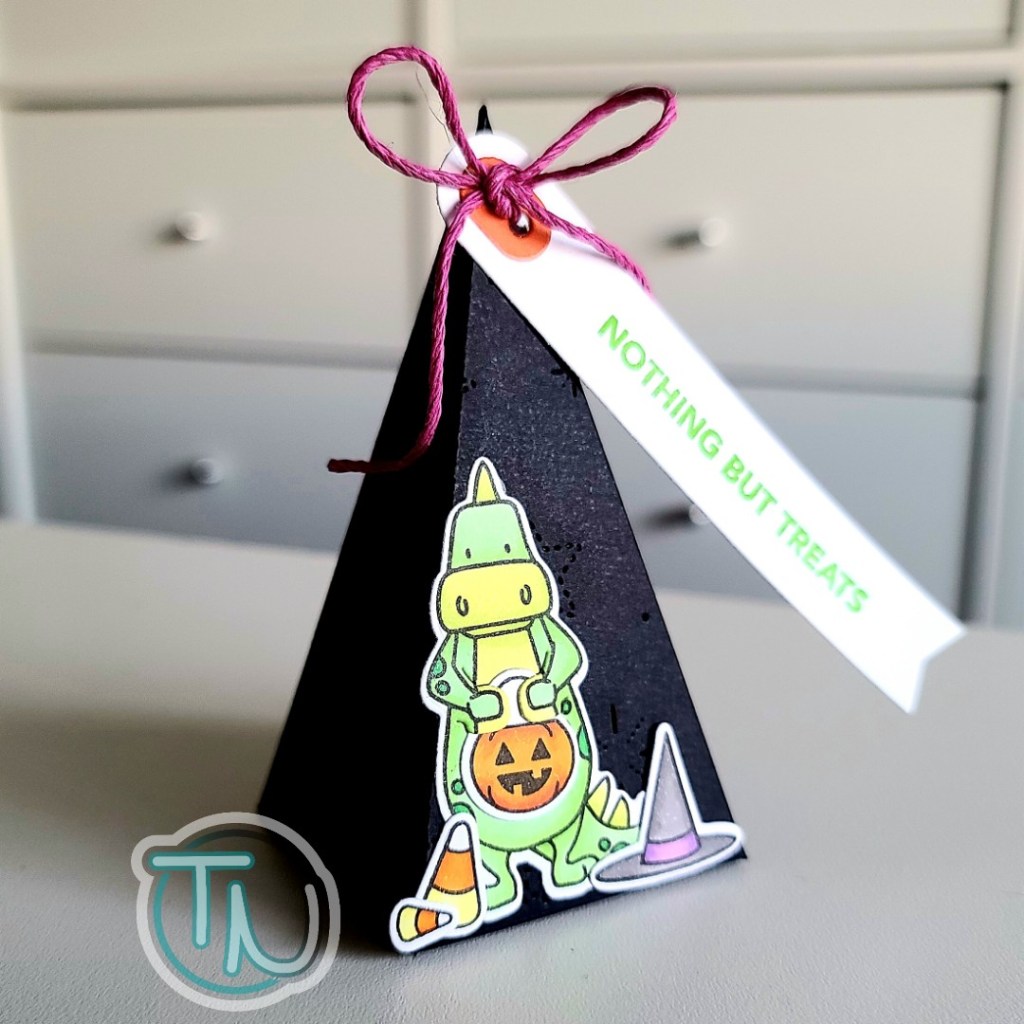
Hi there! Today I’m popping in with a simple little treat box just in time for Halloween! It featuring the recently release pyramid box dies from Ellen Hutson and a total favorite dinosaur from Dinomite Halloween!
I stamped and colored images from Dinomite Halloween with my copic markers. Then I used the coordinating dies to cut them out and used liquid glue to adhere them all together.
Next, I die cut 2 panels with the Pyramid Box die from black cardstock. I ran the panels through the die cutter a second time with the Trinity Stamps Starry Skies cover plate. This gives pierced stars and dots like a night sky. Then I used strong tear tape to adhere my box together.
I die cut one of the Farmhouse Tags from white cardstock and stamped a sentiment from Tag It – Halloween in green ink. Then I cut the reinforcer from orange cardstock, glued it in place and tied some magenta twine from my stash through the holes.
I adhered my dinosaur to the box with liquid glue and the tag with a glue dot. The box opens from the bottom so nothing is interfering with me being able to fill it and give it away. So cool!
Hey friends! We have quite a few new followers here so I wanted to be sure to pop in and let you all know that Newton’s Nook has an exclusive email newsletter that only goes out to subscribers every Tuesday! It’s called Designer’s Nook and it comes straight from the design team with special inspiration just for you!
Here’s a little sneak peek of my project coming out in tomorrow’s edition!
It’s super cute and so much fun so you won’t want to miss out! If you’re not subscribed already, click HERE and be sure to click the Designer’s Nook box when you sign up!
I appreciate you sharing your time with me. Have a fabulous day!
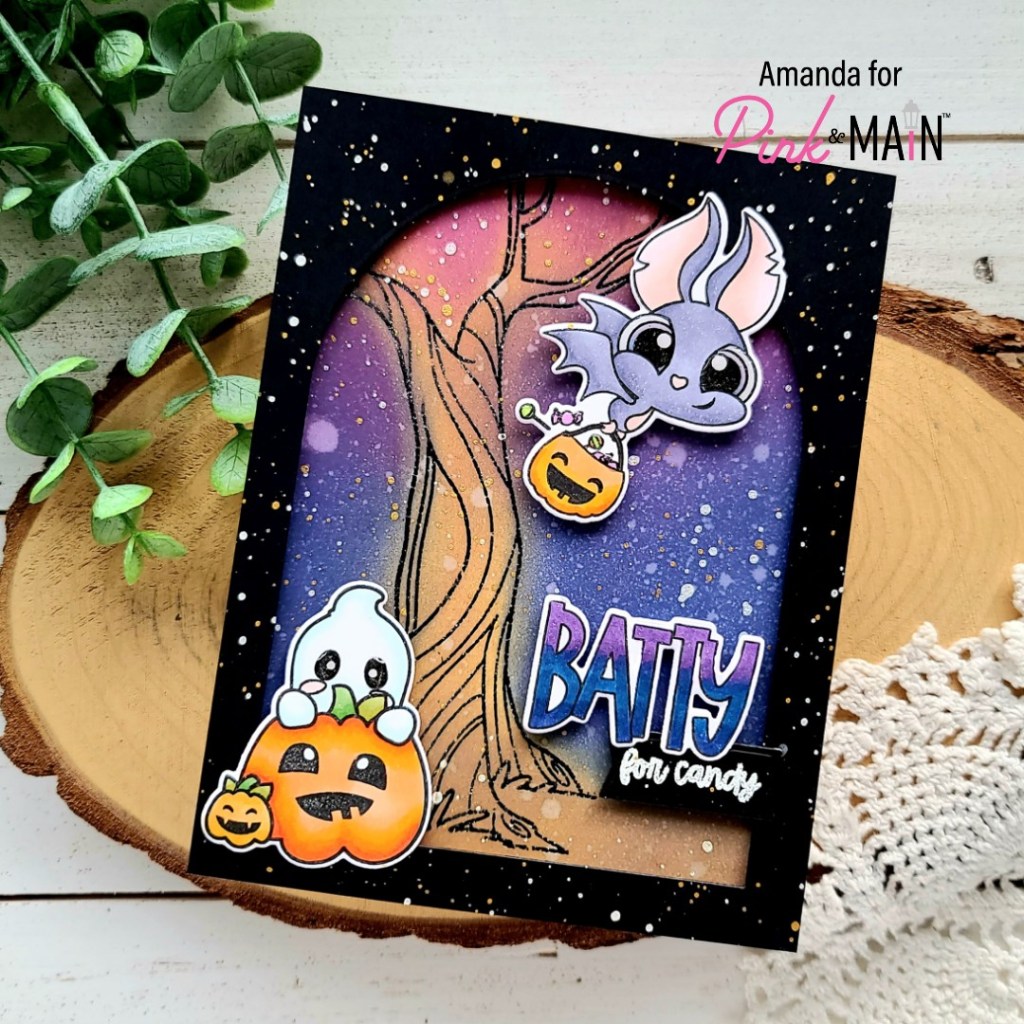
Welcome everyone! Today I’m popping in with a fun Halloween themed card featuring some super fun goodies from the September Pink & Main release. I hadn’t had a chance to ink up these adorable bats and I really just couldn’t let that happen!
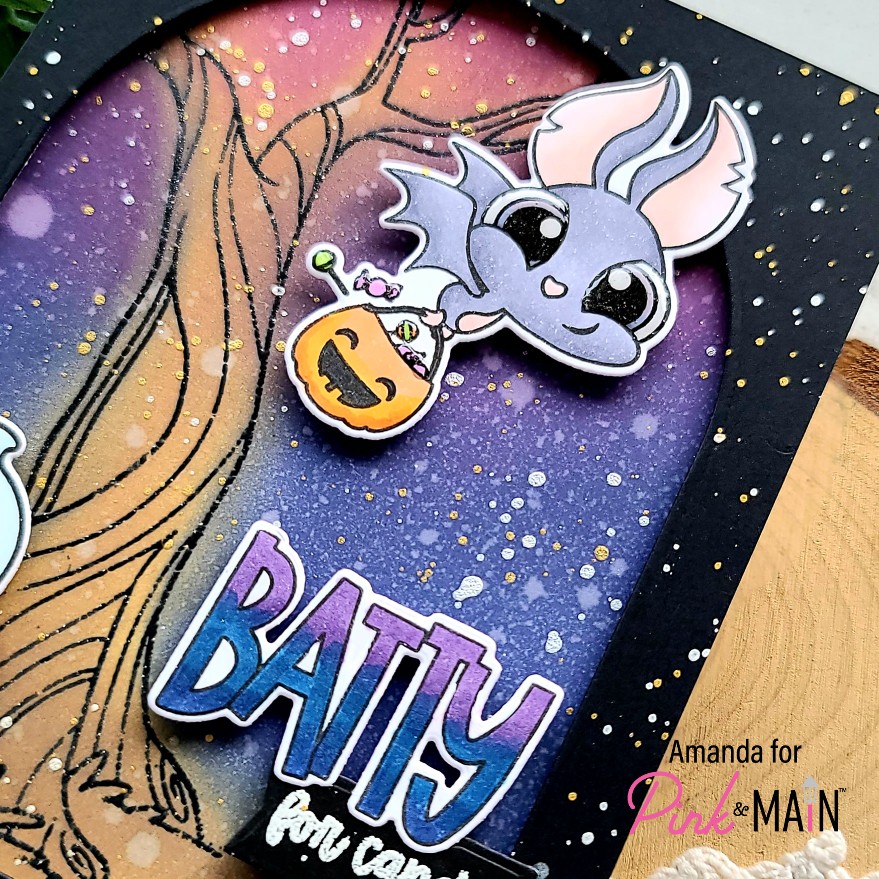
Today I pulled out a few stamp sets from the September release to create my fun Halloween scene. I started with the bat and sentiment from Batty For You and decided to add that sweet little peeking ghost from Hello Bootiful. I inked them all up and colored them with copic markers. Then I used the coordinating dies to cut them out, stamped the second part of my sentiment and heat embossed it before die cutting it with a Large Sentiment Banner die.
I wanted something more than ink blending for my background so I took the tree from Oh Nuts and heat embossed it on a large panel. Then I did some messy fun ink blending with distress oxide inks to “color” my scene in. I used gathered twigs, seedless preserves and chipped sapphire. Then I spritzed the panel with water.
To frame everything up I cut an A2 rectangle and then die cut the next-to-largest Stitched Arches die from it. I added foam tape and popped it on the inked panel. Next, I used foam squares to adhere all of my images and sentiments.
Total transparency…I didn’t like my card at this point. So I walked away and came back later. I decided that the black frame and background were too stark for me. So this is where we remember that it’s just paper and we can change things!
I die cut the images another time from scrap cardstock and laid them over the colored images that were already in place. Then I carefully put the card in my splatter box and went to town with my favorite pearl and gold watercolors. I left it to try for a few minutes and just dumped the die cut masks in the trash.
I know this may be too busy for some people but I LOVE IT! Moving on to finishing touches, I added glossy accents to the ghost and bat eyes and the candy in the bucket.
Last, I went over the word “batty” with a Wink of Stella glitter brush pen for some shimmer in the light. This card was quite a process and I loved all the stages! Mostly, remembering that it’s okay to walk away and it’s even more okay to try something out, it might even work!
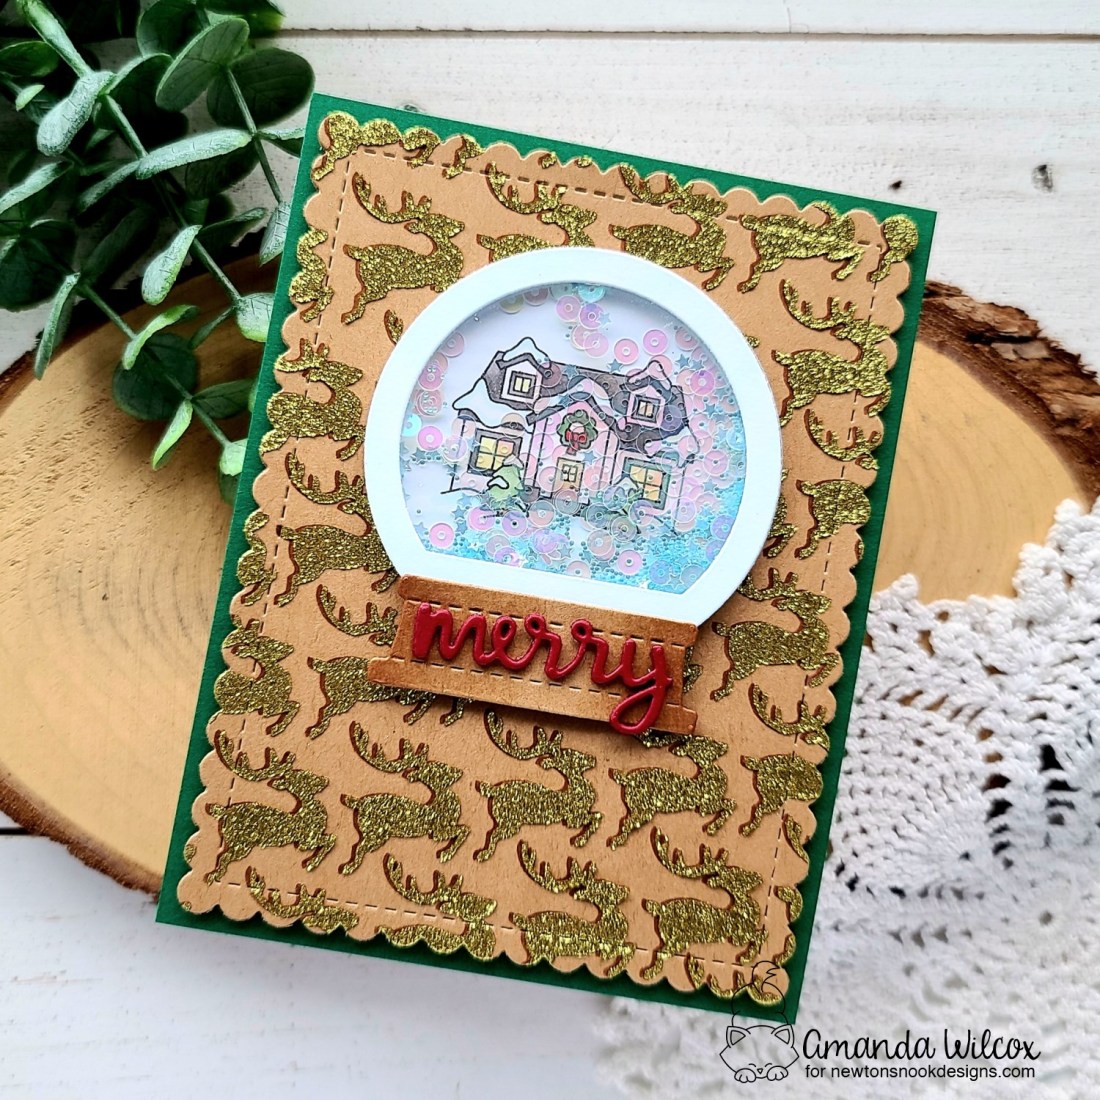
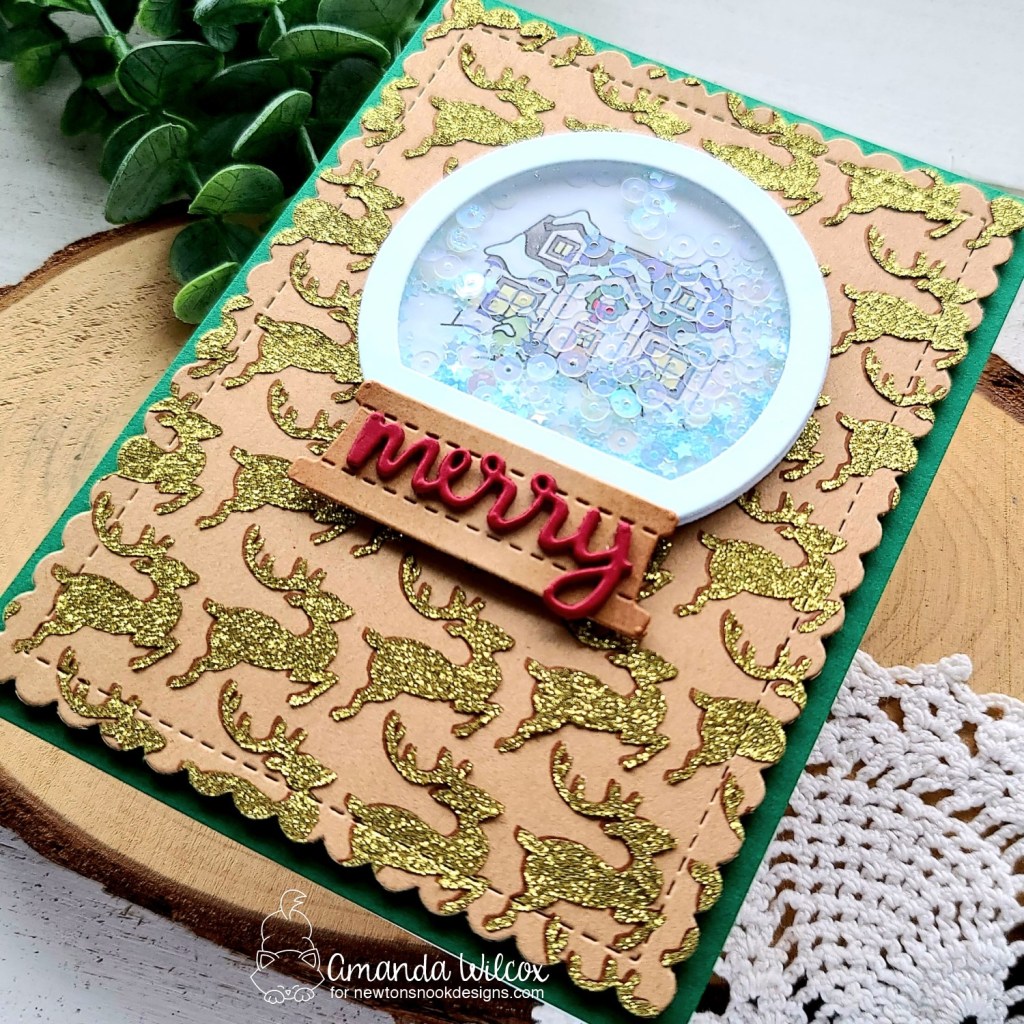
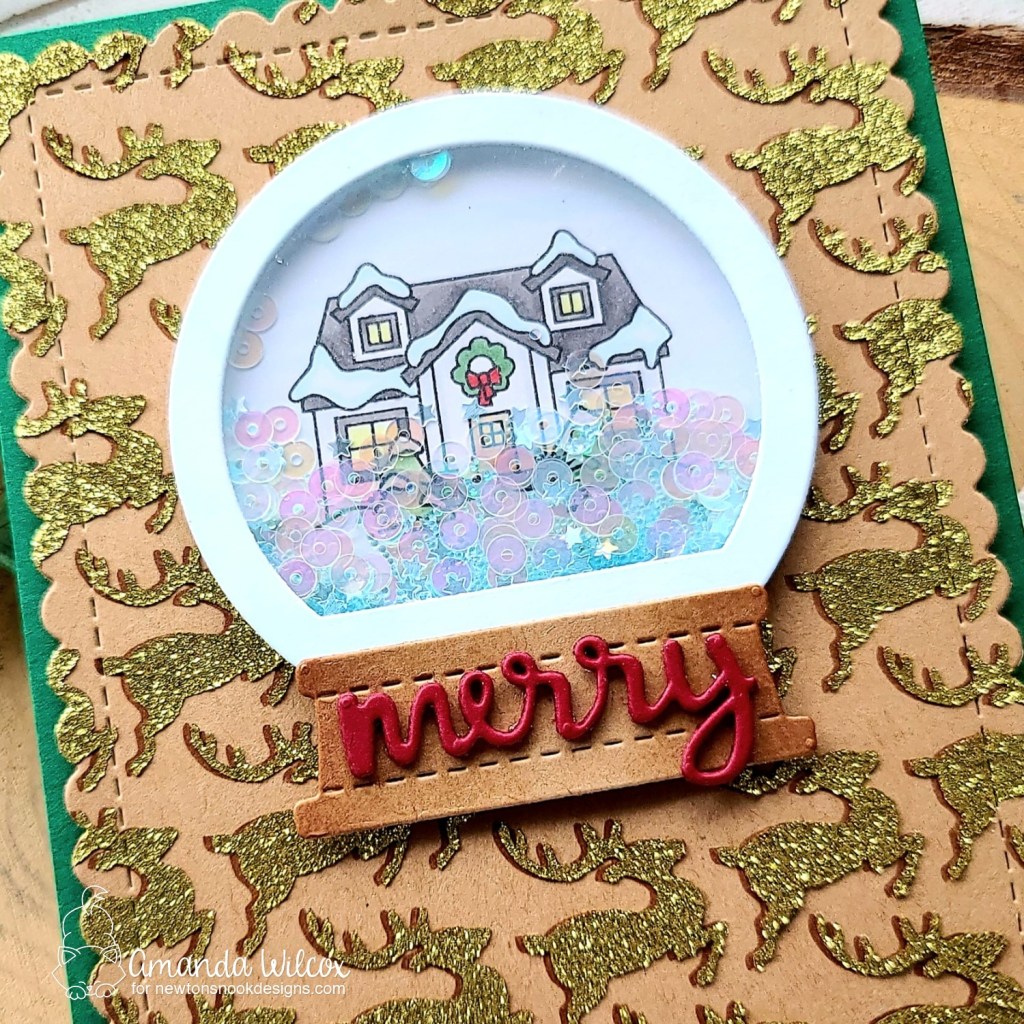
Hello my wonderful crafty friends! I’m popping in today to share a super fun card featuring one of the new stamp sets just release yesterday by Newton’s Nook and a different way to use it! The smaller images and the sentiments from the new Holiday Home stamp set fit inside the Snowglobe Shaker dies! It’s a whole new level of fun!
I started by playing around and creating my shaker globe. I die cut the base piece and stamped the house from Holiday Home on it, colored it with my copic markers and then cut the other elements to the shaker. The frame was cut from white cardstock with a little light blue copic coloring to match the scene and the base of the snow globe from kraft and shaded with copic markers as well. I cut a piece of acetate and sealed it all up with foam strips and some shaker bits from my stash.
For my background panel, I taped a kraft panel to the Reindeer stencil. Then, I inked it up with brown ink, cleaned my stencil and taped it back down, shifting it just a smidge. Next, I spread gold glitz glitter gel through it and set it aside to dry. While that was drying I cut a piece of green cardstock and adhered it to a white card base.
I die cut the word “merry” from the Snow Globe Shaker die set 3 times from red cardstock and glued them together with liquid adhesive. Then I adhered them to my shaker. With the glitz panel dry, I die cut it with the largest Frames & Flags die and popped it up with foam tape on my green base.
Finally I added my shaker snow globe to the front with liquid adhesive. For finishing touches I used Wink of Stella glitter brush pen on the die cut word and stamped a sentiment from Holiday Home on the inside of the card.
Wouldn’t these shakers make amazing Christmas gift tags too??? I think so!
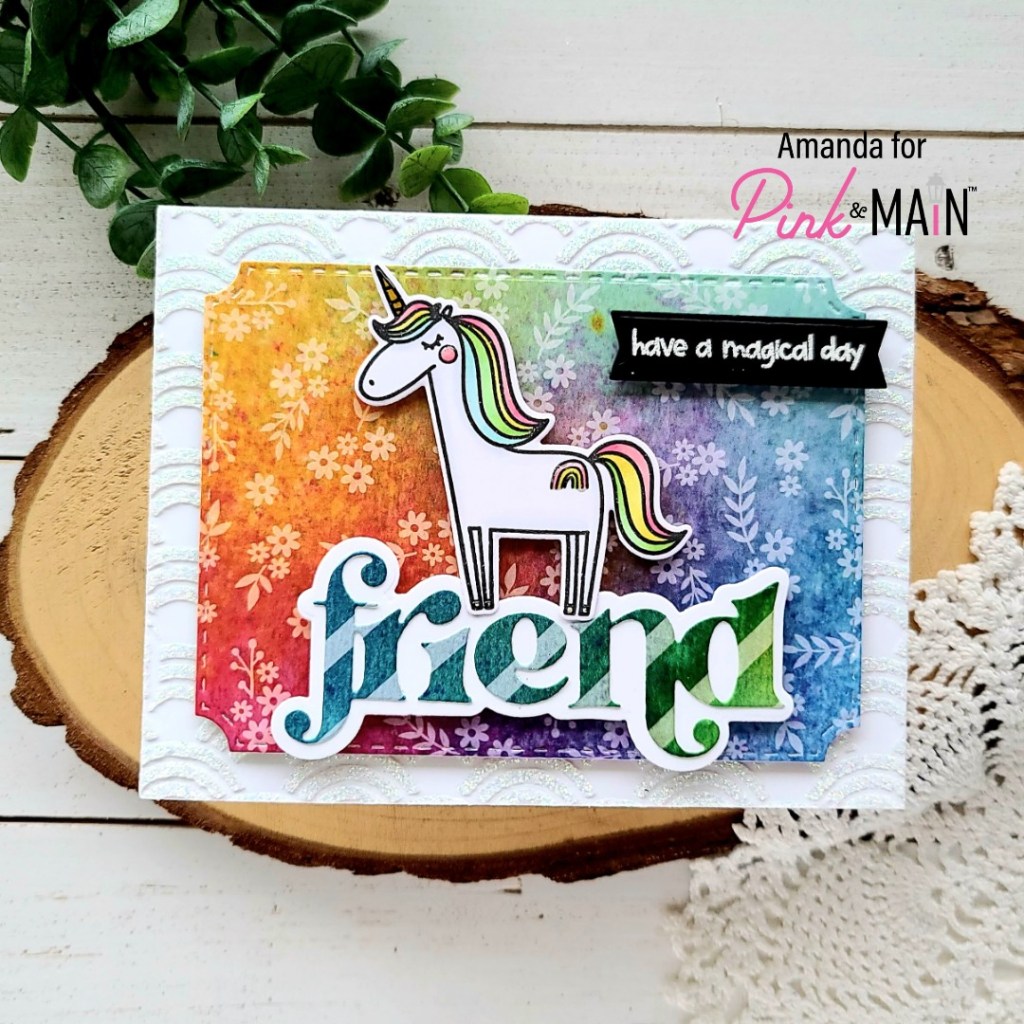
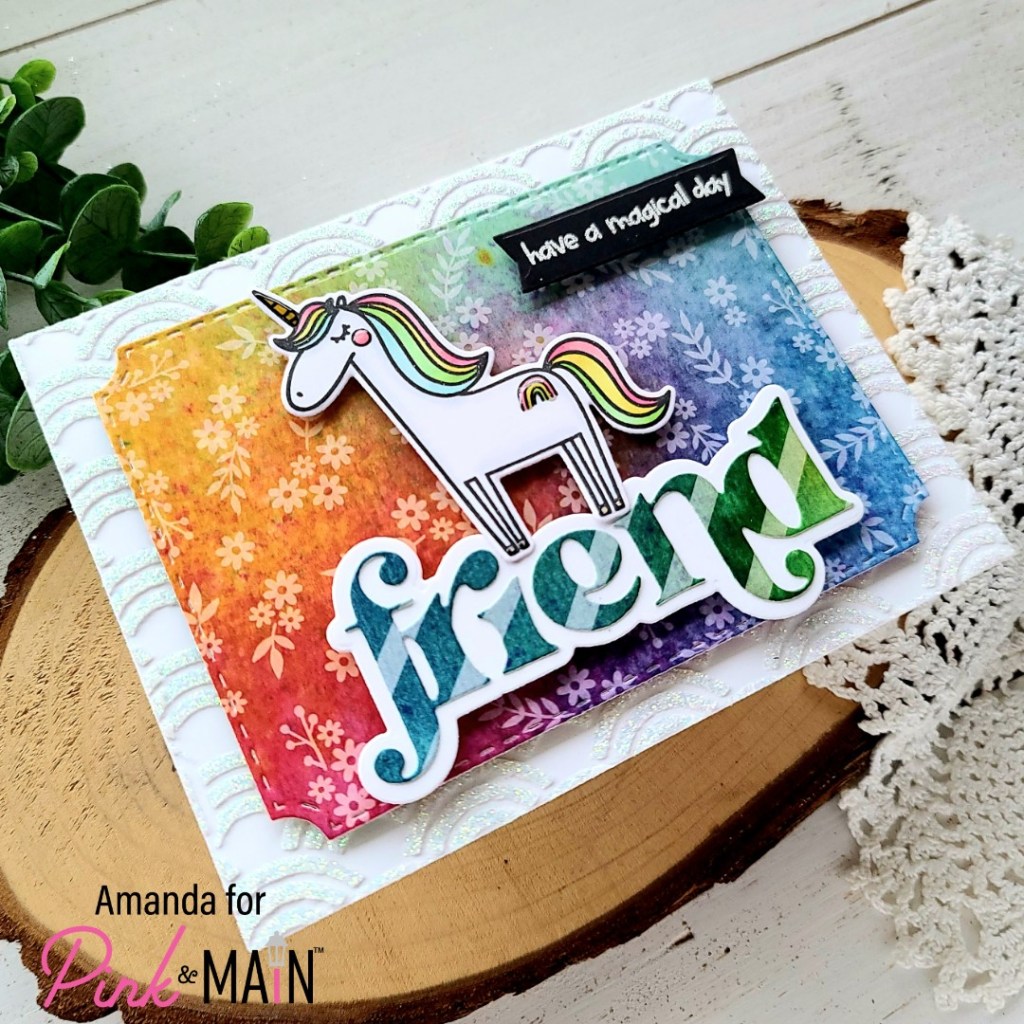
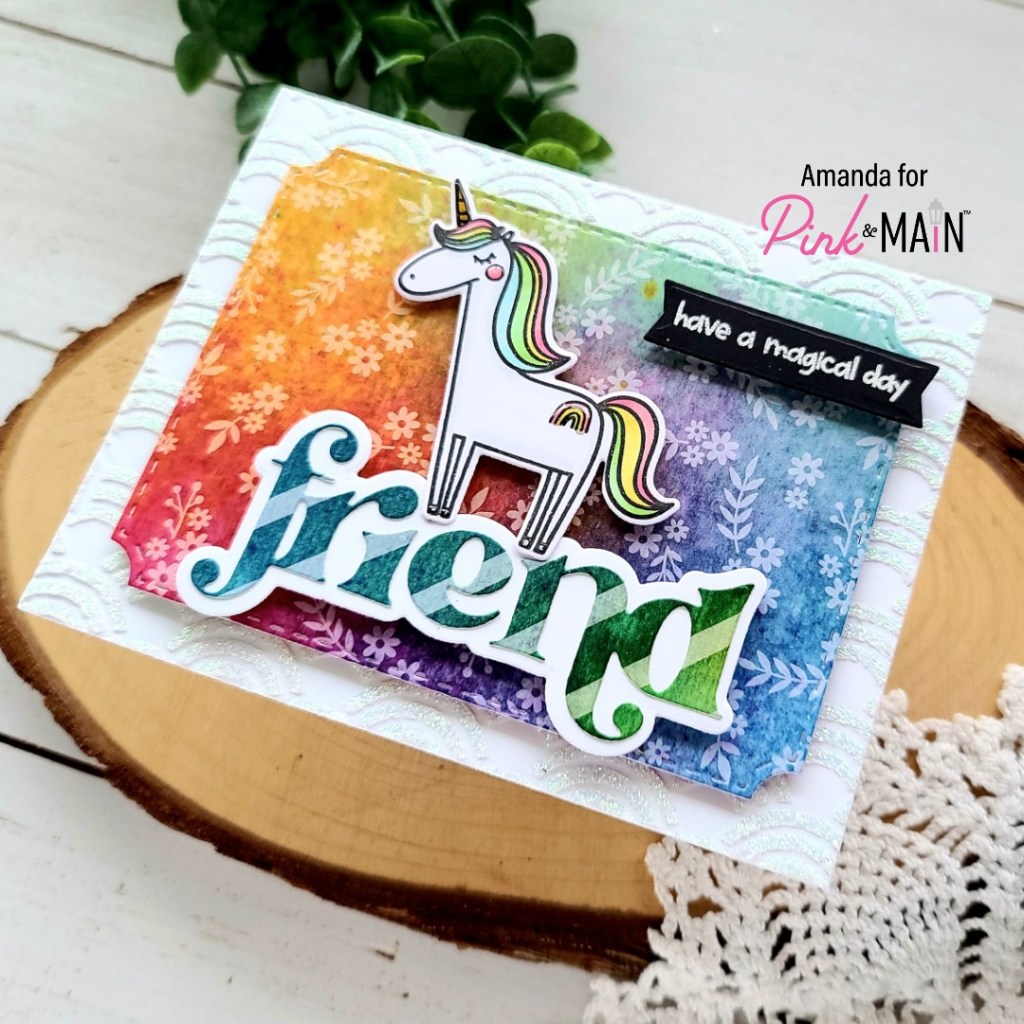
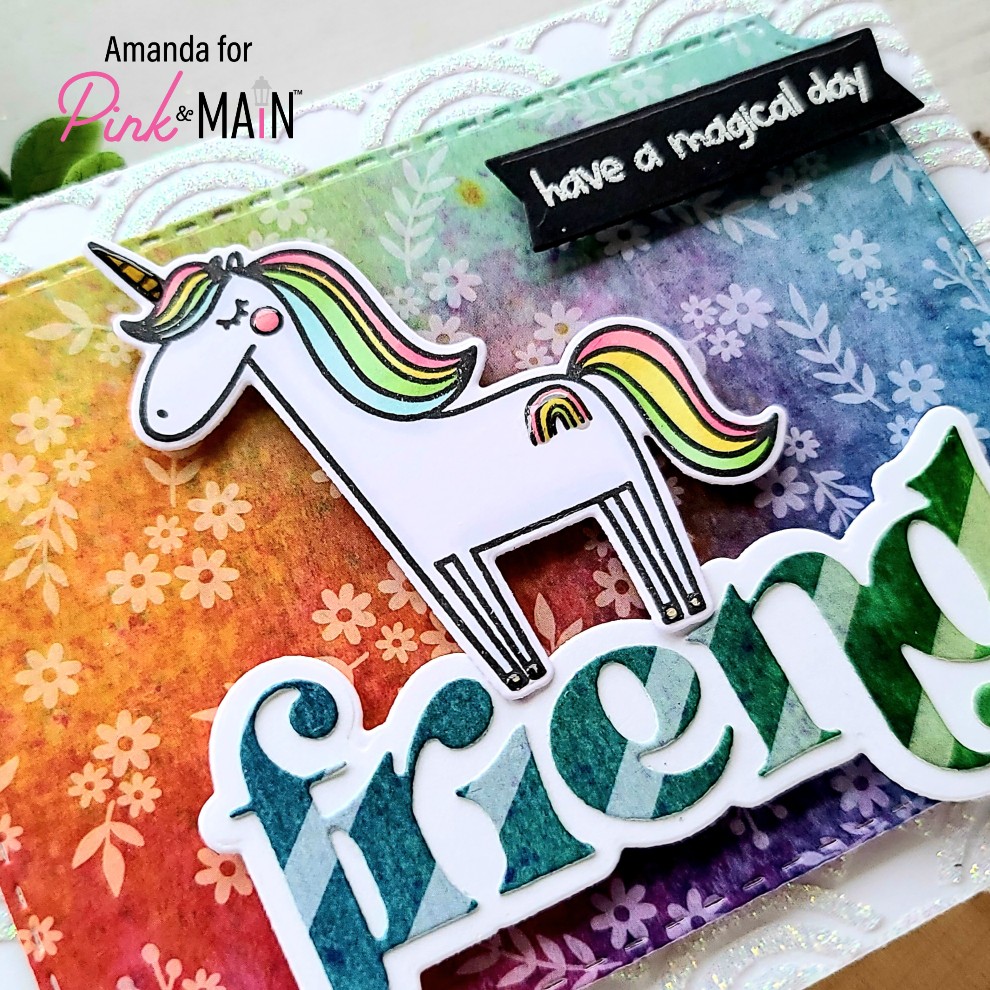
Welcome fabulous friends! Today I’ve got a super fun sneak peek over on the Pink & Main blog featuring lots of goodies from the upcoming October release!
I had a fun design in mind so I started by stamping my image from Unicorn Wishes and colored it with copic markers. Then I used the coordinating dies to cut it out. Next, I started going through the new amazing Watercolor Rainbow paper pad and chose a couple of complimentary sheets to cut my background and sentiment from.
I cut the background panel from the next-to-largest of the new Notched Corners dies and the word die is from the Rainbow Friend dies.
Instead of having a plain white background, I decided that a fun unicorn card needed some bling so I spread iridescent glitz glitter gel through the new Rainbow Fun stencil! After that was dry, I cut the panel out with the largest Layered A2 Rectangle die and adhered it to a card base.
I added foam tape and squares to the back of everything and layered them up. I love good dimension and texture on my cards. It seemed like it was missing something and the sentiments in Unicorn Wishes go great with what I already had so I stamped and heat embossed one on black cardstock and cut it out with a Large Sentiment Strip die. I also added it with foam strips.
For some simple finishing touches, I added glossy accents to the unicorn horn, hooves, rainbow and cheek. Then I came in with Wink of Stella glitter brush pen on the mane and tail.
I can’t wait for you to see more sneak peeks from the rest of the team before the release goes live for purchase on Wednesday, October 20!
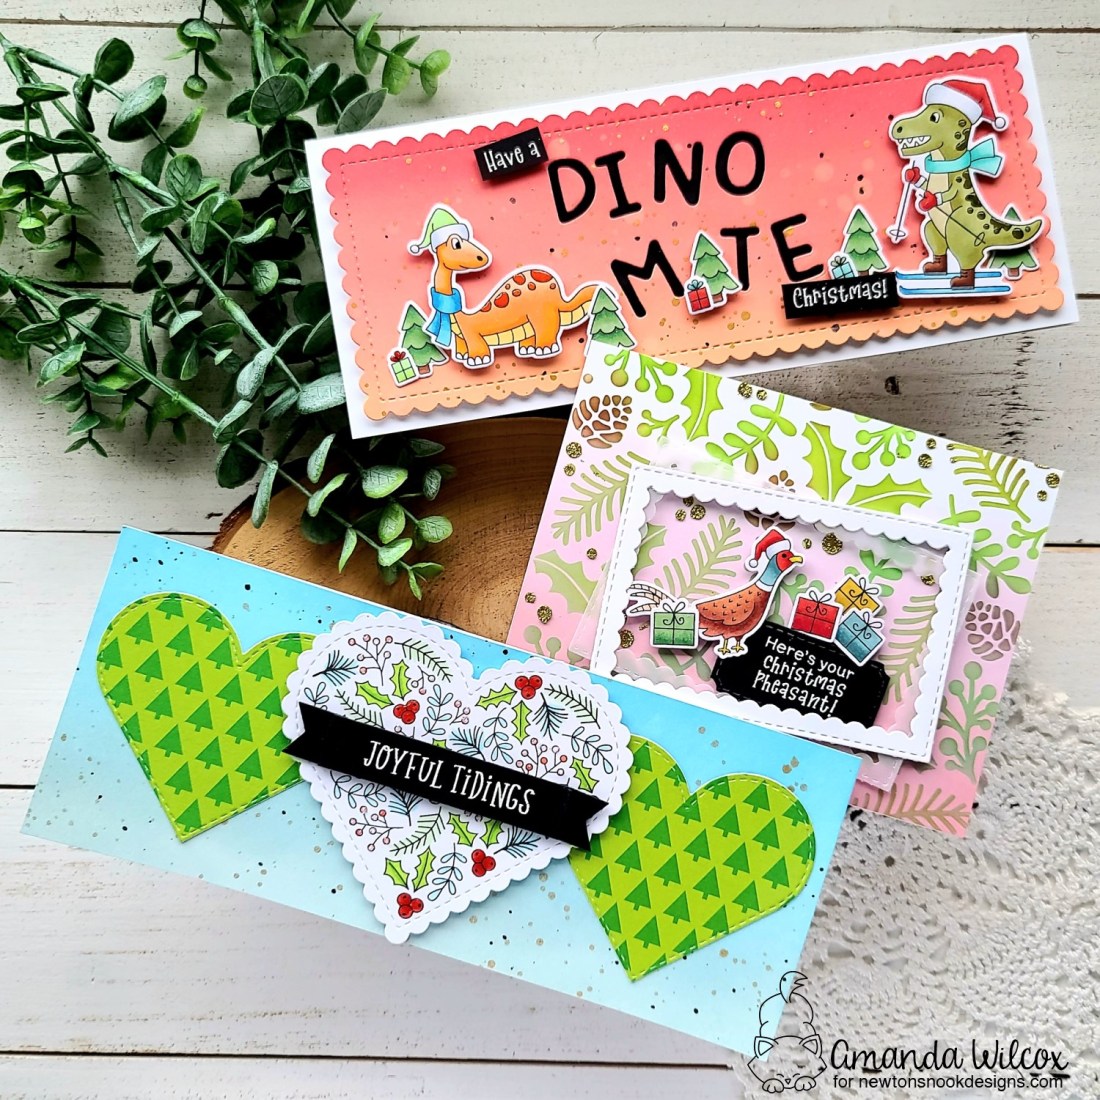
We’ve done it again everyone! We made it to the last day of the Newton’s Nook Holiday Release reveal week. Today is the most packed day of the whole week too! We have 3 new stamp and die sets and I have 3 awesome and fun cards to share with you!
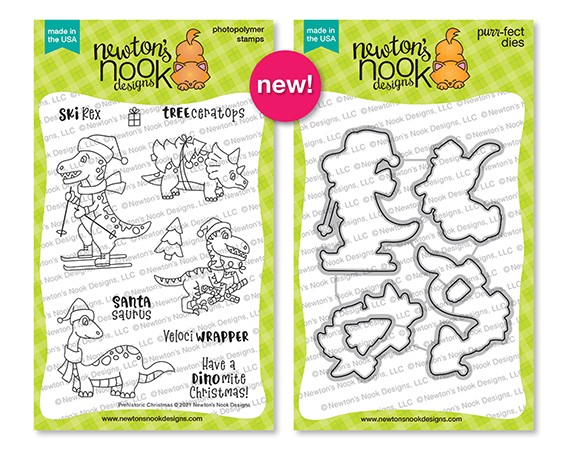
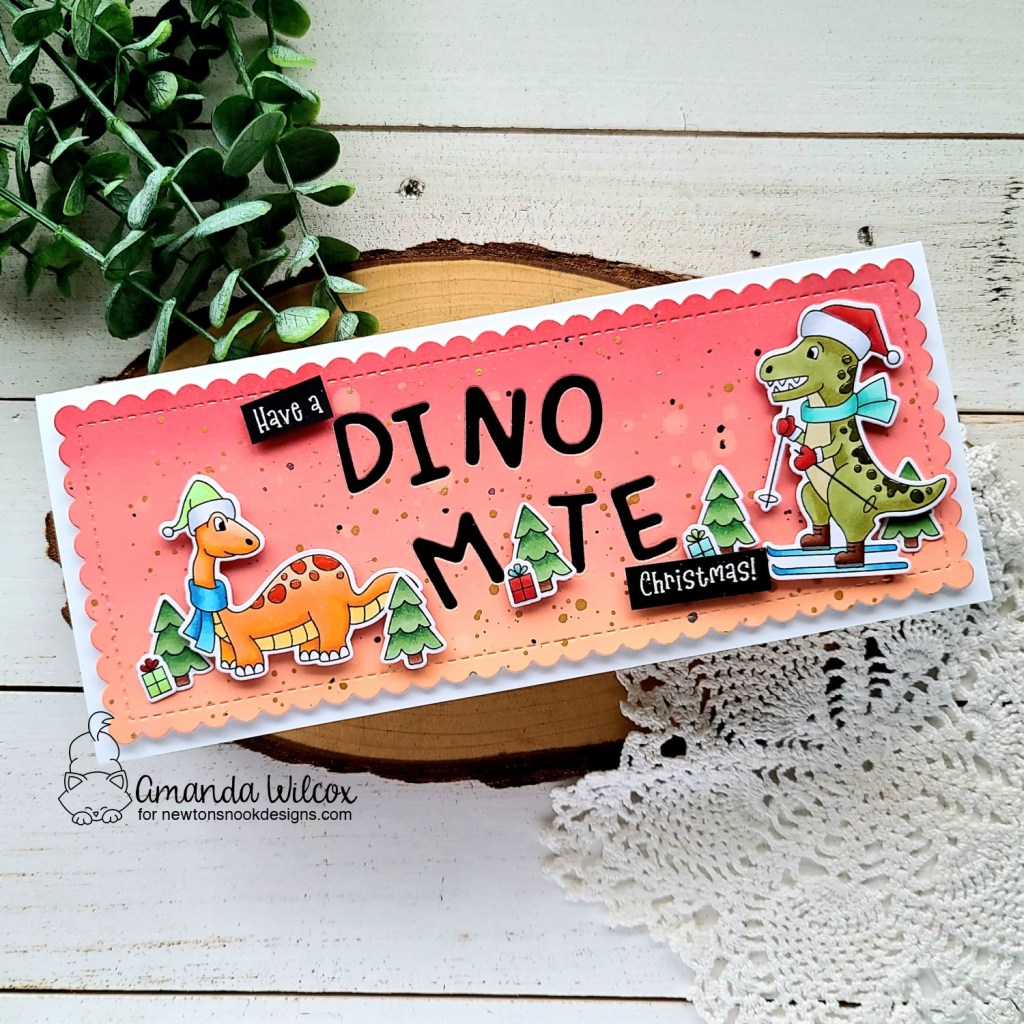
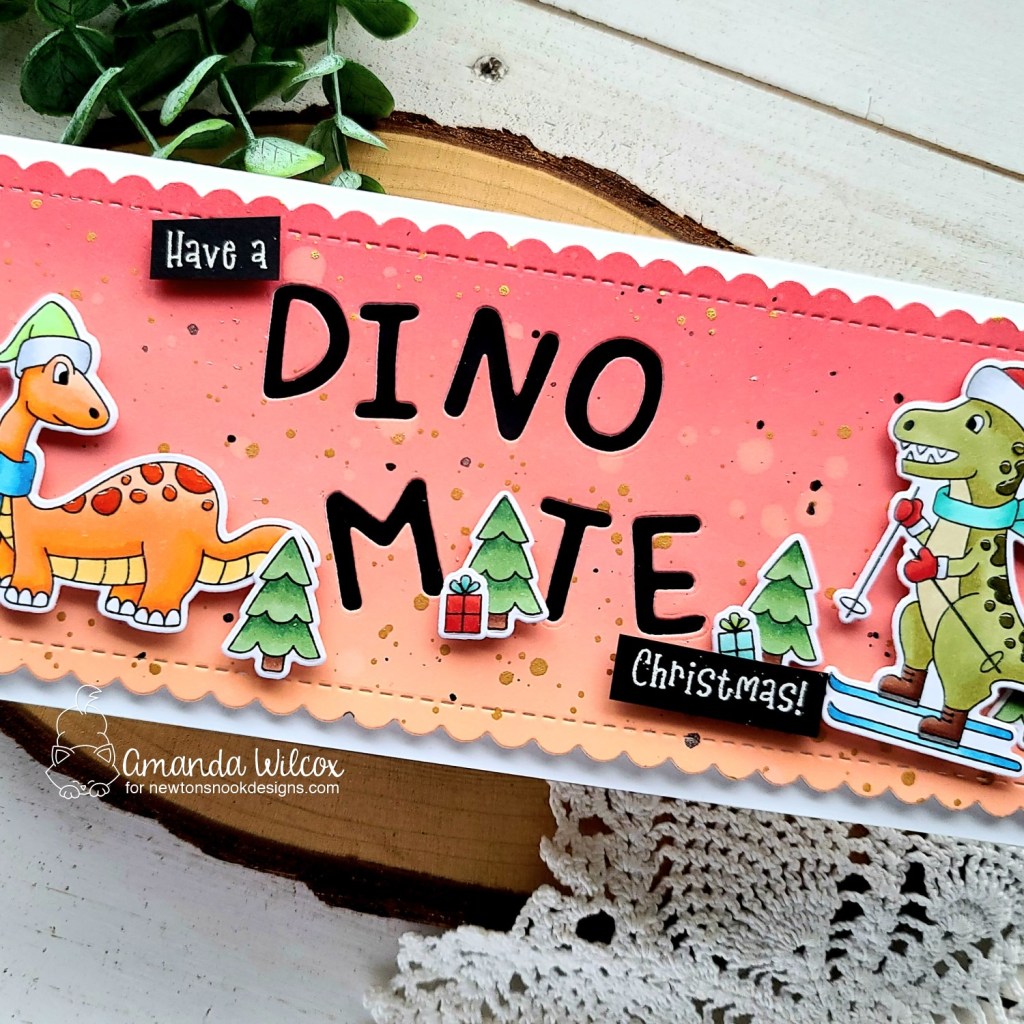
Prehistoric Christmas stamps and dies
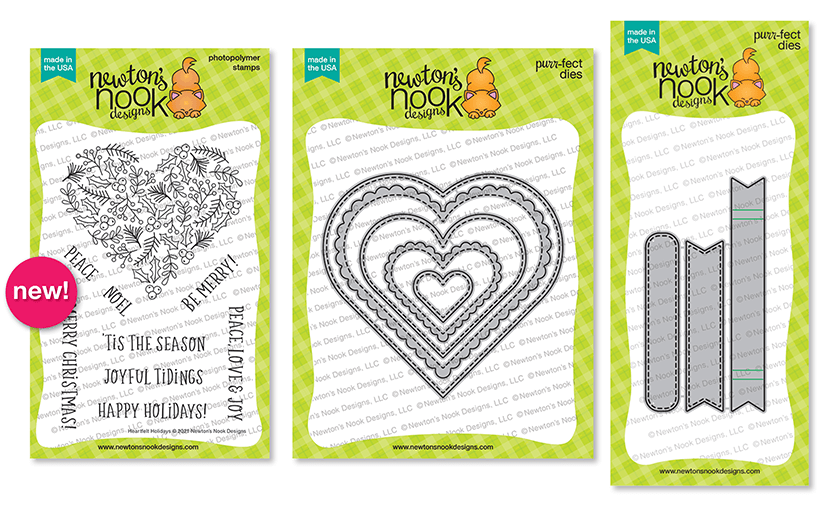
Heartfelt Holidays stamps – coordinates with Heart Frames and Banner Trio dies
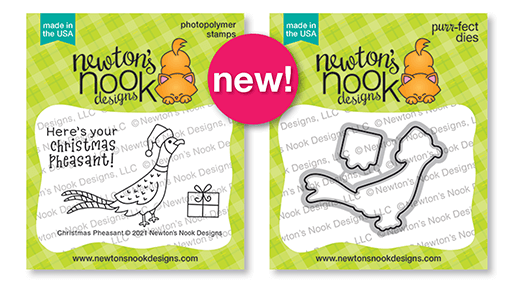
Christmas Pheasant stamps and dies
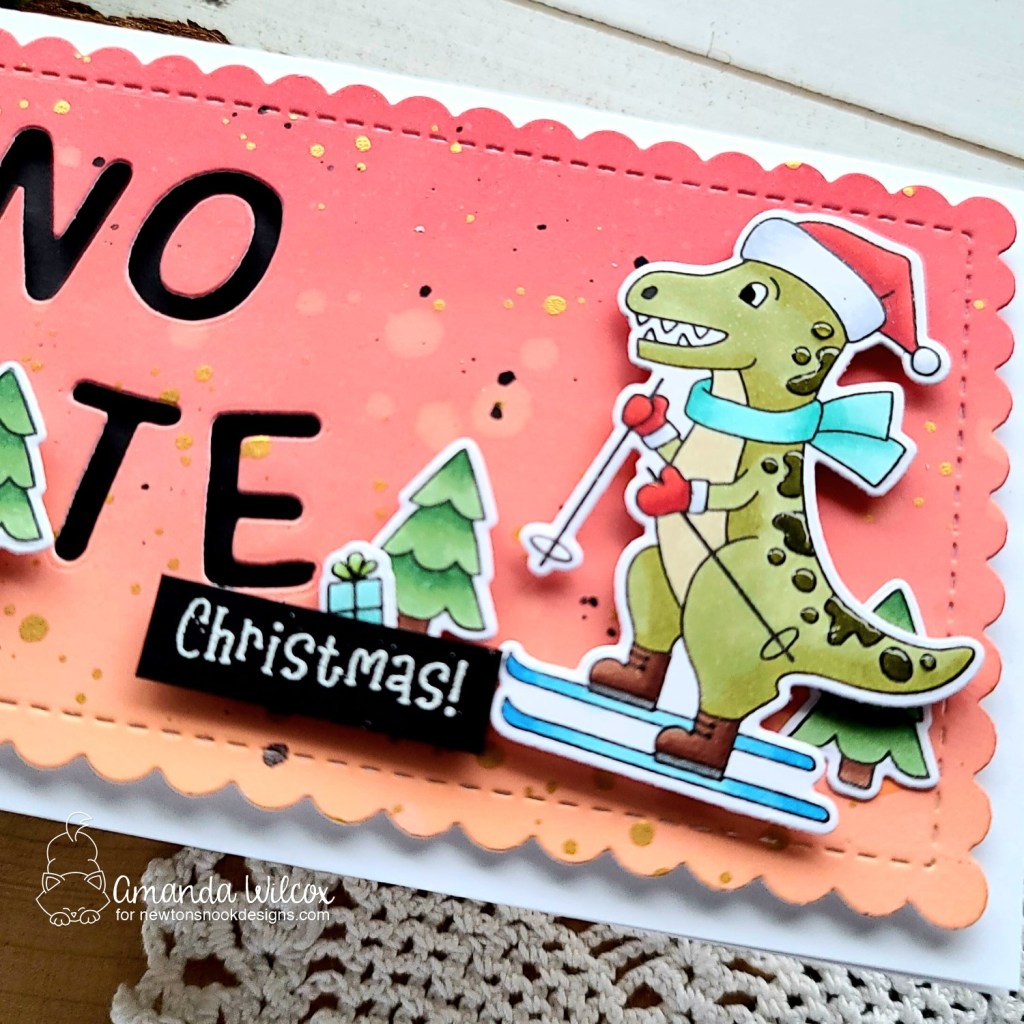
For those that know me, know that I squealed like a little kid on Christmas morning to see these absolutely incredible Christmas dinosaurs! I love them so much and had a blast creating this first card! I hope you love it too!
I stamped a ton of images from the set and colored them with my copic markers. Then I used the coordinating dies to cut them out and set them all aside. Next I blended a panel with distress oxide ink in tattered rose and festive berries. I absolutely love this combo! I spattered it with water, black paint and gold watercolor and let it dry.
Once it was dry I pulled out the Essential Alphabet dies and cut the word “dinomite” from the panel. Before I cut the second “i” out though I thought it would be fun to use a tree for the letter instead so I left it. I placed adhered a piece of black cardstock to the white card base so my letters are bold and popped the ink blended panel up with foam tape.
Next, I popped the images on with a combo of liquid adhesive and foam squares so there is some different dimension in my little scene. Isn’t the brontosaurus the cutest?!? I love him!
After all the images were in place, I stamped and heat embossed the rest of my sentiment from the set, masking off the “dinomite” part that I die cut, trimmed the pieces in to strips and popped them in place too.
For finishing touches I added lots of glossy accents to the images and black glaze pen to the dinosaur’s eyes.
I know that was a lot but I still have 2 more awesome cards to share with you. I hope you’ll stick with me a bit longer.
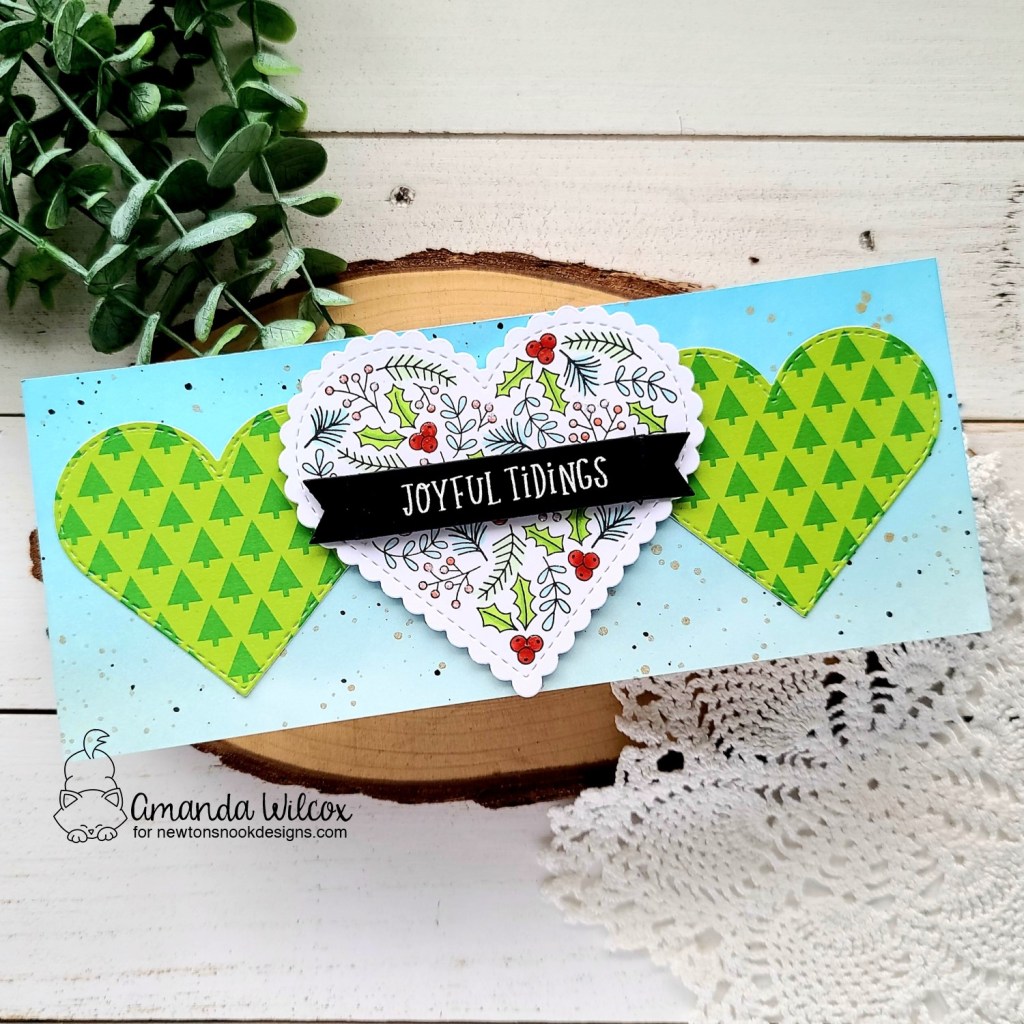
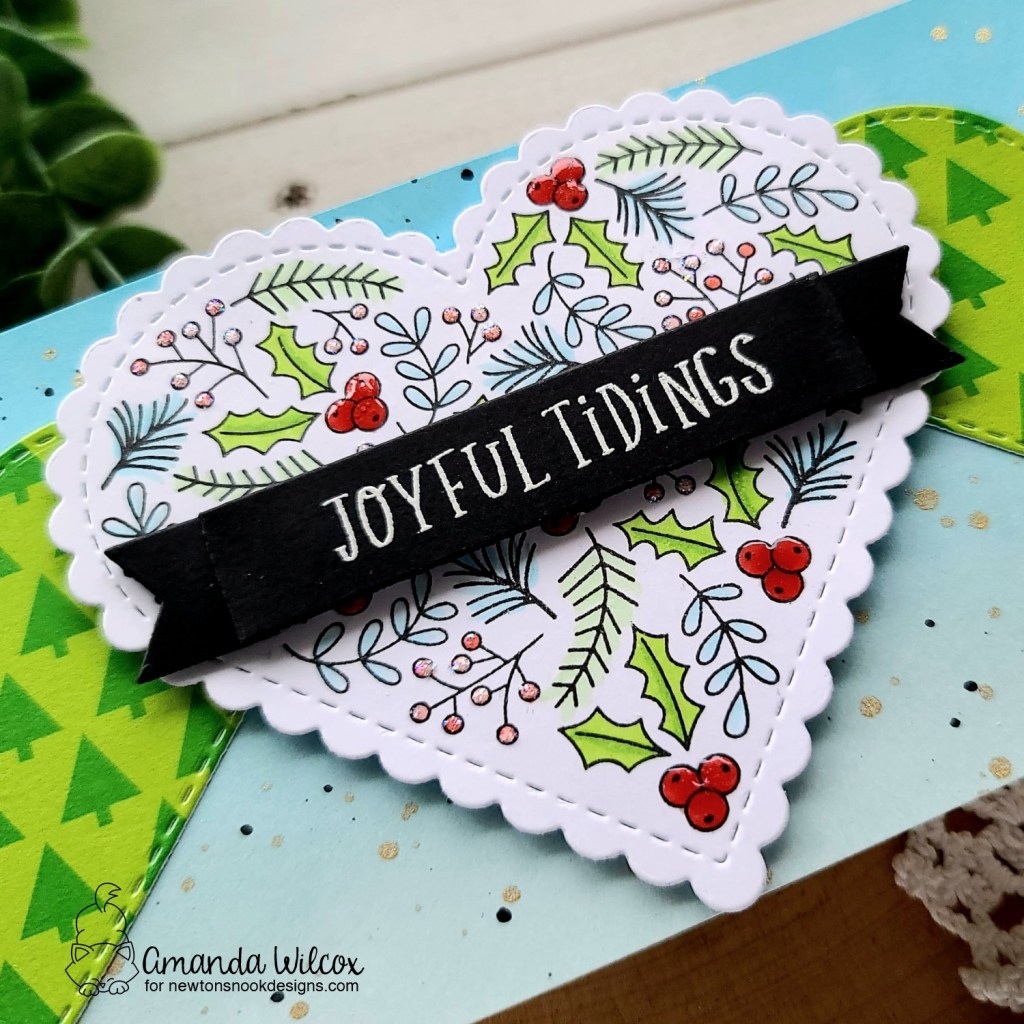
Next up, we have the Heartfelt Holidays beautiful image on another slimline card, also featuring the new paper pad!
For these full size images – heartfelt, circle, square and card front – I die cut the paper first, line up my stamp and then stamp the image. It helps me center the image better and not fall off the edge with those scalloped sides. Just a little trick I wanted to share.
So after all that I colored the image iwth my copic markers, die cut a sentiment banner and heat embossed a sentiment on it. Then I cut a couple of smaller hearts from the Heart Frames die set using paper from the paper pad.
I inked up a panel with tumbled glass and salty ocean distress oxide inks and flicked black paint and gold watercolor all over it. I attached it to a card base and then adhered the smaller hearts with liquid glue. I popped the main heart with foam strips and then did the same with the sentiment.
For finishing touches I added glossy accents to the holly berries and unicorn stickles to the smaller berries.
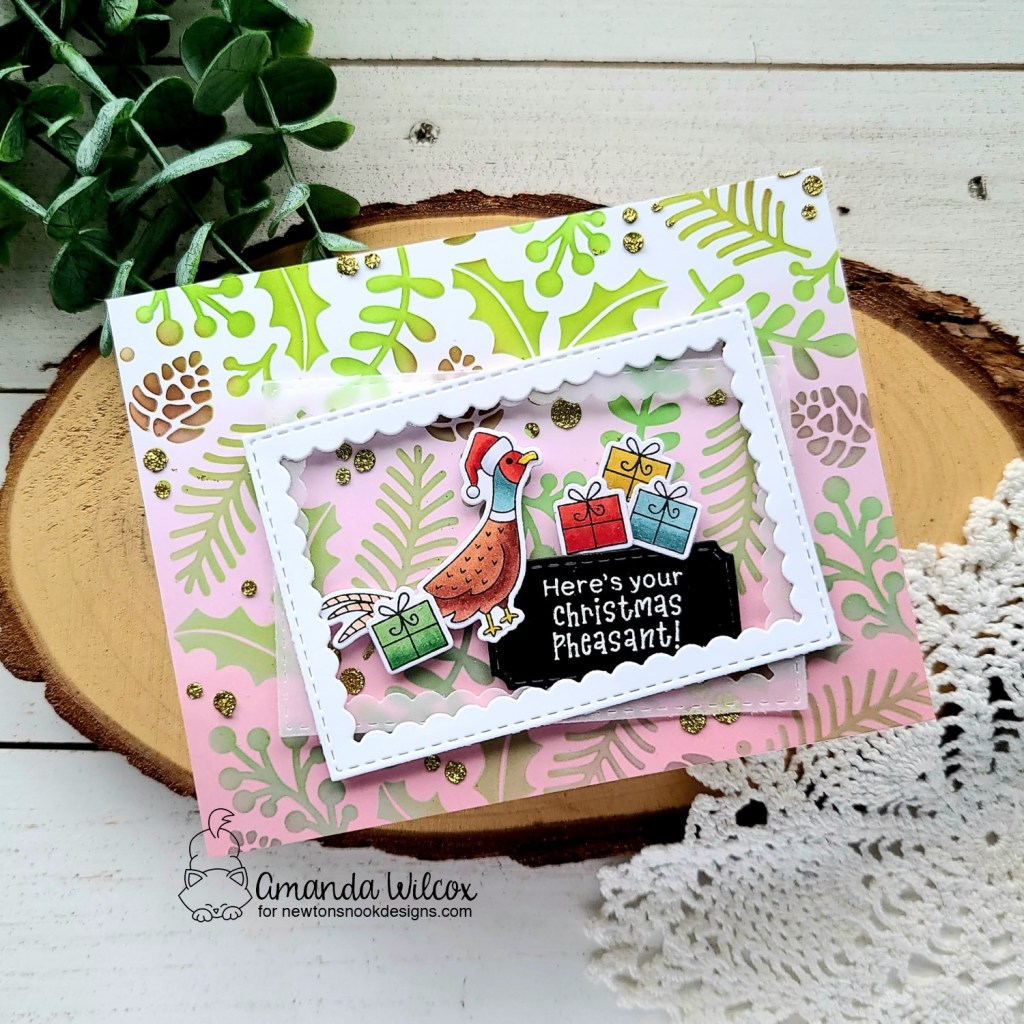
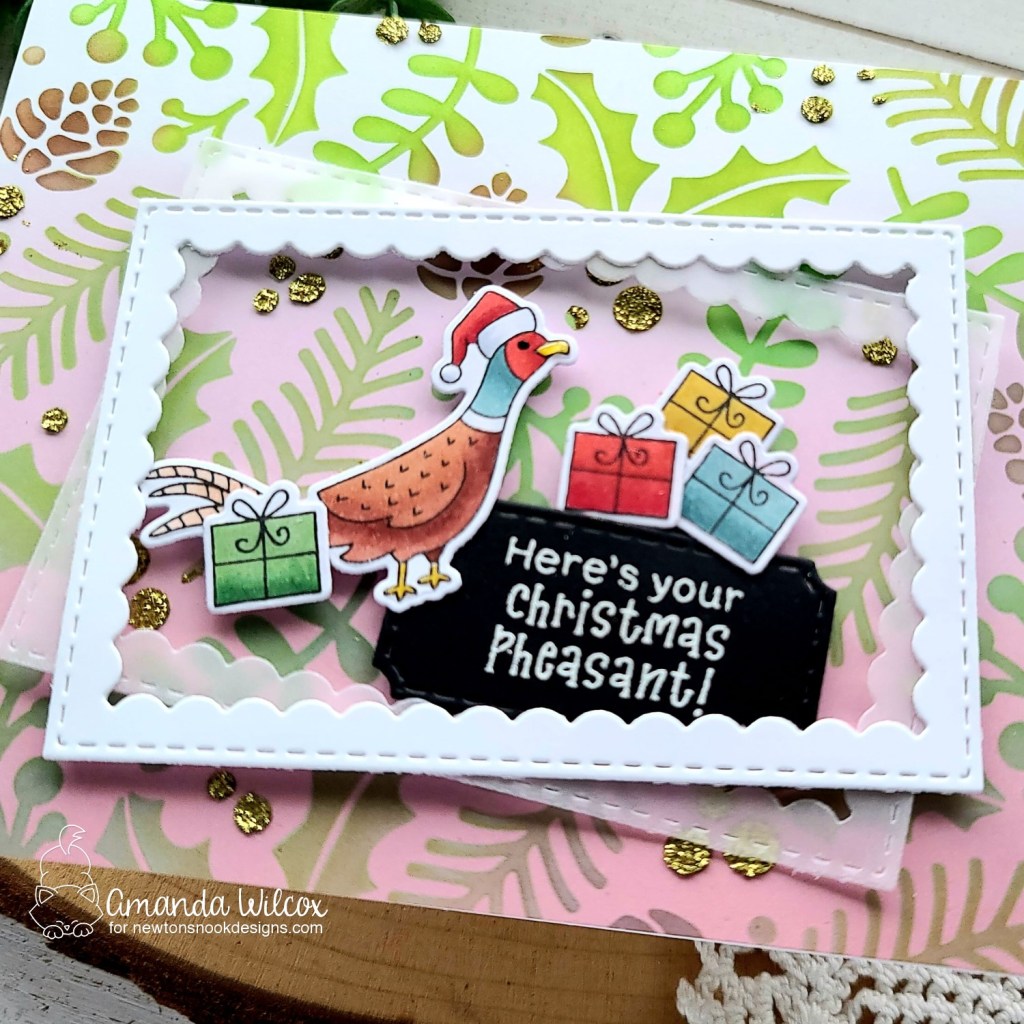
Okay, we’re moving right along to our last card of the day! The mini set for Christmas time – Christmas Pheasant. It’s so fun and the sentiment cracks me up!
After stamping and coloring the image plus some extra gifts, I used the coordinating dies to cut them out. Then I switched to my background panel which I did in 3 stages – I inked the panel with victorian velvet and milled lavender distress oxide inks – fading into nothing at the top. Then I placed the Holiday Foliage stencil over the top and inked it up with various different green inks on all the leaves and brown for the pinecones. I wasn’t too terrible careful if the colors mixed. I like the imperfect look. Last, I grabbed a palette knife and gold glitz glitter gel and smeared it just in the berry and circle openings on the stencil.
Once that panel was dry, I adhered it to a card base, cut 2 frames from the Framework die set, stamped and heat embossed my sentiment on the smallest die from that same set and added everything with foam squares and strips.
For finishing touches I added some glossy accents to the pheasant beak and feet. So much fun!
Would you like to win the “Prehistoric Christmas” or the “Heartfelt Holidays” Stamp Set? We will choose ONE lucky winner for each stamp set!
Here’s how to win: Comment on the NND blog and Design Team blogs (see list below)! Thewinner will be chosen at random from the collective reveal posts. Make sure to check out each of their blogs and comment for your chance to win. You will not know which blog has been chosen so the more you comment on the better your chances are of winning! You have until Thursday October 14th at 9pm ET to comment — winners will be announced on the blog post on Friday, October 15th.
Check out all the awesome Design Team Blogs below to enter:
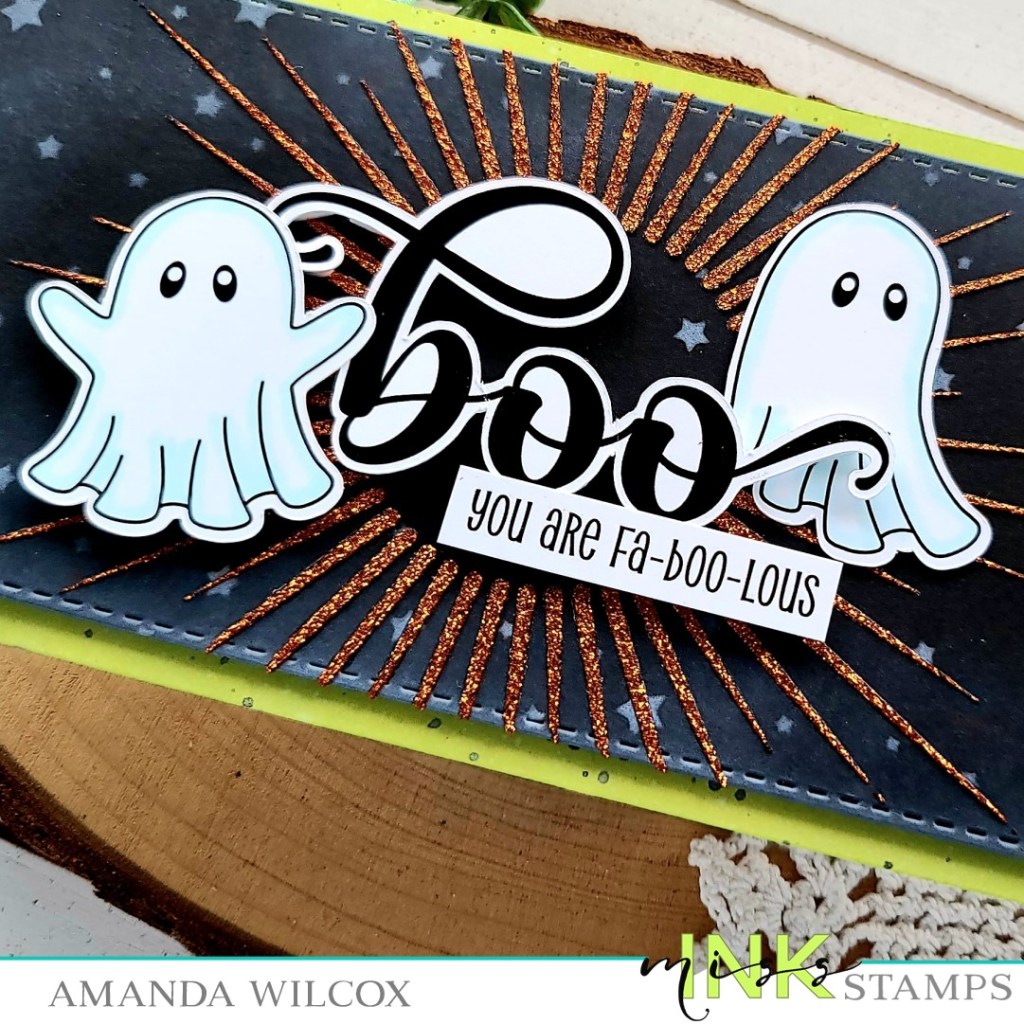
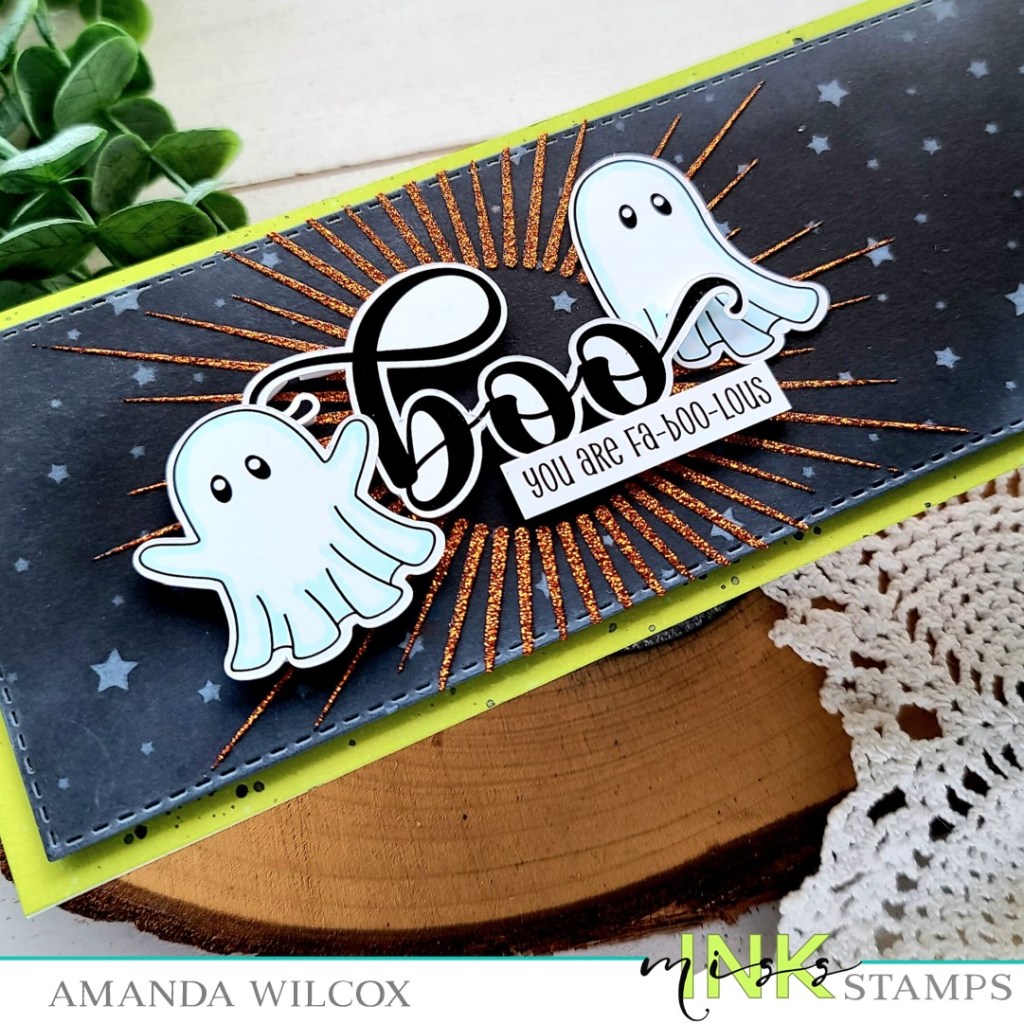
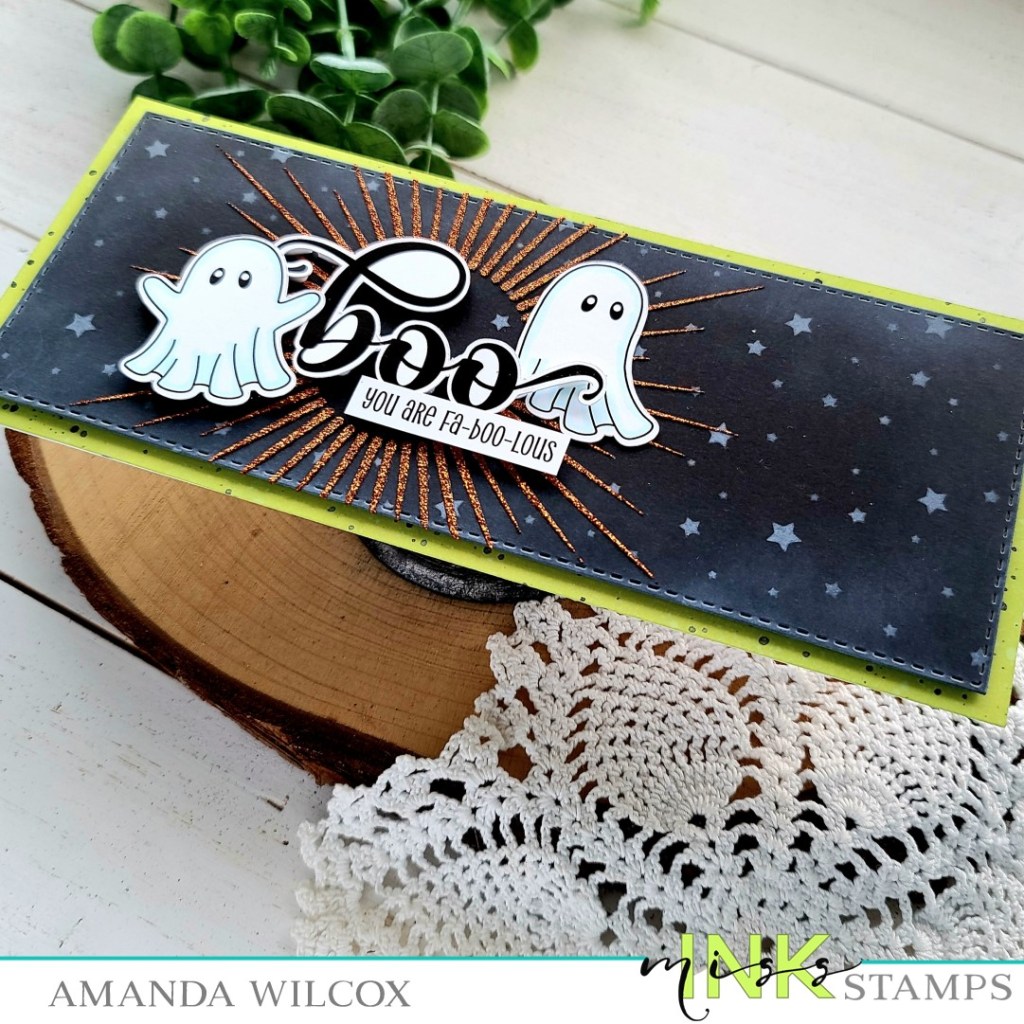
Hello everyone! I’m so happy to finally share this super fun Miss Ink Stamps ghostie slimline card with you. I just love this stamp set and was so happy how this card turned out. I hope you like it too!
I had a general layout in mind for this card so I stamped the ghosts and large BOO sentiment and used the scan-n-cut to cut them out. Then I stamped and trimmed the other sentiment into a strip. I just used a B0000 copic marker around the edge of the ghosts for a little glowing look. Then I moved over to creating that fun background.
I die cut a stitched slimline panel from black cardstock and used a blending brush with white pigment ink over the Starry Night stencil. Then I inked up the edges of the panel with the ink left on my brush. Then I offset the burst layer from the Rainbow Sky stencil, inserted the circle so it was covered up and spread orange glitz gel through the stencil. I set the panel aside to dry and worked on the base panel.
For this I trimmed a piece of cardstock to 8.5×3.5 inches and inked up the edges with twisted citron distress oxide ink. I spritzed it with water and flicked black acrylic paint all over it.
Once both panels were dry I was ready to assemble my card. I started by adhered the green panel to a white card base. Then I popped the black panel up with foam tape. Next, I used foam squares to adhere the sentiments and one ghost and liquid glue to adhere the other.
Then, voila, my card is all finished! Isn’t it so much fun!?! I love these ghosts so much! Plus all the accessories you can have them hold AND don’t even get me started on all those awesome punny sentiments! So great!!! I love it all!
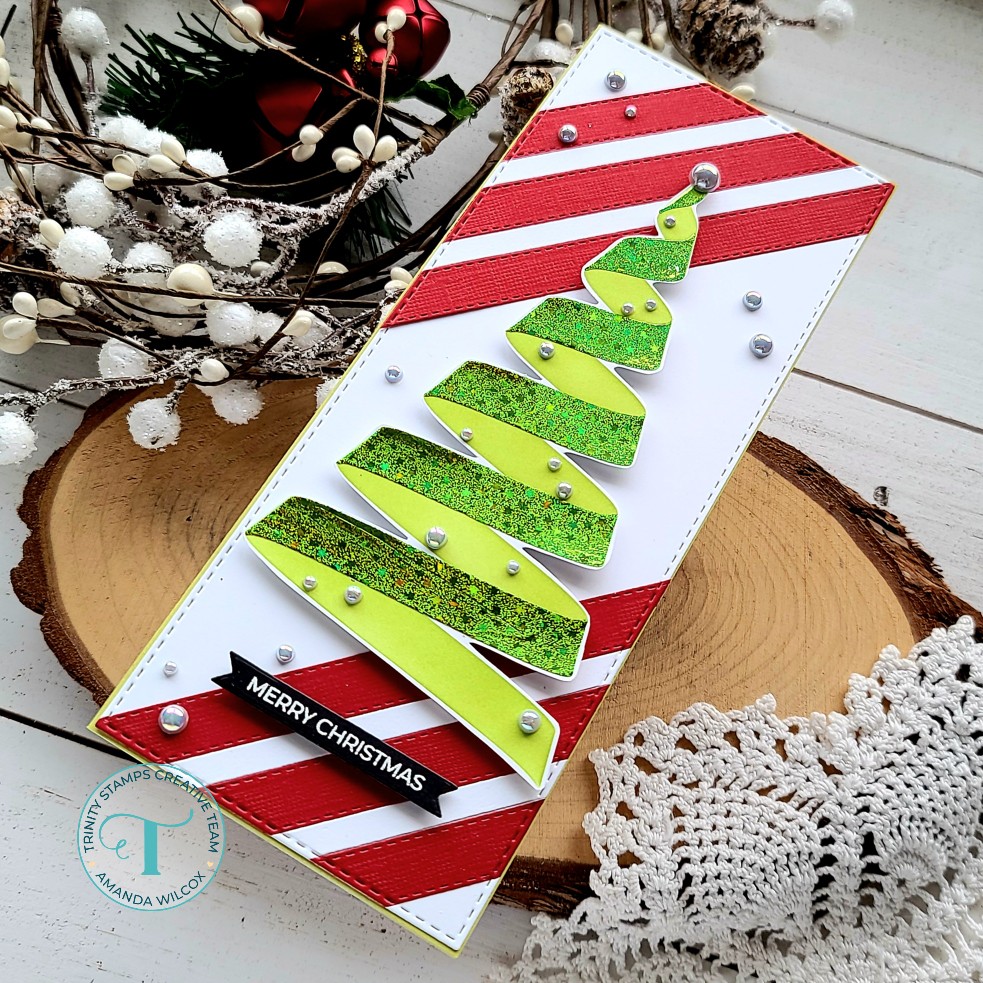
Hey there! I’m super excited to share that today is release day for the Trinity Stamps Treetops and Trimmings Holiday Release! There are some really fun stamps, stencils and dies in this release. We’re having an Instagram Hop today where you can comment for a chance to win but the release is live now so don’t wait, head over and stock up on all the holiday goodness!
Today I’m sharing a card featuring the new Ribbon Wrapped Tree stencil. It’s a 2 part stencil which allows for multiple colors or other fun mediums like foiling, which is what I did today.
I inked up the first layer with some green dye ink and then spread Thermoweb transfer gel blanco through the second layer and set it aside to dry. Once it was dry and my laminator was heated up, I sent it through with some glittering green fancy foils from the Gina K line at Thermoweb.
For my background, I used the slimline stitched strips dies to cut some red and white strips. I glued them to a white panel and die cut that with the largest slimline stitched panels and windows die. This die gives a small border so I inked up the edges of my white card base with twisted citron distress oxide ink to match the tree and adhered the striped panel down.
After foiling, I trimmed my tree out with scissors and added foam squares to the back. I popped it up in the center of my card and heat embossed a sentiment on black cardstock. I used a banner from the 4-Bar Card die set and popped it up as well.
For finishing touches I glued a scattering of glitzy gray baubles across the whole design.
So much bright and fun shine and shimmer on this card. I just love it! And have so many other ideas to try with this simple, but awesome stencil!
Remember there is an Instagram Hop going on if you’d like to see more inspiration and comment for a chance to win. Or feel free to click HERE to head to the Trinity Stamps shop and check out the whole release there too!
I appreciate you sharing your time with me. Have a fabulous day!
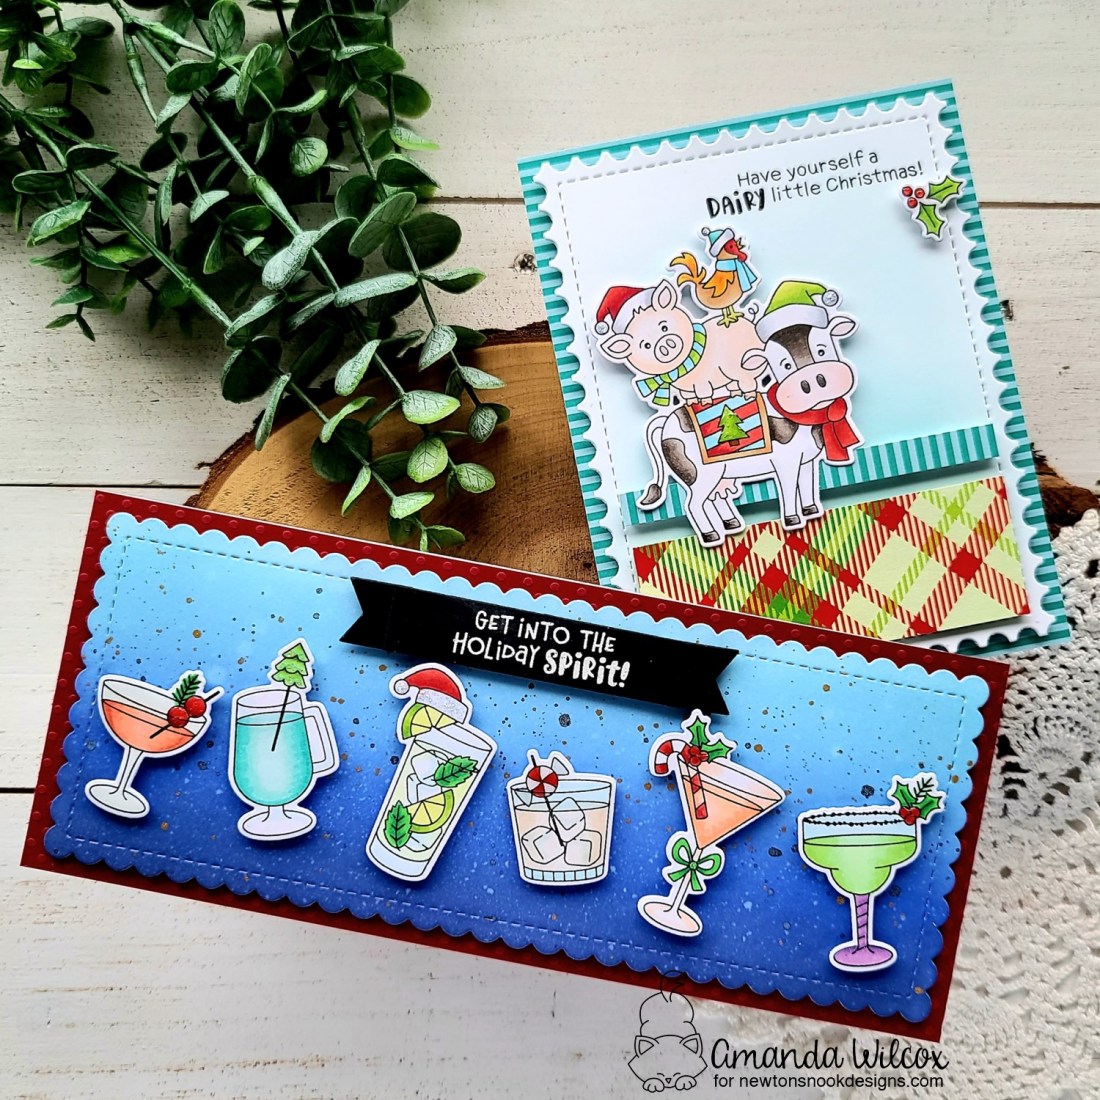
Can you even believe we’re already on day 3 of the Newton’s Nook Holiday Release reveal week? It’s just flying by! We have 2 more super amazing and fun stamp and die sets to share with you! Let’s just dive in!
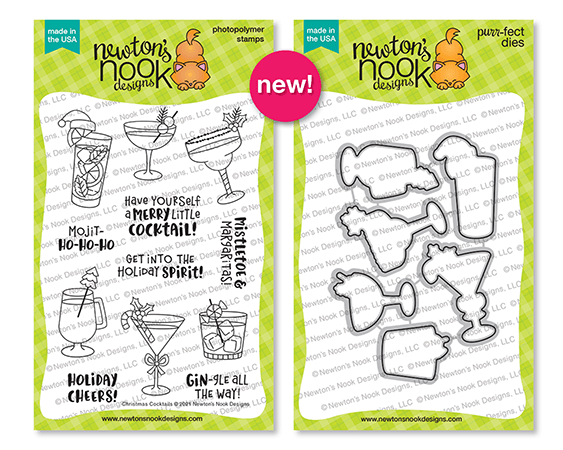
Christmas Cocktails stamps and dies
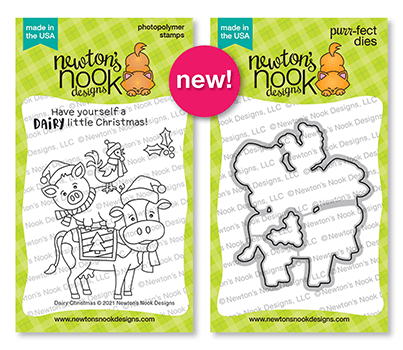
Dairy Christmas stamps and dies
Let’s start things off with a super festively fun Christmas Cocktails slimline card, shall we?!?
I just couldn’t pick which super fun drink or sentiment to use out of this set so I stamped and colored them all! I honestly thought about making tags with each one, which might come later, but instead I landed on this fun slimline card.
I blended distress oxide ink in blueprint sketch and tumbled glass on a large panel and spritzed it with water. I also flicked some gold watercolor on it for added texture. Once it was dry, I die cut it with the Slimline Frames & Portholes largest die.
To assemble my card, I created a white card base and adhered some polka dot textured red cardstock to it. Then I added the ink blended panel with foam tape. I arranged my glasses so they were almost clinking in pairs and popped them up with foam squares.
I chose a sentiment from the set and heat embossed it on a banner from the Banner Trio die set. I used liquid glue and reverse tweezers to glue the ends together and popped the banner up with foam squares as well. For finishing touches I added little bits of glossy accents and unicorn stickles to all the glasses or garnishes.
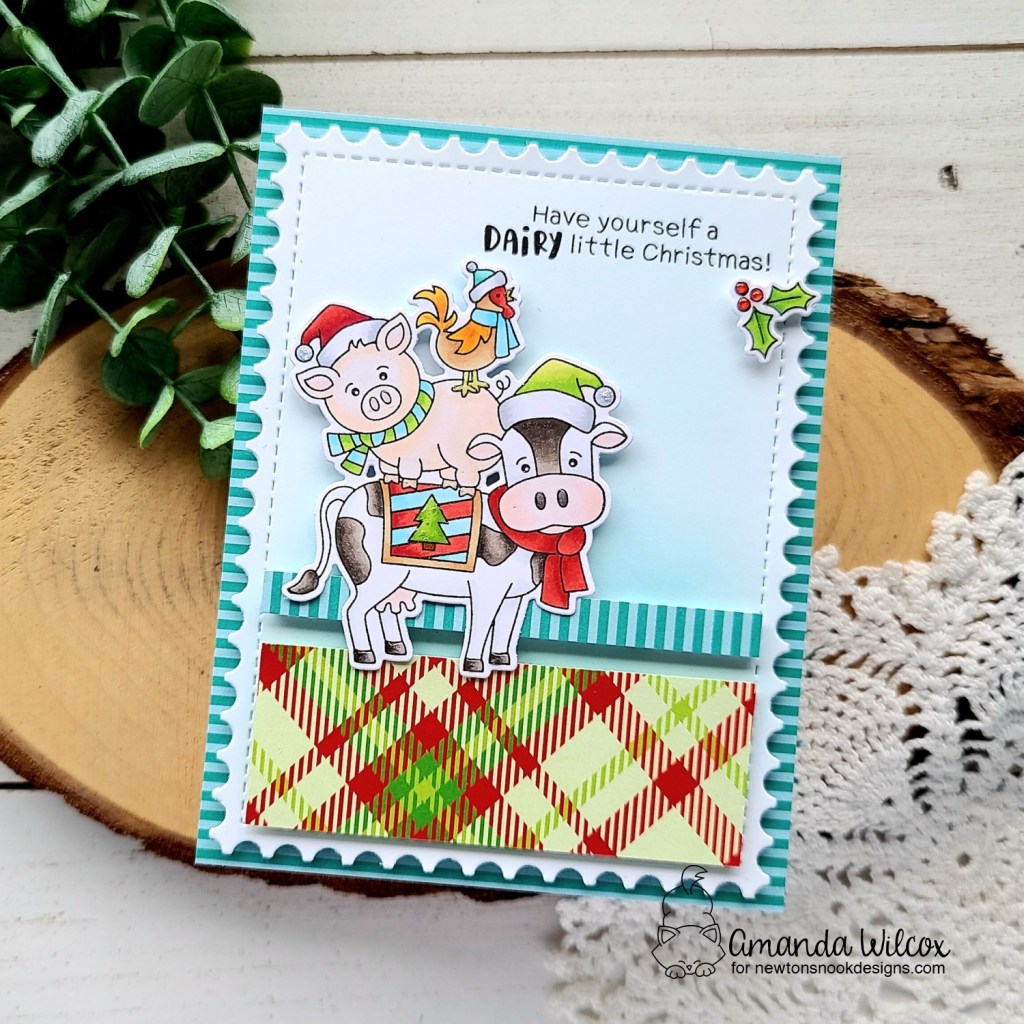
Moving on to one of my favorite sets from this release. The stack of super adorable farm critters in Dairy Christmas just make my heart happy! I had so much fun coloring them up and creating a unique design to showcase them on.
For this card, I brought out the new paper pad again. These patterns and colors are just perfection! I love them all! After the critters were colors and die cut, I cut a white panel with the largest Framework die. Then I cut some strips from the paper pad. While arranging them together I thought the white panel was too stark so I blended a little light blue shadow in the center. Then I adhered everything with foam squares and strips.
Playing off of the strips on the main panel, I cut another piece of the striped paper and adhered it to a white card base and then popped my Framework panel up with foam tape as well. I placed the whole thing in my MISTI and stamped a sentiment in the top right corner. For fun I stamped, colored and cut out the holly image from the set and popped it up too.
For finishing touches I added glossy accents and unicorn stickles to various parts of the images like the tree, hooves, critter noses and such.
Would you like to win the “Christmas Cocktails” or the “Dairy Christmas” Stamp Set? We will choose ONE lucky winner for each stamp set!
Here’s how to win: Comment on the NND blog and Design Team blogs (see list below)! Thewinner will be chosen at random from the collective reveal posts. Make sure to check out each of their blogs and comment for your chance to win. You will not know which blog has been chosen so the more you comment on the better your chances are of winning! You have until Thursday October 14th at 9pm ET to comment — winners will be announced on the blog post on Friday, October 15th.
Check out all the awesome Design Team Blogs below to enter: