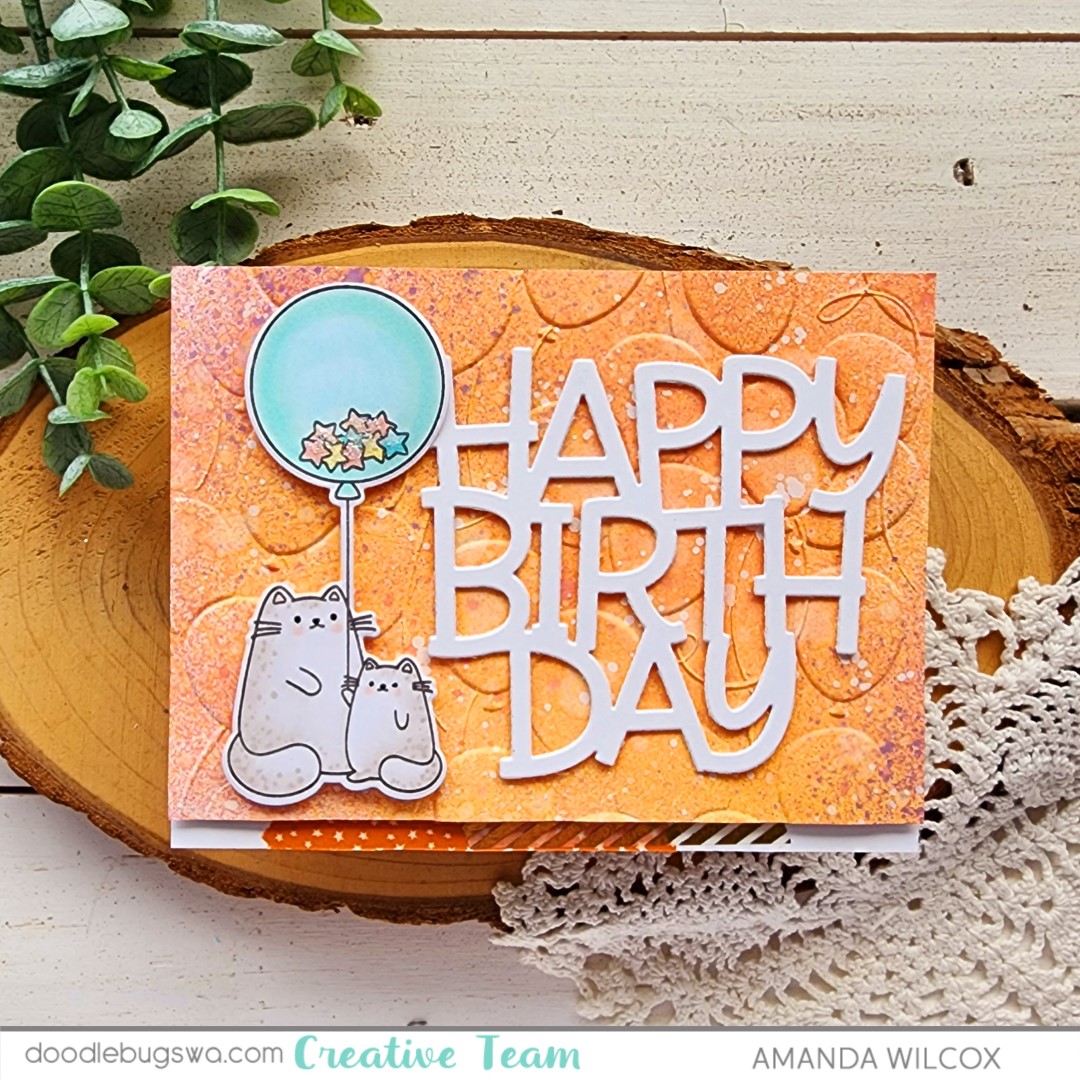
Newton’s Nook – April Release Day 1

Hey friends! What a better way to start a new week than with Newton’s Nook release reveals?!? I’m really excited about this release and can’t wait to share it all with you. Today we’re starting out with a stamp and die combo plus a new die set.

Bookmark II dies

Never Enough Books stamps and dies

While these products work amazingly together, I had extra fun creating two separate projects to share with you today. First up, a new bookmark that I’m already using.

I cut the bookmark twice from kraft cardstock and glue the pieces together, then used the Tree Rings stencil on it for some texture in the background. I cut some books included in the Bookmark II die set from white cardstock and colored them with copic markers. I used liquid glue to adhere them to the bookmark and then stamped a sentiment above them which is from the Never Enough Books stamp set.

Last, I threaded some ribbon through the hole and tied it with twine. I seriously couldn’t identify with this sentiment more. My TBR pile is definitely larger than my lifespan and it’s always growing.

I really like the rustic look when it comes to book things so I kept it going for my Never Enough Books card using the same Tree Rings stencil in the background. This time I inked it up with distress oxide ink so I could get more distressing and color variation.

I stamped and colored images from the set with copic markers and used the coordinating dies to cut them out. Then I popped them up on the stenciled panel with foam tape, included a heat embossed sentiment on a flag from the Frames & Flags die set.

I adhered the panel to a side folding card base so that I could wrap twine around the side. Then I finished the design off with some glossy accents on various parts of the images and clay hearts from the Twiddler’s Nook sweethearts embellishment pack.

Enter to Win a $25 Prize!

We will be choosing two lucky winners to win a $25 store credit for Newton’s Nook Designs online shop! The winners will be chosen at random from the collective blog posts featuring our new products this week. For a chance to win, leave comments on the Design Team Member Blog Posts (see list below) from Monday April 15 through Thursday April 18. You will not know which blog has been chosen so the more you comment on the better your chances are of winning! You have until Thursday, April 18th at 9 pm ET to comment — winners will be announced on the NND blog on Friday, April 19th.

Check out all the awesome Design Team Blogs below to enter:

Newton’s Nook Designs
Donna Idlet
Ellen Haxelmans
Larissa Heskett
Samantha Mann
Zsofia Molnar
Diane Morales
Farhana Sarker
Tatiana Trafimovich
Amanda Wilcox

Doodlebugs – Texturizing Your Backgrounds

Hey friends! I’m on the Doodlebugs blog for Mix it up Monday with an idea for adding color and texture to your backgrounds in a different way. We’re going to ink, emboss and then ink again for added awesomeness!

I had an idea for embossing folders and wanted to try it so that’s where today’s project started. I took a piece of white cardstock and die cut it with the largest Spellbinders Modern Oval die. I inked the panel up with yellow ink and inserted it into the Spellbinders Tiny Dot embossing folder and ran it through my die cutter. After I removed it, I flipped it over to what we normally consider the back side. So the dots indent instead of stick up. Then I added a layer of teal ink over the top with a brayer roller. This kept the ink out of the dots and just added a layer over the panel. Then I added a layer of peacock feathers distress oxide ink over that for a darker effect. I spritzed the panel with water and then flicked white paint on it too.

While that was drying I pulled out some Mama Elephant sets to stamp, color and die cut. I started with Little Agenda Farm and then moved on to Simple Friends Bubbles for my sentiments. Last I used liquid glue to assemble my critters in place and added foam squares to the back of everything.

I didn’t want the card base to be stark white so I inked it up with distress oxide ink in ripe persimmon and spiced marmalade and spritzed it with water. Then I adhered the oval with foam tape and finally added the images and speech bubbles.

For finishing touches I added glossy accents to the critter nose/beaks and bits of the tractor and wagon too. Last I added some enamel dots across the design for a bit of shine and reflection in the light.

Products used today:
Mama Elephant Little Agenda Farm stamps and dies
Mama Elephant Simple Friends Bubbles stamps and dies
Spellbinders Modern Oval dies
Spellbinders Tiny Dots embossing folder
Brayer roller
Lawn Fawn Ink – sunflower, peachy keen and mermaid
Distress Oxide Ink – peacock feathers, ripe persimmon and spiced marmalade
Foam tape and squares
Glossy accents
Enamel dots

I appreciate you sharing your time with me. Have a fabulous day!

Spellbinders | Concord & 9th – Paper Scrap Buster Cards

Welcome everyone! So happy it’s Friday and we can almost taste the weekend. It’s going to be fabulous. But first, I have a pair of cards I created with dies from Spellbinders and Concord & 9th plus a bundle of paper scraps I had sitting around.

I took the paper scraps and glued them to a piece of paper, the used the Concord & 9th Marked Messages dies to cut the hello shadow from the strip collage I had made. My piece was big enough that I actually got two shadows from it. BONUS! I cut the word from black cardstock and used liquid glue to adhere it in place.

Then I used the Spellbinders Four Petal dies to cut a white background shape. That was a little plain and I thought it would be fun to emulate the dots in the scraps I used so I ran the white panel through my die cut machine with the Spellbinders Tiny Dot embossing folder.

I cut a teal background for my card front and splattered it with metallic watercolor before adhering it with liquid glue to a card front. Then I popped the white panel up with foam tape, followed by the hello panel the same way. For finishing touches I wrapped black jute twine around the top and tied it in a bow.

I like making cards like these to have on hand because you can turn them into lots of occasions depending on the message you write, or they’re easy to add a sentiment strip to later on that says something more specific too.

Products used:
Concord & 9th Marked Messages dies
Spellbinders Tiny Dot embossing folder
Spellbinders Four Petal dies
Foam tape
Liquid glue

LH Colors watercolor – minotaur

I appreciate you sharing your time with me. Have a fabulous day!

Miss Ink Stamps – Bananas

Happy Thursday everyone! I’m popping in with a super quick and fun Miss Ink Stamps card today. It uses all things bananas, which I love!!!

I started by ink blending my background panel with the Bananas stencil. After going over the whole thing with yellow ink, fading from corner to corner, I used a detail blending brush to add brown and green ends to each banana. It’s amazing what this little detail does for the background. I love it!

Then I stamped and colored images from Go Bananas and used my scan-n-cut to cut them out. With the images as my spacing guide, I stamped the sentiment in the bottom right corner. Then I popped my images up with foam squares and strips.

For finishing touches I added black glaze pen to the monkey eyes and noses, let it dry and added a white highlight back in. Then I glued a scattering of flat sequins across the design for some interest and shine.

Quick and easy card but it’s so darn cute!!!

Products used:
Go Bananas stamps
Bananas stencil

Blending brushes
Detail blending brushes
Lawn Fawn ink – sunflower, jalapeno and doe
Trinity Stamps Pearly Gates Iridescent Pearl Confetti
Liquid glue
Foam squares and strips

Black glaze pen
White gel pen

I appreciate you sharing your time with me. Have a fabulous day!

Newton’s Nook – Birthday Mice

Hello everyone. I’m happy to be over on the Newton’s Nook blog once again. This time with some fun birthday inspiration. I’m having fun mixing the Back to Basics release with some of my favorite already release products. Today I’ve got the new Bright Basics paper pad and Frames & Tags die set with those sweet Birthday Mice!

I was inspired by a sketch I saw while scrolling Pinterest so that’s where everything started. I chose a couple of fun papers from the Bright Basics paper pad, cut the blue to 4×5.5 and the green with the largest Circle Frames die. Then I cut a white circle with the next size down.

I wanted to make a birthday card so that narrowed my search a little. It wasn’t difficult to land on some of my favorite mice ever in the Birthday Mice stamp set. I colored him with copics before using the coordinating die to cut him out. I inked up a little orange glow on the white circle behind where the mouse would go before adhering all my layers.

For the sentiment I cut one of the tags in the new Frames & Tags die set from black cardstock and heat embossed the sentiment on that. I wrapped twine around the blue panel and tied the tag in place with that. Avoiding the twine I added foam tape to the back of the blue panel and popped it on a white card base.

For finishing touches I added glossy accents to the mouse nose and holes in the cheese. Then I finished the design with stardust Stickles on the party hat and candle.

Products used:
Birthday Mice stamps and dies
Circle Frames dies
Frames & Tags dies
Bright Basics paper pad

Embossing & Watermark ink
Magic anti-static brush
Embossing powder – frosting

Foam tape
Touch of gloss
Stickles – stardust

I appreciate you sharing your time with me. Have a fabulous day!

Pink & Main – Best of Cluck

Hey friends! Stopping by today with some Pink & Main inspiration that was too punny and cute not to share! I needed a card for a chicken loving coworker and this set was just too perfect to pass up.

I stamped and colored my image from Chicken In, then used the coordinating die to cut it out. Next I cut an A2 piece of teal cardstock and embossed it with the Rattan embossing folder. To help the embossing stand out I went over it lightly with gathered twigs distress oxide ink, then I went over the image too. This brought the level of distressing even across the design.

I stamped and cut out the sentiment using the Sunny Greetings dies. Next, I tore and edge off the embossed panel and popped it up on a white card base with foam tape. I added the image and sentiment strip with foam squares after that.

I added washi tape to the bottom edge and a few enamel dots scattered across the design. Then I finished everything off with glossy accents on the chicken beaks.

Products used:
Chicken In stamps and dies
Sunny Greetings dies
Rattan embossing folder
Enamel dots – glossy gold
Distress Oxide Ink – gathered twigs
Foam tape
Touch of gloss

I appreciate you sharing your time with me. Have a fabulous day!

Doodlebugs – Ink Smooshing and Two-for-One Backgrounds

Happy Monday everyone! Mix it up Monday is extra inky fun on the Doodlebugs blog today. We’re ink smooshing and getting two-for-one backgrounds from our efforts. So fun, easy to do and there is no messing up.

Start with a piece of white cardstock and water based markers like Tombow Dual Brush Pens. Scribble a color on an acrylic block or glass mat and spritz it with water. If you use an acrylic block you can stamp the block all over your paper creating splotches of color. If you’re using your glass mat, do that same thing with your paper on the mat to mop up the watery ink. I suggest using a heat gun or letting the panel dry between colors. This layers the colors and gives more interest, instead of colors blending together if the panel is still wet.

Once the panel is ink smooshed to your liking and dry, run it through your die cutter with the Mama Elephant Heart Grid cover plate die. Mine happened to keep all of the hearts in the die which made the next step easier but it’s not game over if they come out.

I chose the melon color from my inking to be the background for both of my cards. So I cut two pieces and adhered them to white card bases. I popped the first one up with foam strips.

For the next one, I place a foam square on the back of each heart while they were stuck in the die, removed the release paper and carefully placed my paper centered over the hearts. They stuck to the paper and made it easy to have them equally spaced.

Then I cut some balloons from the Pretty Pink Posh Party Balloons die set in coordinating colors and stamped this sweet Mama Elephant bear, coloring it in coordinating colors as well.

After adding the extra balloons and image to the design with foam squares, I stamped and heat embossed sentiments on sentiment strips, that are added with liquid glue and foam strips. For finishing touches I added black glaze pen to each bear’s eye and glossy accents to his nose and the balloons.

Two birthday cards in almost the same amount of time to make one. I love that kind of crafting!

Products used:
Mama Elephant Beary Good Day stamps and dies
Mama Elephant Heart Grid die
Pretty Pink Posh Party Balloons dies
Pretty Pink Posh Sentiment Strip dies
Pretty Pink Posh Sentiment Strips | Birthday stamps
Embossing ink
Embossing powder
Glossy accents
Liquid glue
Foam squares and strips
Tombow Dual Brush Markers – pastel set

I appreciate you sharing your time with me. Have a fabulous day!

Twiddler’s Nook Spooktacular IG Hop

Happy 31st of the month everyone! We’re over on Instagram having another Spooktacular Hop to celebrate our love for all things spooky! I have been dying to share my card today. I had SO MUCH FUN creating it and couldn’t love the outcome more.

I’ll give you the deets on my card here but remember to comment on the IG hop for your chance to win!

I started by stamping and coloring the super cute critters and clouds from MFT Stamps Delightful Halloween. I used the coordinating dies to cut them out and set them aside while I got super inky!

Next I grabbed distress oxide inks and inked up the front of my card base. I chose ripe persimmon, carved pumpkin and wild honey for an ombre up the panel. Then I spritzed the panel with water and blotted it dry, followed by black paint splatter for good measure.

Then I cut the MFT Stamps Trick or Treat sentiment out of a piece of light gray cardstock and glued it to my card base. I popped up my images with foam squares around the sentiment and finished things off with clay stars from the Twiddler’s Nook Sailor Moon embellishment mix.

Last, I tied twine around the top of the card and finished the images off with bits of glossy accents on the critter noses and pumpkin faces.

Products used:
Twiddler’s Nook Pressure Pal
Twiddler’s Nook Blending Brushes
Twiddler’s Nook Sailor Moon embellishment mix
Twiddler’s Nook Cloud Embellishment Tray

MFT Stamps Delightful Halloween stamps and dies
MFT Stamps Trick or Treat die

Liquid glue
Glossy accents
Foam squares
Distress Oxide Ink – ripe persimmon, carved pumpkin, wild honey

I appreciate you sharing your time with me. Have a fabulous day!

Pretty Pink Posh – Easter Greetings

Hello everyone! I wanted to pop in one more time this week with cards that I created for the Pretty Pink Posh March release. It was packed with sweet Easter goodness and since Easter is almost here I wanted to give you some last minute inspiration.

This card was created with the adorable Easter Cupcakes stamps and an incredibly designed layering stencil set called Layered Butterfly Florals. My sentiment came from the Easter Train set because the cupcakes have none.

By this time of the year I’m so happy to switch gears into all things soft and pastel. The colors are happy which helps when it’s endlessly raining outside.

Next, I used the same stencil set but added tulips from the Spring Mug Additions die set. I went with gold glitter butterfly bodies on the stenciling and my sentiment came from the Easter Train set again.

I hope you enjoyed this little burst of Easter and spring inspiration using the Pretty Pink Posh March release.

Products used:
Spring Mug Additions dies
Easter Train stamps and dies
Easter Cupcakes stamps and dies
Layered Butterfly Florals stencils

Blending brushes
Stencil pal
Glitz gel – gold
Foam tape
Liquid glue

Embossing powder
Anti-static brush
Embossing & Watermark Ink

Lawn Fawn dye inks – lemonade, peach fuzz, forget me not, jalapeno, ballet slippers, juice box
Touch of gloss
Stickles – stardust

I appreciate you sharing your time with me. Have a fabulous day!

Newton’s Nook – Puppy Friends plus New and Old Frames Mixed

Hey friends! I’m happy to be on the Newton’s Nook blog today. I love the new release and was very excited to mix and match the new dies with the old. They are sized perfectly just for that so it expands their use by at least a billion times! It’s so great.

I was feeling springy so I pulled out the sweet Puppy Friends stamps and chose a few to stamp and color for my card. After using the coordinating dies to cut them out, I set them aside to make my messy background.

I cut the largest Framework die from kraft cardstock and taped off the stitched edging with Thermoweb Pixie Tape. I placed the Petite Paws stencil and spread Ranger Texture Paste through it. While that was drying I cut one of the small tags from Frames & Tags from black cardstock and heat embossed my sentiment on it.

Next, I popped the kraft panel up with foam tape on a white card base. Then I added a teal frame with foam strips, along with the images and sentiment tag. Then I added Sakura Gelly Roll Glaze pen to the puppies eyes. This makes them raised and shiny. Last, I added glossy accents to the noses, turtle shell, flower center and collar tags.

I love creating cards with grid frames like these. This new Frames & Tags set might be my favorite of all! It’s going to be so fun!

Products used:
Puppy Friends stamps and dies
Frames & Tags dies
Framework dies
Petite Paws stencil

Foam tape, squares and strips
Texture paste
Stencil pal
Sakura Gelly Roll Glaze Pen – black
Touch of gloss
Embossing & Watermark ink
Magic Anti-static brush
Embossing powder – frosting

I appreciate you sharing your time with me. Have a fabulous day!