Coffee Loving Cardmakers – Peppermint Spice and Everything Nice

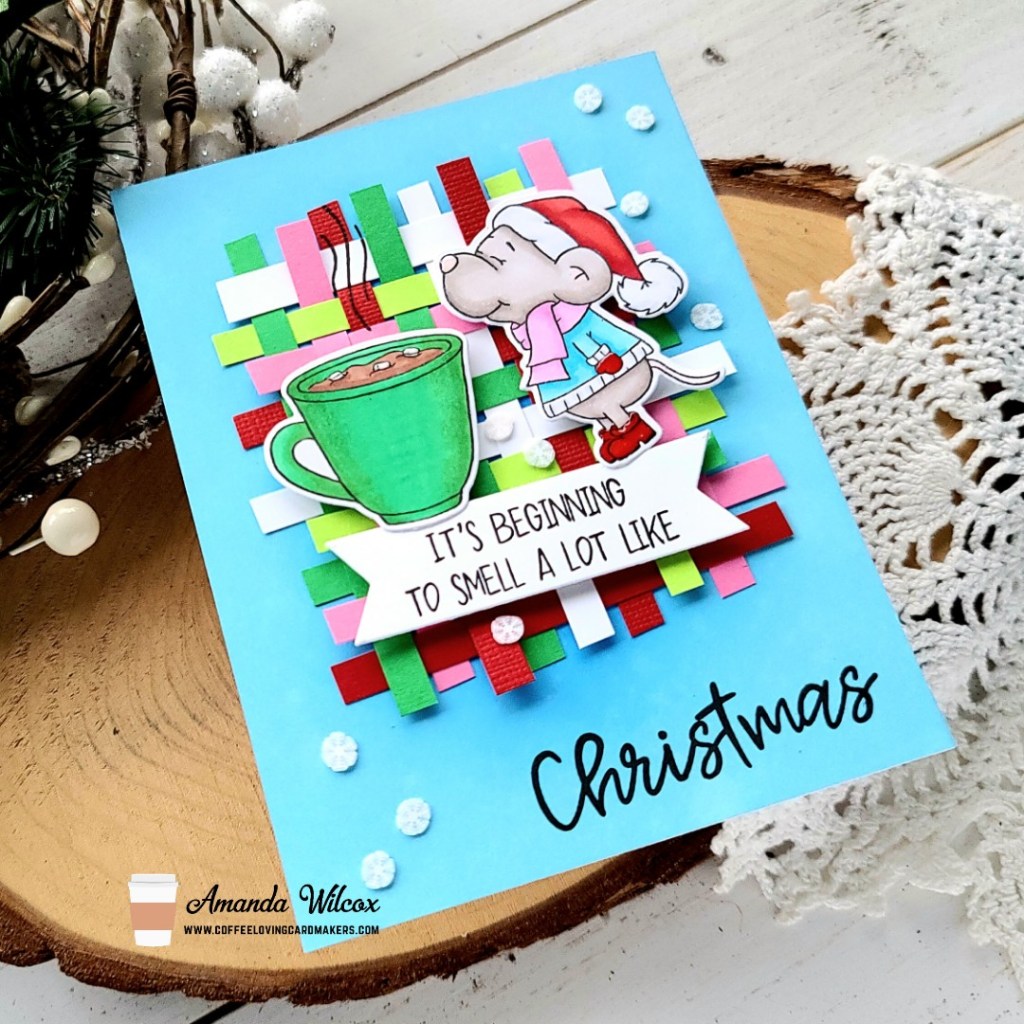
Hello again crafty friends! It’s Tuesday Tea with Twiddler’s Nook over on the Coffee Loving Cardmakers blog today and I had an absolute blast creating today’s card. I don’t think I’ve ever been so free thinking with combining products from different companies. It was so fun!

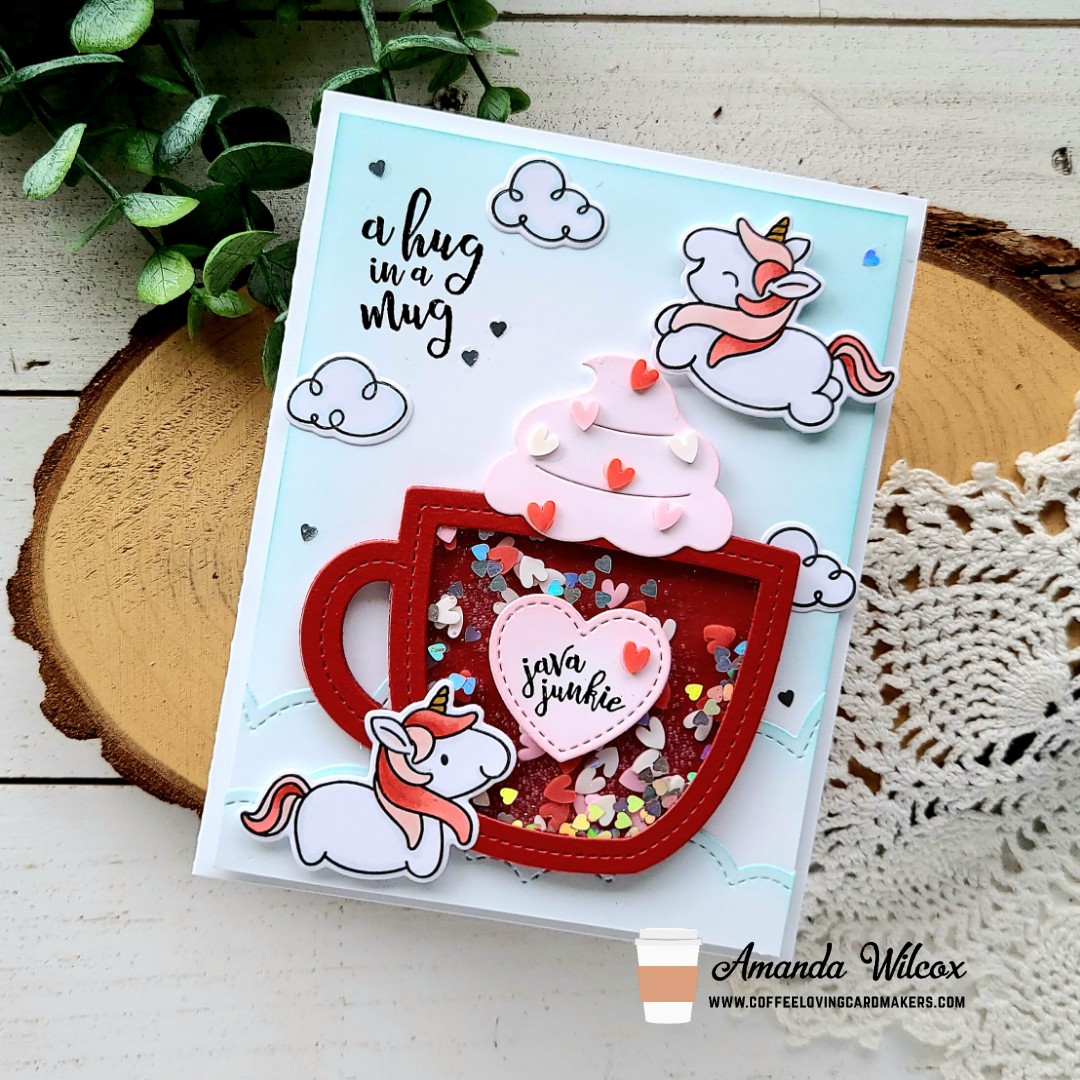
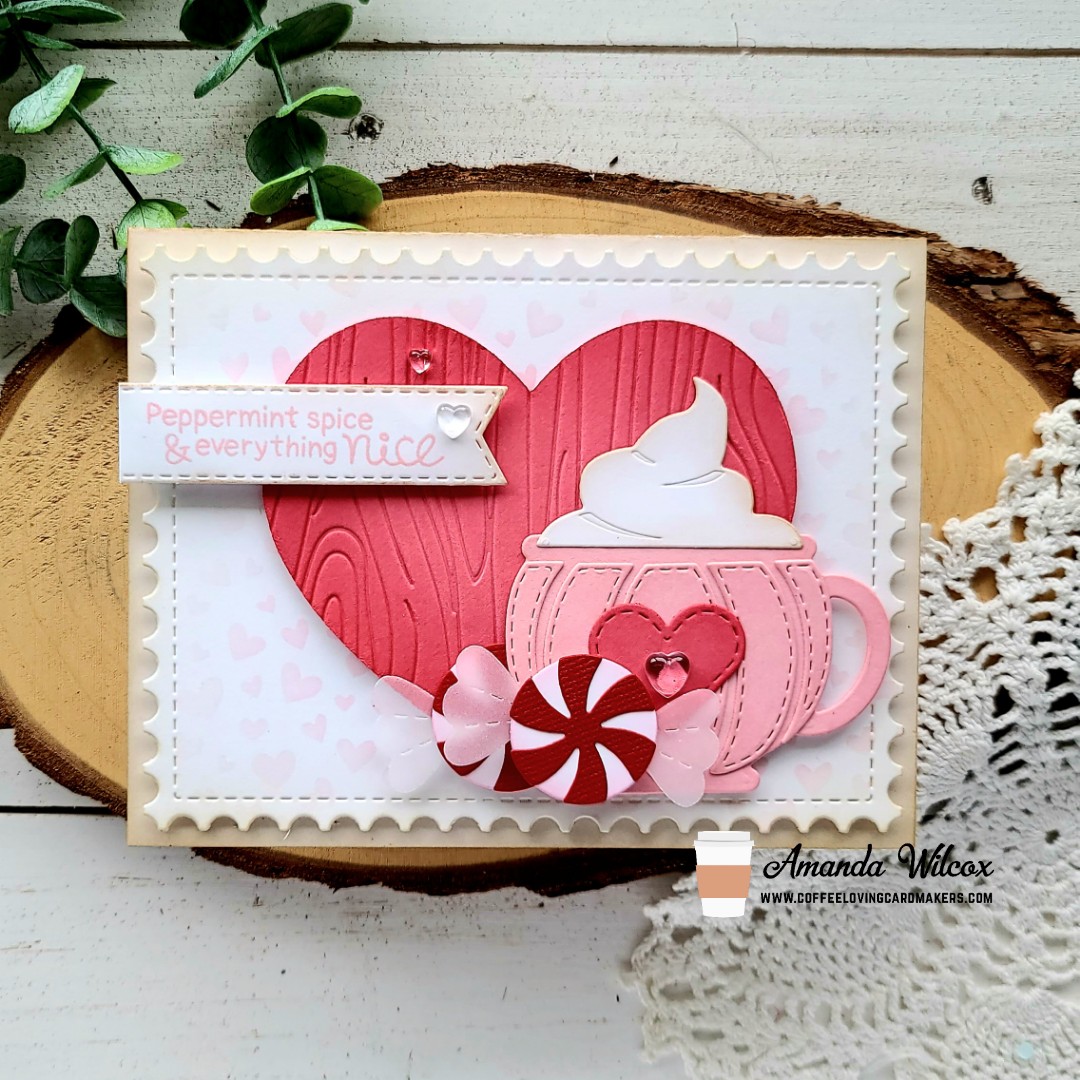
To start my card, I cut the Boo Brew mug and stitching detail from Trinity Stamps from pink cardstock. Then I cut a nested heart to go with it. That’s as far as my planning went. Lol. So I grabbed my blending brushes, Lawn Fawn ballet slippers and guava inks and inked the edges of my die cuts. Then I wanted texture on the background heart so I went looking for a stencil or something. I instantly landed on this Pink & Main woodgrain embossing folder.

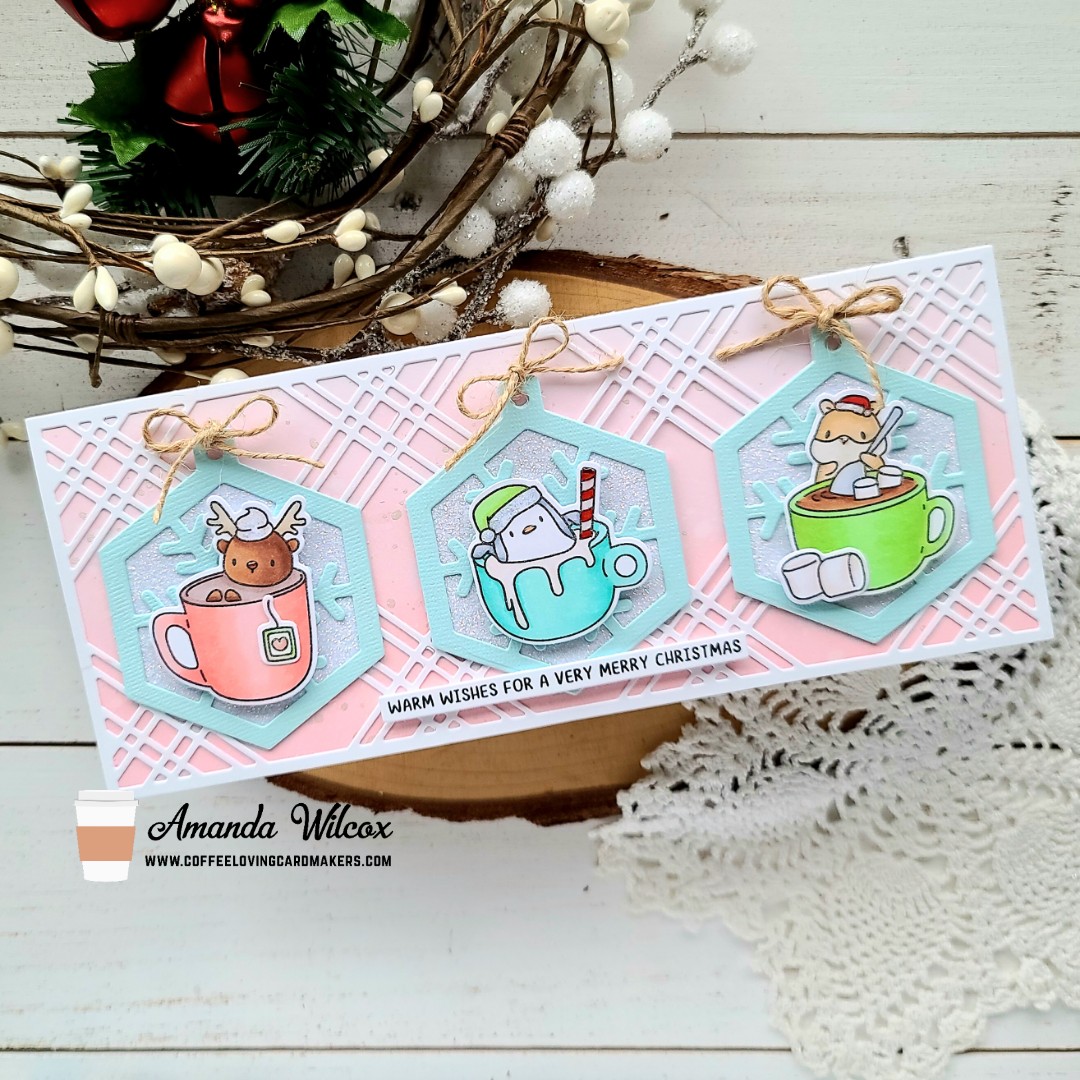
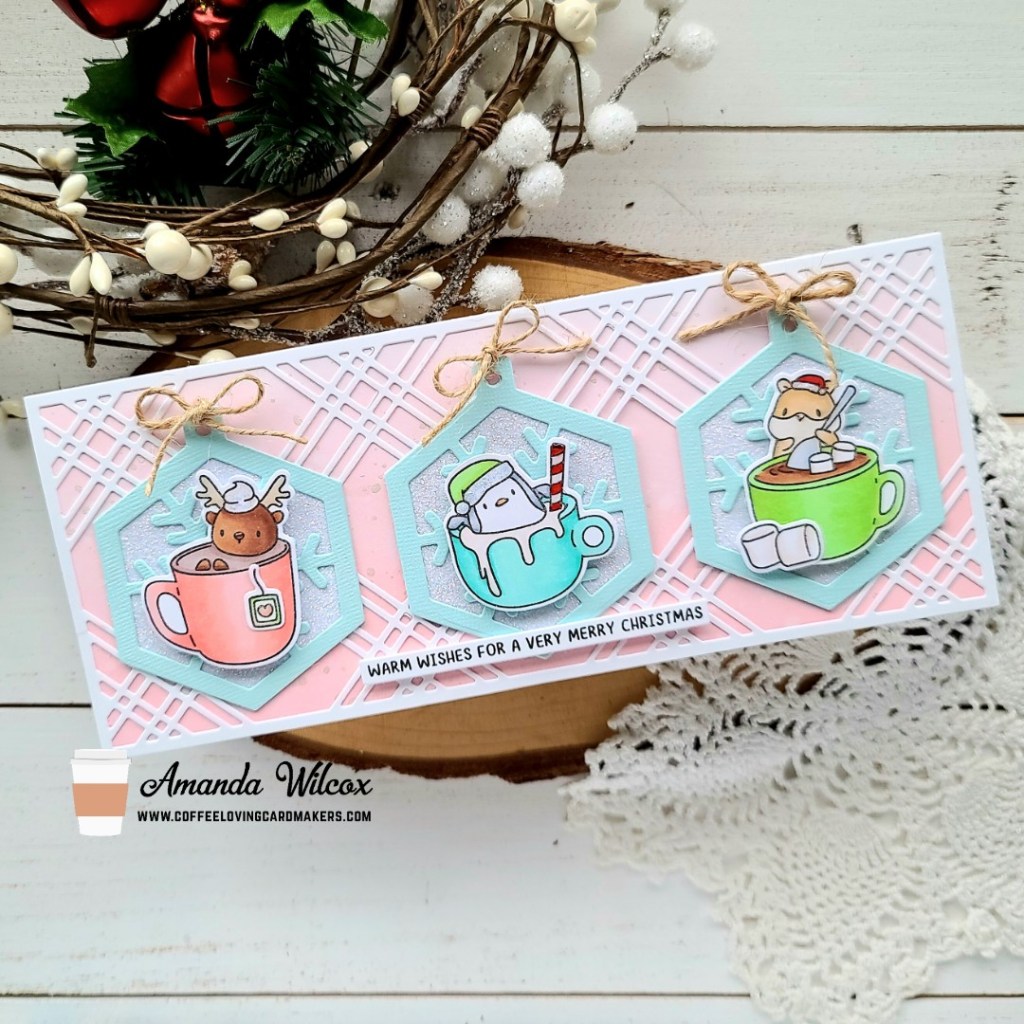
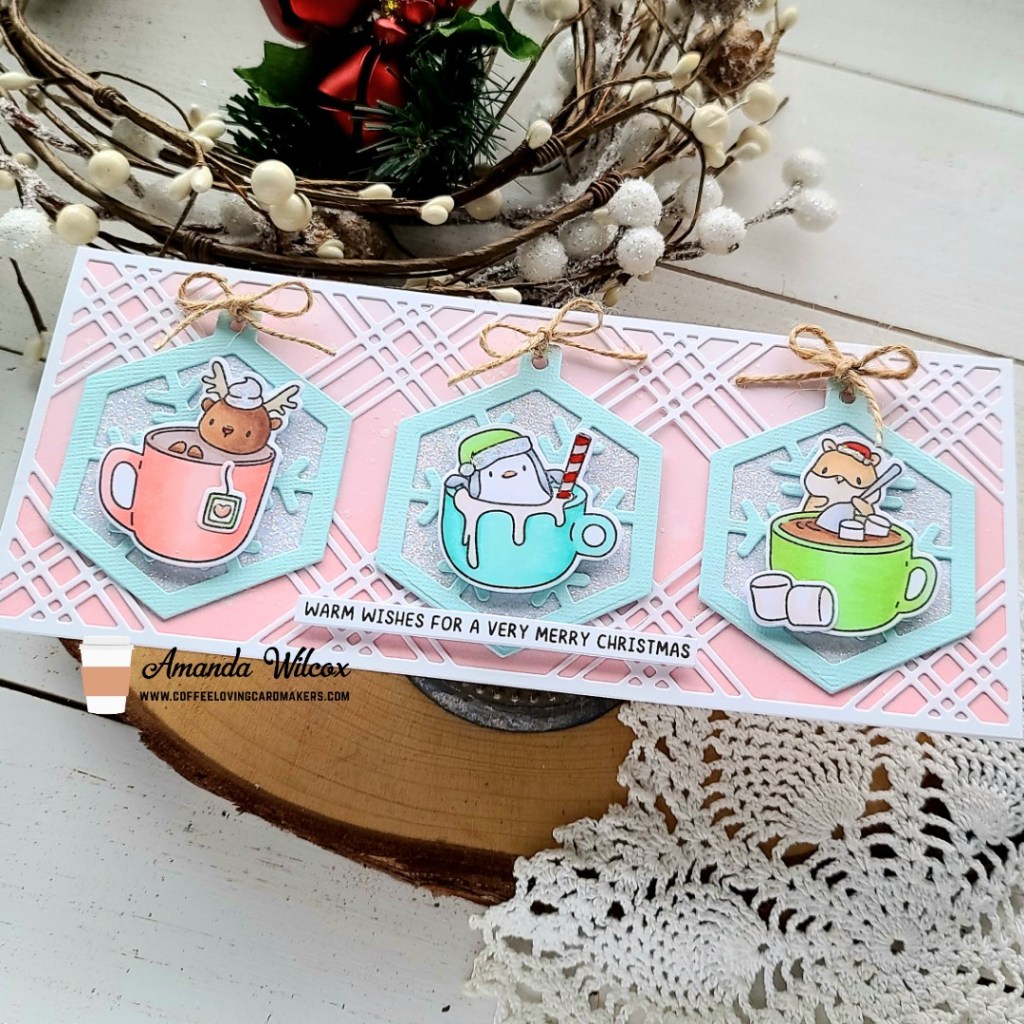
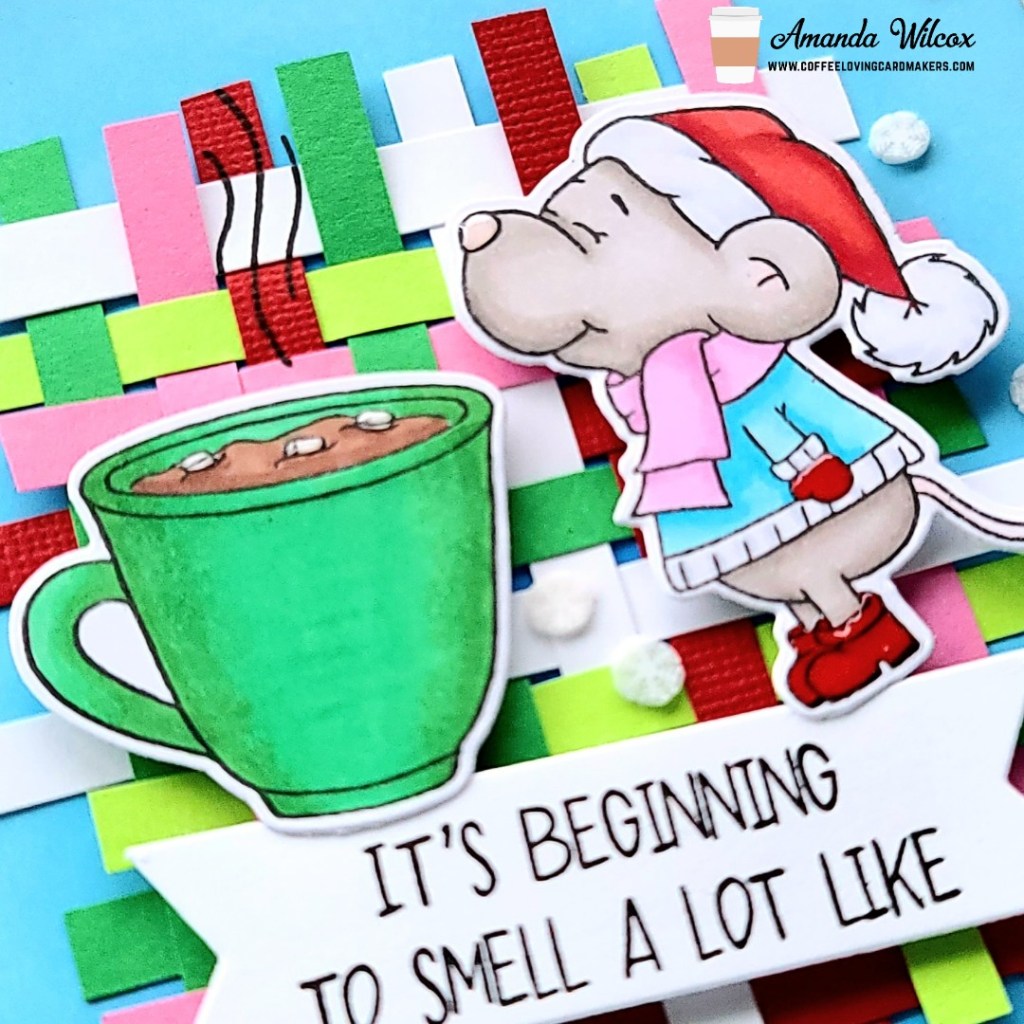
I got into my Newton’s Nook stash for my framework dies to cut a background panel and remembered the awesome peppermint candy dies and everything just came together from this point on. I cut the background from white cardstock and then used the petite hearts stencil that was just revealed yesterday (It will be available to purchase on Friday.) I didn’t want everything to be stark white so I used Lawn Fawn pizza crust ink on the edges of the background panel and my card base. To dress up my mug a little I cut the smallest heart from the Heart Frames set from the same cardstock as the large heart and glued it down.

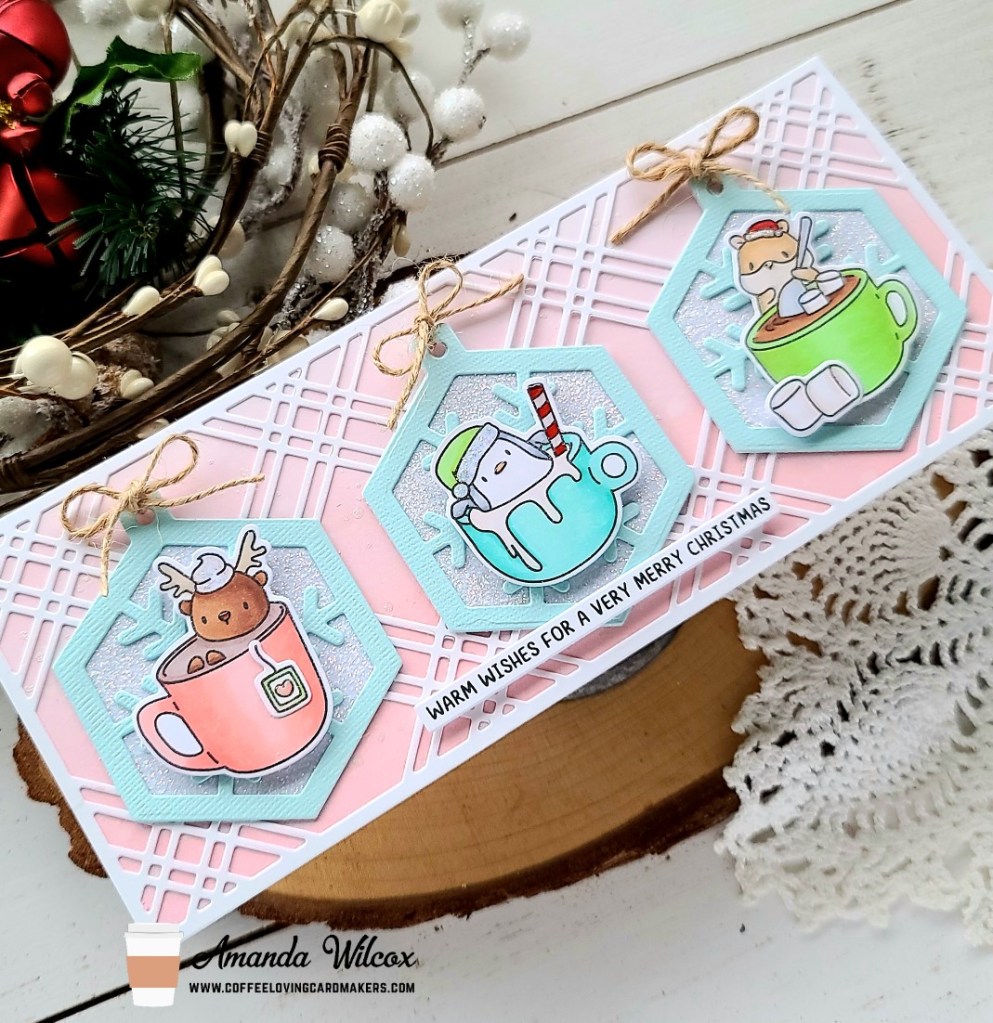
I popped the background panel up with foam tape, then popped the large heart up too. I used a combination of liquid glue and foam squares for my mug and peppermint candies. Then I die cut a stitched banner from Newton’s Nook banner trio die set and stamped a sentiment from the Cup of Cocoa stamp set in ballet slippers ink. I dusted the edges with the same pizza crust ink and popped it up with foam squares too.

I used my scissors to trim off the excess hanging over the edge and moved on to finishing touches. For that I just glue three Trinity Stamps jelly drop hearts down – one to the mug and two by the sentiment banner.

I hope you enjoyed today’s project as much as I did creating it.

Products used today:
Trinity Stamps Nested Heart dies
Trinity Stamps Boo Brew dies
Trinity Stamps Jelly Drop Hearts embellishments
Pink & Main Woodgrain embossing folder
Newton’s Nook Petit Hearts stencil
Newton’s Nook Banner Trio dies
Newton’s Nook Framework dies
Newton’s Nook Cup of Cocoa stamps
Newton’s Nook Peppermint dies
Foam tape

I appreciate you sharing your time with me. Have a fabulous day!

Coffee Loving Cardmakers – Java Junkie Shaker

Hello there! Today I’m over on the Coffee Loving Cardmakers for the first Tuesday Tea of 2022!!! Can you even believe it?!? Time just flies by too fast. I hope you all had a wonderful New Year holiday and are ready to jump into fun crafting! I’ve got a shaker card today featuring so many companies and highlighting embellishments from the Twiddler’s Nook shop. We just had our mini Valentine release yesterday and I couldn’t wait to start creating with it!

I recently picked up these adorable unicorns from Heffy Doodle that I’ve been eyeing for an eternity and I’m so happy to color them up in Valentine colors! Aren’t they adorable!?! Then I used the Lawn Fawn stitched mug die sets to create a shaker and filled it with three embellishments from Twiddler’s Nook – sweethearts clay hearts, holographic hearts confetti and rosetta pixie dust micro beads. The whipped cream on my mug is from the Lawn Fawn cupcake die set.

To create the background for my card, I cut a white panel to 4×5.25 inches and inked the top and side edges with Lawn Fawn mermaid ink and a blending brush. Then I cut two layers of clouds used the Lawn Fawn cloudy border dies and inked the tops of those with the same color before adhering all the layers with liquid glue.

Next, I used my images as guides before stamping my sentiment in the top left sky area. Then I started adding everything with either foam squares or liquid glue, or a combo.

For finishing touches today, I added Wink of Stella glitter brush pen to the unicorn horns, sweetheart clay embellishments to the whipped cream and heart on the mug and a scattering of holographic hearts around the sky.

I probably had way too much fun creating this card but I’m just so happy with how it turned out and think it would make anyone smile when they opened it! Don’t you?!?

Products used today:
Heffy Doodle Fluffy Puffy Unicorn stamps and dies
Lawn Fawn Outside In Stitched Mug dies
Lawn Fawn Stitched Mug Frame dies
Lawn Fawn Puffy Cloud Border dies
Lawn Fawn mermaid ink
Trinity Stamps blending buddy brushes
Hero Arts 2018 My Monthly Hero Kit stamp set
Twiddler’s Nook Pixie Dust Micro Beads – rosetta
Twiddler’s Nook Sweethearts Clay Heart embellishments
Twiddler’s Nook Holographic Hearts embellishments
Wink of Stella glitter brush pen
Foam squares
Liquid glue

I appreciate you sharing your time with me. Have a fabulous day!

Coffee Loving Cardmakers – Coffee Date!

Hey friends! I’m over on the Coffee Loving Cardmakers blog today having a coffee date with my friend Beata June! Here’s a peek at my card but you’ll have to head to the Coffee Lovers blog to see hers!

For our coffee date we chose a layout and a stamp set to use but everything else was up in the air! Using the Mama Elephant Hot Cocoa stamp set and a slimline – 3 window design idea, this is what I came up with. I colored the images with my copic markers and cut them out with the coordinating dies. I cut the hexatag from glitter cardstock and layered the snowflake version over the top in light blue. Then I tied twine bows at the top for a little texture.

On my background panel I ink blended distress oxide ink in spun sugar and festive berries on a white panel. I spritzed it with water and flicked pearl watercolor all over. Once it was dry, I die cut and adhered a slimline plaid panel from Pink & Main.

To assemble my card, I adhered the tags to the front panel with liquid glue and popped the images up with foam squares. Then I pulled out the Easy Christmas Messages set out, stamped and die cut one, then popped it up with a foam strip.

For finishing touches on this card, I added glossy accents to various things like noses and beaks, peppermint sticks and tea tags. Then I came in with unicorn Stickles on hats and whipped cream for some extra sparkle.

Isn’t this just the sweetest!?! I hope you’re all ready for Christmas tomorrow. I totally am and I’m almost more excited than the kids! So silly but I love it all!

Products used today:
Mama Elephant Hot Cocoa stamps and dies
Mama Elephant Hexatag dies
Mama Elephant Easy Xmas Greetings stamps
Pink & Main Plaid Slimline die
Foam squares
Glossy accents
Stickles – unicorn
Distress Oxide ink – spun sugar, festive berries
Copic markers

Merry Christmas!!! I appreciate you sharing your time with me. Have a fabulous holiday everyone!

Coffee Loving Cardmakers – Let It Snow Thank You Card

Hello everyone! It’s hard to believe but today is the last Tuesday Tea with Twiddler’s Nook on the Coffee Loving Cardmakers blog for 2021! Another year has completely flown by! Today I’m sharing a fun mash up card with Newton’s Nook images and some Lawn Fawn dies.

I started my card by stamping images from Newton’s Nook Sending Hugs and Snowman Greetings stamp sets. I colored them with my copic markers and cut them out with the coordinating dies. Then I die cut my background panel from white cardstock using the Lawn Fawn Stitched Snowflake Backdrop die and inked it up with some Lawn Fawn dye ink and a blending brush. I smooshed some of the ink on my glass mat, sprayed it with water and used a paintbrush to flick it on the background for added texture.

With my background finished, I used it along with my images as guides to die cut a white snowy hill to ground my scene. Then I combined a few Lawn Fawn sets to create a custom sentiment to make this a fun winter thank you card to use after the holidays. The top and bottom sentiments came from Thanks a Latte and the middle word came from Big Thanks. After that was stamped I flicked some paint on the hill as well to tie in the speckles a little. Then I popped it up with foam tape on the bottom of my card front.

Last, I added my images with foam squares and liquid glue and switched over to finishing touches. For that I added glossy accents to the snowman nose, buttons and heart, and the other critter noses and beaks too. Then I added black glaze pen to the eyes with a little white gel pen highlight on Winston. So that everyone had a little shiny interest I also added glossy accents to the coffee cup lid and ribbon on the gift. Then to complete my scene I adhered a scattering of snowflakes from Twiddler’s Nook’s Snowy Day embellishments.

Have you switched gears yet or are you still holiday crafting? I am doing a mix of thank you cards and still making holiday things as I’m inspired. I’ve even thrown in a couple Valentine’s Day cards already too. So fun!

Products used today:
Newton’s Nook Snowman Greetings stamps and dies
Newton’s Nook Sending Hugs stamps and dies
Lawn Fawn Simple Stitched Hillside Border dies
Lawn Fawn Stitched Snowflake Backdrop die
Lawn Fawn Thanks a Latte stamps
Lawn Fawn Big Thanks stamps
Foam tape and squares
Ultrabond liquid glue
Glossy accents

Twiddler’s Nook Snowy Day embellishments

I appreciate you sharing your time with me. Have a fabulous day!

Coffee Loving Cardmakers – Gerda Steiner | Smells Like Christmas

Happy Tuesday crafty friends! It’s time for another Tuesday Tea over on the Coffee Loving Cardmakers blog today. I’m sharing an adorable Christmas card featuring a new-to-me stamp set from Gerda Steiner Designs that a friend gifted to me.

I knew I wanted to use this cute mouse and the cup of hot cocoa from the set so I stamped them out but didn’t get any farther than that for a bit. Later on I was scrolling through reels on Instagram and one popped up with someone weaving strips of clay and it hit me! So I headed up to the craft room, chose a fun color palette and cut 1/4 inch strips of the colors and started weaving them together.

Then I colored my images in the same palette that I used for the paper weaving and used the coordinating dies to cut them out. I die cut a banner from Newton’s Nook and stamped a sentiment on it before adding foam squares to the back of everything.

Next, I ink blended a white panel with tumbled glass and salty ocean distress oxide inks and spritzed it with water. I stamped the last word for my sentiment in the bottom right corner before adhering the panel to a white card base. Then I added the paper weaving and popped my images and banner in place last.

For finishing touches, I added glossy accents to the mouse’s nose, mittens and boots and the marshmallows in the cup. Then I glued a scattering of snowy day clay embellishments from the Twiddler’s Nook shop around the whole card.

Isn’t this card so happy and fun!?! I just love how it turned out!

Products used:
Gerda Steiner Smell Like Christmas stamps and dies
Newton’s Nook Frames & Flags dies
Distress Oxide Ink – tumbled glass and salty ocean
Foam squares
Liquid adhesive
Twiddler’s Nook Snowy Day clay embellishments

I appreciate you sharing your time with me. Have a fabulous day!

Coffee Loving Cardmakers – National Espresso Day

Hey crafty friends! It’s National Espresso Day and given that it’s my day on the Coffee Loving Cardmakers blog, we couldn’t let it slip passed! So I have a fun themed card for you featuring the new release from Newton’s Nook!

I really wanted to use the new Time for Coffee stamp set and the Coffee House Stories paper pad. They are so much fun and just perfect for today! So I chose an image, stamped and colored it with my copics. Then used the coordinating die to cut it out and started flipping through the fun paper pad!

I chose an array of papers and grabbed the circle frames dies and the frames squared dies (for the circles in it, haha) and started cutting out different size circles. I also cut one from kraft cardstock and stamped a sentiment from Time for Coffee on it.

Moving on to assembly, I adhered the background paper to a white card base with liquid glue. Then I started adding the circles some with liquid glue and some with foam squares. Finally I added my coffee grinder image with foam squares and then went about trimming off anything hanging over the edge.

For finishing touches, I just added some glossy accents to the metal parts of the grinder for a little shine and interest.

I plan on fully celebrating today’s national holiday with a run through the Starbucks line later. How about you?

Products used today:
Newton’s Nook Time for Coffee stamps and dies
Newton’s Nook Coffee House Stories paper pad
Newton’s Nook Circle Frames
Newton’s Nook Frames Squared
Thermoweb foam squares and foam tape
Thermoweb Ultra Bond liquid adhesive
Glossy accents

I appreciate you sharing your time with me. Have a fabulous day!

Miss Ink Stamps – I Like Big Mugs…

Happy Thursday everyone! I’m back with a little caffeinated inspiration from Miss Ink Stamps today! I had a little fun with one of my favorite gnome sets – Big Mugs and a new stencil – Lava Lamp. I also wanted to change things up a bit so I decided on a circular card today too!

I stamped my gnome out and colored him with copic markers before cutting him out with my scan-n-cut. Then I inked up a brown panel with the lava lamp stencil and white pigment ink using my blending buddy brush. I die cut the panel with an embossed edge circle from Trinity Stamps. Then I cut the next size up circle from kraft cardstock.

I created a white card base with the same circular die and adhered the kraft circle with liquid glue, then popped the stenciled circle up with foam tape. I felt like the gnome needed something behind him so I cut a smaller circle from vellum.

To hide my adhesive, I attached the gnome to the vellum with foam squares and hid tape runner on the back of the vellum behind the gnome only.

Last, I stamped a sentiment on a banner from Newton’s Nook Banner Trio set and popped it up with foam squares under the gnome’s feet.

For finishing touches I added some brown clay hearts from the Twiddler’s Nook Caffeinated Crafting embellishment mix and gave the image some white gel pen highlights.

Tomorrow is the last day to play along with the Coffee Lovers Fall | Winter Hop. Have you played along yet? I’m entering this cutie for sure!

Products used:
Miss Ink Stamps Big Mugs stamps
Miss Ink Stamps Lava Lamp stencil
Trinity Stamps Embossed Edge Circle Stack dies
Newton’s Nook Banner Trio dies
Twiddler’s Nook Caffeinated Crafting embellishment mix
Foam tape and squares

I appreciate you sharing your time with me. Have a fabulous day!

Coffee Loving Cardmakers – Mama Elephant | Little Agenda Penguin Snowflake Tags

Well, hello again! I’m back today with some mini caffeinated inspiration for the Coffee Lovers hop! This time I’ve made a set of Christmas tags featuring some fun Mama Elephant products. I’m slightly obsessed with how fun they turned out and will probably be making lots more before the holiday season is over!

This is such a simple layout that I knew what I wanted to started with the die cutting first this time. I cut the main tag shape from white cardstock 6 times and white glitter cardstock 3 times. Then I added the snowflake shape to the glitter tags and cut that out of the center.

Next, I took 3 of the white tags and inked them up with Lawn Fawn peacock ink in the center. Then I flicked watered down cracked pistachio distress ink on the tags. Once they were dry, I used liquid glue to adhere the snowflake layer over the tops. Next, I glued the plain white tags to the back so they were sturdy and had a clean side to write on.

Then I chose 3 penguins from the Little Agenda Penguin stamp set and colored them with my copic markers. I used the coordinating dies to cut them out and popped them in the center of each snowflake with foam squares. Next, I threaded black gingham ribbon through the tag hole and tied it with twine.

For finishing touches I added a little glossy accents to each penguin on parts like beaks and feet, berries and bows. These came together so quickly and are seriously adorable!

Products used today:
Mama Elephant Little Agenda Penguin stamps and dies
Mama Elephant Hexatag dies
Foam squares
Liquid adhesive
Glossy accents

Are you playing along with the Coffee Loving Cardmakers Fall | Winter hop? There are tons of prizes up for grabs! Just link up a caffeinated project to THIS POST and you’re entered! I hope you will!

I appreciate you sharing your time with me. Have a fabulous day!

Coffee Loving Cardmakers – Reverse Confetti | Warm Holiday Wishes

Hello everyone! I’m back with another entry into the Coffee Loving Cardmakers Fall | Winter Hop! This time I’m playing with super sponsor Reverse Confetti stamps and dies, paired with some fun distress oxide ink blending and that fabulous messy watercolor splatter! You know I love getting inky and making a mess! It’s so fun!

I started my card by stamping out images from Polar Party and Coffee and You from Reverse Confetti and colored them with my copic markers. I used the coordinating dies from each set to cut the images out and played around with different design ideas. Once I decided what I was doing…(In reality this went from a double-sided ornament to a card.) I cut a white panel down to A2 size and inked it up with spun sugar and picked raspberry distress oxide inks. I spritzed the panel with water and flicked gold watercolor on it as well.

Next, I die cut the Ornament Confetti Cut from gold glitter paper and white cardstock. I adhered the frame layers together and put the gold circle cutout away for another day. I took the white circle and inked the center up with Lawn Fawn peacock ink and splattered it with gold watercolor too. I also cut a little white snowy hill for my critters with a Lawn Fawn Stitched Hillside Border.

Moving on to assembly…I adhered the inked panel to a white card base and then added the snowy hill to the bottom of that. I adhered the ornament frame and inset circle above the snowy hill and then started adding my images. The ones in the ornament and adhered directly to the card front with liquid glue and the ones on the hill are popped up with foam squares.

Last, I stamped a sentiment from Polar Party and cut it out with a Pink & Main Large Sentiment Strip die and popped it up with foam squares too.

Moving on to finishing touches, I added glossy accents to all of the lights, beaks, noses and feet. Then I added black glaze pen to the critter’s eyes and some unicorn Stickles to the stars, hat pompom and ribbon on the package.

I’m so happy with how this card turned out! It’s so fun and happy! It will be perfect to share for the Christmas season!

Products used today:
Reverse Confetti Polar Party stamps and dies
Reverse Confetti Coffee and You stamps and dies
Reverse Confetti Ornament dies
Lawn Fawn Stitched Hillside Borders dies
Pink & Main Large Sentiment Strip dies
Glossy accents
Stickles – unicorn
Distress Oxide Ink – spun sugar, picked raspberry
Foam squares
Liquid adhesive

I appreciate you sharing your time with me. Have a fabulous day!

Coffee Loving Cardmakers – Lawn Fawn Kitty Boxes

Hi there! I’m back today with a fun project for the Coffee Loving Cardmakers Fall | Winter Hop! Instead of a card today, I have a set of treat boxes that I made with my all-time favorite die set – the Lawn Fawn Tiny Gift Box! This box is fun to decorate on its own but when you add the mountains of add-on die sets Lawn Fawn has created, give me all the things and let me make boxes for decades!!! Seriously, I love it all! So today I have a set of kitties to share with you.

Aren’t these just the most adorable things you’ve ever seen?!? I know you agree! Here’s a link to the Lawn Fawn video on how to create the boxes with the cat add on options. I won’t bore you with those details.

After creating my kitty boxes, I went digging for a coffee mug for them to hold. I found the one in the Den Sweet Den set and it is absolutely PERFECT for this! I stamped and colored 3 of them, used the coordinating dies to cut them out and slid them in the kitty’s paws for each box.

Filling for these boxes today is a folded up Starbucks Via packet and chocolate covered espresso beans! YUM!!! Super excited to share these and also can’t wait to create more with the other critter add ons too!

Products used today:
Lawn Fawn Tiny Gift Box dies
Lawn Fawn Tiny Gift Box Cat Add On dies
Lawn Fawn Den Sweet Den stamps and dies
Copic markers
Tombow Mono Multi liquid adhesive
Scrappy tape – 1/4 inch

I appreciate you sharing your time with me. Have a fabulous day!