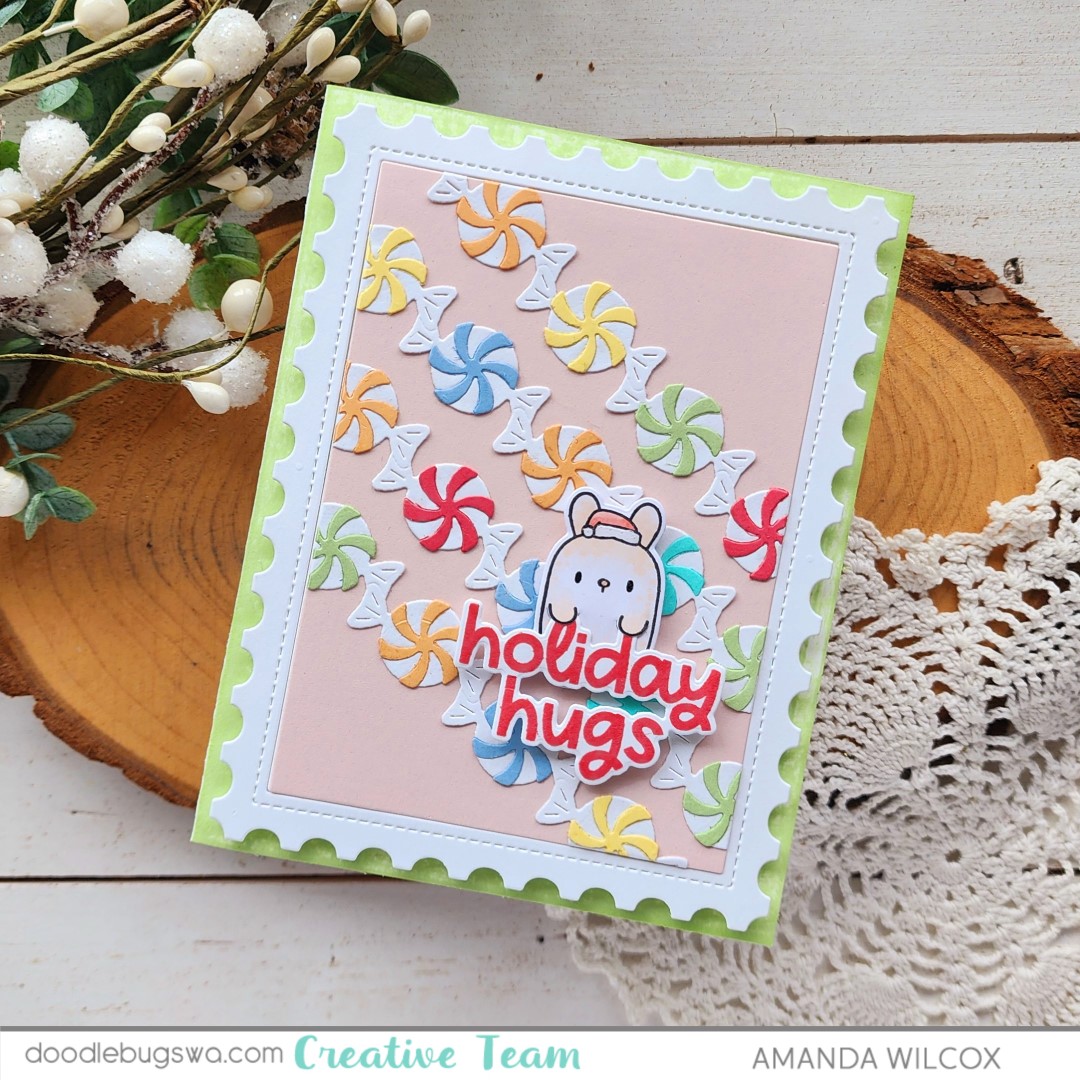
Doodlebugs – Presents for All Occasions

Happy Mix it up Monday everyone! On the Doodlebugs blog today sharing a little reminder that all the stamps and dies you have that are presents, birthday or other work great for Christmas too. That usually goes for the other way around while we’re at it!

I pulled out the new Mama Elephant Surprise Gifts set, which is not holiday at all, at wanted to make a Christmas card with it. So I colored my images accordingly with copic markers, used the coordinating dies to cut them out and some liquid glue to adhere my cute little scene.

Now that we’re on our way to holiday, I pulled out the Pretty Pink Posh Layered Christmas Trees stencil set and inked it up on a piece of light green cardstock. For the final layer I skipped inking and got a little messy with texture paste though. OMG do I love this stuff! It’s the perfect texture add-on if you ask me.

When that was dry, I trimmed it to fit an A2 card base and glued it on the front. I popped up the piggy and gifts and added a Mama Elephant Winter Banner Greeting. The array of options in these sentiment sets is amazing! Highly recommend!

I digress. Back to the card. For finishing touches today I added black glaze pen to the piggy’s eyes and nostrils. Then I added stardust Stickles to the heart he’s holding and white gel pen highlights to all the gifts.

Products used:
Mama Elephant Surprise Gifts stamps and dies
Mama Elephant Winter Banner Greetings dies
Pretty Pink Posh Layered Christmas Trees stencils
Blending brushes
Texture paste
Liquid glue
Foam tape
White and black gel pen
Stickles – stardust

I appreciate you sharing your time with me. Have a fabulous day!

Doodlebugs – Christmas Mug Cuteness

Welcome to this week’s Mix it up Monday for the Doodlebugs blog! Today I’m pulling out some cuteness from last year that did not get enough love! Spellbinders mugs and Mama Elephant critters, could it get any cuter? I think not!

These adorable Mama Elephant Holiday Huggers were just asking to hang out of something fun and when I came across my Spellbinders Merry Mugs I knew it was a match made in heaven! I really tried to make all 3 huggers fit in one mug but it wasn’t happening so I gave in and have that sweet bunny saved for another occasion. *Spoiler alert, gift tag to match!*

So I stamped and colored my images, die cut all the things and then assembled it all with a combination of liquid glue, reverse tweezers and foam tape. I added a double snowflake to the front of the mug with an enamel dot in the center which I really can’t get over is so pretty!

Then I cut a Mama Elephant Shimmer Lights cover from pink cardstock and glued it to a white card base. I added my filled mug to that with liquid glue and found the sweetest sentiment in the Mama Elephant Deliver Lots of Cheer stamp set to add to a banner. I stamped that with Lawn Fawn mermaid ink so it matched the mug and popped it up with foam tape.

For finishing touches I added white gel pen highlights, black glaze pen to the critter eyes and glossy accents to their noses. To finish it all off I added stardust Stickles to the Santa hats.

Oh my goodness, I really can’t get over the cuteness of this card. I love how it turned out so much!!!

Products used:
Mama Elephant Holiday Huggers stamps and dies
Mama Elephant Shimmer Lights cover die
Mama Elephant Deliver Lots of Cheer stamps
Lawn Fawn mermaid ink
Lawn Fawn Banner die
Spellbinders Merry Mugs dies
Sakura Glaze pen – black and white
Foam squares
Liquid glue
Glossy accents
Stickles – stardust

I appreciate you sharing your time with me. Have a fabulous day!

Doodlebugs – Snowflakes and Penguins

Happy Monday friends! It’s Mix it up Monday once again on the Doodlebugs blog and today I added a fun mini shaker to the mix as well.

I started by using some shimmer watercolor powders on a piece of watercolor paper, once that was dry I die cut my Pretty Pink Posh Snowflake Shaker from it. I lined the back with acetate and foam strips, a sprinkle of clay embellishments and sealed it up with a piece of white cardstock.

Next, I stamped and colored some sweet penguins from the Sunny Studios Roly Poly Penguins stamp set. I used the coordinating dies to cut them out and set it all aside. I couldn’t decide how I wanted my background – ink blended or solid and then I came across the Lawn Fawn Stitched Snowflake cover die and all my questions were answered. It’s the perfect backdrop!

I ink blended the snowflake panel with pink ink to help the stitching stand out and then glued it to a white card base. Next I added the snowflake and penguins with foam squares and liquid glue. Finally, I stamped and heat embossed a sentiment on a banner die cut, all from Pretty Pink Posh. I also popped it up and trimmed the excess off.

For finishing touches I added black glaze pen to penguin eyes, glossy accents to their beaks and feet, and white gel pen highlights to all of the images.

Products used:
Sunny Studios Roly Poly Penguins stamps and dies
Pretty Pink Posh Snowflake Shaker dies
Pretty Pink Posh Sentiment Strip dies
Pretty Pink Posh Sentiment Strips | Christmas stamps
Lawn Fawn Stitched Snowflake cover die
Embossing powder – white
VersaMark ink
Anti-static pouch
Foam squares
Liquid glue

Twiddler’s Nook Happy Feet embellishments

I appreciate you sharing your time with me. Have a fabulous day!

Doodlebugs – Mixing Your Mushrooms and Your Techniques

Happy Monday! I’m on the Doodlebugs blog for another Mix it up Monday. Today I’m sharing a fun mushroom filled gnome card. I had fun with all of my favorite techniques on this card – ink blending, messy with texture paste, coloring and die cutting. It’s all there!

After getting the new Mushroom stencil from Pretty Pink Posh, I immediately went to my stash to gather other mushroomy things to play with! Eventually I landed on the Lawn Fawn Mushroom border and Oh Gnome stamps and dies.

I ink blended the background stencils, finishing the detail layer off with texture paste. I cleaned up my space and got to die cutting my fun mushroom border. I love that this border has a grass layer so you can have fun dimension with little effort. I used liquid glue to add my mushroom caps and then adhere the layers together. With the texture paste dry at this point, I trimmed everything down to A2 size and popped the ground layer up with foam tape on the stenciled panel.

Next, I stamped images from Lawn Fawn Oh Gnome and colored them with copic markers. After cutting them out with the coordinating dies, I added them to the scene with liquid glue and foam squares. I also went it with some white gel pen highlights and glossy accents on the mushroom dots.

The Oh Gnome stamp set has great sentiments and a speech bubble with mini sentiments to use but in the end I landed on a fabulous Mama Elephant Banner Greetings die cut. It was more generic which is what I was looking for and fits so perfect up there.

Products used:
Lawn Fawn Oh Gnome stamps and dies
Lawn Fawn Mushroom Border dies
Mama Elephant Banner Greetings dies
Pretty Pink Posh Mushroom stencils
Blending brushes
Lawn Fawn ink – doe, lobster
Texture paste
Glossy accents
Sakura gelly roll white pen
Foam tape and squares
Liquid glue
Reverse tweezers

I appreciate you sharing your time with me. Have a fabulous day!

Also, if you made it this far in my blog post, it’s my birthday! I’m going to give away some happy mail to a few commenters on this post. Comments must be submitted by Friday, Nov. 8, which is my daughter’s 18th birthday!

Doodlebugs – One Design, Two Ways

Hello everyone! Today for Mix it up Monday on the Doodlebugs blog, I’m sharing a card design two different ways. Two different color ways for ink blending, two different ideas for a sentiment and two different orientations too! So many twos it should be Tuesday! (Bad dad joke of the week.)

Here’s a look at both cards side by side. We’re using the Waffle Flower Sunflower Cluster die and stencil combo with the Lawn Fawn Hello Fall sentiment die today.

For starters let’s talk about the sunflowers. This card is light and bright. I did my ink blending on a white die cut with Lawn Fawn dye inks. They’re happy and beautiful. Definitely giving that sunny vibe.

Believe it or not, this card is using Lawn Fawn dye inks but the die cut was made with kraft cardstock. I went heavier handed on the yellow inks to get the depth and added a darker shade of green for fun, it wasn’t necessary.

Next, I cut my sentiment twice from white cardstock and twice from gold die cut foam from Spellbinders. This set is adhered with the white on top and a peek of the gold glitter. I also turned this card landscape instead of portrait.

Then for this card, I chose a portrait orientation and my sentiment has the flashy gold glitter on top. Different vibes for sure but both are gorgeous!

I did splatter the card front with gold watercolor before adhering the sentiments down because, well, sparkle.

Which style do you like better? Can you think of other products we could try this with?

Products used:
Waffle Flower Sunflower Custer die and stencil combo
Lawn Fawn Hello Fall die
Blending brushes
Lawn Fawn ink – no 2 pencil, sunflower, artichoke, noble fir, walnut
Gold watercolor
Liquid glue
Spellbinders die cut glitter foam – gold

I appreciate you sharing your time with me. Have a fabulous day!

Doodlebugs – Merry Coloring with Stencils

Welcome friends! It’s Mix it up Monday and I’m slowly transitioning my crafting to a sprinkling of Christmas, as I’m sure some have noticed. We can’t let it creep up on us unaware and be scrambling to create and mail out our Christmas cards now can we?!?

So today I inked up one of the Waffle Flower holiday themed postage stamp stencil sets. This one is called Gingerbread. If you haven’t tried this line of products from Waffle Flower just go into it knowing a few things…they are addicting and so fun to create with, they are so simple with Waffle Flower etching color or theme ideas in the top right corner of each layer, and there is something for everyone, and the collection keeps growing still!

I prefer to die cut my postage stamp backdrop first, then ink up the stencils and stamp my postage extras, then I use my paper trimmer to cut the stamps apart for today’s project. But you could use it whole as a full card design too. It’s that good!

I decided which images I was going to use and tucked the others away to create with another time. Then I cut a Spellbinders Emerald Cut Label, plus the insert layer from pink cardstock. I inked the larger one up with pink ink and splattered them both with pink ink and white paint.

At the same time, I inked the edges of my card base with mermaid ink and splattered it in the same fashion. After those were dry, I layered everything with liquid glue and foam tape.

Next, I popped my postage stamps up with foam squares on the pink rectangle and finished the design off with a sentiment banner from Mama Elephant.

To keep the red cohesive, I inked the background layer of the banner the same way I did on the bird postage stamp. It’s a mix of brown and red from the gingerbread stenciling.

Here’s a little up close of the cuteness we’ve created today! I’m itching to take the other three stamps this stencil set created and get another card checked of my Christmas list!

How far along are you this year? Be honest…I have a solid 15 Christmas cards ready to go and better get cracking if I’m going to get them all done in time.

Products used:
Waffle Flower Postage Collage Gingerbread stencil set
Waffle Flower blending brushes
Waffle Flower Postage Collage North Pole stamps
Spellbinders Emerald Cut Labels dies
Mama Elephant Winter Banners dies
Lawn Fawn Inks – walnut, lobster, mermaid, ballet slippers
Liquid glue
Foam tape

I appreciate you sharing your time with me. Have a fabulous day!

Doodlebugs – Mixing Critters and Sentiments to Stretch Your Supplies

Happy Mix it up Monday again everyone! I hope this doesn’t get old for you because I truly love it! My brain used to have a hard time reaching for different companies to put on the same card and now it’s like a fun weekly exercise to see how I can extend the life of my crafty stash!

Today we’re playing with cute critter sets that might not have enough or any sentiments in them. So go ahead, grab that other brand and go to town!

Today we’re starting with watercolor and the Pretty Pink Posh Reindeer Friends set along with the new Mama Elephant Holiday Block set. I used my Zig Clean Color Real Brush markers, including the blender to keep things bolder today. If you wanted to tone down your colors, blend them with water which inevitably removes some of the pigment and lightens them.

Once everything was colored and dry, I used the coordinating dies from both sets to cut them all out. So great that the Mama Elephant dies cut the sentiments in the set too! I love it!!!!

For my background, I embossed a piece of white cardstock with the Spellbinders Tiny Dots embossing folder and glued it to a card base. Then I cut a piece of kraft cardstock 2 inches tall and glued it on top of that. I covered the seam with a strip of black cardstock about 1/4″ thick and proceeded to add my images and sentiment with foam squares.

For finishing touches today, I added red twine wrapped around the top and tied in a bow and I also went ahead and added glossy accents in a couple of places – reindeer noses and the hearts in the sentiment.

I love how happy this card turned out! It’s a little early yet but I think Christmas crafting is going to be extra fun this year!

Products used:
Mama Elephant Holiday Block stamps and dies
Pretty Pink Posh Reindeer Friends stamps and dies
Spellbinders Tiny Dots embossing folder
Foam squares
Glossy accents
Liquid glue

I appreciate you sharing your time with me. Have a fabulous day!

Doodlebugs – Die Cut Mania, Getting Ready for Christmas

Happy Mix it up Monday everyone! Today I’m sharing more die cut creations but starting to sprinkle in Christmas with my Halloween and fall creations. This time I was thinking about how to stretch some of the products that might not be holiday and I chose the Pretty Pink Posh dump truck die set to start with!

I cut all the pieces from atypical construction colors and used liquid glue to assemble it. I wanted the bed of the truck to sit on top of the “frame” so I just used a little washi tape to keep them lined up while I was playing around with the other elements.

Digging for Christmas gifts to fill my truck with, I landed on the ones in the Spellbinders Delivery Joy die set. I cut the elements and used liquid glue to assemble everything. Then with the help of a little washi tape, I arranged everything taped it together on the front so I could flip it over and add dabs of liquid glue where things overlapped. After letting the glue dry for a minute I could carefully remove the washi tape and it all stayed put!

For my sentiment, I went with the Spellbinders Make it Merry banners and thought the “jingle all the way” sentiment was too cute with this truck load of gifts. I layered the black top banner over white glitter cardstock and offset them for a little extra sparkle. I popped it up on the truck with foam strips.

For my background, I cut 2 of the largest Spellbinders Emerald Cut Labels dies from white cardstock, scored one 1/2 inch from the top and adhered it to the back to create a shaped card base. Then I cut the inner label from teal cardstock and inked it up with the Pretty Pink Posh Trellis stencil and Lawn Fawn peacock ink. That is adhered with liquid glue and my truck is popped up on that with foam tape.

Isn’t this a fun segue into holiday crafting? Now that I’ve filled this truck with gifts, I’m going backward to fill it with pumpkins and when Valentine’s Day rolls around, watch out!!! We’re going to have fun with this!

Products used:
Pretty Pink Posh Big Dump Truck dies
Pretty Pink Posh Trellis stencil
Spellbinders Emerald Cut Labels dies
Spellbinders Make it Merry banner ides
Spellbinders Delivering Joy dies
Blending brush
Lawn Fawn peacock ink
Liquid glue
Foam strips and tape
Reverse tweezers

I appreciate you sharing your time with me. Have a fabulous day!

Doodlebugs – Ultimate Mix It Up Monday

Hey friends! I’m over on the Doodlebugs blog for our weekly Mix it up Monday but today is seriously the ultimate mix and match with so many companies together and you’d never know. They just work so great!

Isn’t this just the cutest!!! So easy too! Any order really, you just need that sweet Sunny Studios penguin colored and die cut. The awesome Lawn Fawn candy canes die cut and assembled. I started with red and white but didn’t love it until I added the pink. Be sure to play with this die set! I think I’ll try some mint green next.

Now, use liquid glue to adhere your candy canes crisscross and then add the penguin to the top.

Then stamp and heat emboss your sentiment of choice – the Pretty Pink Posh sentiment strips dies and coordinating stamp sets for the win as usual. I’m tell you, you’ll get your moneys worth from these. There is always something that works!

Now, add foam squares and strips behind your images and sentiment strip.

Now, we’re going to switch to Concord & 9th for an awesome background die. Trim your panel to 3.5×4.75 inches and cut it twice with the Double Stripe Card Front die – once landscape and then again portrait. Then you get this awesome plaid stitching.

I used green cardstock and then ink blended the edges with shabby shutters distress oxide for a little shadow and flicked forest moss ink across the panel for extra interest.

Finally, to assemble it all, I popped the background panel up with foam tape on a white card base and then adhered the images and sentiment strip on that. For finishing touches I added black glaze pen to the penguin’s eyes and glossy accents to his beak.

Can you believe it? We mixed 4 companies together today and they created the cutest holiday card!

Products used:
Sunny Studios Roly Poly Penguins stamps and dies
Lawn Fawn Cute Candy Canes dies
Pretty Pink Posh Sentiment Strips dies
Pretty Pink Posh Sentiment Strips | Christmas stamps
Concord & 9th Double Stripe Card Front die
Distress Oxide ink – shabby shutters and forest moss
Foam squares and tape
Liquid glue
Reverse tweezers
VersaMark ink
Embossing powder – white
Anti-static pouch
Glossy accents
Sakura black glaze pen

I appreciate you sharing your time with me. Have a fabulous day!

Doodlebugs – Hang in There Mini Scene

Happy Mix it up Monday everyone! Sometimes creating even a whole card front can feel overwhelming. Whether it’s too much coloring of images or too much space to fill. Today I have a fun design to share with you that shrinks your scene space but is really fun and has lots of interest too.

I started with a few images from Pretty Pink Posh Batty About You. I colored them with copic markers and used the coordinating dies to cut them out. Then I used a dab of liquid glue to adhere my bat to the tree branch.

Next, used some distress oxide inks to create a spooky sky on a piece of white cardstock. I started with crackling campfire, carved pumpkin and wild honey. After those were blended I went over the whole thing lightly with black soot, then went back over it all with the same colors to blend the black a little. I love the smoky look I ended up with. Next, I spritzed the panel with water and flicked black metallic watercolor on it too.

I trimmed a piece of black cardstock down to 4.25×3.5 inches and ran it through my die cut machine with the Spellbinders Tiny Dots embossing folder. This part of the design is easy to change up. Use a stencil or patterned paper, or maybe you like it simple and plain cardstock is your jam. Then just cut a 1/4″ strip of contrasting cardstock to adhere to the top. It’s like a bridge over the seam of your ink blending and the bottom panel. It polishes the design a lot.

Next, pop everything up on the ink blended panel with foam tape and squares. Placement of the sentiment can vary on this design too. I like the dab of orange at the bottom so that’s where my sentiment strip ended up this time. But it often ends up just below the seam strip or even up in the scene itself. Play around with it and see what you like.

Products used today:
Pretty Pink Posh Batty About You stamps and dies
Pretty Pink Posh Sentiment Strips dies
Pretty Pink Posh Sentiment Strips | Halloween stamps
Spellbinders Tiny Dots embossing folder
Distress Oxide Ink – crackling campfire, carved pumpkin, wild honey, black soot
Foam tape and squares
Liquid glue
Distress sprayer

LH Color watercolor – black

I appreciate you sharing your time with me. Have a fabulous day!