Doodlebugs – Fall Mice Postcard

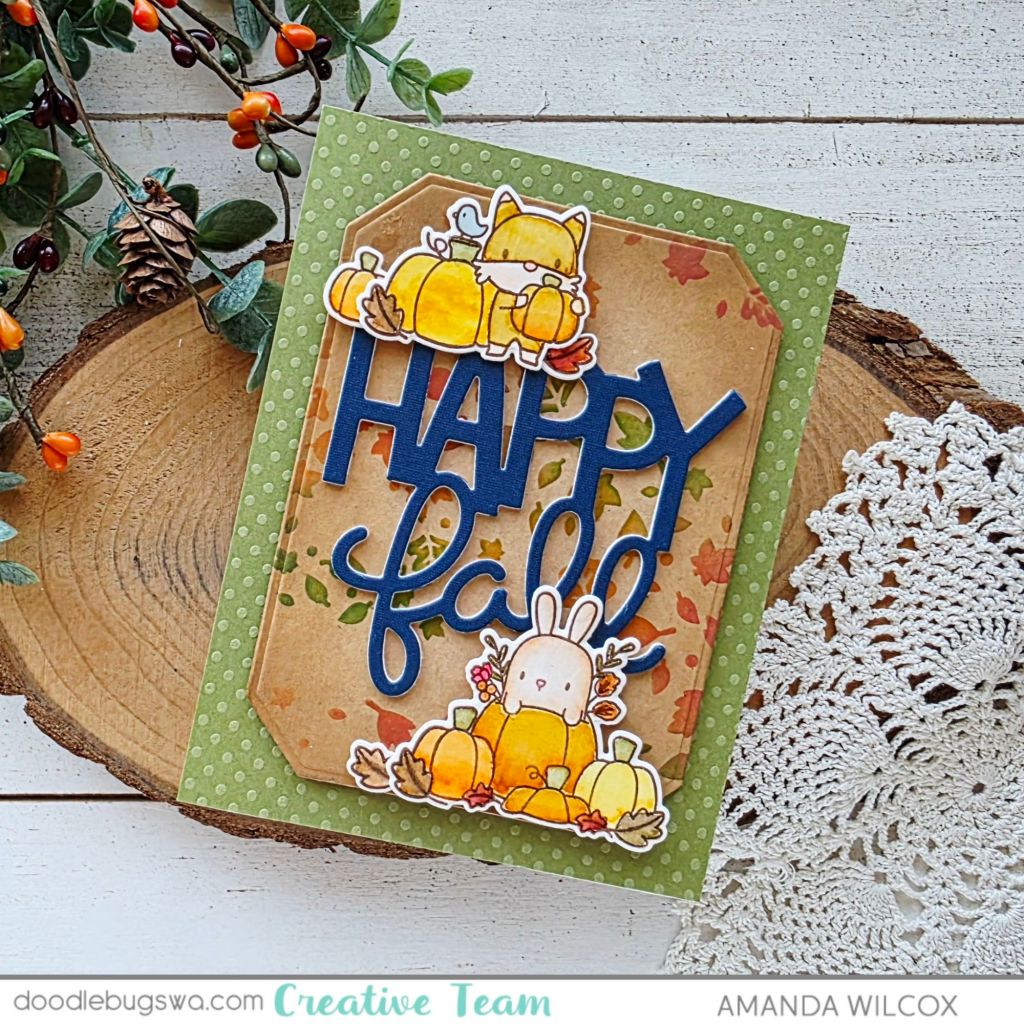
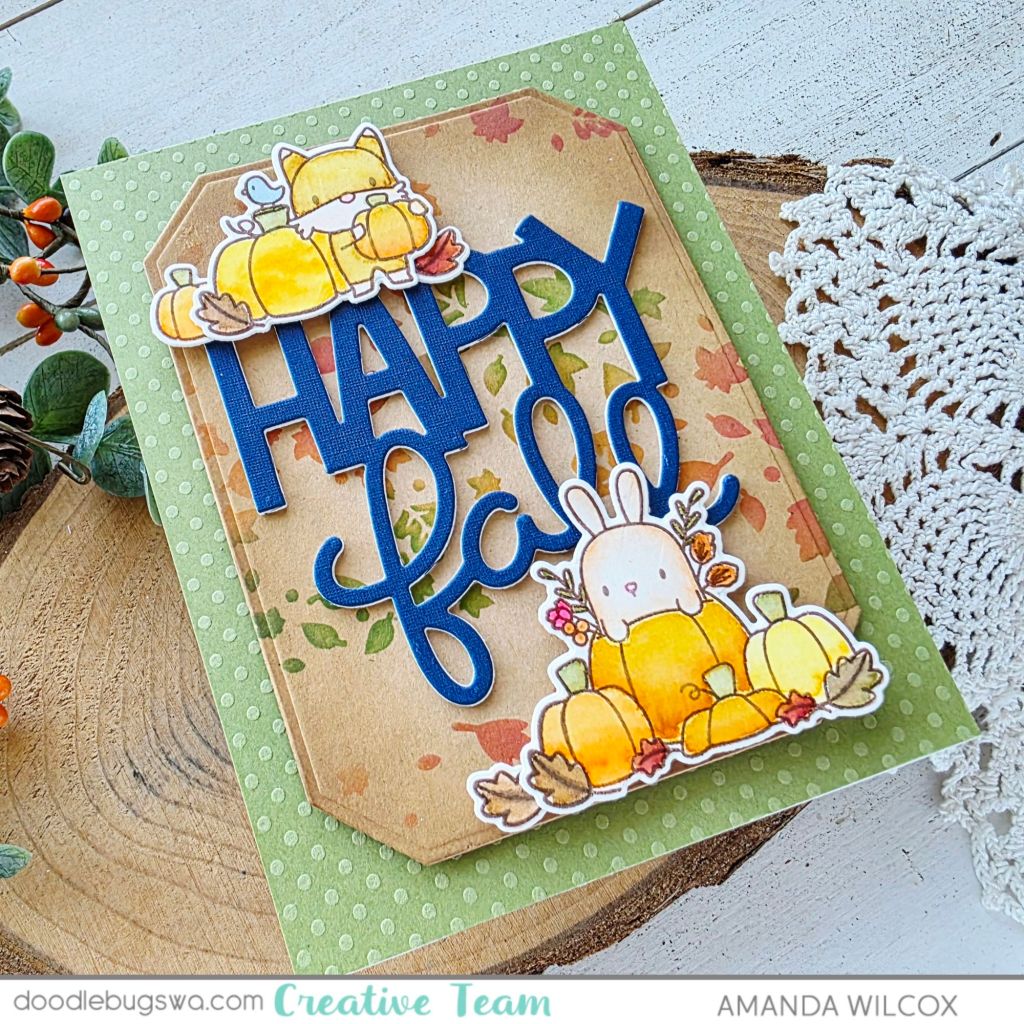
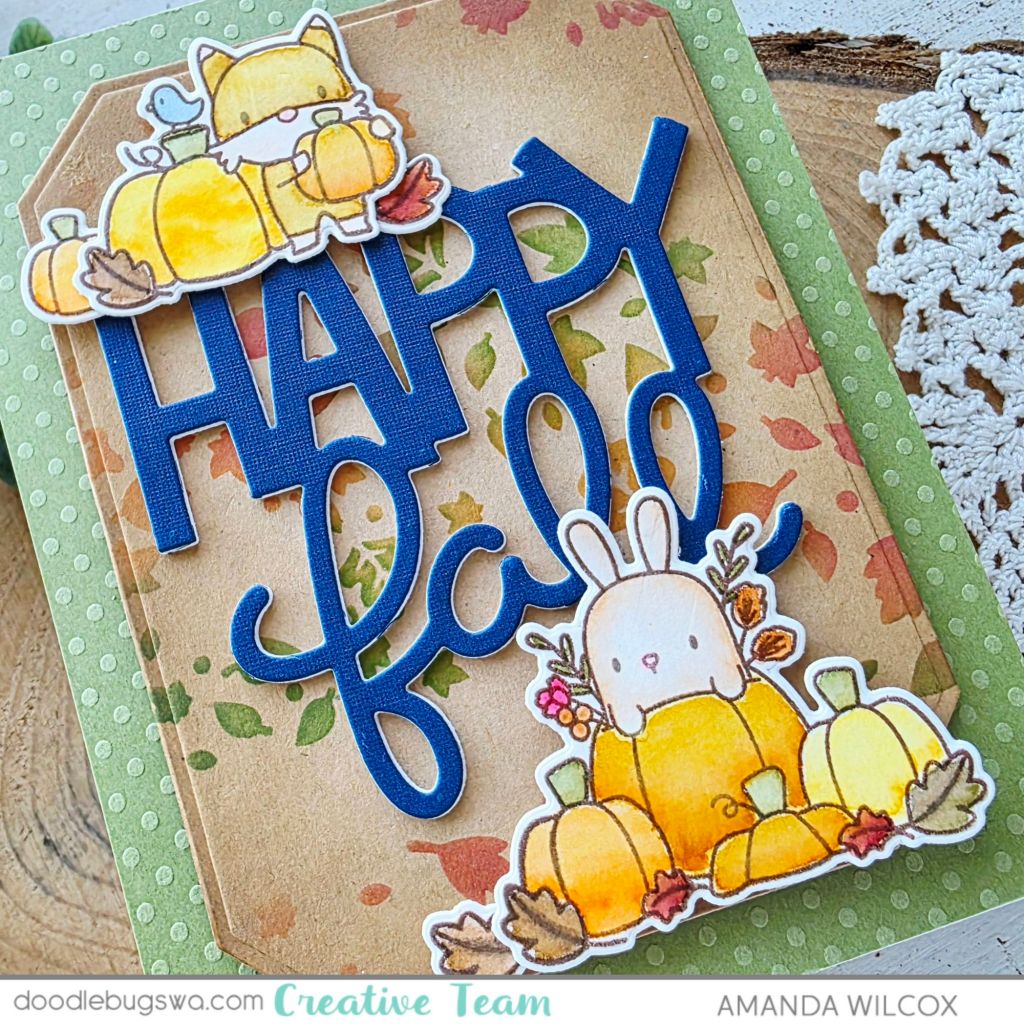
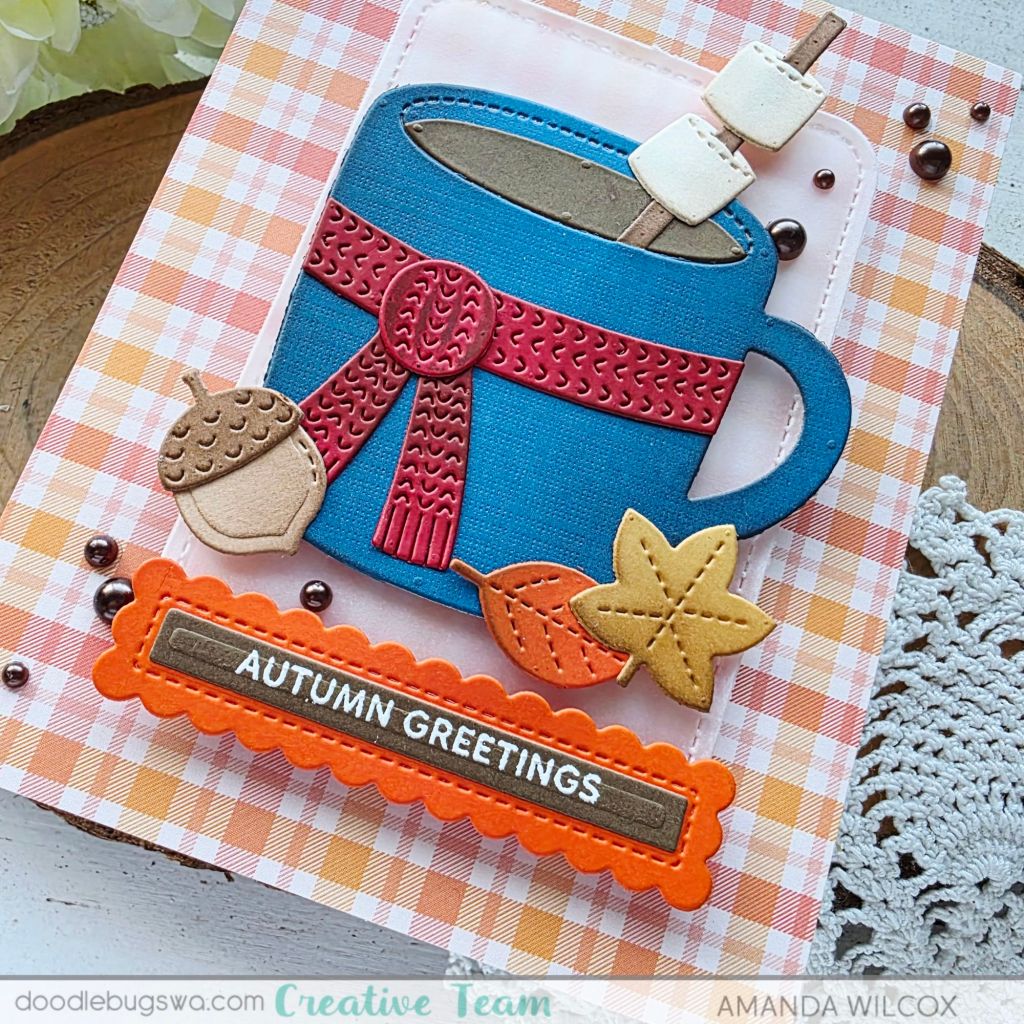
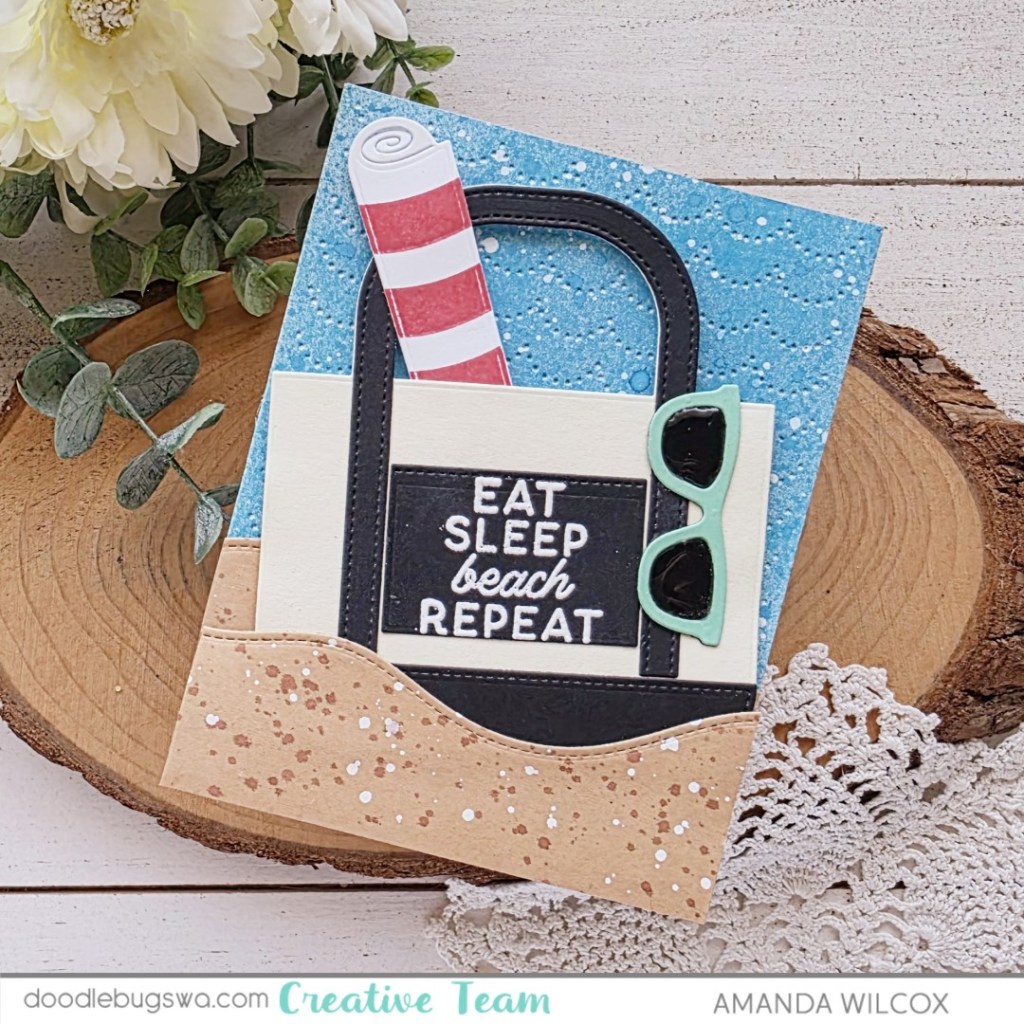
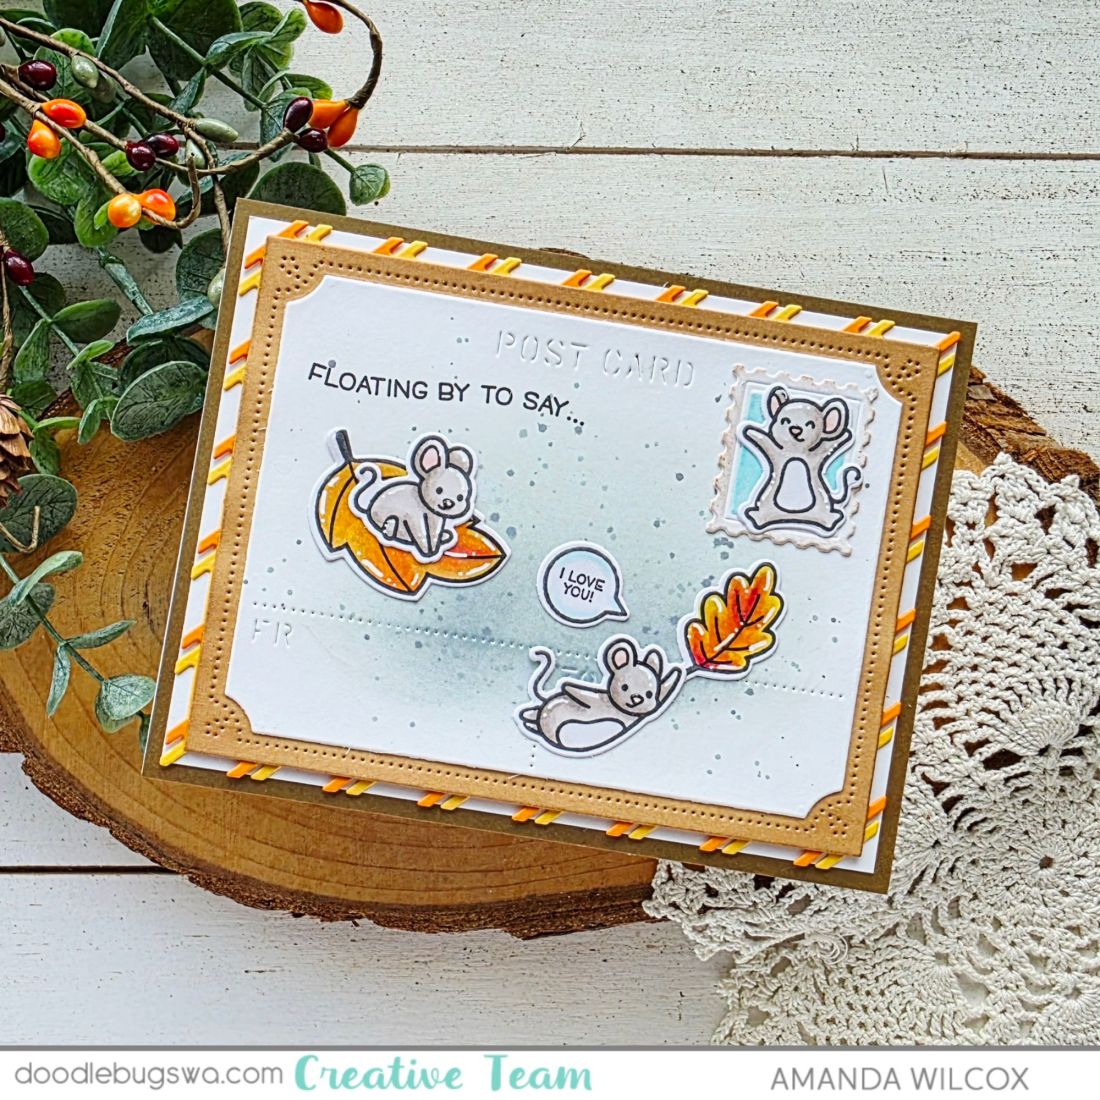
Welcome back to Mix it up Monday for Doodlebugs! Today I’m playing with the recently release Mama Elephant postcard dies, in a fall theme before fall gets away from us!

There are quite a few layers on the postcard die set so I didn’t use foam today at all, just liquid glue to adhere the layers together. My card front is dark brown, then I glued the striped pieces from the postcard to a piece of white cardstock so they popped more. Next, I glued the kraft layer to that.

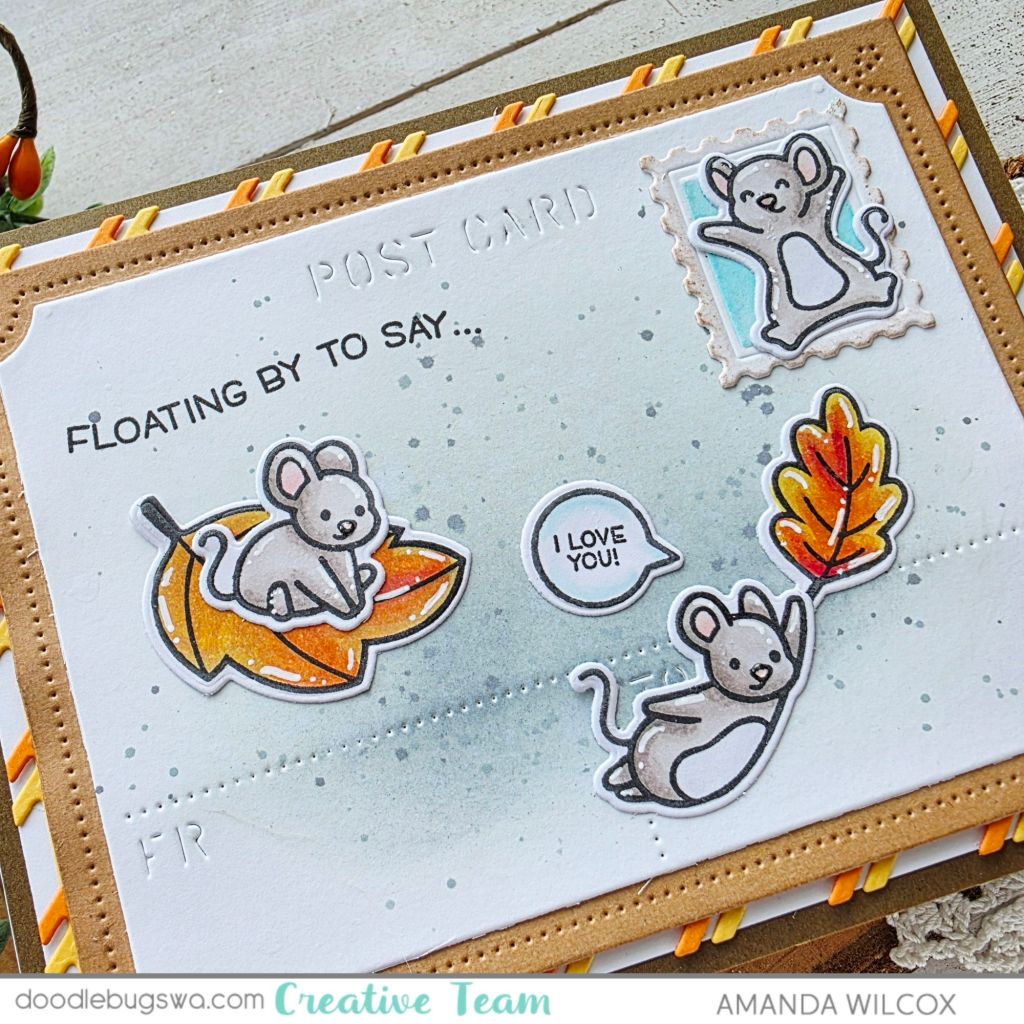
With all of that decided, I cut the postcard panel and postage stamp from white cardstock and inked them up a bit. The edge of the stamp is lightly inked with brown ink. Then I masked off the edges to ink the center with light teal ink. Then I added speckled egg distress oxide ink to the center of the postcard panel, splattering more ink after for added texture.

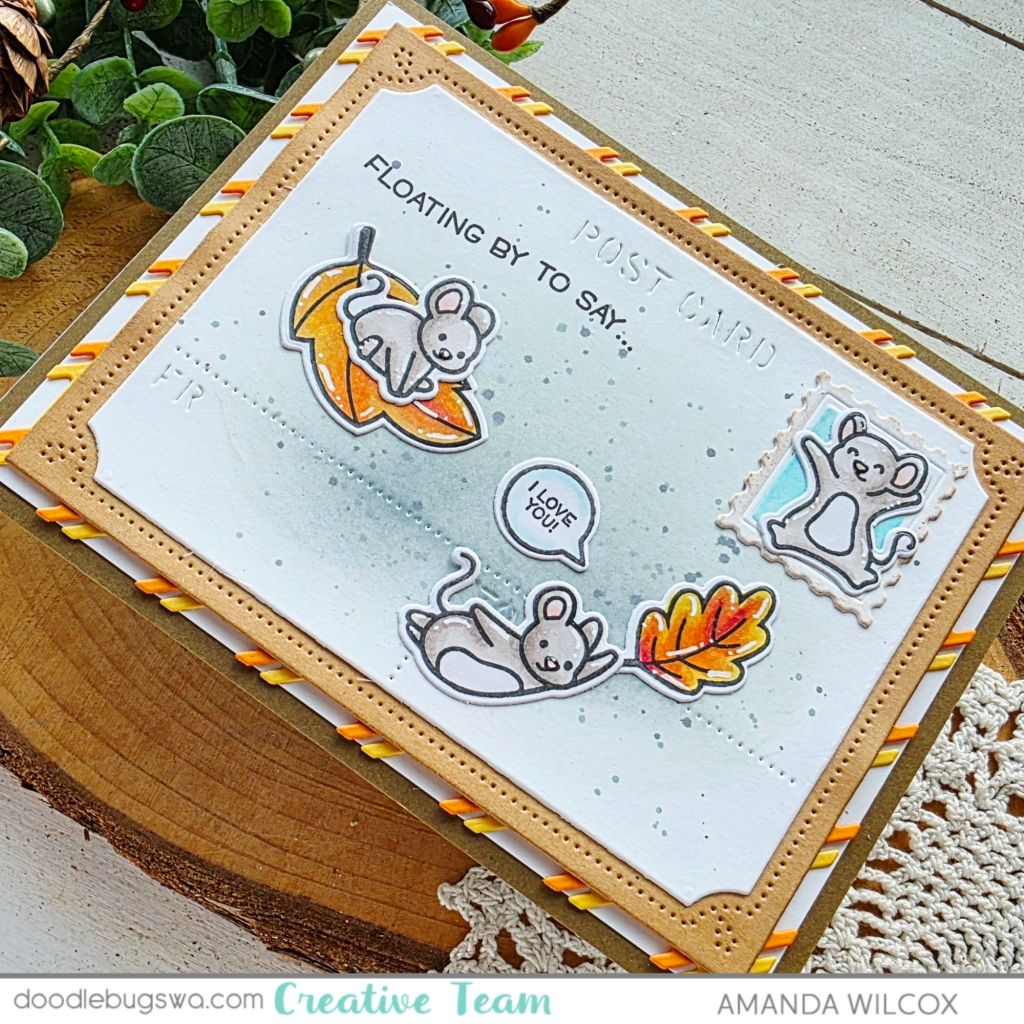
Finally, I pulled out the Lawn Fawn You Autumn Know set to choose my images. I stamped and colored everything with copic markers, using the coordinating dies to cut it all out. I glued the images down with liquid glue and then placed the panel in my MISTI to stamp the first portion of the sentiment on the upper left area.

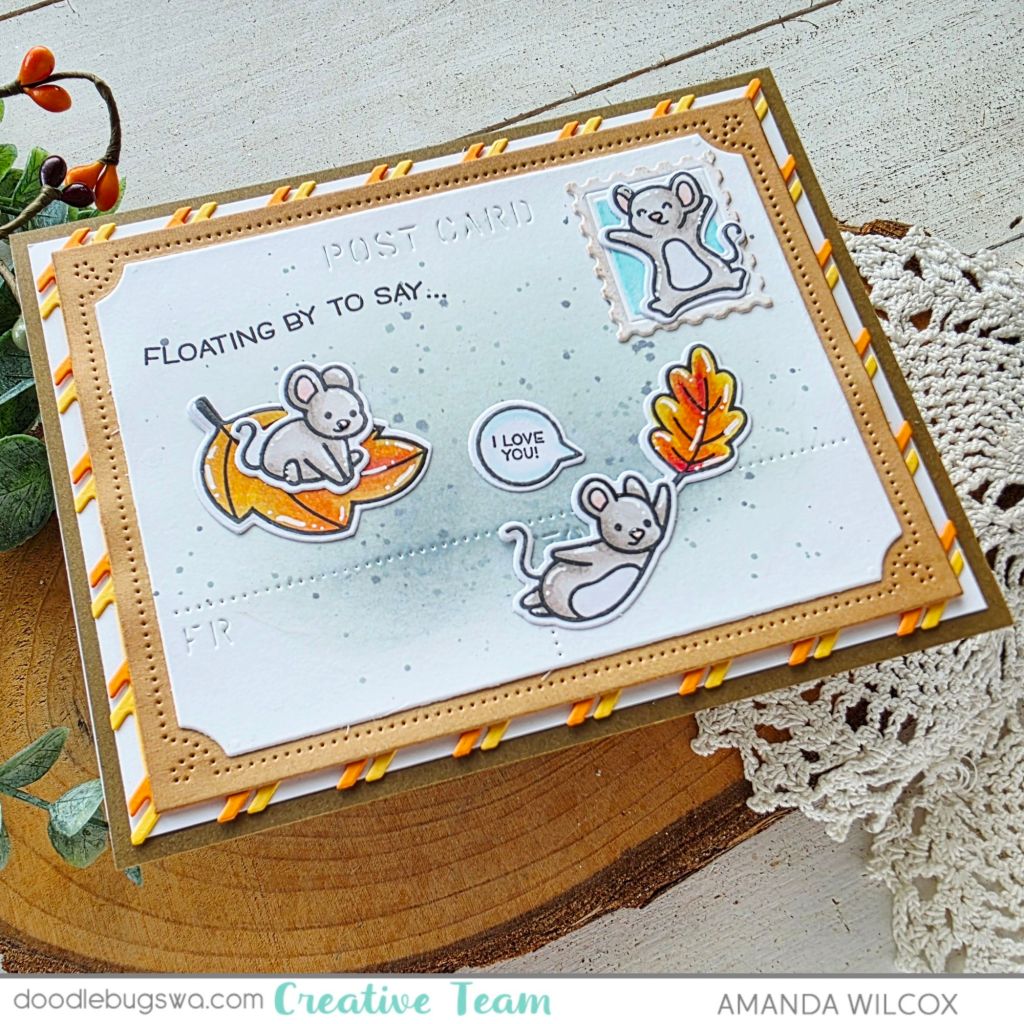
I finished this design off with glossy accents on all the mouse noses and white gel pen highlights on the mice and the leaves. This turned out so cute and the postcard die set is really fun to create with! It’s going to be great at valentine time!

Products used:
Mama Elephant Postcard Combo dies
Lawn Fawn You Autumn Know stamps and dies
Blending brushes
Distress Oxide Ink – speckled egg
Lawn Fawn Ink – walnut and mermaid
Liquid glue

I appreciate you sharing your time with me. Have a fabulous day!

Doodlebugs – Happy Fall

Welcome to this week’s Mix-it-Up Monday for Doodlebugs! We’re into full fall mode with Halloween behind us now so let’s celebrate that with a sweet fall-themed card today!

This card actually started with the sentiment which I created for another card but it didn’t end up fitting. I always save those items in case they can be used later on. So with that in mind, I inked up the Lawn Fawn Autumn Breeze stencil using a combo of fall colors on a kraft panel. I cut that panel with a Spellbinders Emerald Cut Labels and Tag die, then inked the edges with brown for depth.

I chose a few images from the Mama Elephant Hey Pumpkin stamp set to stamp and watercolor. I used the coordinating dies to cut them out and arranged everything with my sentiment on the kraft panel. The sentiment has 3 layers of white cardstock behind the blue so it stands up nicely. I added the images with foam squares so they’re on the same level.

Next, I found the green polka dotted cardstock in my stash but you could always stencil or emboss your own to match. That is glued to a card base with liquid glue and the sentiment/scene panel is popped up on that with foam tape.

Watercolor doesn’t say “shiny” or “sparkly” to me so I don’t typically add any finished touches like that to these cards. I like the muted tone and the soft way about them, so I leave them how they are. But if you’re in the mood, add whatever speaks to you!

Products used:
Mama Elephant Hey Pumpkin stamps and dies
Lawn Fawn Autumn Breeze stencil
Lawn Fawn Hey Fall die
Spellbinders Emerald Cut Labels & Tag dies
Foam tape and squares
Liquid glue
Blending brushes
Lawn Fawn dye inks – pumpkin, jalapeno, walnut, lobster

I appreciate you sharing your time with me. Have a fabulous day!

Doodlebugs – Star Treat Boxes

Happy Mix it up Monday everyone! Today I’m giving life to the awesome new Lawn Fawn star treat box die. It’s perfectly designed – as theirs always are – and going to be so fun to use year round! Let’s get started with some Halloween treats!

I started by cutting the boxes from black cardstock. Then like in the Lawn Fawn intro video, I used adhesive tape to adhere the box as I built it. Be sure to watch the Lawn Fawn intro videos for all of these interactive-type die sets. They’re a life saver!

Next, I ink smooshed some spooky colors on watercolor paper for a mottled effect. Then I stamped my Pretty Pink Posh Halloween Word Scenes images and used the coordinating dies to cut them all out. I love the extra color but the pictures needed to pop so I added a little extra coloring here and there throughout.

Next, I added foam squares to the back of the word scenes and removed the release paper. Before adding them to the box fronts, I looped up a bit of embroidery floss for some added interest behind them. Places where the floss covered too much of the foam square I added some liquid glue for good measure.

To finish these off, I stamped and die cut Pretty Pink Posh Halloween sentiment strips and popped them up with foam strips below the word scenes on each box. Last, I added stardust Stickles on parts of the images for some sparkle and fun.

Products used:
Pretty Pink Posh Sentiment Strips dies
Pretty Pink Posh Sentiment Strips | Halloween stamps
Pretty Pink Posh Halloween Word Scenes stamps and dies
Lawn Fawn Star Treat Box die
Foam squares and strips
Liquid glue
Embroidery floss
Stickles – stardust

I appreciate you sharing your time with me. Have a fabulous day!

Doodlebugs – Grateful for Fall

***Sorry friends, I had this scheduled for the wrong day so it’s publishing a day late.***

Hey friends! This week for Doodlebugs Mix it up Monday, I’m really feeling the fall vibes. I have been itching to play with these Lawn Fawn Sunflower dies since I got them and today it just felt perfect!

Instead of using colored cardstock for the petals, stems and leaves I used distress oxide and spritz sprays to add color to white cardstock. It gives great texture, shimmer and depth. After the panels were dry from spraying them, I cut out the pieces and used liquid glue to assemble everything.

I cut a red background panel at 4×5.25 inches and ink blended the Pretty Pink Posh Deco Leaves stencil over top with darker red ink. Then I ink blended the edges for depth before adding it to a white card base.

Next I popped up my sunflowers with foam squares. Then stamped and die cut a sentiment using the Pretty Pink Posh Sentiment Strips stamps and dies. I glued the layers together and popped it up over the stems with foam strips.

For finishing touches on the design I glued a scattering of brown flat sequins from Pretty Pink Posh.

Here’s a close up look at the texture on the sprayed sunflower parts. I love them!

Products used:
Lawn Fawn Sunflower dies
Pretty Pink Posh Deco Leaves stencil
Pretty Pink Posh Sentiment Strip dies
Pretty Pink Posh Sentiment Strips | Fall stamps
Pretty Pink Posh flat sequins
Blending brush
Lawn Fawn cranberry ink
Liquid glue
Foam squares and strips

I appreciate you sharing your time with me. Have a fabulous day!

Coffee Loving Cardmakers – National Coffee Day Hop

Hi friends! Today I’m here with a fun little shaker card to celebrate National Coffee Day with the Coffee Loving Cardmakers! The hop is over on Instagram so be sure to comment there! Below are some of the details on how I created my card.

I couldn’t help but go for a Halloween coffee shaker card to celebrate today. I used our Happy Jacks embellishment mix with a variety of Lawn Fawn dies and Newton’s Nook stamps and dies for my sentiment.

I rediscovered a fun paper pad in my stash to create the background. First I cut a 4.25×5.5 panel with the green polka dots and then gave life to some scraps in the pad with stripes for some contrast. Isn’t that fun!?!

I created my shaker and glued it in place with a few extra visitors in the form of ghosts and a spider on his web. Then I stamped and heat embossed a sentiment from Newton’s Nook on a banner and popped it up with foam squares.

Products used:
Twiddler’s Nook Happy Jacks embelishments
Twiddler’s Nook Pressure Pal
Twiddler’s Nook Coffee Mug Magnetic Die Holder

Lawn Fawn Mug and Mug Shaker dies
Lawn Fawn Halloween House add-on die set

Newton’s Nook Banner Trio dies
Newton’s Nook Heartfelt Coffee stamps

Embossing and Watermark ink
Embossing powder
Magic anti-static brush
Liquid glue
Foam strips and squares

I appreciate you sharing your time with me. Have a fabulous day!

Doodlebugs – Cozy Autumn Greetings

Welcome to Mix it Up Monday for the Doodlebugs shop! Today I’m falling into cozy fall vibes with a fun combo of Pretty Pink Posh and Lawn Fawn goodies new and older.

I started by die cutting all the bits from Pretty Pink Posh Winter Mug and Fall Mug Additions die sets. I used some ink blending to give the pieces depth and liquid glue to adhere them all together.

Next, I pulled a piece of the new Lawn Fawn Favorite Flannel Fall paper pad for my card front, and cut a rounded rectangle from vellum to center my images. Next I heat embossed my sentiment from Pretty Pink Posh Sentiment Strips Fall on brown cardstock and used the coordinating dies to cut the strip and scallop panel out.

Everything was adhered with foam tape on the vellum panel and then another layer of foam was added behind those to pop it up on the plaid card front. To finish things off I glued down a scattering of Pretty Pink Posh espresso pearls across the design.

Products used:
Pretty Pink Posh Winter Mug dies
Pretty Pink Posh Fall Mug Additions dies
Pretty Pink Posh Sentiment Strips | Fall stamps
Pretty Pink Posh Sentiment Strips dies
Pretty Pink Posh espresso pearls
Lawn Fawn Favorite Flannel Fall paper pad
Lawn Fawn Rounded Rectangle dies
Foam tape and squares
Liquid glue
Embossing and watermark ink
Magic anti static bag
Embossing powder – white

I appreciate you sharing your time with me. Have a fabulous day!

Doodlebugs – Spec-taco-lar Birthday

Hi there! It’s Mix it up Monday on the Doodlebugs blog and today we’re celebrating my favorite way…TACOS!!! I love the new taco cart add on to the Lawn Fawn Treat Cart series. It’s so fun and makes me giggle because mexican food is my favorite!

So today, I chose a few images from the Treat Cart original set and the Taco Cart add on set, stamped and colored them. Then I used coordinating ides to cut it all out and a little liquid glue to assemble the pieces together.

Then I snagged the Mama Elephant Scallop Circles dies and cut the stitched circle from white with the two back layers from orange and green. Such a festive color combo! I used liquid glue to adhere the layers together and ink blended a little yellow in the center of the circle to take off the harsh white background.

Next, I took a piece of white cardstock measuring 4×5.25 inches and spritzed it with Distress Oxide spray and Distress Spritz for color and shimmer. Then I took my Lawn Fawn jalapeno ink pad direct to the edges of my card base for texture and color. While that was drying I stamped and heat embossed my sentiment and cut it up into sentiment strips.

For assembly, I popped the orange panel up with foam tape, then popped the circle up on that. The taco stand is glued directly to the circle and the critters are popped up with foam squares. Last, I added the sentiment strips with foam strips filling in some of the white spaces. For finishing touches today I just added white gel pen highlights to the images.

What’s your favorite type of food? The one that makes you happy dance in your seat…

Products used:
Lawn Fawn Treat Cart stamps and dies
Lawn Fawn Taco Cart Add On stamps and dies
Lawn Fawn Taco Cart Sentiments stamps
Mama Elephant Scalloped Circles dies
Distress Oxide Spray – spiced marmalade
Distress Spritz Spray – squeezed lemonade
Lawn Fawn ink – jalapeno
Liquid glue
Foam tape, squares and strips
Sakura jelly roll pen – white
Embossing and watermark ink
Embossing powder – white
Anti-static bag

I appreciate you sharing your time with me. Have a fabulous day!

Doodlebugs – You’re Tops in my Book

Happy Mix it up Monday everyone! On the Doodlebugs blog today I’m mixing some really fun bookish products together. I have a very special librarian in my life who I needed a card for so this was extra fun to pull together.

I started by die cutting and inking up the Waffle Flower Open Book die and stencils. I used blending brushes and Lawn Fawn dye inks to color the layers. It was so much fun! I can’t believe it took me this long to give it a try. I’m for sure hooked and excited to make some with the new Christmas stencils too!

Once that portion was finished I pulled out the Concord and 9th Wood Plank embossing folder for my background panel. I trimmed it down to 4×5.25 inches after it was embossed and inked it lightly with gray to bring out the texture.

Next, I pulled out the Lawn Fawn Little Woodland Library stamps and dies to choose the sweet reading critters to place around my open storybook. After those were stamped, colored and die cut I moved on to assembling the parts together.

Wanting a little contrast I added deep sea ink to my card front before popping the wood plank panel up with foam tape. Then I glued the storybook down with liquid glue and popped up my critters and sentiment strip with foam squares and strips.

For finishing touches I just added a little glossy accents on the worm’s glasses and white gel pen highlights on all the stamped images.

Products used:
Waffle Flower Open Book dies
Waffle Flower Open Book stencil
Waffle Flower Open Book Dragon Castle stencil
Concord & 9th Wood Plank embossing folder
Lawn Fawn Little Woodland Library stamps and dies
Lawn Fawn Sentiment Strip die
Embossing & Watermark ink
Embossing powder – white
Anti static bag
Blending brushes
Lawn Fawn dye inks
Foam tape, squares and strips
Liquid glue

I appreciate you sharing your time with me. Have a fabulous day!

Doodlebugs – Spooky Wishes

Hey friends! I interrupt your regularly scheduled summer fun for some spooky wishes featuring the Mama Elephant Halloween awesomeness that recently released! If you’ve been here for just a minute, you know Halloween is my favorite and any excuse to create for it has me ALL IN!

I had a general idea that I wanted to create a big sentiment with the adorable mummies and witches around and in the letters somehow. So I started with my background to set the tone and choose my color palette…perfect summerween colors! I used the Pretty Pink Posh Layered Stars stencil set on pink cardstock to start off with. I used Lawn Fawn carrot and jet black inks.

Next, I adhered white cardstock to craft foam and covered the back with adhesive sheet. Then I die cut my sentiment using the Lawn Fawn Henry’s ABCs die set. This gave instant dimension with less work than cutting each letter 4 times and gluing them together. After arranging my letters together I chose a Spellbinders Emerald Cut Label die to cut from vellum as a backdrop.

Now that I had a general placement and size of open space, I chose a couple of mummies and a witch from the new Mama Elephant sets – Mummified and Bewitched. I stamped, colored and die cut them, then adhered each mummy with foam squares and the witch with liquid glue.

Hiding adhesive behind the letters and images, I adhered the vellum panel with tape runner to the stenciled background. Next, I used liquid glue to adhere the whole thing to a card base.

For finishing touches I added orange glitter brush pen to the sentiment and white gel pen highlights to the images.

On a scale from 1 to spooky, how much do you love crafting for Halloween?

Products used:
Mama Elephant Mummified stamps and dies
Mama Elephant Bewitched stamps and dies
Pretty Pink Posh Layered Stars stencils
Spellbinders Emerald Cut Labels dies
Blending brushes
Lawn Fawn inks – carrot and jet black
Liquid glue
Adhesive sheets
Craft foam
Foam squares
Tape runner

I appreciate you sharing your time with me. Have a fabulous day!

Doodlebugs – Beach Vibes

Hey friends! I’m in full beach mode these days, loving all the new beach themed goodies coming out and having fun pairing them with some favorites I didn’t get enough of from previous years!

For today’s card, I got inky and splattery and loved every moment of it! I started by playing around with the Waffle Flower Beach Tote. I cut all the pieces, stamped my towel stripes and heat embossed my sentiment. Then I used liquid glue to adhere it all together.

To create my beach scene, I cut a couple pieces of kraft cardstock using the Lawn Fawn hillside borders and splattered them with brown ink and white paint for that sandy look. Then I cut a piece of cardstock with the Pretty Pink Posh Pierced Scallops cover die and splattered it with distress oxide spray and white paint.

When everything was dry, I glued the back layer of sand to the sky panel and then popped the beach tote up with foam tape. Next, I added the front layer of sand with a combo of liquid glue and foam squares.

Finally, I glued the whole thing to a card base and finished the design off with glossy accents on the sunglass lenses.

Now, who’s ready for a trip to the beach? ME!!!

Products used:
Waffle Flower Beach Tote Combo
Pretty Pink Posh Pierced Scallop cover die
Lawn Fawn Hillside Border dies
Foam tape and squares
Liquid glue
Glossy accents
Lawn Fawn walnut ink
White paint
Distress Oxide Spray – mermaid lagoon

I appreciate you sharing your time with me. Have a fabulous day!