Miss Ink Stamps – Stencil Release Day | Rainbow Hello

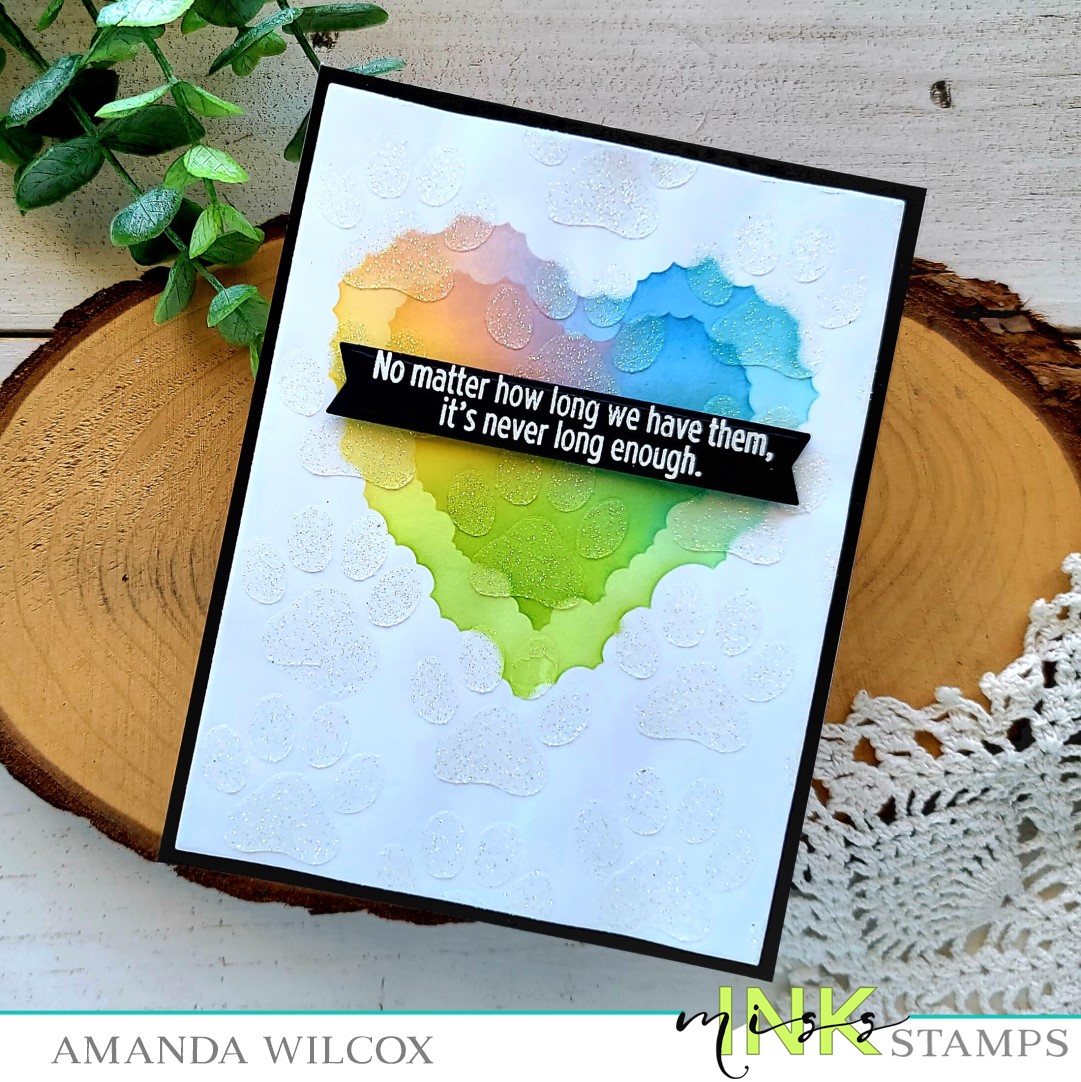
Hey there! Today is a fun stencil release day for Miss Ink Stamps. I wanted to share one of a billion ways to use the new wonky scallop stencil. I inked it up horizontally today on a portrait card front in rainbow colors!

The design of this stencil makes masking super quick and easy to get these rainbow lines. I seriously want to make 100 of these cards and give them to everyone! It’s just so happy!

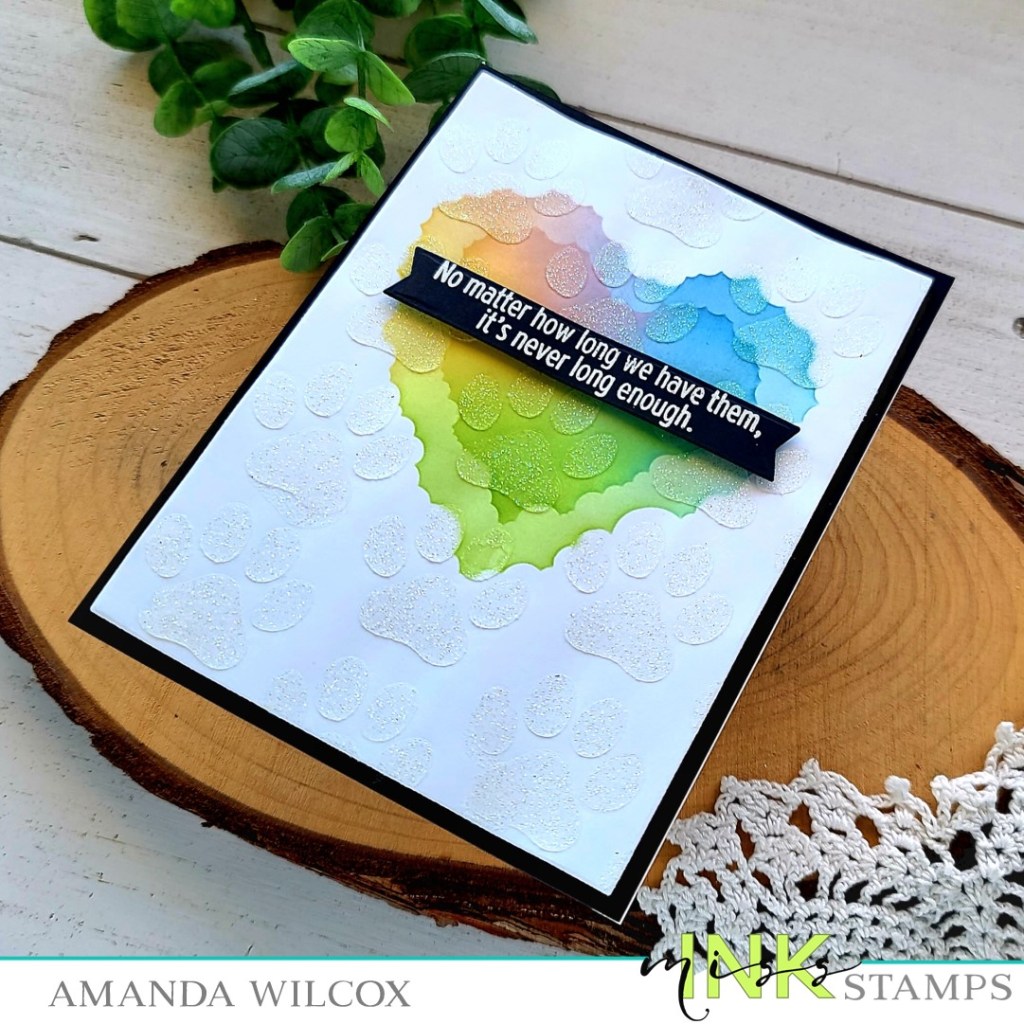
After I inked up my rainbow, I layered the starry night stencil over the top and spread iridescent glitz glitter gel through that. I just love stencil layering like this where it’s subtle but adds so much interest to the design.

Once that was dry I trimmed the panel down to 4×5 1/2 inches and layered it on a piece of gray cardstock that is 4 1/8×5 3/8. Then I added that to a white card base.

For my sentiment, I die cut “hello” using the Ei-ei-o word dies three times from white cardstock and once from white glitter cardstock and used liquid glue to adhere the layers together. I used my grid mat and post-it tape to line them up how I wanted, added liquid glue to the back and placed them on the card front.

Last, I stamped and heat embossed a sentiment from Sunshine and Rainbows in white on black cardstock, trimmed it into a strip and popped it up with a foam strip. Then my card is all finished. The glitz background and glittery letters add so much that I didn’t think any “finishing touches” were needed.

I call this a sherbet rainbow and it is my absolute most favorite thing ever! These colors make me so happy. I hope you like them too!

Products used today:
Wonky Scallop stencil
Starry Night stencil
Ei-ei-o Word dies
Sunshine and Rainbows stamps
Glitz glitter gel – iridescent
Stencil Pal
Foam strips
Blending brushes
Lawn Fawn dye inks

There’s a fun giveaway for the release so head over to the Miss Ink Stamps Instagram for all those details.

I appreciate you sharing your time with me. Have a fabulous day!

Miss Ink Stamps – You Are Fierce

Hello friends! Today I have a little inspiration featuring that fabulous tiger from the new Miss Ink Stamps Jungle Friends stamp set. I finally had a moment to play with one of the new stencils too and tried a new idea for extra texture.

I started by stamping and coloring my image with copic markers. Then I cut a strip of green cardstock and inked up the new Boho Blocks stencil with a darker green ink. For a little bling and texture I took gold glitz glitter gel and randomly spread it through the stencil in various areas. I cleaned up and set this panel aside to dry while I worked on some more stamping.

Next, I cut an A2 piece of kraft cardstock and chose my sentiment. I positioned it in the middle left of the panel and stamped it with brown ink, using my MISTI. I just shifted my cardstock 1/4 inch and kept stamping until the whole line was complete. Then I took a piece of white cardstock and stamped it in black once. I cut this out with a banner from Trinity Stamps 4-Bar Card dies and added a foam strip to the back.

I found some fun gold striped washi tape in my stash so I added it to the right side of the kraft panel before popping the green stenciled panel up with foam tape. Then I added foam squares to the back of the tiger and popped him in place. For the sentiment I just lined the banner up with one of the lines I already stamped so it flows perfectly and trimmed off the excess.

For finishing touches I just added black glaze pen to the tiger’s eyes and glossy accents to his nose. I glued the whole panel to a white card base and it’s all finished.

Products used:
Miss Ink Stamps Jungle Friends stamps
Miss Ink Stamps Boho Blocks stencil
Trinity Stamps 4-bar Card dies
Foam strips, squares and tape
Glitz glitter gel – gold
Glossy accents

I appreciate you sharing your time with me. Have a fabulous day!

Miss Ink Stamps – It’s a Jungle Out There

Welcome everyone! Today I have an atypical style card to share with you featuring more from the newest Miss Ink Stamps release. These critters and all the fun supporting images just don’t get old and I haven’t been able to create with everything yet so I’m not even close to done!

Last weekend I was out of town for my daughter’s State Championship competition for dance. Thinking ahead and knowing I would have lots of down time while the team prepared I stamped some images and packed my Zig Clean Color Real Brush Markers with me. Typically I reach for copics but they don’t travel as well as my Zig collection. I had some wonderfully relaxing time watercoloring and created my card once I was home.

I chose images from Jungle Ruins, Go Bananas and Pretty Bird. Not everything made it on today’s card but now I have a little tray full of images ready to create with this weekend when I hit the craft room again!

To create this card, I cut the background image down with a Pink & Main Layered Rectangle die and cut a black panel one size larger. I adhered the black panel to a white card base and popped the image panel up with foam tape. Then I used the same rectangle die to cut the edge of the ruins image off so they matched and popped it up with foam squares. I also added one extra monkey with foam squares too.

I stamped and heat embossed a sentiment on black cardstock and used the same rectangle dies to cut it out. I adhered it with foam squares to help it stand out. Then, for finishing touches I glued down a scattering of confetti embellishments from Trinity Stamps across the design.

Once that was all finished I thought it was lacking so I went back to my pre-colored images and found the flowers from Pretty Bird and thought that bright red/orange pop of color was perfect! So I used liquid glue and adhered those in various places around the scene too.

I hope you’re enjoying inspiration from this fantastic release!

Products used today:
Jungle Ruins stamps
Pretty Bird stamps
Pink & Main Layered Rectangle dies
Trinity Stamps Glass Slipper confetti mix
Foam tape and squares
Liquid glue

I appreciate you sharing your time with me. Have a fabulous day!

Miss Ink Stamps – Jungle Kids Scene Card

Welcome everyone! Thanks for stopping by. Today I have a scene card featuring a couple of newly release sets from Miss Ink Stamps. These new sets are just so fun to create with. I love sitting and coloring all the images and just playing out little stories in my head.

Today I stamped a couple of images from Jungle Kids and colored them with my copic markers. I used the scan-n-cut to cut them out and set them aside. I stamped the main scene image from Jungle Ruins and used blending brushes and dye ink to fill in the scene.

Once I had the main color laid down I went over the whole thing with some tea dye distress ink to give it a dirty, rustic feel…more jungle-like to me. I spritzed the panel with water and flicked watered down tea dye ink on it too. However, how my images have a stark white edge that looks funny so I took the blending tool and just inked them up too. It’s perfect and makes them fit the scene so well!

I chose a sentiment from Jungle Friends, stamped it and cut it out with a banner die before inking it up to match. Then I added foam squares to my images and sentiment and popped them all in place. I created a side folding card base and adhered my panel to the front. Then I tied twine around the left side and tied it in a bow. I seriously love how this finishes today’s card off! So perfect!

Products used today:
Jungle Kids stamps
Jungle Friends stamps
Jungle Ruins stamps

Blending brushes
Distress Ink – tea dye
Foam squares
Pink & Main Large Sentiment Strip dies

I appreciate you sharing your time with me. Have a fabulous day!

Miss Ink Stamps – You’re Mesmerizing!

Hello again everyone! I’m back with another bit of inspiration featuring the new Miss Ink Stamps release. Today I had fun with some layered stenciling and that fantastic snake from Jungle Friends!

I stamped and colored the snake with my copic markers. Then I used the scan-n-cut to cut him out. I stamped my sentiment which was totally the driving force behind today’s card. I just love it! Then I cut it out with a sentiment banner. I set those aside and moved on to my background.

I really wanted the snake to pop so I started with a back cardstock panel measuring 4×5.25 inches and taped the Ins & Outs Quatrefoil stencil in place. I inked it up with shabby shutters distress oxide ink and then taped the Lava Lamp stencil over the top and inked that layer up with forest moss distress oxide. I removed those stencils and clean them up. Then I switched to the frame from the quatrefoil set and spread Thermoweb grass green glitz glitter gel through that. I cleaned everything up and set the panel aside to dry.

Once it was dry, I added foam tape to the back and popped it on a white card base. Then I added foam squares and strips to my image and sentiment banner before adhering them in place too. For finishing touches I just added glossy accents to the snake’s eyes.

Isn’t this so fun and cool! These new sets are totally amazing and are making it really easy and fun to create masculine feeling cards. I have a hard time with that so I’m really excited!

Products used:
Jungle Friends stamps
Ins & Outs Quatrefoil stencils
Lava Lamp stencil
Distress Oxide Ink – forest moss, shabby shutters
Glitz Glitter Gel – grass green
Stencil pal
Foam squares and strips
Glossy accents
Trinity Stamps 4-Bar Card dies

I appreciate you sharing your time with me. Have a fabulous day!

Miss Ink Stamps – Release Day | Jungle Kids Interactive Card

Hello crafty friends! Today is release day for Miss Ink Stamps and I’m super excited to have a really fun interactive card to share with you. I am over the moon for this whole release and can’t wait to see what everyone creates with it!

To start my card, I stamped the images from Jungle Kids and colored them with my copic markers. Then I used the scan-n-cut to cut them all out. Next, I stamped my sentiment in two parts and cut them out with stitched banners.

To decorate my background, I die cut a scalloped mini slimline panel from Trinity Stamps and taped off the edge. I inked the center with tumbled glass distress oxide ink, then taped the Mouse Flower stencil over the top and inked it up with some blue dye inks and a blending brush. I faded it as I went down for added interest too.

To put my card together, I cut a hole in the top center to make room for my moving mechanism. I added foam tape to the back of the main panel and popped it on a kraft card base and added doubled-up foam circles to the hole I created. Next, I found a die that is essentially an “o” larger than my foam circles and cut it from white cardstock. I glued the vine to the bottom and slid the “o” over the foam circles. I removed the release paper from the foam circles and added the leaves over it and all around to hide the swinging mechanism. Before you add your leaves and such to the top, test out your foam square placement because this will also act as a stopper for your swinging from side-to-side.

Finally, I trimmed the sentiment banners and added them with foam squares too. I created a coordinating kraft mini slimline envelope and my card is all finished! Here’s a little GIF to show you the card in action. It’s super fun and easy to make!

Remember, it’s release day so head over to the Miss Ink Stamps shop and check it all out!

Products used today:
Jungle Kids stamps
Mouse Flower stencil
Trinity Stamps Mini Slimline Card and Envelope dies
Foam circles and squares

I appreciate you sharing your time with me. Have a fabulous day!

Miss Ink Stamps – New Release Sneak Peek | Jungle Friends

Hello again everyone! I’m popping in with a quick sneak peek of the upcoming Miss Ink Stamps release! OMG is it PACKED with so many amazing things! I can’t begin to tell you how excited I am to share it all with you.

Today I’ve got a card featuring the upcoming Jungle Friends and Jungle Ruins stamp sets. Isn’t this so amazing!?! I had so much fun creating this card! The images are so fun to color and I loved doing some simple ink blending on that awesome background image.

I used some Pink & Main dies to cut a frame and sentiment banner before adhering all the layers together. The images and banner are popped up on foam squares and I couldn’t resist a little glossy accents on those critter noses!

Head to Instagram and comment on each post on the Miss Ink Stamps page from Friday until Tuesday, when the release goes live, for a chance to win stamps from the new release!

I’ll be back Tuesday, release day, with a super amazing interactive card using another set from the release. You won’t want to miss it!

I appreciate you sharing your time with me. Have a fabulous day!

Miss Ink Stamps – Good Day to be Happy

Welcome everyone! It’s been a very busy week and I’m super excited to share all the things I’ve been creating. For today I have a brilliant card using Miss Ink Stamps Bubbles stamps and dies and a few stencils layered together to create an awesome background!

I started by stamping and coloring some images from Bubbles with my copic markers. I used the coordinating dies to cut them out and then set them all aside while I got inky. I started by taping my cardstock to the masking layer of the Ins and Outs Marquis stencil. Then I added the Random Dots stencil over the top and inked it with a light teal ink. I removed that and switched it for the Large Random Dots stencil and spread Thermoweb transfer gel blanco through that one. I set the panel aside to dry and cleaned up my mess.

Coming back later on, I heated up my laminator and ran the panel through with pearlescent deco foil transfer sheet and it turned out amazing! After that, I layered the border for the Ins and Outs Marquis over the top and blended a darker teal ink for that. Then I started playing with placement for my images and digging for a sentiment.

I added my images with a combination of liquid glue and foam squares. Then I stamped and heat embossed a sentiment from Sunshine and Rainbows, trimmed it into a strip and popped it up with foam squares too.

For finishing touches, I added unicorn Stickles to the bubbles and called it good. There is so much interest in the background that makes those sweet foxes pop, I didn’t think it needed much else.

Products used today:
Bubbles stamps and dies
Ins and Outs Marquis stencils
Large Random Dots stencil
Random Dots stencil
Sunshine and Rainbows stamps
Thermoweb transfer gel blanco
Stencil Pal
Deco Foil – pearlescent
Foam squares
Stickles – unicorn

I appreciate you sharing your time with me. Have a fabulous day!

Miss Ink Stamps – Pet Sympathy Card

Hello friends. Today I have a bit of a somber card to share with you. It’s one of those things that we have to create and they are horrible to make when you actually need them. So, I try to sprinkle them in here and there when something strikes me and keep a small stash to use when they are needed.

Today I’m using Miss Ink Stamps stencils and a sentiment stamp set to create a pet sympathy card. The stamp set lends to cats or dogs but I did kept mine generic since it’s not for a specific reason.

I started by inking up both layers of the Cloud Hearts stencils in a rainbow fashion. In my mind this was like the reference to animals crossing the rainbow bridge. Once both layers were completed, I removed those stencils and taped down the Big Paws stencil and spread Lawn Fawn fairy dust stencil paste through it for a subtle glittery look of paws over the whole card front.

I set that aside to dry and got the other layers of my card ready. I cut a black piece of cardstock to A2 size and adhered it to a white card base. Then I stamped and heat embossed a sentiment from Pet Sympathy stamps set on black cardstock and cut it out with a sentiment banner.

After the panel was dry, I trimmed it down to 4×5.25 inches and popped it up with foam tape on the card front. Next, I popped up the sentiment banner too.

Today, I also stamped a secondary sentiment on the inside. I chose to do it in 2 colors so they could overlap a bit and then also stenciled one paw using the same Big Paws stencil to tie the front in to the inside a little more.

Products used today:
Miss Ink Stamps Cloud Hearts stencils
Miss Ink Stamps Big Paws stencil
Miss Ink Stamps Pet Sympathy stamps
Lawn Fawn fairy dust stencil paste
Stencil pal
Foam tape
Pink & Main Large Sentiment Strip dies

I appreciate you sharing your time with me. Have a fabulous day!

Miss Ink Stamps – So Many Candles…

Happy Thursday everyone! Today I have a bit of Miss Ink Stamps birthday inspiration to share with you. We all need birthday cards from time-to-time and this is a fun one you could customize with the number of candles or even a certain color scheme too.

For my card, I stamped the gnome fireman from Perfect Match and the two candles with flames – lots of candles! I colored it all with my copic markers and used the scan-n-cut to cut it all out.

I took an 4×5.25 inch piece of white cardstock and inked the bottom portion with tea dye and a teeny bit of gathered twigs distress oxide ink to create a cake. Then I inked up a scrap strip of white cardstock with kitsch flamingo and a bit of picked raspberry. I cut the edge of the pink with a Trinity Stamps Celebration Borders die that looks like cake frosting. When I was laying it all out I wanted the look of more candles so I stamped some in the background before layering the frosting on. I used liquid glue to adhere the frosting and then arranged the colored candles on top of that.

I added foam squares to my gnome fireman and popped him in place on the lower left corner of the panel. I die cut a ticket using the Newton’s Nook Framework dies and inked it up the same as the frosting before stamping my sentiment on it and popping it up too. Last, I added foam tape to the whole panel and added it to a white card base.

For finishing touches I added unicorn Stickles to the candle flames and glossy accents to the candles and gnome fireman.

Such a fun little card! I think it would be so fun to make one for a milestone birthday and have the exact number of candles too!

Products used:
Miss Ink Stamps Perfect Match stamps
Trinity Stamps Celebration Borders dies
Newton’s Nook Framework dies
Foam tape
Glossy accents
Stickles – unicorn
Distress Oxide Ink – kitsch flamingo, picked raspberry, tea dye, gathered twigs
Copic markers

I appreciate you sharing your time with me. Have a fabulous day!