Miss Ink Stamps – Peace and Joy

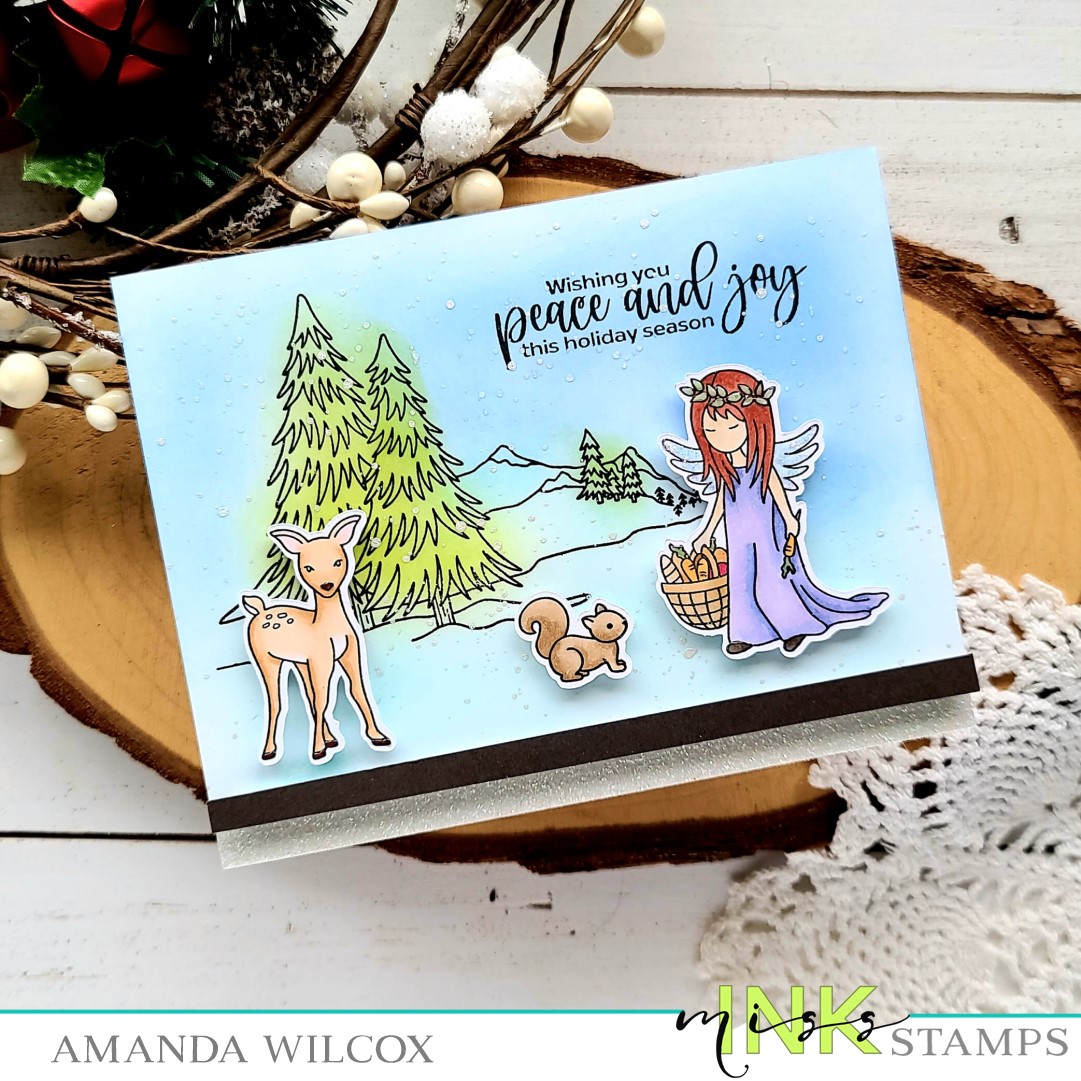
Welcome back friends! Today I’m sharing a sweet Christmas card featuring a couple of sets from Miss Ink Stamps. I love the variety of background scene setting images Miss Ink carries and her critters and characters are amazing to go with them!

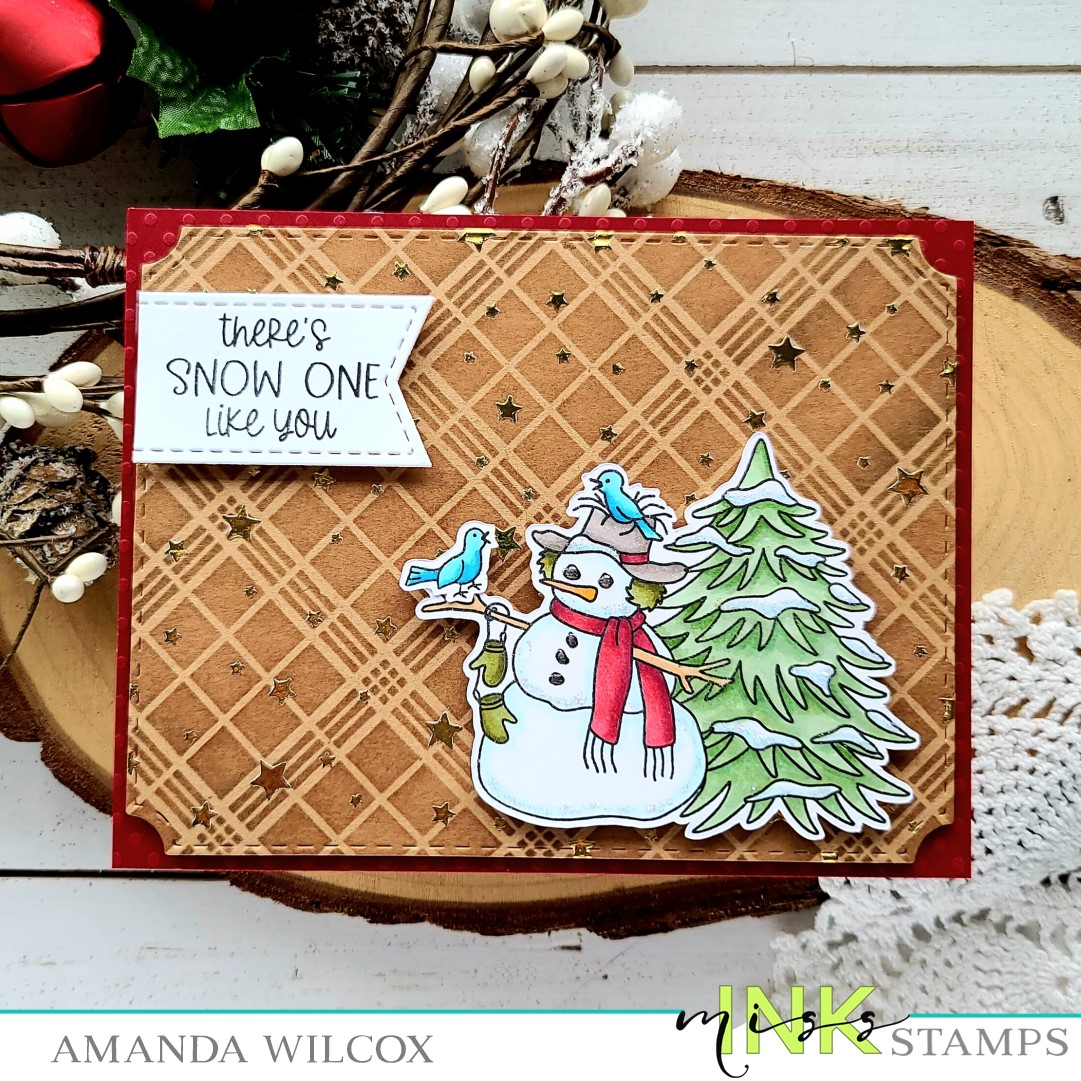
Today I chose the Mountainside stamp for my background. I inked it up on a white panel and then used my blending buddy brushes and some Lawn Fawn dye inks to color in the scene. I stamped a sentiment from Little Angel in the top right corner and switched over to my images.

I chose a few images from Little Angel which I stamped and colored with my copic markers. Then I used the scan-n-cut to cut them out and added foam tape to the back. I thought the background was a little lacking so I splattered pearl watercolor over the scene before adhering it to a white card base. This panel is 5.5×4 inches so there was room for a white glitter cardstock strip at the bottom. Then I added a dark gray strip over the meeting of the two with foam strips.

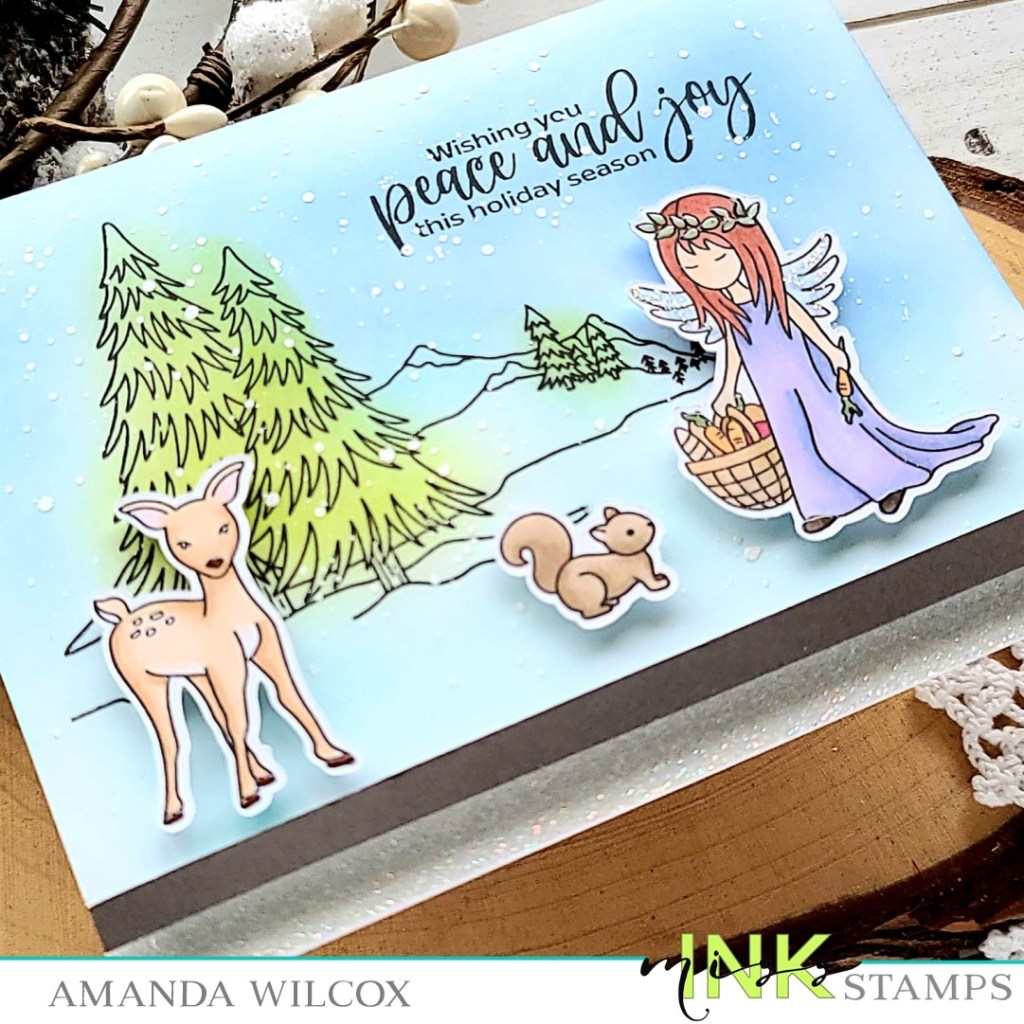
Finally, I added my images and moved on to finishing touches. For that, I just added a little glossy accents to the deer and squirrel noses, carrot stems and the wreath on the angel’s head. Then I finished things off with some unicorn Stickles on her wings.

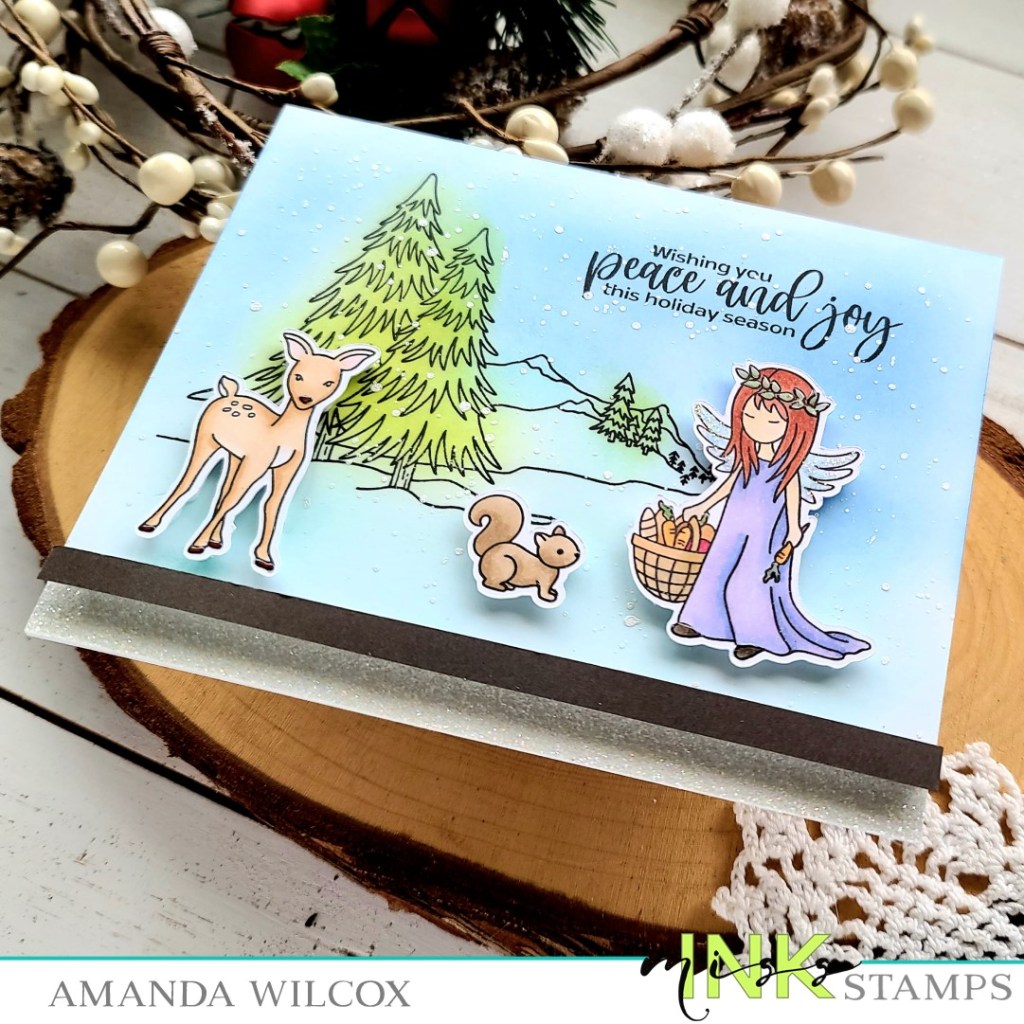
I just love how serene this scene feels and think it will be a wonderful addition to my Christmas card stash to mail out. Have you started making Christmas cards yet? It’s going to sneak up on us super quick, I just know it!

Products used today:
Little Angel stamps
Mountainside stamps
Blending Buddy brush
Lawn Fawn ink – cilantro, mermaid, kiddie pool, blue jay
Foam strips
UltraBond liquid adhesive

I appreciate you sharing your time with me. Have a fabulous day!

Miss Ink Stamps – Snow One Like You

Hello friends! Today I have a festive, wintery card for you featuring stamps and stencils from Miss Ink Stamps. I paired an older stencil, Starry Night, with one of the new releases, Perfectly Plaid. Layering stencils is seriously addicting. I just love mixing and matching them in different cominations.

I actually started my card today by playing with the background first. I inked up the perfectly plaid stencil on kraft cardstock with a brown ink. Then I went over that with the starry night stencil and Thermoweb transfer gel blanco. I set it aside while I decided what images I was going to color up today.

Feeling that Christmas vibe, I stamped and colored the images from Snow One Like You with my copic markers. Then I cut them out with my scan-n-cut. I stamped the sentiment on white cardstock and cut it out with a stitched banner. I heated up my laminator and pulled out some gold decofoil to use on the stenciled panel. Once the laminator was all heated up I ran it through. Then I die cut the panel with a notched corner die from Pink & Main and added foam tape to everything.

I adhered some red cardstock to a white card base and then removed the release paper from the foam squares and tape and popped everything in place, one layer at a time.

Because we all know I can’t leave well enough alone, I added some fun finishing touches next. Glossy accents were in order for the snowman’s eyes and buttons, while the snow was just calling for some glittery Stickles.

I love the rustic feel this card has with the combination of plaid, the color palette and the feel of the images too. It’s perfect!

Products used today:
Snow One Like You stamps
Starry Night stencil
Perfectly Plaid stencil
Newton’s Nook Frames & Flags dies
Pink & Main Notched Corners dies
Thermoweb transfer gel blanco
Thermoweb stencil pal
Thermoweb decofoil – gold

I appreciate you sharing your time with me. Have a fabulous day!

Miss Ink Stamps – Stencil Week | Autumn Greetings

Hello everyone! It’s time for a super fun stencil release for Miss Ink Stamps! There’s a giveaway over on the Miss Ink Stamps Instagram page but before you head there let me share some fun inspiration with the new Fall Mandala stencil and my favorite little squirrels!

To create my background, I inked up an oversized white panel with gathered twigs and tea dye distress oxide inks. Then I sprayed my fall mandala stencil with pixie spray and stuck it to my panel off center a bit. I inked the stencil up with brown dye ink and then removed it. I splattered the panel with gold watercolor and set it aside to dry.

Next, I stamped and colored one of the squirrels from Oh, Nuts! with my copic markers. I used the scan-n-cut to cut it out and added foam squares to the back. Now that my panel is dry, I used an A2 rectangle to cut it down and adhered it to a white card base. I popped it in my MISTI and stamped a sentiment from Autumn Thanks in the top left corner.

Finally, I added my squirrel and his leaves. Then for finishing touches I added black glaze pen to his eyes and nose. After the black was dry I came in with a white gel pen accent on the eyes.

My main focus on today’s card was to add to the stencil and let it shine. I think everything turned out pretty great! Don’t you?!?

Products used today:
Oh, Nuts! stamps
Fall Mandala stencil
Autumn Thanks stamps
Pink & Main Layered Rectangle dies
Thermoweb Pixie Spray
Thermoweb foam squares

Thanks for hanging around this long. Now, head over to the Miss Ink Stamps Instagram and enter to win!

I appreciate you sharing your time with me. Have a fabulous day!

Miss Ink Stamps – FaBOOlous Slimline

Hello everyone! I’m so happy to finally share this super fun Miss Ink Stamps ghostie slimline card with you. I just love this stamp set and was so happy how this card turned out. I hope you like it too!

I had a general layout in mind for this card so I stamped the ghosts and large BOO sentiment and used the scan-n-cut to cut them out. Then I stamped and trimmed the other sentiment into a strip. I just used a B0000 copic marker around the edge of the ghosts for a little glowing look. Then I moved over to creating that fun background.

I die cut a stitched slimline panel from black cardstock and used a blending brush with white pigment ink over the Starry Night stencil. Then I inked up the edges of the panel with the ink left on my brush. Then I offset the burst layer from the Rainbow Sky stencil, inserted the circle so it was covered up and spread orange glitz gel through the stencil. I set the panel aside to dry and worked on the base panel.

For this I trimmed a piece of cardstock to 8.5×3.5 inches and inked up the edges with twisted citron distress oxide ink. I spritzed it with water and flicked black acrylic paint all over it.

Once both panels were dry I was ready to assemble my card. I started by adhered the green panel to a white card base. Then I popped the black panel up with foam tape. Next, I used foam squares to adhere the sentiments and one ghost and liquid glue to adhere the other.

Then, voila, my card is all finished! Isn’t it so much fun!?! I love these ghosts so much! Plus all the accessories you can have them hold AND don’t even get me started on all those awesome punny sentiments! So great!!! I love it all!

Products used today:
Miss Ink Stamps Boo Sheet stamps
Miss Ink Stamps Halloween Sentiments stamps
Miss Ink Stamps Starry Night stencil
Miss Ink Stamps Rainbow Sky stencils
Trinity Stamps Slimline Stitched Card Panels and Windows dies
Trinity Stamps Blending Buddy Brushes
Distress Oxide – twisted citron
Thermoweb Glitz Glitter Gel – orange
Stencil pal
3D foam tape

I appreciate you sharing your time with me. Have a fabulous day!

Miss Ink Stamps – Feline Spooky

Hello everyone! Today I’m over on the Miss Ink Stamps blog with more Halloween goodness featuring the most recent release goodies! I had so much fun putting this card together. Layering stencils and getting inky! It was so great!

I started by stamping and coloring the main image from Feline Spooky with my copic markers. I used the scan-n-cut to cut it out and also stamped and die cut a sentiment banner to go with them.

Next, I took a white cardstock panel and inked it up with seedless preserves, dusty concord and black soot distress inks. I added the Ins & Outs Hollywood stencil over the top and added another layer of seedless preserves before layering the floral wave offset stencil over the top and inking that with dusty concord. All these layers add for a really cool color effect!

Next, I swapped out all the stencil layers for the Ins & Outs Hollywood frame layer and spread Rina K Glitz Glitter Gel in Screamin’ Green! It just glows off this awesomely dark background!

After that was dry, I added it to a white card base and popped my image and sentiment banner up with foam squares. For finishing touches I added glossy accents to the kitty eyes and various parts of each hat like stripes, buckles, etc.

Such a spooky fun card! I hope you enjoyed it!

Products used today:
Feline Spooky stamps
Ins & Outs Hollywood stencil
Floral Wave Offset stencil
Distress Ink – dusty concord, seedless preserves, black soot
Rina K Designs Glitter Glitz Gen – Screamin’ Green
Foam squares
Copic markers
Glossy accents

I appreciate you sharing your time with me. Have a fabulous day!

Miss Ink Stamps – Spook Up Some Fun Box Card

Thanks so much for stopping by today! I have a REALLY FUN box card featuring some Miss Ink Stamps ghosties that are just too cute for words! This set is adorable and the sentiments take it over the top!

To create my card, I stamped images from Boo Sheet and colored them with my copics. I used the scan-n-cut to cut them all out and adhered the supporting small images to each ghost with liquid adhesive.

Next, I cut the pieces of my box card with orange cardstock and the decorative panels from white cardstock. I inked up all the decorative panels with seedless preserves and blueprint sketch distress oxide inks. I spritzed them with water and flicked pearl and gold watercolor on them too. After they were dry, I used scrappy tape to adhere the box together.

I also used scrappy tape to add acetate strips to my ghosts and then adhere them to the different supports going across the inside of the box. I stamped a sentiment and trimmed it into a strip adhering it to the front of the box with liquid adhesive.

I didn’t like the texture my cutting plates left on the back of my box card so I cut another backing piece from white cardstock and adhered it with liquid glue so I have a clean white space on the back to write a fun message to the recipient too!

Products used on my card today:
Miss Ink Stamps Boo Sheet stamps
MFT Stamps Outside the Box Level Up dies
Distress Oxide Ink – blueprint sketch, seedless preserves
Scrappy tape – 1/4 inch
Ultra bond liquid adhesive
Copic markers

I appreciate you sharing your time with me. Have a fabulous day!

Miss Ink Stamps – Black is Such a Happy Color

Hahahaha!!! I’m playing with the newest Miss Ink Stamps release again and these sentiments just crack me up! Today I’ve chosen one from Feline Spooky and I can’t even begin to express how much I love it! These cats are fantastic for spooky Halloween settings, I love them!

Given the sarcastic nature of the sentiment I just had to use, I kept the rest of the card light and a little brighter. We wouldn’t want that awesome black cat to get lost!

For the background, I used the quatrefoil ins and outs stencil with a two tone orange background and layered the small alternating dots stencil over the top. Then I used black ink to blend in the quatrefoil border layer.

I popped the black cat from Feline Spooky up with foam squares, stamped and trimmed a sentiment from the same set. Matted it on a black cardstock strip and popped it up too. Then I thought it needed something else. So I trimmed the panel down to 4×5.25 and mounted it on black glitter cardstock from Pink & Main.

I adhered the whole thing to a white card base and finished things off with a little glossy accents on the kitty’s glowing eyes.

Seriously, if you haven’t checked out this whole release…click HERE now and go see. It’s fantastic!

Products used today:
Miss Ink Stamps Feline Spooky stamps
Miss Ink Stamps Quatrefoil In & Outs stencil
Miss Ink Stamps Small Alternating Dots stencil
Pink & Main black glitter paper
Glossy accents
Thermoweb 3D tape roll
Scrapbook adhesives foam squares

I appreciate you sharing your time with me. Have a fabulous day!

Miss Ink Stamps – Everything I Boo…

Hello there! Today I’m playing with the most recent Miss Ink Stamps Halloween release. It’s so stinking cut and super fun to create with. This time I’ve created a simple heart shaped card with a Halloween flair to it.

I stamped and cut out the ghosts from Kindred Spirits and just outlined the inside of them with a B0000 copic marker for that glowing look.

I started creating my card base with Trinity Stamps Nested Hearts dies by cutting the largest heart from black cardstock. Then I folded a piece of white cardstock in half and hung the same die over the top edge by about a 1/4 inch and cut it out. Then I glued the two pieces together. However, because the edge of the white card base was a teeny bit visible I took a black marker and went around the whole edge.

Next, I inked up a scrap of cardstock with distress oxide inks in carved pumpkin and seedless preserves. I sprized it with water and blotted it dry. Then I layerd the Hand Drawn Hearts stencil over top and spread black glitter glitz gel from Thermoweb through it. Once that panel was dry I added foam tape and centered it on the card base. Then I added foam tape to the ghosts and popped them up as well.

I really liked the simple look on the front of this card and didn’t want to muddle it with a sentiment so I stamped and trimmed one from the set, mounted it on a slightly larger piece of black cardstock and adhered it inside.

Just perfect for a significant other and it all fits in an A2 size envelope still!

Products used on today’s card:
Miss Ink Stamps Kindred Spirits stamps
Miss Ink Stamps Hand Drawn Hearts stencil
Trinity Stamps Nested Hearts dies
Distress Oxide – carved pumpkin, seedless preserves
Thermoweb 3D foam tape roll

I appreciate you sharing your time with me. Have a fabulous day!

Miss Ink Stamps – Release Day | Welcome Home

Hey! Hey!!!! It’s release day for Miss Ink Stamps! This Halloween release is beyond amazing and SO MUCH FUN!!! Today I’m sharing a card featuring the new set called Welcome Home and it’s just adorable plus it’s packed with super fun sentiments too!

I started by stamping my critters and coloring them with copic markers. Then I used the scan-n-cut to cut them all out. Next, I stamped the porch image from the set on a large piece of white cardstock and colored it with my copics as well. Then I die cut a Trinity Stamps Embossed Edge Rectangle from kraft cardstock and cut another from inside it to create a thick frame.

I adhred the scene panel to a card base and then added the frame next. For dimension and interest I added all of my critters with foam squares.

Then I chose two sentiments, stamped and trimmed them into strips and popped them up with foam strips as well.

For finishing touches I added glossy accents to various things all over the scene like lights, critter noses, pumpkin faces and such. Then I cam in with unicorn Stickles on other fun things like costumes.

This release is packed full of so many super fun sets so be sure to head over to the Miss Ink Stamps shop and have a look. Click HERE to get there.

Products used today:
Welcome Home stamps
Trinity Stamps Embossed Edge Rectangle dies
Stickles – unicorn
Glossy accents
Foam squares

I appreciate you sharing your time with me. Have a fabulous day!

Miss Ink Stamps – Boo Cats Sneak Peek

Happy weekend everyone! Today I’m popping in with a super fun sneak peek of the upcoming release from Miss Ink Stamps! I’m absolutely head over heels in love with it all! It’s so original and fun!

Today I’ve got these Boo Cats just dying to witch you a Happy Halloween! Hahaha! I love punny sentiments! They’re the best!

I matted these cute kitties on some Halloween colored stripes and neutral framing so they just pop and bring your eye right to them!

To finish things off I added glossy accents to the bands of all the hats and unicorn Stickles to the stars and moon on the center hat.

Release day is Tuesday, Sept. 21, so keep an eye out for more sneak peeks from the rest of the team and I’ll be back Tuesday with another fabulous card to share with you!

I appreciate you sharing your time with me. Have a fabulous day!