Miss Ink Stamps – Release Day

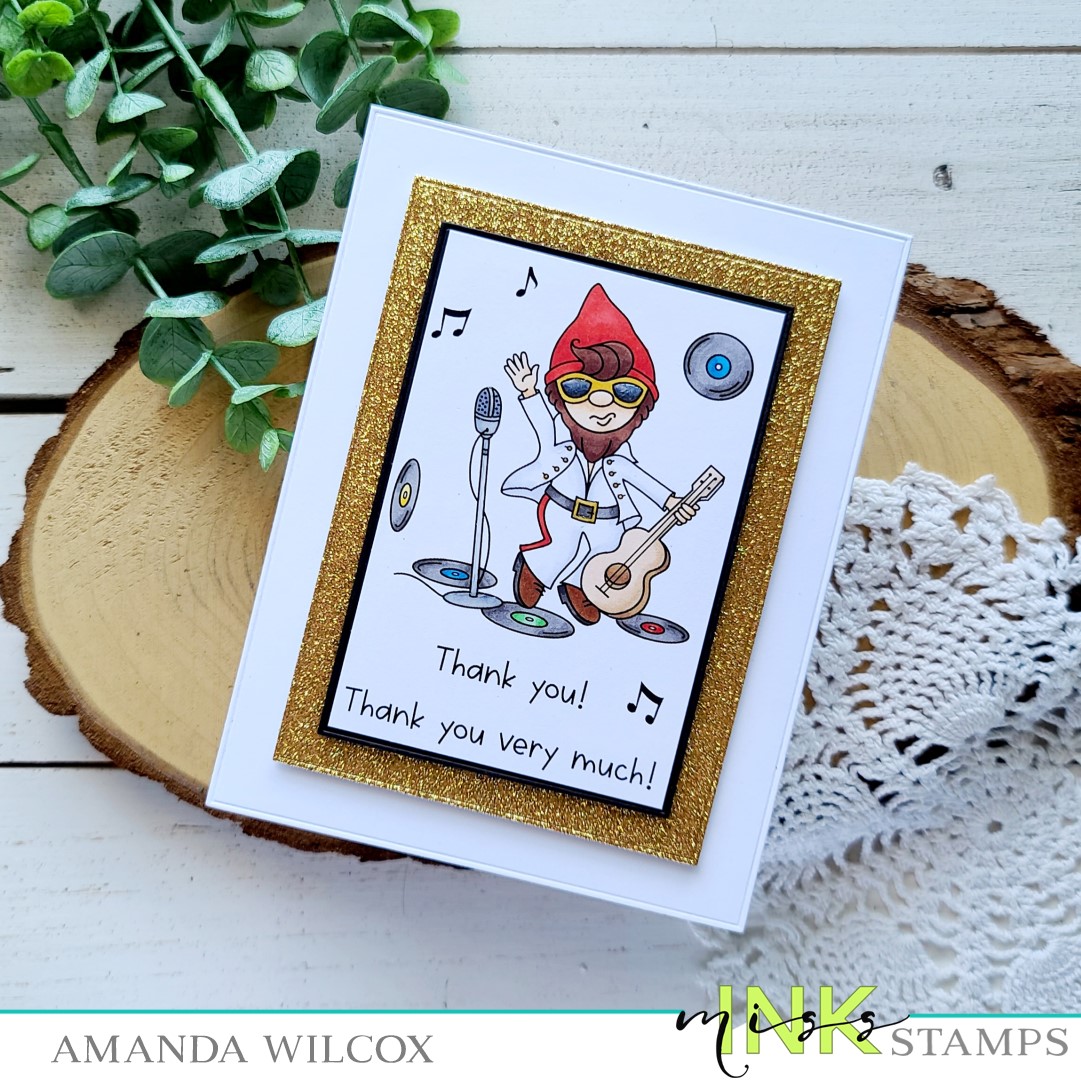
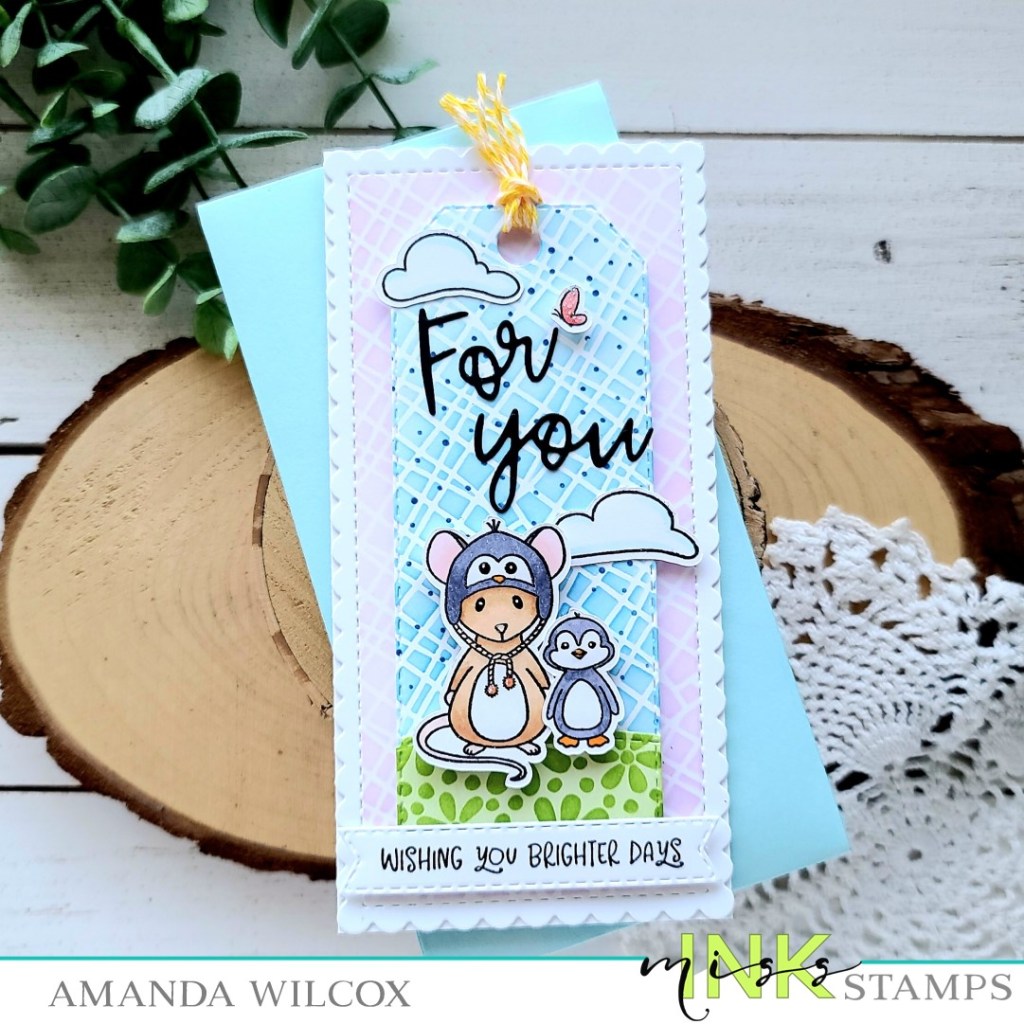
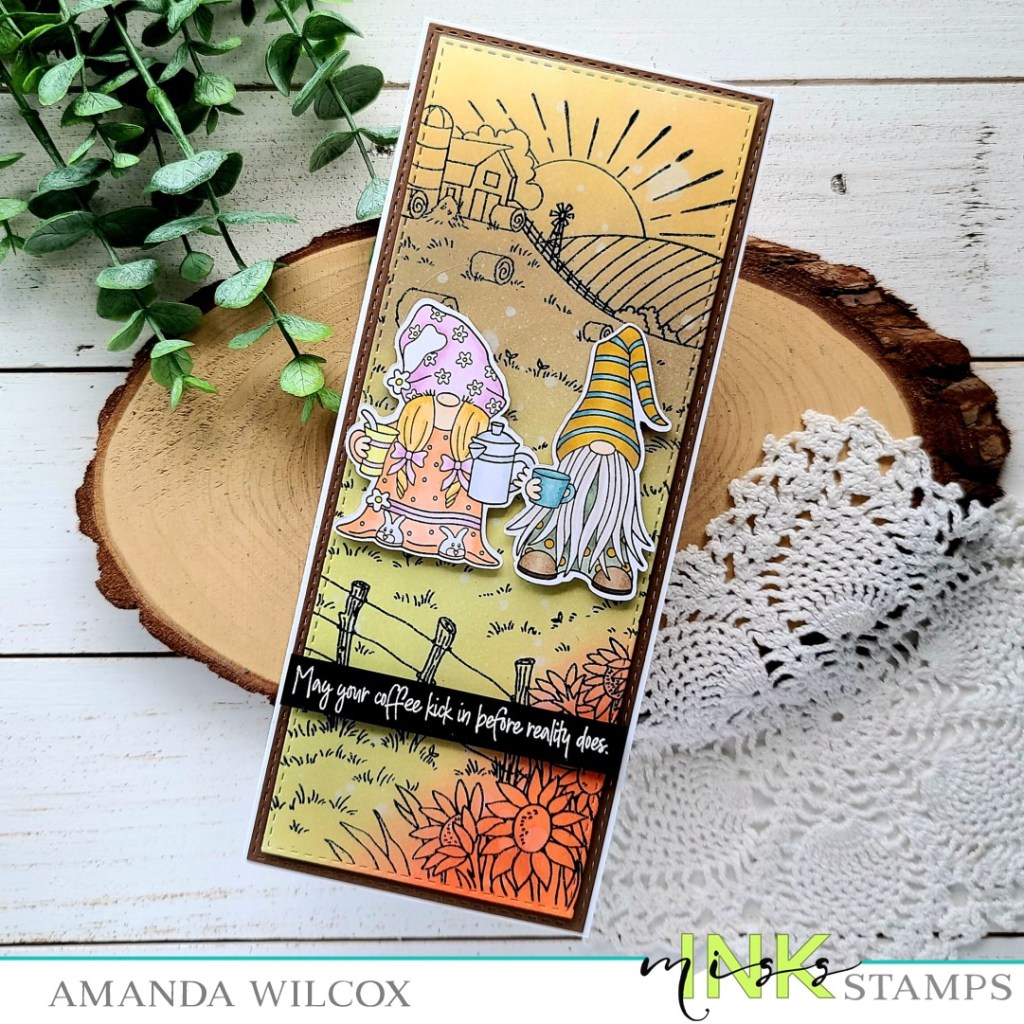
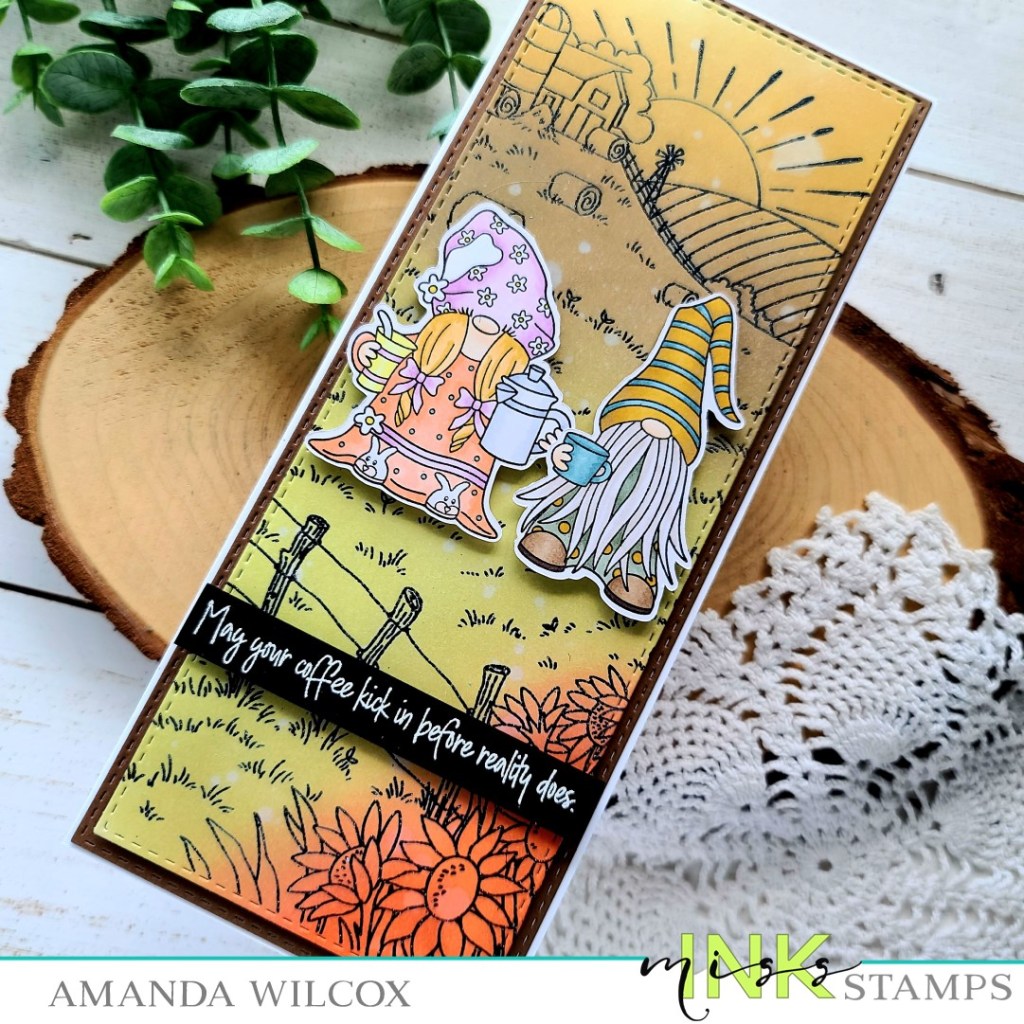
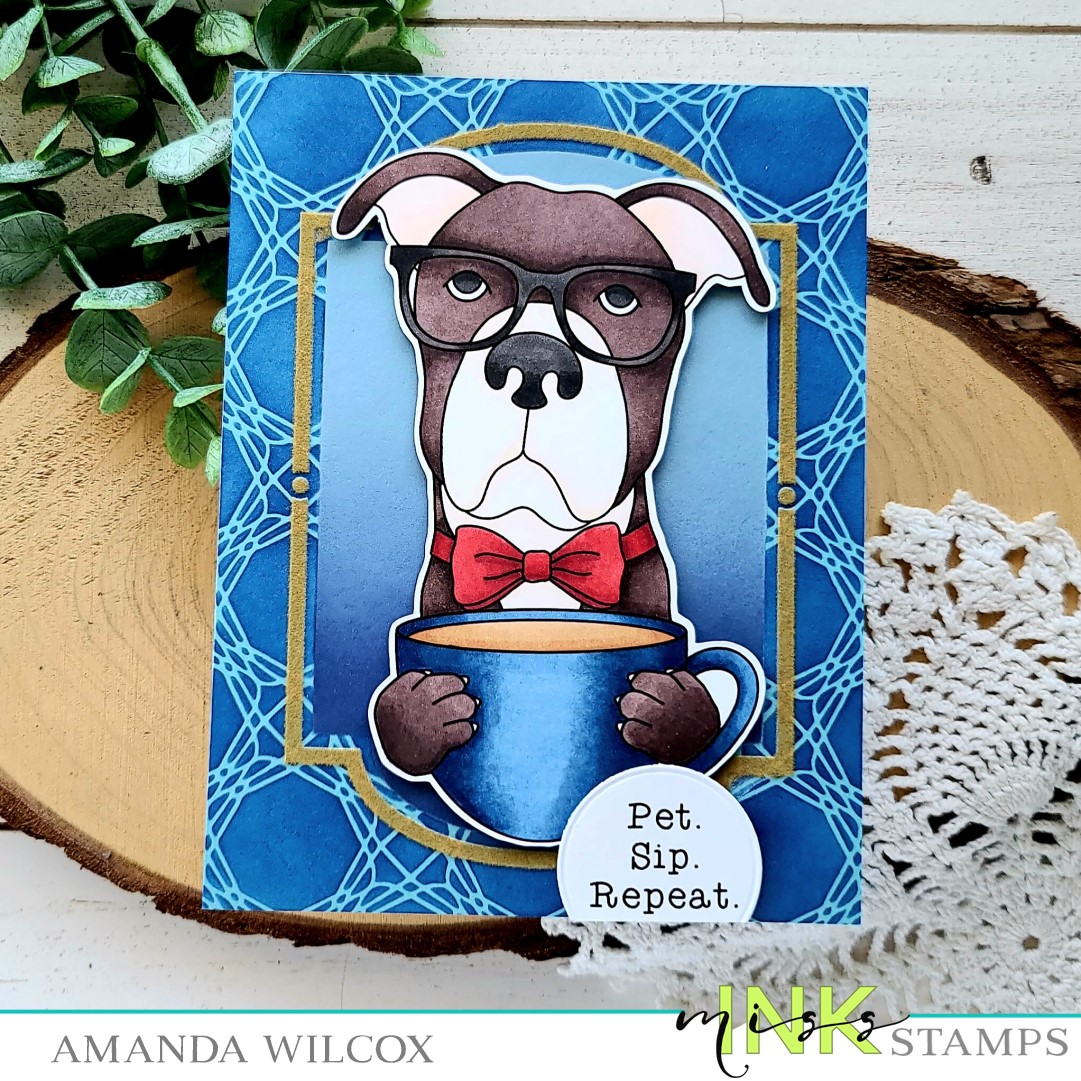
I am so excited to share that today is release day for Miss Ink Stamps and it’s so full of original and amazing stamps!!! I shared a peek earlier in the week of one of the new gnome stamps and today I have a card to share featuring the new Slim’s Whims. This pup is larger than life and soooo much fun t color and arrange with his different accessories! The sentiments are fantastic too!

I mean, look at that face! How could you not love him!!! There are so many color combination possibilities too which makes playing with this stamp set endless fun!

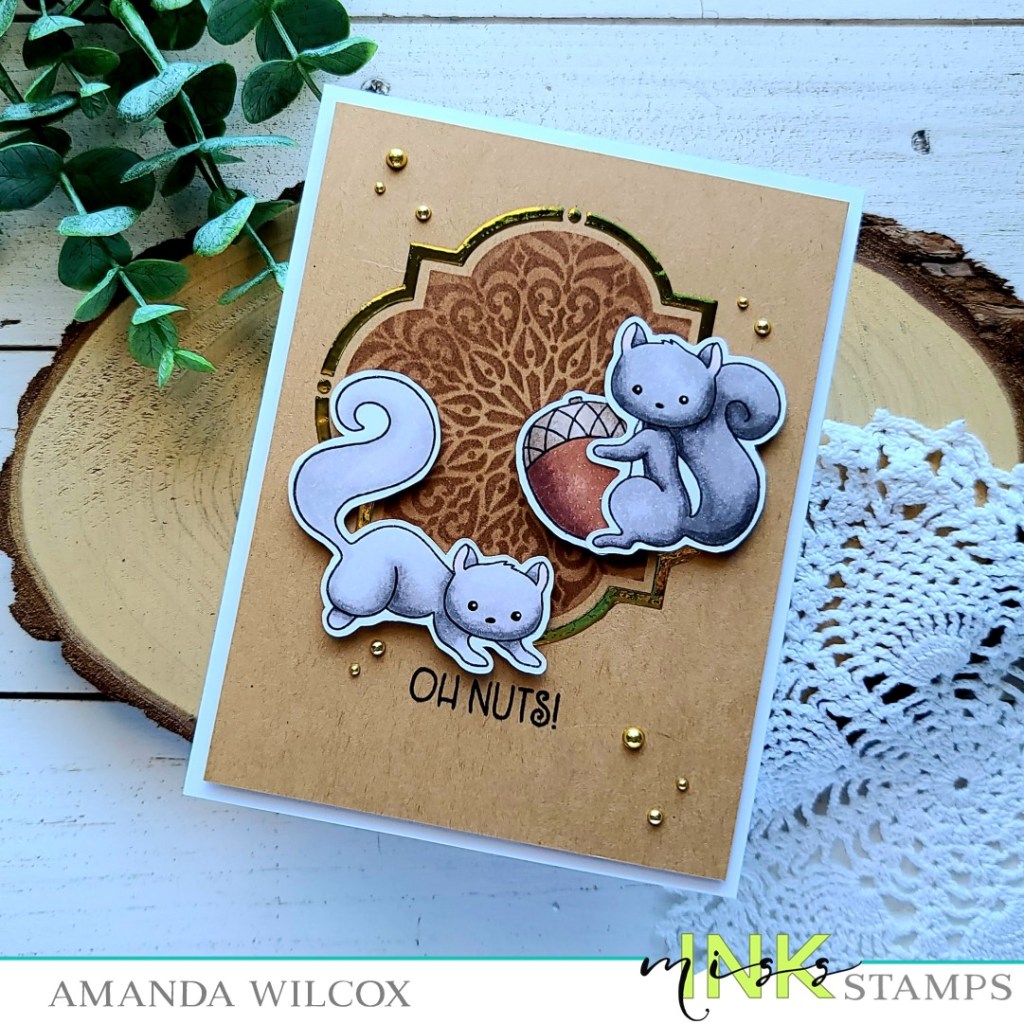
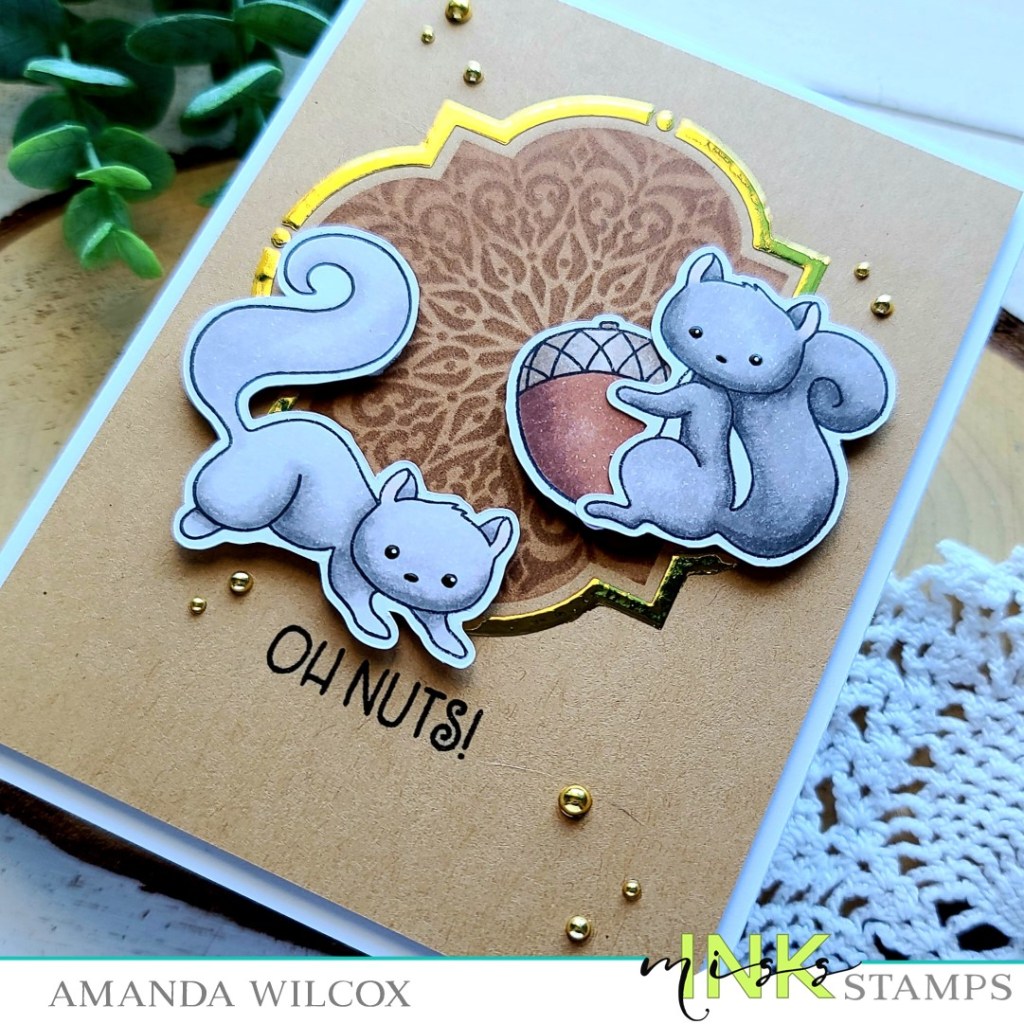
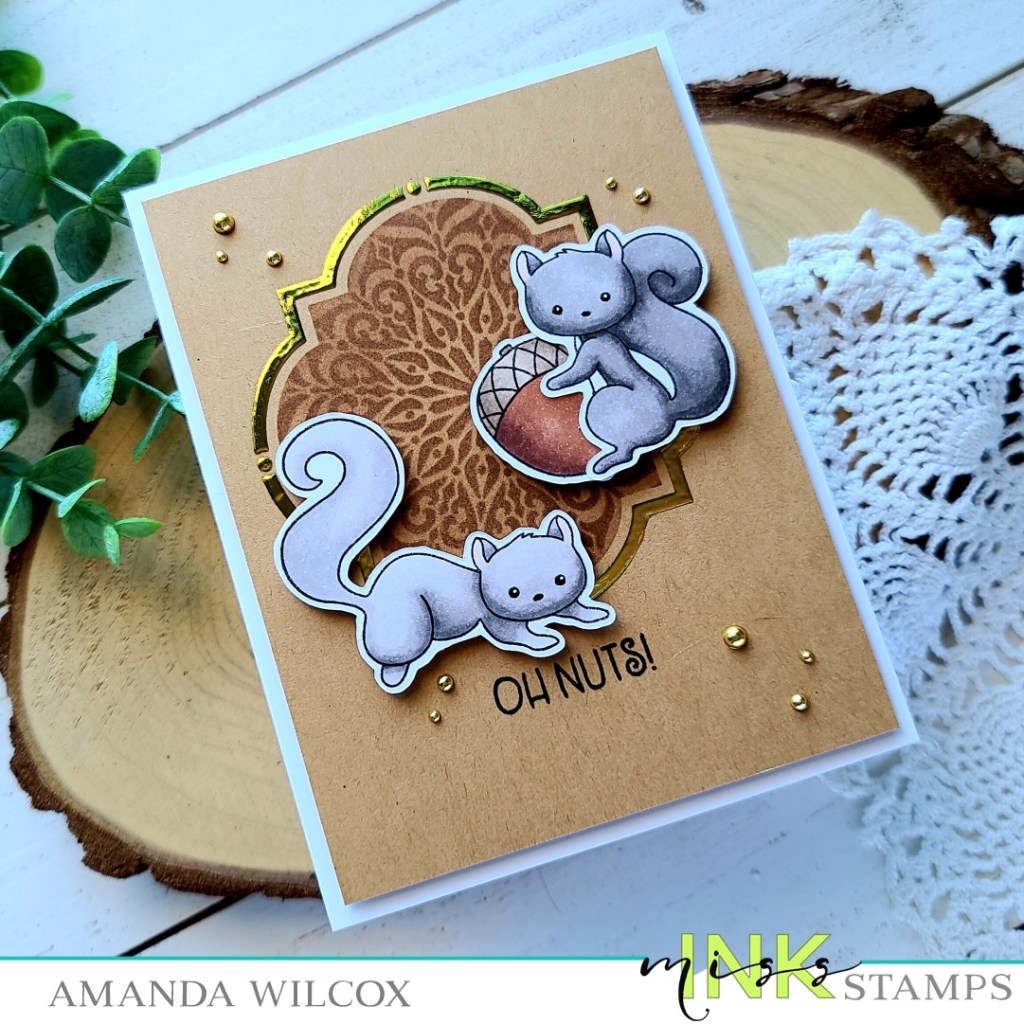
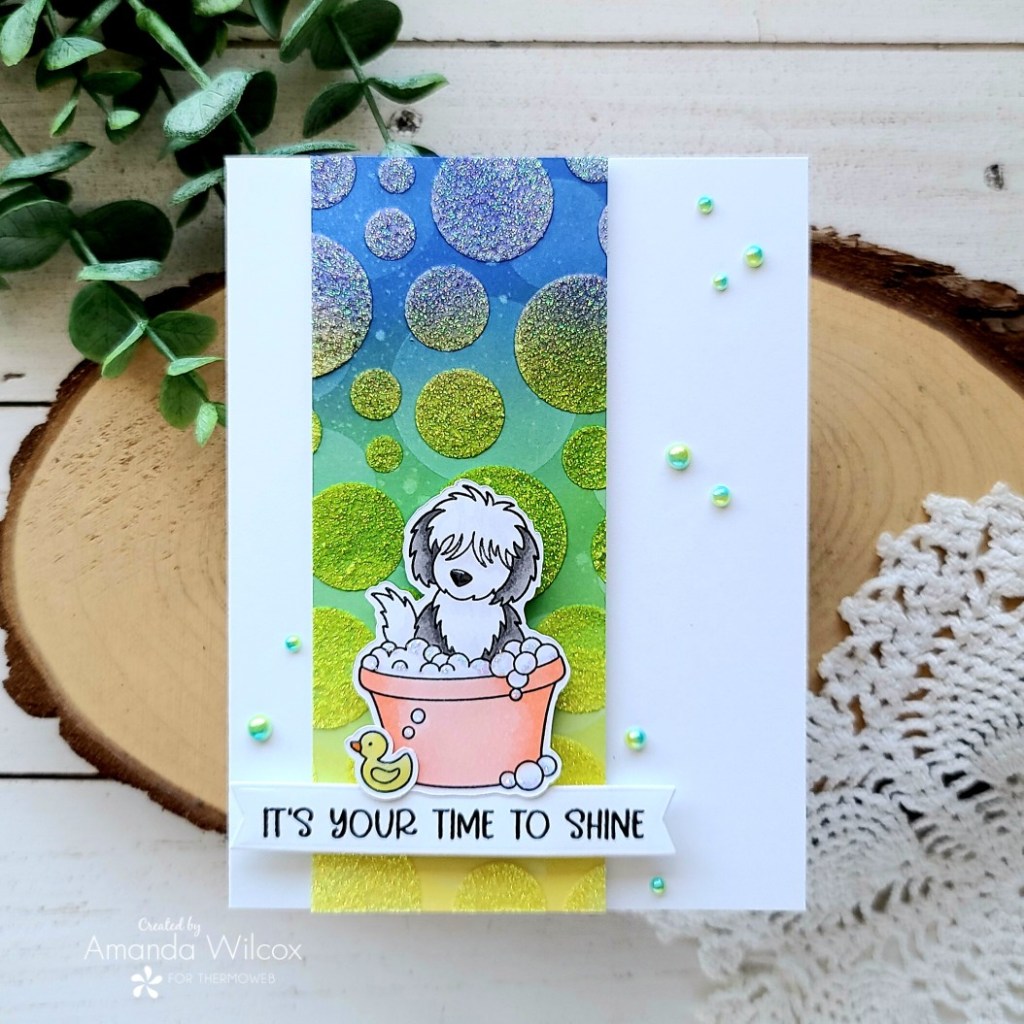
I started my card with a general layout in mind so I don’t into coloring him with my copics and cutting him out with my scan-n-cut. For the background I used a combination of a few stencils. First, the Ins and Outs Hollywood stencil to ink up the center portion of a light blue cardstock panel in distress oxide inks – chipped sapphire and weathered wood. Then I placed the mask over that area and used the Basket Case stencil on the outside of the panel. Finally, I used the frame layer of the Ins and Outs stencil and spread transfer gel through it. Once it was dry and my laminator was heated up I used tuscan gold Deco Foil Transfer Flock. I love the little bit of texture and color difference this gives the design.

I chose a fabulous sentiment from the set and die cut it with a Trinity Stamps Embossed Edge Circle. I added foam tape to the back of Slim and adhered him in the center. Then I used a combo of liquid adhesive and foam squares to place my sentiment circle. I used scissors to trim off the bottom and voila, my card is fabulous and finished!

Quite literally the most distinguished pup you’ll ever meet! Hahaha! We’re having a hop over on Instagram so head HERE and hop along with us for more inspiration and then go HERE to check out the new release!

Products used on today’s card:
Slim’s Whims stamps
Ins and Outs Hollywood stencil
Basket Case stencil
Thermoweb Transfer Gel Blanco
Thermoweb foam tape roll
Thermoweb foam squares
Thermoweb Deco Foil Flock Transfer – tuscan gold
Thermoweb stencil pal

I appreciate you sharing your time with me. Have a fabulous day!

Miss Ink Stamps – Thank You Very Much!

Hey friends! Miss Ink Stamps has a new release coming and we’re sneaking peaks over on Instagram for the next few days before the release goes live on Saturday! Today I have a super cute and silly gnome card to share with you.

My dad is a huge Elvis fan. I grew up watching those movies and dancing to that music so this set just made my heart happy to create with!

I colored up the images with my copic colors and trimmed it down. Then I used the Trinity Stamps Embossed Edge Rectangle Stack to create some layers. Starting with the base which is white adhered to a white card base. I really wanted that matching embossed edge so I didn’t mind the extra layer. Then a cool gold glitter layer adhere with foam strips. Last there is a black layer also popped up with foam tape and the little scene adhered to that with liquid glue.

For finishing touches I added glossy accents to the gnomes glasses, buttons and belt, along with the microphone and stand. I thought there needed to be a little shine but I didn’t want it to compete with the cool glitter cardstock layer.

This is just too much fun! I love the whole little scene. Remember there are giveaways on Instagram from today until the release so be sure to head over and comment on the Miss Ink posts.

Products used on today’s card:
Miss Ink Stamps Thank You Very Much stamps
Trinity Stamps Embossed Edge Rectangle Stack dies
Glossy accents
Thermoweb Foam tape
iCraft Ultra Bond liquid adhesive
Pink & Main gold glitter cardstock

I appreciate you sharing your time with me. Have a fabulous day!

Miss Ink Stamps – You Color My World

Hey friends! I’m back today with another Miss Ink Stamps card. I just had to bring that awesome Rainbow Builder stencil set and play again. I just love these so much!

I started by cutting a white panel to 4×5.25 inches. Then I centered the largest layer of the rainbow stencil I wanted to use and inked it up. Then I switched to the second layer and ended with those fun accents details in dark blue this time.

I trimmed a piece of cardstock in the general shape of the rainbow to use as a mask from the outer stenciling I wanted to do. I taped down the Tiny Snowfall stencil next and inked it up in dark blue. Then I came back with the Starry Night stencil and gold glitter glitz gel. While the glitz gel was drying I stamped and heat embossed a sentiment from Sunshine and Rainbows on a dark blue cardstock with white embossing powder. I used the Trinity Stamps 4-bar Card die set to cut it into a sentiment banner.

I added foam tape to the back of the stenciled panel and popped it on a white card base. Then I used a little liquid adhesive to adhere the banner down and my card is all finished. Isn’t this so fun?!?

Products I used on today’s card:
Miss Ink Stamps Rainbow Builder stencil
Miss Ink Stamps Tiny Snowfall stencil
Miss Ink stamps Starry Night stencil
Miss Ink Stamps Sunshine and Rainbows stamps
Trinity Stamps 4-bar Card dies
Thermoweb Glitter Glitz Gel – gold
iCraft Ultra Bond liquid adhesive
Thermoweb foam tape roll

I appreciate you sharing your time with me. Have a fabulous day!

Miss Ink Stamps – For You Mini Slimline

Hello everyone! Today I’m over on the Miss Ink Stamps blog with this sweet little mini slimline card and coordinating envelope. I just love these mice and their sidekicks from Say Cheese! so I pulled out the penguins, which I hadn’t used yet and decided to color them up!

I also colored a couple of clouds and a butterfly to fill in my scene. Once they were colored I used the scan-n-cut to cut them all out and switched gears to stenciling and ink blending.

For that I die cut the scalloped panel from the Trinity Stamps mini slimline card and envelope die set. I taped off from the stitching to the edge and affixed my Miss Ink Stamps Square Dance stencil. I inked it up with a light purple ink. I removed that panel, die cut the bookmark tag from the same die set and replaced it in the same spot so the stenciling lines up perfectly. This time I inked up with a light blue ink. Next, I taped down the Tiny Snowfall stencil and used a dark blue on that. It gives a really fun texture to the sky.

Finally, I die cut another small panel with the bottom of the bookmark tag die and inked it up with the Oopsie Daisy stencil and green ink. I removed the stencil and inked the whole panel up again giving the whole thing a light green color. I cut the top of that little panel off with a Trinity Stamps Great Outdoor Border die to create a little hill. One last thing before assembling the card, I stamped a sentiment from Sunshine and Rainbows on a banner from the mini slimline die set and die cut the words “for you” from the same set.

For assembly, I created a mini slimline card base measuring 3×6 inches and adhered my scalloped panel with liquid adhesive. I added foam tape to the back of the tag and popped it in place, lining up the stenciling. Then I added foam squares to the back of my images and sentiment banner and used them for placement of the words being glued in the sky. For those skinny pieces I used a glue pen to adhere them. Then I removed the release paper from my images and popped everything in place.

Finishing touches on my card were to cut some strips of yellow bakers twine and thread it through the top of the tag. Then I added glossy accents to noses and beaks and black glaze pen to all the eyes. I used unicorn Stickles on the butterfly and the pom poms on the mouse’s hat. Once the black glaze pen was dry I added white gel pen dot highlights to the eyes.

Products used on today’s card:
Miss Ink Stamps Say Cheese! stamps
Miss Ink Stamps Sunshine and Rainbows stamps
Miss Ink Stamps Square Dance stencil
Miss Ink Stamps Oopsy Daisy stencil
Miss Ink Stamps Tiny Snowfall stencil
Trinity Stamps Mini Slimline Card and Envelope dies
Trinity Stamps Great Outdoor Borders dies
iCraft liquid adhesive
Thermoweb foam tape
Thermoweb foam squares
Stickles – unicorn
Glossy accents

I appreciate you sharing your time with me. Have a fabulous day!

Miss Ink Stamps – Oh, Nuts!

Hey friends! I hope your week is chugging along smoothly. Today I’m popping in with a silly card from Miss Ink Stamps featuring some of my favorite squirrels from Oh, Nuts! I paired them with a little stenciling and decofoil for some texture and shine.

To start my card, I pulled out the Ins & Outs Quatrefoil and Latte Love stencils. The Ins & Outs stencils are 2-piece sets that work together to give you a center shape and a frame. Today I inked up the center piece with Lawn Fawn walnut ink and a blending brush, then taped the Latte Love stencil over the opening and added another layer of the same walnut ink. I removed the stencils and placed the quatrefoil frame stencil in place and spread Thermoweb transfer gel through the opening. I removed the stencil and set my panel aside to dry. Next, I turned on the laminator to heat up while the transfer gel dried and I cleaned up my workspace.

While I was waiting to foil my panel, I stamped images from Oh, Nuts! and colored them with my copic markers. I used the scan-n-cut to cut them out and set them aside. Next, I placed my stenciled panel in a folded sheet of parchment paper and added a piece of gold decofoil over the top. I ran this through my laminator and voila! Shiny, beautiful frame around my stenciling! This never gets old.

I trimmed my panel down to 4×5.25 inches and stamped a sentiment below the foiled frame. I added foam squares to the back of my images and popped them in place. Then I added foam tape to the back of the panel and popped it up on a white card base.

To finish things off I glued a scattering of gold baubles from the Twiddler’s Nook shop and added black glaze pen to the squirrel eyes and noses. After the eyes were dry I added a dot of white gel pen for a highlight.

Aren’t these furry little guys super cute?!? I love them and this sentiment leaves room for so many different types of cards too!

Products used on today’s card:
Miss Ink Stamps Oh, Nuts!
Miss Ink Stamps Ins & Outs Quatrefoil stencil
Miss Ink Stamps Latte Love stencil
Thermoweb Transfer Gel
Thermoweb Decfoil gold
Thermoweb stencil pal
Twiddler’s Nook gold baubles

I appreciate you sharing your time with me. Have a fabulous day!

(This blog uses affiliate links whenever possible, at no additional cost to you.)

Miss Ink Stamps | Thermoweb Collaboration – Bubbles and Foiling

Hey friends! The super fun collaboration between Miss Ink Stamps and Thermoweb continues today! I’m over on the Miss Ink Stamps blog with this adorable card featuring Bubbles and the coordinating dies with Thermoweb toner card fronts and decofoil for some awesome shine!

I started this card by choosing a toner card front from the Love Blooms toner card front pack. I foiled it with glass slipper decofoil and then ink blended tumbled glass and mermaid lagoon distress oxide over the top. I used a clean microfiber cloth to wipe the ink off the foiling and splattered the background with watered down black paint.

Next, I stamped and colored images from Bubbles with my copic markers. Then I used the coordinating dies to cut them out and set them aside. I die cut a vellum heart from the Trinity Stamps Nested Hearts dies, then cut the bottom tip again from white cardstock. I inked that up with mowed lawn and twisted citron distress oxide and cut the top with the grass border from Trinity Stamps Great Outdoor Borders die set. I used tape runner to adhere them together. Using my images as a guide, I stamped and heat embossed some bubbles on the “sky” portion of the heart for a little added interest.

I stamped a sentiment from Bubbles and cut it out with a banner die from the Trinity Stamps 4-Bar Card die set. Next, I added foam squares and strips to the images and sentiment strip and adhered them to the heart.

I trimmed the foiled panel down to 4×5.25 inches and added foam tape to the back, adhering it to a white card base. Then, hiding adhesive behind the grass and images, I adhered the heart to the front of the card and moved on to finishing touches.

For those, I just added glossy accents to the bubble bottle on the snail and the whole bubble that the mouse is floating in. The background on this card is so eye catching and beautiful that I didn’t really need to add anything.

There are giveaways going on over on Instagram, the Miss Ink Stamps blog and Thermoweb’s blog too! So head to those places and check out the posts this week for sure!

Products used on today’s card:
Miss Ink Stamps Bubbles stamps and dies
Thermoweb Love Blooms Toner Card Front
Thermoweb Glass Slipper decofoil
iCraft XL Tape Runner
iCraft foam tape roll
iCraft foam squares
Trinity Stamps Nested Heart dies
Trinity Stamps Great Outdoor Border dies
Trinity Stamps 4-Bar Card dies
Distress Oxide Inks – mermaid lagoon, tumbled glass, twisted citron, mowed lawn
Glossy accents

I appreciate you sharing your time with me. Have a fabulous day!

Thermoweb | Miss Ink Stamps Collaboration – Stenciling with Decofoil and Glitter Glitz Gel

Hello everyone! Today I’m over on the Thermoweb blog for the collaboration with Miss Ink Stamps! This time I have a pair of cards I made using one inked background, cut in half and then stenciled completely different. It was super fun to play around with everything!

Here’s a look at both of the cards I created. One with the Dee and Dum stamp set paired with the Diamond Fade stencil. The other with my favorite pup from Rub-a-Dub Doggies stamp set paired with the Large Random Dot and Random Dot stencils. Those stencils are sold separately if you only want one but they work really awesome together too! (Here’s a pro-tip though…if you only have one you can ink it up and then rotate it to get a second layer of dots in different spots!)

I used Pink & Main Large Sentiment Strip dies to cut out the sentiments for both cards. This one has a scattering of Trinity Stamps Black Eyed Baubles for embellishments along with glossy accents on Tweedle Dee and Dum.

The embellishments on this one include glossy accents for the rubber ducky and dog’s nose. Then unicorn Stickles on the bubbles to help them time in with the background. Last I scattered Twiddler’s Nook half-tone pearls across the design.

Be sure to head over to the Thermoweb blog for all the details on these cards, links to the products and a chance to win prizes from Thermoweb and Miss Ink Stamps! Totally worth the click!

I appreciate you sharing your time with me. Have a fabulous day!

Miss Ink Stamps | Thermoweb Collaboration – Thanks a Bunch

Hey friends! Just popping in with a super quick showing of my card and redirecting you over to Instagram today to check out the super fun inspiration collaboration hop we’re having with Miss Ink Stamps and Thermoweb!

I used the fall bouquet stamps and tried to color them more bright and cheerful to lean toward a more summery bouquet of flowers. I also paired the Ins and Outs Marquis stencil with the Kaleidescope stencil and threw in some awesome iridescent glitter glitz gel over my ink blending for fabulous shimmer and texture in the background!

I heat embossed my sentiment on a die cut circle, and you know how I love dimension so everything is popped up with foam tape.

Then I finished things off with some glossy accents on the stamen of the poppy flower and berries in the bouquet too.

Products used on today’s card:
Miss Ink Stamps Fall Bouquet stamps
Miss Inks Stamps Ins and Outs Marquis stencil
Miss Ink Stamps Kaleidescope stencil
Thermoweb Iridescent Glitter Glitz Gel
Thermoweb Stencil Pal
Trinity Stamps Embossed Edge Circle Stack dies
Trinity Stamps Blending Buddy brush
Lawn Fawn sunflower and mermaid inks
Glossy accents

Click HERE to head to Instagram and check out the hop! There are gift cards for both companies up for grabs if you hop and comment too!

I appreciate you sharing your time with me. Have a fabuous day!

Miss Ink Stamps – Missing You Pig Time

Happy Thursday everyone! I’m sharing a fun mini slimline card featuring some stamps and stencil from Miss Ink Stamps today, along with Trinity Stamps mini slimline dies.

First, I used my stamps and dies to decide on a general layout and then stamped my pig and flower from Punny Farm Pigs and colored them with copic markers. I used the coordinating dies to cut them out and set them aside to work on stenciling.

I used the Oopsy Daisy stencil with a raspberry ink on white cardstock, then went over the whole thing with a light yellow ink and a blending brush. I die cut the panel with a mini modern embossed slimline die and the circle window die that comes in the same set. Then I die cut another white piece with the largest clean and simple mini slimline panel die and inked it up with the same yellow.

I added scrappy tape to the back of the window panel and adhered acetate to it. Then I lined it with foam strips to create my shaker pocket. I sprinkled some dazzle butterflies to the yellow panel, removed the release paper and put the window panel in place.

I added foam squares to the back of my pig and adhered him down next. With a dab of liquid glue I added his flower. For the sentiment, I stamped it in the same raspberry ink as the stenciling and trimmed it into a strip. Then I popped it up with foam strips as well.

For finishing touches, I added black glaze pen to the pig’s eyes and glossy accents to the flower’s center. I also created a sweet purple polka dot envelope for my card to fit in that comes in the original mini slimline die set from Trinity Stamps.

Products used on today’s project:
Miss Ink Stamps Punny Farm Pigs stamps and dies
Miss Ink Stamps Oopsy Diasy stencil
Miss Ink Stamps Dazzle Butterflies
Trinity Stamps Mini Slimline die and envelope set
Trinity Stamps Clean and Simple Mini Slimline Panel dies
Trinity Stamps Mini Modern Embossed Slimline dies
Trinity Stamps Blending Buddy brush
Lawn Fawn raspberry and sunflower inks
Glossy accents

I appreciate you sharing your time with me. Have a fabulous day!

Miss Ink Stamps – May Your Coffee Kick In Before Reality

Hey friends! I’m back with a fun Miss Ink Stamps caffeinated card to share with you and the sentiment could not be more true!

I started by stamped the Hay Daze background stamp on an extra large panel and blended distress oxide ink from top to bottom in scattered straw, frayed burlap, shabby shutters and ripe persimmon. Then I die cut it with the Trinity Stamps slimline stitched panel die in the middle size. I took the largest size and die cut a brown panel with that.

I stamped the gnomes from coffee gnomes and colored them with my copics. Then I used the scan-n-cut to cut them out. I chose a sentiment from the same set and heat embossed it on black cardstock, trimming it into a strip.

Moving on to assembly, I used liquid glue to adhere the brown panel to a white card base. Then I popped the inked panel up with foam tape. Next, I added foam squares to the gnomes and sentiment and put them in place.

Sometimes these background stamps can be daunting to color but they are really fun to just ink blend over too!

Products used on today’s card:
Miss Ink Stamps Hay Daze stamps
Miss Ink Stamps Coffee Gnomes stamps
Trinity Stamps Slimline Stitched Panels and Windows dies

I appreciate you sharing your time with me. Have a fabulous day!