Miss Ink Stamps – Rain or Shine

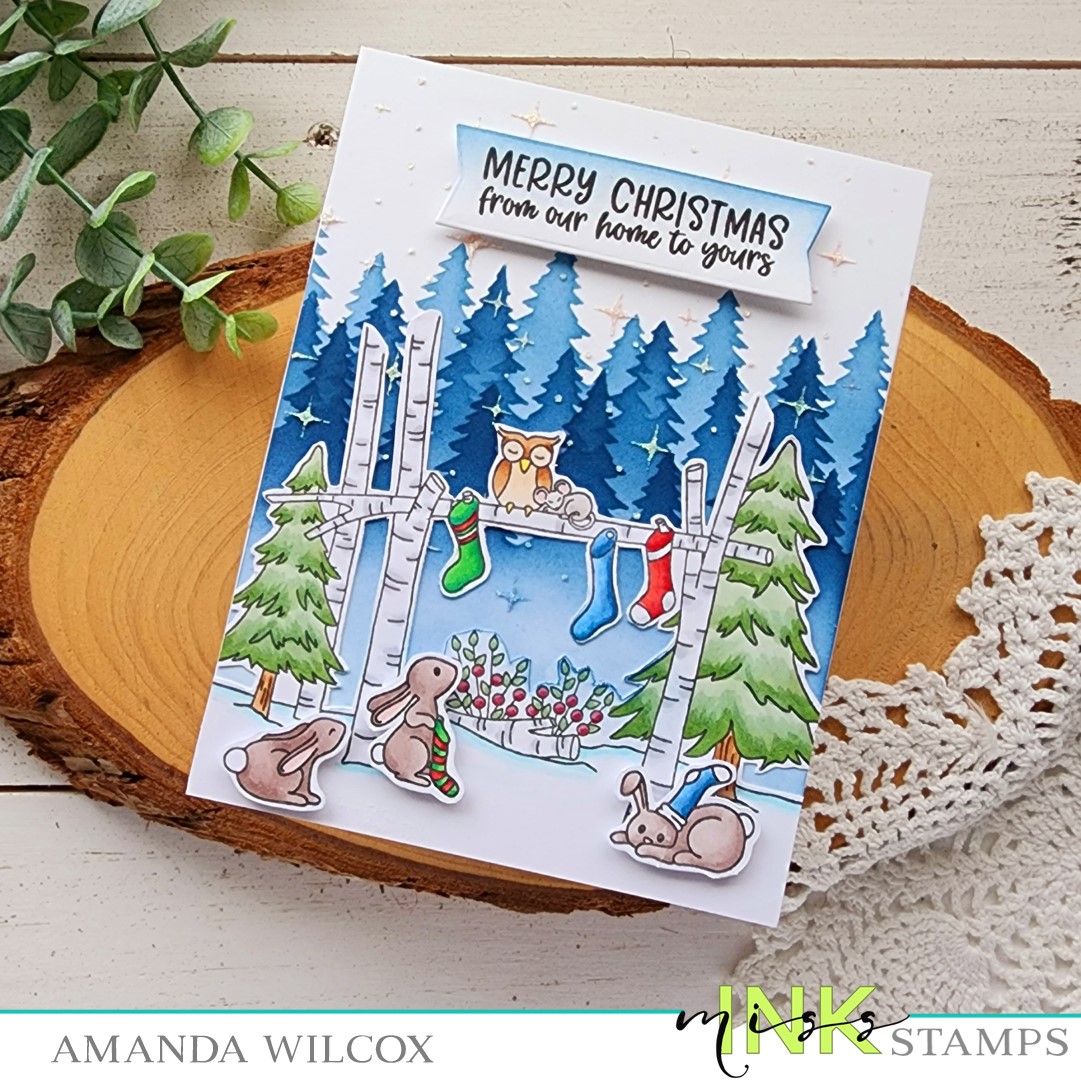
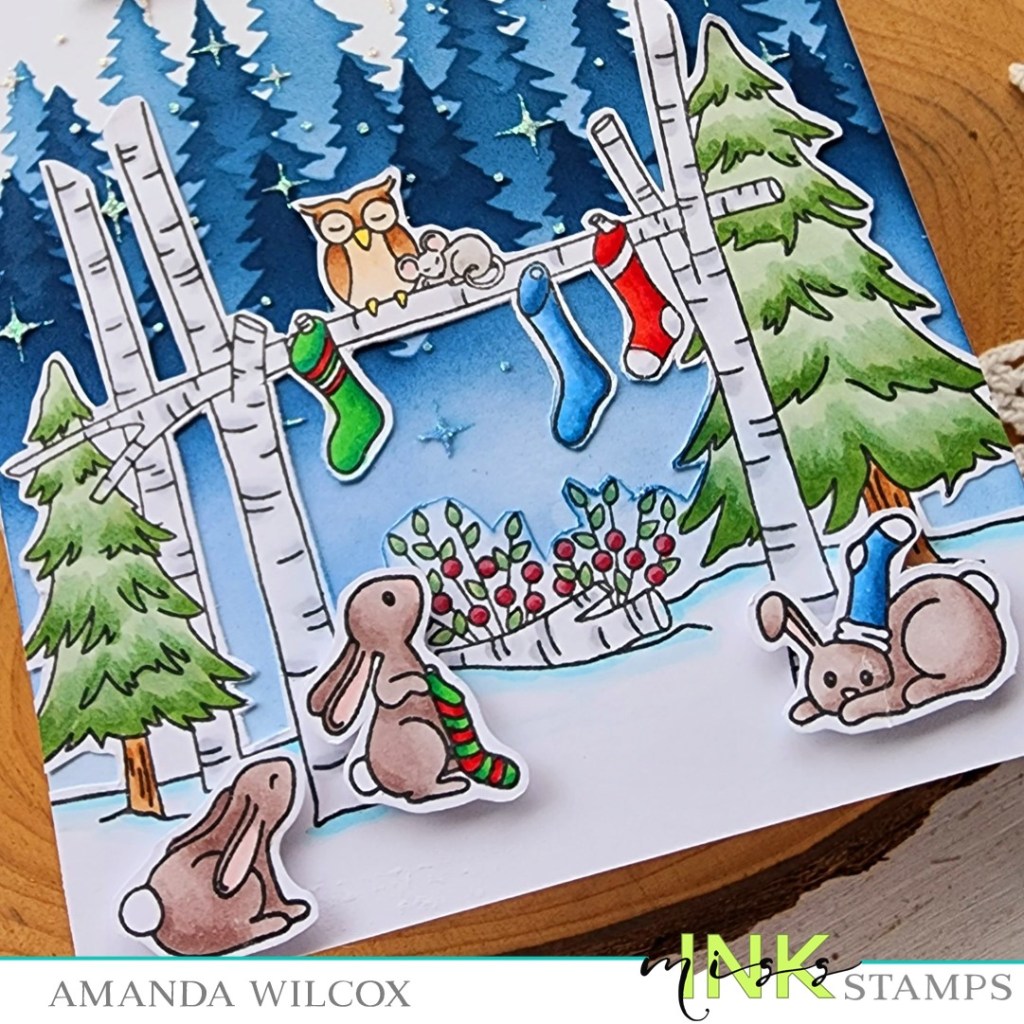
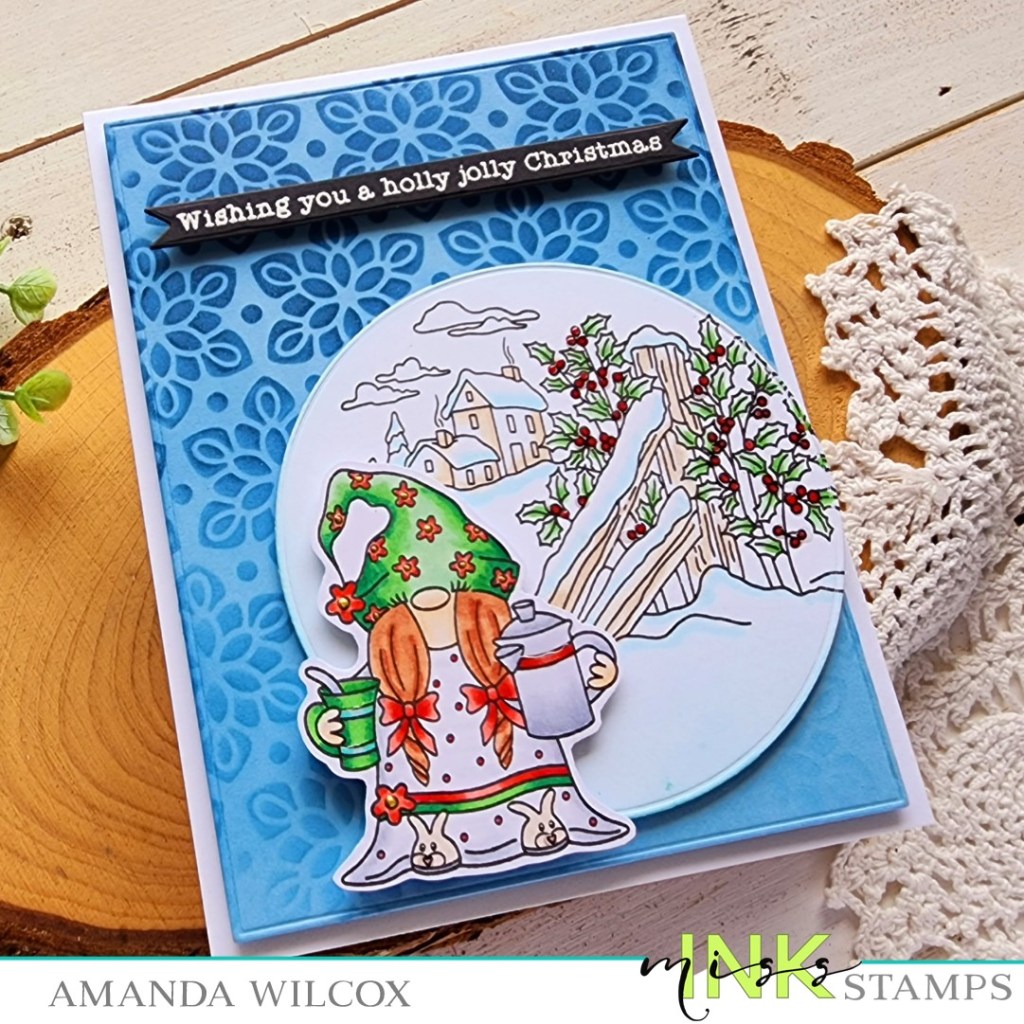
Welcome everyone! I’m back with some Miss Ink Stamps inspiration using products from the brand new release! I have a sweet card featuring Rain or Shine and then a set of quick and easy stencil only cards at the end.

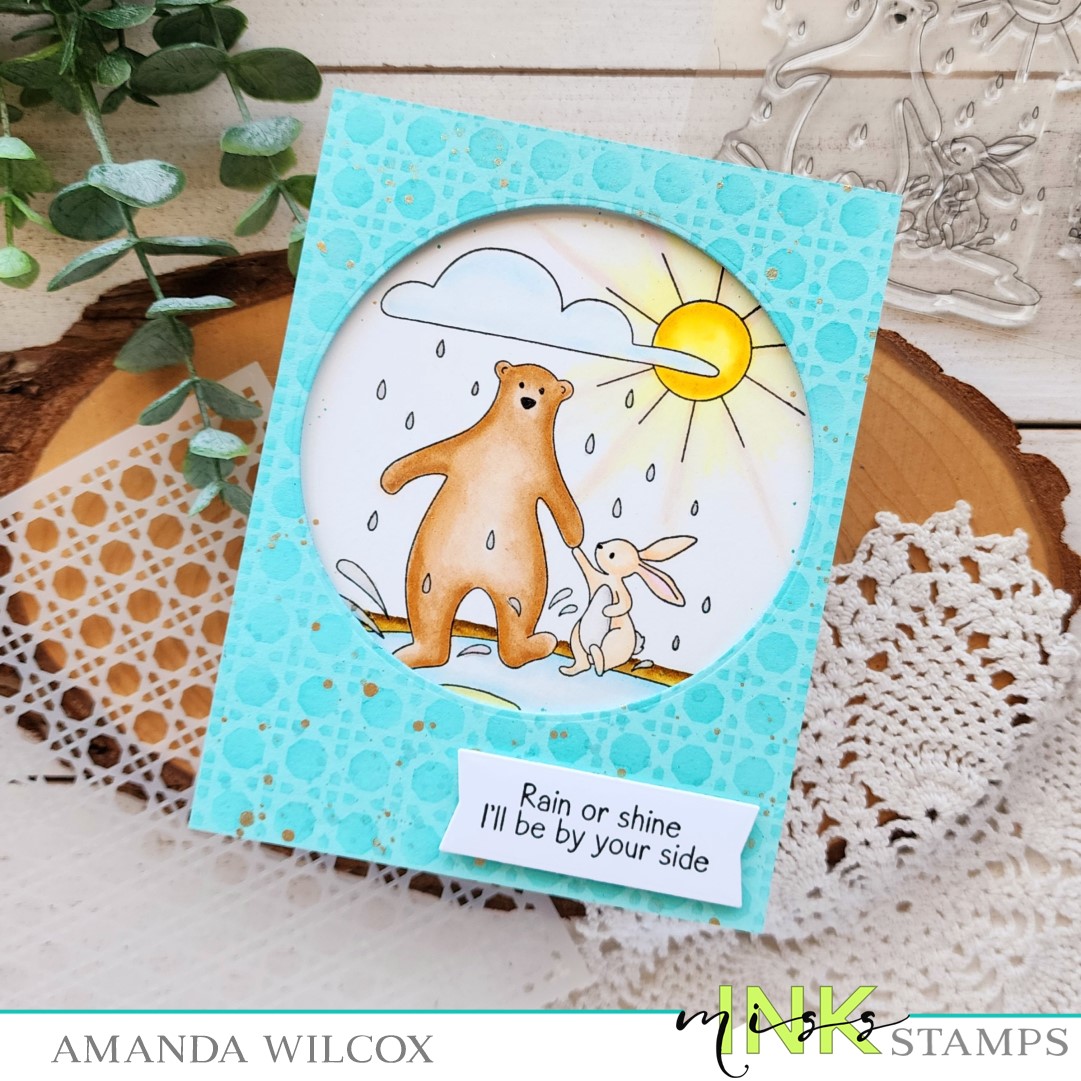
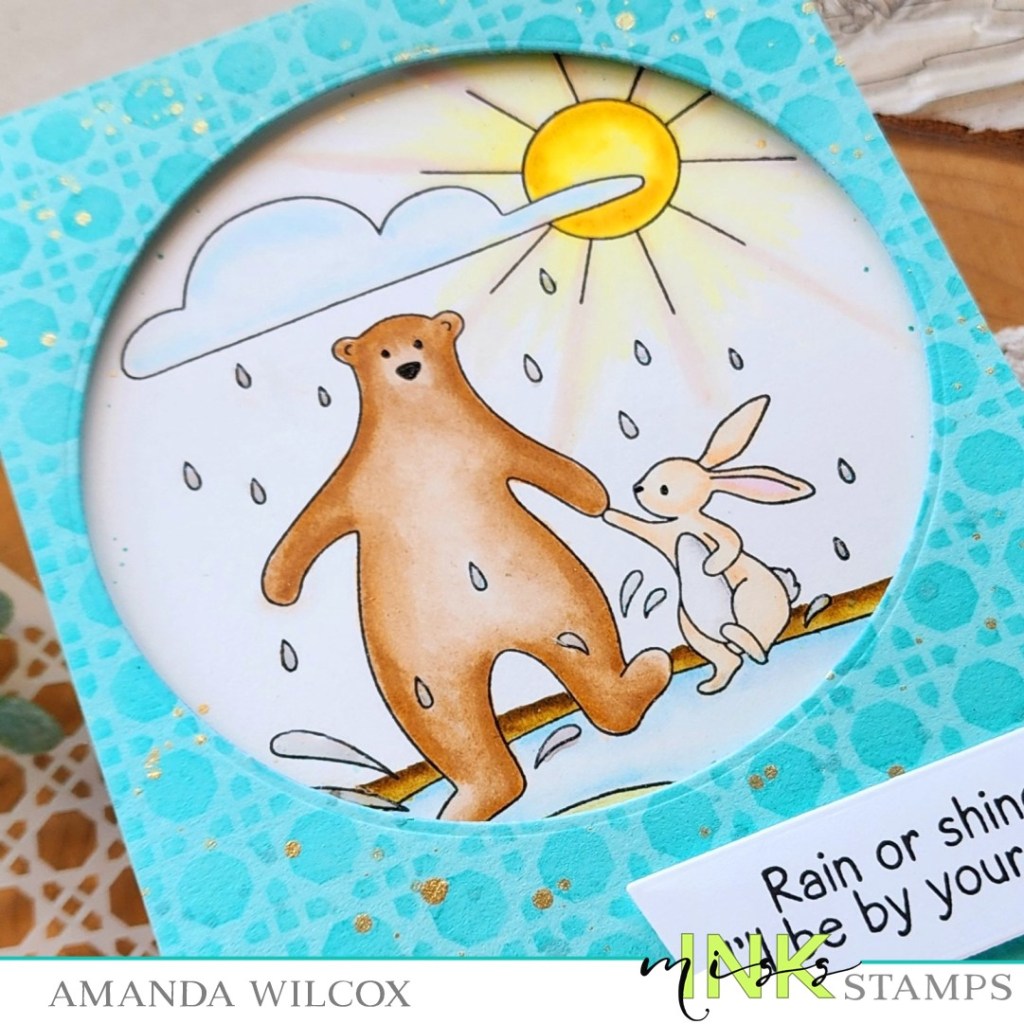
I was feeling a little watercolor mood this time so I cut a piece of watercolor paper and stamped my image on that. Then I used Zig Clean Color Real Brush markers and a water brush pen to color them in.

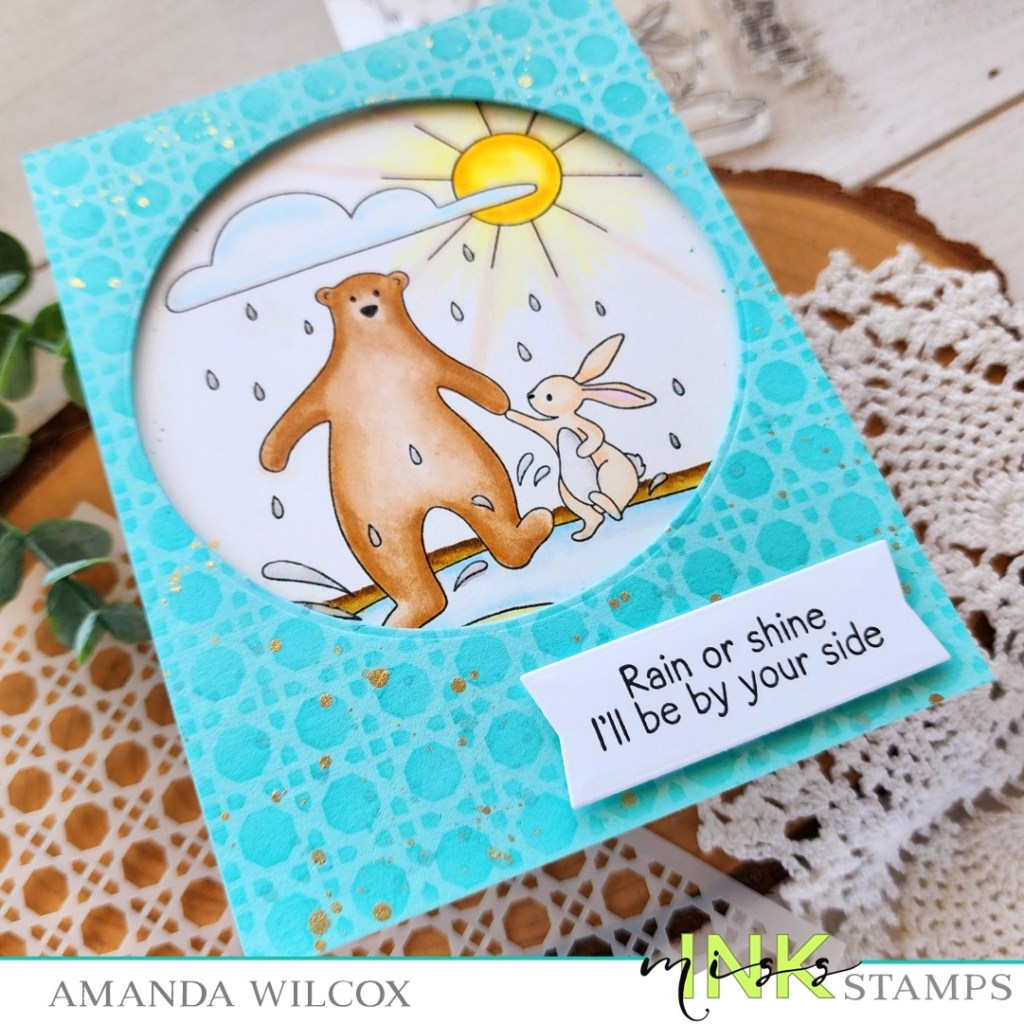
Next, I cut an A2 size piece of teal cardstock and inked it up with the Rattan stencil for texture. Then I used a circle die to cut a window from the upper center of it. I added foam tape to the back and attached it to my image panel. That’s when I decided to add more texture, so I inserted the circle cutout to protect the image and flicked teal ink and gold watercolor on the panel.

Next, I stamped my sentiment and cut it out with a banner die before popping it up on the front of the stenciled panel. I used liquid glue and adhered the whole thing to a card base before adding Touch of Gloss to all the raindrops in the picture. Then I went over the critters’ eyes and noses with a black glaze pen so they shine too.

I just think these new bear and rabbit images are adorable and so very sweet! I look forward to coloring them up in different combos.

Next, I have a trio of cards to share using the Bear Hugs stencil set. It’s an adorable set and makes it really simple to create lots of cards in a flash.

I chose a few different colors and inked up the layers on white cardstock. Then I trimmed the panels down to 4×5.25 inches. I used a simple method to add the same color to the card bases – direct-to-paper with the ink pad I used on the stencil. This way it all matches. You just run your ink pad alone the edge of your paper. Yes, just drag it. If you’re nervous, test it out on a scrap.

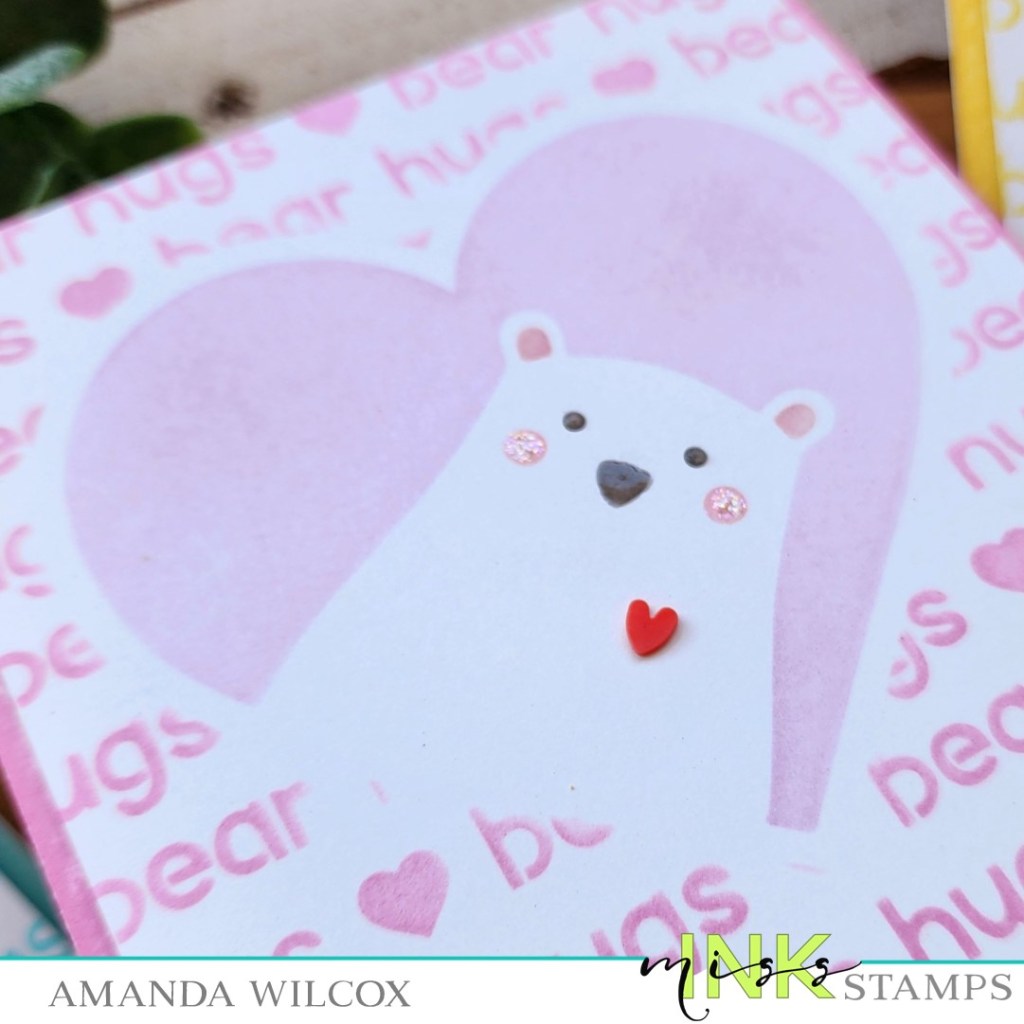
After the card bases matched my stenciled panels, I popped the bear panels up with foam tape. For finishing touches I added Touch of Gloss to the bear noses and eyes, stardust Stickles to the cheeks and a little red heart on their chest for good measure.

Aren’t they the cutest?!?

Products used today:
Rain or Shine stamps
Rattan stencil
Bear Hugs stencils
Foam tape
Touch of Gloss
Stickles – stardust
Sweethearts embellishment mix (red hearts)
LH Colors – gold watercolor
Blending brushes
Lawn Fawn dye inks

I appreciate you sharing your time with me. Have a fabulous day!

Miss Ink Stamps – Highland Cows Sneak Peak

Oh my goodness friends! I’m SUPER EXCITED to announce that Miss Ink Stamps has a new release coming and it’s so fun! There is magic and critters and flowers and EVERYTHING!!!! You’re going to love it!

My personal favorite…highland cows. IYKYK. Trust me. I love cows!

I colored this cutie and his friends with my copic markers, added some fun scene setting images too and used the coordinating dies to cut them out. Then I used liquid glue to adhere all the little elements to the big ones.

Then I took a 4×5.25 inch white panel and scored it every 1/4″ for 2″. The sentiments in this set fit perfectly! So I chose one and stamped it. Then masked off the lines with post-it tape and inked up a little dirt and sky on my panel. I added the images with foam squares and popped the panel up on a white card base with foam tape.

Before adding finishing touches to the front, I stamped a second sentiment and the sweet baby cow on the inside of my card. Doesn’t that just crack you up? It’s so good!

Moving back to the front, I tied some twine around the top and tied it in a bow. Then I added black glaze pen to the birds’ eyes and Touch of Gloss to their beaks and the flower center.

Be sure to check the rest of the design team today through Friday for more sneak peeks of upcoming fun and then head to the Miss Ink Stamps shop on Saturday, May 13, for release day!

Products used:
Highland Cows stamps and dies
Blending brushes
Lawn Fawn Ink – mermaid and doe
Touch of Gloss
Foam tape and squares

I appreciate you sharing your time with me. Have a fabulous day!

Miss Ink Stamps – How Do You Do?

Hello everyone! I’m happy to be here sharing a fun Alice in Wonderland themed card featuring stamps, stencils and embellishments from Miss Ink Stamps. I adore this whole collection and love how they can all be used separate or together to create fun and whimsical cards featuring your favorite Alice characters and scenes.

Another thing that’s fun is to color them any way that suits me in the moment. We all get stuck on the iconic color schemes but changing things up even just a little makes them new and refreshing. I stamped and colored Dee and Dum with my copic markers before using the scan-n-cut to cut them out.

Next, I trimmed a piece of white cardstock to 4×5.25 inches and inked up the Circle Harlequin stencil with orange and teal inks. Then I chose sentiments from Dee and Dum and stamped them in gray ink, using the image as a guide where they fit best.

I added gray cardstock to the front of a white card base and popped the stenciled panel up with foam tape on that. Then I added the image with foam squares because, well, dimension and you know I love it!

For finishing touches I added a scattering of Champagne Stardust glitter across the whole design. Then I added Touch of Gloss to the propellers, buttons and bowties on Dee and Dum. Just a little sparkle and shine on a very fun card.

Products used:
Dee and Dum stamps
Circle Harlequin stencil
Champagne Stardust glitter
Foam tape and squares
Touch of Gloss
Liquid glue
Blending brushes
Lawn Fawn mermaid and peach fuzz inks
Copic markers

I appreciate you sharing your time with me. Have a fabulous day!

Miss Ink Stamps – Toucan of my Appreciation

Happy Thursday everyone! We’re one day closer to the weekend and I’m here for it! Today I’m sharing a little card inspiration featuring stamps and stencil from Miss Ink Stamps. I love all of her critters! The art is amazing and I have so much fun coloring the elements.

Today I chose two images from Pretty Bird, stamped and colored them with copic markers before using the scan-n-cut to cut them out. I added foam tape to the bird and popped it on the leaf image. Then switched to my background.

I simply trimmed a piece of green cardstock and pulled out my On the Vine stencil. I sprayed the stencil with Pixie Spray from Thermoweb and let it dry for a minute for adhering it to the cardstock. Then I blended two colors of green ink across the panel. I wanted variety in the background so it wasn’t flat. Using the images as a guide, I placed the panel in my MISTI and stamped my sentiment in the lower center.

The green cardstock measured 3.5×4.75 inches so I found orange cardstock in my stash and trimmed it to 3.75×5 and adhered them together. Next, I added foam tape to the back and popped it up on a white card base. Finally I added the images above the sentiment and finished them off with black glaze pen on the bird’s eye, then white gel pen highlights all over the images. Very last I found some glitter enamel dots in the perfect orange and added them across the design as well.

Isn’t this such a fun and silly thank you card? I love puns so much and this one is top notch!

Products used:
Pretty Bird stamps
On the Vine stencil
Pixie Spray
Blending brushes
Lawn Fawn ink – cilantro and artichoke
Foam tape
Tape runner
Sakura gel pen – white and black
Glitter enamel dots

I appreciate you sharing your time with me. Have a fabulous day!

Miss Ink Stamps – Merry Christmas Woodland Critters

Happy Thursday everyone. I hope your week is going splendid! I’m here today with a bit of Christmas inspiration using a few Miss Ink Stamps products. Layering stencils together for a magical touch and an array of the cutest woodland critters for a sweet scene! I hope you like it.

I started with my stencils and stamps laid out on my card front to figure out how far the stenciled trees needed to go and how many critters I could fit. Once that was decided I inked up the Scene Builder Treeline stencil with dark blue ink, just applying with a lighter hand as I went up. Then I layered the Sparkles stencil over top and spread iridescent Glitz Glitter Gel through that. I set the panel aside to dry and cleaned my area so I could stamp critters!

I stamped the critters and scene elements from Woodland Hearth and colored them with my copic markers. Then I fussy cut everything out, including the inside of the scene area between the trees and under the stockings and such. Then I used liquid glue to adhere the scene portion to the stenciled panel and popped my bunnies up with foam squares.

I stamped and die cut the sentiment with a banner die and inked the top with leftover blue ink from my blending brush to tie it in and help it stand out from the white space in the sky. I popped it up with foam squares too.

Aren’t these critters just the sweetest?!? I think they are adorable and make a very calm and serene Christmas card.

Products used:
Woodland Hearth stamps
Scene Builder Treeline stencil
Sparkles stencil
Foam squares
Liquid glue
Pink & Main Extra Large Sentiment Strip dies

I appreciate you sharing your time with me. Have a fabulous day!

Miss Ink Stamps – Wish You a Holly Jolly Christmas

Hey friends! I’m popping in today with inspiration and a reminder! Miss Ink Stamps is the sponsor of this month’s Caffeinated Christmas Challenge. This challenge is so fun! Every month you create Christmas cards with caffeination and a twist! This month the twist is gnomes. How fun is that?!? Here’s what I created this time.

I started with that fun girl from Coffee Gnomes and colored her with my copics. I fussy cut her out and then die cut a circle for the focal scene. I stamped Holly Jolly on it and did very loose copic coloring on that. I wanted a little color but nothing bold to distract from my sweet gnome.

Next, I die cut a blue rectangle and inked up Frosty Flakes stencil with dark blue ink fading from top left to bottom right. Then I stamped and heat embossed the sentiment from Holly Jolly on black cardstock and die cut it with a banner.

To adhere everything, I used foam tape and foam squares. If you know me, you know how I dimension and elevation on my cards. The different layers do a lot for me. Then I moved on to finishing touches. I added glossy accents to the holly berries in the background and the stripes on the coffee carafe and mug. Then I pulled out some bright gold Nuvo Crystal Drops to try and make my gnome’s pjs a little more festive by adding it to all of the flower centers. I’m pretending these are poinsettias. Even if it’s a stretch, it’s cute!

I hope you’ll link up to the challenge for a chance to win a gift certificate from Miss Ink Stamps! Click HERE to head to the challenge blog.

Products used today:
Coffee Gnomes stamps
Holly Jolly stamps
Frosty Flakes stencil
Trinity Stamps Embossed Edge Circle dies
Trinity Stamps Embossed Edge Rectangle dies
Foam tape
Glossy accents
Nuvo Crystal Drops – bright gold

I appreciate you sharing your time with me. Have a fabulous day!

Miss Ink Stamps – Ghostly Greetings

Happy Thursday everyone! I have another adorable card featuring the super fun ghosts from Miss Ink Stamps – Boo Sheet! I love this set so much! These ghosts are fun to create with in a million different ways. Today I used them to create a patterned paper background on my card. So easy and really fun!

I just used the different ghost images all over an A2 panel, stamping in light gray ink, masking the ones with hands and giving each one something different to hold just for fun. Then I stamped and heat embossed the large BOO from Halloween Sentiments in orange. It practically glows, it’s so bright!

Next, I used the frame die in Trinity Stamps’ 4-Bar Card die set to cut out of the center of the panel. Then I cut that same frame 4 more times from white, black, green and orange cardstocks. Now, we layer everything together on a white card base.

I started with the outside frame, using liquid glue to adhere it down. Then I added the plain white frame and finally the center ghost panel. Then I started stacking the other frame die cuts on top of the white one. Next, I added orange, then black, green and finally the original stamped and heat embossed one. It’s a fun way to add a little color and also step up an otherwise simple card design.

To finish this card off, I stamped and heat embossed a smaller sentiment from Halloween Sentiments and cut it with a banner in the same 4-Bar Card die set, popping it up with a foam strip. Then I glued Champagne Stardust glitter in all of the openings between the ghosts. This is one of my favorite glitter packs ever! I love it!

Products used today:
Boo Sheet stamps
Halloween Sentiments stamps
Champagne Stardust glitter
Trinity Stamps 4-Bar Card dies
Pink & Main magic anti-static brush, embossing ink and orange embossing powder
Bearly Art liquid glue
Foam strips

I appreciate you sharing your time with me. Have a fabulous day!

Miss Ink Stamps – You Are Magical

Hello crafty friends! I’m over on the Miss Ink Stamps blog today sharing a magically wonderful card using the newest release of stamps and dies.

Sometimes I get overwhelmed at the thought of coloring in those big full-background stamps but today I wanted to show you that you don’t always need to. It brings the focus more on your images and sentiment if you don’t.

Today, I stamped the Ups and Downs image on a 4×5.25 inch piece of white cardstock and splattered it with black acrylic paint. I set it aside to dry and stamped a few images from Magical Graduation. I colored those with copic markers and used the coordinating dies to cut them out before gluing the wand in the wizard’s hand.

Next, I stamped an image from Heart’s Desire and fussy cut it out. Then, for my sentiment I used the “magical” in those dies and cut them from white cardstock 4 times, using liquid glue to adhere them together. To complete my sentiment, I stamped a few words from a sentiment in Heart’s Desire and heat embossed them in white. I trimmed that out with my scissors and started adhering all the pieces together.

First, I added the wizard and the wand flourish with foam squares. Then I added the background panel to a white card base with foam tape. I played around a bit with the sentiment pieces and finally decided I like the whimsical feel of the letters not being lined up. Once I had my final placement decided, I used liquid glue to adhere them and popped the heat embossed portion up with foam too.

Up until now, “magical” was white because I couldn’t decide what color to make it. Finally, I landed on red so it would really show and coordinate with the tie on the image. For this, I just used copic markers and carefully colored the top layer of letters.

For finishing touches, I added black glaze pen the the wizard’s eyes, let it dry and added the white highlight back in. Then I used Wink of Stella glitter brush pen on the magical flourish so it shimmers in the light.

Super fun card, that’s great for a bunch of occasions! I love how it turned out!

Products used today:
Magical Graduation stamps and dies
Heart’s Desire stamps and dies
Ups and Downs stamps
Foam squares and tape
Wink of Stella glitter brush pen
Liquid glue

I appreciate you sharing your time with me. Have a fabulous day!

Miss Ink Stamps – Thanks a Fa La La La Latte

Hey friends! Miss Ink Stamps is the sponsor this month for the Caffeinated Christmas Challenge and today I’m playing along!

For this challenge, every month you have to create cards with coffee, Christmas and one other element. This month is gnomes! So I had a little fun mixing and matching different sets to create a little scene and a super fun sentiment!

I love how the sizes match from the gnome in Big Mugs and the snowman in Snow One Like You. So I stamped and colored them up with my copic markers. Then I used the scan-n-cut to cut everything out. I added the bird to the mug handle with liquid glue and then put foam squares on the back of everything.

I set those aside and cut down a piece of white cardstock to 4×5.25 inches and inked up the top portion with light and dark blue inks. Then I layered the Sweater Weather stencil over top and inked it with the lighter blue ink for a subtle texture in the background. Next, I placed that panel in my MISTI and carefully masked sentiments from Woodland Hearth and Brewtiful to create this really fun custom sentiment. (Seriously, I’m still smiling about how clever I think I am.)

I added the background panel to a kraft card base with foam tape and adhere the images next. Then I came in for the finishing touches. I started with glossy accents to the snowman buttons and eyes, then I switched to stardust Stickles for the snow on the tree, snowflakes and snowman. But the extras looked heavy on the right side of the card, so I switched back to glossy accents and added that to the gnome’s shoes and the stripe on the mug.

Click HERE to check out the Caffeinated Christmas Card Challenge and link up your creations for a chance to win!

Products used today:
Big Mugs stamps
Snow One Like You stamps
Brewtiful stamps
Woodland Hearth stamps
Sweater Weather stencil
Foam tape
Glossy accents
Stickles – stardust
Bearly Art glue

I appreciate you sharing your time with me. Have a fabulous day!

Miss Ink Stamps – The Next Chapter

Happy Thursday everyone! I’m back with another bit of inspiration featuring the new Miss Ink Stamps Magical Release. It’s so amazing and so fun to play with! Today I have a graduation card to share that will be perfect for my stash until next summer.

For today’s card, I chose images from Magical Graduation to stamp and color with my copic markers. I used the coordinating dies to cut everything out and liquid glue to adhere them together. I also stamped and heat embossed a sentiment from the set and cut it out with a banner die.

For my background panel I took a piece of white cardstock that measured 4×5.25 inches and blended distress oxide ink at an angle. Today I started with aged mahogany and went into fired brick, fading into nothing. I spritzed the panel with water and blotted it dry. Then I added the Lightning stencil over top and spread gold Glitz Glitter Gel through it, making a point not to cover the whole thing.

Once everything was dry, I added foam tape to the panel and popped it up on a white card base. Then I added foam squares to the sentiment banner and images and popped them in place next. For finishing touches, I added a little black glaze pen to his eyes and glossy accents to the scroll tie and tassel on the cap.

Products used:
Magical Graduation stamps and dies
Lightning stencil
Thermoweb Glitz Glitter Gel – gold
Stencil pal
Foam tape and squares
Distress Oxide – aged mahogany, fired brick

I appreciate you sharing your time with me. Have a fabulous day!