Miss Ink Stamps – For My Friend

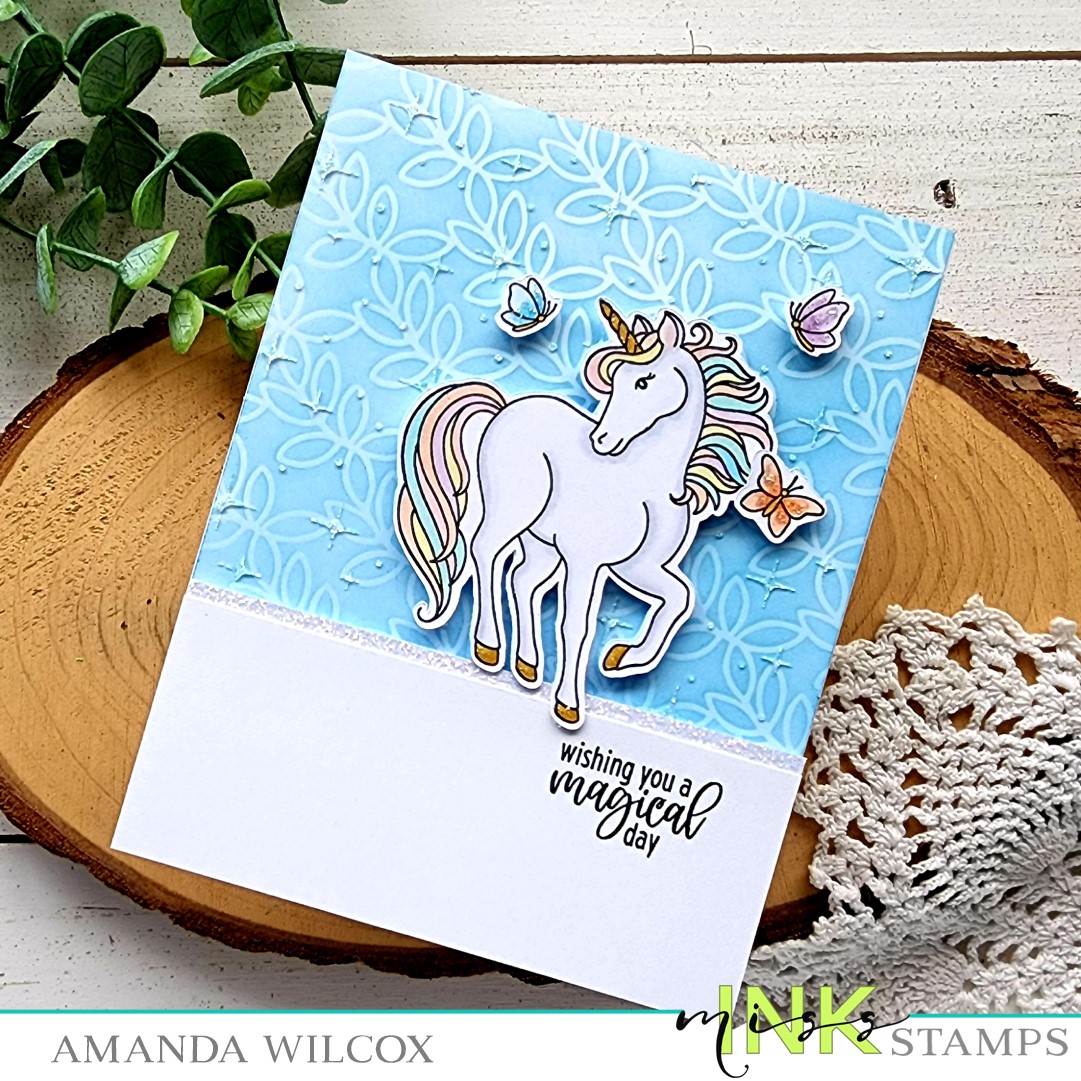
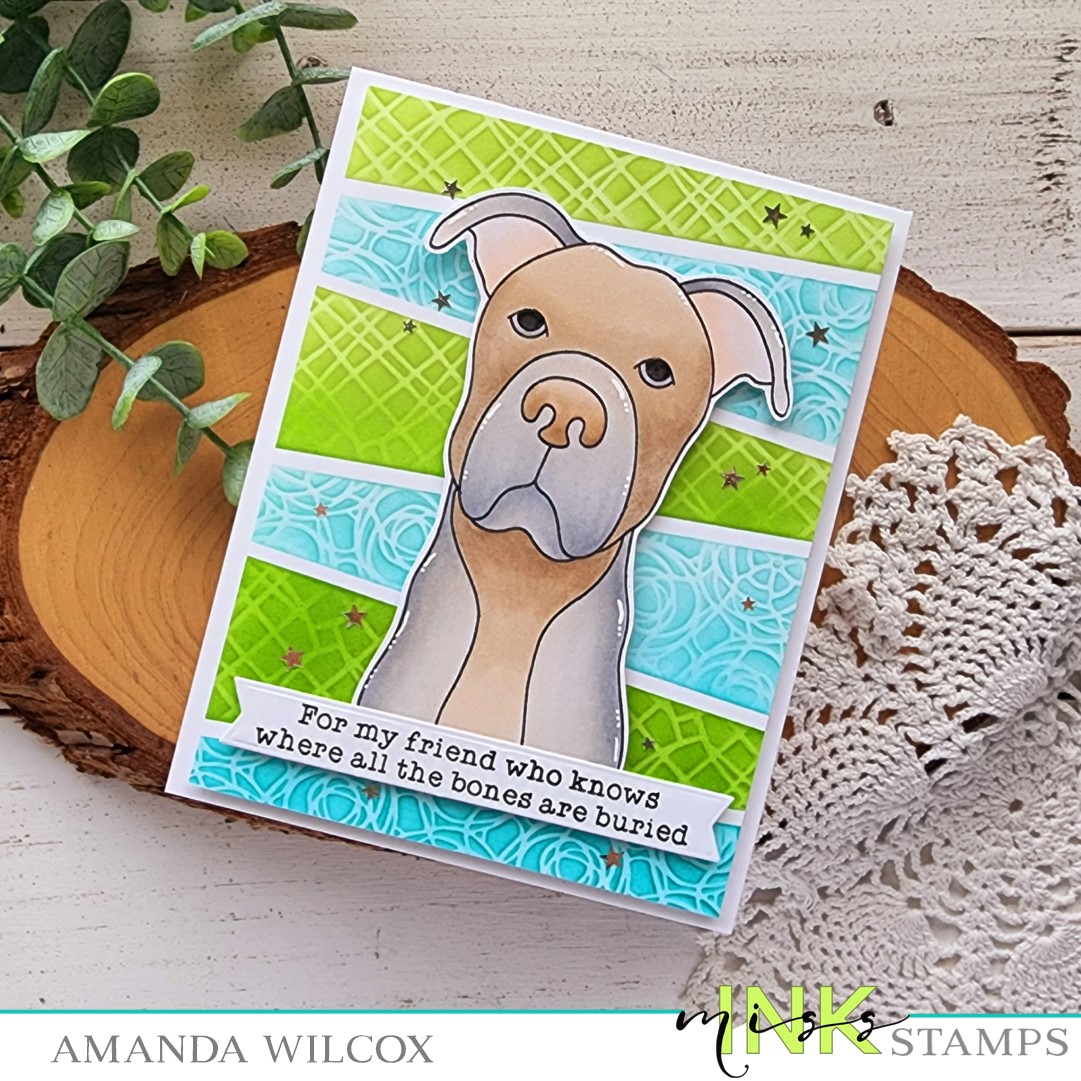
Happy Thursday everyone. I hope your week is going good. Today I have some new Miss Ink Stamps inspiration featuring some stencil layering and that fabulous pup – Slim! I have fun coloring him in different combos each time, and the sentiments in this set get me giggling too!

I stamped and colored slim with my copic markers first, then fussy cut him out and set him aside. Next, I chose a sentiment, stamped and die cut it with a banner die and glued the two together. I love my dimension so I added foam tape to the back of these and switched gears to my background.

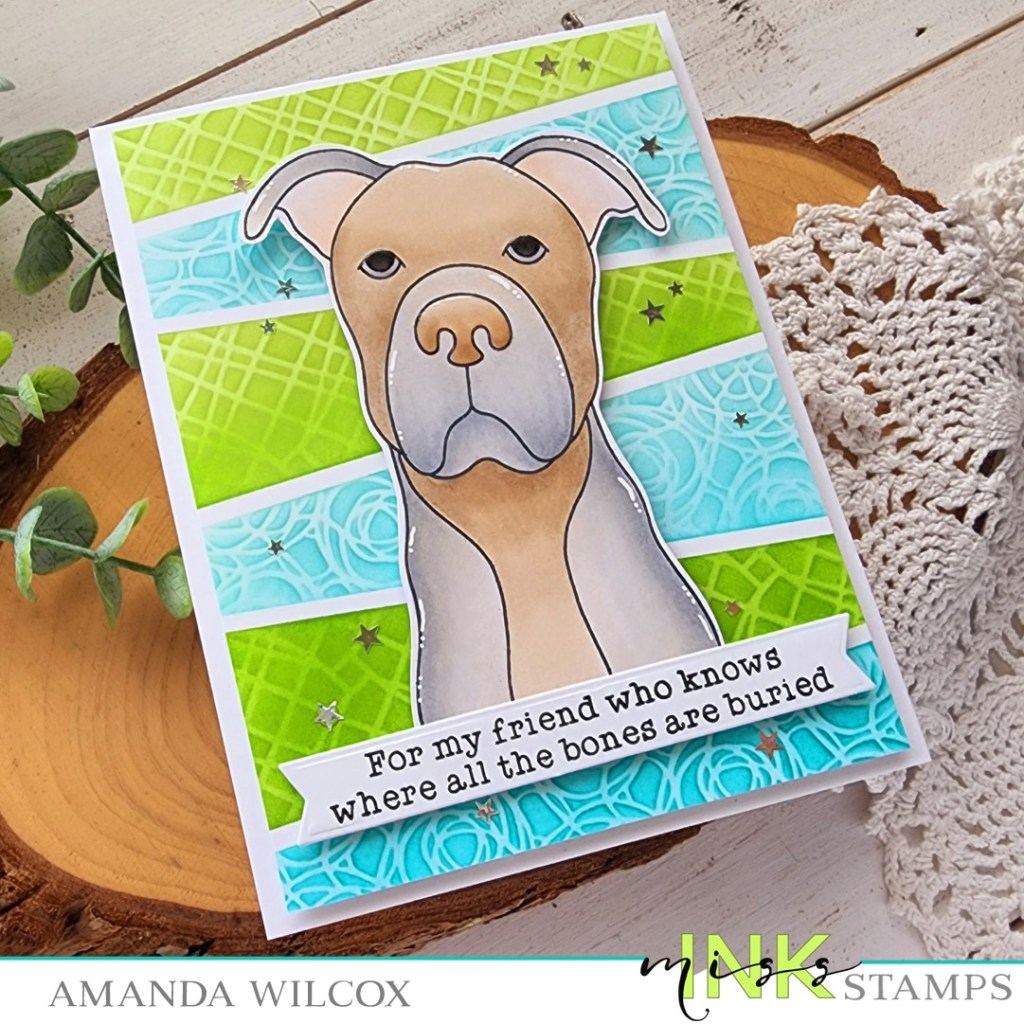
I knew that I wanted to use the new Diagonal Stripes Mask stencil so I started with that. You just place it over your cardstock, ink it up however you like, rotate it 180 degrees and ink it again to fill in all the spots perfectly. It’s so cool! Today I inked them up in gradient greens and teals, then layered another stencil over the top and added more of the same ink color to add texture to each space. The green has the square dance stencil over top and the teal has pocket full of posies.

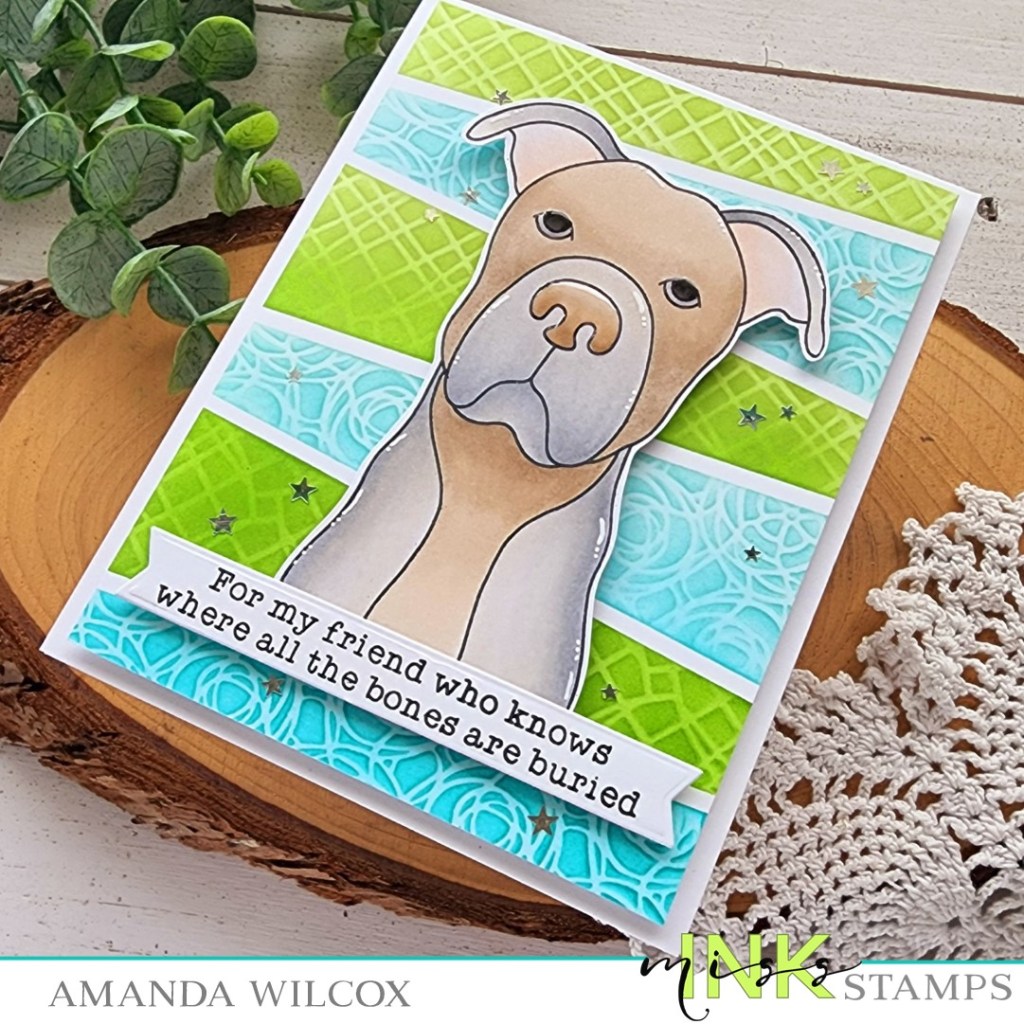
I trimmed the stenciling down to 4×5.25 inches and popped it up on a white card base with foam tape, then added my image and sentiment. For finishing touches, I added white gel pen highlights and glossy accents to Slim’s eyes and nose. Last, I glued a scattering of stars from the champagne star dust sequin mix.

I had lots of fun getting inky and coloring Slim in a brand new combo for me. I hope you enjoyed today’s project too.

Products used today:
Slim’s Whims stamps
Square Dance stencil
Diagonals Masking stencil
Champagne Star Dust sequin mix
Lawn Fawn ink – jalapeno, celery stick, mermaid, peacock
Blending brushes
Foam tape
Glossy accents

I appreciate you sharing your time with me. Have a fabulous day!

Miss Ink Stamps – Go Bananas

Hey friends! I have a really cool Miss Ink Stamps card to share with you today. It opens in a fun way and I did a little deco foil flock with my stenciling for added interest.

I started by die cutting a yellow panel from an A2 stitched rectangle die. I inked it up with the bananas stencil, first with yellow ink and then a little green on the tips of the banana stems for some dimension.

Next, I cut a stitched banner from kraft cardstock and started inking it up with the Jungle Vines stencils set. I started with two browns on the vines and green for one layer of leaves. For the second layer, I spread Thermoweb transfer gel blanco through it and set it aside to dry. While it was drying, I stamped and colored a monkey and the vine image from Go Bananas and cut them out with the scan-n-cut. After the leaves were dry and the laminator was heated up, I ran the banner through with green deco foil flock in a craft & carrier sheet. I love the fuzzy texture in the background.

For this card, you lift the banner up to write your message. It doesn’t open like a traditional card at all. To do this, I cut two more stitched banners, the same size from kraft cardstock and also a scrap as long as the banner and about an inch wide. I scored that down the middle and adhered it to the back of the stenciled banner, then to the back of the other banner. I used the third banner to adhere to the back of the stenciled one, hiding the hinge I created. It’s purely cosmetic and not necessary to make your card open.

Before adding my images, I placed the banner in my MISTI and stamped a sentiment on the lower right. Then I added the images with foam strips and trimmed off the excess with scissors. Last, I added this to the yellow panel, and my card is all finished.

Isn’t it so much fun!?! If you wanted extra space to write or maybe hide a gift card or something, you could always mount this on a regular card base but you totally don’t have to!

Products used today:
Go Bananas stamps
Bananas stencil
Jungle Vines stencil
Thermoweb transfer gel blanco
Deco Foil Flock – green envy
Stencil pal
Foam strips

I appreciate you sharing your time with me. Have a fabulous day!

Miss Ink Stamps – I’m Bacon You a Cake Slider Pop Up Card

Hello everyone. Thanks for stopping by today. This project was an absolute blast to create and by the time I was adding sentiments, I was cracking up. It was so great! I hope you enjoy it too.

Here’s a look at the card all folded up flat like it would come out of the envelope. For the front I used the Punny Farm Pigs stamps and dies from Miss Ink Stamps. I colored everything with my copic markers and cut it all out. Then I took an A2 panel and inked up the Scene Builder: Clouds stencil on it plus an extra for underneath. I layered the Sparkles stencil over the top and chose a peach ink for that to tie in the color palette I used in my coloring.

Next, I cut the main front panel with the Heffy Doodle Slider Card die and also created a peach card for the pull out portion. Using all the pieces as my guides, I stamped sentiments on the inside panel and the pull out one as well. I added some confetti around “Happig Birthday” and a cupcake below “I’m Bacon You a Cake” for fun.

Here’s a little look at the pull out panel. I just think all the puns are so fun!

I used scrappy tape to adhere my pieces together and added it all to a white card base. Then I trimmed the stamped strings off the balloons and added string to them instead. I pulled them taut and adhered them to the back of the piggy. I connected the two with a strip of acetate and glued the pig to the card panel below the fold line only. Be careful here or your mechanism won’t work.

I adhered the other piggy, cake and gift with foam squares only on the bottom portion so the slider still moves but they stay put. Then I finished everything off with a scattering of fun sequins.

Products used today:
Punny Farm Pigs stamps and dies
Scene Builder: Clouds stencil
Sparkles stencil
Heffy Doodle Slider Pop Up dies
Pawsome Stamps campfire sequins
Scrappy Tape 1/4″
Foam squares

I appreciate you sharing your time with me. Have a fabulous day!

Miss Ink Stamps – Hippo Infinity Shaker Card

Hello again crafty friends! I’m so glad you stopped by today. I have an infinity shaker card to share with you featuring goodies from Miss Ink Stamps today.

When I saw the Artsy Abstracts stencil set, some of them reminded me of water and I really wanted to try pairing it with the super adorable Hippo Hooray set. So, that’s the fun I have to share with you today.

I started by choosing a few images from Hippo Hooray, stamping and coloring them with my copic markers. I used the scan-n-cut to cut them out and set them all aside while I played with my stencils!

For that, I started with a light blue cardstock panel measuring 4×5.25 inches and a few blue and teal inks to use with my stencils. I inked up a few blobs and then added the texture detail layer with teal.

I used some discarded stamp packaging to create an infinity shaker and poured in Twiddler’s Nook princess rings confetti embellishments for my shaker. I thought these looked a bit like bubbles. I sealed it up and adhered it to my card front.

I added a few seaweed images with tape runner but the rest are adhered with foam squares. Finally, I stamped and heat embossed a sentiment, die cut it with a strip and popped it on with foam squares as well.

The only finishing touch I added to this card is black glaze pen to the eyes of all the critters and a little white highlight added back in to the hippo.

Products used:
Artsy Abstracts stencils
Hippo Hooray stamps
Twiddler’s Nook Princess Rings – Cinderella
iCraft XXL Tape Runner
Foam squares

I appreciate you sharing your time with me. Have a fabulous day!

Miss Ink Stamps – Artsy Abstracts Thank You Card

Happy Thursday everyone! Thanks for stopping by today. I have a card featuring a new stencil set from Miss Ink Stamps called Artsy Abstracts. I just love the idea behind these stencils and have had so much fun playing with them in different ways. Today I went bright and bold for a little toucan fun.

For this card, I started with an A2 size panel of white cardstock. I chose the smaller “blob” stencil in the set and the smaller accent stencil as well. I was very random and unintentional with my placements today. I simply chose a color, inked up a blob, chose a detail accent and inked it up somewhere around it and moved on to the next.

Once my panel was decorated to my liking I played with different images and sentiments to see what I wanted to add. First, I chose the simple thank you sentiment from Fall Bouquet and heat embossed it in black on a strip of vellum. That seems a bit plain so I trimmed down the inked panel to 3 3/4×5 inches, wrapped the vellum around and mounted it on a piece of black cardstock measuring 4×5 1/4 inches. I added foam tape to that and added it to a white card base.

I actually walked away from my card for the night and came back the next day. Still unhappy with it, it was just too plain for me. I went through my stamps again and this time the Pretty Birds caught my eye so I gave them a go and totally love how wild and fun this looks with them on it.

For finishing touches, I added glossy accents to both of the bird beaks but that’s all today.

Products used:
Artsy Abstracts stencils
Fall Bouquet stamps
Pretty Bird stamps
Blending Brushes
Lawn Fawn dye inks
Thermoweb 3D foam tape and squares
Glossy accents

I appreciate you sharing your time with me. Have a fabulous day!

Miss Ink Stamps – Coffee Stencil Trio

Hey friends! I’m on the Miss Ink Stamps blog today highlighting the super fun coffee themed gift with purchase stencil that is available! I have two cards and a bonus gift tag to share.

I started today by taking a 6×6 piece of white cardstock and inked it up very messy and random with distress oxide inks in tea dye, gathered twigs and ground espresso. Once I liked the look of the panel and spritzed it with water and then flicked black acrylic paint on the whole thing. After it was dry I spread Thermoweb transfer gel blanco through the coffee stencil. I removed the stencil, cleaned up and set the panel aside to dry.

Once the panel was dry, I heated up my laminator and ran the whole panel through with copper deco foil in a craft & carrier sheet. Then I trimmed the text blocks and rainbow apart using my paper trimmer. I adhered the text blocks to black panels giving them a small border and popped that up with foam tape on white panels.

For this card, I inked up a teal A2 panel with the new Latte Love stencil and white pigment ink before adding the foiled layers to the center.

For the second card, I did the same thing with the foiled panel, adding the white and black mat layers before inking up the teal panel with the Lava Lamp stencil and darker teal ink for a tone-on-tone contrast.

Bonus! This stencil has a third image that is a cup ring/coffee bean rainbow! It’s so fun and different! This time I decided to add it to a tag that I could tie to a box of K-cups to share with a friend.

I cut the large tag from textured teal cardstock and the stitched layer from white. I attached the Perfectly Plaid stencil with Pixie Spray and inked it up with Dusty Concord distress oxide ink. Since I pounced my sponge dobber instead of using a brush I got this cool distressed looking texture. I splattered the panel with watered down Cracked Pistachio distress oxide ink to tie in the teal color and adhered the tag layers together.

Using my MISTI I stamped the sentiment from Brewtiful on the lower center and popped the rainbow up with foam squares. To finish it off I threaded some ribbon through the hole and tied it with twine.

Don’t miss your chance to get this super fun gift with purchase stencil! Click HERE for all the details.

Products used today:
Free with Purchase Coffee Stencil
Perfectly Plaid stencil
Latte Love stencil
Lava Lamp stencil
Brewtiful stamps
Thermoweb Transfer Gel Blanco
Thermoweb Deco Foil – copper
Thermoweb stencil pal
Thermoweb 3D foam tape
Thermoweb Pixie Spray
Avery Elle Easy Layer Tag dies
Distress Oxide Ink – tea dye, ground espresso, gathered twigs, dusty concord, cracked pistachio

I appreciate you sharing your time with me. Have a fabulous day!

Miss Ink Stamps – To Perk You Up

Welcome friends! Today I have a bit of caffeinated inspiration featuring stamps and stencils from Miss Ink Stamps. Tomorrow is the start of the Coffee Loving Cardmakers Spring | Summer Hop and I wanted to get you warmed up today!

To start this card, I had an idea in my head, so I pulled out my stamps and laid them on a card from to see if things would fit the way I was hoping. It seemed to work out so I stamped everything and colored the images with my copic markers. I used the scan-n-cut to cut them all out and arranged them in layers, using liquid glue to adhere small bits together at a time.

Once I had the general shape of my images together I pulled out an A2 panel and inked it up with cracked pistachio and mermaid lagoon distress oxide inks. Then I layered the Springtime Lace stencil over the top and added another layer of the same colors over the top. I spritzed the panel with water and then gold watercolor and set it aside to dry.

Once the panle was dry, I trimmed it down to 4×5.25 inches and added it to a white card base with liquid glue. I added the images with a combo of liquid glue and foam squares next. Finally, I put the whole card in my MISTI and carefully stamped my sentiment nestled in beneath the banner.

For finishing touches I added some glossy accents to parts of the coffee beans and berries on the branch. Then I added unicorn Stickles to the flowers and leaves.

Be sure to start at the Coffee Loving Cardmakers blog tomorrow and hop along for chances to win prizes at lost of stops, including Miss Ink Stamps and back here too!

Products used today:
Springtime Banners stamps
Springtime Lace stencil
Brewetiful stamps
Bubbles stamps
Distress Oxide – cracked pistachio and mermaid lagoon
Glossy accents
Stickles – unicorn

I appreciate you sharing your time with me. Have a fabulous day!

Miss Ink Stamps – Wishing You a Magical Day

Hello there! Thanks so much for stopping by. Today I have a little inspiration featuring some magical products from Miss Ink Stamps. I pulled out the Lovely Unicorns because it had been a minute since I colored these beauties up and decided to pair some beautiful stencils together too!

I started by stamping my images out and coloring them with my lightest copic markers. I wanted to keep things soft and sweet for this card. Then I used the scan-n-cut to cut them all out.

Knowing the general design direction I was going, I trimmed a piece of white cardstock down to 2×4.25 inches and stamped my sentiment on the upper right side. I added 1/8″ scrappy tape to the edge and adhere a strip of silver cardstock to it. Then, I set this aside with my images while I worked on the stencil panel.

I have really been itching to try out the new On the Vine stencil to see how it was in person and I can’t even tell you how much I love it. It’s beautiful and is going to be so versatile with any images you try it with! Today I inked up a white piece of cardstock with light blue ink. Then I sprayed the stencil with Pixie Spray and stuck it down before adding another layer of the same color blue ink over the top. The moment I peeled the stencil away I was in love!

But thanks to my friend Lynnea, I just can’t leave these alone without trying to layer a little something over the top. Today for that added magical feel, I used the Sparkles stencil with iridescent Glitz Glitter Gel from Thermoweb for the perfect amount of magic!

Once the glitz gel was dry, I lined everything up to figure out final spacing and decided to trim the sentiment panel down to 1.5 inches and pop it up with foam tape. Then I added foam squares to the images and added them next.

For finishing touches I added unicorn Stickles to the unicorn horn and hooves and also the butterfly wings. Then I took my Wink of Stella glitter brush pen and added a little shimmer to the unicorn mane and tail too. You can’t have too much sparkle on a card like this, ever!

Products used today:
Lovely Unicorns stamps
Sparkles stencil
On the Vine stencil
Glitz Glitter Gel – iridescent
Stencil Pal
Pixie Spray
Foam squares
Foam tape
Wink of Stella glitter brush pen
Stickles – unicorn
Scrappy Tape – 1/8″

I appreciate you sharing your time with me. Have a fabulous day!

Miss Ink Stamps – Stenciled and Glitzed Cheetah

Hello everyone. I have a bit of Miss Ink Stamps inspiration to share with you featuring one of the new animal portrait stencil sets. These layering stencils are gorgeous and so easy to use! Today I stepped them up a bit from just inking to glitz glitter gel for some sparkle and interest.

In this stencil set you get three piecs – the cheetah shape mask, the shading layer and the spots layer. They are super easy to line up and ink how you want.

Today I started with kraft cardstock and used the mask to ink around the cheetah with peeled paint distress oxide ink, then I inked the edges of the panel with rustic wilderness distress oxide for a color gradient.

Next I added the shading layer stencil and inked it up with carved pumpkin distress oxide ink. I chose this bright color for some contrast on the kraft cardstock. If I were using white, I would probably have stuck to another color in the yellow family instead. Just something to keep in mind when you are choosing colors.

Finally, I added the spots layer and inked the whole thing up with VersaFine black ink before selectively adding black glitz glitter gel to the spots. However, I didn’t mask anything off, I was just careful when adding the glitz and didn’t mind if it went outside of the spots to the face lines or something else.

I let that dry and then went in with the frame layer for the Ins & Outs Marquis stencil to add a gold glitz frame to really bling things up. While that was drying, I stamped a sentiment from Jungle Ruins and cut it out with a rectangle die. I inked the top with a little green ink that coordinated with my card front and popped it up with foam squares.

Once it was all dry, I glued the whole panel to a white card base and my card is completely finished. Sometimes it’s not to just get inky and not color anything. I love these stencils for those moods.

Products used today:
Cheetah Portrait stencils
Ins & Outs Marquis stencils
Jungle Ruins stamps
Glitz Glitter Gel – gold and black
Stencil pal
Foam squares
Distress Oxide Ink – rustic wilderness, peeled paint, carved pumpkin
Pink & Main Layered Rectangle dies

I appreciate you sharing your time with me. Have a fabulous day!

Miss Ink Stamps – Stencil Week | Let’s Monkey Around

Hello friends! Today I’m back with a bit more inspiration featuring a new stencil from Tuesday’s release called Bluet Burst. It’s so pretty and has lots of potential, especially with the recent jungle release of stamps.

To create my card, I stamped some images from various sets – Go Bananas, Jungle Ruins and Pretty Bird – and colored them all with my Zig Clean Color Real Brush markers. I used the scan-n-cut to cut them out and set everything aside to get inky for the rest of my card.

First I took a green panel of cardstock and inked up the Bluet Burst stencil with Lawn Fawn cilantro ink and a blending brush. I cut the panel down to 3×4 1/4 inches and then added a strip of gold glitter cardstock to the top. I added foam tape to the back and set it aside.

Next I inked up an A2 panel of white cardstock with peacock feathers and tumbled glass distress oxide inks. I spritzed that with water and blotted it dry. Then, I splattered gold watercolor over the panel to tie it in with the strip I already had going on.

Finally, I added splattered panel to a card base and popped the stenciled panel up. Last, I added foam squares to my images and adhered them too. I looked through a bunch of my stamp sets to choose a sentiment and finally decided to emphasize the fun monkey theme with this one from Go Bananas. I stamped and heat embossed it on a black cardstock scrap and trimmed it into a strip before popping it up with a foam strip too.

I think it’s fun to mix and match unlikely images from different sets and play around a little. I hope you enjoyed today’s card and found some inspiration to create something wonderful to share with someone.

Products used today:
Go Bananas stamps
Jungle Ruins stamps
Pretty Bird stamps
Bluet Burst stencil
Foam tape, squares and strips
Bearly Art liquid glue

I appreciate you sharing your time with me. Have a fabulous day!