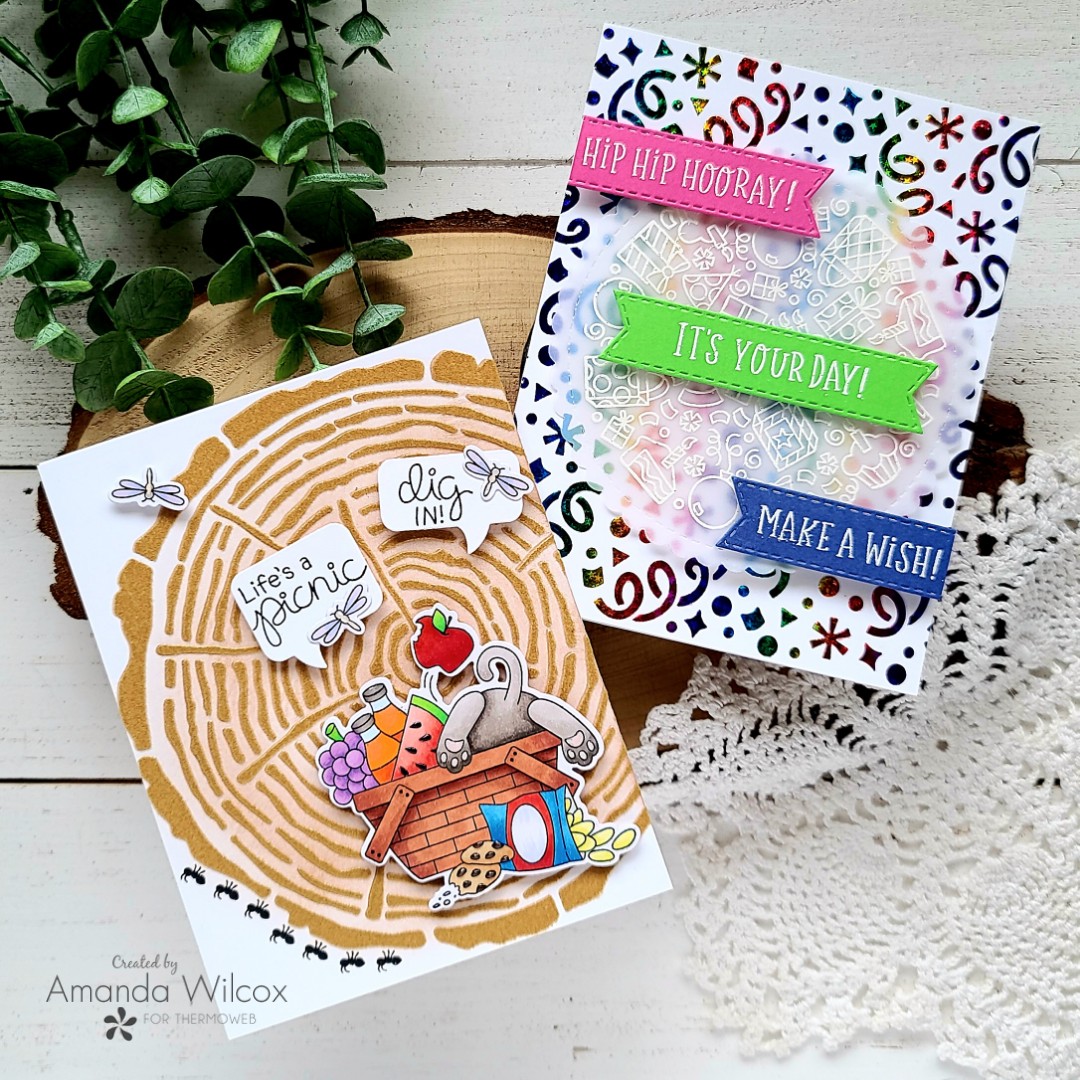
Hey friends! I’m back with a fun set of cards today for the Thermoweb | Newton’s Nook collaboration. Today I have a detailed how-to post over on the Thermoweb blog. So head there for all the true details for both of these fun cards.
On Tuesday I shared a little flocking with glitz gel and today I’ve gone back to my favorite flocking but also played with some fabulous confetti foil too!
I used the confetti stencil and foiled it with Rainglow decofoil. I kept the rest of the card simple with heat embossing for the birthday roundabout image and the sentiments on banners too.
I love the rainbow foil and the star pattern in the foil just goes perfect with the confetti stencil too! It’s so happy and fun!
Here’s a look at the adorable picnic flocked card that I created as well.
I did a little inking with the tree rings stencil before adding the transfer gel and flocking it. And aren’t those ants marching along just hilarious?!? I love that part the most I think.
Here’s a close up of the fuzzy tree rings and the glossy accents that I always love to add to the detail elements.
Be sure to head to the Thermoweb blog and Newton’s Nook blog all week long for inspiration from different design team members each day and a chance to win prizes from both companies too!
I appreciate you sharing your time with me. Have a fabulous day!
This week Newton’s Nook Designs and Therm O Web are partnering for a fabulous inspiration week! All week long both design teams will be sharing ways to add use Therm O Web products with Newton’s Nook Designs stamps! There are prizes too! Read all the way to the end of this post to find out how you can win!
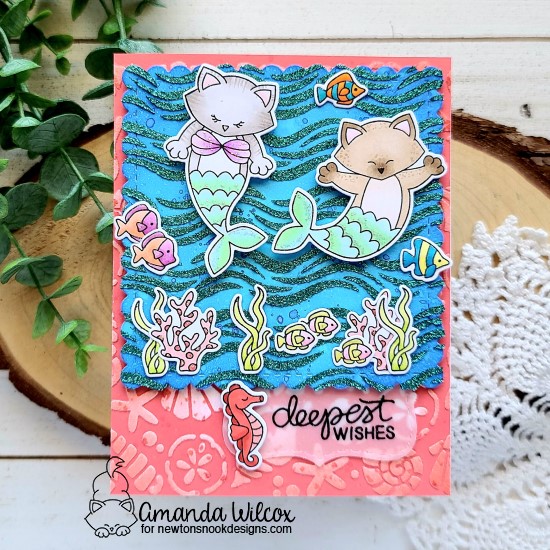
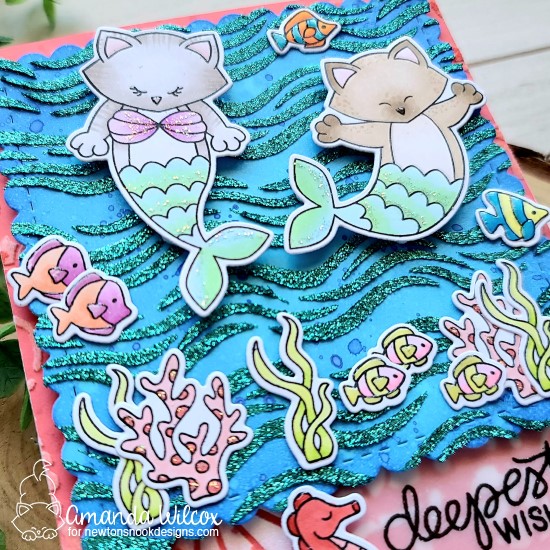
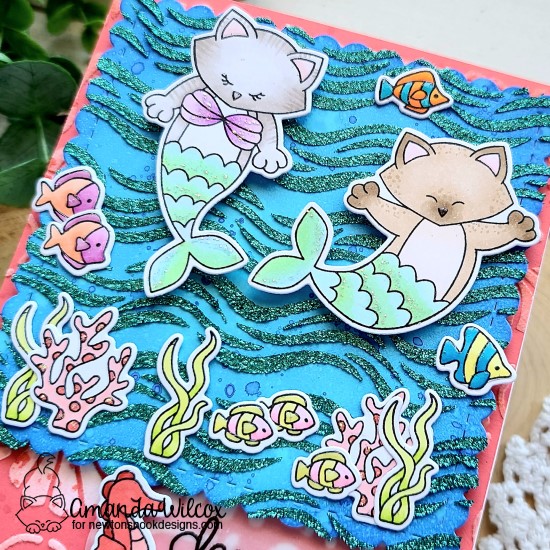
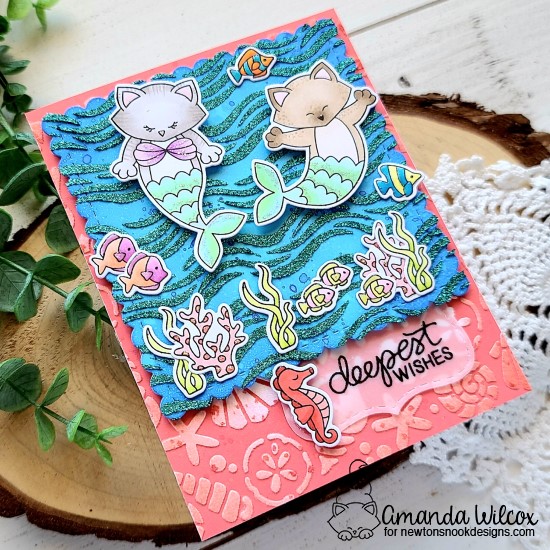
For today’s project, I started with the messy stuff first so it had time to dry while I was stamping and coloring. I applied Thermoweb Transfer Gel Blanco over a piece of melon cardstock and the Newton’s Nook seashells stencil. Then I set it aside to dry and cleaned off my tools. Next, I die cut the scalloped square from Frames Squared out of a light blue cardstock. I inked up the edges with peacock feathers and blueprint sketch distress oxide inks. Then I splatter the panel with watered down blueprint sketch. I hit this with my heat gun for just a second to dry the ink. Then I adhered the Newton’s Nook waves stencil and applied a layer of Glitz Gel in turquoise sea. I removed the stencil, set the panel aside to dry and cleaned my tools and work surface one more time.
Before moving on too far, I turned my laminator on to heat up nice and hot while I was waiting for things to dry. Then, I stamped images from Scuba Newton and Purr-maids stamp sets and colored them all with my copic markers. I used the coordinating dies to cut the images out. Then I die cut the label shape from Frames Squared and heat embossed a sentiment from Scuba Newton in black.
Finally, my panels were dry so I ran the seashells through the laminator with Deco Foil Flock in white latte. I love all the glitter and shiny things but this flock really gets me every time! I love using it and the feel of it when you have your final product. But, I digress. I took the seashell panel and went around the edges with abandoned coral distress oxide ink, then flicked watered down festive berries all over for extra texture. I also love that this ink doesn’t take away the fun fuzzy feeling of the flock at all! It just gives extra visual texture to your panel.
Now moving on to assembly. I adhered the seashell panel to a white card base with the iCraft Ultra Bond liquid adhesive. I added foam tape to the back of the square glitz gel panel and adhered the sentiment label to the bottom, then popped it in place on my card. I added some of the images with liquid glue and placed acrylic blocks on top to help them dry on the glitz gel. While that was sitting, I added foam squares to the back of the other images. I removed the blocks, popped the final images in place and switched gears to finishing touches.
I started with glossy accents on different parts of each fish and the seahorse, as well as the kitty noses. Then I came back through with unicorn Stickles on the purr-maid tails, seashell bra and the coral at the bottom of the scene.
I appreciate you sharing your time with me. There are more amazing projects today over on the Therm O Web blog so pop over there for more inspiration!
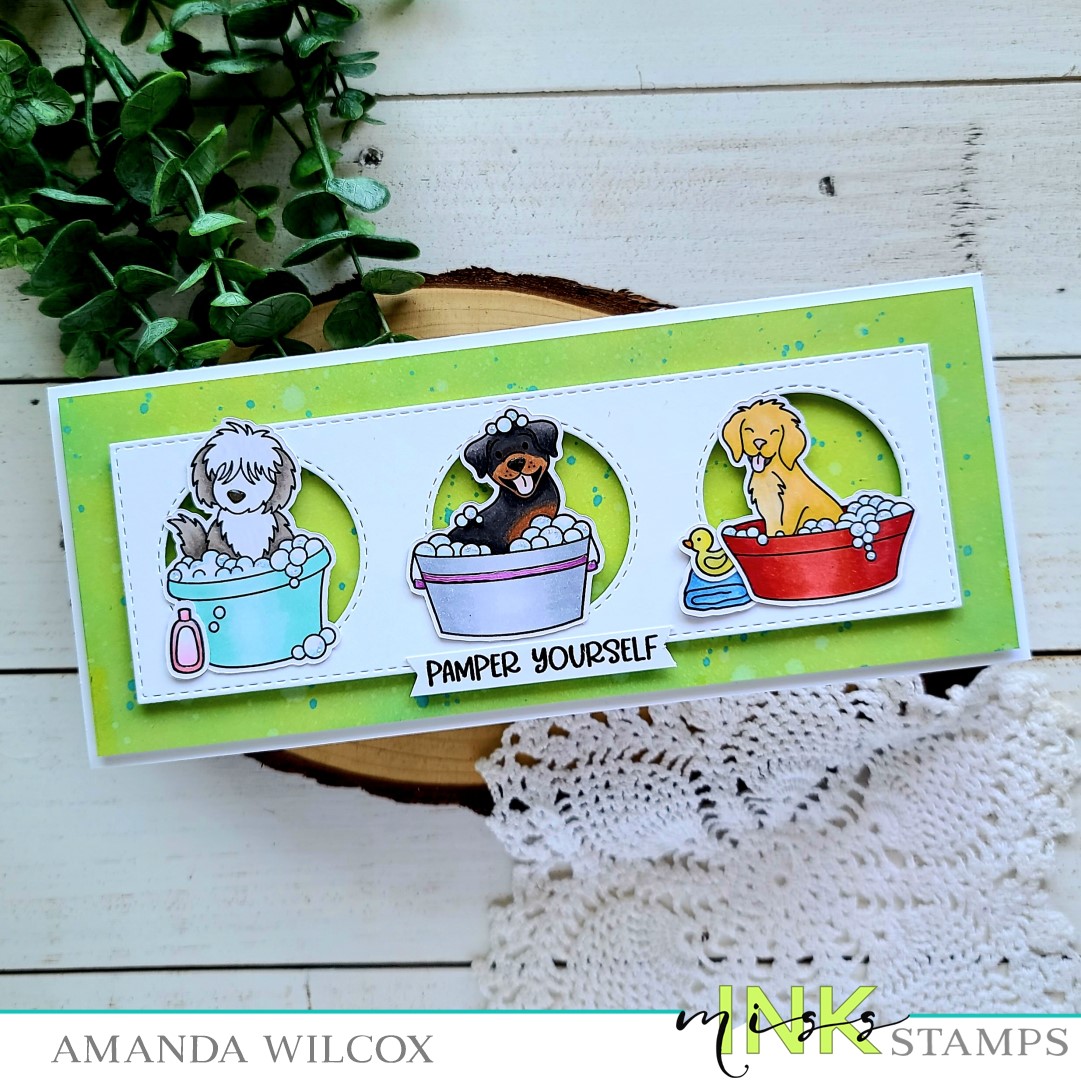
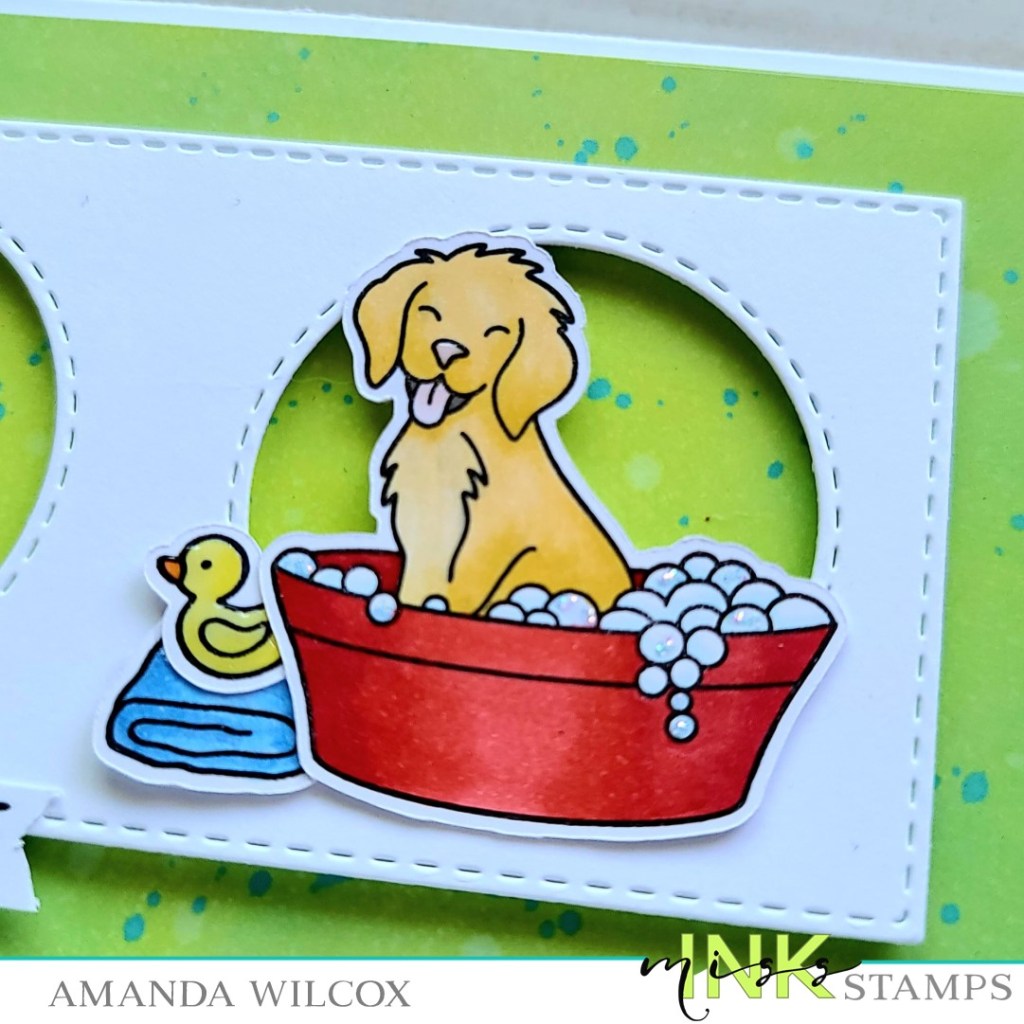
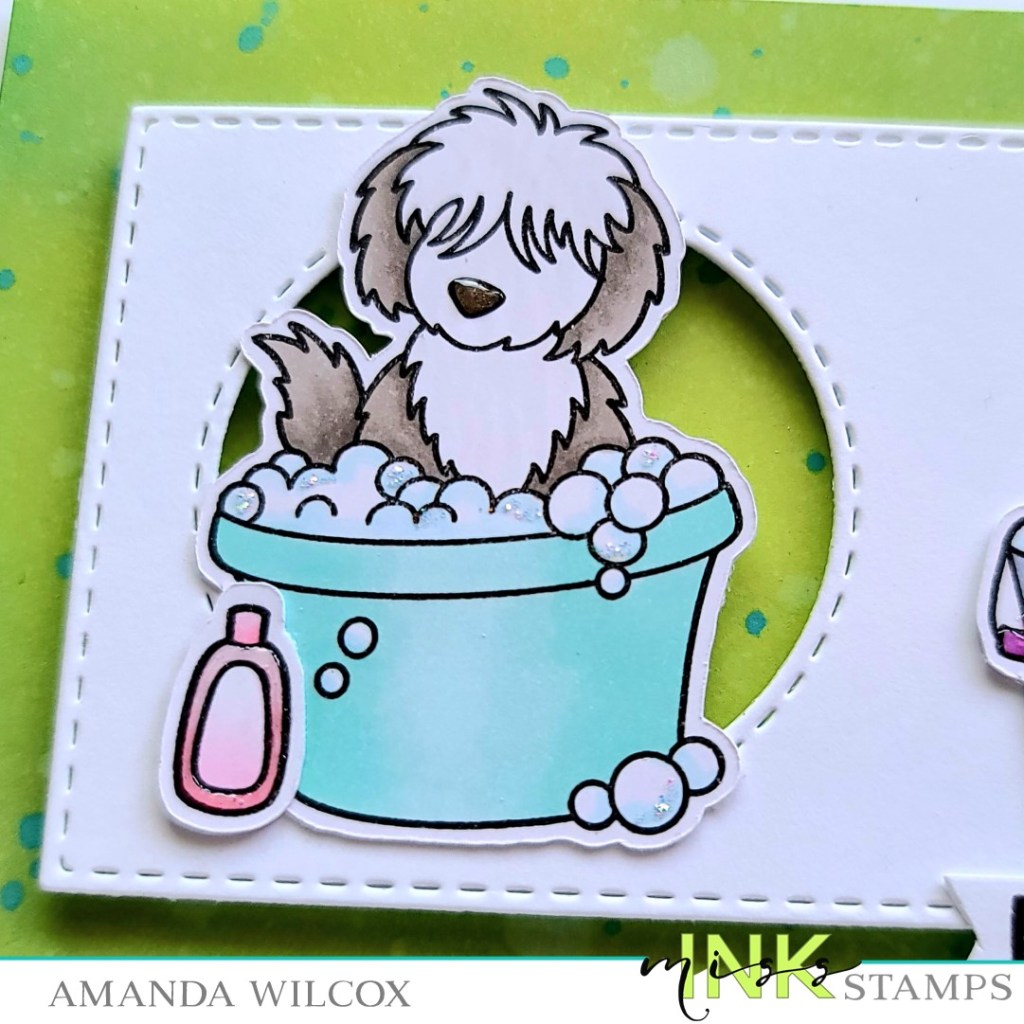
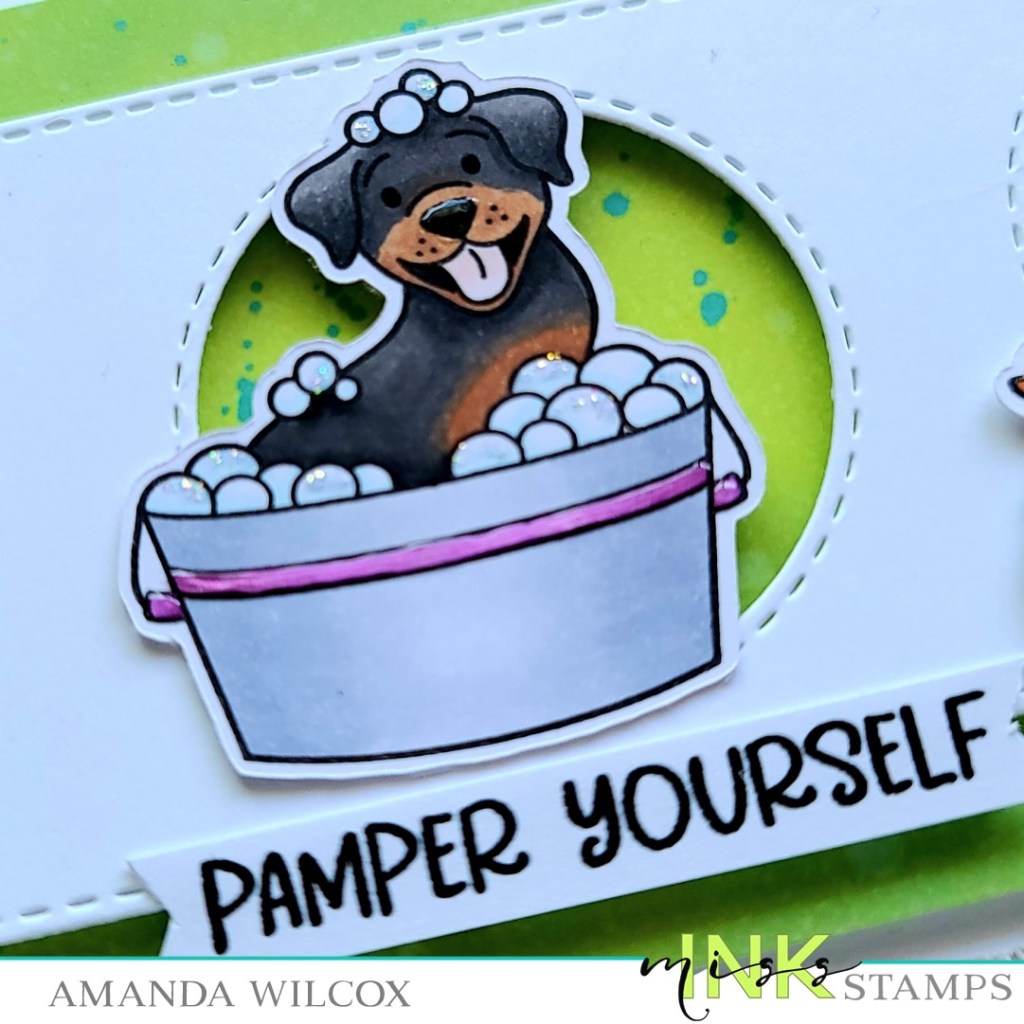
Yippee!!! It’s release day for Miss Ink Stamps and we’ve got so much fun to share with you! Today I have an adorable card featuring the new Rub-a-Dub Doggies stamps! I love these cuties so much!
I stamped those cute pups and colored them with my copics. Then I used the scan-n-cut to cut them all out. I inked up a panel with twisted citron and lucky clover distress oxide inks. Then I spritzed it with water and flicked watered down lucky clover on the panel. Once it was dry, I trimmed it down to 3.25×8.25 inches and added foam tape to the back, adhering it to a white card base measuring 3.5×8.5 inches.
Then I die cut a panel from the Newton’s Nook Slimline Frames & Portholes set and added foam tape to the back of that too. I put it in place on my card and added the pups and their accessories one at a time to each window with a combination of foam squares and liquid glue.
Then I went through and added glossy accents to the noses, shampoo bottle, rubber ducky and purple on the middle washtub. Finally, black glaze pen to the one set of eyes that are open and some and some unicorn Stickles on the bubbles.
I hadn’t specifically planned a sentiment, it was hard to choose. So last, I stamped one and trimmed it into a strip. Then I used my scissors to create banner ends, added a foam strip and added it to my card.
Isn’t this just too adorable! I love all the different types of dogs in this set. They’re really awesome!
Don’t forget to head over to Instagram and YouTube to comment for chances to win new products from the release!
I appreciate you sharing your time with me. Have a fabulous day!
Hello everyone!!! It’s the start of a really fun week! I hope you’re ready because it’s Newton’s Nook release week which means starting today we have reveals through Thursday with the release available for purchase on Friday! We’re kicking things off today with 2 new stamps and coordinating dies, along with a new fabulous stencil!
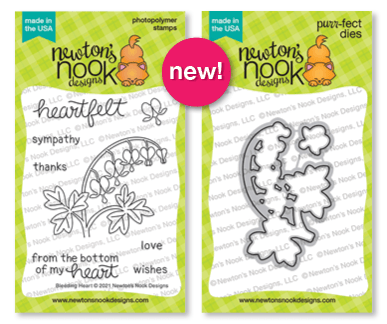
Gnome Garden Stamps and Dies
Bleeding Heart Stamps and Dies
Petite Clouds Stencil
Phew! That’s a whole lot of goodness for you all up front! Plus I have 2 fun cards to share with you featuring these goodies.
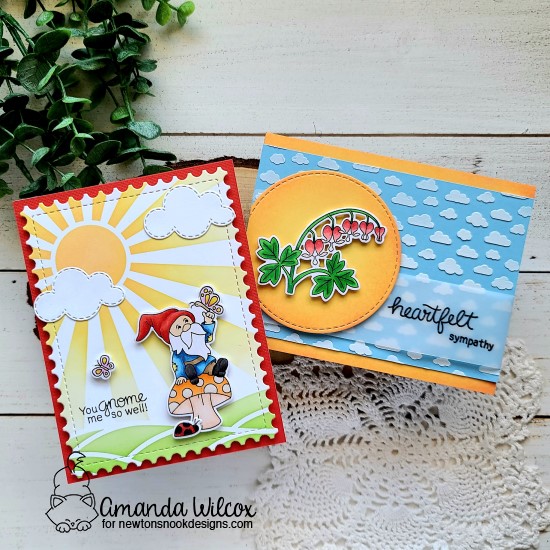
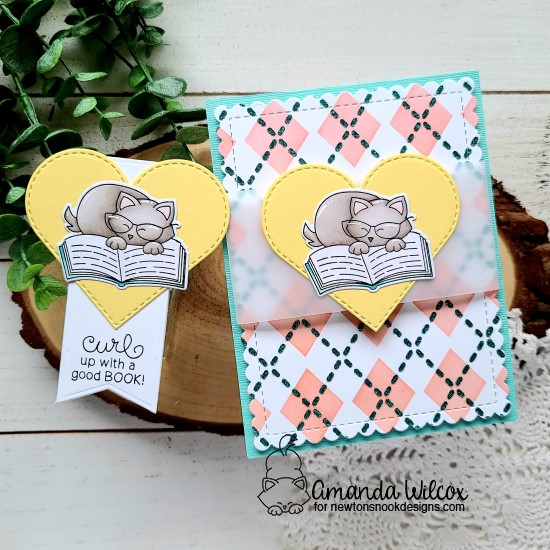
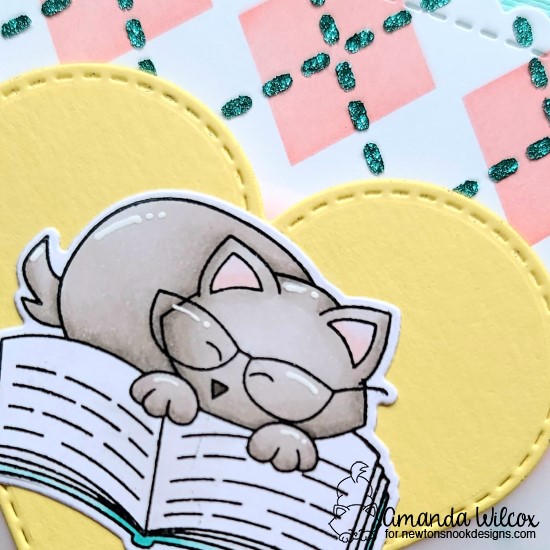
For my card featuring the bleeding heart image, I used texture paste with the new petite clouds stencil on a blue panel. I trimmed a yellow panel to A2 size and also die cut a circle frame from the same yellow. Then I inked up the edges of both with an orange ink for a little texture. I heat embossed the sentiment in black on a vellum strip and wrapped it around the cloud panel. For assembly, I used liquid glue to add the yellow panel to a white card base, then glued the vellum strip around the cloud panel and adhered it down. Last, I popped my image up on the circle and popped that up on the card.
Isn’t this image beautiful?!? I’m not a floral person but I really enjoyed coloring it and when I looked them up to see what colors I should use, found that there are lots of variety which is super fun as well.
Oh my goodness, this adorable Gnome Garden set is just too cute for words! I managed to choose one sweet image from the set, colored him up and used the coordinating dies to cut him, an extra butterfly and ladybug out. Then I inked up the sunscape stencil and used the framework die to cut it out. I also cut some clouds with the sky scene builder set and started assembling everything.
I added a red panel to a white card base and popped the stenciled panel up with foam tape. I used liquid glue to add my clouds to the sky, then foam squares to add my gnome, butterfly and ladybug to the scene. And I’m not even going to fudge that I hadn’t planned a sentiment so I placed my whole card in my MISTI and stamped it at the very end. For finishing touches, I added glossy accents to the mushroom dots, butterflies and ladybug. Then I added a little Wink of Stella glitter brush pen to the clouds in the sky.
Would you like to win the “Gnome Garden” or the “Bleeding Heart” Stamp Set? We will choose ONE lucky winner for each stamp set!
Here’s how to win: Comment on the NND blog and Design Team blogs (see list below)! Thewinner will be chosen at random from the collective reveal posts. Make sure to check out each of their blogs and comment for your chance to win. You will not know which blog has been chosen so the more you comment on the better your chances are of winning! You have until Thursday April 22nd at 9pm ET to comment — winners will be announced on the blog post on Friday, April 23rd.
Check out all the awesome Design Team Blogs below to enter:
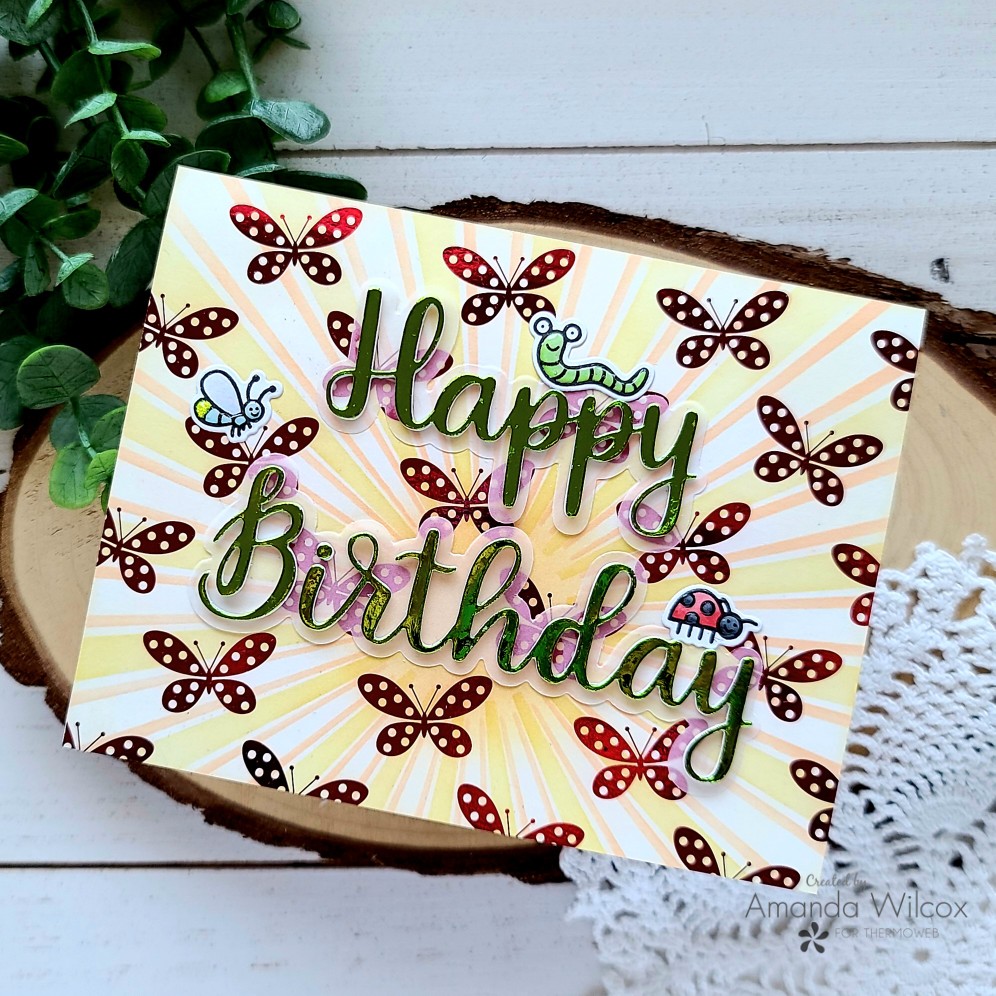
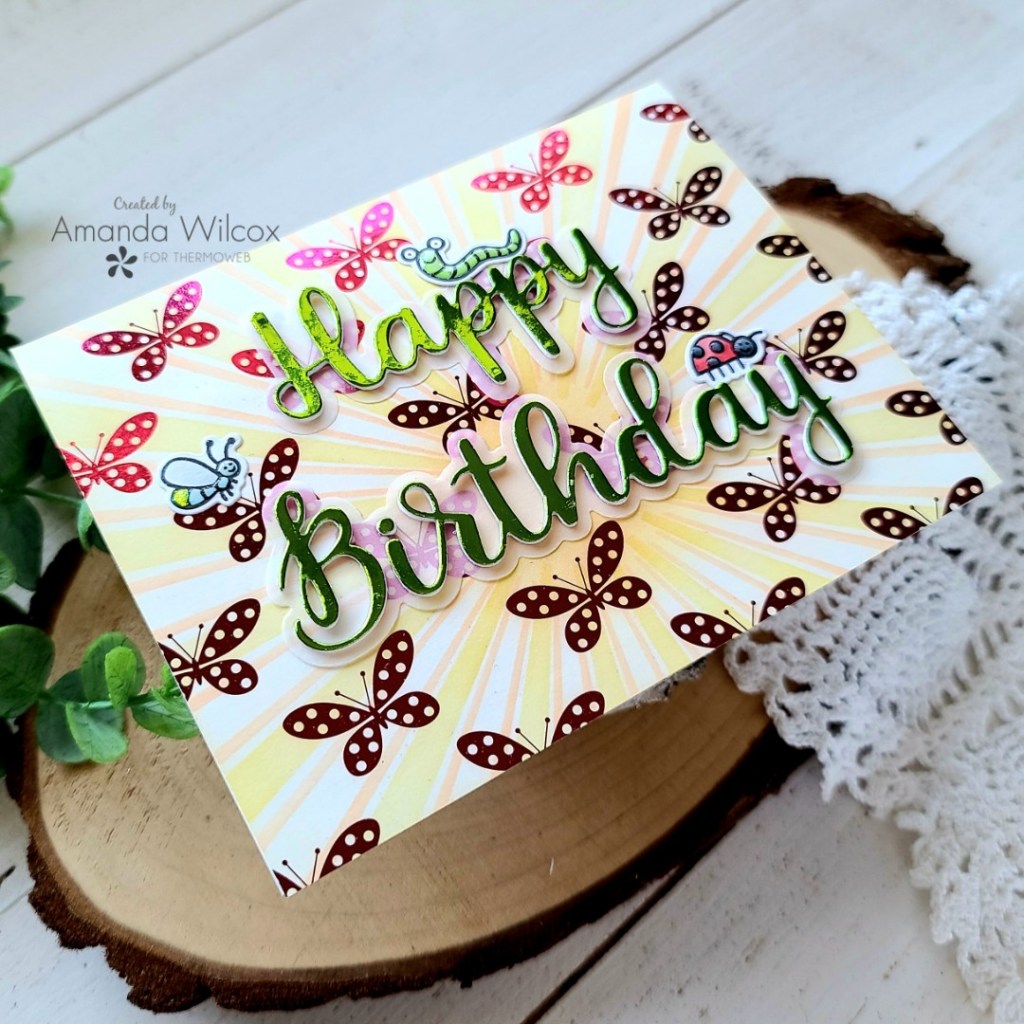
Hi again! I’m back today with a really fun Reverse Confetti birthday card celebrating all this sun we’ve been having where I’m at.
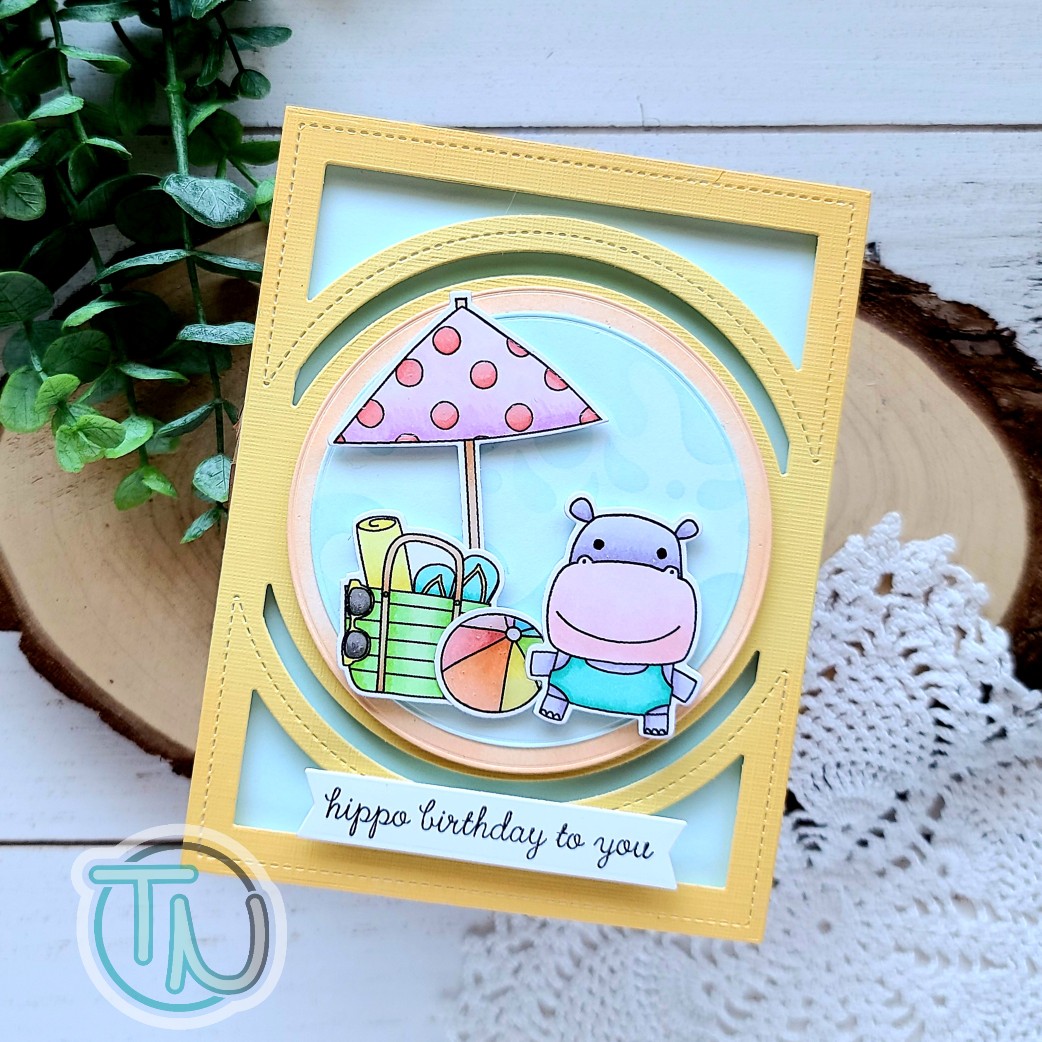
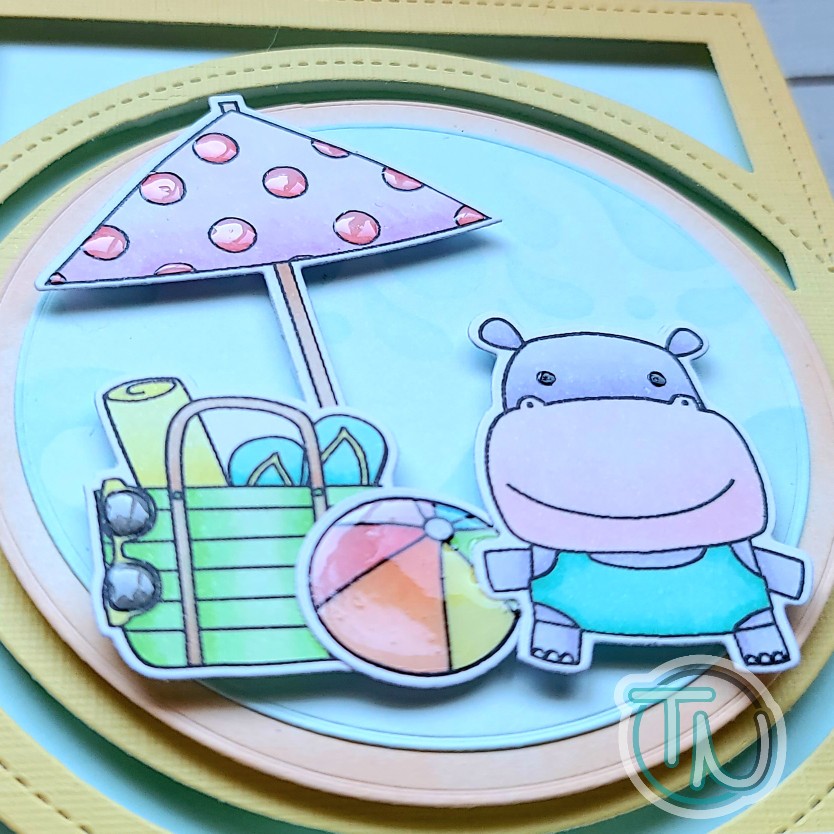
For today’s card, I started by stamping the images I knew I wanted to use from Hippo Pool Party and colored them with my copic markers. Then I used the coordinating dies to cut them out and switched gears to figure out my background.
I also knew that I really wanted to create a little scene in the middle of the Center Circle Cover Panel so I pulled that out and ultimately cut it from yellow cardstock. Then I used my Trinity Stamps embossed edge circle stack to cut a couple circles that fit inside. The larger one from white which I inked up orange, and another from light blue which I inked up with the Newton’s Nook waves & splashes stencil for a little texture.
Moving in to assembly, I cut another blue panel to cover my white card base that matches the blue waves circle. I popped the frame up with foam tape. Then I glued the circles together and added them to the frame with foam tape as well. Last, I added my images with a combination of foam squares and liquid glue. I stamped a wonderfully punny sentiment from the Hippo Pool Party set and cut it with a Pink & Main sentiment strip die and added it to the card front with foam squares.
I finished my card off with some glossy accents on all the necessary places, like the beach ball, glasses, umbrella dots and, last but not least, the hippo’s eyes.
This is such a fun card and just perfect for summer birthdays that you might have coming up very soon!
I appreciate you sharing your time with me. Have a fabulous day!
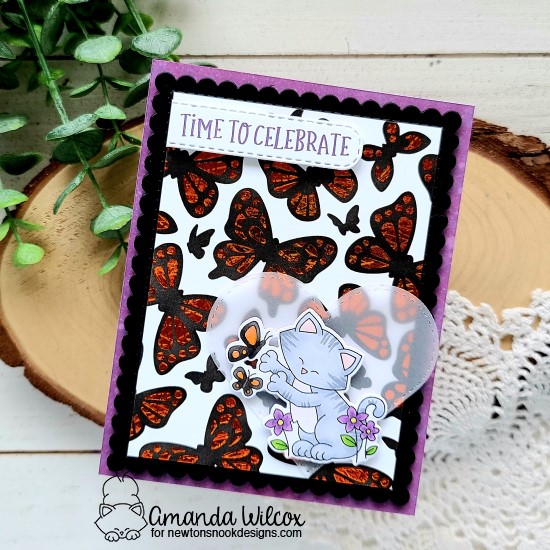
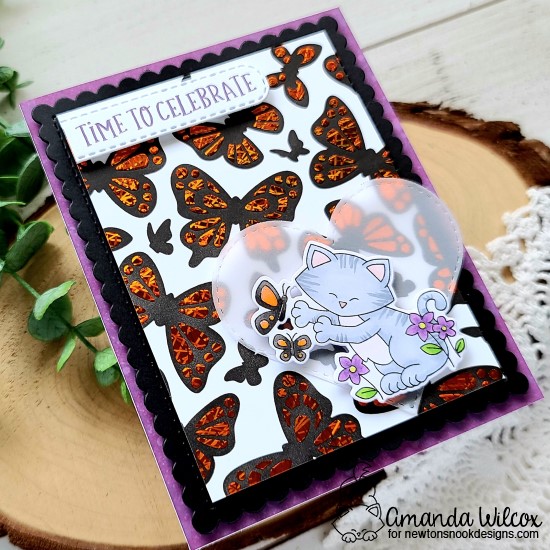
Welcome! Welcome! Today I’m over on the Newton’s Nook blog sharing a REALLY FUN spring card that would be amazing for a bunch of different occasions. I specifically chose the generic sentiment so I had flexibility later on when I am ready to use it. Do you ever do this with your cards?
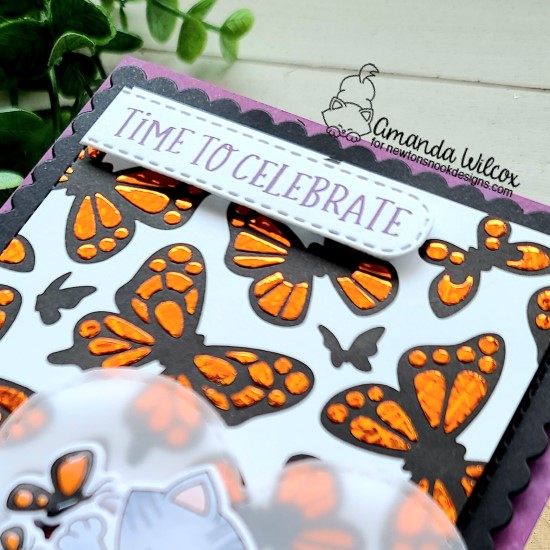
I had been wanting to play with the butterflies stencil for a while so I finally pulled it out and inked it up. I inked the first layer black and when over the spots layer with Thermoweb transfer gel. I let it dry and ran it through my laminator with orange sketch deco foil. I love the texture this foil has! It’s so cool! Then I chose an image from Newton’s Flower Garden and colored it with my copics. I used the coordinating dies to cut it out.
Playing off the colors I chose for the image, I inked up a white panel with distress oxide inks in seedless preserves and dusty concord. I spritzed the panel with water and let it dry. While I was waiting I die cut the scalloped rectangle from Frames & Flags and a vellum heart from the heart frames set.
For assembly, I adhered the purple panel to a white card base with liquid glue. Then I added the black scalloped panel with foam tape. I trimmed the foiled butterfly panel down to 3.5×4.75 inches and added it with foam tape as well. I popped my Newton image up on the vellum heart with foam squares, then I hit liquid glue behind that portion to adhere it to the butterflies.
For my sentiment, I die cut the rounded banner from the banner trio set and stamped a sentiment from Birthday Roundabout in the same purple ink as the background panel. I trimmed off one end, added foam squares and popped it in place.
For finishing touches, I added glossy accents to the flower centers, Newton’s nose and parts of the butterflies.
This bold fun card is sure to make the recipient smile. I just love the dark and bright together with the happy Newton image. It’s all so wonderful!
I hope you find some inspiration to create something wonderful. I appreciate you sharing your time with me. Have a fabulous day!
Hey friends! I have some new followers since the last time I was up on the Newton’s Nook Designer’s Nook newsletter. I wanted to share what a fun thing it is and how to sign up.
This is a weekly subscribers only newsletter direct to your inbox coming straight from the design team with special projects for your eyes only! They don’t go public at all. It’s so fun! Here’s a peek at what I’m sharing tomorrow.
If you’re not already signed up, click HERE to get there. Be sure to click the Designer’s Nook button…along with all the others too. Hehehe! You know you don’t want to miss anything.
I appreciate you sharing your time with me. Have a fabulous day!
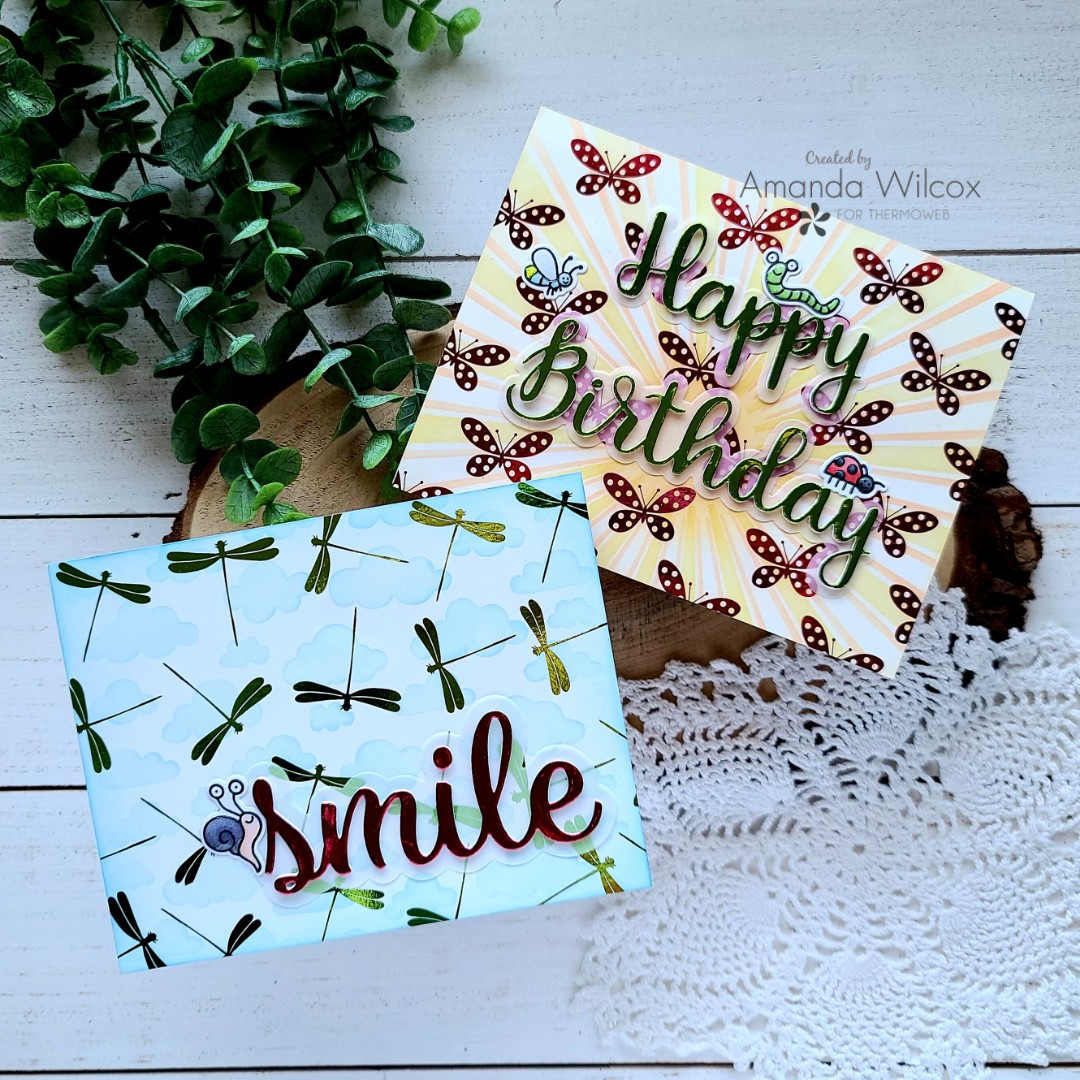
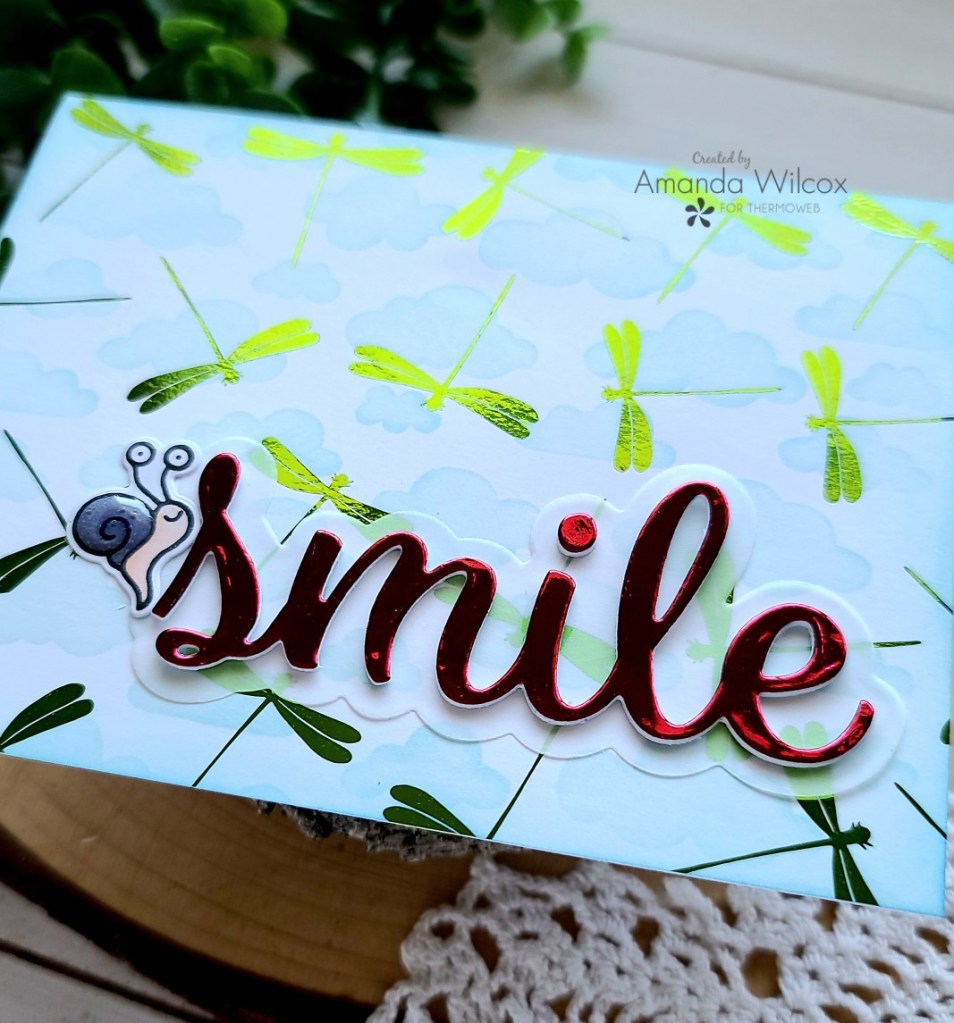
Hello again! Cheers to a new week and a fresh start! Today I’ve got a couple of fun cards to share with you featuring the newest limited edition release of toner sheets from Thermoweb called Time To Fly! They are super adorable butterflies and dragonflies! I couldn’t choose so I made a card with each of them for you!
I used a combination of grass green and passionate pink deco foils on both cards. I paired these awesome products with stamps, dies and stencils from Pink & Main, Trinity Stamps and Newton’s Nook.
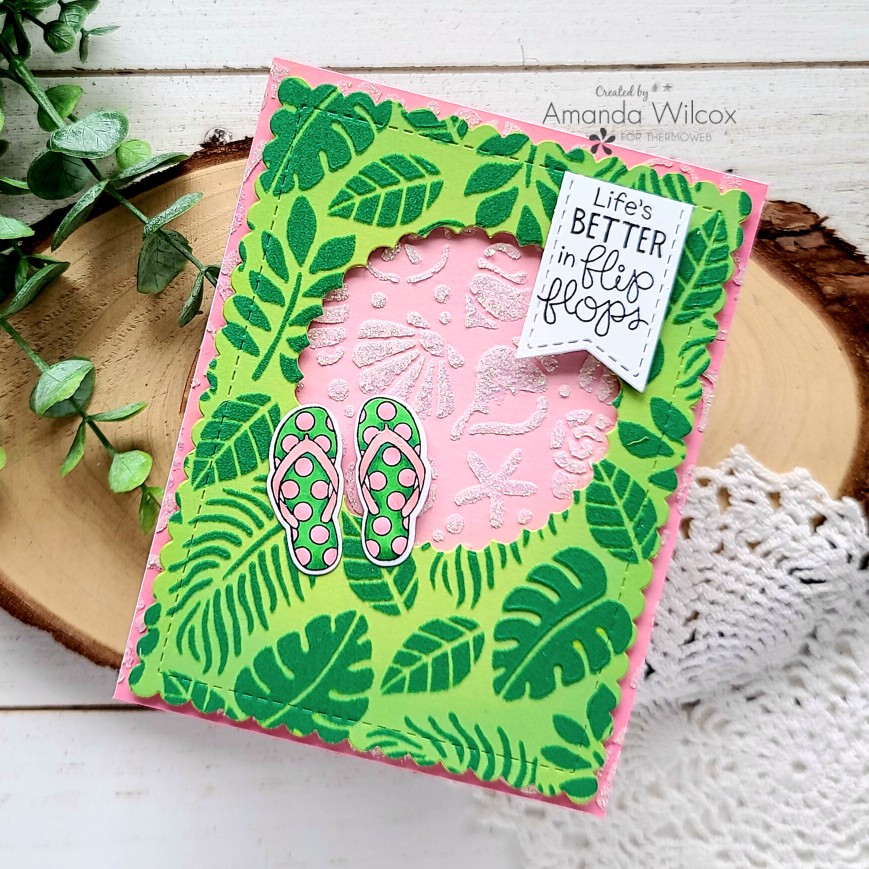
Hey friends! It’s a busy day on here so I appreciate you bearing with me. I’m over on the Thermoweb blog today sharing a pair of cards I made featuring glitz gel and deco flock backgrounds. I paired these awesome products with Newton’s Nook stamps, dies and stencils for some really fun results!
These cards started with the pink and green one but as soon as I die cut the scalloped circle from the center, I knew I couldn’t just throw it out so I started designing a second card to compliment it.
I have a full tutorial available over on the Thermoweb blog today if you’d like to take a peek at how I created this pair of super fun, summer-loving cards!
Any time there’s a chance for a make-one, make-two instead, I’m going to take it and you should too! Your future self with thank you. First, it’s extra crafting time which is always good for us! And second, you immediately have two cards for the mess of one. Hahaha!
I appreciate you sharing your time with me. Have a fabulous day!
Hey friends! I have a bonus Newton’s Nook card for you this week with a beautiful Easter theme. I just love how this card turned out and thing it’s perfect for the Easter season.
I started by stamping and coloring the Easter Lily image with my copics. Then I used the coordinating dies to cut it out and set it aside. Next, I cut an A2 panel and inked it up with mermaid lagoon, salty ocean and tumbled glass distress oxide inks. Then I put the serene stripes stencil over the top and inked it up with white pigment ink. I spritzed the panel with water and adhered it to a card base.
Next, I cut a white panel about 2 inches wide and stamped a sentiment from Easter Lily on the right side. I added a thin strip of gray cardstock behind the top edge and popped this panel up on the stenciled one with foam tape. I added foam squares to my Easter Lily image and popped it in place.
For finishing touches on this card, I added glossy accents to the stamen of the Easter Lilies and then scattered different size droplets of Nuvo Crystal Drops in morning dew.
I appreciate you sharing your time with me. Have a fabulous day!