Miss Ink Stamps – Painting the Roses

Hellooooooo everyone!!! I am soooooooo beyond excited to share that I have joined the Miss Ink Stamps Design Team! This is so surreal and I am so grateful to be designing along this incredible team of talent! To celebrate, I’m sharing my first card today!

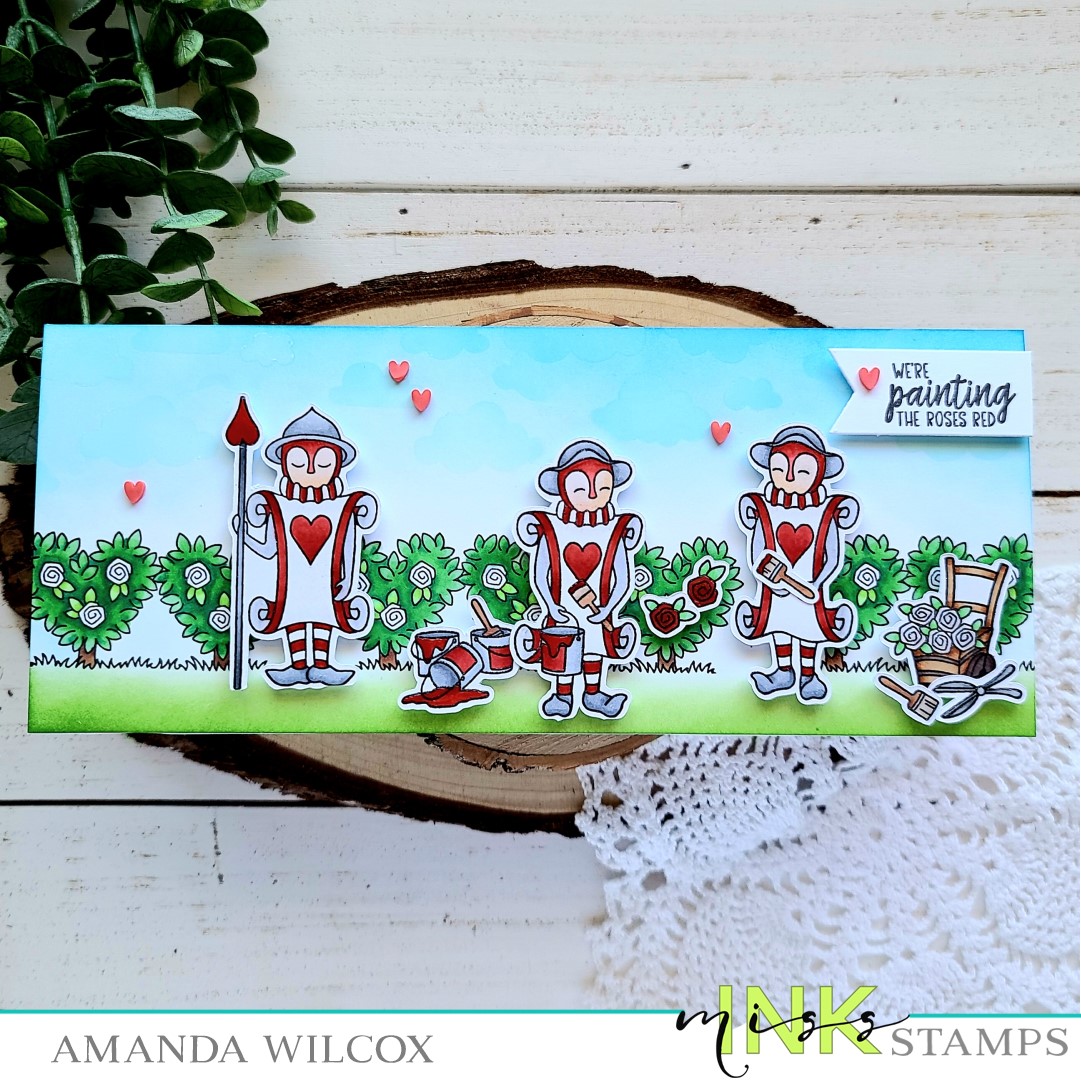
This super fun card was created with just one of the stamp sets from the amazing Alice in Wonderland release from earlier this year. I stamped and colored the images from Painting the Roses with my copics. Then I ran them through my scan-n-cut to cut them out. Then I took the bush image and repeat stamped it across a slimline size panel (8.5×3.5 inches). Then I used distress inks in mowed lawn and salty ocean to create my grass and sky. Next I colored the bushes with my copics and set to adhering the images where I wanted them.

I popped them up with foam squares to give the card a little extra dimension and interest. Then I stamped my sentiment and cut it into a flag shape, popping it up too.

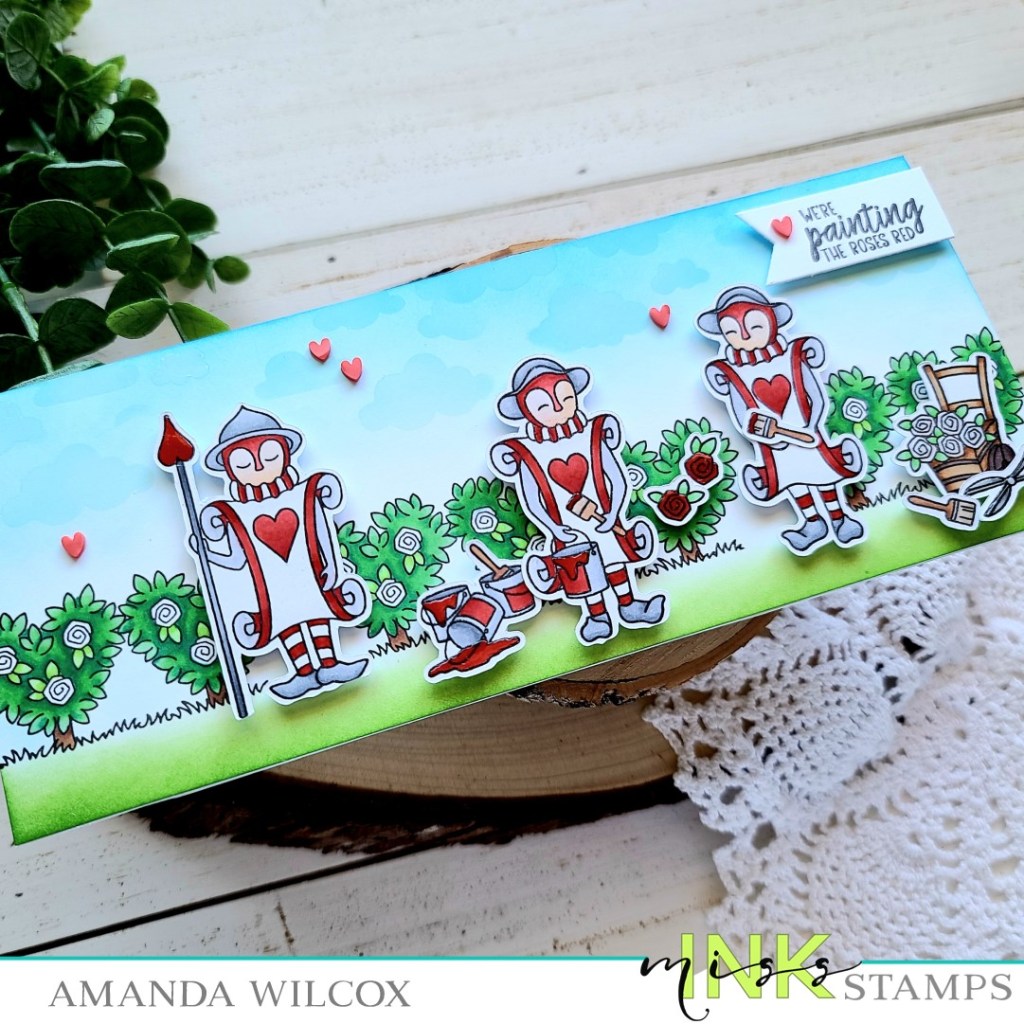
At this point I thought my sky was a little boring so I pulled out a Newton’s Nooks stencil called cloudy sky and inked Hero Arts unicorn white pigment ink through it with a blending brush. It was easy to manipulate the stencil around the images and I love the little bit that it adds. Finally I finished the design off with glossy accents on various things like some roses, garden tools and the soldier’s staff and then a scattering of red clay hearts across the sky and one on the sentiment to tie it all together.

This is just the beginning of sharing some amazing creations with Miss Ink Stamps products. I hope you enjoy the journey with me.

I appreciate you sharing your time with me. Have a fabulous day!

Reverse Confetti – Cool Birthday

Happy weekend everyone! We’re having a heat wave here so this card is helping me cool off mentally. 😉 I was very excited to finally make my first order from Reverse Confetti. I love their unique critters and had a really hard time choosing just a couple.

As soon as they came in I couldn’t resist inking them up. Here’s the first card I made.

I knew that I wanted to try keeping my color palette limited and softer than typical so I pulled out some pink and mint and immediately thought brown would go great with it all. I mean, who doesn’t love chocolate ice cream???

I colored up my images from Ice Cream Social with my copic markers and used the coordinating dies to cut them all out. Then I set to ink blending my background with spun sugar and cracked pistachio distress inks. Then I flicked watered down color on the panel.

I used my Newton’s Nook cloudy sky stencil with some texture paste for fun dimensional clouds in the sky. Once this was dry I adhered my panel to a card base. Then I used Newton’s Nook Frames & Flags dies to make a frame and popped it up with foam strips. I used a combination of foam squares and liquid glue to adhere all of my images down next. I stamped my sentiment on a soft pink cardstock and cut it into a flag, then popped it up too.

For finishing touches on this sweet card, I used glossy accents on the critter noses, eyes and toe beans, the ice cream truck window, horn, light and decal on the side of the truck. Then I thought it would be fun to add some sparkly so I used unicorn Stickles on all the sprinkles of the ice creams.

I’m in love with this guys! Totally hooked and can’t wait to create more. I hope you find some inspiration to create something wonderful today!

I appreciate you sharing your time with me. Have a fabulous day!

Newton’s Nook – Designer’s Nook Speak Peek

Hello there! I’m popping in really quick to give you a sneak peek of my Designer’s Nook newsletter post that will be hitting inboxes tomorrow!

It’s so much fun! I hope you’ll take a moment to subscribe to the exclusive newsletter if you haven’t already! Click HERE to do that today so you don’t miss another week of awesome inspiration from the Newton’s Nook design team!

I appreciate you sharing your time with me. Have a fabulous day!

Newton’s Nook – Cosmic Newton

Hey everyone! I’m up on the Newton’s Nook blog today with this really fun surprise outer space card featuring Cosmic Newton heading out to space and floating among the stars when he gets there! Let’s check it out!

To create this card, I started by taking a white card base, opening it up and using the sky borders die on the bottom to create the front flap. Then I took the cloudy sky stencil and lightly added some blue clouds over the top.

I stamped and colored my images from Cosmic Newton with my copics. Then I used the coordinating dies to cut them all out. Next, I took a flag from the Frames & Flags die set and cut it out to stamp my sentiment on it.

Moving to the inside, I took a 4.25×5.5 panel and inked it up with distress inks in peacock feathers, picked raspberry and mustard seed and then went over the whole panel with black soot to create my galaxy background. I spritzed it with water and flicked gold and pearl watercolor on it for a great starry look. Then I adhered my images with liquid glue.

I wanted to continue the sentiment to the inside too, so I cut another flag and heat embossed the second sentiment in white and glued the flag down. Then I took the whole panel and glued it to the inside of my card.

Next, I moved on to finishing touches. On the front, I popped my sentiment flag up with foam squares and added white gel pen accents to the images. Then I took glossy accents and covered the whole window and the bolts on the spaceship. I used crushed pineapple Stickles on the star too.

For the inside images, I just added white gel pen accents and Wink of Stella glitter brush to the planets because I wanted the card to close nice and flat. However, one of the shooting stars peeks out beneath the cloudy border that was die cut so I added the crushed pineapple Stickles to that for fun.

Between outer space and undersea cards, I could be content for life. The backgrounds are so soothing to make and I always love the images so much. I hope you enjoyed today’s card.

I appreciate you sharing your time with me. Have a fabulous day!

Coffee Loving Cardmakers – Pink & Main Mermazing

Fancy meeting you here again! Today I’m over on the Coffee Loving Cardmakers blog with this fun card and tag combo featuring the Mermazing Coffee stamps and dies from Pink & Main. Keep scrolling to check it all out!

I’ve been wanting to try embossing with a background die for a while and this card just seemed like the perfect scenario to try it out. I did some ink smooshing with my Tombow brush markers to create the bright fun background and then, using the embossing sandwich for my die cutter, embossed the panel with the Neat and Tangled snake scales coverplate die. I trimmed it down to 4×5.25 and set it aside to work on the rest of my card.

I stamped, colored and die cut my images from Mermazing Coffee, not totally sure what I was doing with my card. Then I decided to cut a vellum heart using the Trinity Stamps nested hearts and heat embossed my sentiment. I attached my mermaid with foam squares.

I decided to add some jute twine around the background panel for a little fishy texture and then adhered my heart over that. I finished my card off with some Wink of Stella glitter brush pen on the mermaid tail, Stickles on her cheeks and heart in her hair and finally a scattering of Nuvo Crystal Drops across the design.

But I still had an extra image I didn’t use…so I thought a fun coordinating tag was in order.

I die cut the tag pieces from Newton’s Nook’s Fancy Edges Tag die set and adhered them together. I stamped the sentiment from Mermazing Coffee and also some hearts from the set too. I popped the image up with foam squares and added a little Wink of Stella glitter brush pen here and there for some extra shimmer. Then I thought it needed more so I grabbed the glossy accents and added some of that to the mug on all the pink areas…and then finished it off with some teal twine I had in my stash.

I hope you enjoyed my little project today and found some inspiration to create something wonderful.

I appreciate you sharing your time with me. Have a fabulous day!

Newton’s Nook June Release Day

Hello everyone! I hope you enjoyed Newton’s Nook reveal week and have hopped over to buy some new goodies for your stash since everything is on sale today!

I was having so much fun creating, my husband came to check on me one night and had a hilarious idea. I couldn’t resist creating it and wanted to share it with you today.

We both loved the G.O.A.T. sentiment and he thought the goat really needed to go in the tractor’s trailer. I told him the proportions were off and when I showed him to prove my point we both cracked up so much that I just had to do it.

To create my card, I stamped, colored and die cut my images from Bleat and Farming Fun and set them aside. I pulled out the Framework dies and Sunscape stencil again and inked it up. This time after I inked the dirt and yellow part of the sun, I rotated the stencil and used it like a mask to add a little blue sky too.

There are a few layers to this card. I started with a white cardbase and glued a brown panel directly to it measuring 4 1/8×5 3/8. Then the green panel is popped up with foam tape and measures 4×5.25 which is the same size as the framework stenciled panel. That is also popped up with foam tape. Finally the images were glued together with liquid glue and popped up with foam squares.

Finally I die cut a flag from Frames and Flags and heat embossed the first half of my sentiment on it in white. This is popped up with foam squares. The second half of the sentiment is stamped inside the card.

Last I moved on to finishing touches which were pretty simple. I added black glaze pen to the eyes and white gel pen accents throughout. Then I finished it off with glossy accents on all the shiny parts of the tractor and trailer, along with the goat’s bell and horns.

Cheers to being silly with your spouse and ending up with a fabulous card as the outcome. I hope you enjoyed the week and are able to pick up some new goodies to play with.

I appreciate you sharing your time with me. Have a fabulous day!

Newton’s Nook June Release – Day 4

I hope you’ve enjoyed all the previews so far. Today we have two last ones to share with you before everything goes on sale for you to purchase first thing tomorrow! A Newton’s Nook release wouldn’t be complete without a new Newton image, so we’ve got that covered, and then we have another great floral image to add to that collection too.

Porch Swing Friends

Roses

First up I wanted to share the card I made with Porch Swing Friends. I just think it’s so sweet and it makes me wish I had a big porch with a swing like this to relax on.

Given the shape of the image I knew right away I wanted to make a square card so I pulled out my Frames Squared dies and cut some layers out. The scalloped panel is inked with the Clouds stencil and each of the layers are popped up with foam tape. I stamped, colored and die cut my image and then used my MISTI to stamp my sentiment. For finishing touches I added white gel pen accents and glossy accents to their noses. This scene is so sweet and relaxing, I just love it! And that sentiment…remember it from earlier in the week? I used it on one of my Bleat cards on Tuesday. It’s so great and versatile to use all the time.

Next up I am excited to share this beautiful card featuring the new Roses stamps and dies.

I started by actually coloring three roses and die cutting them all. I had an idea of filling the fence line with them but it cluttered up too much and I wanted you to see the cool mountains in the background. So now I have two extra roses to make other fun cards with. Bonus!

I used the Frames and Flags dies along with the Fence die, Land Borders dies and Mountains stencil to create my scene. After I inked up my stenciled panel I used texture paste on the mountains and set it aside to dry. I thought the yellow panel was a little plain so I added some Petite Flowers stenciled in yellow ink for a subtle texture. You know my by now, the layers are adhered with foam tape for that great dimension and the scene is all attached with liquid glue. I really find that this helps with the inked panels. It just sticks better.

I wanted to keep the sentiment simple so I just used the Hello stamp on a die cut banner from the Banner Trio dies and inked it with the same blue in the sky for consistency.

I live in the Pacific Northwest and I really feel like this card is home. The mountains and roses with lush green grass everywhere. It’s super comforting and just makes me happy.

Would you like to win the “Roses” or the “Porch Swing Friends”  Stamp Set?We will choose ONE lucky winner for each stamp set!

Here’s how to win: Comment on the NND blog and Design Team blogs (see list below)! The winner will be chosen at random from the collective reveal posts. Make sure to check out each of their blogs and comment for your chance to win. You will not know which blog has been chosen so the more you comment on the better your chances are of winning! You have until Thursday, June 18th, at 9 p.m. EST to comment  — winners will be announced on the blog post on Friday, June 19th. 

Check out all the awesome Design Team Blogs below to enter:

Newton’s Nook Designs
Ellen Haxelmans
Larissa Heskett
Samantha Mann
Zsofia Molnar
Naki Rager
Maria Russell
Andrea Shell
Tina Smith
Tatiana Trafimovich
Amanda Wilcox

Newton’s Nook June Release – Day 3

And the fun just keeps coming!!! Aren’t you just loving everything so far? We really are! Keeping with this fun farm-ish theme, today we get to share this fabulous set called Neigh with you. Bet you can’t guess what’s in it? haha! Bad jokes aside, these horses are adorable! Check them out.

Neigh

Another great set to create with. For today’s card I paired them with both the new Slimline Frames and Portholes (for the scalloped panel) with the Slimline Frames and Windows.

Honestly, I wasn’t totally sure about design for this card so I simply started by stamping and coloring my images with copics. Then I used the coordinating dies to cut them out and started playing around. In the end I used the Plaid stencil on the white window cutouts with dark blue and green inks. I cut the scalloped panel from Slimline Frames and Portholes out of dark green and then cut the frame from Slimline Windows and Frames 2 more times from white and once from dark blue. I adhered all of the frames together for a stacked dimension and glued it to the green scalloped panel. Then I inserted the stenciled windows and popped the whole panel up with foam tape on a white cardbase measuring 3.5×8.5.

I die cut the flag banner from the same green cardstock and heat embossed my sentiment in white. This is popped up with foam squares. The horseshoes underneath are glued directly down. Then each of the horses is popped up with foam squares in the windows below.

For finishing touches I added black glaze pen to the eyes and white gel pen accents throughout. The horseshoes all have glossy accents for a little shine and this card is all finished.

Would you like to win the “Neigh”  Stamp Set?This stamp set will be given away to ONE lucky winner!

Here’s how to win: Comment on the NND blog and Design Team blogs (see list below)! The winner will be chosen at random from the collective reveal posts. Make sure to check out each of their blogs and comment for your chance to win. You will not know which blog has been chosen so the more you comment on the better your chances are of winning! You have until Thursday, June 18th at 9 p.m. EST to comment  — winners will be announced on the blog post on Friday, June 19th. 

Check out all the awesome Design Team Blogs below to enter:

Newton’s Nook Designs
Ellen Haxelmans
Larissa Heskett
Samantha Mann
Zsofia Molnar
Naki Rager
Maria Russell
Andrea Shell
Tina Smith
Tatiana Trafimovich
Amanda Wilcox

Newton’s Nook June Release – Day 2

We’re back at it today with another fabulous reveal for you! Today we have…drum roll…GOATS! Seriously, these are adorable and the sentiments are so great! I had a blast creating with them just like I know you will!

Bleat

Again, I couldn’t stop and I created two cards to share with you today. The first one is really clean and simple so we’ll start there.

For this, I just trimmed down some white cardstock to 4×5.25, stamped my images and colored them with copic markers. The sentiment is a little sneak of what’s coming later in the week. I added black glaze pen to the eyes with white gel pen for highlights all over. Then I finished with a teeny bit of glossy accents on the bell and flower center. The panel is popped up with foam tape and the card is done. Adorable? I think so. ❤

This next card is a little more involved but it’s just soooo cute, it’s totally worth it and was so much fun to create!

Here I finally used the slimline frames and portholes dies. I cut the scalloped piece out of a melon cardstock and set it aside. Then I cut the portholes and a second panel out of white and inked them up with blue and green dye inks. I took the portholes and scored them about 1/4 inch in on different sides so each of my windows opens a different way. Then I placed them in my MISTI and stamped sentiments on them.

I took the images from Bleat, stamped them out and colored them with copics – multiples of some to fill in my scene. Then I used the coordinating dies to cut them all out. Next it’s time to assemble. Everything here is glued directly to the panels so nothing interferes with the portholes opening and closing. I used a strong tape on the porthole flaps and liquid glue on everything else. The porthole panel is popped up with foam tape on the scalloped panel and that is popped up on a white cardbase that measures 3.5×8.5.

And here is what you see when you open all those cool portholes up! Adorable goats ready to celebrate with the recipient! So much fun!!! I did a few finishing touches by added some glossy accents to things like the cupcakes and flower centers. I kept it simple so you could really focus on the fun portholes opening and closing.

Would you like to win the “Bleat” Stamp Set?This stamp set will be given away to ONE lucky winner!

Here’s how to win: Comment on the NND blog and Design Team blogs (see list below)! The winner will be chosen at random from the collective reveal posts. Make sure to check out each of their blogs and comment for your chance to win. You will not know which blog has been chosen so the more you comment on the better your chances are of winning! You have until Thursday, June 18th, at 9 p.m. EST to comment  — winners will be announced on the blog post on Friday, June 19th. 

Check out all the awesome Design Team Blogs below to enter:

Newton’s Nook Designs
Ellen Haxelmans
Larissa Heskett
Samantha Mann
Zsofia Molnar
Naki Rager
Maria Russell
Andrea Shell
Tina Smith
Tatiana Trafimovich
Amanda Wilcox

Newton’s Nook – June Release Day 1

I’m so excited that release week for Newton’s Nook is finally here! We all have some amazing inspiration to share with you this week created with another batch of incredible products from Newton’s Nook! Today we’re starting off with Farming Fun stamps and coordinating dies AND two versions of amazing slimline dies, Slimline Frames and Portholes and Slimline Frames and Windows. Check them out!

Slimline Frames and Windows along with Slimline Frames and Portholes

Farming Fun and Coordinating Dies

My cards today don’t feature the new slimline dies but I promise I have some fun ideas with those later on in the week. Today I have two cards featuring Farming Fun and some other awesome Newton’s Nook products. Here’s the first one.

To create this card, I stamped, colored and die cut my truck. Then took a white cardbase and inked some dingy green and brown inks on it. I cut two strips of white cardstock – 4.25×1.5 and 4.25×2.5 and inked one edge brown. Then I splattered the panels with dark brown ink. I stamped my sentiment in the bottom right corner of the bigger one and attached the panels with foam tape. Then I attached the truck the same way and moved on to finishing touches.

I kept those simple with just some glossy accents on the window and “chrome” parts of my farm truck. I absolutely LOVE the puns in this stamp set. They are all so fun. Along with those awesome images.

I was having so much fun with this set that I just kept going with a second card.

For this card, I chose one of the tractors and that cool trailer to color up and die cut. Then I die cut one of the Framework dies and a circle from Circle Frames. I taped of the framework cutout so I could ink only the center with my distress oxides – tumbled glass, mermaid lagoon and peacock feathers – and spritzed it with water. With the circle, I used the Sunscape stencil and some dye inks. I laid out my card to get an idea where I wanted to stamp my sentiments and then stamped them in black ink.

Moving on to assembly, I popped my inked panel up with foam tape on a kraft cardbase and then popped the circle up on that. The tractor and trailer are popped up with foam squares and then I added white gel pen accents. Last, I finished the card off with some glossy accents on those “chrome” pieces again.

This set is so much fun and makes it so easy to create boy cards of all kinds! It’s definitely going to be a staple in my crafting!

Would you like to win the “Farming Fun” Stamp Set? This stamp set will be given away to ONE lucky winner!

Here’s how to win: Comment on the NND blog and Design Team blogs (see list below)! The winner will be chosen at random from the collective reveal posts. Make sure to check out each of their blogs and comment for your chance to win. You will not know which blog has been chosen so the more you comment on the better your chances are of winning! You have until Thursday, June 18th, at 9 p.m. EST to comment  — winners will be announced on the blog post on Friday, June 19th. 

Check out all the awesome Design Team Blogs below to enter:

Newton’s Nook Designs
Ellen Haxelmans
Larissa Heskett
Samantha Mann
Zsofia Molnar
Naki Rager
Maria Russell
Andrea Shell
Tina Smith
Tatiana Trafimovich
Amanda Wilcox