Newton’s Nook – Blooming Botanicals

Happy Friday everyone!!! I’m so excited that you stopped by so I could show you this beautiful Newton’s Nook Blooming Botanicals card. I love these full card front stamps. They are so great for times when you just want to relax and color. Which was exactly my mood when I pulled this beauty out.

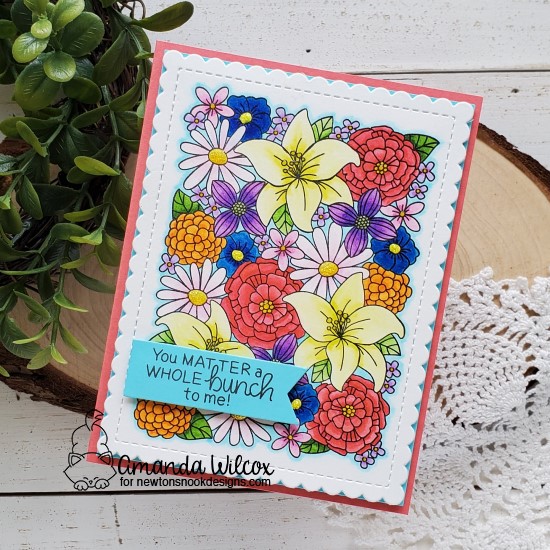
I started by die cutting the scalloped rectangle from the Frames and Flags die set out of Bristol Smooth Cardstock. Then I stamped my image with VersaFine ink so I could use my Zig Clean Color Real Brush Markers. I really gravitate toward these for flowers. I love the look they give.

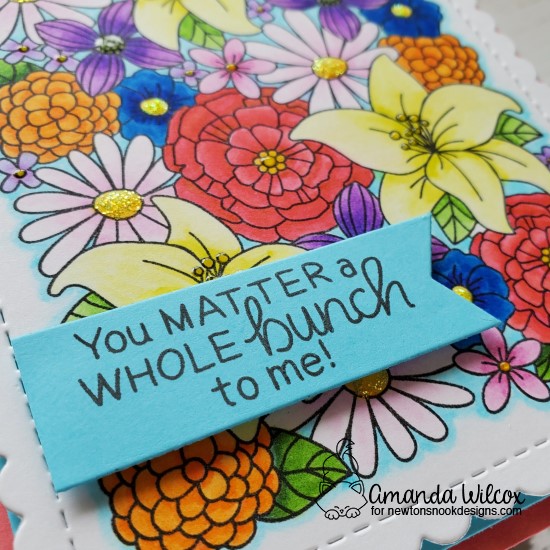
I trimmed a blue piece of cardstock down to 4×5.25 and mounted it on a red cardbase with foam tape. Then I mounted my image on that panel with foam tape as well. I took the same blue, cut a flag and stamped my sentiment on it. The flag was also popped up. What can I say?!? I like dimension. 🙂

Then I moved on to finishing touches for this beautiful, bold card. I used yellow Stickles on some of the flower centers and glossy accents on others. I like the different looks this gives on a card full of flowers.

I appreciate you sharing your time with me. Have a fabulous day!

Newton’s Nook – Picnic Box Card

Welcome back! I’m up on the Newton’s Nook blog today with this fun interactive box card. The critters are having a picnic and you’re invited!

I had a blast creating this adorable card! I started by stamping all of the critters and the soda bottle from Woodland Picnic and colored them with copics. I cut them out with the coordinating dies and moved on to creating my box card.

I die cut all of those pieces from the Lawn Fawn Scalloped Box Card from white cardstock. I took three of the panels for decorating the box and used the gingham stencil with red ink and my blending buddy brushes. Then I stamped some of the ants for fun. For the last one I used the clouds stencil and some light blue ink and also stamped my sentiment with black ink. I also used my brushes with green to create some grass for my layers in the box. I die cut these with the land borders grass die. The grass pieces are glued to the actual divider tabs that are part of the Lawn Fawn Scalloped Box Card. With all of the pieces done, I assembled the box card and started adding my critters.

I adhered all of the images with tape runner to the box card and made sure it still closed up properly. I had one too many images to fit in my card so I added the bunny to the back of the card where I’ll write my message to the recipient. It just adds a fun little whimsy to that part too!

I appreciate you sharing your time with me. Have a fabulous day!

Neat & Tangled – Puppy’s Favorite Things

Welcome! I picked this sweet puppy up from Neat & Tangled a while ago and finally had a chance to ink him up. He’s just adorable and so fun to color! I paired him with some fun Newton’s Nook products to create a birthday card for a change of theme these days.

I started by stamping and coloring the images from Puppy’s Favorite Things and then used the coordinating dies to cut them out.

Then I grabbed my Newton’s Nook balloons stencil and my Trinity Stamps blending buddy brushes to ink up the balloons different colors. Then I used the Framework dies from Newton’s Nook to cut the panel out along with an orange woodgrain floor. I trimmed down a teal piece of cardstock to 4 1/8×5 3/8 and popped the stenciled panel on it with foam tape. This is all glued to a white card base.

I had used the special die to cut the puppy’s hands out so he could hold the cupcake so I glued that in place. Then I added foam squares to the back of all my images and put them in place. Last, I die cut a banner from the Newton’s Nook Frames and Flags set and stamped my sentiment. This banner is also popped up with foam squares.

For finishing touches I added white gel pen accents throughout the images, black glaze pen to the puppy’s eyes and nose and glossy accents on a few images. I also added sprinkled sugar Stickles to the cupcake frosting and yellow Stickles to the top of the birthday hat.

I appreciate you sharing your time with me. Have a fabulous day!

Paper Smooches – Bee Hi

Thanks so much for sticking through all four days of my super fun Paper Smooches Happy Hellos series. Today features the final image in the stamp set – the adorable upside down bee! He’s the cutest and I was extra excited to plan something out with him.

This card was the biggest struggle out of them all but I think I love it the most! I started by stamping, coloring and cutting out my bee image. Then I had an idea that he would be fun on a tag so I started playing around with the design but it was too simple. That’s where distress oxides and some heat embossing played a big part!

I die cut the Newton’s Nook Fancy Edges Tag from yellow and black. Then I used the zig zag die to cut the bottom of the black off. I cut a yellow hole reinforcer from the same set and used some gathered twigs distress oxide on all the of the yellow for a little depth. I adhered all the pieces, strung some ribbon through the hole and tied it with baker’s twine. Then I popped the bee image up with foam tape and set it aside to work on this plain background.

I took a teal panel and inked the edges with peacock feathers distress oxide ink. Then I stamped the double hexagon image from Happy Hellos repeatedly around the panel with VersaMark and heat embossed it with yellow embossing powder. I trimmed this panel down to 4×5.25 and popped it up on a black card base with foam tape. Then I also popped the tag up with foam tape.

For finishing touches on this card I added Unicorn Stickles to the bee wings, black glaze pen to his eyes and some white gel pen accents to the whole image including the letters.

This is such a fun, bright card with the contrasting colors, I just love it!

This is my final link up for the HAPPY – Paper Smooches Challenge this month. I look forward to playing along with the next challenge as well.

I appreciate you sharing your time with me. Have a fabulous day!

Newton’s Nook – Underwater Slimline Scene

Oh my goodness, I’m so excited about today’s card! I’m up on the Newton’s Nook blog today with this fabulous underwater scene slimline card featuring a bunch of awesome Newton characters!

To start things off I laid my stamps out on the white panel I wanted to use for my background to make sure everything would fit. Then I stamped them out. I’ve got Scuba Newton, Purr-maid Newton and Gull Friends all represented here. So much fun! I colored them with copics and used the coordinating dies to cut them all out.

Then I moved on to distress oxide inks on my background. I used a little tea dye with ground espresso for the sand and mermaid lagoon with tumbled glass for the water. Then I die cut the top of the panel with the sea borders die. I spritzed the panel with water and then flicked the darker of the colors on each section for extra texture. I cut another background panel and used squeezed lemonade with the clouds stencil for the sky. I glued these two together and slipped my seagulls in between so it looks like they’re peeking out of the water.

Next, I arranged all of my images and started adhering them down with liquid glue. Scuba Newton and Purr-maid Newton are both popped up with foam squares though.

I stamped my sentiment on the top left area of the sky and adhered the panel to a white scalloped background with foam tape. This whole thing was then adhered to a white card base.

Finally I moved on to finishing touches. I added glossy accents to the seashell, bubbles, kitty noses, goggles and seagull beaks. I put black glaze pen on the the eyes and white gel pen accents throughout. Last, I added unicorn Stickles to the purr-maid tail for that extra fun shimmer.

I hope you enjoyed today’s card and find some inspiration to create something beautiful.

I appreciate you sharing your time with me. Have a fabulous day!

Coffee Loving Cardmakers – Kitty in a Cup

I’m up on the Coffee Loving Cardmakers Blog today featuring these sweet kitty in a cup box cards from Doodlebug Designs on the Lori Whitlock shop. I just love their artwork and couldn’t resist buying the cut files for my Cricut when I saw them available.

These fun cards fold up flat and fit in an envelope to be mailed. Isn’t that awesome!?!

I simply used my Cricut to cut out all the pieces in different colors and assembled them with a combination of liquid glue and tape runner. I stamped the sentiment on the tea bad from the Newton’s Nook Cup of Cocoa stamp set. I thought it was just too perfect of a sentiment and it fit great too!

I made this first card to look like our cat Hercules with my favorite teal and melon color combo for the mug. I did some distress ink blending on the edges of the pieces for added dimension and a little pink chalk for his cheeks.

For this second one, I really wanted to try fun patterned paper for the mug and decided on a dark gray/black kitty to give good contrast. One of my hearts got demolished by the Cricut so it’s only got 4 but I like it.

I plan to pop these fun cards in the mail with a tea bag or two for some of my tea loving friends. This project inspired me to try some other things so stay tuned for variations of this project in the future.

I appreciate you sharing your time with me. Have a fabulous day!

Newton’s Nook – Designer’s Nook Sneak Peek

Hi there! I’m up on the Newton’s Nook Designer’s Nook Newsletter again tomorrow. It’s going to be totally out of this world!!! You won’t want to miss it so be sure to subscribe!

Here’s a little peak at what we’re creating.

If you haven’t done it yet, head to Newton’s Nook and subscribe to the different newsletters they have available…especially Designer’s Nook. This is a special, subscriber only newsletter that goes out Tuesdays with added inspiration and special tutorials from the design team. It’s full of amazing tips, tricks and ideas to spark your creative side!

I appreciate you sharing your time with me! Have a fabulous day!

Newton’s Nook – Zoo Party

Hello everyone! I’m up on the Newton’s Nook Blog today with this super fun square card featuring the Zoo Party stamp set along with the Frames Squared dies. This is such a fun line! There are so many different square card front stamps that go with this single die set. It’s genius and so much fun to play with!

To make this card I stamped and colored my image from Zoo Party with copics. Then I cut it out with scissors and started to decide on the layering for my card. Using the different dies from Frames Squared I cut the scallop square from gold cardstock and the rounded square from black. I made a card base from kraft and inked the edges with tea dye and black soot distress inks. For my sentiment I used the larger of the two circles and heat embossed it in gold. Then I took a copic marker and colored the edge so it coordinated with the stamped image. Last I moved on to assembly.

I started at the top and worked my way down. The circle is adhered with foam squares and the image is glued directly to the gold square. I wrapped teal twine around the black square and then added foam tape to that and the gold square and adhered everything together.

There is so much going on with this card that I decided to leave it as is. I love the little bit of metallic from the embossing and the paper. I think the darker bold colors really help those awesome animals pop off the card. I hope you enjoyed it too!

I appreciate you sharing your time with me. Have a fabulous day!

Happy Easter, Again!

Hi everyone! I hope you’re enjoying your Easter with those that you can this year and making the best of whatever situation you’re in. Our Easter is much smaller than normal and not at all typical.

I wanted to pop in a second time today to share a couple of special Easter cards that I made, but didn’t want to spoil anything so by now they’ve already opened them.

This first card is for my daughter and features fun products from Trinity Stamps – including a few from the release that just went live on Friday. That Dir-tea bunny was just asking to hold the awesome Easter egg embellishments and my daughter loves them so it was a perfect combo! I used the slimline scenic borders to create the grass and clouds. The sentiments are from the new spring senti-mini set from Trinity as well.

This second card is for my parents. We always visit them on Easter and won’t be able to this year so I thought it would be fun to make them a special card. This card features one of my favorite images from Newton’s Nook’s Hop Into Spring set. I also used the recently released sky scene builder dies for the clouds and sun. I stenciled in some clouds for texture on the mini scene and used the land borders for some grass too. The scalloped rectangle from Frames and Flags gives the perfect sweet frame to all my scene to as well.

I appreciate you taking time to stop by. Enjoy the rest of your day!